Musicmaker’s Kits limfin-p User manual

Finished
Limerick Lap Harp
Musicmaker’s Kits
P.O. Box 2117
Stillwater MN 55082
(651) 439 9120
www.harpkit.com

© Musicmakers 6/29/2018
2
Finished Limerick Parts List:
1 Set of Stringing & Tuning Directions
1 L-shaped Tuning Wrench
STRINGING & TUNING
_____1. Stringing a harp is somewhat of an art. We recommend that you read through
these last pages of directions completely before beginning, so you know what to expect. It
is not uncommon for people to call us in a panic because their harp either: a) won’t stay in
tune; or b) keeps breaking its strings. Careful installation will do much to eliminate these
problems. We string this model harp regularly and tune it up to concert pitch right away
with rarely a broken string, but it takes a little patience and concentration.
The strings are numbered from 1 (for the smallest) to 26 (for the longest), and they
are color-coded to help guide you as you play. "C" strings are all red, and "F" strings are
blue.
Gather the following tools for this operation:
Set of harp strings with plastic beads
Scissors
Tube of Superglue or Krazy glue
Tuning wrench
_____ 2. Start at the bass (longest) end of the harp with #26
(red). Push the end of the string through the lowest hole in
the SOUNDBOARD from back to front.
_____ 3. If it is a tight fit through the eyelet, work the eyelet
carefully over any bulky spots. If there
is no knot at the end of the string, tie a
simple overhand knot, as shown. Put
a drop of Superglue or Krazy glue on
the knot to keep it from slipping under
tension.
Then pull the knot tightly against the
inside of the SOUNDBOARD, as shown.
NOTE: PULL STRAIGHT THROUGH THE HOLE, NOT AT AN
ANGLE, SO AS TO AVOID SCRATCHING THE NYLON
AGAINST THE BRASS EYELET.
NOTE: If the color on the strings happens
to fade, you can restore it with permanent
marker.
IF STRINGING WITH WIRE
SKIP TO PAGE 6

© Musicmakers 6/29/2018
3
Thread the other end of the string through the last TUNING PIN at the point of the NECK. Pull it
through the PIN until there is some slack below the pin.
Turn the PIN clockwise with the tuning wrench and guide
the windings of the string downward toward the wood. As
the string begins to tighten, place it in the groove of the
GUIDE PIN.
HINT: Do not accumulate a lot of windings of string
around the TUNING PINS, especially in the bass. They
become bulky and cumbersome. If you find yourself with
that problem, turn the TUNING PIN backwards to unwind
the string and then pull more slack through the hole
before tightening again.
_____4. When you come to the .050” and higher strings, tie
the bottom knot a little differently to give it more bulk. Start
with the same overhand knot, but before tightening it; push
the loose end part way back into the knot, just to add one
more thickness of string to the knot.
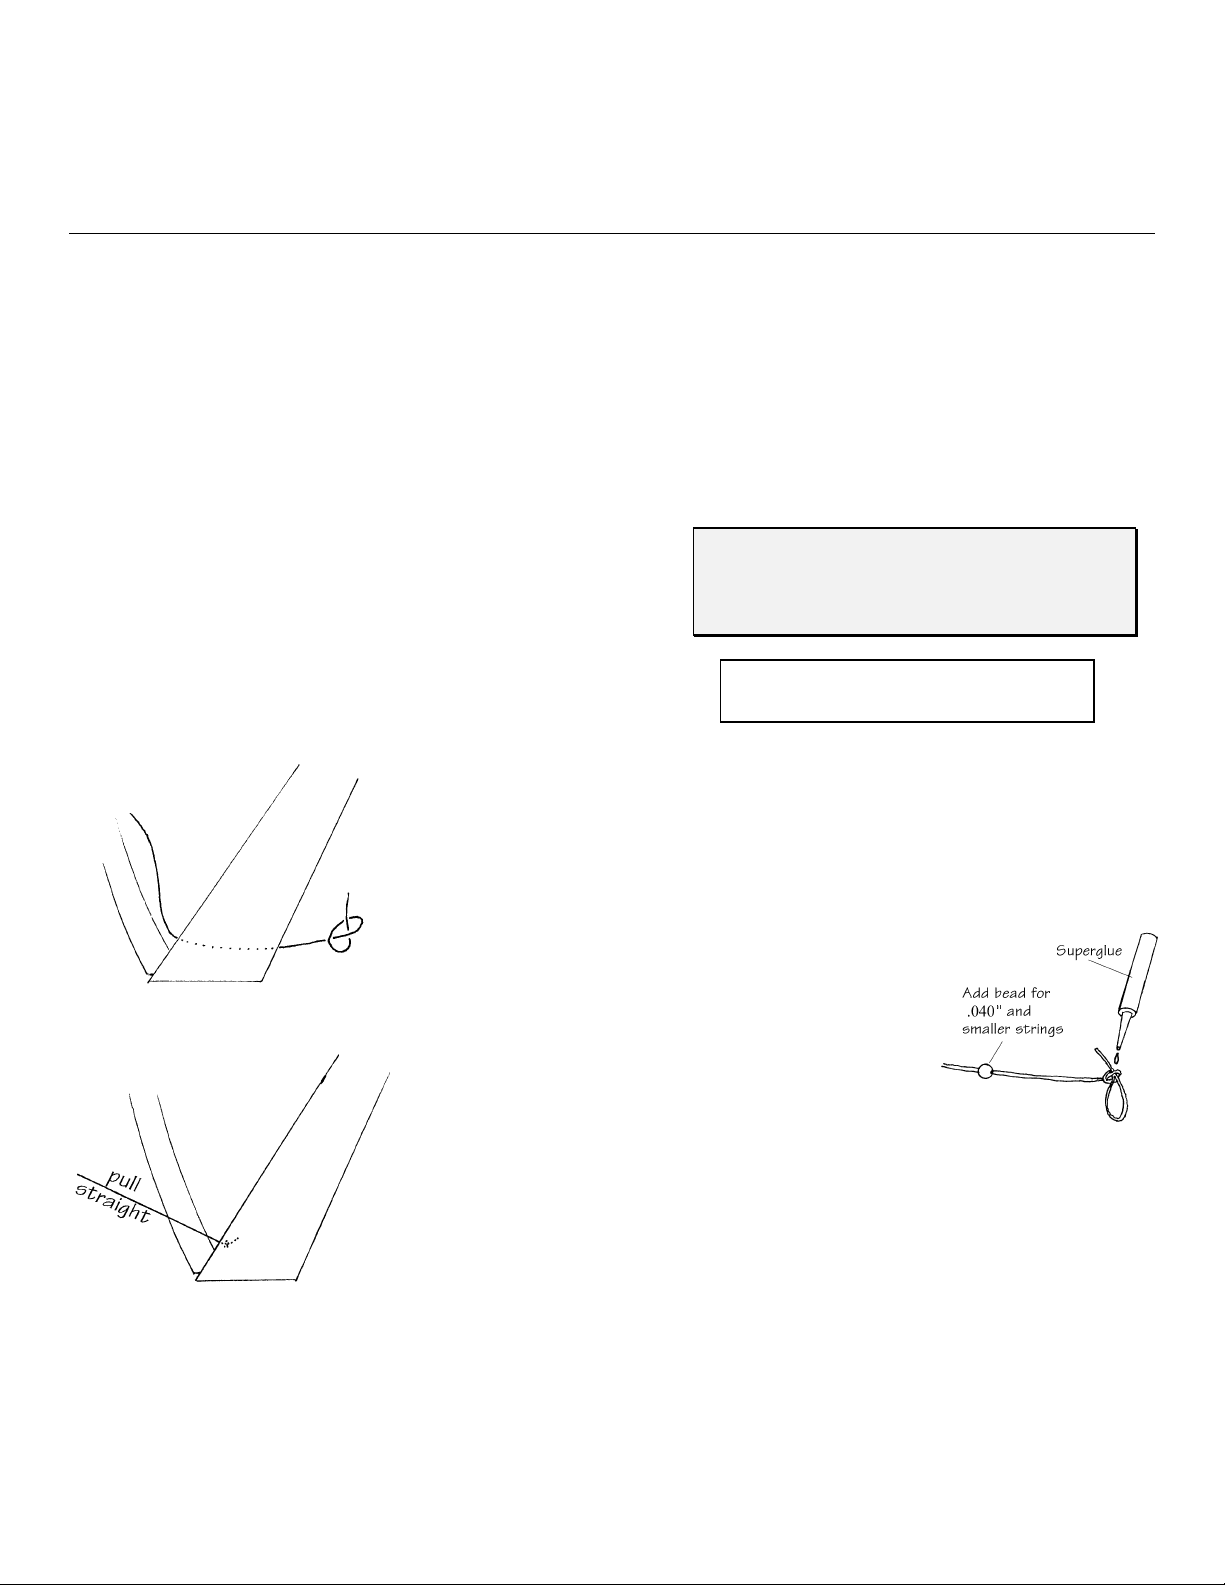
_____5. For the rest of the strings (sizes .040” and higher),
thread a small plastic bead onto each string before tying the
knot. The bead will prevent the knotted string from pulling
through the hole in the SOUNDBOARD.
ANOTHER HINT: We also like to anchor the tops of these
lighter strings securely to the tuning pins, as follows: Make
one or two windings of string around the tuning pin, then
cross the next winding over the others so the string is
holding itself tightly around the PIN. Otherwise we often
experience string slippage and breakage, especially in the
upper half of the instrument.
CAUTION: Nylon strings are somewhat fragile, especially in
the upper octaves. Try to avoid scratching them as you
install them. Most string breakage occurs at the tuning pin,
when the string is pulled forcefully around the sharp corner
of the small hole in the metal. You can minimize the problem by installing the string carefully and
by anchoring the windings before applying too much tension to
the strings, so the nylon does not begin to slip back through the
hole under tension and become scratched.
_____6. When you come to the lightest strings (.025”
diameter), you will need to add a short piece of heavier
string into the knot in order to make the knot bulky enough
to keep from pulling through the hole in the plastic bead.
Just use some scraps of excess nylon from the bottom
strings. When all the strings are installed, tighten them to
pitch and allow the instrument to adjust itself to the tension.

© Musicmakers 6/29/2018
4
TUNING
The strings should all be tuned to the natural C major scale (white keys on the piano). All
the red strings will be C notes and the blue ones F notes. Middle C is string number 19
from the top, or the eighth string from the bottom.
NOTE: It will take several tunings before the harp will stay in tune. Be patient! It should
get better each day.
Many people are not certain if they are tuning their harp strings to the correct octave.
Tuning the strings an octave too low will result in flabby harp strings that don't provide
much volume. Tuning the strings too high will cause strings to break. To make sure you
are tuning your harp strings to the correct octave, you can double-check the pitch on our
website with our "online tuner". www.harpkit.com/freetuner
CONGRATULATIONS! We hope you have enjoyed building this harp and that you enjoy
many years of musical pleasure from playing it. We stock a good number of teaching
materials and accessories for your instrument to help you get started. Just call us for more
information or for placing an order.
MUSICMAKERSPO Box 2117
Stillwater, MN 55082
(651) 439-9120
ACCESSORIES FOR YOUR HARP
Please check our website or catalog for current pricing.
LIMSTRGNY Spare set of 26 nylon strings
LIMSTRGWR Spare set of 26 wire strings
LIMBAG Padded gig Bag for Limerick harp
CA1 Korg CA1 electronic tuner
TUNERCORD External pickup & cord for tuner

© Musicmakers 6/29/2018
5
SHARPING LEVERS
Sharping levers are used on folk harps to facilitate key changes. Installing a lever over a
string allows you to raise the pitch of that string one-half step by engaging the cam against
the string. Thus an F-string can be raised to F# by a simple flick of the lever. Similarly, a
B-string may be tuned to Bb so that the lever will raise it to a B-natural and release it back
to a B-flat, as needed.
Most folk harp players set the key signature (sharps or flats) on the harp before
starting each piece of music. For the key of G, you would engage the levers on all the F
strings to produce the F# needed for that key (making sure all other notes on the harp are
natural). If the following piece were then to be played in the key of F, you would then
release the levers on all the F strings to produce F-natural, and also release all the B-string
levers to produce Bb.
You may install a lever
over every string on the harp,
or, if you think you won’t use
all of them, it would be more
cost-effective to select which
keys you think you are most
likely to use, and then install
only the levers necessary for
those keys.
Check our website or catalog for current sharping lever options and prices.
KEY OF E: requires F# and C# and G# and D#
KEY OF A: requires F# and C# and G#
KEY OF D: requires F# and C#
KEY OF G: requires F#
KEY OF C: requires no sharps or flats
KEY OF F: requires Bb
KEY OF Bb: requires Bb and Eb
KEY OF Eb: requires Bb and Eb and Ab

© Musicmakers 6/29/2018
6
LIMERICK LAP HARP
INSTALLATION INSTRUCTIONS FOR WIRE STRINGS
NOTE: Wire strings do not come with pre-colored C and F strings. Just install all the
strings first, in proper order, and then use "opaque paint markers" from an arts & crafts
store (like Michael's) to color the C strings red and the F strings blue. These paint pens
give the most vivid we have found for wire strings. Keep the pens with the harp in case you
need to touch-up the color in the future.
______1. Begin at the bottom of the harp with the longest string (.032” diameter). Thread a
plastic bead onto the string first. Then poke the end through the SOUNDBOARD from the
inside.
______2. Pull the wire all the way until the ball end is snug against the inside of the
SOUNDBOARD. Then hold it taut up to the first TUNING PIN and clip off the excess
length, about 3 inches beyond the pin.
______3. Hide the end of the wire in the hole in the TUNING PIN (so it barely shows on the
other side) and begin turning the pin with your tuning wrench. Turn clockwise to wind the
slack wire onto the pin. You should have enough slack to make about 3 full turns around
the pin, but take care not to over-tighten it.
______4. Proceed with the remaining strings, keeping them in order.
______5. Mark all F strings with a blue permanent marking pen, running the pen up and
down the length of the strings from all sides. Do the same with a red pen for all the C
strings, referring to the tuning chart to make certain you are coloring the correct strings.
______6. Tune the strings according to the tuning chart. It will require several tunings, as
the SOUNDBOARD will respond to the added tension with each try. But it will settle down
after a few days and begin to stay in tune nicely.
Musicmaker’s Kits Inc.
PO Box 2117
Stillwater, MN 55082
(651) 439-9120
NOTE: This technique of hiding the end of wire inside
the tuning pin prevents the hazards of pricking your
clothing on the sharp points. It may take a little finesse
but it will be worth the effort, as it is difficult to trim
the wires very closely with a wire cutter.

© Musicmakers 6/29/2018
7
LIMERICK LAP HARP -C TUNING
(C3 to G6) code: limstrg
FULL SET OF 26 STRINGS
STRING
NOTE
GAUGE
CODE
COLOR
VIBRATING
LENGTH
LOVELAND
LEVER SIZE
1 G6 .025 NYL025 clear 3-3/4” 00
2 F6 .025 NYL025 blue 4-3/8 00
3 E6 .025 NYL025 clear 4-7/8 00
4 D6 .025 NYL025 clear 5-1/2 00
5 C6 .032 NYL032 red 6-1/8 00
6 B5 .032 NYL032 clear 6-3/4 00
7 A5 .032 NYL032 clear 7-3/8 00
8 G5 .032 NYL032 clear 8 0
9 F5 .036 NYL036 blue 8-5/8 0
10 E5 .036 NYL036 clear 9-1/4 0
11 D5 .036 NYL036 clear 10 6a
12 C5 .040 NYL040 red 10-3/4 6a
13 B4 .040 NYL040 clear 11-1/2 6a
14 A4 .040 NYL040 clear 12-1/4 6a
15 G4 .050 NYL050 clear 13-1/8 6a
16 F4 .050 NYL050 blue 14 6a
17 E4 .050 NYL050 clear 15 9
18 D4 .040/.010 NYNY18D4 clear 16 9
19 Mid C4 .040/.010 NYNY19C4 red 17-1/4 9
20 B3 .040/.010 NYNY20B3 clear 18-1/2 9
21 A3 .045/.010 NYNY21A3 clear 19-3/4 9
22 G3 .050/.010 NYNY22G3 clear 21 12
23 F3 .050/.013 NYNY23F3 blue 22-1/4 12
24 E3 .050/.015 NYNY24E3 clear 23-1/2 12
25 D3 .055/.015 NYNY25D3 clear 24-3/4 14
26 C3 .055/.020 NYNY26C3 red 26 14
(Set includes one spare clear string of each monofilament nylon size)
NOTE: 15 beads enclosed for the upper strings
MUSICMAKER’S KITS, INC.
P.O. BOX 2117
Stillwater, MN 55082
(651) 439-9120
www.harpkit.com

© Musicmakers 6/29/2018
8
LIMERICK LAP HARP -C TUNING
(C3 to G6) WIRE STRINGS code: limstrgwr
FULL SET OF 26 STRINGS
STRING
NOTE
GAUGE
CODE
COLOR
VIBRATING
LENGTH
LOVELAND
LEVER SIZE
1 G6 .010 BALL010 clear 3-3/4” 00
2 F6 .010 BALL010 blue 4-3/8 00
3 E6 .010 BALL010 clear 4-7/8 00
4 D6 .012 BALL012 clear 5-1/2 00
5 C6 .012 BALL012 red 6-1/8 00
6 B5 .012 BALL012 clear 6-3/4 00
7 A5 .014 BALL014 clear 7-3/8 00
8 G5 .014 BALL014 clear 8 0
9 F5 .016 BALL016 blue 8-5/8 0
10 E5 .016 BALL016 clear 9-1/4 0
11 D5 .018 BALL018 clear 10 0
12 C5 .018 BALL018 red 10-3/4 0
13 B4 .020 BALL020 clear 11-1/2 2
14 A4 .020 BALL020 clear 12-1/4 2
15 G4 .023 BALL023 clear 13-1/8 2
16 F4 .023 BALL023 blue 14 4
17 E4 .023 BALL023 clear 15 4
18 D4 .023 BALL023 clear 16 4
19 Mid C4 .025 BALL025 red 17-1/4 4
20 B3 .025 BALL025 clear 18-1/2 4
21 A3 .025 BALL025 clear 19-3/4 4
22 G3 .025 BALL025 clear 21 5
23 F3 .032 BALL032 blue 22-1/4 5
24 E3 .032 BALL032 clear 23-1/2 5
25 D3 .032 BALL032 clear 24-3/4 5
26 C3 .032 BALL032 red 26 5
(Set includes one spare string of each plain wire size)
NOTE: 26 beads (8mm size, clear plastic) enclosed for all strings
MUSICMAKER’S KITS, INC.
P.O. BOX 2117
Stillwater, MN 55082
(651) 439-9120
www.harpkit.com
Table of contents
Other Musicmaker’s Kits Musical Instrument manuals

Musicmaker’s Kits
Musicmaker’s Kits 17/16 User manual

Musicmaker’s Kits
Musicmaker’s Kits 12/11 User manual

Musicmaker’s Kits
Musicmaker’s Kits CIGAR-BOX UKULELE KIT User manual

Musicmaker’s Kits
Musicmaker’s Kits SMARTWOOD HARP KIT User manual

Musicmaker’s Kits
Musicmaker’s Kits 31 String Gothic Harp Kit User manual