Musicmaker’s Kits 31 String Gothic Harp Kit User manual

Musicmaker’s Kits
P.O. Box 2117
Stillwater, MN 55082
(651) 439 9120 www.harpkit.com
31 String Gothic Harp
Kit

© 2008 Musicmaker’s Kits, Inc.
2
31 STRING GOTHIC HARP KIT
1 set of Assembly Instructions
WOOD PARTS:
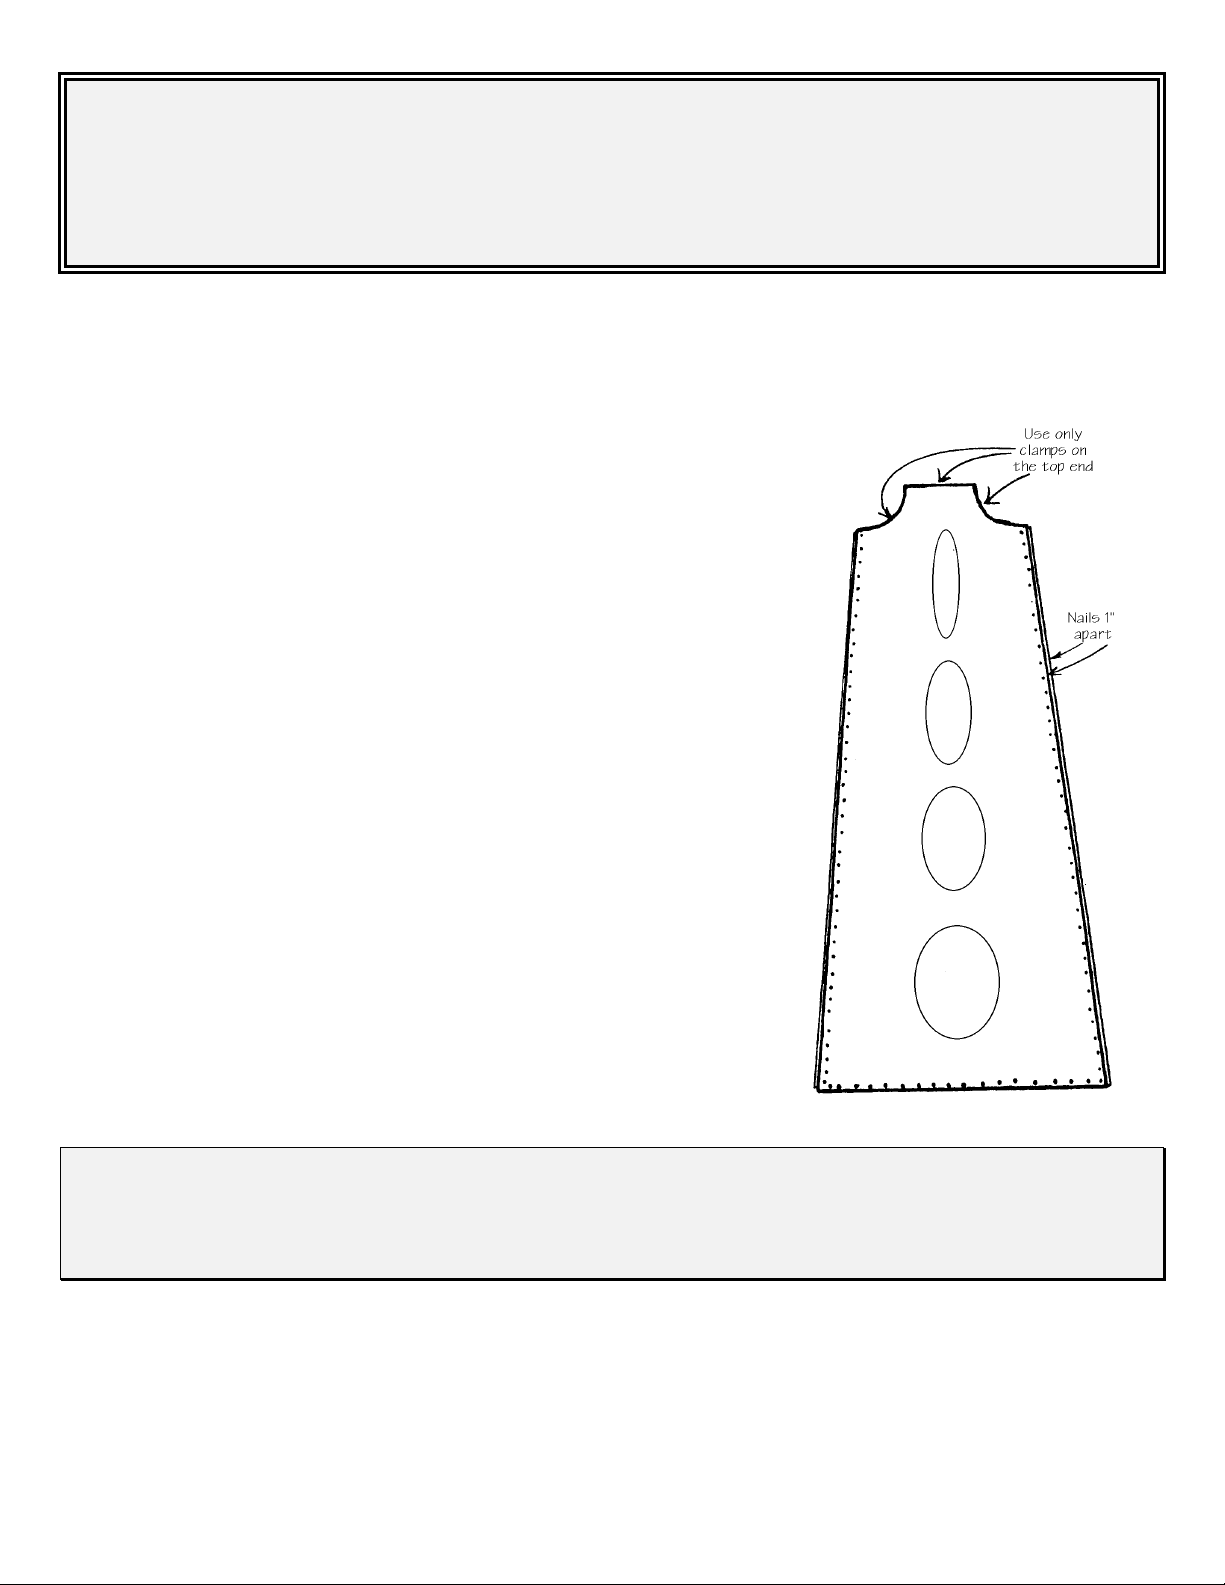
1 soundboard, laminated birch
1 back panel, thin plywood
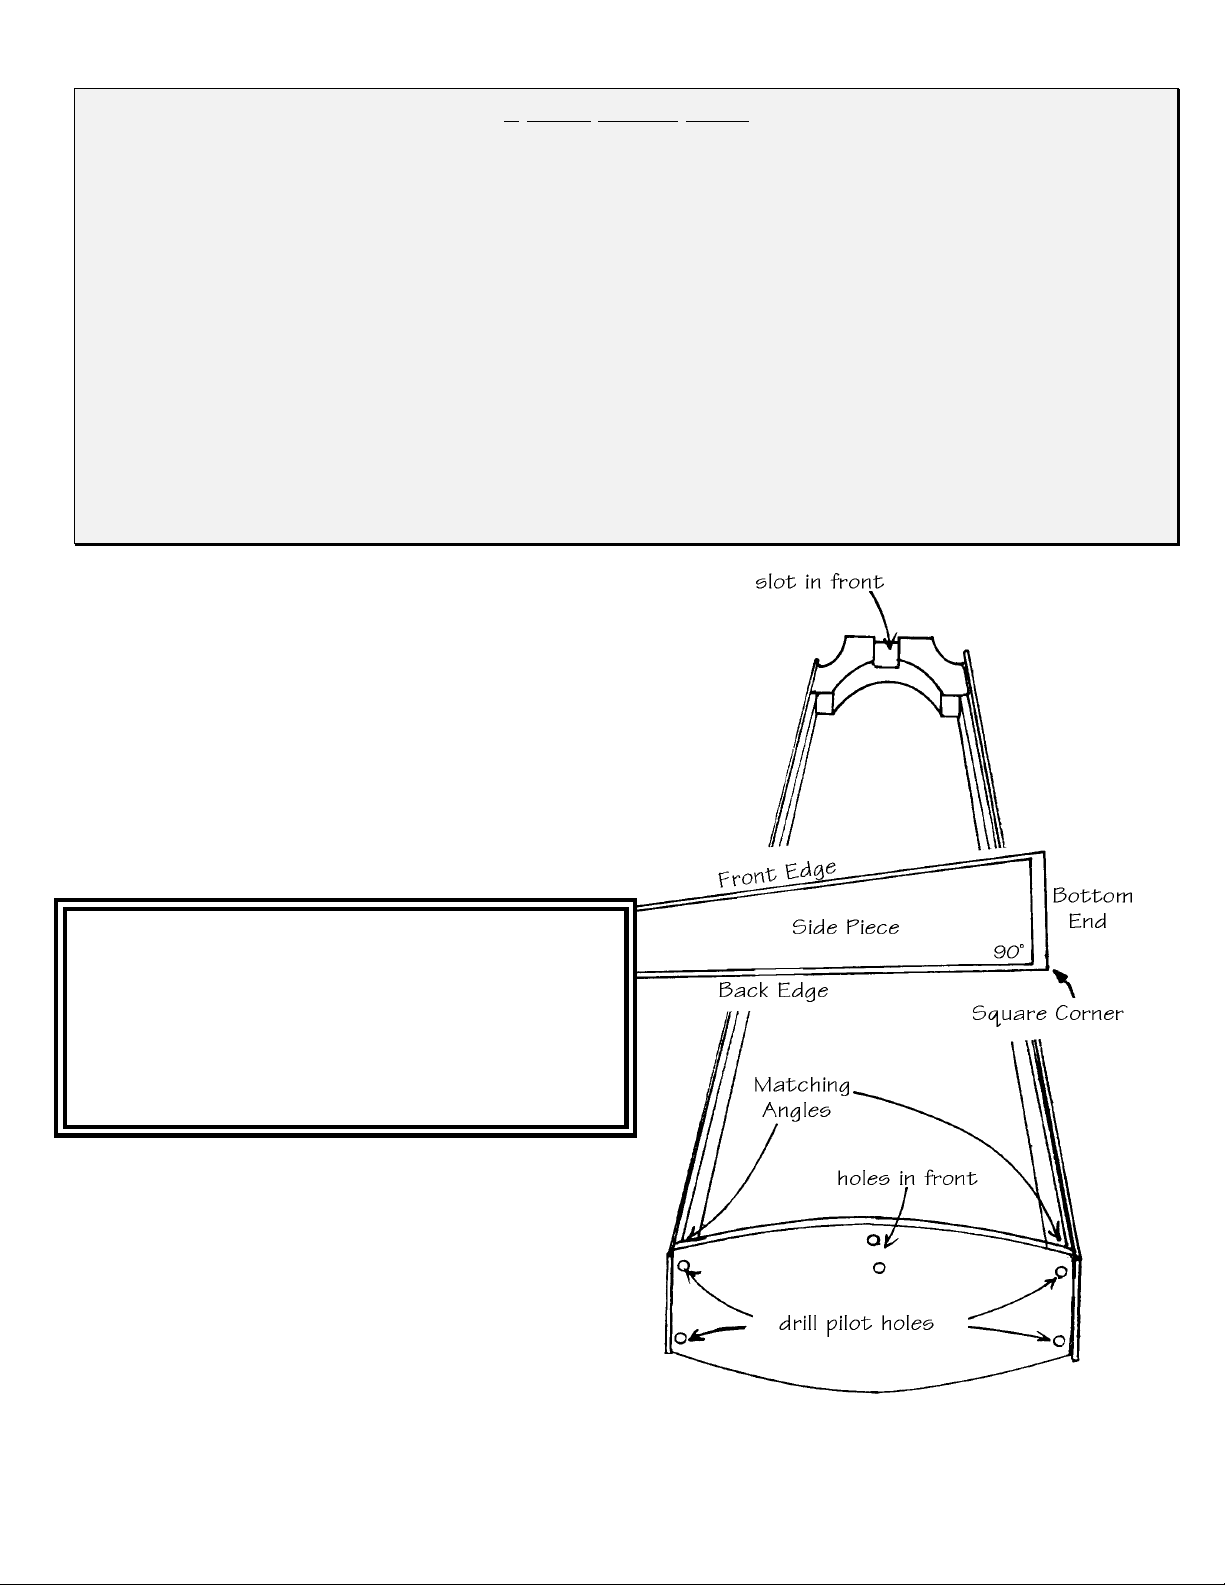
2 sides, solid hardwood
1 curved neck, laminated hardwood
1 pillar, laminated hardwood
1 shoulder, laminated hardwood
2 feet, solid hardwood
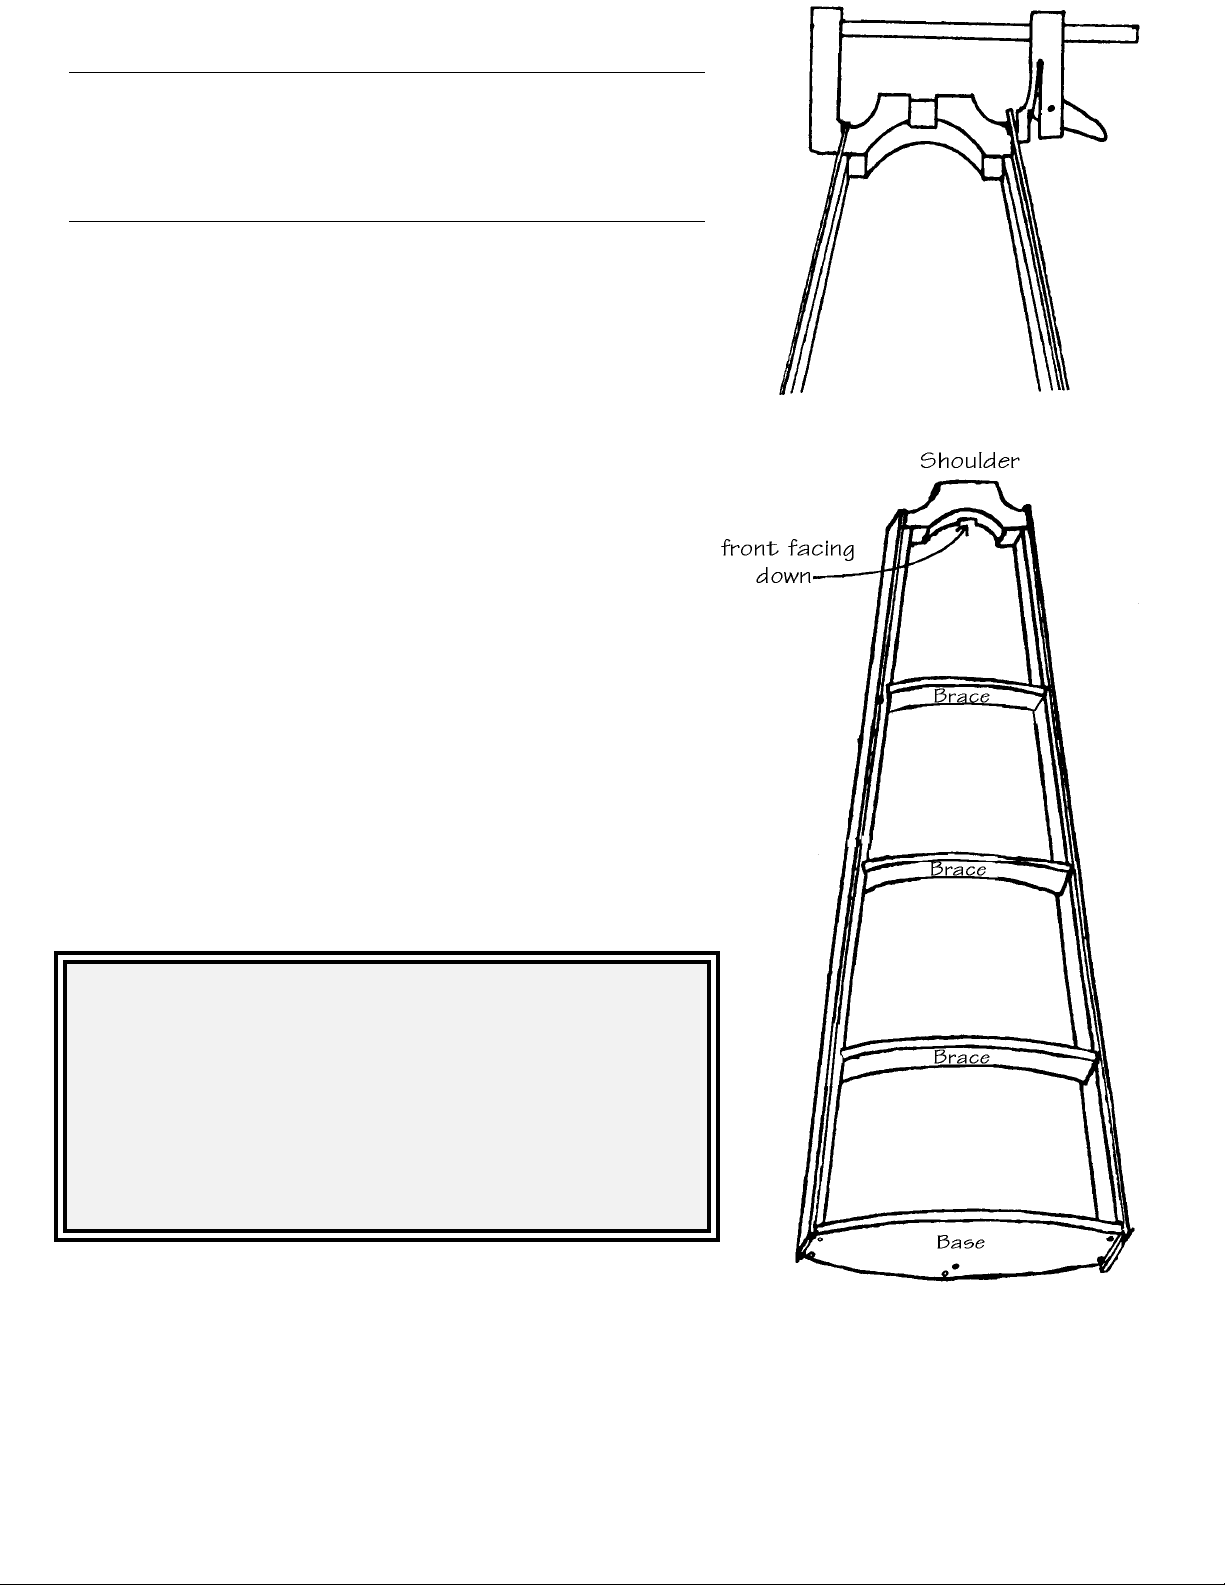
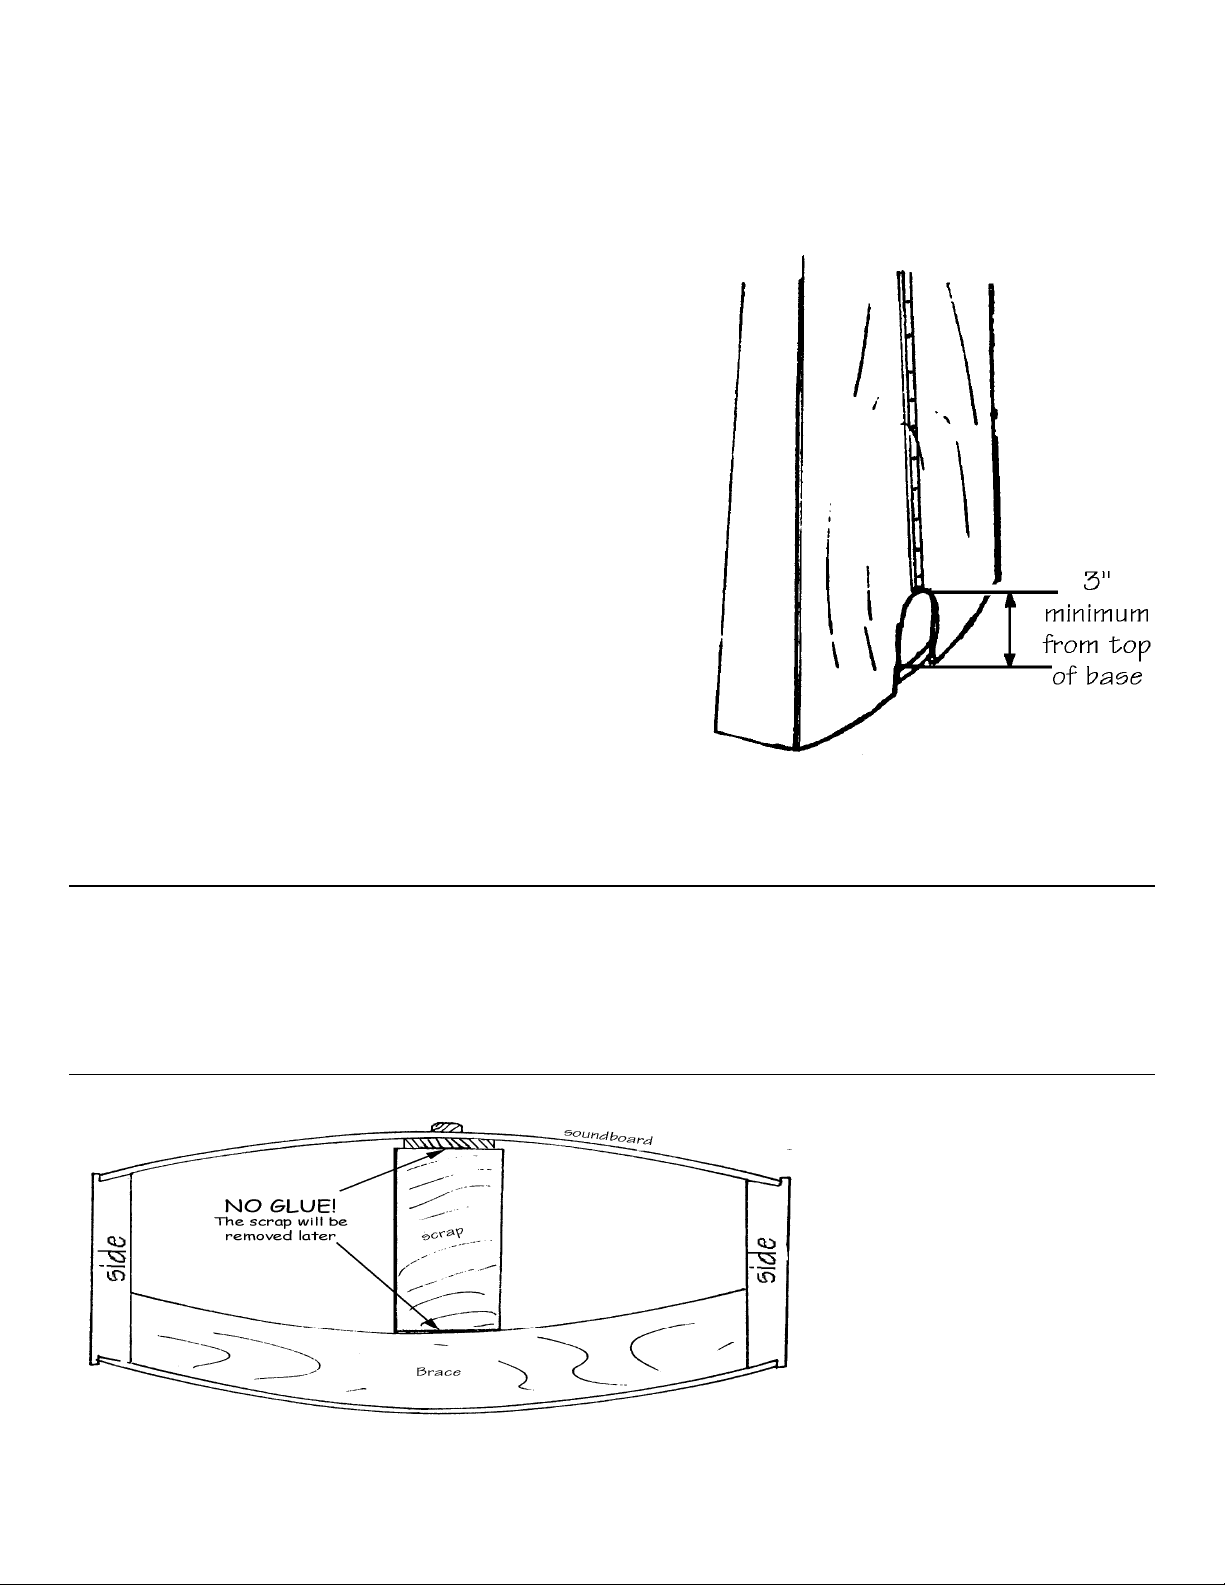
3 internal braces, hardwood
1 base, laminated hardwood
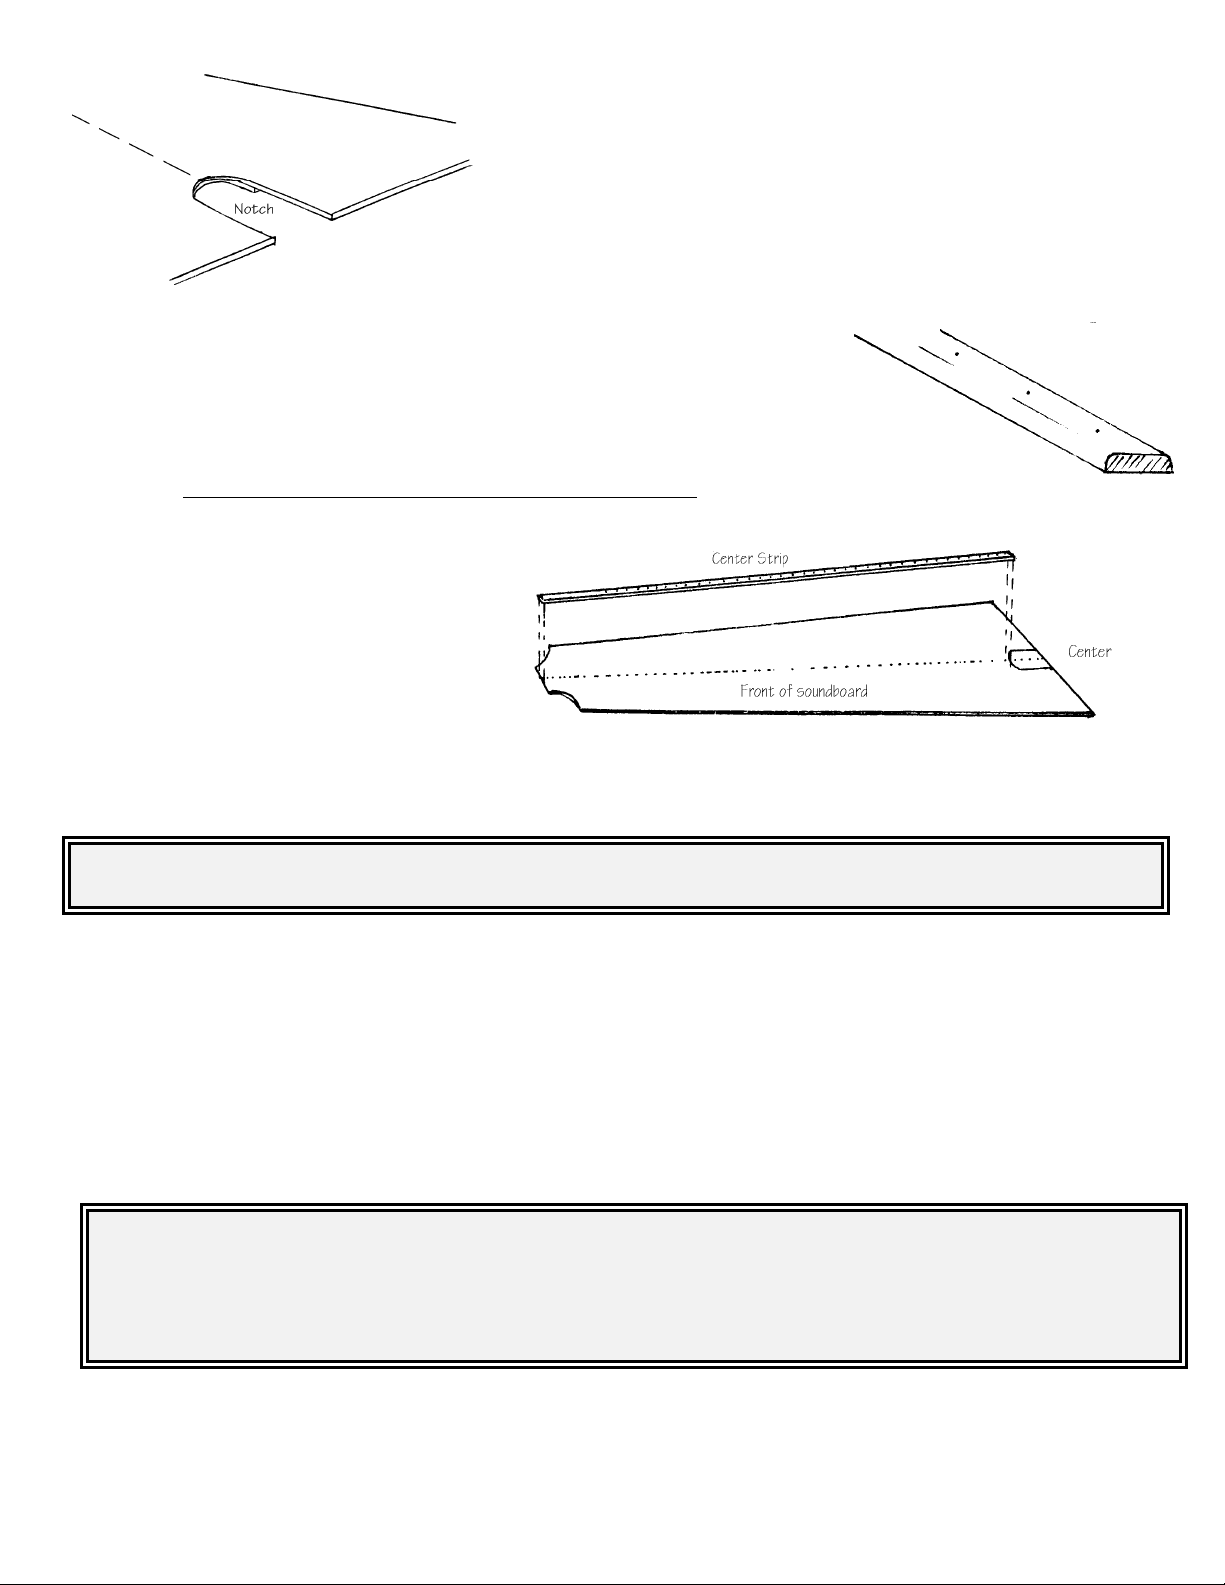
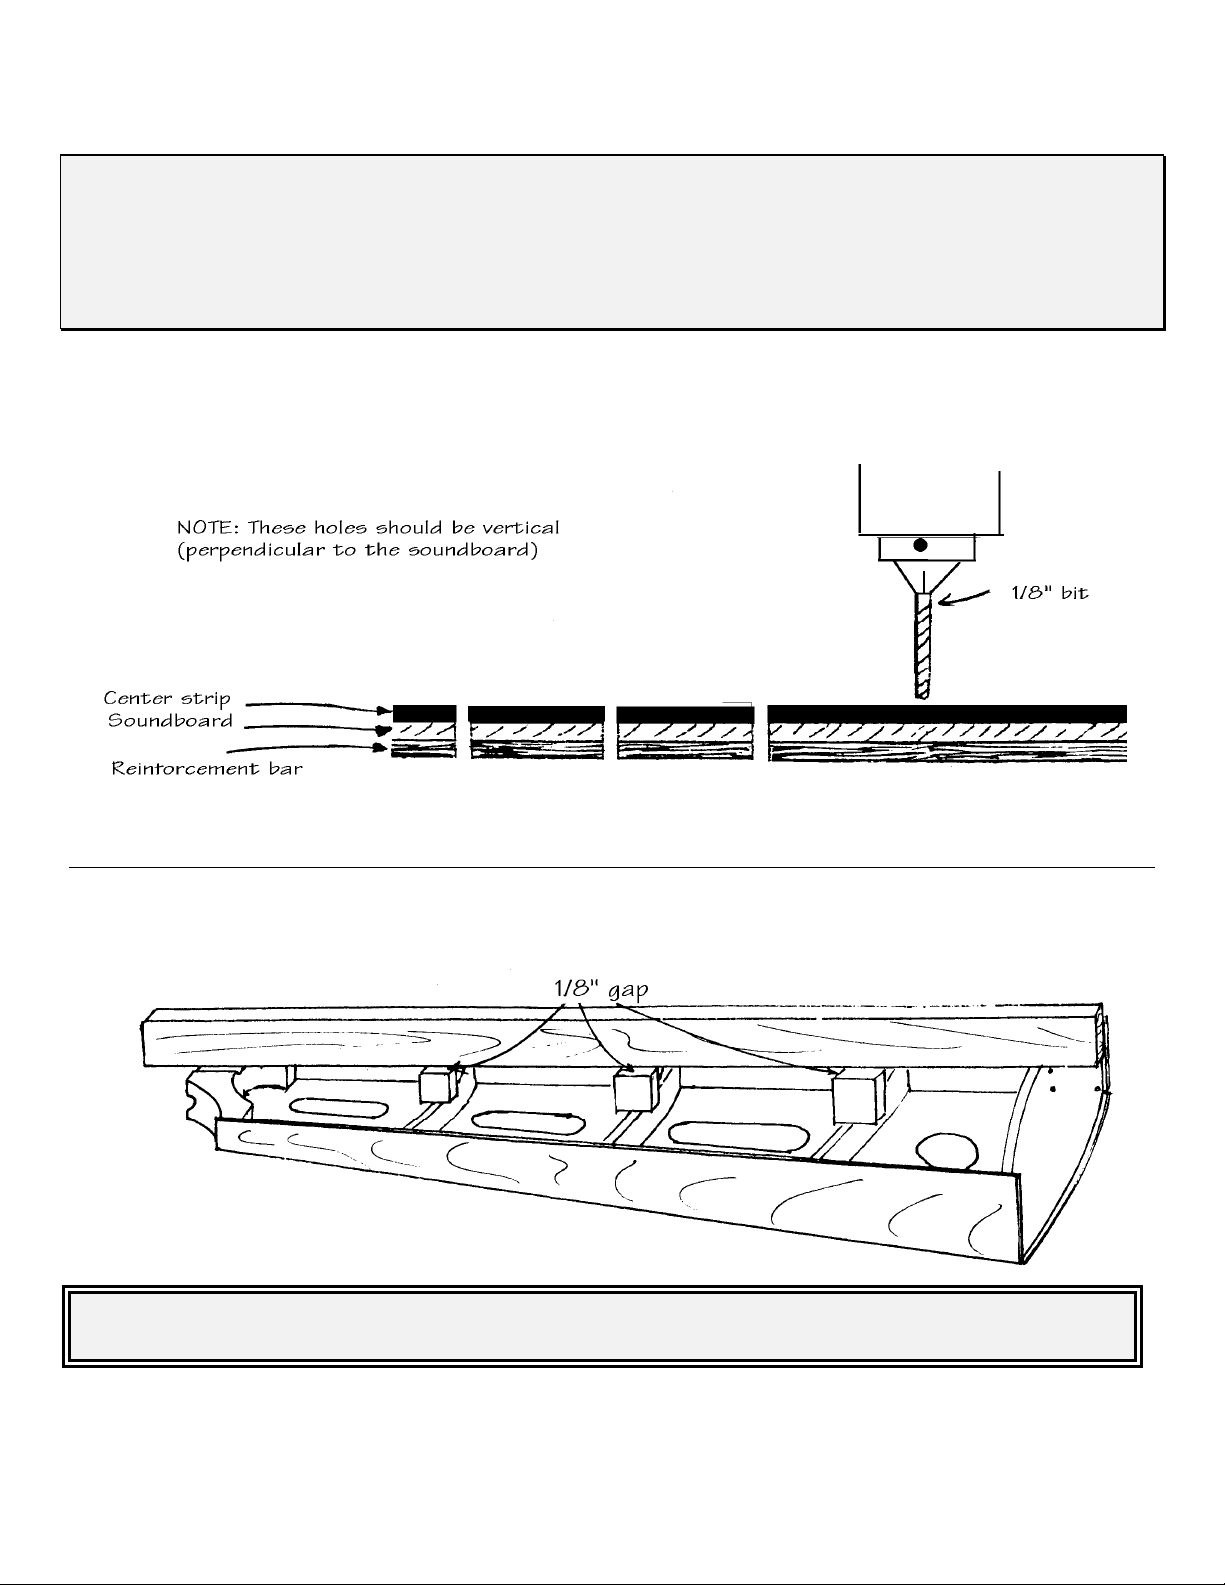
1 ctr strip for soundboard, hardwood
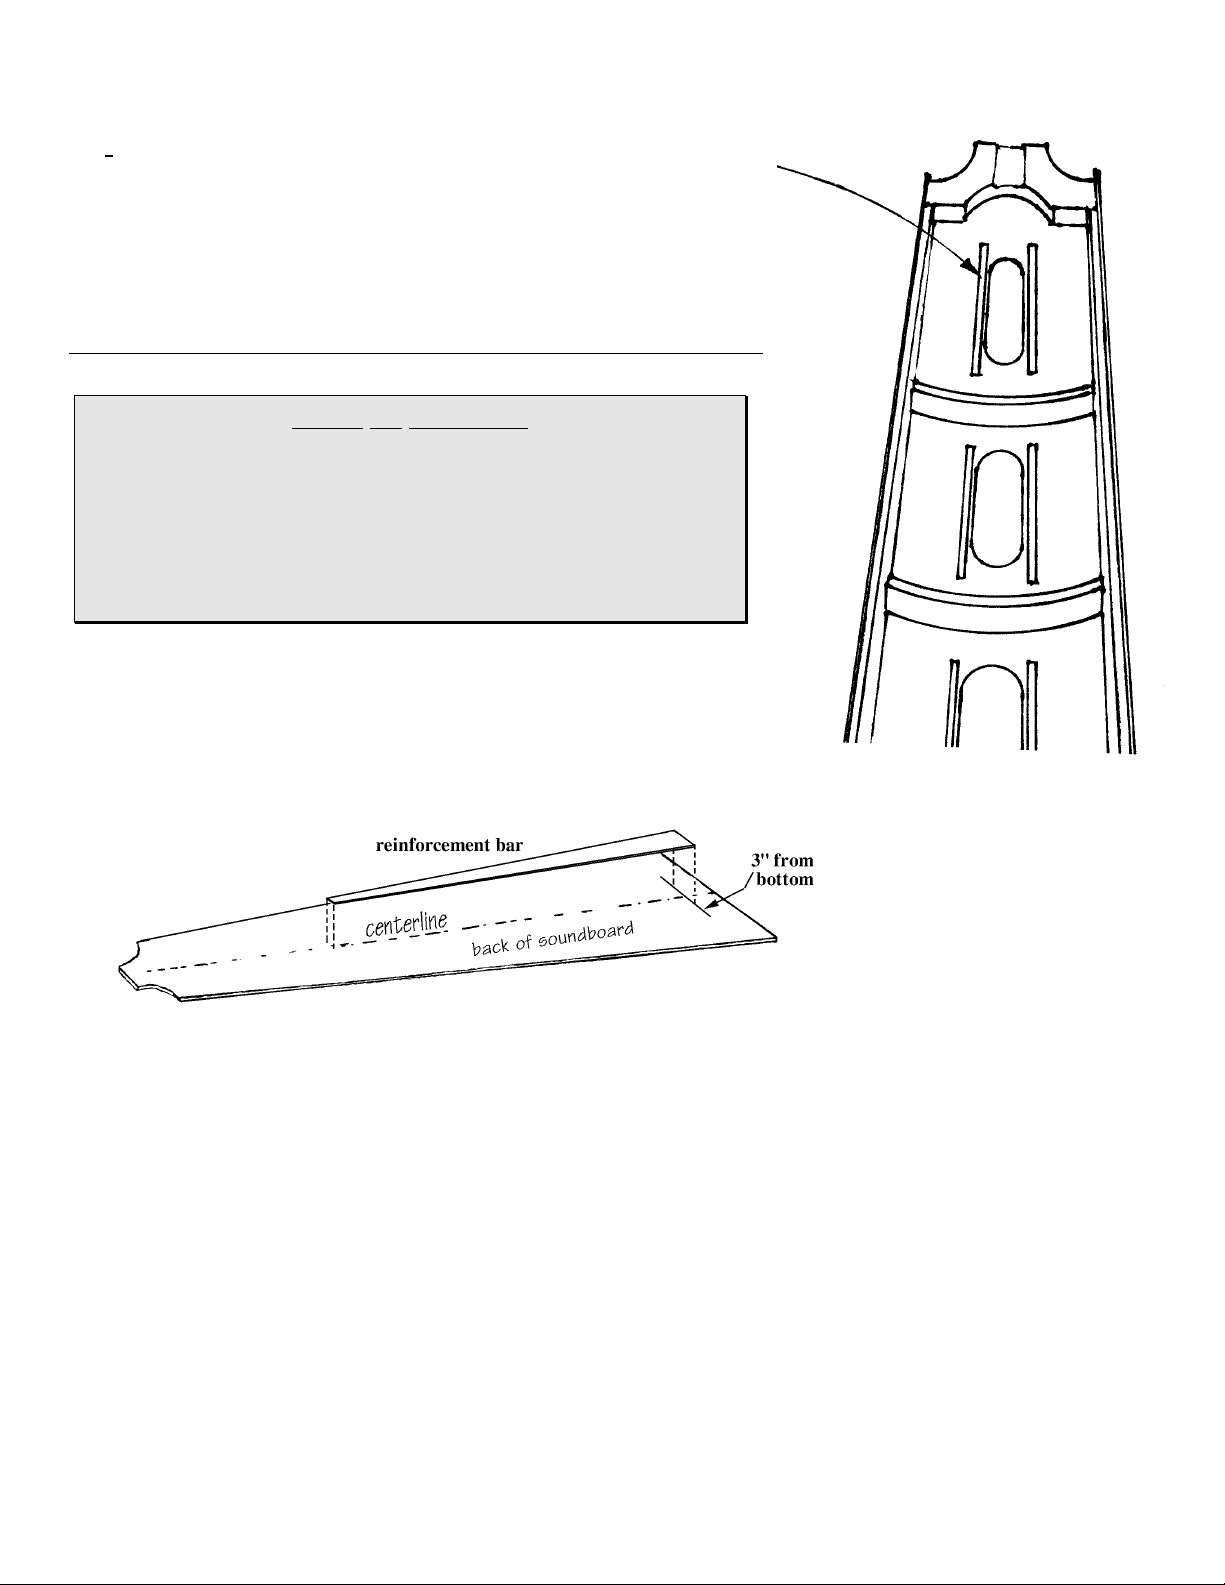
1 reinforcement bar, hardwood
1 hardwood dowel, 1" dia, 3-1/4" long
2 oval wood overlay pieces, hardwood
1 bottom trim strip, hardwood
6 stiffener battens (for back)
HARDWARE:
31 threaded harp pins
31 medium brass eyelets
31 threaded bridge pins
Allen Driver 5/64"
1 brass driver for threaded harp pins
4 wood plugs, 3/8" cherry
1 oz wire nails, 3/4" X 18
2 wood screws, 3" drywall
2 wood screws. 2" drywall
6 wood screws, 1-5/8" drywall
4 wood screws, 1" drywall
Spacing Guide
1 set of 31 harp strings
1 tuning wrench
1 drill bit, 1/8” (for eyelets)
8 ft of decorative inlay banding (Inlay J - 3 strips)
10 ft of iron-on veneer tape, cherry
1 small dowel pin, 1/4 X 2”
BEFORE YOU BEGIN
Please take the time to check over the parts of your kit now, to make sure everything is
there. If you discover a problem, call us right away so we can rectify it quickly without
causing you much delay in your project. We also suggest skimming through the entire
directions before beginning, just to get an overview of the project. You may decide that you
need to gather more tools or purchase a few optional decorations or accessories to enhance
the finished instrument. Now is a good time to decide so you can avoid delays when you
reach those steps of construction.
If you have any questions about the
assembly process – please visit our
online Builder’s Forum at
www.harpkit.com/forum

© 2008 Musicmaker’s Kits, Inc.
3
THE SOUNDCHAMBER FRAME
______1. Check all parts of your kit against
the parts list, lightly labeling them in pencil if
desired.
______2. Find the two SIDES, the BASE, and
the SHOULDER for the soundchamber frame.
Hold them together dry to check the fit of each
joint.
IMPORTANT
Be certain that you understand which is the front
and which is the back of each piece. The front of
the SHOULDER has a slot cut in to allow for more
vibration of the soundboard. The front of the
BASE has two holes pre-drilled in the center for
attaching the pillar. The front edge of the SIDES
is not square with the BASE.
______3. Drill pilot holes for wood screws at
each end of the BASE, as follows: Hold the
BASE in position on the ledge of the SIDE
piece with all edges flush and tight. Drill
through the BASE into the SIDE piece with a
7/64" bit. Repeat for the other SIDE. Take
care to aim your pilot holes into the core of
the SIDE material. These holes will guide your
screws.
ANOTE ABOUT GLUE
DO NOT ASSEMBLE THIS PROJECT WITH 5-MINUTE EPOXY, SUPERGLUE, OR HOT MELT GLUE!
Find a good woodworking glue. Many luthiers (guitar & violin makers) still use the natural hide
glues that have been around for centuries, carrying on a fine old tradition, but that does not mean
that you must do the same. We build this instrument with modern woodworking adhesives (such
as Elmer's Carpenter's Wood Glue or Titebond) because they hold the parts even more securely than
the old hide glues. The few advantages that some people claim with hide glue are more than offset
by the strength, durability, ease of application, and availability of modern woodworking adhesives.
When gluing parts together, be sure to put enough glue on the joint to wet the entire surfaces to be
joined. A good sign of proper gluing is that a little excess will squeeze out around the joint when
clamping pressure is applied. Too little glue may cause the parts to separate later, whereas too
much glue makes things messy. We always keep a damp rag handy for quick cleanup, as
necessary. It is especially helpful to keep your fingers clean while gluing, because gluey fingerprints
have the embarrassing tendency to appear on the finished product in places you never expected.
Most woodworking adhesives "set" sufficiently after 30 minutes of clamping to allow you to proceed.
Check your dispenser for recommended drying times.

© 2008 Musicmaker’s Kits, Inc.
4
Find the following items for the next step:
Carpenter’s glue
4 small wood screws, 1-5/8”
Cordless drill with Phillips screwdriver bit
Woodworkers clamp or large C-clamp
______4. Clean all surfaces of the SIDES, BASE and
SHOULDER. Apply glue to the ends of the BASE and
the bottom notch of each side. Hold pieces together
while you insert the screws to draw the joints up
tight.
______5. Apply glue to the edges of the shoulder and
to the notch at the top of each side piece. Place the
parts together and clamp them, making sure all
edges are flush. (Note: it is very important that the
front of each part faces the same direction.)
______6. Turn the frame (if necessary) so the front
faces down on your work surface.
Find and check the fit of BRACES #1, #2, and
#3. They should fit between the SIDES at the
positions of the notches.
Be sure the convex curve (hump) of each BRACE faces
up, and that you place these BRACES right up to the
back edge of the SIDE pieces, so the curve matches
the ledge cut along the SIDE piece, as these braces
establish the curvature of the back.
NOTE
Sometimes the BRACES do not fit perfectly between the
SIDES. This could be caused by sloppy cutting on our
part, or it might be that the SIDES have bowed a little on
their own. We recommend checking the SIDES with a
straight-edge and fitting the BRACES so as to push or
pull the SIDES into alignment. If a BRACE is too short,
you may shim it with a scrap of veneer. If too long, use a
disk sander to remove a small amount of material without
changing the angle or rounding the end.
______7. When satisfied with the fit of each brace,
glue them in place and apply pressure (clamps or
tape) to hold until dry.
______8. Check over the back edges of the harp
frame. If any of the BRACES stand taller than the SIDES, sand them down flush with the
ledge.

© 2008 Musicmaker’s Kits, Inc.
5
_____9. Test fit the BACK panel to the convex (humped) side of the frame. With a little
effort, it should bend to fit the curve of the BRACES and seat into the ledges of each SIDE.
You may have excess plywood extending beyond the SHOULDER and BASE of the frame
which can be trimmed off later.
It is not uncommon for the BACK to need sanding or planing along the edges to make
it a little narrower. Our parts are often generously sized. Use a hand plane to shave the
edges of the BACK to fit. Don't be concerned about a perfect fit, however. Slight gaps will
be covered over later on when you add veneer tape.
HINT: Find two scrap boards (bed slats or old 2 X 4's work fine) to place under the SIDES
of the frame before beginning to tack the BACK in place. This will keep the frame from
rocking from side to side as you pound the nails in. It may also help to place a thick
blanket or towel under the harp for padding.
Find the following items for the next step:
hammer
a few C-clamps
glue
bag of small nails included in this kit.
a friend to help with this step (four hands and two hammers make this easier)
______10. Clean off all sawdust from the frame and the back panel.

© 2008 Musicmaker’s Kits, Inc.
6
Before you begin gluing, locate and start several nails along the sides of the panel, so they
are going in but not through the panel. This will make installation considerably faster after
gluing.
______11. Apply a thick bead of glue to the backside of the entire frame where it contacts
the BACK panel, including the cross BRACES,
SHOULDER, and BASE.
Immediately place the BACK in position with one clamp at
the BASE and another at the top of the SHOULDER.
Make sure the panel will bend down to fit into the ledges
at each SIDE.
Install a few more C-clamps at each BRACE, using the
large holes for easy access.
Begin tacking the plywood to the frame. Start by tacking
across the bottom so the BACK is held firmly to the BASE.
Place the nails 1" apart and centered on the frame below.
You might want to start tacking in every other nail,
working your way up each side to the SHOULDER to get
the plywood attached, then go back and put in the rest of
the nails.
DO NOT PLACE TACKS ACROSS THE TOP OF THE
SHOULDER OR ACROSS THE CENTER OF THE BACK
BRACES.
Try to work quickly, before the glue becomes too
thick.
POINT OF INTEREST
We use nails here because it is difficult to put clamps on these curved surfaces. The nails
do a nice job of holding the parts together until the glue dries. We provide wood veneer
tape to cover them later so they won’t be noticed by nosy friends or critical relatives.
______12. When the nailing is complete, check over all the seams to see if you need to add
or adjust clamps. Check especially at the top of the SHOULDER where the seams will show
on the finished harp.
HELPFUL HINT
Before gluing the SOUNDBOARD or BACK into place, get two clean rags wet, and have them readily
available for cleaning up excess glue that squeezes out of the joints. Keep your fingers clean too.
The second rag should be used for final “scrubbing” any affected area, just to make sure all glue
residue is removed. This will help save you lots of time toward the end of this project when you are
preparing to apply the finish.

© 2008 Musicmaker’s Kits, Inc.
7
______13. Clean off excess glue with your damp rag right away, making a thorough job of it.
___ __14. We find it helpful to add STIFFENER BATTENS
along each side of the top three access holes in the BACK,
just to reinforce this thin laminate. Glue and clamp these
BATTENS to the BACK near the holes, as shown.
THE SOUNDBOARD
_____15. Draw a centerline down the length of the
SOUNDBOARD, on the front and back sides. Then draw a
pencil line 3" from the bottom on the back side only.
_____16. The REINFORCEMENT BAR is to be glued to the backside of the SOUNDBOARD,
starting at that line. It does not reach all the way to the top of the instrument because we
want the SOUNDBOARD to be thinner at the top. You may taper the thickness of the top 6
inches of this REINFORCEMENT BAR to make it gradually blend into the SOUNDBOARD.
Then glue and clamp it in place, as shown.
_____17. The front face of the SOUNDBOARD has the notch drawn on it (or precut).
POINT OF INTEREST
Many people ask why we use laminated wood instead of
solid for the soundboard. The reason for this is that we get
much more strength from laminated material than from
solid, and much less trouble with cracking. This superior
strength allows us to use a thinner soundboard than if we
were to use solid wood, so you get remarkable sound and
tuning stability with minimal risk of breakage.

© 2008 Musicmaker’s Kits, Inc.
8
Cut out the notch marked at the bottom, using a
jigsaw or coping saw, so the reinforcement bar is
flush with the notch in the soundboard.
NOTE: SAVE THE SCRAP of wood from this cut-out.
You will use a portion of it later on.
_____18. Find the CENTER STRIP for the SOUNDBOARD. It is a long
narrow piece of walnut or cherry with punch marks in it. Sand the
sharp corners of this strip, as shown, to round them over.
_____19. Glue the CENTER STRIP to the SOUNDBOARD as follows:
A) Be sure the top and bottom are properly oriented. The punch
marks are closer to the bottom end than to the top.
B) Place the bottom of the
CENTER STRIP right next to the
notch. The upper end may extend
beyond the top of the SOUNDBOARD,
or you may cut it shorter and taper the
top end just beyond the last punch-
mark.
C) Draw the outline of the strip in its proper position so you can be sure to keep it properly
centered when clamping.
D) Make certain string hole markings are facing up.
E) Apply only a small ribbon of glue to the underside of the CENTER STRIP so you don't get
too much squeeze-out that will need to be cleaned up.
F) Use weights or clamps (in an emergency, look for a heavy sacks of flour, sugar, sand, or
fertilizer to use as weights!) to hold it until dry.
G) Check it again for straightness, if possible. This little strip can easily slide around under
the pressure of your clamps.
HINT: If the CENTER STRIP is not straight, hold a straight-edge against it to force it into
place, and use masking tape to hold it straight before applying clamps or weights.
CUSTOMER SUGGESTION: One customer who has built several of these harps suggests
tacking the CENTER STRIP in place with the tiny nails in the kit, instead of using clamps.
Place the nails at the punch-marks, but be careful not to pound them all the way in -- leave
the heads sticking up so you can pull the nails out later. We think this is a great idea!
Just take care not to split the wood when pounding the nails in.

© 2008 Musicmaker’s Kits, Inc.
9
_____20. This would be a good time to sign and date your harp, on the inside of the
SOUNDBOARD, where it can be seen through one of the access holes in the BACK.
POINT OF INTEREST
Some people ask about finishing the inside of the soundchamber. We do not recommend trying it.
Guitars and violins are never finished on the inside, so this instrument need not be sealed on the
inside either. We understand people’s concern about the effects of humidity on the wood, but even
the best varnish or lacquer does not hermetically seal the wood. It blocks spilled milk from soaking
in, but it does not prevent the wood from “breathing” moisture vapor from the surrounding air.
_____21. Turn the SOUNDBOARD over and note the punch marks along the CENTER STRIP. Use
a 1/8" drill bit to bore these 31 holes through all three layers of wood in the SOUNDBOARD
assembly, as shown below.
INSTALLING THE SOUNDBOARD
_____22. Lay a straight-edge across the frame, from BASE to SHOULDER, and measure
the gaps between the straight-edge and the center of each BRACE.
HINT: Just as for the BACK, use bed slats or other supports along the sides of the harp,
underneath the protective padding, to hold it steady while pounding the nails into the frame.

© 2008 Musicmaker’s Kits, Inc.
10
_____23. Subtract 1/8" from each measurement and cut a small scrap of wood to fill each gap, so it
reaches up within 1/8" of the straight-edge. Tape the scraps to the corresponding BRACES, so the
soundboard REINFORCEMENT BAR will rest on the scraps when you install the SOUNDBOARD.
(Don't worry; you will remove the scraps later!)
_____24. Test fit the SOUNDBOARD to the front of the
frame. You want it to have the same kind of curve that
the BACK has, along the entire length. And you want
the top of the "notch" to be at least 3” from the top of
the BASE. The scraps that you just taped to the
BRACES will help you achieve the proper curve to the
SOUNDBOARD. These scraps can be left in place until
you install the strings. The string tension will pull the
SOUNDBOARD away from the BRACES, allowing the
scraps to fall free.
You may have to push pretty hard to test fit the
SOUNDBOARD all the way along its entire length.
Make sure the SOUNDBOARD fully covers the
SHOULDER and the BASE. Again, you may need to
shave a little off each side to make this piece narrower.
Don't be concerned about a perfect fit along the SIDES.
Slight gaps will be covered over later when you add
decorative trim.
_____25. When you are satisfied with the fit, make some pencil marks on each edge so you know
where to position the assembly quickly after applying the glue.
Gather the following tools and supplies ready for quick use:
hammer (s)
glue
bag of small nails
padding to protect the back of the harp
two damp rags for clean-up
a friend to help you with this step (just as with the BACK)
_____26. Remove the
SOUNDBOARD and start
several nails along the
edges, as on the back, to
make installation faster,
and then apply a thick
bead of glue around the
four edges of the frame
that will contact the
soundboard.
NOTE: Do not put
glue on the scraps
taped to the
BRACES.

© 2008 Musicmaker’s Kits, Inc.
11
_____27. Quickly replace the SOUNDBOARD in the
position you had it during the test fitting. Nail it in
place along the bottom and sides, just as you did the
BACK panel, and clamp the top to the SHOULDER,
checking for tight seams.
Clean off excess glue with your damp rags right
away, making a thorough job of it.
_____28. When the glue is dry, trim off all excess
wood that hangs over the top of the SHOULDER and
the bottom of the BASE. Take the time to do a nice
job with this. A drum sanding attachment to your
electric drill will help for the curved parts of the
SHOULDER. This is the most visible portion of the
finished instrument, so it shouts your woodworking
skills to the world.
ADDING DECORATIVE TRIM
Gather the following items for the next steps:
Wood veneer tape
Decorative inlay banding
Sanding block or electric sander
Electric iron
Glue
Sharp knife or chisel
Hammer
Nail set or large nail
_____29. Use a sharp knife or chisel to remove any clumps
of glue or slivers of wood along the edges of the soundboard and
back that might interfere with the decorative trim.
_____30. Check to see if any nail heads along the
SOUNDBOARD or BACK panel are raised up above the surface
of the wood. If so, tap them deeper with a nail set and hammer.

© 2008 Musicmaker’s Kits, Inc.
12
_____31. Begin with the back of the instrument.
Cut two pieces of wood veneer tape long enough
to cover the full length of the soundchamber,
from SHOULDER to BASE, along the side edges.
Test the way you want these to fit, making sure
they cover all the nails. You have two options:
We think option Blooks better on the
BACK (but not on the SOUNDBOARD), but it
requires a little more work. If you decide on this
second option, be careful when sanding down
the “lip” to avoid sanding through the thin outer
layer of the BACK.
_____32. This VENEER TAPE is pre-glued. If there is cellophane protective paper over the
glue, peel that off first. Then lay the tape in place, covering the nails and the small gaps
along the sides.
_____33. Preheat the iron to 300 degrees (medium setting) without steam.
_____34. Iron the two wood VENEER TAPE strips to make them adhere permanently,
following behind the iron with a block of wood to press on the tape as it cools. If a portion
of veneer comes loose, just iron it down again.
OPTION A) Lay the VENEER TAPE against the
“lip” of the SIDE that sticks up higher
than the BACK, or
OPTION B) Sand that “lip” flush with the BACK
and lay the VENEER TAPE over
the seam.
NOTE: The veneer tape can be moved slightly while it is still hot, so if the tape slides
out of position a bit, just heat it up again and push it back into place. Follow
behind your iron with a block of wood, pressing the VENEER into place as it cools.

© 2008 Musicmaker’s Kits, Inc.
13
_____35. Cut a piece of VENEER TAPE to fit across the bottom of the BACK panel, between
the other two strips. Iron that in place to cover the nails at the bottom. Save any leftover
scraps of VENEER TAPE for later. They sometimes come in handy for shims and fillers.
_____36. Turn the harp over and prepare the decorative
INLAY BANDING for covering the nails in the SOUNDBOARD.
This decorative trim should be installed beside the “lip” of the
SIDES, as shown, so it covers the nails and hides the crack
between the SOUNDBOARD and each SIDE.
NOTE: There are two possible methods of installing this
INLAY BANDING. Some customers prefer to simply spread
glue on one side of the INLAY and hold it down with lots of
masking tape until dry, and others prefer the iron-on method,
which is a little tidier but takes a little more time. Both methods are acceptable. Here is
how to do the iron-on method:
You will need to make a nice clean splice with a sharp chisel
at the point where you join two pieces of banding together to
reach the full length of the harp. Try to do this at a point in
the pattern that where the joint will be less noticeable.
No, there is not enough decorative inlay to reach across the
bottom of the soundboard. We provide a sturdier BOTTOM TRIM piece for this place.
OPTIONAL IRON-ON METHOD
a) Spread a smooth coating of carpenter's glue on one side
of the INLAY BANDING. Set aside to dry thoroughly.
b) Spread a 1/2" wide band of the same glue (Elmer's
works well) along each side of the soundboard where the
INLAY is to be installed, Allow to dry thoroughly.
HINT: use a scrap of wood that is slightly less than
1/2” wide for spreading this glue, so you don’t
inadvertently smear glue out onto the SOUNDBOARD
where it will have to be cleaned off later.
c) When both surfaces are dry to the touch, you can iron
the banding onto the SOUNDBOARD just as you did with
the veneer tape.

© 2008 Musicmaker’s Kits, Inc.
14
_____37. Before installing that last bit of trim across the bottom of the SOUNDBOARD, find the
scrap of 1/8" plywood that you saved from the notch and cut a small piece of it to fit in the gap
across the bottom. Glue and nail it in place.
_____38. Then find the BOTTOM TRIM piece (pre-drilled with four holes) and four short wood
screws. Glue and screw this strip firmly to the SOUNDBOARD. You may need to drill pilot holes
(7/64) for the screws.
NOTE: The BOTTOM TRIM piece is longer than necessary. You may trim it to cover over the
INLAY BANDING or to fit between the INLAYS, whichever you prefer.
_____39. Cover the screw heads by gluing the WOOD PLUGS over them and sanding the plugs
flush with the trim piece.
SANDING THE SOUNDCHAMBER
_____40. Start with a coarse (#80) sandpaper wrapped around a block of wood. Use it to round
over the sharp edges of the soundchamber sides and reduce the "lip" of the sides down so they are
flush with the decorative INLAY BANDING on the front.
You want the decorative INLAY BANDING to appear as though it is inlaid at the SIDE.
Remember that your fore-arms will make frequent contact with these
corners of the soundchamber as you play, so make them feel
comfortable. A sure sign of amateur woodworking is sharp corners.
Don’t hesitate to round them generously, as shown.Then your harp will
look and feel like the professionally built instruments.
_____41. Switch to a medium grit (120) sandpaper to smooth off the
scratches made by the coarse paper. This time, be sure to sand with the
grain of the wood so you don't add more scratches.

© 2008 Musicmaker’s Kits, Inc.
15
INSTALLING THE FEET
_____42. Place the sound-chamber on
a table with the bottom end hanging
over the edge at any easy working
height. Place the FEET in position
approximately 2" from each SIDE so
that the angled ledge of each FOOT
contacts the BACK of the instrument.
We like the FEET to point slightly
outward at the front rather than being
"pigeon toed".
Insert the appropriate length screws
into the holes in the FEET, and tap
them with a hammer to punch-mark the location for drilling pilot holes into the BASE.
_____43. Drill pilot holes into the base with a 7/64" bit so the screws will go in easily
Attach the FEET to the BASE with screws only - no need for glue. Now the soundchamber
will stand up on its own two FEET!
Check to see if the FEET make contact with the floor at all four points. If the harp rocks on
two points, then you can adjust them as follows:
a) Look carefully at which points do not touch the floor (e.g., the “left toe” and the
“right heel”, or vice versa).
b) Remove the FEET and shim them with short pieces of WOOD VENEER TAPE, as
shown. (If, for example, the “left toe” needs to be lower, add shims near the front screw
that holds that foot in place.)
Point of Interest
Many people ask why we use laminated wood for the NECK of this harp instead of solid hardwood.
The reason is that the strings exert nearly 700 pounds of tension trying to break the wood. With
such a deeply curved shape to the NECK, there is bound to be at least one weak point where the
grain would be quite short, and that is where it would break if the wood were solid (straight grain).
So the modern solution to this dilemma is to laminate thin layers of hardwood together, having each
layer with the grain going a different direction (we bury these laminations inside the neck in our
kit). That way there are always some strong layers of wood in any given section of the NECK,
regardless of the curves. You can rest assured that this harp will last a long time with this
laminated wood.
You are doing great - more than
half done!

© 2008 Musicmaker’s Kits, Inc.
16
PREPARING THE NECK
_____44. The BOTTOM TRIM STRIP may
require filing at the center so it is level with
the surface of the BASE. Otherwise it
would interfere with the PILLAR. Use a
coarse file to accomplish this.
_____45. Test fit the NECK and PILLAR to
the soundchamber. Place the 1" diameter
DOWEL across the top of the SHOULDER,
rest the back of the NECK on top of the
DOWEL, and stand the PILLAR up from
the notch in the SOUNDBOARD up to the
front of the NECK.
These parts should stay together by
gravity. Make sure the PILLAR rests flat
on the BASE. You want plenty of clearance
around the PILLAR at the notch. The
sound of the harp will be dampened if the
SOUNDBOARD touches the PILLAR.
HELPFUL HINT: You can pull the
bottom of the PILLAR out away
from the SOUNDBOARD and
pound a finishing nail part way
into the PILLAR to prevent it from
sliding too far into the notch. We
like to be able to fit a little finger
between the PILLAR and the
CENTER STRIP of the
SOUNDBOARD.

© 2008 Musicmaker’s Kits, Inc.
17
Look carefully at each joint. The SHOULDER and NECK should fit nicely on the
DOWEL but should not touch each other (you can sand away some of the wood to make a
small gap in front of and behind the DOWEL, so there is some room for the NECK to pivot
on the DOWEL). Don’t worry if this joint is a little loose now. The string tension will draw
these parts together firmly.
_____46. OPTIONAL STEP: We have included one
SMALL DOWEL (1/4”) that can be used to “pin” this
knuckle joint, if you wish to install it. We
recommend it if you think you will ever ship the
instrument somewhere. Occasionally, we have seen
the NECK shift to one side of the SHOULDER
during shipment, just because of the constant
vibration of transporting it on its side for hundreds
of miles.
This pin need not fit tightly, so we use a
slightly oversize drill bit (17/64”) to drill a hole
through the center of the WALNUT DOWEL, and
just 1/2” into the SHOULDER and the NECK so the
pin will be hidden inside the knuckle joint, as
shown.
POINT OF INTEREST
The joint at the back of the NECK is meant to be a kind of knuckle joint that allows for some
movement in the future. If we were to attempt to glue a permanent joint here, the string
tension would eventually cause a crack to open as the harp frame flexes in response to the
strings. So we simply create a joint that allows for slight movement. Another benefit of this
type of joint is that you will always have the option of taking your harp apart for future
repair or refinishing. Just remove the strings and the NECK/PILLAR assembly can be
taken off the harp.
Point of Interest
Many people ask why we don’t have dowels in the NECK/PILLAR joint. Doweling this joint
would not hurt anything, but it is a difficult and unnecessary step. We have designed this
instrument so that the string tension actually holds the parts together. The only force to worry
about is the torque from the strings all pulling on one side of the NECK. They want to tip it over.
Adding dowels would do little to prevent this motion, so we use decorative wood OVERLAYS on
the outside of the NECK/PILLAR joint. They give a kind of “I-beam” strength to this joint. When
properly glued in place, they are much more effective than dowels embedded on the inside. If you
dislike our decorative shapes for these OVERLAYS, you may make your own customized shape.
Just take care to make them out of sturdy wood -- no pressed wood, thin veneers, or soft wood
here. Make sure also to aim the direction of the grain vertically, so it crosses the NECK/PILLAR
joint.

© 2008 Musicmaker’s Kits, Inc.
18
_____47. Look carefully at the joint at the front of the NECK where it rests on the PILLAR.
It should be nice and tight, no wide gaps, when the bottom of the PILLAR is in correct
position in the notch. Some adjustment can be made by sanding the top of the PILLAR, if
necessary. But don’t worry if the joint is not absolutely airtight. You may add a little filler
paste here later. We usually do.
_____48. Test fit the OVERLAY pieces to the
NECK/PILLAR joint, centering the length over the seam.
Lightly mark their outlines on each side of the PILLAR
and NECK, so they will be positioned opposite one
another.
_____49. Sand the OVERLAY pieces before installing
them. It is much easier to smooth off the edges now
than it will be after gluing them to the harp.
Gather the following tools and supplies for the next gluing operation:
Several C-clamps
Masking tape
Glue
Two damp rags
Some scraps of wood for clamping pads
_____50. Apply glue to the butt joint of the PILLAR and NECK first, keeping the parts
standing in place on the harp. Use masking tape to hold the parts together as tightly as
possible until the glue dries, about 3 hours.
Once dry, round the edges around this area. It will be easier to do now, without the
overlay in the way. Make sure the surface is flush, so your overlay rests nicely on the joint.
STOP!
Many customers have glued the NECK and
PILLAR together without following these directions
and have had trouble as a result.
PLEASE PROCEED ONLY AS DIRECTED!
You must glue the NECK and PILLAR together as
they are standing in position on the harp.
Otherwise you cannot be certain they will fit back
into place again.

© 2008 Musicmaker’s Kits, Inc.
19
_____51. Apply glue to one of the OVERLAY pieces and
tape it into position (where you drew the outline
earlier).
Tape some clamping pads to your clamps, so they
don't dent the harp when tightened.
Clamp one OVERLAY, watching to be sure the
part stays in correct position and is held securely.
Use damp rags to clean up all glue as it squeezes out.
This is very important! You will kick yourself every
time you look at the finished harp if you leave glue
residue around these decorative pieces.
Allow the first side to set for about a half hour, then glue the second OVERLAY,
clamping both sides at the same time. Again, clean up any glue that squeezes out, to avoid
glue marks on your finished harp. Keep the clamps on for about 3 hours, giving it ample
time to dry.
_____52. When dry, you may remove the NECK/PILLAR assembly from the frame of the
harp. This is the best time to do final sanding and shaping of these pieces. Here are some
guidelines:
Sand all the edges to remove machining marks, scratches, and glue residue. A
medium sandpaper (150 grit) should suffice for this. Hold the parts in different lighting to
check for scratches and glue spots. They can be elusive!
Note that we have rounded over all edges of the NECK except one.This lower edge should
be left square so you have room for mounting sharping levers later on.
Any minor cracks can be filled with your favorite wood putty. If you have nothing on
hand that will match your wood, make up a paste of sawdust and Elmer's glue mixed to a
consistency of putty (thin it with a few drops of water). You might also find scraps of the
WOOD VENEER TAPE handy for filling narrow openings.
CUSTOMER SUGGESTION: One customer
suggests burying four tiny nails in the NECK and
PILLAR to help hold the OVERLAY PIECES from
sliding out of place when clamped. Clip off the nail
heads, and drill 1/16” pilot holes into the NECK
and PILLAR near the top and bottom of the pencil
outline so the nails will show just enough to poke
into the OVERLAYS when you clamp them in place.
Great idea!

© 2008 Musicmaker’s Kits, Inc.
20
FINAL ASSEMBLY
_____53. Now you can attach the
NECK/PILLAR assembly to the soundchamber.
It requires only two screws (no glue), as the
string tension will help hold the entire
instrument tightly together.
Lay the harp on its back on a carpeted floor.
Fit the NECK/PILLAR assembly in place on the
harp and then drill pilot holes through the
holes in the BASE, using 7/64” drill bit,
making sure the PILLAR is centered in the
notch and not too close to the center strip.
Insert the screws to hold the parts together. We use no glue in this assembly step because
it is unnecessary and because you may wish to be able to disassemble the harp in the
future for refinishing, repairing, shipping, etc. That is a handy option.
FINISHING
Your harp is now assembled. All that remains is to do some final sanding and then apply the finish.
Here are some finishing options, along with a few hints from our factory workshop:
STAIN -- STAINS are coloring agents and should only be used if you dislike the natural color of the
wood. We usually do not apply stains to our projects, especially when they are made with naturally
beautiful hardwoods such as cherry or walnut. These woods look very nice with just a clear finish.
But, if you want to color the wood differently, your staining should be accomplished before applying
a surface finish such as oil, varnish, or lacquer.
OIL -- An oil finish will give your wood a low luster appearance, bringing out the natural color of the
grain, but it tends soak into the wood and appear dry and "thirsty" after awhile. The principal
advantage of an oil finish is that it can be applied and wiped dry immediately, so you can proceed to
installing hardware (and strings) right away. The main disadvantage of oil is that it usually does not
give much surface protection or sheen, although there are some brands that include waxes and/or
varnishes to give more surface build-up and luster.
VARNISH -- Any regular varnish will work fine on this project, but we recommend our wipe-on
polyurethane called MUSICMAKER'S INSTRUMENT FINISH. Our complete finishing kit includes
detailed instructions, sandpaper sheets and a half-pint can of wipe-on gel varnish. The advantages
of this finish are its simple application, durability, and deep, soft luster. It also works well for
protecting painted decorations, decals, woodburned decorations, etc.
LACQUER -- Many professional instrument makers still use lacquer for their finish. The most
readily available lacquer is called Deft Clear Wood Finish. It is best to purchase a can of liquid to
brush on as a sealer coat first, and then use an aerosol can of the same product to spray on the
final coats. The advantage of this finish is its quick drying time, but the disadvantage is the strong
odor of the toxic lacquer fumes.
CAUTION: Lacquer finish may not work over some decals and paints because of its aggressive
solvents.
Table of contents
Other Musicmaker’s Kits Musical Instrument manuals