Mustek GSMART-D55 User manual

82-147-00050
Digital Camera
English
Español
User Guide
Multi-Functional

Image Sensor 3.1M CMOS sensor
Resolution Fine: 2688 x 2016 (H/W enhancement);
High: 2048 x 1536 ; Standard: 1024x768
Internal Memory 16MB Flash
External Memory SD/MMC card slot
Interface USB/TV out
Flashlight Photo detector, IGBT type; On/Auto/
Red-eye/Off
File Format JPEG/AVI/WAV
Video Frame Rate(PC Cam) 20~30 fps (320 x240)
Self-timer 10-second delay
Shutter Speed 1/15~1/2500 sec.
Lens Fixed(6G glass lens), f=9mm
Focus Range 25cm~35cm(macro),70cm~infinity(normal)
Aperture Ratio F3.0
Digital Zoom 4X
LCD Display 1.5" TFT LCD
Power 1.5V AAA alkaline batteries X 2
Dimensions 86 x 42 x 37 mm
Weight 93g (without batteries)
Mass Storage YES (OS: Win98se/Me/2000/XP; Mac
OS 9.X and 10.1 above)
PC Cam Mode YES (OS: Win98se/Me/2000/XP)
SPECIFICATIONS

Multi-Functional Digital Camera
User Guide
English

Digital Camera User Guideii | English
Table of Contents
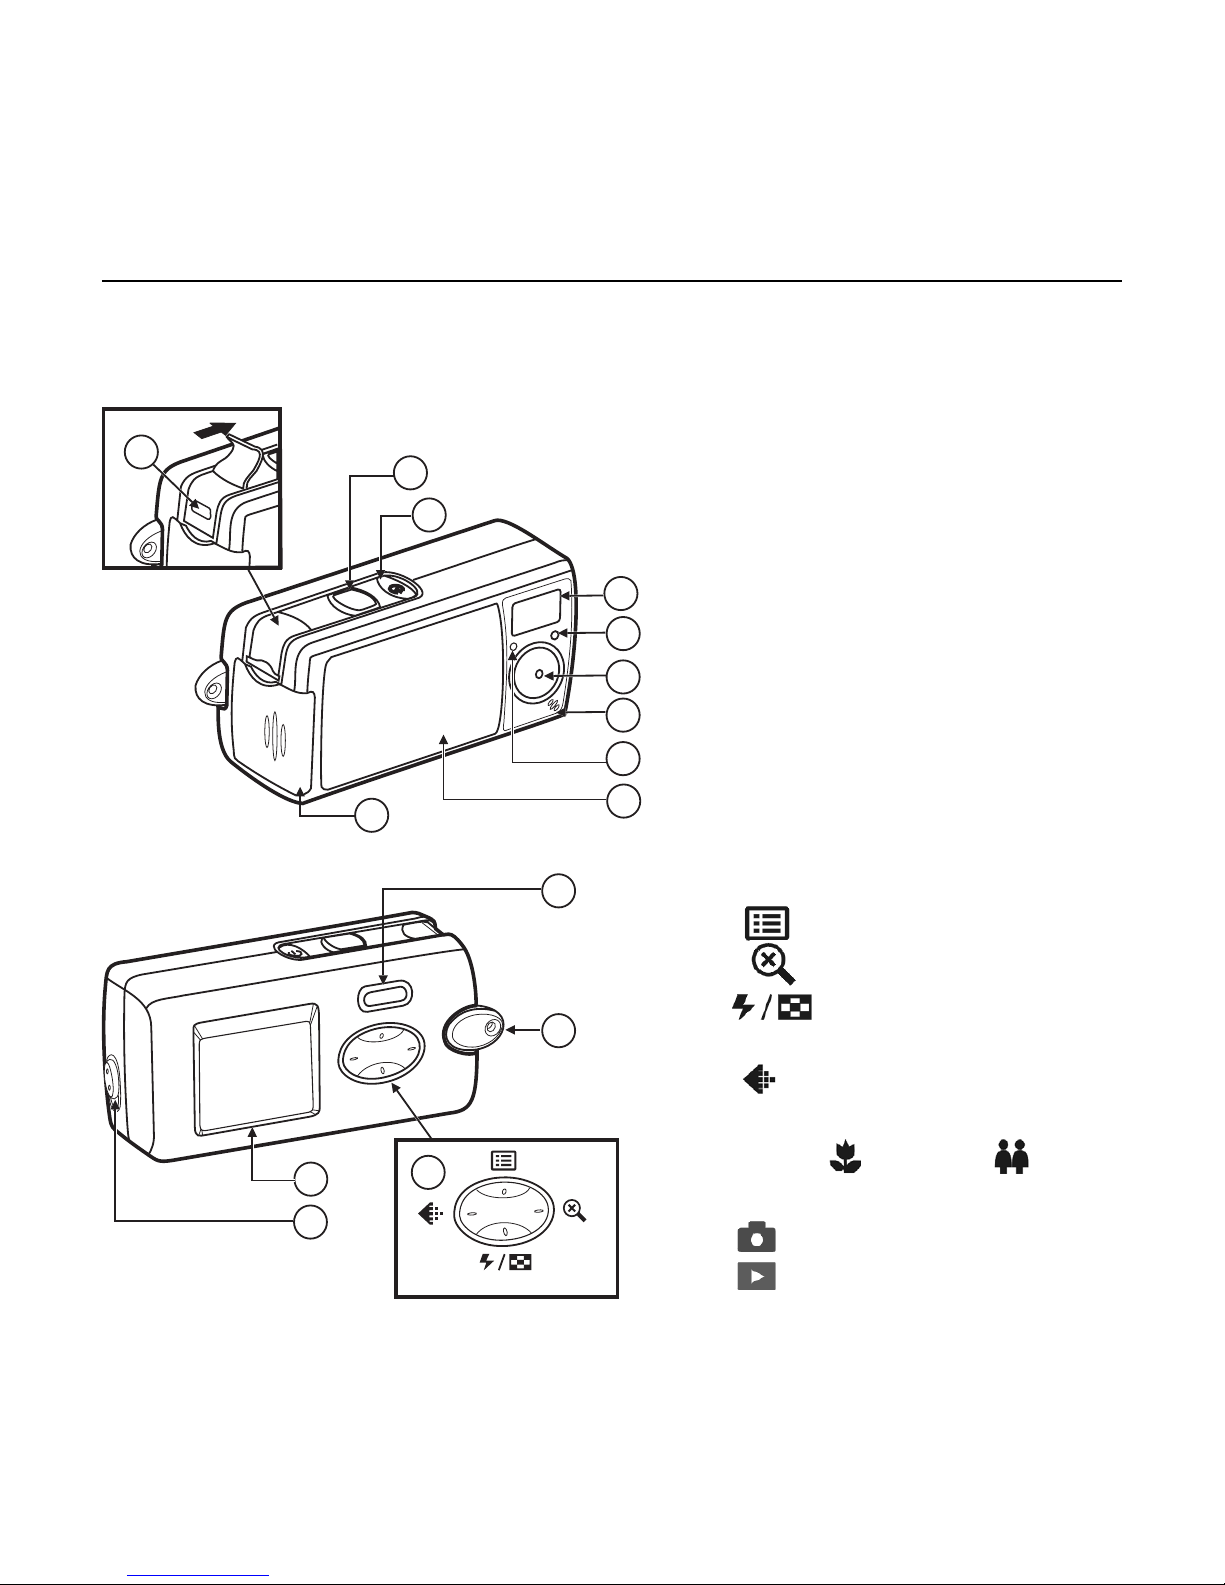
Identifying the Parts .............................................................. 1
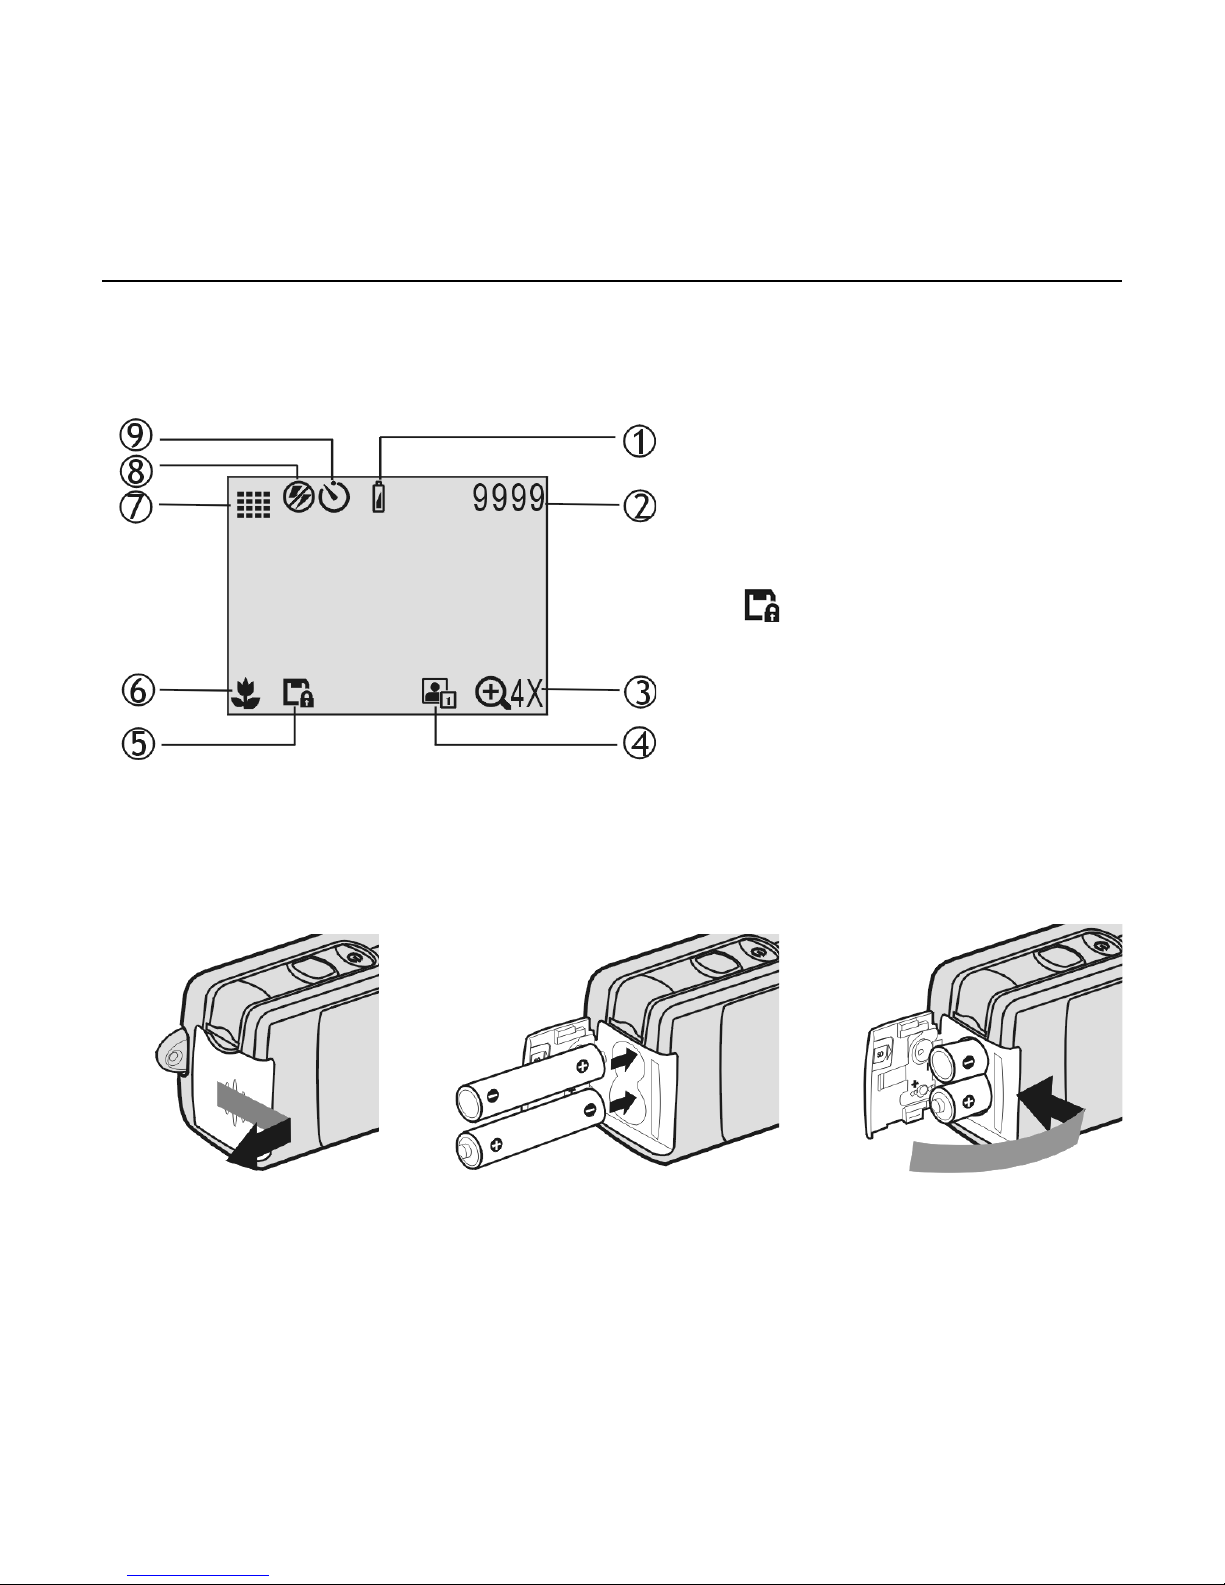
LCD Display Icons.................................................................. 2
Preparation ......................................................................... 2
Loading Batteries .............................................................. 2
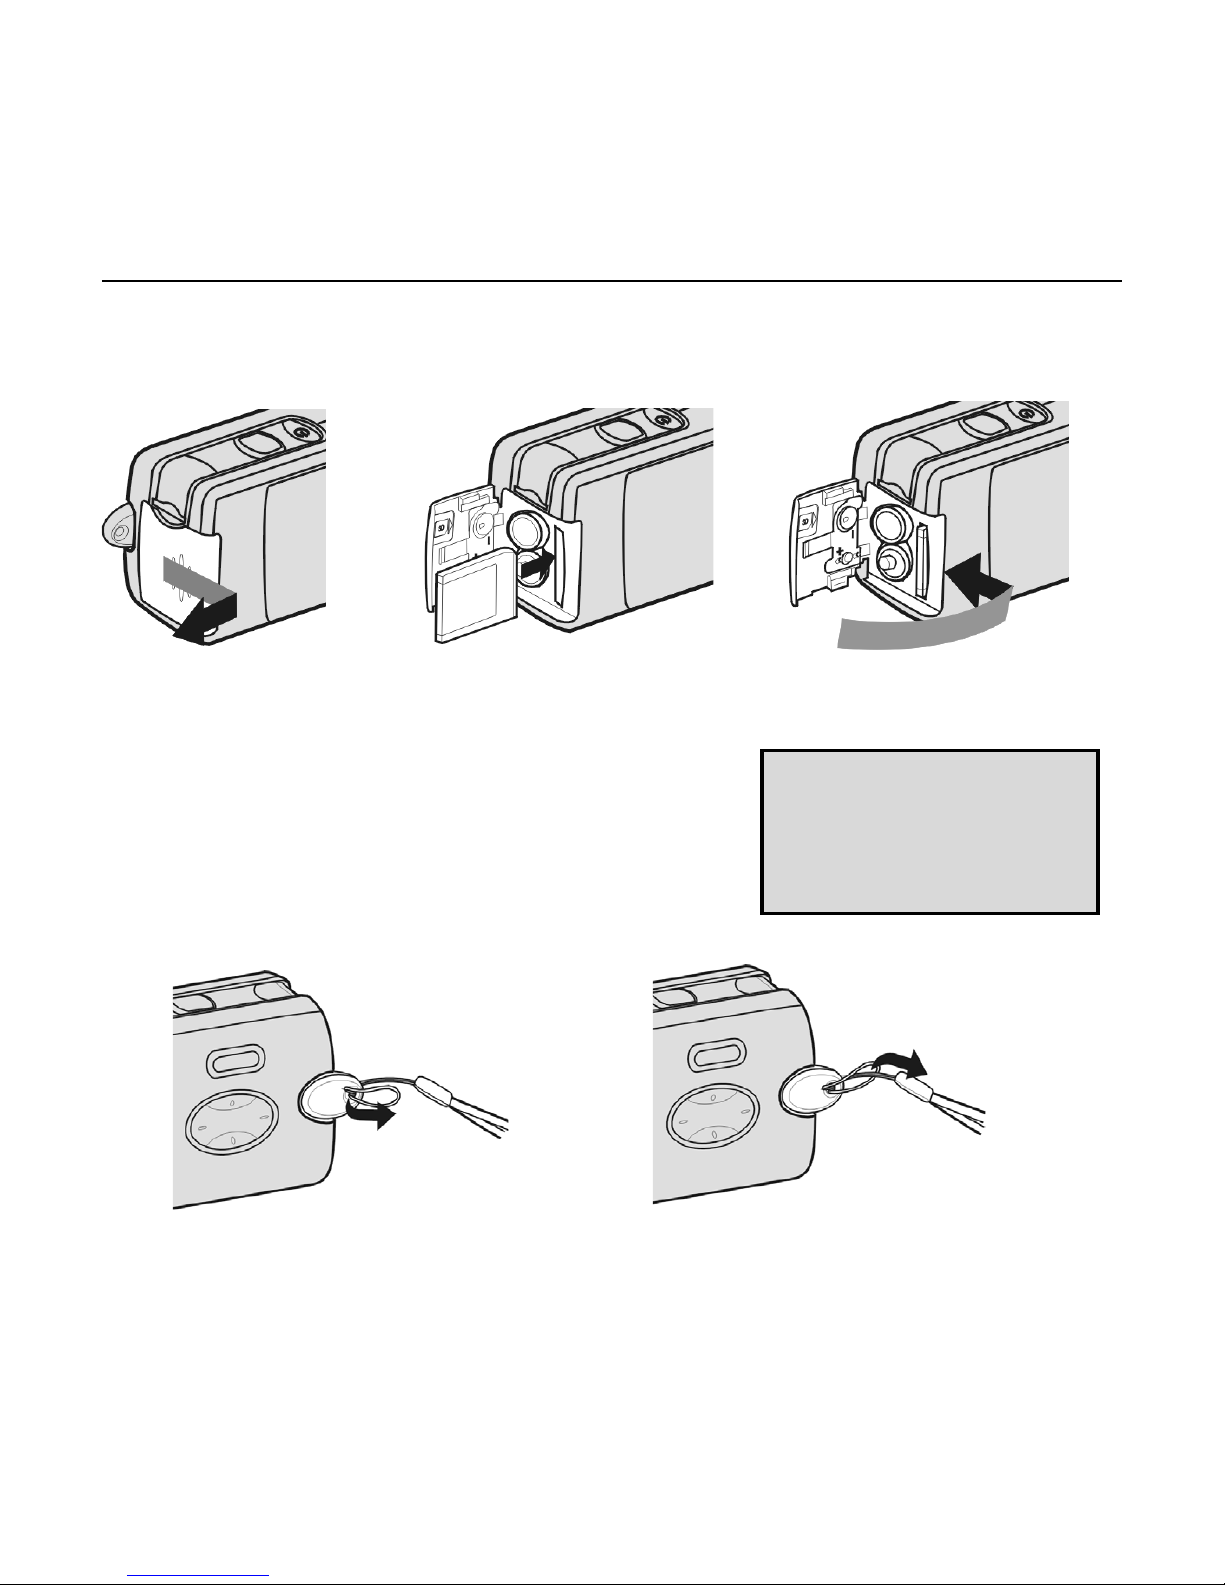
Inserting the SD/MMC Card .................................................. 3
Attaching the Strap ........................................................... 3
Camera Settings
Record Mode( ) ............................................................... 4
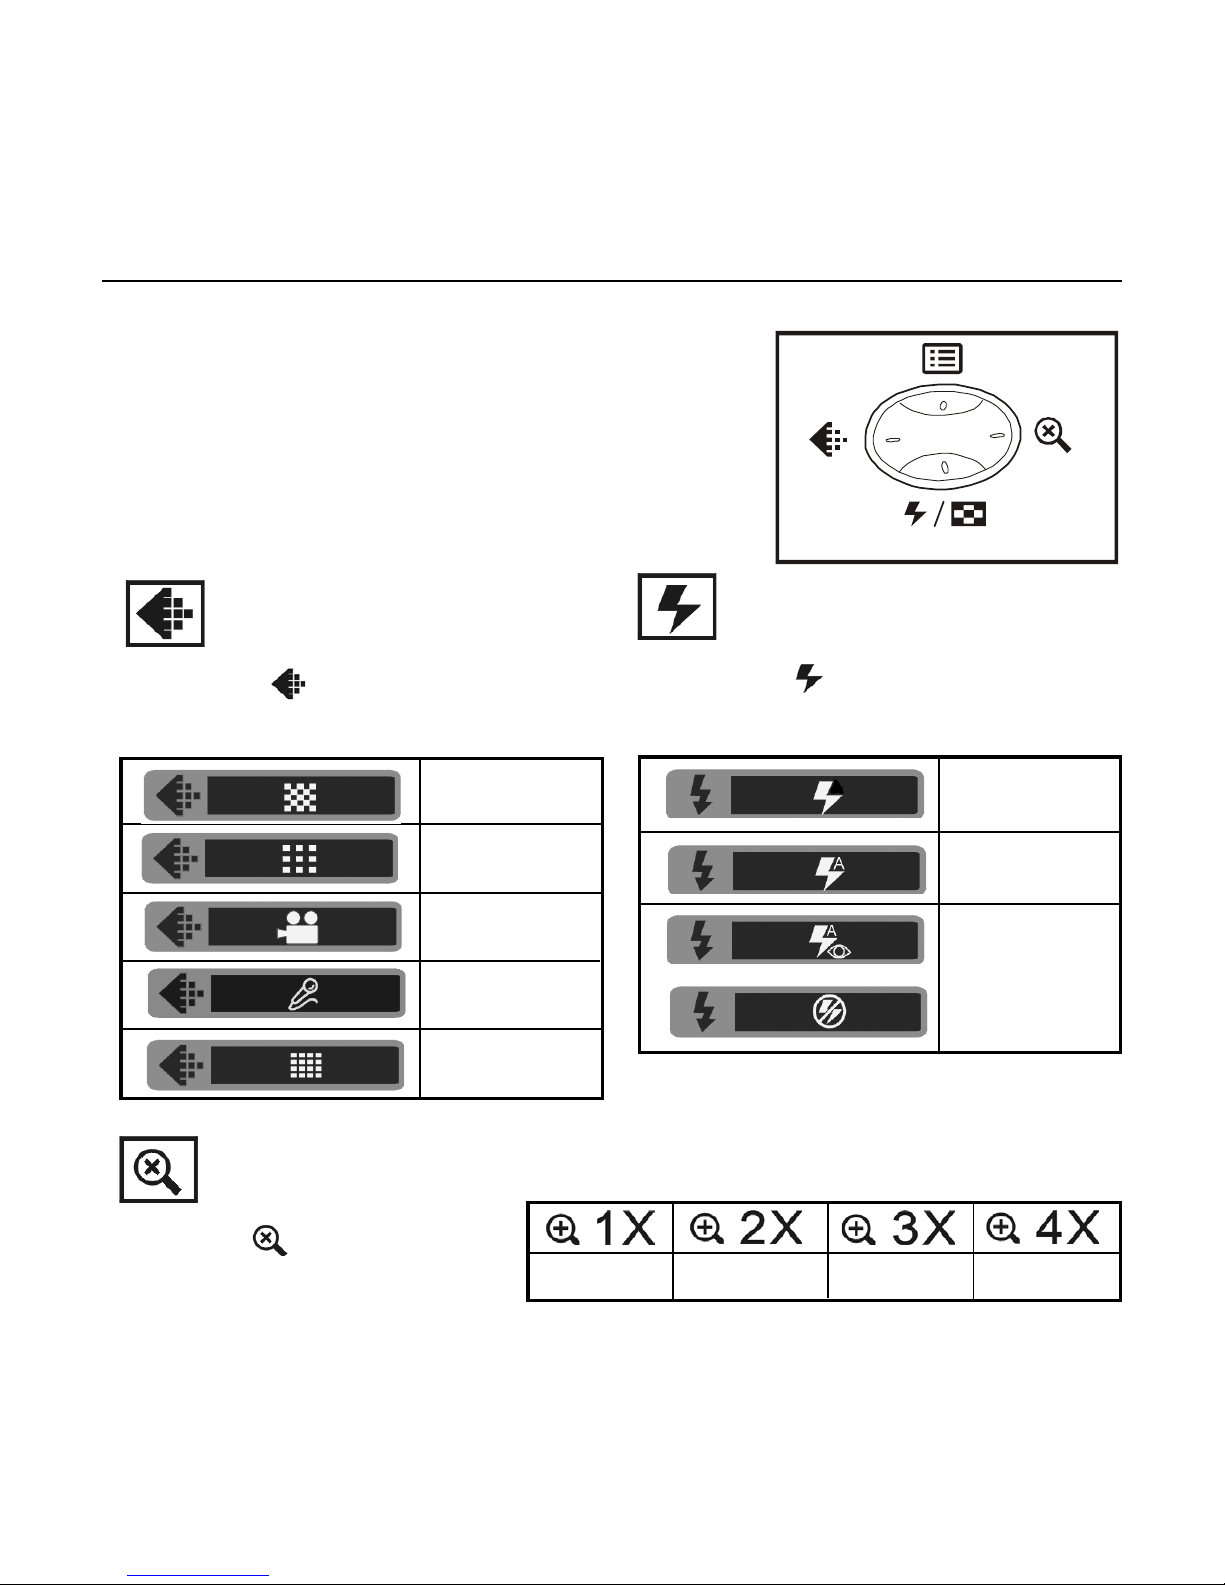
Resolution( )/Flash( )/Zoom( ) ..................................... 4
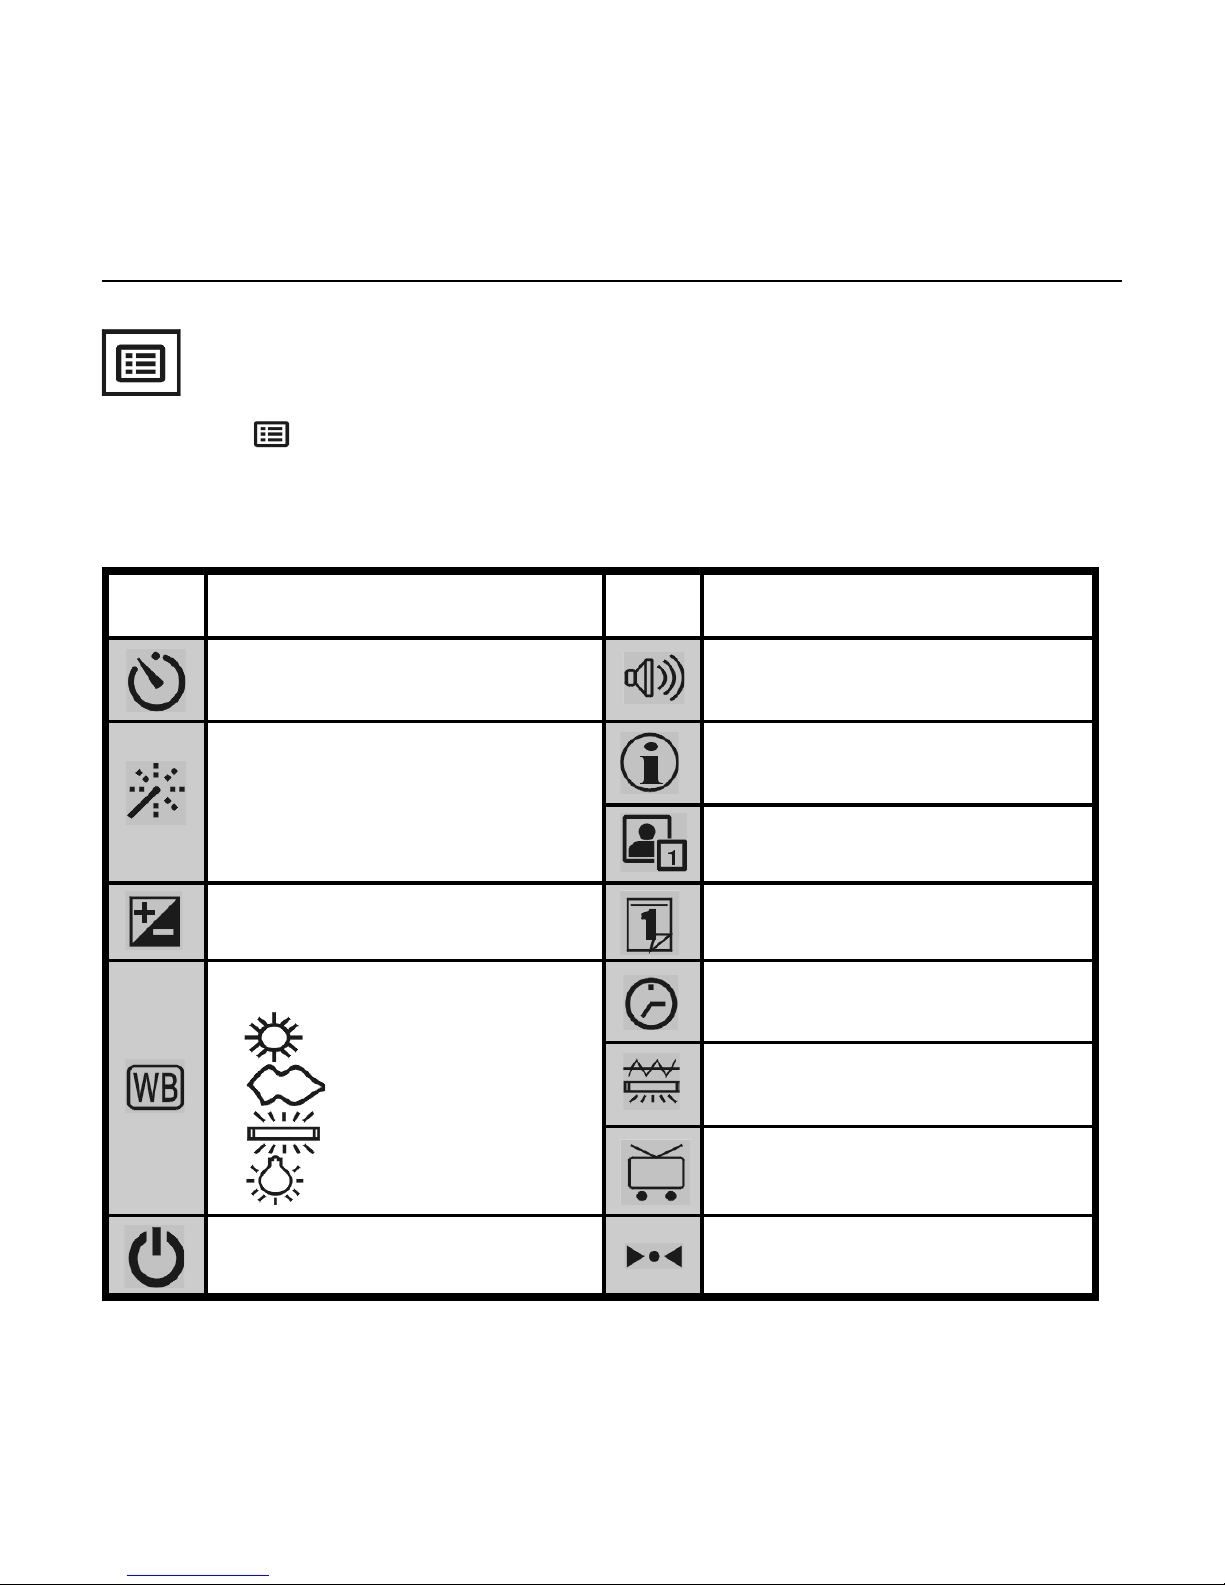
Menu( ) .................................................................... 5
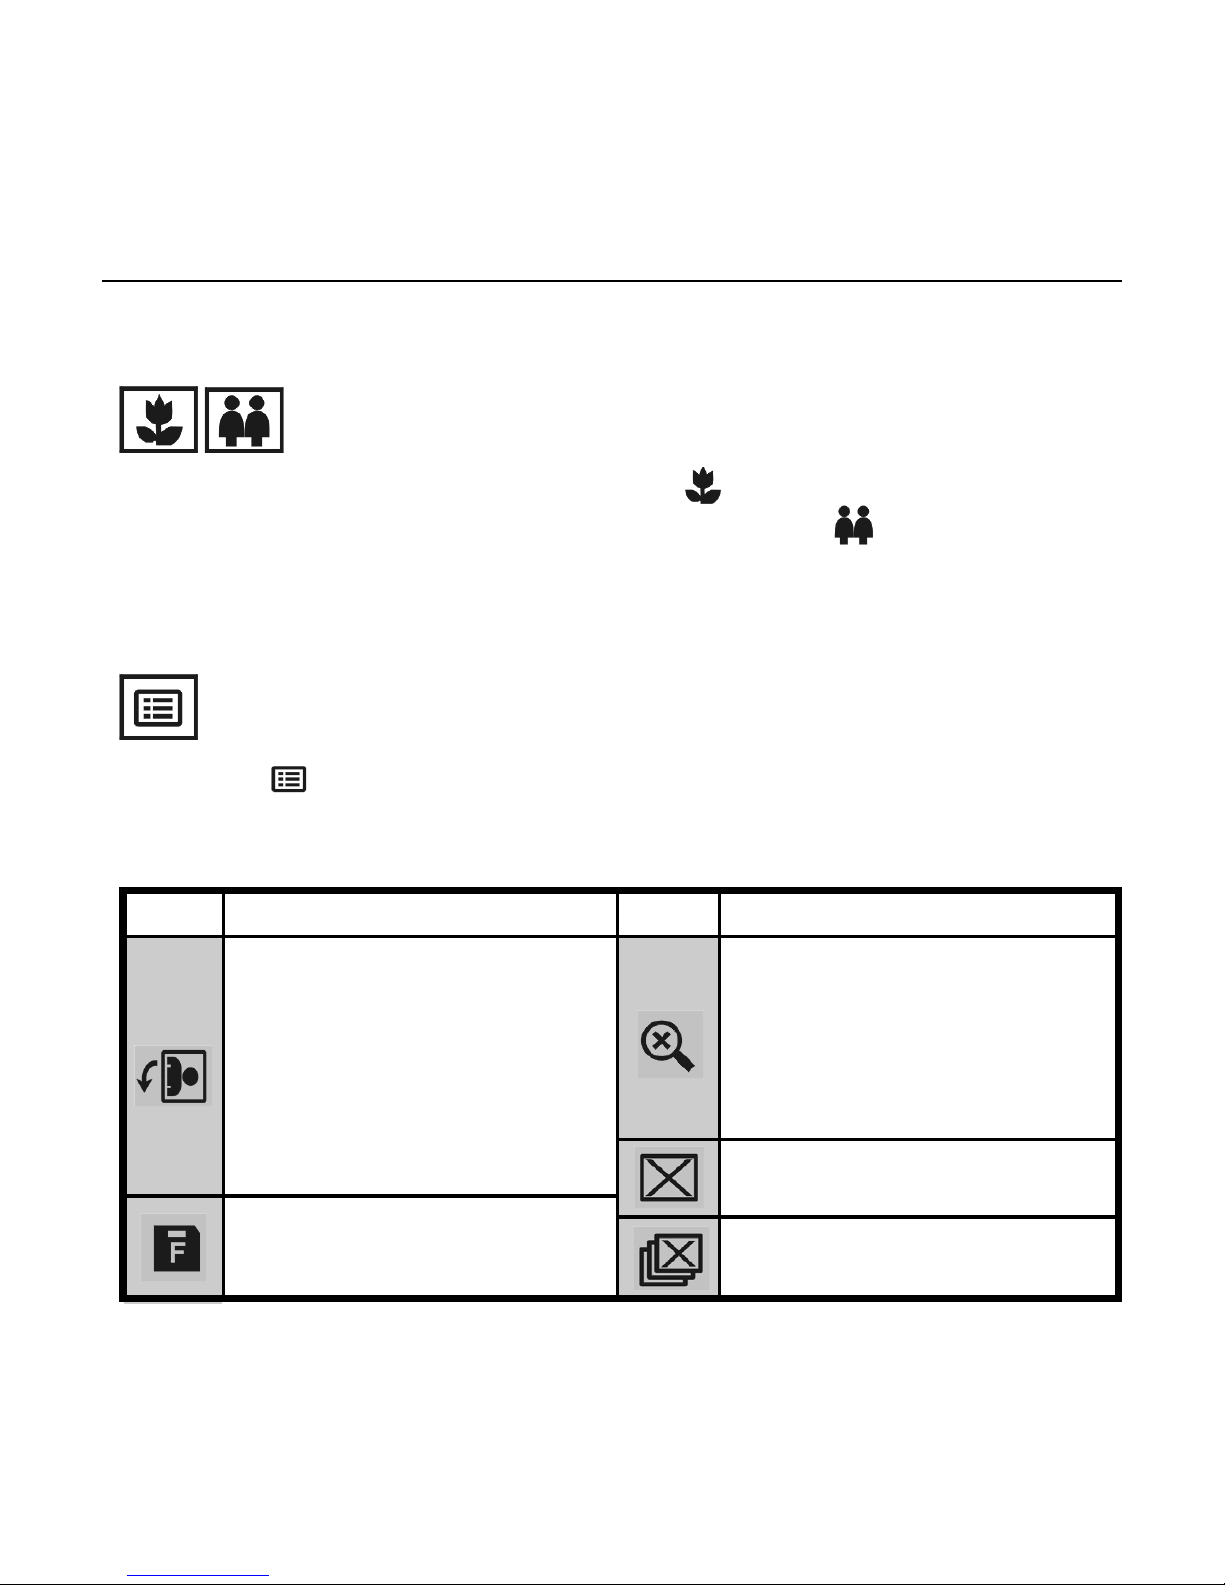
Macro( )/Normal Mode( ) ............................................ 6
Playback Mode( ) ............................................................ 6
Menu( ) .................................................................... 6
Taking Pictures
Taking a Still Picture ........................................................... 7
Taking a Video .................................................................. 7
Recording sound clips ......................................................... 8
Playing Pictures Back
Playing the Pictures ........................................................... 9
Playing the Videos ............................................................. 9
Playing Videos on TV ......................................................... 10
Deleting Pictures ................................................................. 11
Installing Software ............................................................... 12
Transfering Files .................................................................. 13
Connecting to PC ............................................................. 13
Removing the Camera ...................................................14
For MAC Users .................................................................15
Removing the camera from Mac ....................................... 15
Using console .................................................................. 16
Using as a PC camera ............................................................ 17

EN
English | 1
Digital Camera User Guide
Identifying the Parts
1. Shutter button
2. Power button
3. Flash
4. Photo Sensor
5. Lens
6. Microphone
7. Self-timer LED
8. Lens cover
9. Battery & SD/MMC card
cover
10. USB/VIDEO OUT port
11. strap holder
12. Control button
: Menu/Up/Exit
:Zoom/Right
:Flash/Down/
Multi-image
: Resolution/Left
13. LCD display
14. Macro( )/Normal( ) slide
15. Mode button
: Record Mode
: Playback Mode
13
14
15
11
<Up>
<Right>
<Down>
<Left>
12
1
2
8
9
10
3
4
7
5
6

2 | English Digital Camera User Guide
PREPARATION
Loading Batteries
a. Open the battery &
SD/MMC card cover
b.Insert batteries
as shown above
LCD Display Icons
1. Battery Low: the power goes
off in few seconds when it
starts to blink.
2. Image counter
3. Zoom
4. Date Mark
5. Memory card
: The card is locked for
writing.
6. Macro/Normal mode
7. Resolution
8. Flash
9. Self-timer
c.Close the battery &
SD/MMC card cover

EN
English | 3
Digital Camera User Guide
Attaching the Strap
b.Insert the card as
shown above. Push
the card all the
way in until it is
securely locked.
Inserting the SD/MMC Card (not supplied)
a. The small loop goes
through the strap holder.
b. The big loop goes through
the small loop and pull tight
a.Open the battery
& SD/MMC card
cover
c.Close the cover.
To remove the card
Open the cover, then
push in the card to
pop it out.

4 | English Digital Camera User Guide
Camera Settings
Record Mode
Turn on the power. Press the below
buttons to make settings before
taking pictures.
Resolution
Press the button repeatedly
to circle through the settings.
Flash
Press the button repeatedly
to circle through the settings.
<Up>
<Right>
<Down>
<Left>
ON
AUTO
RED-EYE
OFF
High
2048x1536
Standard
1024x768
Video
320x240
AUDIO
Fine
2688x2016
Zoom
Press the button to view
a bigger size of the image. ZOOM 2X ZOOM 3X ZOOM 4X
ZOOM 1X

EN
English | 5
Digital Camera User Guide
Menu
Press the button to enter or exit the LCD menu. Press the
<Left>/<Right> buttons to select the item, and press <Down> /
<Up> to change settings.
Self-timer: OFF ON
Photo Effect: OFFBLUR
NATURE
SEPIA (sepia tone)
B&W (black & white)
Exposure: Auto +1.0
+0.5 -0.5 -1.0
Auto shutdown:
OFF 1.5 min.
Information: ON OFF
Button Beep:
ON OFF
Date Set: 20YY/MM/DD
(year/month/day)
Time Set: HH/MM/SS
(hour/minute/second)
Date Mark: OFF ON
White Balance: AUTO
(Daylight)
(cloudy)
(Fluorescent)
(Tungsten)
Restore Default Set:
NO YES
Items Settings SettingsItems
Banding:
50Hz 60Hz
TV Output:
TV OFF NTSC PAL

6 | English Digital Camera User Guide
Playback Mode
Menu
Press the button to enter or exit the LCD menu. Press the
<Left>/<Right> buttons to select the item, and press <Down> to
change settings.
Delete one: NO YES
Formatting the memory
card: NO YES
Zoom: Press <Left>/
<Right>/<Up>/<Down> to
view another area of an
image. Press Shutter to
exit.
Items Settings Settings
Items
Delete all: NO YES
Record Mode - continued
Macro/Normal mode
Push the Macro/Normal slide toward when taking close-up
pictures at a range of 25 ~ 35 cm. Push toward when taking
from any other distance.
Rotate: YES EXIT
Select “YES” to rotate by
90ºfor each time. The
result can be retrieved
by using Console. (Refer
to page 16)

EN
English | 7
Digital Camera User Guide
Taking Pictures
Taking a Still Picture
1. Slide the lens cover.
2. Turn on the power, and make
sure it is in REC ( ) mode.
3. Position the subject in the LCD
display.
4. Press the Shutter button.
Taking a Video
Repeating step 1 and 2 above.
3. Press the button to select
(VIDEO) icon.
4. Press the Shutter button to start
recording. To stop recording, press
the Shutter again.

8 | English Digital Camera User Guide
Recording Sound Clips
1. Slide the lens cover.
2. Turn on the power, and make
sure it is in REC ( ) mode.
3. Press the button to select
(AUDIO) icon.
4. Press the Shutter button to start
recording. Note: LCD screen will
turn off in few seconds for power-
saving. Press control button to
resume the screen.
5. To stop recording, press the
Shutter again.
Note: Sound clips can only play on a PC,
please refer to page 13.
REC

EN
English | 9
Digital Camera User Guide
Playing Pictures Back
Playing the Pictures
1. Turn on the power.
2. Set the camera to Playback( )mode.
3. Press the <Left>/<Right> buttons to
review your pictures.
4. You can review up to 6 images at a time
by pressing button.
Playing the Videos
Select the picture marked with the icon
and then press the Shutter button to play.
4

10 | English Digital Camera User Guide
Playing videos on TV
1. Connect your camera to a
TV at VIDEO IN (yellow)
port via the video cable.
Note: The sound will not
play on TV.
2. Turn on the TV, and select
“Video” as TV input.
3. Press the button to select
settings.
4. Set NTSC or PAL in the settings as
same as your TV system.
Note: It will take few seconds to test
if the camera matches TV
system correctly.
5. Set the camera to Playback( )mode.
6. Press Shutter button to play.
To stop TV playback
1. Set “TV OFF” in the settings.
2. Press .
12
3
4

EN
English | 11
Digital Camera User Guide
1. Turn on the power.
2. Set the camera to Playback mode.
3. Press the <Left>/<Right> buttons
to select the picture/video you
want to delete.
4. Press the (Menu) button.
5. Select to delete one or select
to delete all.
6. Select YES to delete. Select NO
not to delete and to exit.
Deleting Pictures
5
6

12 | English Digital Camera User Guide
Installing Software
1. Insert installer CD into the CD-ROM
drive.
2. Close the CD-ROM drive.
3. An installer wizard will automatically
launch.
If the installer wizard does not appear,
then;
4. You can click Start in the Windows
Taskbar. Then, select Run to con-
tinue.
5. Click Browse, and select RUN.exe in
your CD-ROM drive.
6. Click Open
7. Click OK
8. Follow the on-screen instructions to
complete driver installation and the
bundled software.
1
4
5

EN
English | 13
Digital Camera User Guide
Transfering Files
Connecting To PC
1. Connect your camera to a
computer via USB cable
2. In the Windows (98SE/Me/2000/
XP), your PC will detect the
camera after connection.
Note: For Windows 98SE users,
please install the Installer CD
first.
Windows XP
Windows Me/2000

14 | English Digital Camera User Guide
3. Click My Computer on the
desktop.
4. A removable disk drive appears.
5. Double click on the removable
disk.
6. Double click on the DCIM folder.
WARNING: Please do not copy any
files into the DCIM folder of your
camera. Otherwise it may cause
the camera unstable or crash.
7. Then, You can drag-and-drop files
to your PC.
Removing the camera
Windows XP
1. Click Safely Remove Hardware
() icon in the taskbar.
2. Select Safely remove USB Mass
Storage Device from the menu.
Windows 98SE/Me/2000
Windows XP

EN
English | 15
Digital Camera User Guide
(A)
For MAC users
(Mac OS: 9.x and 10.1 above)
By connecting your camera to a MAC computer (referring to
“Connecting to PC” on Page 14), it will automatically detect Mass
Storage drive. You can easily manipulate your files the way you do
in MAC user interface.
Removing the camera from Mac
1. Select the camera icon (shown as ‘NO_NAME’or ‘untitled’
drive) on the desktop.
2. Drag and drop the drive to the Trash.
Windows 2000/Me
Windows 98SE
Windows 2000/Me
1. Click Unplug or Eject Hardware
() icon in the taskbar.
2. Select Stop USB Mass Storage Device
from the menu (Windows 2000).
Select Stop USB Disk from the menu
(Windows Me).
Windows 98SE
1. In My computer, Right click on the removable
disk corresponding to the camera.
2. Select Eject from the menu.

16 | English Digital Camera User Guide
Using MAX Console (Not available for MAC)
By connecting your camera to a computer, MAX Console opens.
You may choose either to transfer the camera data through MAX
console or through Mass Storage.
Sharing
Import e-darkroom
Bundle
software
Attribute
Move to
Duplicate to
Rotate
Sort by
Open
Display sound
Display music
Setting
Help
Selected
image
Personal Style
Delete
Display video
Display image
VIP
Search
Table of contents
Other Mustek Digital Camera manuals

Mustek
Mustek MDC 5500Z User manual

Mustek
Mustek MDC 3000 User manual

Mustek
Mustek GSMART-LCD2 User manual

Mustek
Mustek G-SMART G-SMART LCD User manual

Mustek
Mustek MDC 3500 User manual

Mustek
Mustek MDC 4000 User manual

Mustek
Mustek MDC-530Z User manual

Mustek
Mustek G-Smart D35 User manual

Mustek
Mustek DV316L User manual

Mustek
Mustek MDC-800 User manual

Mustek
Mustek G-Smart LCD 3 User manual

Mustek
Mustek GSmart 350 User manual

Mustek
Mustek MDC 6500Z User manual

Mustek
Mustek GSmart mini 2 User manual

Mustek
Mustek GSmart S40 User manual

Mustek
Mustek VDC-300 User manual

Mustek
Mustek GSmart 350 User manual

Mustek
Mustek GSMART-D30 User manual

Mustek
Mustek GSMART-MINI3 User manual

Mustek
Mustek MDC 4000 User manual