MOUNTING THE LATHE ON A BENCH
Remove the rear turning attachment if this is fitted.
Position the lathe on the bench, allowing sufficient bench length for screwing down the swivel arm support bracket (76).
Mark out with pencil or scriber the headstock and ea d support (29) outlines.
Paste paper templates to bench top. Cut bench for belt clearance and drill bolt holes.
Mount the motor pulley on to the motor shaft with the small step innermost. If the belt drive guard is to be fitted, the face of the pulley must be 3/8 to 1/2
clear of the retaining plate for the resilient mounting bush on the motor. If the guard is not to be fitted, the face of the pulley should be only 1/16 to 1/8
clear of the plate.
Place the motorizing unit on the bench top, upside down and with the wing nut at the back and to the right.
Place the motor centrally on the motor base (pulley to the left) and secure with the motor clamping bolts.
A. Position the motorizing unit so that the centre line through the right hand holes in the swing bracket (54) matches the centre line through the right
hand holes in the bench top (the holes are offset and will therefore not match up.).
A. Position the motor on its base so that the distances on either side of the pulley to the edges of the slot cut in the bench top are equal.
A. Finally tighten the bolts to secure the motor to its base.
B. Position- the complete unit on the bench so that the pulley is centralized in both directions with the slot cut in the bench top.. (The swing bracket
should not overlap the limit line shown on the headstock template).
B. Mark round the square side and ends of the swing bracket with pencil or scriber.
B. Paste the swing bracket template to the bench top, to match lines and drill for fixing bolts.
When bolting lathe to bench, check for uneven surface and pack where necessary. Releasing the hexagon head screw (31) for the end foot, whilst
tightening lathe securing bolts and retightening afterwards, will prevent distortion.
N.B. Holes in base of headstock and tailstock end support are tapped 3/8" B.S.W.
When mounting the rear turning attachment, the swivel arm support. bracket (76) should be secured to the bench by means of two No 10 x 1 1/2" wood
screws. (When the machine is mounted on the cabinet stand, two 2 B.A. x 7/8"countersunk head screws are used).
•
LATHES ON CABINET STANDS
When installing lathes mounted on cabinet stands, first release the hexagon head screw (31) which secure the end support. When the stand is in its final
position, with packing under the feet so that it is standing firmly on the floor, check that the tailstock end support is resting truly on the cabinet top. If it is
not, pack as necessary. Finally retighten the hexagon head screw (31).
ALIGNMENT OF HEADSTOCK AND TAILSTOCK
When locking the tailstock anywhere along the bed it should always be pushed away from the operator so that the clamp bolt (45) is firmly-against the
back of the slot in the top of the bed.
If at any time the bed tube should become disturbed, thus upsetting the alignment, the wood prong and cup centres (which for the purpose must be-in
good condition), should be inserted into the headstock and tailstock. The tailstock should be moved towards the headstock till the centres are almost
touching and then clamped to the bed as described above (i.e. pushed away from the operator). The lathe must now be removed from the stand or
bench and turned on its side.
The two socket set screws (25) must now be released and the bed tube rotated in the headstock till the centres in the headstock and tailstock are in line.
Retighten the socket set screws.
Place the lathe back into position on the stand or bench, but before tightening the securing screws, release hexagon head screw (31) which secures the
end support and check that the support is sitting evenly on the stand or bench. Place packing under the foot if necessary. The lathe may now be
fastened in position after which the hexagon head screw (31) must be retightened.
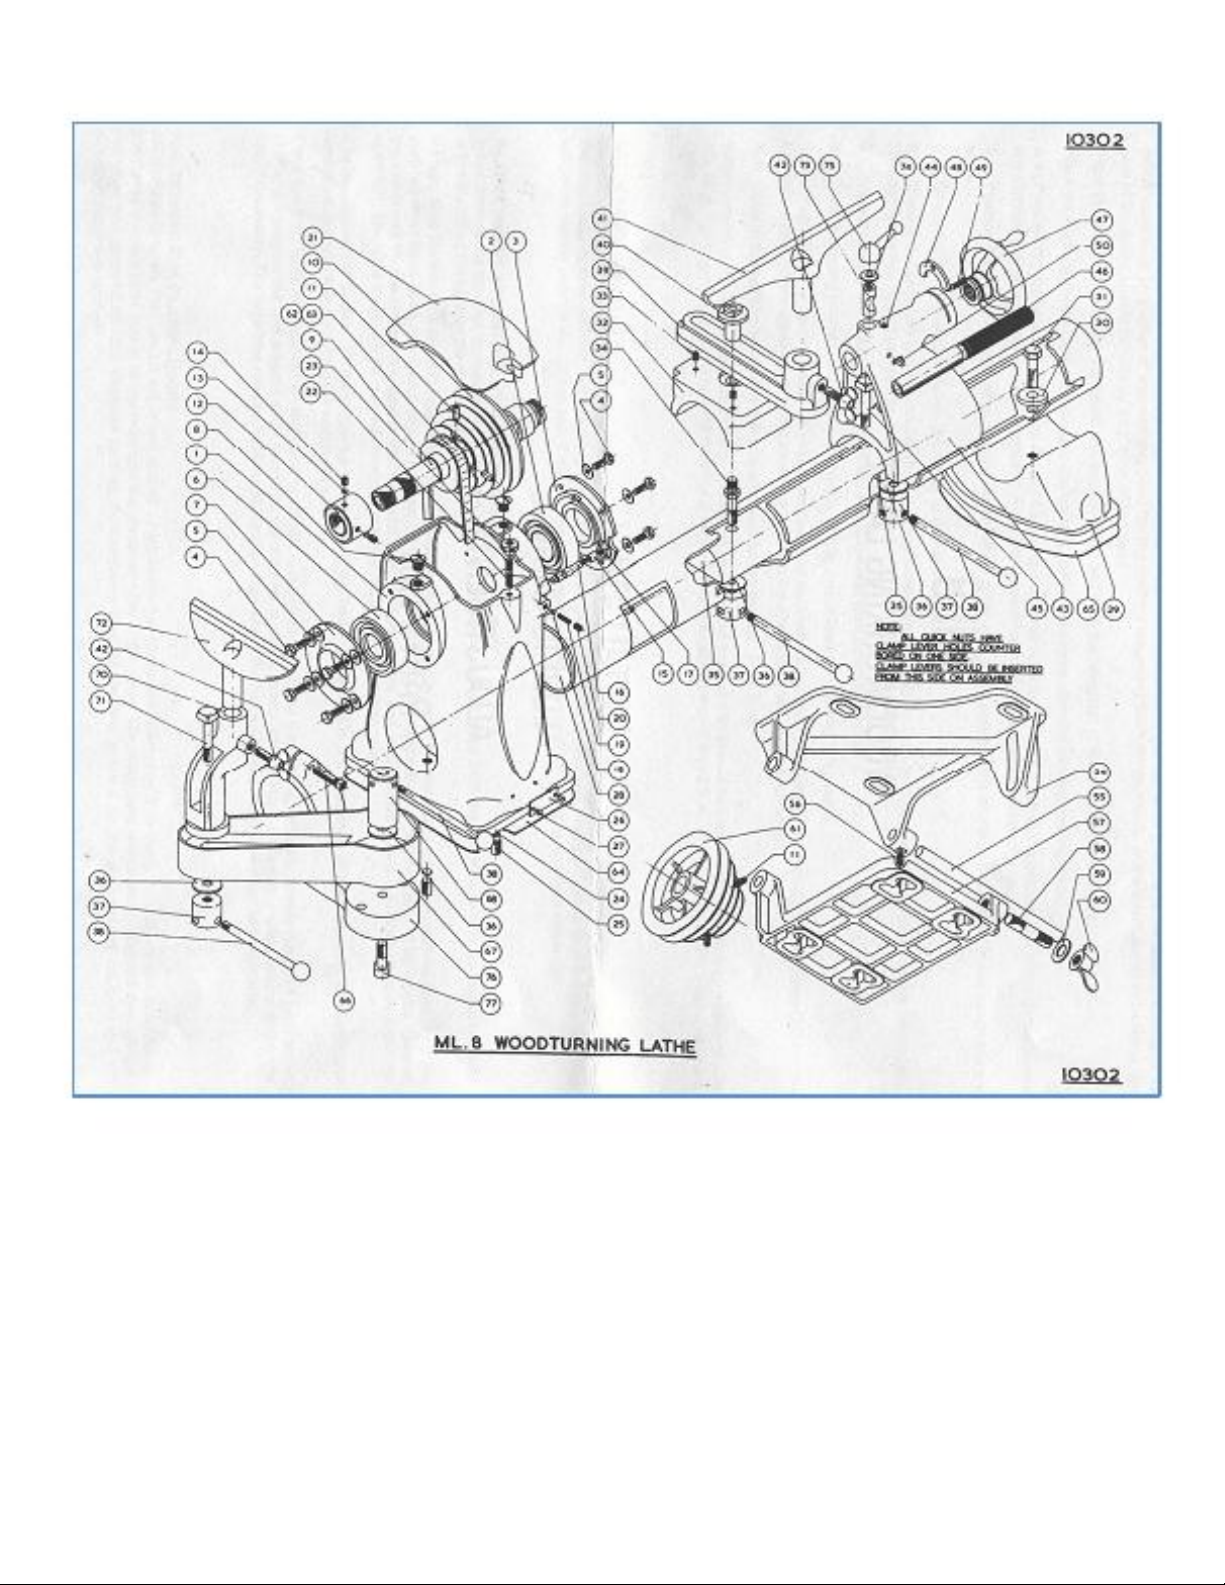
POSITIONING THE CLAMP LEVERS
All four clamp levers (38) can be set in any one of 12 positions for convenient clamping. The quick nuts (37 & 68) must be so positioned that the plain
hole is at the front and the threaded hole at the back. The clamp lever will then be inserted through the plain, hole and screwed into the threaded
portion, thus ensuring that the bending action is on the plain part of the lever and so providing maximum strength.
All four quick nuts (37 & 68) have two sets of holes. The clamp bolt (34) for the -saddle is provided with a hexagon whereas the clamp bolts for the
tailstock (45) and for the rear turning attachment (71 & 77) have square heads.
Normally it will be sufficient to rotate the bolts and the quick nuts which will give 12 positions for the saddle clamp and 8 for the others. However, all the
quick nuts and bolts have three start threads which gives a further range of lever positions for the applications having square head bolts.