Myson EB24 User manual

Installation, Operating, Maintenance
and After Sales Manual.
Part Number: TPLEA0036
Issue 3
heatingthroughinnovation.
Sealed Electric Wall & Floor Mounted Towel Warmers
01.12.2010 ISSUE 3
Tested to UL & CSA Standards
23416 Towel Warmer US:Layout 1 25/11/10 15:18 Page 2

1.0 General Information 03
2.0 Location 03
3.0 Preparation 03
4.0 Fixing 03
5.0 Electrical Connection 05
6.0 Technical Data 06
7.0 Operating Instructions 11
8.0 Maintenance 11
As you follow these instructions, you will notice warning and cautions symbols. The symbols call out
information important for the safe and efficient installation and operation of your towel warmer.
States a hazard: serious injury or death may occur if precautions are not followed.
Signals a situation where minor injury or product damage may occur if instructions
are not followed.
Signals that the towel warmer is hot. If contact occurs it can cause burns.
Highlights information that is especially relevant to a problem free installation.
Contents
!
WARNING
!
CAUTION
!
HOT
!
IMPORTANT
23416 Towel Warmer US:Layout 1 25/11/10 15:18 Page 3

03
Sealed Electric Wall & Floor Mounted Towel Warmers
1.0 General Information
2.0 Location 3.0 Preparation
This is an electrical heating appliance, intended
only for indoor use in homes, hotels and spas.
For your safety please use your towel warmer
with the following precautions:
GDO NOT place the towel warmer unit inside a shower, sauna
or steam room enclosure or any location where the towel
warmer is in direct contact with water.
GThe MYSON towel warmer should not be located on a wall
over a bath tub.
GDo not stand, hang or sit on the towel warmer.
GAccording to the National Electrical Code all electrical work
must be carried out by authorized /licensed professionals.
For your safety, please ensure you adhere to these
regulations.
The towel warmer will be hot. Please exercise
caution if the towel warmer is accessible to children
or the elderly. Please ensure that children are
supervised at all times in the vicinity of the towel
warmer and warn them that it is a hot surface that
can cause burns.
The towel warmer must be located in
accordance with any prevailing codes and
relevant electrical wiring rules and regulations,
in particular regulations that cover the use of
products and accessories in damp situations
such as bathrooms, showers, laundries and
other areas with fixed water containers.
GThe top of this product must be at least 2” below any
overhanging surface.
Before proceeding with installation, carefully unpack the carton
and check against the checklist below:
GTowel Warmer
GInstallation and Operating Instructions
GWarranty Information Sheet
It is the responsibility of the installer to inspect for any damage
when the carton is opened. Shipping damage should be
reported immediately to your place of purchase.
4.0 Fixing
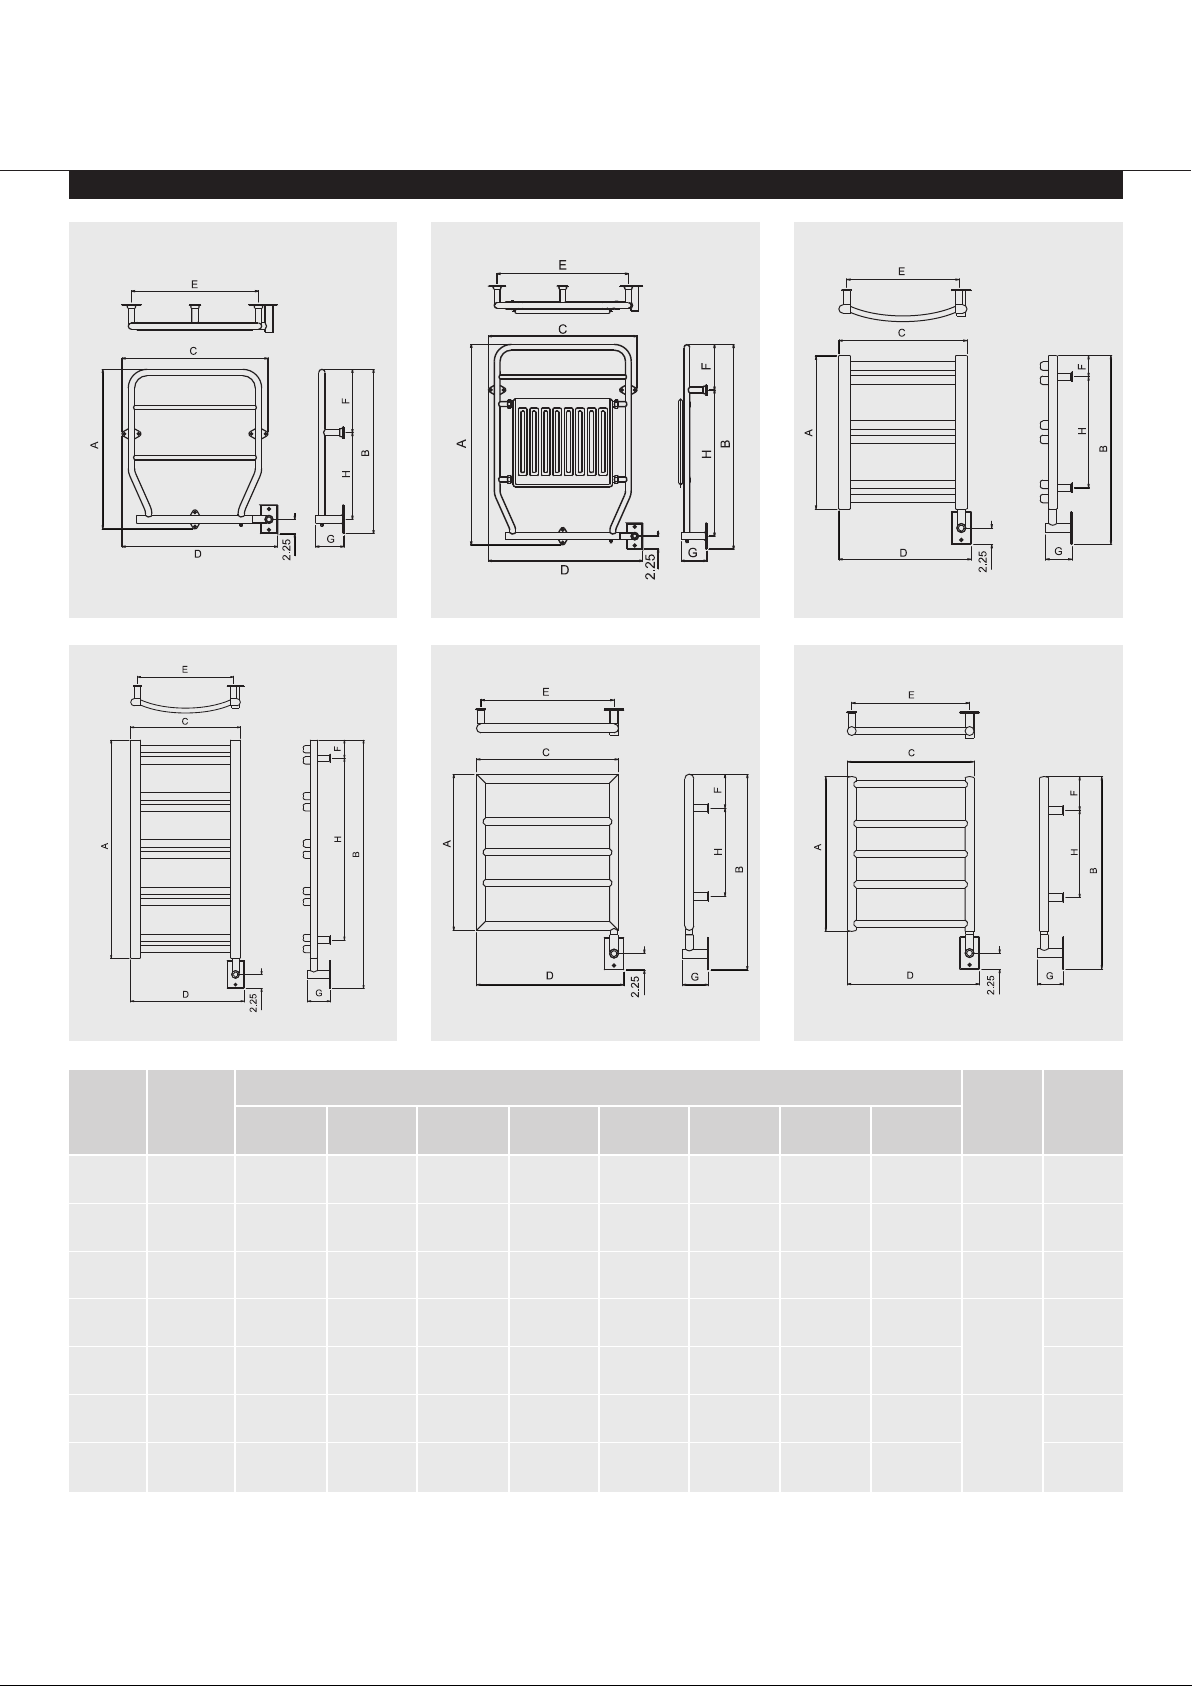
GThis product must be mounted upright and fixed securely with
the electrical connection point in the bottom right hand
corner position as shown in the diagrams in Section 6. No
other position is safe or acceptable.
GThis product must be securely mounted to the wall/floor.
When possible it should be attached to adequate blocking or
framing.
GFor mounting directly to sheetrock, where blocking or
framing is not available, appropriate wall anchors must be
used.
Mounting for: EB24, EB27, EB29, EB30, EB31, EB34, EB35,
EB36, EB49, EVR1, EO100, EO140, EO350 (Flange mounted
products).
GPlace the product in the desired location and mark the
position of the fixing holes.
GDrill holes according to choice of fixing (eg plastic anchors,
wall blocking).
GFix the product firmly to the wall / floor.
GUse all fixing holes to secure the product.
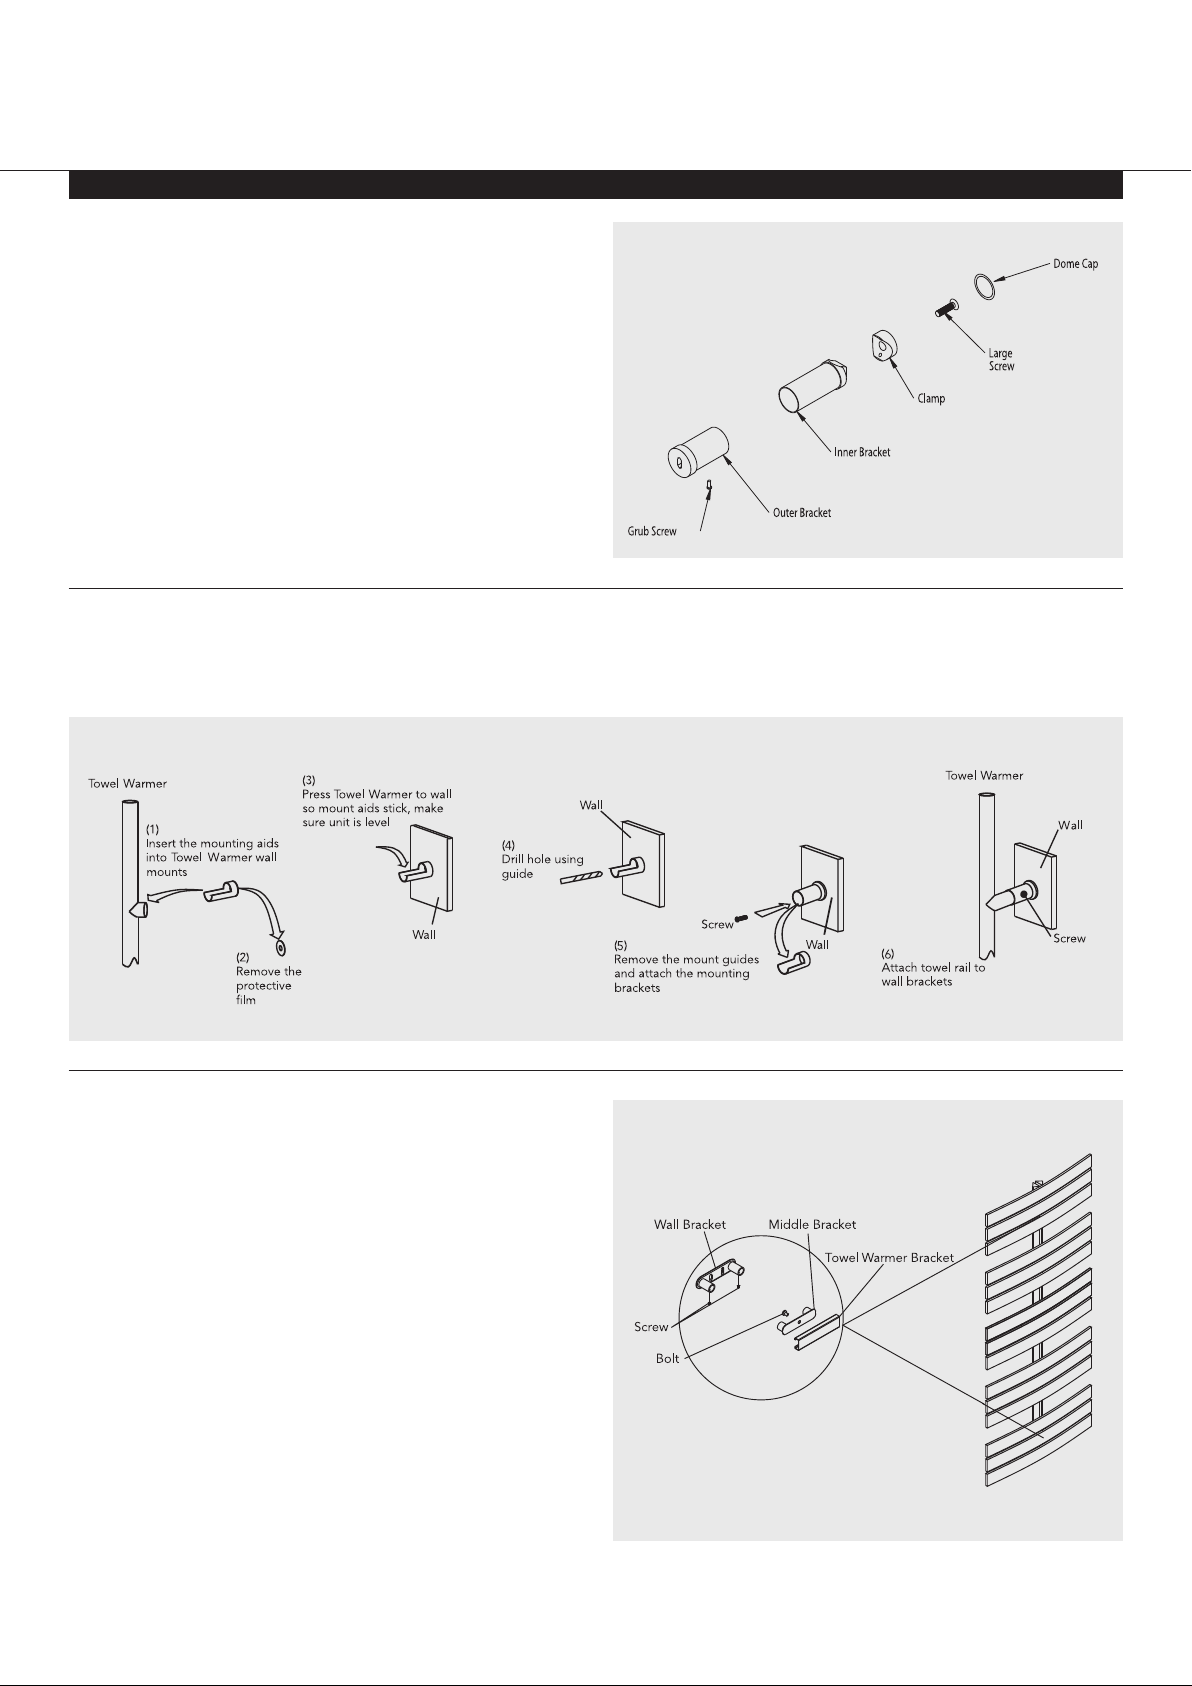
Mounting for ERR, ECM, EMR, ECMH, EINT:
GPlace the product in the desired location and mark the
position of the fixing brackets.
GDrill holes such that the brackets line up with the location of
the fixing lugs.
GLoosen the grub screw and the large screw on the bracket
with the key provided, and remove the central cylinder. Fix
the brackets firmly to the wall.
GScrew the central cylinders firmly into the fixing bosses on the
back of the towel warmer, and then slide smoothly into the
wall brackets. DO NOT FORCE - adjust wall bracket position
to ensure smooth fitting.
GTighten grub screw and large screw.
Note: The EINT model insert studs have hooks that interface with
the welded brackets on the towel warmer
1.02.03.0
4.0
READ THIS INSTRUCTION MANUAL THOROUGHLY BEFORE BEGINNING INSTALLATION.
!
WARNING
!
WARNING
!
HOT
!
IMPORTANT
23416 Towel Warmer US:Layout 1 25/11/10 15:18 Page 4

Mounting for ECOS:
GSecure inner bracket to rail in the positions shown in
Technical Data (Section 6) using clamp and screw.
GPlace the product in the desired location and mark the
position of the inner fixing brackets.
GDrill holes such that the inner brackets line up with the
location of the outer brackets.
GFix inner brackets firmly to wall.
GSlide outer brackets onto inner brackets and lock with grub
screw. DO NOT FORCE - adjust wall bracket position to
ensure smooth fitting if necessary.
4.0 Fixing (cont)
Mounting for EGAV:
Decide on the location for the towel warmer and then follow the
fitting instructions below.
Mounting for ECAV:
GDecide on the location for the towel warmer and mark the
position of the wall brackets.
GDrill holes for the wall bracket and fix securely.
GSlide middle bracket into the towel warmer bracket and lock
in place using the fixing screw.
GSlide towel warmer onto wall bracket. DO NOT FORCE -
adjust wall bracket position to ensure smooth fitting.
GTighten the grub screws.
04 Sealed Electric Wall & Floor Mounted Towel Warmers
23416 Towel Warmer US:Layout 1 25/11/10 15:18 Page 5

05
Sealed Electric Wall & Floor Mounted Towel Warmers
4.0 Fixing (cont)
4.0
Mounting for ES40:
GPlace the product in the desired location and mark the
position of the fixing brackets.
GDrill holes and fix wall bracket securely.
GSlide the towel warmer onto the wall brackets. DO NOT
FORCE - adjust wall bracket position to ensure smooth fitting.
GTighten the locking screw.
5.0 Electrical Connection
Electrical connection of this product must
be carried out by a licensed electrician, in
accordance with LOCAL OR NATIONAL
ELECTRICAL CODES.
If tube is to be rotated, the grub screws must
be completely loosened before turning.
This product may be hot to touch. It is the
responsibility of the installer to ensure this caution
is brought to the attention of all users.
Provision for disconnection from the electrical supply must be
incorporated in the fixed wiring in accordance with the wiring
rules.
To provide continued protection against risk of electric shock,
connect to properly grounded outlets only.
It is recommended this towel warmer is fitted to a GFI breaker.
A dedicated circuit is required.
GPrior to fixing and electrical connection the 120V AC wiring
must be ‘roughed in’ to a standard size outlet box in the wall.
The wire box should be positioned at the lower right corner
of the product. Check the product specifications for the exact
location of the box in the wall.
GAt this point, the mounting hardware should be located and
fixed to the wall.
GRemove the ferrule at the end of the tube. Put the wires
through the wall plate and fix the wall plate to the tube by
tightening the large nut supplied with the kit. Replace the
ferrule on the end of the tube and tighten ensuring that the
strain relief plate is firmly located with the dimples aligned.
GConnect the wires from the product to the wires in the wall
box using appropriate wire nut connectors. Connectors
should be tight so as to prevent arcing or heat build up from
poor connection.
GSlip the product onto its mounting hardware on the wall and
tighten. Align the wall plate with the box and mount with
screws.
GThe switch tube on EB30 can be mounted vertically if desired.
Loosen the two set screws and rotate the tube to the vertical
position. Re-tighten set screws.
GSwitch on the electrical supply. Turn on the product and allow
30+ minutes to warm up.
!
CAUTION
!
HOT
Neutral (Supply)
Ground
bk
w
w
bk
g
Electric
Element
Switch
Line (Supply)
Strain
Relief
Bush
Strain
Relief
Washer
Locking
Nut
Wall
Plate
Switch
Holder
w = White
bk = Black
g = Green
5.0
For the correct installation of radiators it is essential that the fixing of the towel warmer is carried out
in such a way that it is suitable for intended use AND predictable misuse. A number of elements need
to be taken into consideration including the fixing method used to secure the towel warmer to the wall,
the type and condition of the wall itself, and any additional potential forces or weights that may
happen to be applied to the towel warmer, prior to finalising installation.
!
IMPORTANT
!
WARNING
23416 Towel Warmer US:Layout 1 25/11/10 15:18 Page 6

06 Sealed Electric Wall & Floor Mounted Towel Warmers
6.0 Technical Data
Model
Approx
shipping
weight
(lbs)
EB24 100 37 5/827 5/16 30 7/16 24 3 3/814 3/45 1/2N/A 1 1/455
EB27 200 37 5/827 5/16 30 7/16 24 3 3/812 3/16 5 1/2N/A 1 1/460
EB29 200 40 15/16 27 5/16 30 7/16 24 3 3/8N/A 5 1/2N/A 1 1/465
EB30 200 40
3/827 5/16 30 7/16 24 3 3/84 1/211 1/4N/A 1 1/480
EB31 200 27 5/16 27 5/16 30 7/16 24 3 3/8N/A 5 1/2N/A 1 1/455
EB34 100 27 5/16 27 5/16 30 7/16 24 3 3/8N/A 5 1/2N/A 1 1/440
Power*
(Watts)
*Represents draw at steady state. Power could be higher during warm up.
ABCDEFGH
Tube
diameter
(ins)
Dimensions (ins)
Dimension Drawings
EB24 EB27 EB29
G
EB30 EB31 EB34
23416 Towel Warmer US:Layout 1 25/11/10 15:18 Page 7

07
Sealed Electric Wall & Floor Mounted Towel Warmers
6.0
6.0 Technical Data (cont)
Model
Approx
shipping
weight
(lbs)
Power*
(Watts) ABCDEFGH
Tube
diameter
(ins)
Dimensions (ins)
EB35 150 51 5/16 21 1/424 7/16 18 3 3/8N/A 5 1/2N/A 1 1/4150
EB36 280 51 5/16 21 1/424 7/16 18 3 3/8N/A 5 1/2N/A 1 1/4150
EB49 285 73 1/227 5/16 30 7/16 24 3 3/812 3/16 5 1/2N/A 1 1/4150
ES40/1 115 6
3/418 1/422 1/4N/A N/A N/A 12 N/A 1 1/434
ES40/2 200 6 3/424 1/428 3/4N/A N/A N/A 12 N/A 1 1/439
EVR1 385 37 5/826 5/829 3/423 3/83 3/811 7/16 8 1/2N/A 1 1/4150
ERR1 230 PL 30 9/16 34 13/16 19 11/16 20 7/16 18 7/16 33/8424 41
330 PA
ERR2 240 PL 30 9/16 34 13/16 23 5/824 3/822 3/833/8424 47
355 PA
ERR3 300 PL 30 9/16 34 13/16 29 1/230 1/428 1/433/8424 58
435 PA
ERR4 370 PL 47 1/252 1/219 11/16 20 7/16 18 7/16 33/8440
15/16 61
500 PA
1 1/2
vertical
1
horizontal
*Represents draw at steady state. Power could be higher during warm up.
PL = Plated Finishes
PA = Painted Finishes
ES40/1 EVR1 ERR
EB35 EB36 EB49
23416 Towel Warmer US:Layout 1 25/11/10 15:18 Page 8

08 Sealed Electric Wall & Floor Mounted Towel Warmers
6.0 Technical Data (cont)
Model
Approx
shipping
weight
(lbs)
Power*
(Watts) ABCDEFGH
Tube
diameter
(ins)
Dimensions (ins)
EO100 95 PL 25 1/825 7/823 1/424 5/820 10 4 13 11/16 121
110 PA
EO140 135 PL 34 7/835 5/823 1/424 5/820 10 4 23 1 31
185 PA
EO350 190 PL 34 7/835 5/825 9/16 26 15/16 22 7/8715/16 425
7/16 140
300 PA
ECMH3/1 75 PL 21 1/426 1/417 1/417 7/815 1/16 215/16 47/16 15 3/820
100 PA
ECMH3/2 100 PL 35 1/440 1/417 1/417 13/16 15 1/16 215/16 47/16 29 3/828
150 PA
ECMH3/3 75 PL 21 5/827 3/819 11/16 20 7/16 18 7/16 43/4412
3/16 24
100 PA
ECMH3/7 75 PL 21 5/826 1/16 17 1/418 16 4 3/4412
3/16 24
100 PA
*Represents draw at steady state. Power could be higher during warm up.
PL = Plated Finishes
PA = Painted Finishes
EO100/140 EO350 ECMH 3/1
ECMH 3/2 ECMH 3/3 ECMH 3/7
1 1/2
vertical
1
horizontal
1 1/4
vertical
1
horizontal
23416 Towel Warmer US:Layout 1 25/11/10 15:18 Page 9

6.0 Technical Data (cont)
Model
Approx
shipping
weight
(lbs)
Power*
(Watts) ABCDE FGH
Tube
diameter
(ins)
Dimensions (ins)
ECM1 220 PL 28 3/433 5/819 5/16 19 3/16 17 3/16 31/841/222 7/16 41
235 PA
ECM2 230 PL 28 3/433 5/823 1/423 3/421 1/831/841/222 7/16 47
225 PA
ECM3 210 PL 28 3/433 5/829 1/829 5/827 3 1/841/222 7/16 58
320 PA
ECM4 255 PL 47 1/452 3/16 19 5/16 23 3/417 3/16 31/841/240 15/16 61
475 PA
EMR750
190 PL 29 15/16 35 1/219 11/16 23 7/818 7/16 31/8423
5/811/4 &139
225 PA
EECOS85
200 33 15/16 38 7/819 11/16 20 3/16 12 3 11/16 426
9/16 40
EECOS86
200 33 15/16 38 7/823 5/824 1/816 3 11/16 426
9/16 45
EECOS125
300 48 1/853 1/16 19 11/16 20 3/16 12 7 1/44 33 11/16 60
EECOS126
300 PL 48 1/853 1/16 23 5/824 1/816 7 1/44 33 11/16 70
400 PA
11/2
vertical
1
horizontal
tubes
11/2
vertical
D
1
horizontal
oval tubes
09
Sealed Electric Wall & Floor Mounted Towel Warmers
6.0
*Represents draw at steady state. Power could be higher during warm up.
PL = Plated Finishes
PA = Painted Finishes
ECM EMR EECOS
23416 Towel Warmer US:Layout 1 25/11/10 15:19 Page 10

10 Sealed Electric Wall & Floor Mounted Towel Warmers
6.0 Technical Data (cont)
Model
Approx
shipping
weight
(lbs)
Power*
(Watts) ABCDEFGH
Tube
diameter
(ins)
Dimensions (ins)
EGAV1 150 PL 29 13/16 34 13/16 19 11/16 23 1/815 3/43 3/85 13/16 N/A 40
250 PA
EGAV2 200 PL 29 13/16 34 13/16 23 5/823 1/819 1/23 3/86 3/16 N/A 46
300 PA
EGAV3 300 PL 48 1/16 53 19 11/16 41 5/16 15 3/43 3/85 13/16 N/A 52
400 PA
EGAV4 400 PL 48 1/16 53 23 5/841 5/16 19 1/23 3/86 3/16 N/A 58
500 PA
EINT1 250 20 7/825 13/16 19 11/16 20 17 5/83 1/84 1/813 40
EINT2 400 35 5/840 9/16 19 11/16 20 17 5/83 1/84 1/824 7/16 48
EINT3 500 65 3/16 70 1/819 11/16 20 17 5/83 1/84 1/857 1/254
CAV1 250 44 1/249 7/16 25 9/16 35 7/16 24
1/25 3/16 N/A N/A 40
CAV2 500 56 5/16 61 1/425 9/16 47 1/424
1/25 3/16 N/A N/A 60
1 3/16
vertical
7/8
horizontal
tubes
Flat tube
product
Electrical Specification
GThe towel warmer requires 120VAC, 60Hz power supply.
GThe towel warmer is to be protected by a separate 15 amp
circuit breaker or equal.
GIn accordance with our policy of continual improvement, we
reserve the right to amend specifications without prior notice.
*Represents draw at steady state. Power could be higher during warm up.
PL = Plated Finishes
PA = Painted Finishes
EGAV EINT CAV
23416 Towel Warmer US:Layout 1 25/11/10 15:19 Page 11

11
Sealed Electric Wall & Floor Mounted Towel Warmers
7.0 Operating Instructions
GThe unit can be left on constantly if desired, without
detrimental effect.
GThe unit can be switched on or off using the control switch
on the unit or using optional programmable timer.
GThe temperature of the unit may vary during operation.
Fabrics that contain soap, laundry detergent,
liquid fabric softener or bath oil residue may
show what appears to be scorch marks. This is
simply discoloration due to the residue. The
towel warmer does not reach sufficient temperature to scorch
fabric. We are not responsible for fabric discoloration due to
laundry detergent, softener or bath oil. As a precaution we
recommend you place a towel directly onto the rail before
placing items of clothing.
!
IMPORTANT
8.0 Maintenance
Cleaning: The finish of your MYSON towel
warmer can be protected and maintained by an
occasional wiping with a soft, non-abrasive,
damp cloth then lightly polishing with a soft dry
cloth when the towel warmer is cold. Under no circumstances
should abrasive cleaning powders, metal polish or chlorine
based cleaners be used on any part of this product.
This product is filled with a precise quantity of
liquid. Any leakage from the product, and any
repairs that involve opening the product must
be dealt with by the manufacturer or its
representative.
GIf the supply cord is damaged, it must be replaced by the
manufacturer, its service agent, or a similarly qualified person
in order to avoid a hazard.
GThe liquid in this product is not affected by temperatures
below 0°F.
GPlease contact your supplier in the event of any problems or
if repair is needed.
!
IMPORTANT
!
CAUTION
8.0 7.0 6.0
23416 Towel Warmer US:Layout 1 25/11/10 15:19 Page 12

heatingthroughinnovation.
01.12.2010 ISSUE 3
MYSON Inc. 948 Hercules Drive, Suite 5, Colchester, Vermont VT 05446
23416 Towel Warmer US:Layout 1 25/11/10 15:18 Page 1
This manual suits for next models
5
Table of contents
Other Myson Food Warmer manuals
Popular Food Warmer manuals by other brands

Cater Chef
Cater Chef 921.530 Operation instructions

Alto-Shaam
Alto-Shaam 300-TMC Series Operation and care manual

Alico
Alico Proxy70 74EHCT manual

mr. steam
mr. steam Broadway W219 Installation, operation and maintenance manual

Alto-Shaam
Alto-Shaam 500-1D Operation and care manual

Avantco
Avantco W30 user manual

GGM gastro
GGM gastro WHVJ3 user manual

Silvercrest
Silvercrest SFW 100 C4 Operating instructions and safety advice

Maxi-matic
Maxi-matic ELITE PLATINUM EWM-9933 instruction manual

Alto-Shaam
Alto-Shaam Halo Heat 300-HW SERIES Specification sheet

Avantco
Avantco 177W50 user manual

Alto-Shaam
Alto-Shaam PD2SYS-48 Series Specification sheet