N.A. Elettronica HTG-300 User manual

MANUALE D’USO OPERATORS MANUAL
HTG-300
TESTER GRANO GRAIN MOISTURE TESTER

- 2 -
INTRODUZIONE INTRODUCTION
GRAZIE per avere scelto un prodotto della N.A.
Elettronica. LEGGERE ON ATTENZIONE QUESTO
MANUALE per imparare come far funzionare
correttamente ed assistere la vostra macchina.
QUESTO MANUALE DOVREBBE ESSERE ONSIDERATO una
parte permanente della vostra macchina e deve rimanere
con la macchina quando la venderete. S RIVERE I NUMERI
DI INDETIFI AZIONE nella sezione delle note. Il vostro
fornitore ha bisogno di questi numeri se il vostro tester ha
bisogno di riparazioni. La GARANZIA è fornita da N.A.
Elettronica per i clienti che fanno funzionare ed
mantengono la loro apparecchiatura come descritta in
questo manuale. La garanzia è spiegata qui sotto.
THANK YOU for purchasing a product.
READ THIS MANUAL carefully to learn how to operate
and service your machine correctly.
THIS MANUAL SHOULD BE ONSIDERED a permanent
part of your machine and remain with the machine when
you sell it.
WRITE IDENTIFI ATION NUMBERS in the Serial Number
section (page 15). Your dealer needs these numbers if
your tester needs repairs.
WARRANTY is provided or through dealers for customers
who operate and maintain their equipment as described
in this manual. The warranty is explained below.
GARANZIA
Questo prodotto è garantito per essere libero da difetti
in materiali e nell'esecuzione per un (1) anno a partire
dalla data dell'acquisto al minuto. Questa garanzia non
copre la batteria o da danneggiamenti derivati da misure,
negligenza, incidente o installazione o manutenzione
impropria. Questa garanzia non si applica ad alcun
prodotto che è stato riparato esternamente da altra
fabbrica non autorizzata di riparazione alterandone
quindi le funzioni.
La garanzia precedente è esclusiva ed è in vece di tutte
le altre garanzie di commerciabilità, di idoneità per
utilizzo e di qualunque altro tipo, espresse o implicite.
N.A. Elettronica non si assume nè autorizza nessuno ad
assumere per essa alcun l'obbligo o responsabilità in
relazione al relativo prodotto e non sarà responsabile per
danni conseguenti.
WARRANTY
This product is guaranteed to be free from defects in
materials and workmanship for two (2) years from date
of retail purchase in USA or anada and one (1) year
overseas. This warranty does not cover the battery or
damage resulting from misuse, neglect, accident or
improper installation or maintenance. This warranty
does not apply to any product which has been repaired
or altered outside an authorized factory repair facility.
The foregoing warranty is exclusive and in lieu of all
other warranties of merchantability, fitness for purpose
and any other type, whether express or implied.
AgraTronix neither assumes nor authorizes anyone to
assume for it any other obligation or liability in
connection with its product and will not be liable for
consequential damages.
Tutte le informazioni, illustrazioni e specifiche riportate in
questo manuale si basano sulle ultime informazioni
disponibili al momento della pubblicazione. Si riserva il
diritto di apportare modifiche in qualunque momento
senza preavviso.
All information, illustrations and specifications in this
manual are based on the latest information available at
the time of publication. The right is reserved to make
changes at any time without notice.

- 3 -
INDICE CONTENTS
Garanzia del prodotto e Programma di riparazione.........2
Utilizzo
ondizioni di utilizzo .........................................................4
Messaggi operativi ………................................................... 4
Procedura operativa
Preriscaldamento ...........................................................5
Funzionamento normale.................................................6
Per visualizzare la temperatura nella cella .......................7
Per la media dei risultati del test........................................7
Per regolare la calibrazione............................................... 8
Linee guida limite di umidità..............................................9
alibrazione onsiderazioni / Limiti.................................10
Per cancellare la calibrazione...........................................11
Per selezionare una lingua diversa...................................11
Per selezionare una nuova scala o Funzione....................12
Per attivare la retroilluminazione e spegnere il Tester...12
Ser izio
Per sostituire le batterie...................................................13
Per pulire il tester ............................................................13
Problemi e soluzioni........................................................14
Registrazione del numero seriale.....................................15
ustodia ...........................................................................15
Product Warranty and Repair Program ..........................2
Operation
Operating onditions .....................................................4
Operational Messages ….................................................4
Operating Procedure
Preheating ...................................................................5
Normal Operation ........ ...............................................6
To Display Temperature in the ell ................................7
To Average Test Results ..................................................7
To Adjust alibration ...................................................... 8
Moisture Limit Guidelines ...............................................9
alibration onsideration / Limits ................................10
To lear alibration .......................................................11
To Select a Different Language .....................................11
To Select a New Grain Scale or Function .......................12
To Turn on Backlight and Turn Off Tester ......................12
Ser ice
To Replace Batteries ……………........................................13
To lean the Tester .......................................................13
Troubleshooting ...........................................................14
Record the Serial Number .............................................15
arrying ase .................................................................15
All information, illustrations and specifications in this
manual are based on the latest information available at
the time of publication. The right is reserved to make
changes at any time without notice.
All information, illustrations and specifications in this
manual are based on the latest information available at
the time of publication. The right is reserved to make
changes at any time without notice.

- 4 -
FUNZIONAMENTO OPERATION
CONDIZIONI OPERATIVE
La cella di prova ed i grani devono essere liberi da
qualsiasi umidità o condensa in superficie. Umidità sui
grani o nella cella di prova provoca valori di lettura
elevati. Grani molto caldi o freddi assorbono l'umidità
quando si riscalda o si raffredda. Il tappo di pressione del
tester può spremere l'umidità da cereali con alta umidità,
sul fondo della cella di prova. Poiché i grani sono di
forma irregolare e non può sempre raccoglierli allo
stesso modo nella cella di prova, piccole variazioni nelle
letture possono accadere. Per migliorare la precisione,
prendere sempre tre (3) letture successive del campione
totale in fase di test e tenere la media dei risultati.
Svuotare e riempire il tester con grano nuovo da testare
prima di ogni prova. Il tester è più preciso quando grani e
tester sono tra 16˚ e 32˚ . L'unità potrà tuttavia
operare a temperature tra 1˚ e 49˚ . Per ottenere i
migliori risultati, la temperatura dei grani non deve
essere inferiore a 4˚ o superiore a 43˚ . Se la
temperatura del grano è 11˚ in più o in meno della
temperatura dell'unità, preriscaldare il tester come da
istruzioni a pagina 5. E’ meglio evitare condensa sulla
cella o nei grani in prova tenendo il tester e i grani a circa
la stessa temperatura. L'ambiente a cui è esposto un
campione di grani può notevolmente cambiare il suo
contenuto di umidità. Esposti all'aria aperta i grani
possono guadagnare o perdere tra l'1% e il 2% di umidità
nella lettura in pochi minuti. Se un campione si terrà
esposto all’aria anche per un breve periodo di tempo
prima di essere testato, deve essere collocato in un posto
ben chiuso, un contenitore ermetico, ad esempio un
sacchetto di plastica o vaso.
OPERATING ONDITIONS
Test cell and grain MUST be free of any condensation or
surface moisture. Moisture on grain or in test cell will
cause high readings. Very hot or cool grain will pick up
moisture when it warms or cools. The pressure cap of the
tester can squeeze moisture from high moisture grains,
such as corn, into the bottom of the test cell.
Because grains are irregularly shaped and may not
always pack the same way in the test cell, minor
variations in readings may occur. To enhance accuracy,
always take three (3) successive readings of the total
sample being tested and average the results. Empty and
refill the tester with new grain from the sample between
each test.
The tester is most accurate when grain and tester are
between 60˚F (16˚ ) and 90˚F (32˚ ). The unit will,
however, operate at temperatures between 33˚F (1˚ )
and 120˚F (49˚ ). For best results, grain temperature
should not be below 40˚F (4˚ ) or above 110˚F (43˚ ). If
the grain temperature is 20˚F (11˚ ) more or less than
the temperature of the unit, preheat the tester per
instructions on page 5. ondensation on the grain or test
cell is best avoided by having the tester and grain at
about the sample temperature.
The environment to which a grain sample is exposed can
appreciably change its moisture content. Exposed to the
open air, grain can gain or lose 1% to 2% indicated
moisture in only a few minutes. If a sample is to be held
for even a short time before being tested, it should be
placed into a tightly closed, airtight container, such as a
ziplock bag or jar.
MESSAGGI OPERATIVI
Simbolo Definizione
BATTERIA SISTEMA BASSA - batteria deve essere sostituita
Umidità inferiore al LIMITE ---- umidità è inferiore al limite
UMIDITA SOPRA LIMITE ------- umidità è superiore al limite
ERROR (---) ------------------------------------- guasto elettronico
OPERATIONAL MESSAGES
Symbol Definition
SYSTEM BATTERY LOW ---System battery needs replacing
MOISTURE BELOW LIMIT -----------Moisture is below limit
MOISTURE ABOVE LIMIT ------------Moisture is above limit
ERROR (---) -------------------------------------Electronic Failure

- 5 -
FUNZIONAMENTO OPERATION
PROCEDURA OPERATIVA – PRERISCALDO
IMPORTANTE: Se la temperatura del campione in grani è
11˚ più o meno della temperatura dell'unità,
preriscaldare il tester ed eseguire il test come segue:
PROCEDURA DI PRERISCALDAMENTO
1. Rimuovere il tappo (A) e controllare che la cella di
prova (B) per essere sicuri che sia pulita e vuota.
2. Premere il tasto ON-OFF ( ) per accendere il tester. Il
display (D) mostrerà sempre la media di 3 PROVE per
circa 7 secondi, quindi mostrerà ERBA MEDI A (messa in
funzione) o il nome del grano ultima verifica.
3. Quando il tipo di prodotto è stato selezionato con le
frecce di selezione (E) riempire la cella di prova (B)
completamente con il campione da testare.
4. Rimettere il tappo senza stringere. NON STRINGERE.
5. Dopo 30 secondi, svuotare la cella di prova e subito
riempire con grani freschi.
6. Rimettere il tappo (A) e serrare fino a a che
l’Indicatore di pressione a vite (F) è a filo con la parte
superiore del tappo (A). (passare il dito per verificarlo
come illustrato in Figura 1.)
7. Premere immediatamente il pulsante TEST (G). La
parola test sarà visualizzata per circa 10 secondi, mentre
il tester compensa la temperatura. L'umidità anno % e la
temperatura sarà visualizzate per circa 10 secondi.
OPERATING PROCEDURE – PREHEATING
IMPORTANT: If the temperature of the grain sample is
20˚F (11˚ ) more or less than the temperature of the
unit, preheat the tester and test as follows:
PREHEATING PROCEDURE
1. Remove cap (A) and inspect test cell (B) to be sure that
it is clean and empty.
2. Press ON-OFF button ( ) to turn on tester. The display
(D) will show ALWAYS AVERAGE 3 TESTS for
approximately 7 seconds, then will show ALFALFA (initial
operation) or the name of the last grain tested.
3. When the grain to be tested has been selected using
the SELE T arrows (E), fill the test cell (B) even to the top
of the cell with sample to be tested.
4. Replace cap loosely. DO NOT TIGHTEN.
5. After 30 seconds, empty test cell and immediately
refill with fresh grain.
6. Replace cap (A) and tighten until pressure indicator
screw (F) is flush with the top of cap (A). (Use finger flush
test as illustrated in Figure 1.)
7. Immediately press TEST button (G). The words
TESTING will be displayed for about 10 seconds, while
the tester compensates for temperature. The moisture %
and temperature will then be displayed for about 10
seconds.
Figura 1 – Figure 1.
A - Tappo
B – ella di Test
– Tasto ON/OFF
D - Display
E – Frecce di selezione
F – Vite di compressione
corretta raggiunta
G – Pulsante di test
A - ap
B - Test ell
- ON/OFF Button
D - Display
E - Select Arrows
F - Pressure-Indicator Screw
G – Test Button

- 6 -
FUNZIONAMENTO OPERATION
PROCEDURE OPERATIVE – NORMALI OPERAZIONI
1. Rimuovere il tappo (A) ed ispezionare la cella di test
(B) per essere sicuri che sia vuota e pulita.
2. Premere il tasto ON-OFF ( ) per accendere il tester. Il
display (D) mostrerà SEMPRE la media di 3 PROVE per 7
secondi circa, poi mostrerà AFFÈ VERDE (messa in
funzione) o il nome del grano dell’ultima verifica.
3. Quando il grano da testare è stato selezionato usando
le frecce di selezione (E), riempire la cella di prova (B)
fino in cima alla cella con il campione da testare.
4. (Solo per la prova iniziale) Prima di serrare il tappo a
pressione, accendere il tester e lasciare scaldare per 30
secondi prima di tentare la prima prova.
5. Rimettere il tappo (A) e serrare fino a che l’indicatore
di pressione a vite (F) è a filo con la parte superiore del
tappo (A). (Utilizzare il dito per verificare come
illustrato.)
6. Premere immediatamente il pulsante TEST (G). La
parola TESTING sarà visualizzata per circa 10 secondi,
mentre il tester compensa per la temperatura. L'umidità
% e la temperatura saranno visualizzati per circa 10
secondi.
7. Il tester ritornerà a visualizzare il nome dell’ultimo
grano verificato. Svuotare la cella di prova, riempire con
un campione fresco e ripetere il test.
NOTA: Prendere almeno tre letture di grani nuovi dal
campione raccolto e fare la media i risultati.
OPERATING PROCEDURE – NORMAL OPERATION
1. Remove cap (A) and inspect test cell (B) to be sure that
it is clean and empty.
2. Press ON-OFF button ( ) to turn on tester. The display
(D) will show ALWAYS AVERAGE 3 TESTS for
approximately 7 seconds, then will show GREEN OFFEE
(initial operation) or the name of the last grain tested.
3. When the grain to be tested has been selected using
the SELE T arrows (E), fill the test cell (B) even to the top
of the cell with sample to be tested.
4. (For Initial Test Only) Before tightening pressure cap,
turn on tester and allow to warm up for 30 seconds
before attempting first test.
5. Replace cap (A) and tighten until pressure indicator
screw (F) is flush with the top of cap (A). (Use Finger
Flush test as illustrated.)
6. Immediately press TEST button (G). The words
TESTING will be displayed for about 10 seconds, while
the tester compensates for temperature. The moisture %
and temperature will then be displayed for about 10
seconds.
7. The tester will then return to displaying the name of
the last grain tested. Empty the test cell and refill with a
fresh sample and test again.
NOTE: Take at least three readings of new grain from the
sample collected and average the results.

- 7 -
FUNZIONAMENTO OPERATION
PER VISUALIZZARE LA TEMPERATURA NELLA
CELLA
Per visualizzare la temperatura nella cella,
premere la freccia di selezione SU o GIU’ (A)
per indicizzare in avanti o indietro attraverso il
menu dei grani (funzione) finché viene
visualizzata la parola TEMPERATURA.
Quando la temperatura è visualizzata,
premere il pulsante TEST (B). La temperatura
attuale nella cella verrà visualizzata sia in °F
che ° . Sarà visualizzata per alcuni secondi,
poi ritornerà al menu principale dei grani.
NOTA: Se il tester ed i grani sono a diverse temperature, la
massa in metallo del tester riscalder o raffredder
rapidamente i grani. Pertanto, la lettura della temperatura
sar la temperatura della cella e non necessariamente la
temperatura del grano prima di essere messo in cella.
MEDIA DEI RISULTATI DEI TEST
1. Durante il test dei grani, il risultato del test
viene visualizzato per circa dieci secondi.
Durante il periodo in cui la % di umidità di prova
e la temperatura sono visualizzati, premere il
tasto MEMORY (A). Il tester riconoscerà di aver
concluso la lettura in memoria, visualizzando
l’attuale media e quindi il numero di letture
memorizzate.
Possono essere memorizzate fino a 20 letture. Se il numero
massimo di letture è stato raggiunto, il tester non consentirà
più memorizzazioni.
NOTA: il calcolo della media viene conservato per un solo tipo
di grani. Quando un test per un nuovo tipo di grani viene
eseguita, le medie dei dati esistenti per il tipo di grani
precedente viene cancellata appena la nuova media è presa. I
dati di calcolo della media vengono mantenuti anche se le
batterie vengono rimosse.
2. Premere il pulsante AVG (B) per visualizzare la
media di tutti i risultati immessi per i grani in
prova.
3. Per cancellare il calcolo della media, premere
il pulsante AVG. La media attuale sarà
visualizzata. Quindi premere il tasto LEAR ( ) e
il tester visualizzerà quindi 0,0% (0). Questo
indica che la media è stata cancellata.
TO DISPLAY TEMPERATURE IN THE CELL
To display the temperature in the cell,
press either the up or down arrow on the
SELE T button (A) to index forward or
backward through the grain (function)
menu until the word TEMPERATURE is
displayed.
When TEMPERATURE is displayed, press
TEST button (B). The current temperature
in cell will be displayed in both F˚ and ˚.
Temperature will be displayed for a few
seconds then will return to the main grain
menu.
NOTE: If the tester and grain are different temperatures,
the mass of the metal tester will quickly warm or cool the
grain. Therefore, the temperature reading is the cell
temperature, not necessarily the temperature of the
grain before being put in the cell.
TO AVERAGE TEST RESULTS
1. When testing grain, the test result is
displayed for about ten seconds. During the
period that the test moisture % and
temperature is displayed, press the
MEMORY button (A). The tester will
acknowledge that it has entered the reading
into memory, by displaying the current
average and then the number of stored
readings.
Up to 20 readings can be stored into memory.
If the maximum number of readings has been reached,
the tester will not allow any more readings to be stored.
NOTE: Averaging is stored for one grain only. When a
test for a new grain is performed, existing averaging
data for the previous grain is erased when the new
grain’s averaging data is taken. Averaging data is
retained even if batteries are removed.
2. Press the AVG button (B) to display the
average of all results entered for the grain
being tested.
3. To clear the averaging, press the AVG
button. The current average will be displayed.
Then press the LEAR button ( ) and the
tester will then display 0.0% (0). This indicates
that the averaging has been cleared.

- 8 -
FUNZIONAMENTO OPERATION
PER REGOLARE LA CALIBRAZIONE
IMPORTANTE: ottenere sempre tre (3)
risultati di test del campione da
misurare. Fare la media di questi tre (3)
risultati. Confrontare questa media con
la media di tre (3) pro e da 3 risultati
ciascuna dal tester.
1. Ogni scala di grano può essere adattata
individualmente fino al 5,0% con incrementi
di 0,1% per ottenere risultati più vicini ad un
tester di precisione (ad esempio una bilancia
termica).
2. Per prima cosa selezionare il grano da
regolare.
3. Testare il grano selezionato, utilizzando il campione di
esempio a cui si desidera calibrare. Una volta che
l'umidità valida, appare premere il tasto AL (A). NOTA:
la calibrazione di un tipo di grani dato non può essere
eseguita a meno che un valido di test umidità (con uno
strumento campione tipo bilancia termica) non sia stato
eseguito.
4. Una volta premuto il pulsante AL (A) il tester
visualizzerà la lettura di umidità ottenuta ed il corrente
offset di scarto applicato a tale intervallo di umidità.
5. Premere il tasto freccia SU (B) per aumentare la
quantità di regolazione o premere il tasto freccia GIÙ ( )
per abbassare. Il tester aggiungerà o sottrarrà fino al
5,0% con incrementi di 0,1% alla gamma di umidità
corrente.
6. Dopo il grado di aggiustamento è stato selezionato,
premere il tasto AL (A) per tornare alla modalità test.
NOTA: la regolazione non può essere fatta per la
calibrazione di fabbrica se il tester mostra letture di
umidit "sotto il limite" o " SOPRA IL LIMITE" del campo
di lettura.
IMPORTANTE: Questo tester incorpora un Multi-Point
di taratura per ogni grano. Pertanto, una olta preso un
test alido e una olta fatta una calibrazione,
l’aggiustamento a rà effetto solo per la gamma di
umidità del campione testato.
TO ADJUST CALIBRATION
IMPORTANT: Always obtain three (3)
test results from the grain ele ator for
the sample being compared. A erage
these three (3) results. Compare this
a erage with the a erage of three (3)
tests by the moisture tester.
1. Each grain scale can be individually
adjusted up to 5.0% by increments of
0.1% to more closely match the results
of an elevator tester.
2. First select the grain to be adjusted.
3. Test the grain selected, using the sample you wish to
adjust to. Once valid moisture appears, press the AL
button (A). NOTE: alibration of given grain cannot be
performed unless a valid mois- ture test has been
performed.
4. Once AL button (A) is pressed, tester will now display
the obtained moisture reading and the current offset
applied to that moisture range.
5. Press the UP arrow (B) to raise the adjustment amount
or press the DOWN arrow ( ) to lower. The tester will
add or subtract up to 5.0% by increments of 0.1% to the
current moisture range.
6. After the adjustment amount has been selected, press
the AL button (A) to return to grain tester mode.
NOTE: Adjustment can NOT be made to factory
calibration to produce moisture readings in a tester that
shows “BELOW LIMIT” or “ABOVE LIMIT” readings.
IMPORTANT: This tester incorporates Multi Point
Calibration for each grain. Therefore, once a alid test is
taken and an adjustment is made, the adjustment will
only affect the moisture range of the sample tested.

- 9 -
FUNZIONAMENTO OPERATION
DISPLAY READING MOISTURE LIMIT GUIDELINES
(Specifications and design subject to change without notice)
DISPLAY READING MOISTURE LIMIT GUIDELINES
(Specifications and design subject to change without notice)
Moisure Range
Grains Low Limit High Limit
ERBA MEDI A
ORZO
BARBABIETOLA
GRANO SARA ENO
SEMI ANARINI
PORPORA DI TRIFOGLIO
BIAN O DI TRIFOGLIO
MAIS:ALTA UMIDITÀ
MAIS:BASSA UMIDITÀ
DA TYL
FESTU A
LINO(SEME)
LENTI HIE
MIGLIO
SENAPE
FAGIOLI DI MARINA
AVENE
ARA HIDI:SPAGNOLO
PISELLI :FORAGGIO
PISELLI :VERDE
PISELLI :GIALLO
FLEO
GRANOTUR O SOFF.:BIAN O
GRANOTUR O SOFF:GIALLO
BRASSI A( OLZA)
RISO:LUNGO
RISO:MEDIO
SEGALE
ERBA DI SEGALE
ARTAMO
SORGO (MA INATO)
SOIA
GIRASOLE
GIRASOLE:STRIS IA
IBRIDO SEGALE GRANO
GRANO:DURO
GRANO:HRD RD SPR
(PRIMAVERA ROSSA DURA)
GRANO:HRD RD WTR
(INVERNO ROSSO DURO)
GRANO:SFT RD WTR
(INVERNO ROSSO MORB)
GRANO: BIAN O
LUPINI: GIALLO
6.0%
7.0%
8.0%
6.0%
8.0%
6.0%
6.0%
15.0%
6.0%
7.0%
6.0%
5.0%
7.0%
6.0%
5.0%
8.0%
6.0%
6.0%
7.0%
7.0%
7.0%
6.0%
6.0%
6.0%
7.0%
8.0%
8.0%
7.0%
9.0%
6.0%
9.0%
8.0%
4.0%
6.0%
7.0%
8.0%
8.0%
7.0%
8.0%
7.0%
8.0%
24.0%
25.0%
20.0%
23.0%
23.0%
20.0%
20.0%
40.0%
22.0%
22.0%
22.0%
17.0%
18.0%
21.0%
21.0%
20.0%
23.0%
15.0%
20.0%
21.0%
21.0%
22.05
24.0%
24.0%
15.0%
22.0%
22.0%
26.0%
20.0%
28.0%
21.0%
25.0%
20.0%
22.0%
23.0%
20.0%
20.0%
21.0%
22.0%
22.0%
35.0%
Moisure Range
Grains Low Limit High Limit
ALFALFA
BARLEY
BEET
BU KWHEAT
ANARY
LOVER:PURPLE
LOVER:WHITE
ORN:HIGH MOISTURE
ORN:LOW MOISTURE
DA TYL
FES UE
FLAX(LINSEED)
LENTILS
MILLET
MUSTARD
NAVY BEANS
OATS
PEANUTS:SPANISH
PEAS:FODDER
PEAS:GREEN
PEAS:YELLOW
PHLEUM
POP ORN:WHITE
POP ORN:YELLOW
RAPESEED ( ANOLA)
RI E:LONG
RI E:MEDIUM
RYE
RYE GRASS
SAFFLOWER
SORGHUM (MILO)
SOYBEANS
SUNFLOWER
SUNFLOWER:STRIPE
TRITI ALE
WHEAT:DURUM
WHEAT:HRD RD SPR
(HARD RED SPRING)
WHEAT:HRD RD WTR
(HARD RED WINTER)
WHEAT:SFT RD WTR
(SOFT RED WINTER)
WHEAT: WHITE
LUPINS: YELLOW
6.0%
7.0%
8.0%
6.0%
8.0%
6.0%
6.0%
15.0%
6.0%
7.0%
6.0%
5.0%
7.0%
6.0%
5.0%
8.0%
6.0%
6.0%
7.0%
7.0%
7.0%
6.0%
6.0%
6.0%
7.0%
8.0%
8.0%
7.0%
9.0%
6.0%
9.0%
8.0%
4.0%
6.0%
7.0%
8.0%
8.0%
7.0%
8.0%
7.0%
8.0%
24.0%
25.0%
20.0%
23.0%
23.0%
20.0%
20.0%
40.0%
22.0%
22.0%
22.0%
17.0%
18.0%
21.0%
21.0%
20.0%
23.0%
15.0%
20.0%
21.0%
21.0%
22.05
24.0%
24.0%
15.0%
22.0%
22.0%
26.0%
20.0%
28.0%
21.0%
25.0%
20.0%
22.0%
23.0%
20.0%
20.0%
21.0%
22.0%
22.0%
35.0%
NOTA: Se la temperatura dei grani è 40˚F (4˚C) al di sotto, o
110˚F (43°C) superiore, e l'umidit della granella è vicino al
limite inferiore o superiore del tester (vedi sopra), il tester è
programmato a chiudere la sua gamma di limiti operativi.
NOTE: If grain temperature is 40˚F (4˚C) or below, or 110
˚F
(43
˚C) or above, and the grain moisture is near either the
high or the low limit of the unit (l
isted above), the tester is
programmed to close down its range of operating limits.

- 10 -
FUNZIONAMENTO OPERATION
CONSIDERAZIONI DI CALIBRAZIONE / LIMITI
In genere il tester di umidità sarà coerente
con la maggior parte dei tester campione su
una vasta gamma di livelli di umidità.
Tuttavia, ci sono alcune cose da considerare
quando si pensa alla taratura di un tester
umidità.
NOTA: Il grafico fornito è solo a scopo
illustrativo e non riflette i dati di test effettivi.
Differenze Tester: il tester di umidità
potrebbe non corrispondere nei risultati ad un tester
campione. Nessun tester corrisponde mai esattamente
nell'umidità effettiva ponderata di ogni grano misurato.
Non esiste uno standard nazionale per i tester campione. La
differenza tra i tester di umidità e altri tester certificati non
è un valore costante. Una rettifica ad un livello di umidità
non può essere valida per un’altro livello di umidità diverso.
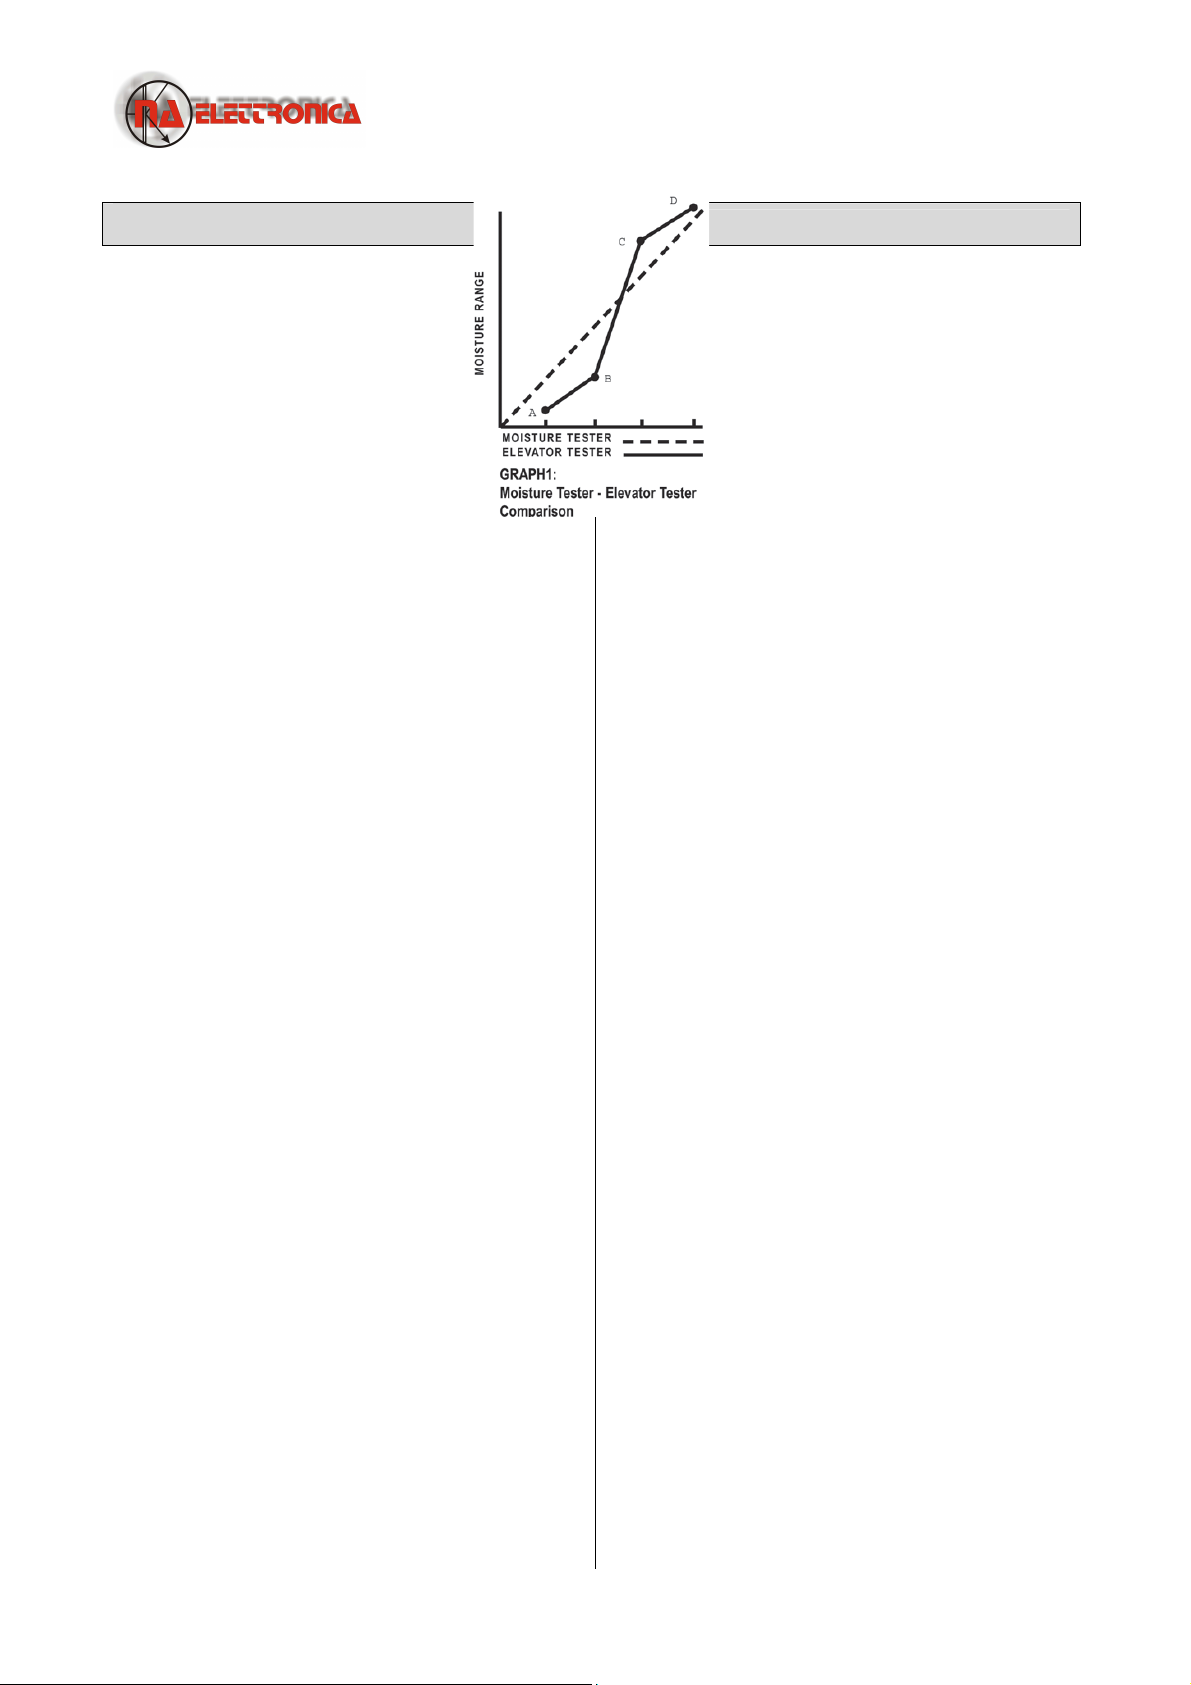
Il grafico 1 mostra come il tester di umidità potrebbe
confrontarsi con un tester campione su un'ampia gamma di
livelli di umidità. Il tester e la maggior parte dei tester
campione (indicato nel grafico con linea continua) saranno
molto vicini a quelli del tester di umidità (indicato dalla
linea tratteggiata) nell’intervallo, come illustrato. Tuttavia,
come noi ci allontaniamo da range medio nei livelli di
umidità alti e bassi, la differenza tra i tester campione e ed
altri tester di umidità non solo diventa migliore, ma può
passare da letture migliori di un tester campione a letture
peggiori di un tester campione. Per esempio, nel grafico 1,
la zona tra B e rappresenta un valore intermedio di
umidità. Le letture del tester corrispondono alle letture del
tester campione in quest’area con una precisione di più o
meno 0,5 per cento. L'area tra A e B rappresenta la range
basso di umidità. Le letture di umidità del tester
differiscono di più dalle letture del tester campione e sono
inferiori alle letture del tester campione. L'area tra e D
rappresenta il range alto di umidità. . Le letture di umidità
del tester differiscono ancora di più dalle letture del tester
campione e sono inferiori alle letture del tester campione di
quanto non fosse nel range medio di umidità, ma ora le
letture sono superiori letture tester campione.
Requisiti di calibrazione: Il grafico 1 mostra che le letture
del tester di umidità si attengono scrupolosamente alle
letture del tester campione per la fascia media di umidità.
(Il grafico è solo a scopo illustrativo e non riflette i dati di
prova effettive.) Le variazioni di calibrazione richieste per i
grani in questo intervallo di umidità saranno piccole.
Tuttavia, se i grani sono molto secchi (range di umidità
bassa) o molto umidi (range di umidità alto), potrebbe
essere necessario calibrare il tester con il tester campione
utilizzando un campione di grani in entrambi i tester.
Registrare la correzione di calibrazione è necessario. Sarà
valido per tutte le prove in quella fascia di umidità per quel
tipo di grani.
CALIBRATION CONSIDERATION / LIMITS
Typically the moisture tester will be
consistent with most elevator testers over
a broad range of moisture levels. However,
there are some things to consider when
thinking about your moisture tester
calibration.
NOTE: Graph provided is for illustration
purposes only and does not reflect actual
test data.
Tester Differences: Your moisture tester unit, may not
match a given elevator tester. None of the testers exactly
match the actual weighted moisture of any given grain.
There is no national standard for elevator testers. The
difference between moisture testers and various U.S.D.A.
approved elevator testers is not a constant value. A
correction at one moisture level may not be valid for a
different moisture level. Graph 1 shows how the moisture
tester might compare to an elevator tester over a broad
range of moisture levels. The moisture tester, and most
elevator testers (shown in graph by solid line) will closely
match those of the moisture tester (shown by dashed
line) for that range, as illustrated. However, as we get
away from midrange into the high and low moisture
levels, differences between elevator tester and moisture
tester not only become greater, but may switch from a
moisture tester reading higher than elevator tester to a
reading lower than the elevator tester. For example, in
Graph 1, the area between B and represents the
midrange moisture. Moisture tester readings match
elevator tester readings in this area with an accuracy of
plus or minus 0.5 percent. The area between A and B
represents the low moisture range. Moisture tester
readings differ more from elevator tester readings, and
are LOWER than elevator tester readings. The area
between and D represents the high moisture range.
Moisture tester readings again differ more from elevator
tester readings than they did at midrange moistures, but
now the readings are HIGHER than elevator tester
readings.
Calibration Requirements: Graph 1 illustrates that
moisture tester readings closely match elevator tester
readings for midrange moisture levels. (Graph is for
illustration purposes only and does not reflect actual test
data.) alibration changes required for grain in this
moisture range will be small, if any. However, if grain is
very dry (Low Moisture Range) or very wet (High Moisture
Range), it may be necessary to calibrate your moisture
tester unit against the elevator tester using a sample of
your grain in both testers. Record the calibration
correction required. It will be valid for all testing in that
moisture range for that grain.

- 11 -
FUNZIONAMENTO OPERATION
PER CANCELLARE LA CALIBRAZIONE
1. Selezionare grano per cancellare.
2. Premere il pulsante AL (A) il tester
visualizza quindi l’ultima calibrazione che è
stata fatta.
3. Premere il tasto LEAR (B).
4. Il tester visualizza quindi 0,0% per
entrambe le linee se la taratura è stata
cancellata.
NOTA: Se si preme il pulsante CAL ed il
tester visualizza 0,0% su entrambe le linee,
allora nessuna calibrazione è stata fatta per
questo tipo di grani.
TO CLEAR CALIBRATION
1. Select grain to clear.
2. Press AL button (A), tester will then
display last calibration that was made.
3. Press LEAR button (B).
4. Tester will then display 0.0% for both
lines if the calibration has been cleared.
NOTE: If you press the CAL button and
tester displays 0.0% on both lines, then
no calibration has been made for this
grain
PER SELEZIONARE UNA LINGUA
DIVERSA
1. All'avvio, il tester visualizzerà sempre
il nome dell’ultimo tipo di grano testato
nella lingua selezionata. (L'inglese è la
lingua predefinita dalla fabbrica.)
2. Per selezionare una nuova lingua,
premere la freccia su o giù sul pulsante
SELE T (A) per indicizzare in avanti o
indietro attraverso i grani del menu
fino a quando la parola LINGUA viene
visualizzata.
3. Quando LINGUA è visualizzata, premere il pulsante TEST
(B). La lingua selezionata viene visualizzata. Premere la
freccia verso l'alto o verso il basso (A) per indicizzare in
avanti o all'indietro nel menu lingua fino a quando la
scelta la lingua desiderata viene visualizzata. Le sette (7)
lingue (come mostrato) sono: INGLESE, SPAGNOLO,
TEDES O, FRAN ESE, ITALIANO, svedese e portoghese.
4. Premere il pulsante di TEST (B) per tornare al menu
principale dei grani,
TO SELECT A DIFFERENT LANGUAGE
1. At start up, the tester will always
display the name of the last grain tested
in the current language selected.
(English is the default language from the
factory.)
2. To select a new language, press either
the up or down arrow on the SELE T
button (A) to index forward or backward
through the grain (function) menu until
the word LANGUAGE is displayed.
3. When LANGUAGE is displayed, press TEST button (B).
The current language selected will be displayed. Press
either the up or down arrow on the SELE T button (A) to
index forward or backward through the grain language
menu until your choice of language is displayed. The
seven (7) languages (as displayed) are: ENGLISH, SPANISH,
GERMAN, FREN H, ITALIAN, SWEDISH and PORTUGUESE.
4. Press TEST button (B) again to return to the main grain
menu, which will now be displayed in the new language

- 12 -
FUNZIONAMENTO OPERATION
TO SELECT A NEW GRAIN SCALE (OR
FUNCTION)
1. At start up, the tester will display
ALWAYS AVERAGE 3 TESTS for
approximately 7 seconds, then will
display the name of the last grain tested,
such as GREEN OFFEE.
2. To select a new grain scale, press either
the up or down arrow on the SELE T
button (A) to index forward or backward
through the grain (function) menu. The
grains are listed in alphabetical order
followed by other tester functions.
NOTE: To use other functions included with the tester,
push SELECT button (A) up or down to get desired
function. Push TEST button (B) to perform that function.
TO SELECT A NEW GRAIN SCALE (OR
FUNCTION)
1. At start up, the tester will display
ALWAYS AVERAGE 3 TESTS for
approximately 7 seconds, then will
display the name of the last grain tested,
such as GREEN OFFEE.
2. To select a new grain scale, press
either the up or down arrow on the
SELE T button (A) to index forward or
backward through the grain (function)
menu. The grains are listed in
alphabetical order followed by other
tester functions.
NOTE: To use other functions included with the tester,
push SELECT button (A) up or down to get desired
function. Push TEST button (B) to perform that function.
PER ACCENDERE RETROILLUMINAZIONE
E SPEGNERE TESTER
1. Premere il tasto LIGHT (A).
2. Premere di nuovo per disattivare la
retroilluminazione. NOTA: La funzione di
retroilluminazione è progettata per
migliorare la visibilità del display in
condizioni di scarsa illuminazione. In
condizioni di luce intensa, la
retroilluminazione non può essere vista.
3. Per disattivare tester, premere il tasto
ON-OFF (B). Il tester si spegne
automaticamente dopo 2 minuti che
nessun pulsante è premuto.
TO TURN ON BACKLIGHT AND TURN OFF
TESTER
1. Press LIGHT button (A).
2. Press again to turn off backlight. NOTE:
The backlighting feature is designed to
improve display visibility in low light
conditions. In bright light conditions, the
backlighting cannot be seen.
3. To turn off tester, press ON-OFF button
(B). Tester will automatically turn itself off
2 minutes after the last button has been
pushed.

- 13 -
SERVIZIO SERVICE
PER VERIFICARE IL LIVELLO DELLE BATTERIE E LORO
SOSTITUZIONE
1. Il tester è alimentato da due batterie da 9 volt alcaline.
La batteria a sinistra (A) alimenta il circuito di
retroilluminazione. La batteria a destra (B) alimenta il
sistema.
2. Il tester mostra un messaggio BATTERIA S ARI A
lampeggiante se le batterie di sestra (B)devono essere
sostituite quando l'unità è accesa. Questo non avviene
per la batteria retroilluminazione (A). Nel caso in cui la
batteria retroilluminazione sia scarica semplicemente la
retroilluminazione non funzionerà.
3. In qualsiasi momento, selezionare BATTERIA dal menu
principale e premete TEST per visualizzare la percentuale
disponibile per entrambe le batterie.
4. Il tester funziona anche se la batteria di
retroilluminazione non è installata o se è scarica.
5. BATTERIA DI SISTEMA BASSA sarà visualizzato quando
l'apparecchio è acceso e la batteria è al 10% o meno.
NOTA: Se la batteria della retroilluminazione è nuova e la
batteria di sistema deve essere sostituita, la batteria
retroilluminazione può essere scambiata per azionare il
sistema.
TO CHECK BATTERY POWER LEVELS AND REPLACE
BATTERIES
1. The tester is powered with two 9 volt alkaline
batteries. The left battery (A) powers the backlight
circuit. The right battery (B) powers the system.
2. The tester will flash a BATTERY LOW message if system
battery needs replacing when unit is turned on. It will not
say this for the backlight battery. In the event that the
backlight battery is low, the backlight will not work.
3. At any time, select BATTERY from main menu and
press TEST to display the percentage available for both
batteries.
4. The tester system functions will operate if no backlight
battery is installed or if it is low.
5. SYSTEM BATTERY LOW message will be presented
when unit is turned ON and the battery is 10% or less
usable.
NOTE: If the backlight battery is fresh and the system
battery needs replacing, the backlight battery can be
used to operate the system by moving it to the system
battery location.
PER PULIRE IL TESTER
Togliere il tappo e asciugare all'interno il tester con un
tovagliolo di carta asciutto.
NOTA: Alcuni grani possono rimanere incastrati nel filetto
del tappo, possono essere rimossi con una piccola lama.
TO CLEAN THE TESTER
Remove cap and wipe out inside of the tester with a dry
paper towel.
NOTE: Grain may become lodged in threads of cap and
should be removed with a small blade.
A - Batteria retroilluminazione
B - Batteria di sistema
- Menu principale
D - Tasto di test
E - Tasto di selezione
A -Light Battery
B - System Battery
- Main Menu
D - Test Button
E - Select Button

- 14 -
RISOLUZIONE DEI PROBLEMI TROUBLESHOOTING
Sintomo A: l'unità non si accende o perde potenza di
tanto in tanto (o la retroilluminazione non funziona.)
Soluzione 1: Premere brevemente il tasto ON-OFF. NON
tenere premuto il pulsante.
Soluzione 2: ontrollare le batterie. Sostituire se
necessario.
Soluzione 3: i contatti della batteria possono fare un
cattivo contatto. Rimuovere le batterie e tirare i contatti
metallici in alto dal fondo del compartimento con delle
pinzette. Vedere la figura di seguito.
Symptom A: Unit does not power up or loses power
occasionally (or backlighting does not operate.)
Solution 1: Press ON-OFF button for shorter time. Do
NOT hold button down.
Solution 2: heck batteries for 0% or higher. Replace as
necessary.
Solution 3: Battery contacts may be making poor
contact. Remove batteries and pull metal contacts up
from bottom of compartment and above height of plastic
knob using needlenose pliers. See illustration below.
Sintomo B: L’unità non è accurata.
Soluzione 1: la temperatura del grano e
dell'unità potrebbero essere differenti per
più di 20 ˚ F (11 ˚ ). Seguire la procedura di
preriscaldamento (pagina 5).
Soluzione 2: se i grani sono a un punto
estremo di temperatura, lasciateli
raggiungere la temperatura ambiente, poi
testarli.
Soluzione 3: i grani e / o la cella di prova
possono aver sviluppato umidità di
superficie dal rapido cambiamento della
temperatura del campione. onsentire ai
grani ed al tester di stabilizzarsi a
temperatura ambiente. ontrollare
l’umidità visibile sul grano e all'interno della
cella di prova. Asciugare la cella di prova
con un panno morbido o asciugacapelli, se
necessario. Ritestare I grani. (Vedere a
pagina 6).
Soluzione 4: Se il tester visualizza SYSTEM
BATTERY LOW, i risultati dei test potrebbero
non essere accurati. Sostituire la batteria.
Soluzione 5: può essere necessario
ricalibrare l’unità dalla fabbrica. Restituire il
tester al proprio rivenditore per la
riparazione o la sostituzione o chiamate il
Servizio lienti.
Symptom B: Unit is inaccurate.
Solution 1: Temperature of the grain and
unit may be more than 20˚F (11˚ )
different. Follow preheat procedure (page
5).
Solution 2: If grain is at an extreme
temperature, let grain settle to reach
room temperature. Retest grain.
Solution 3: Grain and/or test cell may
have developed surface moisture from
rapid change in temperature of the grain
sample. Allow grain and tester to stabilize
near room temperature. Inspect for
visible moisture on grain and inside test
cell. Dry test cell with soft cloth or blow
dryer, if necessary. Retest grain. (See page
6).
Solution 4: If the tester displays SYSTEM
BATTERY LOW, the test results may be
inaccurate. Replace battery.
Solution 5: Unit may need to be
recalibrated by factory. Return tester to
your dealer for repair or replacement or
call customer service.
Sintomo C: l’unità legge UMIDITÀ al di sotto del limite o
umidità sopra al limite.
Soluzione 1: i grani possono essere troppo bagnati o
asciutti per fare il test. ontrollare il limite di umidità
nelle linee guida a pagina 9 delle istruzioni per l'uso.
NOTA: I limiti riportati a pagina 9 sono solo indicativi.
Symptom C: Unit reads MOISTURE BELOW LIMIT or
MOISTURE ABOVE LIMIT. Solution 1: Grain may be too
wet or dry to test. heck moisture limit guidelines on
page 9 of Operating Instructions.
NOTE: Limits shown on Page 9 are only guidelines.
Sintomo D: l’unità legge ERROR (---).
Soluzione 1: guasto elettronico. Rendere il tester al
proprio rivenditore per la riparazione o la sostituzione o
chiamate il Servizio lienti
Symptom D: Unit reads ERROR (---).
Solution 1: Electronic failure. Return tester to your dealer
for repair or replacement or call customer service

- 15 -
NUMERO SERIALE SERIAL NUMBER
REGISTRARE Il NUMERO SERIALE
NOTA: Il numero di tester serie si trova sul fondo
dell'apparecchio.
Scrivi il tuo numero di modello, numero di serie e la data
di acquisto nello spazio sottostante. Il rivenditore ha
bisogno di queste informazioni quando si ordinano parti
e al momento del deposito di garanzia.
RECORD SERIAL NUMBER
NOTE: The tester serial number is located on the bottom
of the unit.
Write your model number, serial number and date of
purchase in the space provided below. Your dealer needs
this information when ordering parts and when filing
warranty claims.
Modello Nr.__________________________________________________________
Model No.
Serie Nr. ____________________________________________________________
Serial No.
Data di acquisto ______________________________________________________
Date of Purchase
(Da compilare a cura del proprietario - To be filled in by the owner)
CUSTODIA
La custodia è costruita in vinile
imbottito per proteggere il
tester.
Un fondo a cerniera e Velcro®
permette il funzionamento con il
tester in valigetta.
odice Ordine 06053
CARRYING CASE
The carrying case is constructed
of padded vinyl to protect the
tester.
A zipper bottom and Velcro®
sealing flap permit operation
with tester in carrying case.
Order Part No. 06053

- 16 -
Per informazioni del produttore e servizio al cliente, si
prega di contattare:
For manufacturer information and customer service,
please contact:
N.A. ELETTRONICA S.R.L.
Via Toscana, 11/d - 40069 Zola Predosa (BO) - ITALY
tel. 0039 - 051 758213 fax 0039 - 051 6185939
E-mail: info@naelettronica.it Web site: www.naelettronica.it
Table of contents
Other N.A. Elettronica Test Equipment manuals
Popular Test Equipment manuals by other brands

HP
HP 181A Operating and service manual

Psiber Data Systems
Psiber Data Systems Pinger Plus Network IP Tester user guide

Rohde & Schwarz
Rohde & Schwarz R&S QAR50 Getting started

Dräger
Dräger Alcotest 9510 Standard IR Instructions for use

Fluke
Fluke 707 instruction sheet

Bosch
Bosch GE-50576-A operating manual