Nabtesco ALLUX User manual

イ
ン
ス
ト
ー
ル
方
法
1
TM
Adjustment App
Instruction Manual
(iOS Version)
For Prosthetists
Product Type: NE-Z41, NE-Z41SH
Document Number: 81-SS00127(ver.3)
Application Ver. 0.4.9 or later
Date of issue: 2023-07-01
Language:English
CAUTION
■Carefully read the instruction manual prior to use.
■Adjust the knee joint to the user in a place where the user’s safety can be ensured.
■Keep this instruction manual for future reference.

ALLUXTM Adjustment App Instruction Manual (iOS Version) For Prosthetists
Introduction
1
Introduction
Thank you for purchasing Nabtesco’s ALLUXTM.
ALLUXTM can be assembled and adjusted only by the persons who have participated in a
Nabtesco ALLUXTM certification seminar and are certified. Matters concerning typical usage such
as walking, maintenance, operation procedures including replacement of service part, trouble
shooting, and cautionary notes are described in the instruction manual that comes with an
ALLUXTM (hereinafter referred to as the ALLUXTM Instruction Manual).
This Adjustment App Instruction Manual describes how to install and use the Adjustment App
(hereinafter referred to as this App) in the iOS system environment.
Before adjusting ALLUXTM, thoroughly read the ALLUXTM Instruction Manual mentioned above
and the Adjustment App Instruction Manual, sufficiently understand the contents, and strictly
observe the safety precautions stated in these manuals.
Nabtesco owns the copyright for this document.
IOS is a trademark or registered trademark of Cisco in the United States and other countries
and is used under license.
iPhone is a trademark of Apple Inc. in the United States and other countries.
Apple is a trademark of Apple Inc. in the United States and other countries.
App Store is a service mark of Apple Inc. registered in the United States and other
countries.
The Bluetooth word mark and logos are registered trademarks owned by Bluetooth SIG. Inc.
and any use of such marks by Nabtesco Corporation is under license.
QR code is a registered trademark of Denso Wave Incorporated.
All other company names and product names are trademarks or registered trademarks of
their respective companies.

ALLUXTM Adjustment App Instruction Manual (iOS Version) For Prosthetists
Table of contents
2
Table of contents
Introduction ·····························································································································1
Table of contents ······················································································································2
1Supported model and operating environment ············································································3
2
Install procedures and initial settings
····················································································4
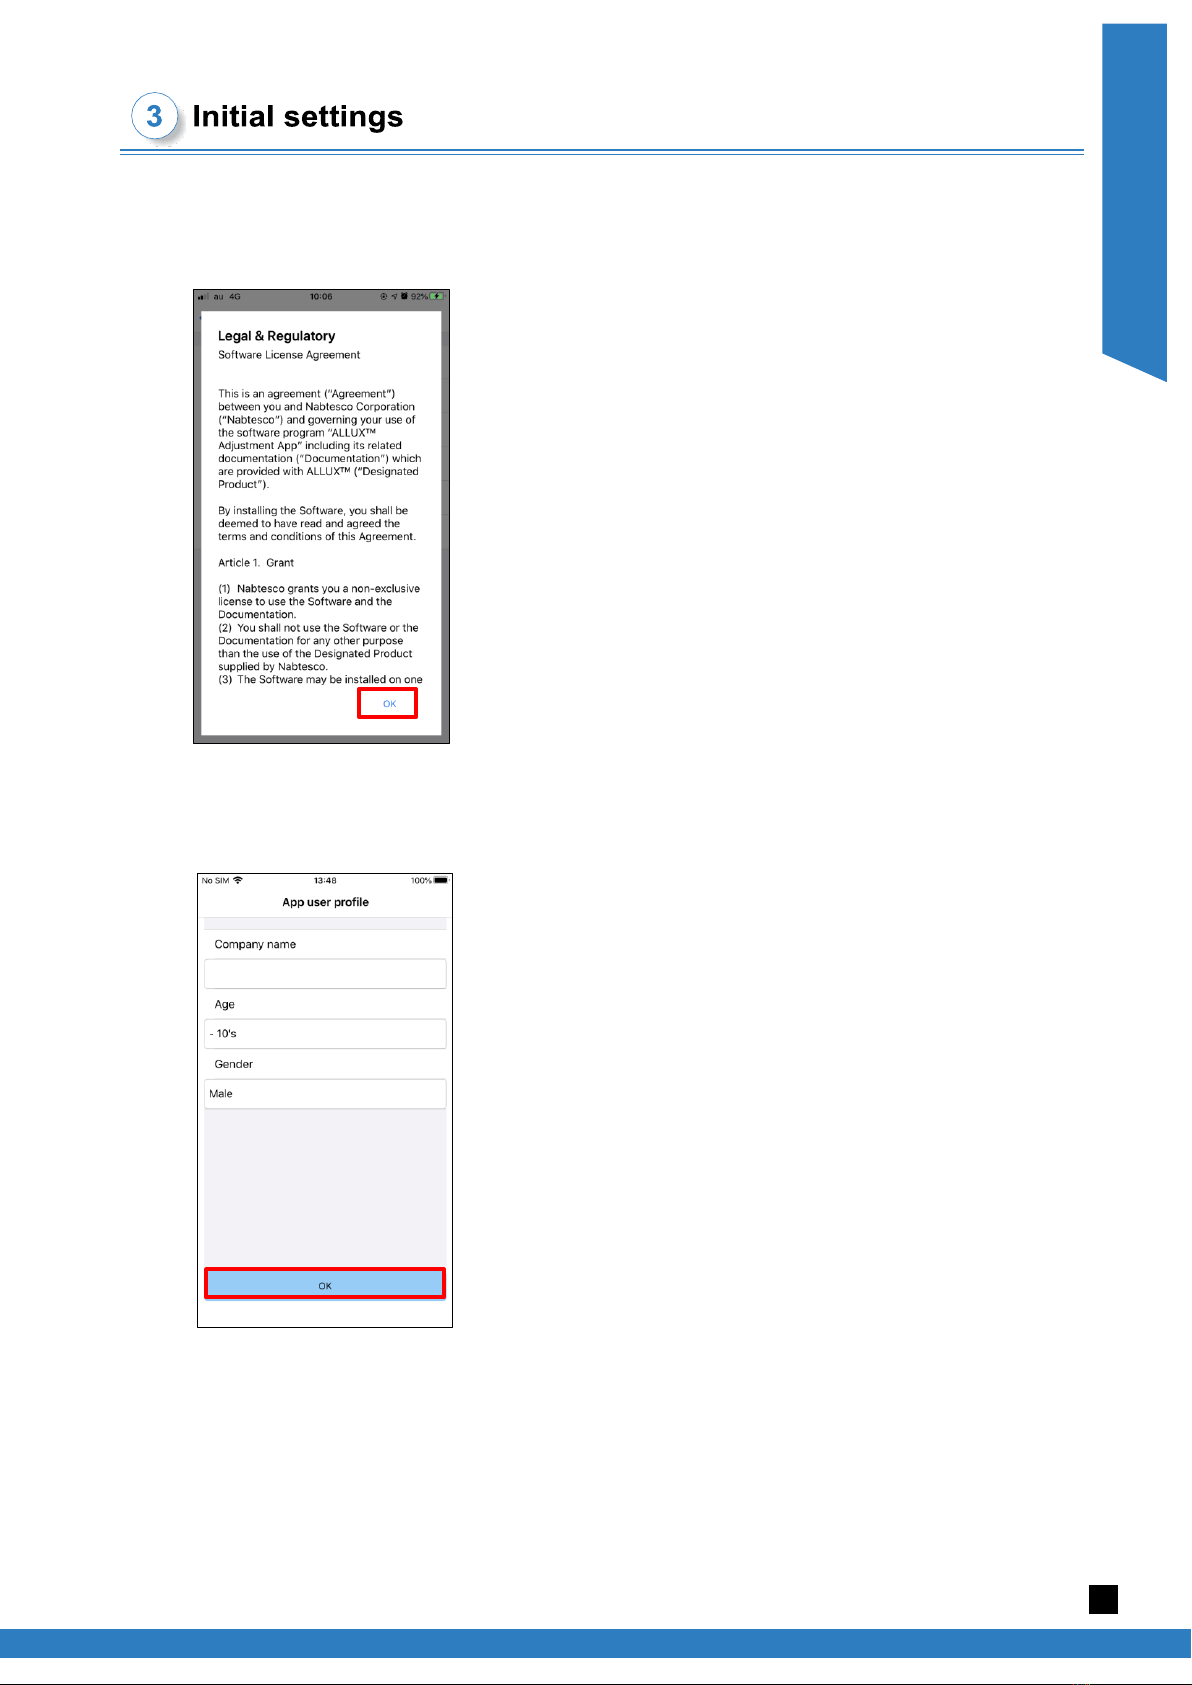
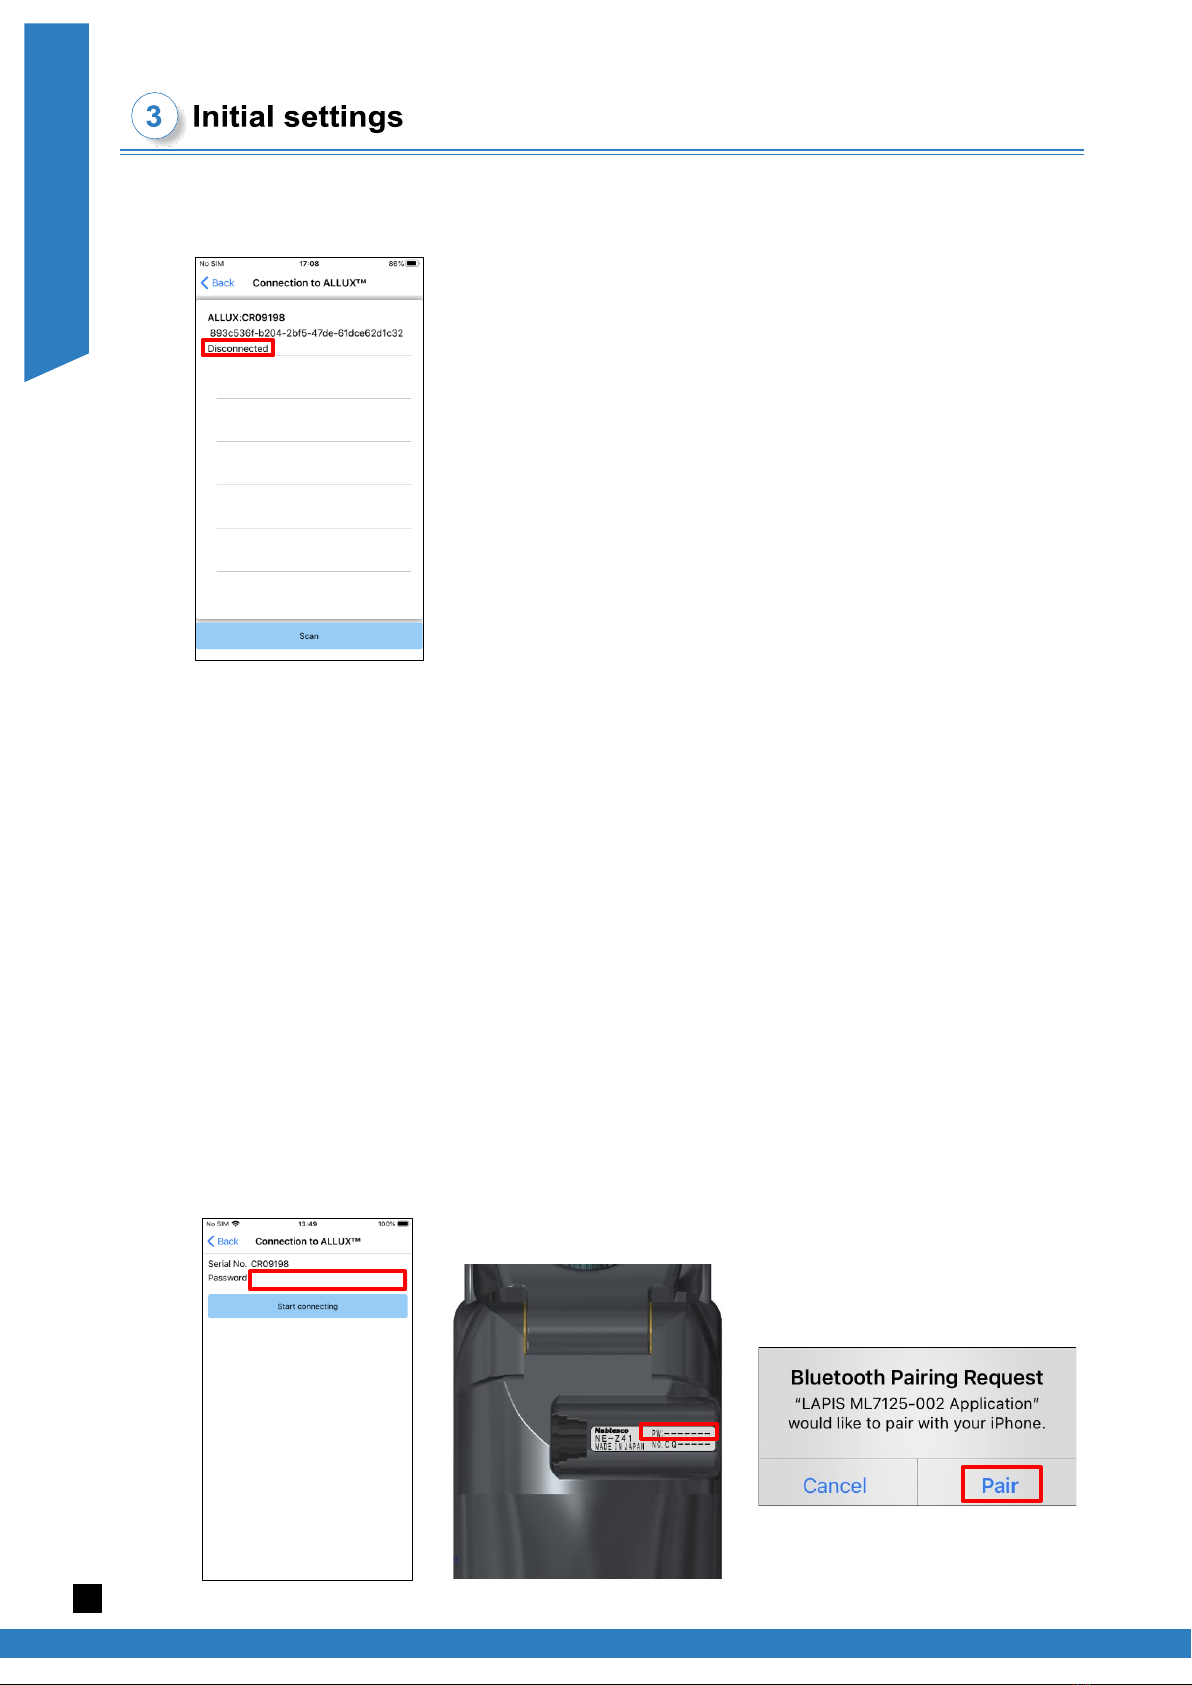
3Initial settings ·····················································································································5
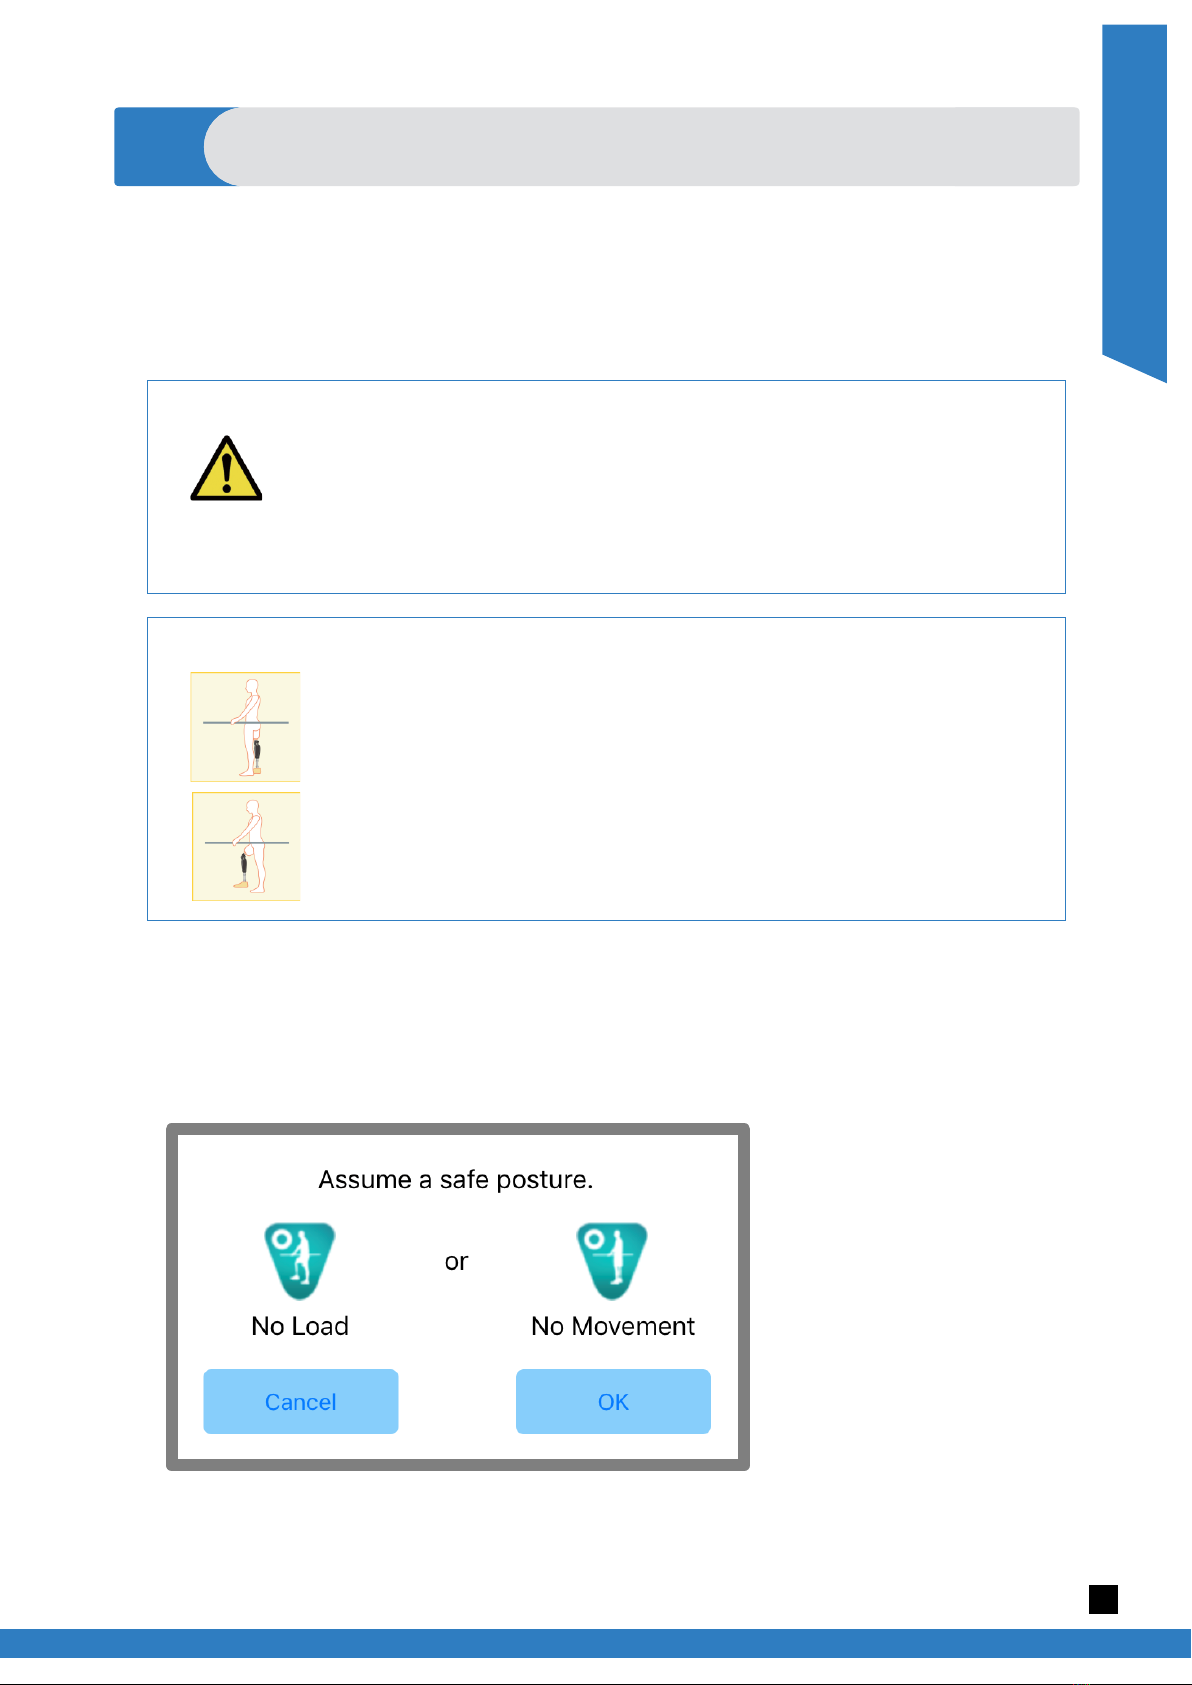
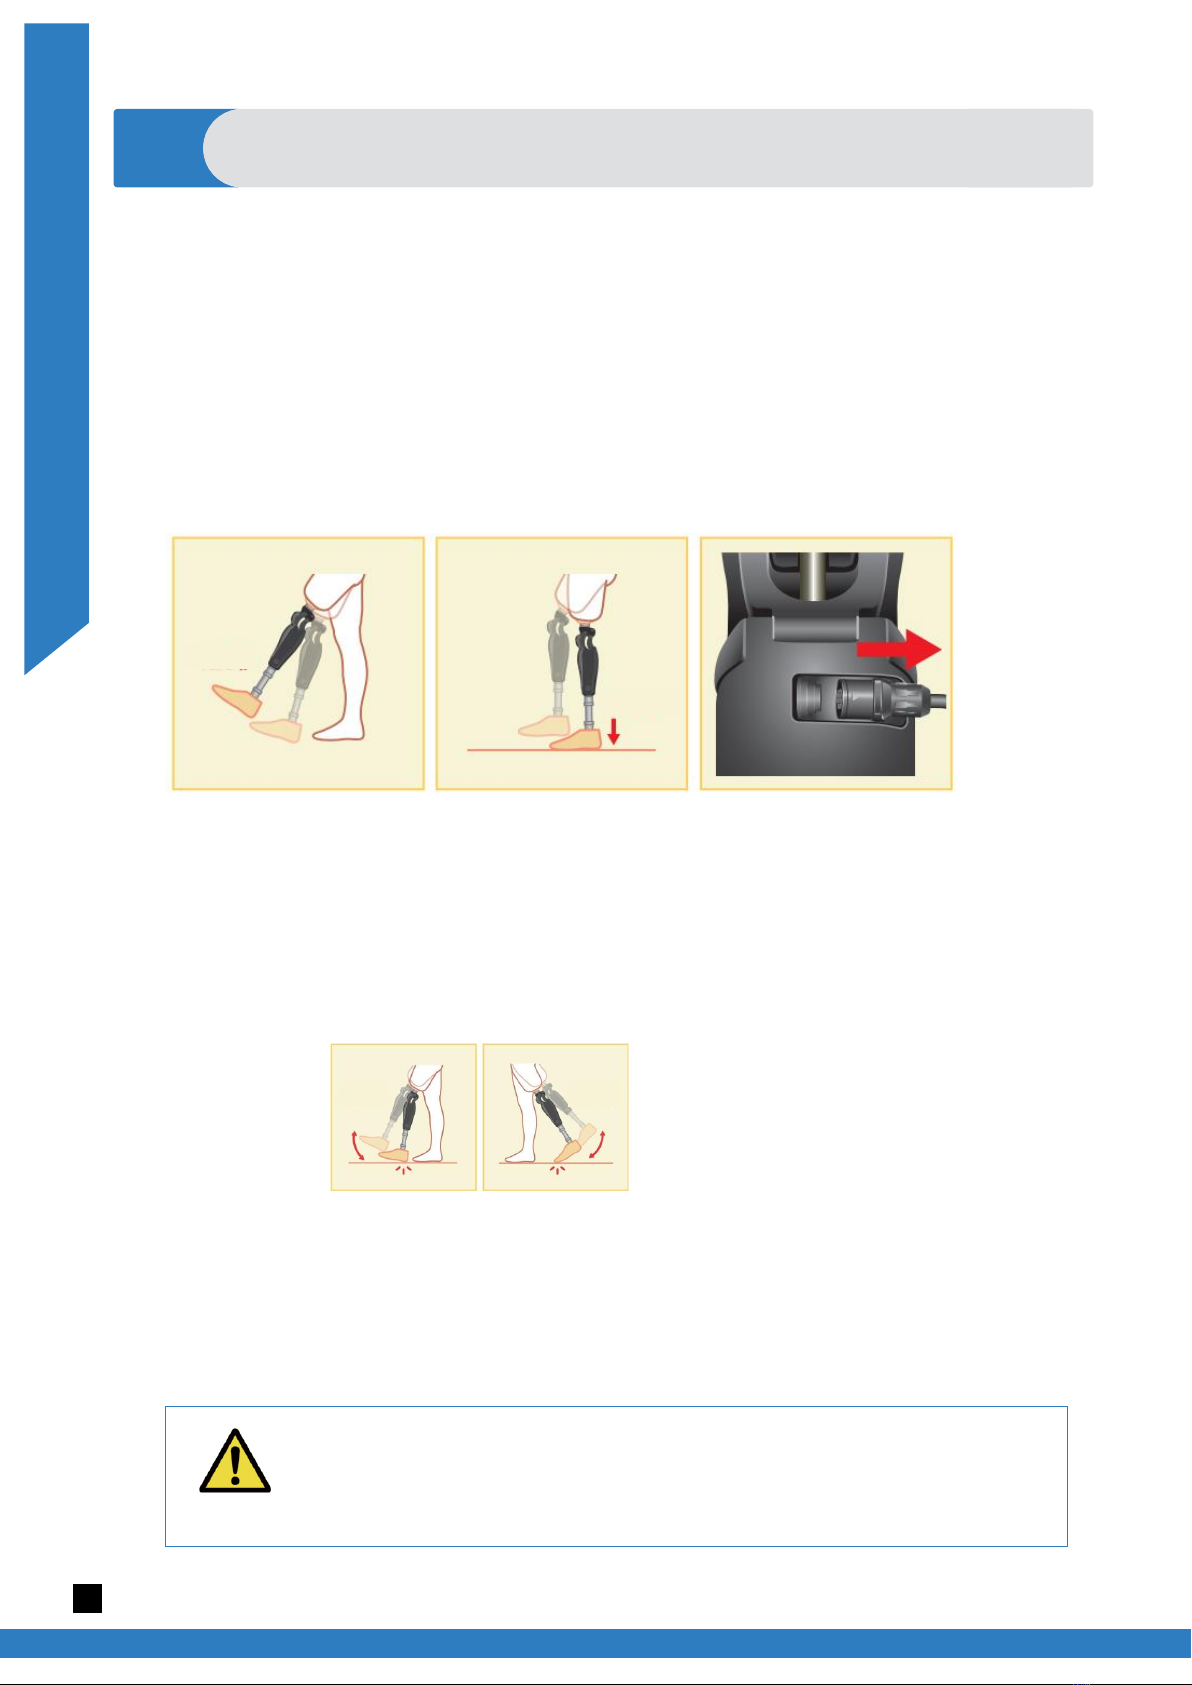
4Safe posture ······················································································································8
5Communication mode and how to connect Bluetooth ··································································9
6Common operation as to the initial startup and each screen ······················································· 10
7Adjustment procedure·········································································································11
8Basic Settings ·················································································································· 12
9Setting the Time Zone········································································································ 13
10 Calibration······················································································································· 14
11 Adjusting the Toe Release Point··························································································· 15
12 Adjusting the Stance Flexion Yielding ···················································································· 16
13 Adjusting the Stance Extension Dampening············································································ 17
14 Adjusting the Swing Flexion Resistance················································································· 18
15 Adjusting the Terminal Impact ······························································································ 19
16 Adjusting the Safety Lock ··································································································· 20
17 Low Battery settings ·········································································································· 21
18 Saving the adjustment data································································································· 22
19 Advanced Adjustments······································································································· 23
20 Setting the remote control··································································································· 24
20.1 ALLUXTM operational modes························································································· 24
20.2 Assigning operational modes to the buttons on the Application Remote Control ······················· 25
20.3 Remote control setting screen······················································································· 26
21 Data Copy······················································································································· 29
22 Gait Data ························································································································ 30
22.1 Gait data screen ········································································································ 30
22.2 Make chart screen······································································································ 31
22.3 Creating a report ········································································································ 32
23 Adjustment History ············································································································ 33
24 General ·························································································································· 34
25 Error message popup ········································································································ 35
25.1 Password error (“Enter Password” screen) ······································································ 35
25.2 Password error (“Connection to ALLUXTM” screen) ···························································· 35
25.3 Password error (3 times)······························································································ 35
25.4 Wireless connection error ···························································································· 35
25.5 Wireless communication error ······················································································· 36
25.6 Safe posture error ······································································································ 36
25.7 Hydraulic control error ································································································· 36
26 Troubleshooting················································································································ 37

ALLUXTM Adjustment App Instruction Manual (iOS Version) For Prosthetists
Supported model and operating environment
1
3
1 Supported model and operating environment
●ALLUXTM (type: NE-Z41)
*ALLUXTM (type: NE-Z4) is not supported.
The model can be identified by the design of the front link pad.
It can also be identified by the indication on the charging port.
NE-Z41
(Supported type)
NE-Z4
(Non-supported type)
NE-Z41
(Supported type)
NE-Z4
(Non-supported type)
●Compatible OS: iPhone running iOS 13 or later
Precautions on Bluetooth
■Radio waves emitted by a Bluetooth device may affect the operation of electronic devices and
other devices. Turn off Bluetooth devices when near priority seats in trains, in areas where
flammable gas is generated such as in airplanes near automatic doors and fire alarm devices,
as it may cause an accident.
■We do not take any responsibility for the leakage of information when using Bluetooth
technology.
■This product does not guarantee wireless connection with all Bluetooth devices. The
Bluetooth device to be connected must comply with the Bluetooth standard specified by
Bluetooth SIG and must have obtained at least a certification. In addition, even if the device to
be connected complies with the Bluetooth standard, phenomena such as inability to connect
or different display/operation may occur, depending on the characteristics and specifications
of the device.
■Do not disassemble or modify this product as the wireless functionality of this product has been
certified to meet technical standards.

ALLUXTM Adjustment App Instruction Manual (iOS Version) For Prosthetists
2
Install procedures and initial settings
4
2
Install procedures and initial settings
1. Sign in with your Apple ID.
Tap the search icon in the bottom right corner of the “App Store” screen.
2. Type the App name “ALLUX2” into the Search field. Tap the “Search” button on the keyboard.
The following QR code can be used to install.
3. After the search results are displayed, tap the target App as shown below.
4. Tap the “GET” button, then tap the “INSTALL” button.
5. After the installation is completed, the icon of the App is created on the home screen of the
smartphone.
6. Tap the icon to start the App.

ALLUXTM Adjustment App Instruction Manual (iOS Version) For Prosthetists
5
Initial settings
3
3 Initial settings
1) Tap the icon of this App to start.
2) When you first start the App, you will need permission to use Bluetooth.
When the following popup is displayed, tap Allow or OK.
3) After the company logo is displayed on screen for a second, this screen automatically changed
to the next screen.
4) “Enter Password” screen is displayed. Enter the indicated password in the instruction manual.
If you fail in entering the password 3 times, you need to restart this App.
* The popup screen will vary depending on the
smartphone you are using.

ALLUXTM Adjustment App Instruction Manual (iOS Version) For Prosthetists
3
Initial settings
6
5) The “Legal & Regulatory” dialog is displayed.
Read it and tap the “OK” button.
6) The “App user profile” is displayed.
Enter each information and tap the “OK” button.
Company name:
Enter the P&O Clinic name or company that App user
works for.
Age:
Select the age of the adjuster from the list.
Gender:
Select the gender of the adjuster from the list.

ALLUXTM Adjustment App Instruction Manual (iOS Version) For Prosthetists
Initial settings
3
7
7) The “Connection to ALLUXTM” screen is displayed.
1. On the “Connection to ALLUXTM”screen, scanning for
wireless devices automatically starts.
2. The devices related to ALLUXTM are listed up. The indicated
characters vary based on the serial number of ALLUXTM.
The third line indicates the connection state.
Disconnected
Connecting
Connected
3. “ALLUX:Serial No” is displayed. If more than one device is
listed up, according to the Serial No. of your own ALLUXTM,
select the appropriate wireless device.
4. If the wireless device for ALLUXTM is not listed, the wireless connection of ALLUXTM may be
in sleep mode. Try to activate the wireless connection with slightly flexing and extending
ALLUXTM or applying user’s body weight on ALLUXTM. After that, tap the "Cancel" button and
then tap the “Scan” button displayed in that position to search for wireless devices again.
5. Tap the wireless device on the list. If the wireless connection is successfully done,
“Connection to ALLUXTM”screen is displayed automatically.
For consecutive connections, the “Connection to ALLUXTM screen is skipped and the initial
startup screen is displayed.
8) “Connection to ALLUXTM”screen is displayed.
On the “Connection to ALLUXTM”, you need to enter the password that comes with ALLUXTM.
The password is indicated on the charging port of ALLUXTM.
If you fail in entering the password 3 times, you need to restart this App.
When connecting for the first time, Bluetooth pairing to a smartphone is required. Tap Pair to
allow it.

ALLUXTM Adjustment App Instruction Manual (iOS Version) For Prosthetists
8
4
Safe posture
4 Safe posture
Before changing the operational mode of ALLUXTM using the Application Remote Control or before
adjusting or setting ALLUXTM using this App, the user needs to take a posture which is safe even if
hydraulic resistance changes. This posture is referred to as ‘safe posture’. Explain to the user about
safe posture.
[Request for safe posture]
If ALLUXTM is not in the safe posture when adjusting or setting ALLUXTM, a popup is displayed.
Make sure that the user is in a safe posture, and then tap the “OK” button to reflect the adjustments
or settings. If you tap the “Cancel” button, the adjustments or settings will be cancelled.
■Explain to the user about the safe posture, and ensure that the user
understands it.
■When the user takes the safe posture without applying the body weight
to ALLUXTM, he/she must hold a handrail or sit down.
Flexion/extension resistance may suddenly change, leading to a fall.
CAUTION
[Safe posture]
:State where ALLUXTM is stationary, straight, and vertical and may be
subject to weight loading
:State where ALLUXTM is not subject to weight bearing and the knee may
be flexed and stationary.

ALLUXTM Adjustment App Instruction Manual (iOS Version) For Prosthetists
Communication mode and how to connect Bluetooth
5
9
5 Communication mode and how to connect Bluetooth
In order to conserve power, ALLUXTM is not always in communication mode.
In order to enable the communication mode, you need to perform the following operations.
Once ALLUXTM communication is established using this App, this state lasts until communication is
disconnected.
[Communication mode enabled]
1. For 5 minutes after ALLUXTM is slightly flexed and extended
2. For 5 minutes after you apply your body weight to ALLUXTM
3. For 5 minutes after the charger or the power OFF cap is disconnected from ALLUXTM
With the Application Remote Control, it is possible to turn OFF wireless connection when the user gets
on a plane, etc. To restore wireless connection from that state, the actions such as the one shown below
are required.
1. Disconnect the charger or the power OFF cap form ALLUXTM.
2. "Apply a load on the heel 4 times intermittently" or "Apply a load on the toe 4 times intermittently".
*You can switch to either one you like with the Application Remote Control.
*Just starting this App does not connect to ALLUXTM. Tap the Bluetooth icon on the initial startup screen
(Refer to page 10) to connect to ALLUXTM.
*Just tapping the home button etc. on the smartphone does not disconnect communication with
ALLUXTM and this App keeps working behind the screen. If you tap the icon of this App again, it starts in
the connected state.
5min
5min
■Do not force-quit this App by turning off the smartphone.
Doing so may cause adjustment values to turn into an unintended state and
result in a fall.
CAUTION
4
times
4
times

ALLUXTM Adjustment App Instruction Manual (iOS Version) For Prosthetists
6
Common operation as to the initial startup and each screen
10
6 Common operation as to the initial startup and each screen
At the first start-up, the initial startup screen is displayed after the “Connection to ALLUXTM” screen.
At the second and subsequent startups in the normal state, the initial startup screen is displayed
after the company logo.
Bluetooth icon:
Tap this icon to display the “Connection to ALLUXTM”
screen. The icon changes depending on the connection
state. When it is in a disconnected state, tap the icon to
enable connection.
Disconnected Connected
General icon:
Tap this icon to display the “General” screen.
Standby mark:
While this App is communicating with
ALLUXTM or performing other
processing, a circle standby mark is
displayed. While this mark is displayed,
all on-screen operations are disabled.
Latest adjustment date:
It shows the date when ALLUXTM was in last adjusted.
Battery level:
It shows the battery level of ALLUXTM.
●Basic setting button: Tap this button to display the “Basic setting” screen (page 12).
●Advanced Adjustments button: Tap this button to display the “Advanced Adjustments” screen
(page 23).
●Remote Control button: Tap this button to display the “Remote Control” screen (page 24).
●Data Copy button: Tap this button to display the “Data Copy” screen (page 29).
●Gait Data button: Tap this button to display the “Gait Data” screen (page 30).
●Adjustment History button: Tap this button to display the “Adjustment History” screen (page 33).
10% or less 10~40% 40~70% 70% or more

ALLUXTM Adjustment App Instruction Manual (iOS Version) For Prosthetists
11
Adjustment procedure
7
7 Adjustment procedure
Adjustments are undertaken in the following steps.

ALLUXTM Adjustment App Instruction Manual (iOS Version) For Prosthetists
8
Basic Settings
12
8 Basic Settings
*When this screen is displayed, the setting items in the lower part may not be displayed. Swipe the
screen upward to display those setting items.
●Time Zone:
Tap this button to display the “Time Zone” screen (page 13).
●Calibration:
Tap this button to display the popup for calibration dialog
(page 14).
●Vibration demo:
ALLUXTM vibrates to give information and warnings to the
user. By tapping these buttons, the user can recognize
vibration patterns. Please have the user understand the types
and meanings of the vibration alarm patterns.
When you tap each button, the popup for a vibration alarm
pattern corresponding to the button is displayed. Tap the “OK”
button to vibrate ALLUXTM.
Safety Posture: ALLUXTM vibrates when the user should
take a safe posture.
Battery (Fine): ALLUXTM vibrates when the remaining
battery level is 3 hours or more.
Battery (Low): ALLUXTM vibrates when the remaining
battery level is less than 3 hours.
Battery (Very Low): ALLUXTM vibrates when the remaining
battery level is insufficient and normal walking is impossible.
High temp warning: ALLUXTM vibrates when the knee joint is in high temperature.
Malfunction: ALLUXTM vibrates when the knee joint needs service.
Safety Lock: ALLUXTM vibrates when the safety lock is turned on.
Reboot: ALLUXTM vibrates when ALLUXTM is rebooted.
Release from airplane mode: ALLUXTM vibrates when the airplane mode is turned off. (page 9)
Stop vibration demo: ALLUXTM stops vibration.
●Back button: Tap this button to display the initial startup screen.
●OK button: Tap this button to display the initial startup screen.
●Next button: Tap this button to display the “Toe Release Point” adjustment screen.
■Make sure the user recognizes all vibration patterns and understands the
differences. If the user uses ALLUXTM without understanding the meanings
of the vibrations, he/she may not be in a safe posture against a warning
about failure or high temperature and may fall because the ALLUXTM is
locked when he/she tries to walk.
CAUTION

ALLUXTM Adjustment App Instruction Manual (iOS Version) For Prosthetists
Setting the Time Zone
9
13
9 Setting the Time Zone
ALLUXTM contains an internal clock used to keep records of the number of steps taken per day. The
default setting is Japan Standard Time (GMT+09:00). Please change the time zone to reflect the
local time.
1. Tap the Time Zone picker to display the time zone list.
2. Select the time zone of user’s location.
3. Tap the “Settings” button to send the time zone to ALLUXTM.
*Once selected, it is unnecessary to repeat this step unless there is a permanent relocation to
another time zone. It is also unnecessary to select it again when the user travels overseas for a
short period of time. Note, however, that the time zone selected here becomes the standard time
zone for when the day changes.
●Back button: Tap this button to display the “Basic setting” screen.
●OK button: Tap this button to display the initial startup screen.
●Settings button: Tap this button to send the time zone to ALLUXTM.
1
2

ALLUXTM Adjustment App Instruction Manual (iOS Version) For Prosthetists
10
Calibration
14
10 Calibration
When ALLUXTM is used for the first time or re-aligned or the foot part is replaced, ALLUXTM will need
to be calibrated.
1. Tap the “Calibration” button on the “Basic setting” screen,
a popup is displayed.
2. Have the user lift his/her foot to keep ALLUXTM free from
load.
*Have the user hold a handrail in parallel bars or sit on a
chair to ensure his/her safety.
3. Tap the “OK” button on the popup.
4. The popup closes and the screen returns to the “Basic
setting” screen.
■Calibrate ALLUXTM in the correct posture.
If it is calibrated under load, the user cannot walk normally and may stumble,
possibly resulting in an injury.
■When calibrating, make sure the user is safe.
If the user stands on one foot in an unstable state they may fall.
■Calibrate with definitive components attached and fully tightened.
If alignment adjustments are made, ALLUXTM may not work properly.
■Apply the toe release point setting (see Chapter 11) after calibration.
The setting the Toe Release Point prior to calibration may make normal walking
impossible or unsafe.
■
WARNING

ALLUXTM Adjustment App Instruction Manual (iOS Version) For Prosthetists
Adjusting the Toe Release Point
11
15
11 Adjusting the Toe Release Point
Factory default setting = 80
Set the Toe Release Point for transition to the swing phase. Check the walking condition in parallel
bars where the user’s safety can be ensured.
1. Have the user stand in parallel bars and place the prosthetic foot behind them and load the
prosthesis simulating terminal stance.
2. The amount of toe load will be displayed on the display bar.
3. Set the adjustment value to the maximum sensor output value (It is indicated as a red line).
4. Test by having the user walk slowly.
*If ALLUXTM releases with every step, gradually increase until it sticks, then reduce
approximately five points.
*If ALLUXTM fails to release with every step, reduce the value until it releases with every step
when walking slowly.
5. When complete, tap “Next” button to move to the “Stance Flexion Yielding” adjustment screen.
Adjustment value (min: 0, max: 200):
A toe release point adjustment value is displayed and
entered in figures.
Adjustment value stepper:
These buttons increase or decrease the adjustment
value in increments of 1.
Bar meter box view:
It shows the sensor output during ambulation.
Adjustment value slider:
This slider is used to set an adjustment value.
*Adjustments can be made by any of the three options:
direct number input, + or – buttons, or click and drag.
●Back button: Tap this button to display the “Basic
setting” screen.
●OK button: Tap this button to display the initial startup
screen.
●Next button: Tap this button to display the “Stance
Flexion Yielding” adjustment screen.
■Check the walking condition in a place, e.g. in parallel bars, where the
user’s safety can be ensured.
If ALLUXTM cannot smoothly shift to swing phase, user may fall.
CAUTION

ALLUXTM Adjustment App Instruction Manual (iOS Version) For Prosthetists
12
Adjusting the Stance Flexion Yielding
16
12 Adjusting the Stance Flexion Yielding
Factory default setting = 20 (Standard value: 15 ~ 25)
Adjust the yielding resistance so that the user feels balanced when sitting into a chair, or walking
down stairs and slopes. Gradually increase or decrease the value according to the user’s
preference and always ensure they are standing safely prior to making adjustments. It is
recommended to adjust the resistance at a normal temperature (+20˚C/+68˚F).
1. Adjust the resistance so that the user’s weight is applied equally to both feet when the user sits
on a chair.
*If the resistance is low, increase the adjustment value.
*If the resistance is high, decrease the adjustment value.
Adjustment value (min: 0, max: 40):
A stance flexion yielding adjustment value is displayed
and entered in figures.
Adjustment value stepper:
These buttons increase or decrease the adjustment
value in increments of 1.
Adjustment value slider:
This slider is used to set an adjustment value.
●Back button: Tap this button to display the “Toe Release
Point” adjustment screen.
●OK button: Tap this button to display the initial startup
screen.
●Next button: Tap this button to display the “Stance
Extension Dampening” adjustment screen.
■When ALLUXTM is used in a low-temperature environment (0˚C/+32˚F or
less), the yielding resistance may be higher. Check the yielding resistance
before starting use in a low-temperature environment. Since ALLUXTM
cannot be easily flexed, the user may fall on stairs or slope.
WARNING
■Do not touch the linkage parts on ALLUXTM when standing up to avoid
potential pinching.
■The yielding resistance, for walking downstairs or slopes, should be adjusted
after completion of all adjustment. If the adjustments have not been made
sufficiently, the user may fall on stairs or slopes.
CAUTION

ALLUXTM Adjustment App Instruction Manual (iOS Version) For Prosthetists
Adjusting the Stance Extension Dampening
13
17
13 Adjusting the Stance Extension Dampening
Factory default setting = 5 (Standard value: 0 ~ 25)
Normally, set the extension resistance in stance phase to 5, no resistance state. Adjust the
resistance only when the user walks with stance flexion. It is recommended to adjust the resistance
at a normal temperature (+20˚C/+68˚F).
1. Adjust the resistance for stance extension dampening.
*If the resistance is low, increase the adjustment value.
*If the resistance is high, decrease the adjustment value.
Adjustment value (min: 0, max: 40):
A stance extension dampening adjustment value is
displayed and entered in figures.
Adjustment value stepper:
These buttons increase or decrease the adjustment
value in increments of 1.
Adjustment value slider:
This slider is used to set an adjustment value.
●Back button: Tap this button to display the “Stance
Flexion Yielding” adjustment screen.
●OK button: Tap this button to display the initial startup
screen.
●Next button: Tap this button to display the “Swing
Flexion” adjustment screen.
■When ALLUXTM is used in a low-temperature environment (0˚C/+32˚F or
less), the stance extension dampening may be increased. Check the
extension resistance before starting use in a low-temperature environment.
Since ALLUXTM cannot be easily extended, the user may stumble and then
fall when initiating swing phase.
WARNING
■Check the walking condition in a place, e.g. in parallel bars, where the user's
safety can be ensured.
■The user must walk in such a way that the knee shifts to the swing phase
after it is extended.
Since ALLUXTM cannot shift to the swing phase in flexed state for double
knee motion, the user may stumble and then fall.
CAUTION

ALLUXTM Adjustment App Instruction Manual (iOS Version) For Prosthetists
14
Adjusting the Swing Flexion Resistance
18
14 Adjusting the Swing Flexion Resistance
Factory default setting = 20 (Standard value: 15 ~ 35)
Adjusts the flexion resistance during swing phase. After the resistance is adjusted, based on normal
walking, the knee joint will automatically adjust the flexion resistance according to the walking
speed.
*If the foot scuffs the floor because ALLUXTM didn’t trigger swing phase, re-adjust the Toe Release
Point as stated in “Adjusting the Toe Release Point” (page 15).
1. Adjust the Swing Flexion Resistance for normal walking speeds.
*If there is excessive heel rise, the resistance is low, increase the adjustment value.
*If the toes scuff the ground, the resistance is high, decrease the adjustment value.
Adjustment value (min: 1, max: 50):
A swing flexion resistance adjustment value is displayed
and entered in figures.
Adjustment value stepper:
These buttons increase or decrease the adjustment
value in increments of 1.
Adjustment value slider:
This slider is used to set an adjustment value.
●Back button: Tap this button to display the “Stance
Extension Dampening” adjustment screen.
●OK button :Tap this button to display the initial startup
screen.
●Next button: Tap this button to display the “Terminal
Impact” adjustment screen.
■Evaluate the walking function in a place, e.g. in parallel bars, where the
user’s safety can be ensured.
If ALLUXTM cannot smoothly shift to swing phase, the user may fall.
CAUTION

ALLUXTM Adjustment App Instruction Manual (iOS Version) For Prosthetists
19
Adjusting the Terminal Impact
15
15 Adjusting the Terminal Impact
Factory default setting = 5 (Standard value: 0 ~ 25)
Adjust the extension resistance during swing phase. If terminal impact occurs, gradually increase it.
After the resistance is adjusted based on the normal walking, ALLUXTM will automatically adjust the
extension resistance according to the walking speed.
1. Adjust the terminal impact resistance for normal walking speed.
*If the resistance is low, increase the adjustment value.
*If the resistance is high, decrease the adjustment value.
Adjustment value (min: 0, max: 40):
A terminal impact adjustment value is displayed and
entered in figures.
Adjustment value stepper:
These buttons increases or decreases the adjustment
value in increments of 1.
Adjustment value slider:
This slider is used to set an adjustment value.
●Back button: Tap this button to display the “Swing
Flexion” adjustment screen.
●OK button: Tap this button to display the initial startup
screen.
●Next button: Tap this button to display the “Safety Lock”
adjustment screen.
■Evaluate the walking function in a place, e.g. in parallel bars, where the
user’s safety can be ensured.
If the resistance is set too high, ALLUXTM cannot extend completely, and
the user may fall.
■and the user may fall.
CAUTION
Other manuals for ALLUX
1
Table of contents
Other Nabtesco Personal Care Product manuals