Naggura Swop Physio User manual

Swop Physio
Swop Physio
VERSION 1.2
Treatment Tables for Physiotherapy
SWOP2 - SWOP2L - SWOP2W - SWOP3 - SWOP5
Instruction Manual
EN

Instruction
Manual
2
Treatment Table for Physiotherapy
Instruction Manual
Table of contents
1. Introduction
2. Use of the manual
3. Warranty
4. Product Liability
5. EC Declaration of conformity
6. Safety instructions
7. Dimensions
8. Features & Operation
Wheel Block/Unblock system
Lever to adjust the headrest
Breather hole and plug
Handlebar support
Hand controller
Twinli©
Space Ball perimeter foot switch
Switches for lumbar flexion
Lever to adjust the backrest
Paper roll holder
Side widening supports
Safety lock
Interchangeable front panels
LED lighting & Cromo Mood
Bamboo sound system
9. Maintenance and cleaning
10. Troubleshooting and service
11. EMC Guidance

Instruction
Manual
3
CONGRATULATIONS! You took NAGGURA home!
Thank you for having acquired a NAGGURA product and for the trust shown in us.
We are sure that this medical examination table will turn into the pillar of your work and will
more than fulfil your most demanding work requirements.
NAGGURA’s experts are in the lead of a project created with great devotion. Every single detail
has been cared to join technology, performance and design altogether in a single table. Our
aim is designing and manufacturing INTUITIVE, DYNAMIC and HIGH-TECH tables of a DARING
and UNIQUE design.
Thanks for your choice and start enjoying the NAGGURA experience.
1. Introduction

Instruction
Manual
4
Before using the treatment table, please read the instruction manual carefully. It is important to keep this manual and store it in a
safe place so that it can be consulted at any time.
By carefully following these instructions you will be able to avoid any problems in using the treatment table.
Some texts and/or illustrations may not belong to your Naggura table since they are general and it depends on your product choice
at the purchase time.
2. Use of the Manual
The warranty period is eective on the date of purchase of the treatment table for a period of two (2) years. It covers all the compo-
nents of the treatment table under the normal and correct use. It also covers defects in workmanship from factory.
The above-mentioned warranty does not cover defects or malfunction caused by:
- Misuse, abuse or improper maintenance of the table and its upholstery;
- Non-observance of the precautions and warnings stated in this instruction manual;
- Lack of maintenance or repair tasks carried out by non-qualified service personnel who are unauthorized by the manufacturer;
- Wrong and faulty electrical installations or which do not fulfil the legal requirements;
- Naggura company is not liable for incidental or consequential damage to property or business.
3. Warranty
Under any circumstances, the producer shall be liable for any indirect, special, incidental or consequential damage incurred by the
user, the patient or the table itself as a result of:
a. A wrong diagnosis;
b. Incorrect use of the table or any of its accessories;
c. The wrong interpretation or non-observance of this user manual;
d. A lack of maintenance of the table;
e. Or maintenance works of the table and/or repairs performed by persons unauthorized to do so by the manufacturer.
According to the current legislation, the manufacturer cannot be held responsible for any flaws in the table or its components and
accessories aer a period of ten (10) years from the date on which the producer puts into circulation the actual product. Therefore,
producer cannot be obliged to supply any spare parts or accessories for this table.
4. Product Liability
Provided that the operator and user takes care of the table and undertakes regular maintenance tasks as described in section 9 of
the current manual, the expected lifespan of the Naggura table can reach over 10 years from production date.
The intended use of the Treatment Table is to position a patient for the treatment. The unit is intended for use by qualified professio-
nal within a professional setting.
Expected lifespan

Instruction
Manual
5
Naggura products are produced and marked in conformity with the directives hereby stated :
Low voltage : 2014/35/CE
Electromagnetic compatibility : 2014/30/CE
These products are manufactured according to the essential requirements established in the European Medical Devices Directive
(Annex II+III of Regulation (EU) 2017/745):
EN ISO 14971:2019; EN ISO 204117:2021; EN ISO 15223-1:2016; ISO 10993-1: 2018; EN ISO 10993-5:2009; EN ISO 109933-10:2013; EN
60601-2-52:2010+AC:2011+A1:2015; EN 60601-1-2:2015+A1:2020; EN 60601-1:2006+A1:2013+AC:2014+A12:2014+A2:2020.
The Swop line has a guarantee of two (2) years in all parts. The manufacturer will not be held responsible for the results of mainte-
nance or repairs performed by unauthorised persons. For further information on guarantee terms, please contact your distributor.
5. EC Declaration of conformity
Naggura treatment tables are only meant to be used by professional personnel in physiotherapy, rehabilitation, examination, mas-
sage and aesthetics fields.
It is the responsibility of the owner to ensure that training is given to all operators and third parties (like for example cleaning per-
sonnel) on safe use of the treatment table, and that they have read and understood all the operating and safety instructions.
Only trained operators may use the treatment bed. Please keep the manual in a place where it is easily accessible to all users, and
make it an important part of your employee training program.
6. Safety instructions
Responsibility of the owner
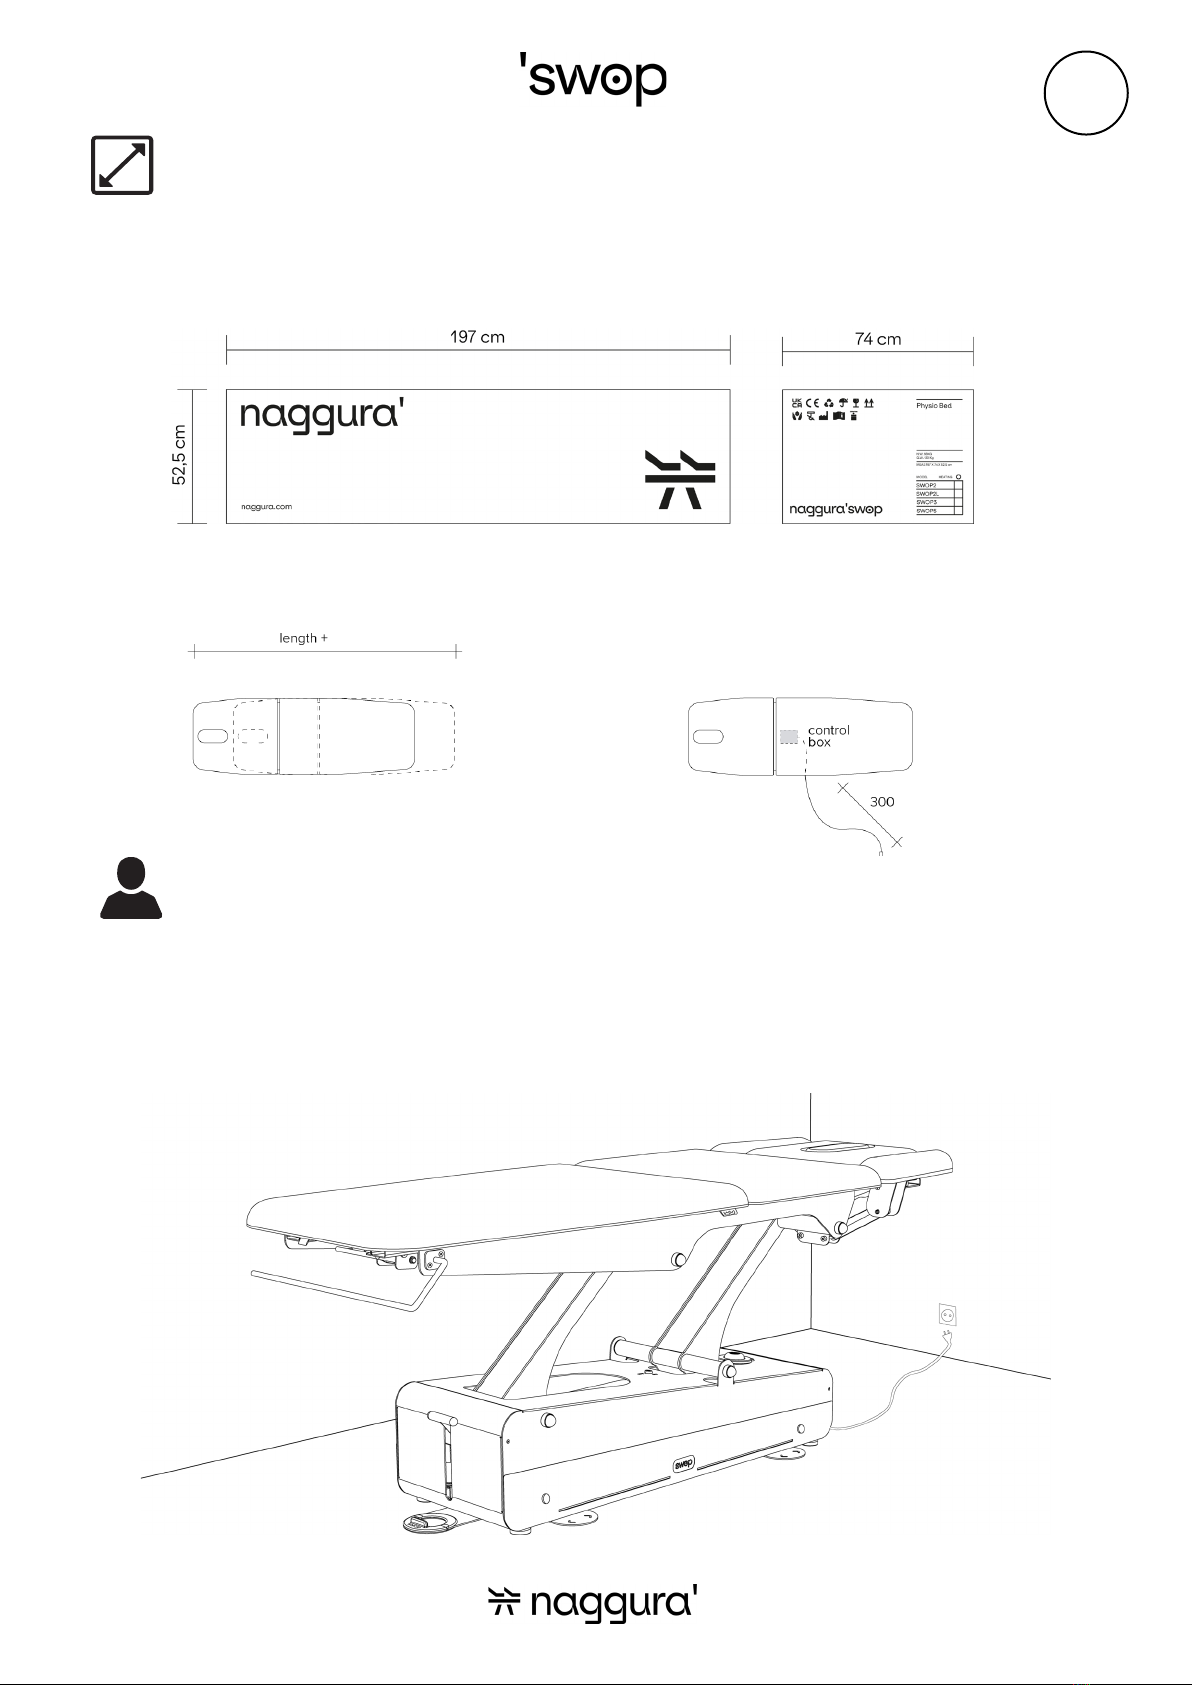
- Place the table in a space with free access from the 4 sides. Do not place the table against the wall or against any obstacles.
- Do not use the table in a high-humidity environment or in so-called “wet rooms” (hydrotherapy spaces). Any prolonged exposure to
high moisture conditions may aect the electrical components and may result in failure.
- Check the technical data and electrical parameters to ensure that the supply voltage meets the technical specifications of the
table. If not, contact your supplier before connecting the device.
- Make sure that the unit is correctly plugged into an earth intake, following the local and national requirements and standards.
- Make sure that the power cable is correctly and safely placed in such a way that it cannot get trapped between any mechanism.
- Pay special attention that the supply cable does not get pinched under the feet of the table, (e.g. aer having moved the table on
its wheels).
- If the table accidentially gets wet, unplug it immediatelly.
- Do not leave chlidren unattended near the table.
- Unless being monitored or instructed by personnel who can be responsible for their personal safety, the people who have physical
obstacles, tactile disorders, mental disorders, lack of experience, common sense or children, are not allowed to use the equipment.
- Do not use the device near electromagnetic transmitters. Read and follow all the information about electromagnetic compatibility
(EMC) in page 19.
- If the power cord or plug is damaged, please contact the distributor, service center or experienced technicians for reparing.
- Please pay attention that the continuous working times should be “Max.2Min. ON; 18Min. OFF”, when operating the motor.
Safety on installation and electricity

Instruction
Manual
6
Safety instructions
- Don’t let anybody, except the operator and the patient, in the treatment room.
- The table is not intended to transport patients. Therefore it cannot be used for this purpose.
- Do not sit on the head section or end of the leg section of the table. The head section and armrests are not suitable to sit on.
- Patients are not to be le unattended,
- Never leave the table on its wheels during the treatment.
- Do not exceed the maximum load capacity of the table.
- Place the table on a stable and horizontal surface. Level it if necessary with the levelling feet under the table.
- Guide the backrest section with the other hand when adjusting the backrest by gas levers.
- Ensure that neither the patient nor the operator can get any part of the body or clothes trapped between the moving parts of the
mechanism when the table is being raised or lowered.
Safety during treatments
- Do not leave anybody unattended alone near the table.
- Disconnect the table if not used for a long period of time.
Safety before or aer the treatment
- Disconnect the table from the power supply.
- Do not get under the table or between its moving parts.
Safety when cleaning the bed or the therapy room

Instruction
Manual
7
Swop 2 Swop 2L
Swop 3 Swop 5
Swop 2W
7. Product dimensions

Instruction
Manual
8
Handling and transport

Instruction
Manual
9
27 cm
250 cm
Lateral displacement (cm) Power cord length(cm)
Product dimensions
Voltage and frequency input shall be 220-240V, 50/60Hz. Plug the table cable into the socket as shown below:
8. Operation
Power input
Package dimensions (cm)

Instruction
Manual
10
1. Wheel block/unblock system
2. Lever to adjust the headrest
3. Breather hole and plug
4. Handlebar support
5. Twinli©
6. Space Ball perimeter foot switch
7. Switches for lumbar flexion
8. Lever to adjust the backrest
9. Paper roll holder
10. Side widening supports
11. Safety lock
12. Interchangeable front panels
13. LED lighting & Cromo Mood
14. Bamboo sound system
Optional
Operation of Swop Physio

Instruction
Manual
11
Operation
Space Ball perimeter foot switch 6
The height of the SWOP physio tables is adjusted from 6 dierent points located around the base of the table, at floor level.
Two semicircles are placed on each long side of the table; one is placed at the front side (head section) and the other at the
end side (foot section). All this activating points are part of the same platform located under the table base.
The Space Ball perimeter switch works as follows: if the therapist is located in one side of the table, pull or push the activating
point towards the le or right direction to move the table up and down. When the therapist is located in the head or legrest sec-
tions push the mechanism forwards or backwards to move it up and down.
The Space Ball foot switch is activated by pulling, pushing or pressing the activating points shown in picture below.
NEUTRAL PULL FORWARD / INWARD PULL BACKWARD / OUTWARD

Instruction
Manual
12
Product size 202 (+/- 27 cm with movement) x 68 x 48 / 90 cm
Package size 197 x 74 x 52,5 cm
Highest position 90 cm
Lowest position 48 cm
Net weight 96-102 Kg
Gross weight 110-122 Kg
Power AC 220 - 240V, 50/60Hz
Max power 300W
Environment temperature 0ºC - +40ºC
Relative humidity 30% - 90%
Loading capacity 200 Kg
Specifications
7
Switches for lumbar flexion
If your Swop is a 2-engine table (Swop3 and Swop5), the middle section (lumbar flexion) is adjusted by the push button
box placed at both sides of the table. If a handcontroller is included, the motors can also be adjusted by the buttons on
the handcontroller.
SWOP3 and SWOP5 button panel for
controlling middle section engine.
Operation

Instruction
Manual
13
OFF
ON
5
Operation
Twinli Armrests
SWOP5 is equipped with a head section with built-in arm supports. You can adjust them as it is shown in the pictures below. Press
the lever on the side and bring the arm rests up and down to the desired position. They will move at the same time eortlessly. The
patients can adjust them by themselves.
Safety lock
The table can be locked or unlocked using the key on the base. If the key is
switched to ON-position, the table and all its functions are unlocked and
ready to use.
If the key is in OFF-position (horizontal position), the table is locked and all
the electrical systems are disabled.
The safety-key can only be removed when the safety lock is in OFF-position.
All SWOP physio models are fitted with a motor with an automatic clutch system. In case somebody or something gets stuck
between the upper and lower frame of the bed (when the bed moves downwards), the motor clutch will make sure that the motor
stops pulling downwards. Only the “passive weight” of the bed will impact the object and there will be no additional pulling force of
the motor.
Important: in case somebody or something gets stuck, make sure that 2 persons li up the upper frame of the bed to release the
object. Aer the object is fully released and safe, gently release the upper frame until the bed is in its lowest position.
Integrated safety system
11

Instruction
Manual
14
Operation
The Swop treatment tables highlights by a very special feature: the front exchangeable panels. There are lot of dierent pos-
sibilities to dress your table up. Get a new table in a matter of seconds and according to your taste, the interior design of your
centre, your mood or however you feel today!
The exchangeable panels are 2 units: one for one side of the table base and the other for its opposite.
The available panels are made of dierent materials (metal, wood and pmma) and multiple colours. You can visit our website to
discover the full range of possibilities.
Changing the panels is so easy! Simply unscrew the 2 screws that subject the panel with your fingers (no tools required). Remove
the current panel to place a dierent one.
Interchangeable Front Panels 12

Instruction
Manual
15
13
14
On/O
Brightness
Colour
selection
Mode
Speed
Operation
As standard feature placed at both sides of the base, the Swop table has a white LED lighting. A line that underlines the table
and shows the Swop display name. To turn the light on, press the button on top of the base frame.
As an option the Cromo Mood System with multicolour led lighting can be chosen. This option has to be installed at the purcha-
se time and it cannot be added aerwards.
If the Cromo Mood is installed, an additional hand controller is provided to select your beloved colour, to adjust the intensity of
light or to change the lighting mode.
LED lighting / Cromo Mood
If you purchased the Bamboo Sound System, your Swop table arrives with an awesome Bluetooth speaker:
we call it the Bamboo Sound System.
The speaker is lodged inside a bamboo case with bevelled base. You can place the speaker on the table housing designed for
this purpose or take it o and place it on your working table. Thanks to its inclined base you can direct the sound wherever you
want to.
The Bluetooth speaker has a USB charger and additional instructions. Please read them carefully.
Bamboo Sound System

Instruction
Manual
16
9. Maintenance and cleaning
Cleaning the chassis and metal frame:
Clean the table with a clean, so and dry cloth.
For persisting stains, use a white cloth, damp it with clear water and a domestic household cleaner FREE of alcohol.
Cleaning the cushions:
The Naggura tables have a high quality Spradling vinyl protected by Permablok, against stains and abrasion.
The vinyl should be cleaned periodically in order to maintain its appearance and prevent build-up of dirt and contaminants. Any
stains should be removed immediately.
- Cleaning aer each patient:
If desinfection aer each patient is required, use one of the products “list of desinfectants”. In case of spilling massage oil, re-
move it with a PH-neutral soap immediately (1:9 liquid soap, neutral PH and water). Always remove residu with clean water aer
cleaning with soap.
- Cleaning at te end of each day:
In order to prevent the build-up of contaminents and grease, it is important that the surface is cleaned every day. Clean the en-
tire surface using a mixture of 1:9 liquid soap (neutral PH) and water. Do not use soap or cleaning solutions that contain alcohol,
ketones, xylene, acetates or solvents. Always remove residu with clean water aer cleaning with soap.
- Cleaning each month or in case of stains:
Use the original Naggura Cuirnet high-performance cleaner in a dilution of 1:9 Cuirnet and water. If the stain cannot be removed,
the cuirnet cleaner maybe be used undiluted.
- Aer the cleaning, always rinse with clear water and dry.
- NEVER use the Naggura Cuirnet cleaner for the metal frame of the table.
Maintenance
Naggura tables have been designed for an intensive use during long time thanks to its stability, reliability and durability. Howe-
ver, we advise to keep the table in perfect conditions and make a correct use of it. Unplug the table if you will not use it for a long
period of time.
Environment information
If this symbol appears on electrical products or on its packaging, this means that they must be recycled properly. Please en-
sure that you are well informed of the local rules and regulations regarding to the removal of equipment and accessories.

Instruction
Manual
17
Squeaking noise when moving the table up & down (mechanical noise)
• The axes are adjusted and greased from factory but with the time and use, they may need some little adjustement. Remove
the grey plugs of the 2 connecting rods (4 at each side, so 8 in total). Loosen the axes a litlle bit by unscrewing them (approx. 2
turns). Apply a bit of neutral grease and plug them again.
10. Troubleshooting and service
If you need to reach the electrical main components
of the table to perform repairing tasks, the table must
be leant laterally to let it resting on the floor. To do so,
the operator has to install a protection kit to prevent
the Space Ball mechanisms from being damaged. If
not, the sphere metal mechanisms will bend.
First, install the set of 2 L-shaped plates as it is shown
in the picture to turn the bed to one side without da-
maging the Space Ball perimeter switch.
Take the decorative panel in the base out and screw
the L-shaped plates in the same threaded holes.
Place a washer between the table frame and the
L-shaped plate and screw it tightly with the Allen key
provided. The mounting tools, screws and washers
are provided by Naggura.
When both L-shaped plates are installed at each
side, the table can be leant to the side safely. 2 peo-
ple needed to tilt the table carefully.
In order to protect the upholstery, we recommend you
to put a towel or a protective tarpaulin on the ground.
Only a technician authorized by Naggura is allowed to perform any kind of repairs on the bed.
None of the parts inside the device may be replaced by the user. If your technical sta is allowed by Naggura to repair the
bed, naggura can provide the necessary instructions and spare parts lists.
Please contact your local Naggura distributor for more information.

Instruction
Manual
18
The backrest moves down alone
The supporting gas lis are loose.
• In such a case, remove the gas li from the lower part and loosen it (unscrew it) 2 turns and fix it again. Proceed the same way with
the second gas li.
The back rest is blocked (it can’t be lowered nor raised up)
The gas li activating pin does not activate the lever. Remove the lower side of the gas li and tighten it (screw it 2 turns until you see
that the pin can activate the lever. Proceed the same operation with the second gas li.
The up and down motor does not work
• Check if the power cable is disconnected, either from the wall socket or the control box.
• Check the power cable for any damage.
• Check all the plugs and connections.
• There are 3 possible components that may be faulty: the Space Ball System, the control box or the motor itself. Contact your dealer
to proceed accordingly.
10. Troubeshooting and service
Persisting problems
If the problem persists, contact your local distributor and provide the serial number and the model of the table, or a picture
of the typeshield.
This can be found on the typeshield, located at the backside of the table, inside the top frame.
Serial number

Instruction
Manual
19
11. EMC Guidance
Warning: It is not safe to operate the device in
the presence of HF surgical equipment or places
where the intensity of EM disturbances is high.
Warning: Use of this equipment adjacent to or
stacked with other equipment should be avoided
because it could result in improper operation. If
such use is necessary, this device and other equi-
pment should be observed to verify that they are
operating normally.
Warning: Use only accessories and cables
provided by the manufacturer. Accessories and
cables not recommended may aect the EM
emissions or immunity.
Guidance and Manufacturer’s Declaration
- Electromagnetic Emissions
Emissions test Compliance
RF emissions CISPR 11 Group 1
RF emissions CISPR 11 Class A
Harmonic emissions IEC 61000-3-2 Class A
Voltage fluctuations/flicker emissions
IEC 61000-3-3 Complies
Warning: Maintain minimum distance of 12 inches (30 cm) between any part of the working table and portable
RF communication equipment (including peripherals such as antenna cables and external antennas.) Perfor-
mance of the table might degrade if proper distance is not maintained.
Guidance and Manufacturer’s Declaration - Electromagnetic Immunity
Immunity Test IEC 60601-1-2
Test level Compliance level
Electrostatic discharge
(ESD) IEC 61000-4-2
±8 kV contact
±2 kV, ±4 kV, ±kV, ±15 kV air
±8 kV contact
±2 kV, ±4 kV, ±kV, ±15 kV air
Electrical fast transient
/burst IEC 61000-4-4
±2 kV for power supply lines
±1 kV for input/output lines
±2 kV for power supply lines
±1 kV for input/output lines
Surge IEC61000-4-5 ±1 kV line(s) to line(s)
±2 kV line(s) to earth
±1 kV line(s) to line(s)
±2 kV line(s) to earth
Voltage dips, short
interruptions and voltage
variations on power supply
input lines IEC 61000-4-11
0% U; 0.5 cycle T at 0º, 45º,90º,
135º, 180º, 225º, 270º, 315º
0% UT; 1 cycle
70% UT; 25/30 cycle
0% U; 250/300 cycle
0% U; 0.5 cycle T at 0º, 45º,90º,
135º, 180º, 225º, 270º, 315º
0% UT; 1 cycle
70% UT; 25/30 cycle
0% U; 250/300 cycle
Power frequency (50/60 Hz)
Magnetic field IEC61000-4-8
30 A/m
50Hz/60Hz
30 A/m
50Hz/60Hz
Conducted RF
IEC61000-4-6
3 V r.m.s.
150 kHz to 80 MHz
6 V RMS in the ISM bands
between 0.15 MHz and 80 MHz
3 V r.m.s.
150 kHz to 80 MHz
6 V RMS in the ISM bands
between 0.15 MHz and 80 MHz
Radiated RF IEC61000-4-3
3 V/m
80 MHz - 2,7 GHz
80% AM at 1 kHz
3 V/m
80 MHz - 2,7 GHz
80% AM at 1 kHz
NOTE: UT is the a.c. mains voltage prior to application of the test level.

Instruction
Manual
20
Test Specifications for enclosure port immunity to RF wireless communications equipment
Immunity Test
IEC60601 test level
Compliance
level
Test frequency Modulation Maximum
power
Immunity
level
Radiated RF
IEC 61000-4-3
385 MHz **Pulse Modulation:
18Hz 1.8W 27 V/m 27 V/m
450 MHz *FM+ 5Hz derivation:
1kHz sine 2W 28 V/m 28 V/m
710 MHz
745 MHz
780 MHz
**Pulse Modulation:
217Hz 0.2W 9 V/m 9 V/m
810 MHz
870 MHz
930 MHz
**Pulse Modulation:
18Hz 2W 28 V/m 28 V/m
1720 MHz
1845 MHz
1970 MHz
**Pulse Modulation:
217Hz 2W 28 V/m 28 V/m
2450 MHz **Pulse Modulation:
217Hz 2W 28 V/m 28 V/m
5240 MHz
5500 MHz
5785 MHz
**Pulse Modulation:
217Hz 0.2W 9 V/m 9 V/m
Note* - As an alternative to FM modulation, 50% pulse modulation at 18 Hz may be used
even if it does not represent actual modulation.
Note** - The carrier shall be modulated using a 50% duty cycle square wave signal.
This manual suits for next models
10
Table of contents
Other Naggura Indoor Furnishing manuals
Popular Indoor Furnishing manuals by other brands

KI
KI WorkZone Assembly instructions

OAKWORKS
OAKWORKS Marina user manual

Home Decorators Collection
Home Decorators Collection VA-FC0201 Assembly instructions

Keter
Keter SPACE RITE Assembly instructions

Merry Product
Merry Product MPG-PT-41110WP Use and care guide

Home affaire
Home affaire Adriana 43949663 Assembly instructions

Home Decorators Collection
Home Decorators Collection MERRYFIELD 419112-V48-DG Assembly instructions

VIPACK
VIPACK PISBMA14 Instructions for use

Philips
Philips H33 datasheet

GWINNER
GWINNER TREVISO Installation

Furniture of America
Furniture of America CM7441N Assembly instructions

Walker Edison
Walker Edison CHW2 Assembly instructions