Nahita 5144 Series User manual

Pág. 1 Versión 1, septiembre 2023
Manual de uso de balanzas analíticas
Este manual es parte inseparable del aparato por lo que debe estar disponible a todos
los usuarios del equipo. Le recomendamos leer atentamente el presente manual y seguir
rigurosamente los procedimientos de uso para obtener las máximas prestaciones y una
mayor duración del mismo.
This manual should be available for all users of these equipments. To get the best
results and a higher duration of this equipment it is advisable to read carefully this
manual and follow the processes of use.
Ce manuel est une partie indissociable de l’appareil et doit être mis à la disposition de
tous les utilisateurs de l’équipement. Nous vous recommandons de lire attentivement
ce manuel et de suivre scrupuleusement les procédures d’utilisation afin d’obtenir des
performances maximales et une plus longue durée de vie de l’appareil.
SERIES - SERIES - SÉRIES 5144, 5145, 5183
BALANZAS ANALITICAS NAHITA BLUE
NAHITA BLUE ANALYTICAL BALANCES
BALANCES ANALYTIQUES NAHITA BLUE

Page 22
ENGLISH
Version 1, September 2023
User’s manual for analytical balances
1. Introduction ........................................ 22
2. Preparation......................................... 25
3. Calibration.......................................... 26
4. Set up and operation............................ 29
5. Troubleshooting................................... 41
English 2-21
English
French
22-41
42-61
INDEX OF CONTENTS
INDEX OF CONTENTS
1. INTRODUCTION
5144, 5145, 5183 Series analytical balances work on electromagnetic force compensation technology
and microprocessor, which allows high speed stabilization and high reliability. They can be widely used
in industry, agriculture, commerce, schools, scientific research and other institutions.
Safety precautions
Avoid direct sunlight
Avoid vibrations
Avoid strong drafts
Avoid temperature fluctuations
Verify that the AC/DC adapter input voltage matches the local AC power supply
Sufficient spacing for balances: >15cm all around the instrument
Diagram
1. Control panel
2. Front panel draft shield
3. Top door draft shield
4. Side door draft shield (right/left)
5. Weighing pan
6. Leveling feet
7. RS232 interface
8. USB-B port
9. Socket for power adapter
10. Bubble level
11. Below weighing

Page 23
ENGLISH
Version 1, September 2023
User’s manual for analytical balances
Control panel
Display information
No Display Description
1 Model display
2 Internal calibration sign
3 Negative weight value
4 Stable value
5 Weighing sign
6 Density determination
7 Piece counting
8 Dynamic weighing
9 Summation
10 Progress bar
11 Time setting
12 W1 W2 W1: weight in air, W2: weight in liquid
13 Unauthenticated numbers
14 Unit

Page 24
ENGLISH
Version 1, September 2023
User’s manual for analytical balances
Technical data - 5145 Series analytical balance (0.01mg))
Technical data - 5144 Series analytical balances (0.1 mg)
Reference (ext. calibration) KBK002
Capacity 200 g
Readability 0.01 mg hasta 51 g / 0.1 mg > 51 g hasta 200 g
Stabilization time 2-3 s
Preheating time 30-60 min
Weighing unit g / oz / ct / mg
Min. weight 1 mg / 0.5 mg
Repeatability ±0.03 mg / ±0.1 mg
Linearity ±0.03 mg / ±0.2 mg
Interface RS232/USB
Pan size Ø 90 mm
Net weight 6280 g
Power supply AC 110-240 V; 9 VD 2 A
Reference (ext. calibration) KBF010 KBF011 KBF012
Reference (int. calibration) KBF013 KBF014 KBF015
Capacity 120 g 320 g 520 g
Readability 0.1 mg
Stabilization time 1.5 s 2.5 s
Preheating time 30-60 min
Weighing unit g / oz / ct / mg
Min. weight 0.1 mg
Repeatability ±0.1mg ±0.2 mg
Linearity ±0.2 mg ±0.3 mg
Interface RS232 / USB
Pan size Ø 90 mm
Net weight 6280 g
Power supply AC 110-240 V; 9 VD 2 A

Page 25
ENGLISH
Version 1, September 2023
User’s manual for analytical balances
Technical data - 5183 Series analytical balances (1mg)
Reference (ext. calibration) KBD015 KBD016 KBD017
Reference (int. calibration) KBD018 KBD019 -
Capacity 500 g 1000 g 2000 g
Readability 1 mg
Stabilization time 1-2 s
Preheating time 30-60 min
Weighing unit g / oz / ct / mg
Min. weight 1 mg
Repeatability ±1 mg
Linearity ±2 mg
Interface RS232 / USB
Pan size Ø 90 mm
Net weight 6280 g
Power supply AC 110-240 V; 9 VD 2 A
Leveling the balance
Connecting and switching on
2. PREPARATION
Put the balance on the stable desk, the desk can not be moved.
Adjust the two feet on the bottom, until the bubble is centered in the circle, then place the balance
pan.
Plug in the AC/DC adapter and connect the control panel with the balance.

Page 26
ENGLISH
Version 1, September 2023
User’s manual for analytical balances
Conexión y encendido
Press the ON/OFF button. Balance enters the weighing interface.
When the operating temperature changed, put the balance in the new place for 2 hours in the state
of “power on”, to make the balance comply with the new temperature. Recommended temperature
between 15 and 25 ºC.
Attention: lf the number on display is not stable in first boot, this occurred by operating temperature,
you can press “TARE” botton repeatedly and lay aside for 30 minutes.
In order to get accurate weighing result, balance should be calibrated in below usage scenarios.
1. Before first use
2. Balance power off for long time
3. After changing the operating environment
4. Perform regularly in weighing procedure
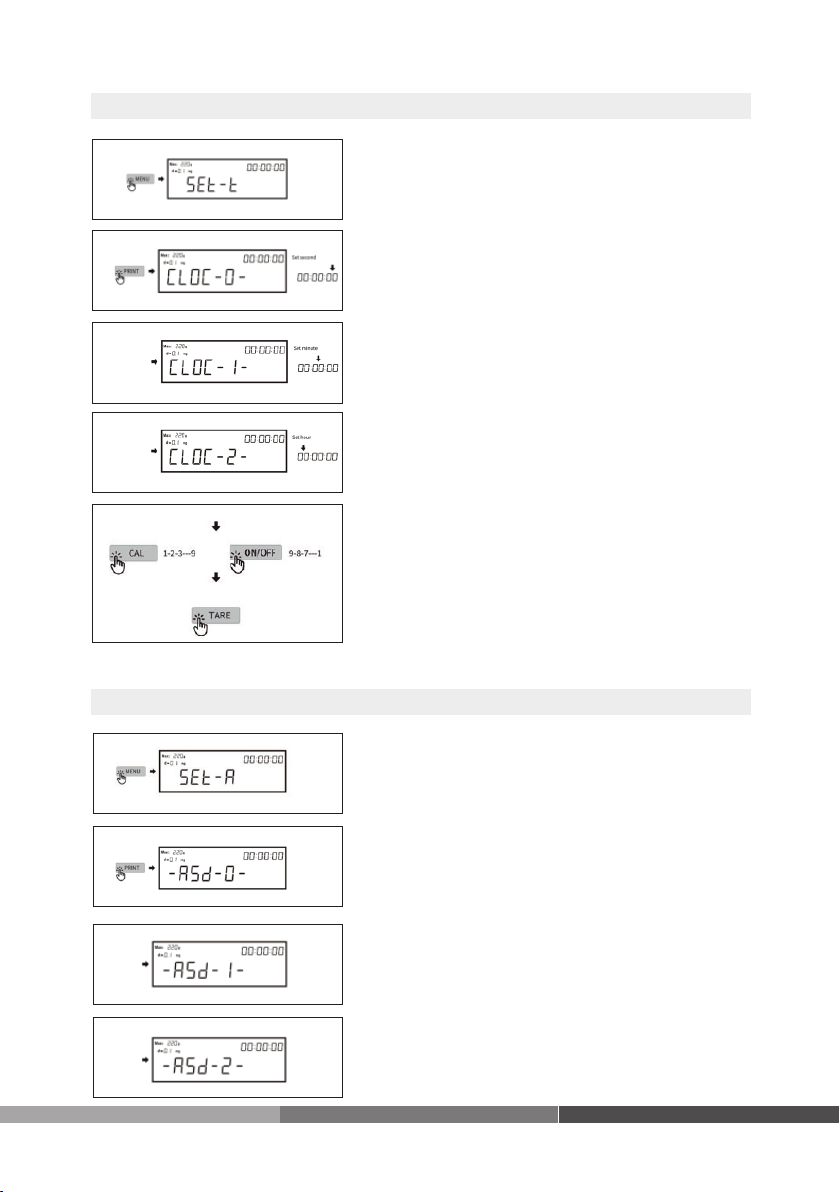
Chose the calibration method (follow the sequence)
3. CALIBRATION
Enter the calibration mode
External calibration mode
Internal calibration weight value setting mode (balance
with internal calibration only)
Internal calibration mode (balance with internal calibra-
tion only)
Auto-calibration every 30 minutes (balance with inter-
nal calibration only)
Auto-calibration every 1 hour (balance with internal ca-
libration only)
Auto-calibration every 3 hours (balance with internal
calibration only)
Save setting

Page 27
ENGLISH
Version 1, September 2023
User’s manual for analytical balances
Balance back to zero
External calibration (single-point calibration)
Linear calibration
Enter external calibration mode; “CAL-100” flicker
Put the 100g weight (for example, in balance ref.
KBF010)
Put the 100g weight (for example, in balance ref.
KBF010). Screen shows “CAL-100”. Remove the
weight. Finish the calibration.
Balance back to zero
Press MENU button until screen shows “SET-C”
Enter linear calibration mode; screen shows “Lin-0”
Finish the calibration
Follow the prompts to put the corresponding weights

CASTELLANO
Versión 1, Septiembre 2023
Pág. 28
Manual de uso de balanzas analíticas
Enter calibration mode
Chose the calibration method
Screen shows “CAL-dn”
Put the corresponding weight. Screen shows “CAL-
uP”. Remove the weight.
Internal calibration weight value setting (balance with internal calibration only)
Auto-calibration
Finish the setting
If the balance model is an internal calibration model, please directly press the calibration
button to calibrate.
Enter calibration mode
Automatic calibration with a fixed time of 30 minu-
tes (balance with internal calibration only)
The TARE button saves the setting, and the ba-
lance automatically checks every 30 minutes the-
reafter.

Page 29
ENGLISH
Version 1, September 2023
User’s manual for analytical balances
Unit conversion
Baud rate setting
4. SET UP AND OPERATION
Unit “g”
Unit “oz”
Unit “ct”
Unit “mg”
Enter Baud rate setting mode
Baud rate is 1200
Baud rate is 2400
Baud rate is 4800
Baud rate is 9600. Save setting

Page 30
ENGLISH
Version 1, September 2023
User’s manual for analytical balances
Time setting
Sensitivity setting
1. Enter time setting mode
2. Set seconds
3 Set minutes
4. Set hours
5. CAL increase. ON/OFF decrease. Press
the TARE button to save the settings.
1. Enter sensitivity setting mode
2. -ASD-0- highest sensitivity
3. -ASD-1- high sensitivity
4. -ASD-2- medium sensitivity

Page 31
ENGLISH
Version 1, September 2023
User’s manual for analytical balances
Sensitivity setting
Filter level setting
5. -ASD-3- low sensitivity
Save setting
NOTE: Factory setting sensitivity “-ASD-3-” is suitable for most environments. Higher sensi-
tivity requires better environment. Don’t adjust the sensitivity without consulting the manu-
facturer.
1. Enter filter level setting mode
2. -Int-0- filter level highest
3. -Int-1- filter level high
4.-Int-2- filter level medium
5. -Int-3- filter level low
Save setting
NOTE: Filter level is the internal calculating time of
balance. Factory setting is “-Int-3-”. Don’t change by
yourself without professional instruction.

Page 32
ENGLISH
Version 1, September 2023
User’s manual for analytical balances
Print setting
1. Enter print setting mode
2. -Prt-0- press “PRINT” printing
3. -Prt-1- interval 0.5 s printing
4. -Prt-2- interval 1 s printing
5. -Prt-3- interval 2 s printing
6. -Prt-4- interval 3 s printing
Save setting
INTERFACE PARAMETERS
RS232 interface
Connection
Balance (9 pins) PC/Printer (9 pins)
RXD (Input) 2 2
TXD (Output) 3 3
GND (Ground) 5 5
The baud rate by default is 9600 bps (see baud rate setting)
Data format: 10 bits, 0 as start bit, 1 as stop bit, 8 digits (ASCII code) – No odd and even numbers
adjusting
Data output: By default is continuous mode. The data output mode can be changed into press output,
timing output and continuous output (see data output setting)
Output data format:
123456 789101112131415
Type or data Data Data Data Data Type or data Type or data Data Data Data Unit Unit Unit Return Line feed

Page 33
ENGLISH
Version 1, September 2023
User’s manual for analytical balances
Piece counting
Put 10 pcs on the balance pan according to above
setting. Press “UNIT” to confirm the sample weight
and start weighing
1. Enter piece counting mode
3. -COU-25- sample quantity 25 pcs
2. -COU-10- sample quantity 10 pcs
4. -COU-50- sample quantity 50 pcs
5. Enter piece counting mode

Page 34
ENGLISH
Version 1, September 2023
User’s manual for analytical balances
Percent weighing
Density determination (gravity kit needed – optional)
1. Enter percent weighing mode. Put the contrast
target sample on the balance pan, for example, 2
pcs of screw.
2. Save the sample weight. “100.00” (100%) is
shown.
3. If you put 1 screw on the balance pan, “50.00”
(50%) is shown.
4. If you put 4 screws on the balance pan,
“200.00” (200%) is shown.
1. Enter density determination mode
2. -dEn-0- close density weighing
3. -dEN-1- open solid density weighing
4. -dEN-2- open liquid density weighing
5. Save settings. Display shows and “W1”
6. Enter density determination mode

Page 35
ENGLISH
Version 1, September 2023
User’s manual for analytical balances
Density determination (gravity kit needed – optional)
7.-dEN-1- open solid density weighing
9. Press “MENU”. Display shows
8. Save setting. Display shows and “W1”
10. Enter auxiliary liquid density value. If the auxiliary liquid
is water, enter 1 g/cm3.
Put object on pan 1, for
example, screw
14. Get the result of density
11. Press “PRINT” to increase the value and “CAL” to
decrease the value. Save density value setting.
15. If no more measurements, enter density determi-
nation mode again. -dEn-0- close density weighing.
Exit density determination.
13. Put object on pan 2

Page 36
ENGLISH
Version 1, September 2023
User’s manual for analytical balances
Dynamic weighing
Summation function
1. Enter dynamic weighing mode
2. -COU-0- close dynamic weighing
3. -COU-10- data sampling 10 seconds (approx.)
4. -COU-20- data sampling 20 seconds (approx.)
5. Save setting. Display shows . Place the sam-
ple on the balance pan (if the weight is not displayed,
press the UNIT key) and the weight of the object will
be displayed.
6. Put the sample on the balance pan, the icon
starts flashing, dynamic weighing begins
7. stops flashing, the dynamic weighing is finished,
the display shows the final result. When the weighing
is finished, you can remove the object from the pan
and press the UNIT key again to start the weighing
again.
1. Enter summation function mode
3.-Add-5- accumulate 5 times weighing value
2.-Add-0- close summation function

Page 37
ENGLISH
Version 1, September 2023
User’s manual for analytical balances
Summation function
Summation function
3. -Add-15- accumulate 15 times weighing value
4. -Add-10- accumulate 10 times weighing value
4. -Add-20- accumulate 20 times weighing value
5. Save setting. Display shows
1. Enter summation function mode
2. -Add-5- accumulate 5 times weighing value (e.g.)
3. Save setting and enter weighing mode
4. Put on target object 1 (e.g. screw)
6. Remove target object 1. Balance back to zero.
5. Record value of target object 1. Bottom right corner
shows “1” time.

Page 38
ENGLISH
Version 1, September 2023
User’s manual for analytical balances
Summation function
Pipette calibration
7. Put on target object 2
8. Record value of target object 2. Bottom right
corner shows “2” times.
9. Remove target object 2. Balance back to zero.
10. Repeat the procedure for target objects 3 and 4
Put on target object 5
11. Auto display 5 times accumulated weighing
value.
12. If no more measurements, enter summation
function mode again
13. -Add-0- close summation function. Exit sum-
mation function.
1. Enter pipette calibration mode
2. -COU-0- close pipette calibration

Page 39
ENGLISH
Version 1, September 2023
User’s manual for analytical balances
Pipette calibration
3.-COU-2- get 2 times weighing value as reference
5. -COU-7- get 7 times weighing value as reference
7. Save setting and enter pipette calibration interface
4. -COU-5- get 5 times weighing value as reference
6. -COU-10- get 10 times weighing value as reference
Pipette calibration
1. Enter pipette calibration mode
2. -COU-5- get 5 times weighing value as reference
3. Save setting and enter pipette calibration interface
4. Take with the pipette 100μl, drop into the contai-
ner, first time
5. Record the first value

Page 40
ENGLISH
Version 1, September 2023
User’s manual for analytical balances
Pipette calibration
Sensor locking and unlocking
6. Remove the first value. Balance back to zero.
1. Enter dual program switching
2. Balance default program
3. The standby program
7. Repeat the above procedure 3 times
Take with the pipette 100μl, drop into the container,
fifth time
8. Get liquid volume directly. Calibration completed.
9. If no more calibrations, enter pipette calibration
mode again
10. -COU-0- close pipette calibration. Exit pipette ca-
libration mode
This manual suits for next models
14
Table of contents
Other Nahita Scale manuals