nama C2 User manual


TABLE OF CONTENTS
Getting Started Support Page
Welcome
Thank you for purchasing your new Nama®C2 Cold Press
Juicer + Blender. We are very excited to welcome you to
the Nama brand and our community. One of our goals is to
empower you to make healthy choices that taste good and
are fun to make. This brand is built on the idea that our
wellness rituals will help everyone on their path to becoming
better, every day.
We want you to maximize the benefits from your new Nama
C2 Cold Press Juicer + Blender and use it with the utmost
confidence, so please read through this User Manual prior
to juicing and blending.
We continually strive to improve our products, services,
and content and graciously ask for your feedback to help us be
better so we can help you create your own wellness journey.
Cheers to good health!
Your friends at Nama
CHECK US OUT ONLINE AT WWW.NAMAWELL.COM
02 |Juicer
01 |Safety
03 |Blender
04 |Appendix
05 |Languages
02 Important Safeguards
03 Safety Precautions
10 Parts and Accessories
12 Assembling the Chamber
13 Assembling the Hopper
14 Final Assembly
15 Tips
16 Control Knob and Display
18 How to Operate
20 Ingredients
21 Layering Guide
22 How to Operate for Sorbet
23 Sorbet Ingredients
24 Silicone Parts
26 Strainers and Attachments
27 How to Disassemble / Clean
30 Parts and Accessories
32 Assembly
34 Control Knob and Display
35 Blending Modes
36 How to Operate
38 Ingredients
39 Blending Guide
40 How to Disassemble / Clean
41 Troubleshooting
43 Error Codes
44 Warranty
45 Traducción al Español
91 Traduction Française

02 03
WHEN USING ELECTRICAL APPLIANCES, BASIC SAFETY PRECAUTIONS SHOULD
ALWAYS BE FOLLOWED INCLUDING THE FOLLOWING:
1. READ ALL INSTRUCTIONS.
2. TO PROTECT AGAINST RISK OF ELECTRICAL SHOCK, DO NOT PUT THE MAIN BASE
MOTOR IN WATER OR ANY OTHER LIQUID.
3. THIS APPLIANCE IS NOT INTENDED FOR USE BY PERSONS INCLUDING CHILDREN
WITH REDUCED PHYSICAL, SENSORY, OR MENTAL CAPABILITIES, OR LACK OF
EXPERIENCE AND KNOWLEDGE, UNLESS THEY ARE CLOSELY SUPERVISED AND
INSTRUCTED CONCERNING USE OF THE APPLIANCE BY A PERSON RESPONSIBLE
FOR THEIR SAFETY. CLOSE SUPERVISION IS NECESSARY WHEN ANY APPLIANCE
IS USED BY OR NEAR CHILDREN. CHILDREN SHOULD BE SUPERVISED TO ENSURE
THAT THEY DO NOT PLAY WITH THE APPLIANCE.
4. TURN THE APPLIANCE OFF, THEN UNPLUG FROM THE OUTLET WHEN NOT IN USE,
BEFORE ASSEMBLING OR DISASSEMBLING PARTS AND BEFORE CLEANING. TO
UNPLUG, GRASP THE PLUG AND PULL FROM THE OUTLET. NEVER PULL FROM THE
POWER CORD.
5. AVOID CONTACTING MOVING PARTS. DO NOT ATTEMPT TO DEFEAT ANY SAFETY
INTERLOCK MECHANISMS.
6. DO NOT OPERATE ANY APPLIANCE WITH A DAMAGED CORD OR PLUG, OR AFTER
THE APPLIANCE MALFUNCTIONS, OR IS DROPPED OR DAMAGED IN ANY MANNER.
CONTACT NAMA CUSTOMER SERVICE AT SUPPORT@NAMAWELL.COM EMAIL OR
NAMAWELL.COM/CONTACT WEBSITE FOR REVIEW AND FURTHER INSTRUCTIONS.
7. THE USE OF ATTACHMENTS NOT RECOMMENDED OR SOLD BY THE MANUFACTURER
MAY CAUSE FIRE, ELECTRIC SHOCK OR INJURY.
8. DO NOT LET CORD HANG OVER EDGE OF TABLE OR COUNTER.
9. DO NOT USE OUTDOORS.
10. ALWAYS MAKE SURE HOPPER IS SECURELY FASTENED IN PLACE BEFORE MOTOR
IS TURNED ON. DO NOT UNFASTEN HOPPER WHILE JUICER IS IN OPERATION.
11. BE SURE TO TURN SWITCH TO OFF POSITION AFTER EACH USE OF YOUR JUICER.
MAKE SURE THE MOTOR STOPS COMPLETELY BEFORE DISASSEMBLING.
12. DO NOT PUT YOUR FINGERS OR OTHER OBJECTS INTO THE JUICER WHILE IT IS
IN OPERATION. IF FOOD BECOMES LODGED IN OPENING, USE FOOD PUSHER OR
ANOTHER PIECE OF FRUIT OR VEGETABLE TO PUSH IT DOWN. WHEN THIS METHOD
IS NOT POSSIBLE, TURN THE MOTOR OFF AND DISASSEMBLE JUICER TO REMOVE
THE REMAINING FOOD.
13. KEEP HANDS AND UTENSILS, OTHER THAN THE TAMPER PROVIDED, OUT OF
CONTAINER WHILE BLENDING TO REDUCE THE RISK OF SEVERE INJURY TO PERSONS
OR DAMAGE TO THE BLENDER. THE COVER MUST REMAIN IN PLACE WHEN USING
THE TAMPER THROUGH THE COVER OPENING. A SCRAPER MAY BE USED BUT MUST
BE USED ONLY WHEN THE BLENDER IS NOT RUNNING.
14. BLADES ARE SHARP. HANDLE CAREFULLY.
IMPORTANT SAFEGUARDS IMPORTANT SAFEGUARDS (CONTINUED)
SAFETY PRECAUTIONS (HOUSEHOLD USE ONLY)
Read this manual before operating product.
1. Read Safety Precautions (pp.03-05) and use the appliance properly in
accordance with this user manual.
2. After reading the manual, keep it in a convenient location for future reference.
3. Do not use this product internationally that has a dierent power supply and
voltage than specied on the rating label located on the product base.
4. Any quality improvements are subject to change without notice.
WARNING: VIOLATING THE LABELING
REQUIREMENTS AND WARNING MARKS
MAY CAUSE SERIOUS INJURY OR DEATH,
OR DAMAGE TO THE PRODUCT.
• USE THE CORRECT VOLTAGE AND POWER
ONLY AS SPECIFIED ON THE WARRANTY
CARD, THE PRODUCT SPECIFICATIONS,
AND RATING LABEL. FAILURE TO
FOLLOW THIS INSTRUCTION MAY
RESULT IN ELECTRIC SHOCK, FIRE, OR
PERFORMANCE IMPAIRMENT. Connecting
to a dierent voltage may shorten the
motor’s lifespan or cause malfunction.
• IF THE POWER CORD IS DAMAGED IN
ANY WAY, DO NOT USE OR OPERATE
PRODUCT AND DO NOT ATTEMPT TO
REPAIR OR MODIFY IT YOURSELF. IT MUST
BE REPLACED BY MANUFACTURER OR
AUTHORIZED DEALER. PLEASE CONTACT
NAMA CUSTOMER SERVICE.
Precautions for Safe Use
1. You should read Safety Precautions.
2. You should follow Safety Precautions.
3. Precautions are classied as follows:
15. ALWAYS OPERATE BLENDER WITH COVER IN PLACE.
16. THE USE OF ATTACHMENTS, AND ACCESSORIES, NOT RECOMMENDED BY THE
MANUFACTURER AS IT MAY CAUSE A RISK OF INJURY TO PERSONS.
17. WHEN BLENDING HOT LIQUIDS, ENSURE LID IS SECURE AND DO NOT FILL JUG ABOVE
THE MAX HOT LIQUID INGREDIENT LEVEL.
18. DO NOT USE APPLIANCE FOR OTHER THAN INTENDED USE.
19. DO NOT OPERATE WITHOUT THE PULP CONTAINER IN PLACE.
SAVE THESE INSTRUCTIONS

04 05
• DO NOT BEND, TIE, DAMAGE OR PULL THE
POWER CORD BY FORCE, OR PLACE IT NEAR
A HIGH TEMPERATURE OR HEAT SUCH AS
A GAS STOVE. ALSO, DO NOT PLACE ANY
HEAVY OBJECT ON TOP OF THE PRODUCT,
WEDGE IT INTO A NARROW SPACE, OR
ALTER IT. It may damage the power cord and
cause re and/or electric shock.
• DO NOT PRESS BUTTONS AND INSERT OR
PULL THE CORD WITH WET HANDS. IT MAY
CAUSE ELECTRIC SHOCK, A SHORT CIRCUIT
AND/ OR FIRE. DO NOT LET ANY FOREIGN
SUBSTANCES COME INTO CONTACT AND/
OR NEAR THE CONTROL KNOB.
• DO NOT USE THE PRODUCT IN A PLACE
WITH A HIGH HUMIDITY LEVEL OR RISKS
OF FIRE. DO NOT PLACE THE DEVICE ON
TOP OF OR NEAR A HOT GAS STOVE,
MICROWAVE OR OTHER KITCHEN
APPLIANCES THAT MAY BECOME HOT.
• DO NOT ATTEMPT TO MODIFY, DISMANTLE
OR REPAIR THE PRODUCT YOURSELF UNDER
ANY CIRCUMSTANCES.
• DO NOT SPLASH LIQUIDS ON THE
PRODUCT MOTOR BASE. IF LIQUIDS GET
INTO THE PRODUCT MOTOR BASE, UNPLUG
PRODUCT FROM POWER AND CONTACT
NAMA CUSTOMER SERVICE FOR SUPPORT.
• DO NOT SOAK THE PRODUCT MOTOR
BASE IN ANY LIQUIDS TO CLEAN IT. DO
NOT LET WATER GET ON THE POWER PLUG.
DO NOT WIPE THE PRODUCT WITH
A PAINT THINNER, BENZENE OR SPRAY
TYPE CHEMICAL. PLEASE STORE
THE PRODUCT AWAY FROM HIGH
TEMPERATURES AND HUMIDITY.
• DO NOT USE THE PRODUCT IN A PLACE
SUCH AS A SINK OR BATHTUB WHERE
WATER MAY GET INTO IT. DO NOT
CONTROL BUTTONS WITH WET HANDS.
USE THE PRODUCT ONLY ON A FLAT
AND DRY SURFACE.
• DO NOT USE SEVERAL ELECTRIC
APPLIANCES SIMULTANEOUSLY BY
PLUGGING THEM ALL INTO A SINGLE
MULTITAB POWER STRIP OR OUTLET.
PLEASE USE AN EXCLUSIVE OUTLET
WHEN OPERATING THIS PRODUCT.
• DO NOT MOVE THE PRODUCT DURING
OPERATION. AND DO NOT INSERT
HANDS, TOOLS OR ANYTHING OTHER
THAN INGREDIENTS AND THE PUSHER
INTO THE CONTAINER. Insertion of hands,
tools, etc. may cause a serious injury,
accident and/or malfunction.
• THOSE WHO ARE NOT FAMILIAR WITH
THE HANDLING OF THIS PRODUCT
SHOULD NOT USE IT ALONE. Those
who experience physical and/or mental
discomfort, those who lack experience and
knowledge, and children should use the
product with a guardian.
• DO NOT USE IT WITHIN CHILDREN’S
REACH. Children should be carefully
supervised so that they do not use this
device for play. There is a risk of an injury
or malfunction if children accidentally hit
and knock it down.
• FOR CHILDREN, EVEN A MINOR BURN
MAY BE EXTREMELY DANGEROUS.
EDUCATE CHILDREN SO THAT THEY
LEARN THE HABIT OF PRACTICING
CAUTION ABOUT HOT LIQUIDS.
• TURN OFF THE POWER AND PULL OUT
THE POWER PLUG WHEN ASSEMBLING
OR DISASSEMBLING PARTS, WHEN THE
PRODUCT IS NOT USED, OR BEFORE
CLEANING. Make sure to pull out the power
cord pulling from the plug and disconnect
power before cleaning or when not in use.
• MAKE SURE TO REMOVE THE POWER
PLUG FROM THE OUTLET BEFORE
CLEANING THE PRODUCT. DO NOT
CLEAN THE PRODUCT IN AN INCORRECT
METHOD. Refer to the user manual for
cleaning and do not clean by any method
not specied.
• USE IT IN PLACE WITH A LEVEL SURFACE.
DO NOT USE THE PRODUCT OUTDOORS,
OR EXERT ANY EXCESSIVE SHOCK TO OR
DROP THE PRODUCT. DO NOT USE THE
PRODUCT IF IT IS DAMAGED.
• DO NOT USE THE PRODUCT WHILE
WEARING OR POSSESSING AN ARTICLE
WITH MAGNETIC FORCES E.G.
MAGNETIC BRACELET. KEEPING AN
SAFETY PRECAUTIONS (CONTINUED) SAFETY PRECAUTIONS (CONTINUED)
ITEM WITH MAGNETIC FORCES NEAR THE
PRODUCT MAY CAUSE A MALFUNCTION.
• THE SMELL EXPERIENCED WHEN USING
A NEW PRODUCT WILL NATURALLY
GO AWAY OVER TIME. It is a common
phenomenon and has no issue during use.
• USE OF AN EXCESSIVELY LARGE AMOUNT
OF INGREDIENTS MAY DAMAGE THE
PARTS.
• PLEASE REMOVE ALL PACKAGING AND
LABELS BEFORE USE. ALL PROTECTIVE
MATERIALS ATTACHED TO THE
CONTAINER SHOULD BE REMOVED
BEFORE USE.
• FOR SAFETY, PLEASE KEEP PACKAGING
MATERIALS BAGS, DRAWSTRINGS, ETC.
OUT OF CHILDREN’S REACH.
• PRIOR TO USE, ALWAYS CHECK THAT THE
PRODUCT IS ASSEMBLED CORRECTLY .
• THIS PRODUCT IS FOR HOUSEHOLD USE
ONLY, DO NOT USE FOR COMMERCIAL
PURPOSES. USE OF THE DEVICE FOR AN
INCORRECT PURPOSE OR METHOD OR A
FAILURE TO COMPLY WITH THE ABOVE
GUIDELINES MAY CAUSE A SERIOUS
INJURY OR DEATH, OR CONSIDERABLE
DAMAGE TO THE PRODUCT.
• DO NOT CLEAN THE PRODUCT AT A
TEMPERATURE OF 80°C OR HIGHER. DO
NOT PLACE IT IN A DISHWASHER, DRYER,
MICROWAVE, ETC.
• WE RECOMMEND TO CLEAN THE
PRODUCT IMMEDIATELY AFTER USE TO
PREVENT ISSUES WITH PERFORMANCE.
• DO NOT USE THE BLENDER JUG AS A
STORAGE CONTAINER AS IT MAY CAUSE
DAMAGE TO THE PRODUCT.
• WE RECOMMEND FOLLOWING THE
INSTRUCTIONS IN THIS USER MANUAL
TO PREPARE INGREDIENTS BEFORE
INSERTING THEM.
• DO NOT OPERATE THIS PRODUCT
WITHOUT INGREDIENTS.
• WHEN USING THE PRODUCT, BE CAREFUL
SO THAT CLOTHING, A TIE, LONG
NECKLACE, SCARF, ETC. DO NOT GET
INTO THE INLET.
• DO NOT USE THE DEVICE IF A ROTATING
PART AUGER, PROCESSING BLADE,
STAINLESS BLADES OF THE BLENDER
OR A LID HOPPER LID, BLENDER LID IS
DAMAGED OR CRACKED. IF THE DEVICE IS
DAMAGED, DO NOT USE IT AND CONTACT
THE NAMA CUSTOMER SERVICE FOR AN
INSPECTION, REPAIR OR REPLACEMENT.

06 07
WHEN USING JUICER
• MAKE SURE TO PROPERLY READ
THE INSTRUCTIONS FOR PREPARING
INGREDIENTS BEFORE INSERTING THEM.
- Poorly prepared ingredients may hinder the
extraction process and/or cause damage to
the product.
• INGREDIENTS THAT NEED EXTRA CARE
- When using soft ingredients alone, such as
oranges, mangoes, bananas, or strawberries,
the juice or ingredients may collect inside the
chamber and hopper and not be extracted
properly. We recommend to add harder type
of ingredients like carrots, beets, and celery
on top of or after soft ingredients.
- When making nut milks, we recommend
soaking the nuts in water for a minimum of 4
hours to help soften the nuts for extraction.
• INGREDIENTS THAT CANNOT BE JUICED
- Do not use ingredients such as sesame
seeds, coee beans, hard seeds, or pits of
stone fruits.
- Do not use any ingredients that are not
juiceable in nature, such as lemongrass or
sugarcane, which may cause damage to
the product.
- Do not use frozen ingredients or ice cubes
for juicing.
• WE RECOMMEND CONSUMING THE JUICE
IMMEDIATELY FOR OPTIMAL NUTRITION,
AND CONSUME JUICE WITHIN 3 DAYS
IF REFRIGERATED IN AIRTIGHT SEALED
CONTAINER.
• DO NOT USE THIS PRODUCT FOR
GRINDING GRAINS OR COFFEE BEANS
(FAILURE TO FOLLOW THIS INSTRUCTION
MAY CAUSE MALFUNCTION OR DAMAGE
TO THE PRODUCT.)
WHEN USING BLENDER
• DO NOT USE IT CONTINUOUSLY FOR
A DURATION LONGER THAN THE
STANDARD USAGE TIME. IT MAY
OVERHEAT THE MOTOR AND CAUSE A
MALFUNCTION. IF IT HAS TO BE USED
FOR LONGER THAN THE STANDARD
USAGE TIME, DO SO WITH A GAP OF 30
MINUTES OR LONGER. IN MANUAL MODE,
USE IT FOR 1 MINUTE, 8 TIMES 1 MINUTE
OF OPERATION FOLLOWED BY 1 MINUTE
OF STOPPAGE, PROHIBITED TO USE 9
CONSECUTIVE TIMES AND, IN AUTO
MODE, USE IT ONCE FOR 7.5 MINUTES 7.5
MINUTES OF OPERATION FOLLOWED BY
30 MINUTES OF STOPPAGE, PROHIBITED
TO USE 2 CONSECUTIVE TIMES
• WHEN DETACHING THE JUG FROM THE
BASE DURING OPERATION, ALWAYS WAIT
UNTIL BLADES COME TO A COMPLETE
STOP. When removing food or mixing
ingredients, make sure to do so after
separating the jug from the base.
• NEVER OPERATE THE BLENDER WITHOUT
THE LID IN PLACE.
• WHEN THE POWER IS ON, DO NOT
REMOVE THE FOOD STUCK ON THE
WALLS OF THE BLENDER JUG OR MIX
THE INGREDIENTS. When removing food
or mixing ingredients, make sure to do so
after separating the jug from the base. For
re-operation, stop the device completely
before use.
• PLEASE BE MINDFUL OF YOUR SAFETY
WHEN INSERTING YOUR HANDS OR
KITCHEN TOOLS INTO THE BLENDER JUG.
ALWAYS STOP OPERATION OF BLENDER
COMPLETELY AND SEPARATE THE JUG
FROM THE BASE BEFORE INSERTING
HANDS OR KITCHEN TOOLS IN THE JUG.
BLADES ARE SHARP, BE CAREFUL NOT TO
CUT YOURSELF.
• DO NOT POUR LIQUIDS OF AN AMOUNT
GREATER THAN THE MAXIMUM
ALLOWABLE CAPACITY SPECIFIED ON
THE RECOMMENDED USAGE DIAGRAM.
THE AMOUNT OF LIQUID OR FOOD
INGREDIENTS SHOULD BE MAINTAINED
- Do not re-squeeze pulp discharged through
the pulp outlet.
- Do not operate the product before inserting
ingredients.
• DO NOT OVERLOAD INGREDIENTS INTO THE
HOPPER ABOVE THE MAXIMUM FILL LINE.
- We recommend not to operate the juicer for
more than 30 minutes continuously. It may
cause failure due to overheating of the motor.
- Never insert utensils such as a knife or spoon
into the pulp outlet during the operation.
Inserting utensils or foreign objects may
cause damage to the juicer and personal
injury.
- Do not push the ingredients in the hopper
with anything except the pusher provided
with this juicer. Using anything except the
pusher provided may stick to the processing
blade and cause injury and failure.
• DO NOT OPERATE THE CONTROL KNOB
WITH WET HANDS. IT MAY CAUSE
ELECTRIC SHOCK, SHORT CIRCUIT OR FIRE.
• REMEMBER TO OPEN THE JUICE CAP WHEN
THE CHAMBER BECOMES FULL WHILE
JUICING AND EMPTY THE PULP CONTAINER
FREQUENTLY WHEN JUICING IN BULK OR
MAKING LARGE BATCHES OF JUICE.
- Juice or pulp may overow the container.
The juice can ow backwards into the hopper
and may leak if the juice cap is closed.
- If you do not wash immediately after use,
it may be caked with pulp, which makes
it dicult to disassemble and wash or
may become the cause of performance
degradation.
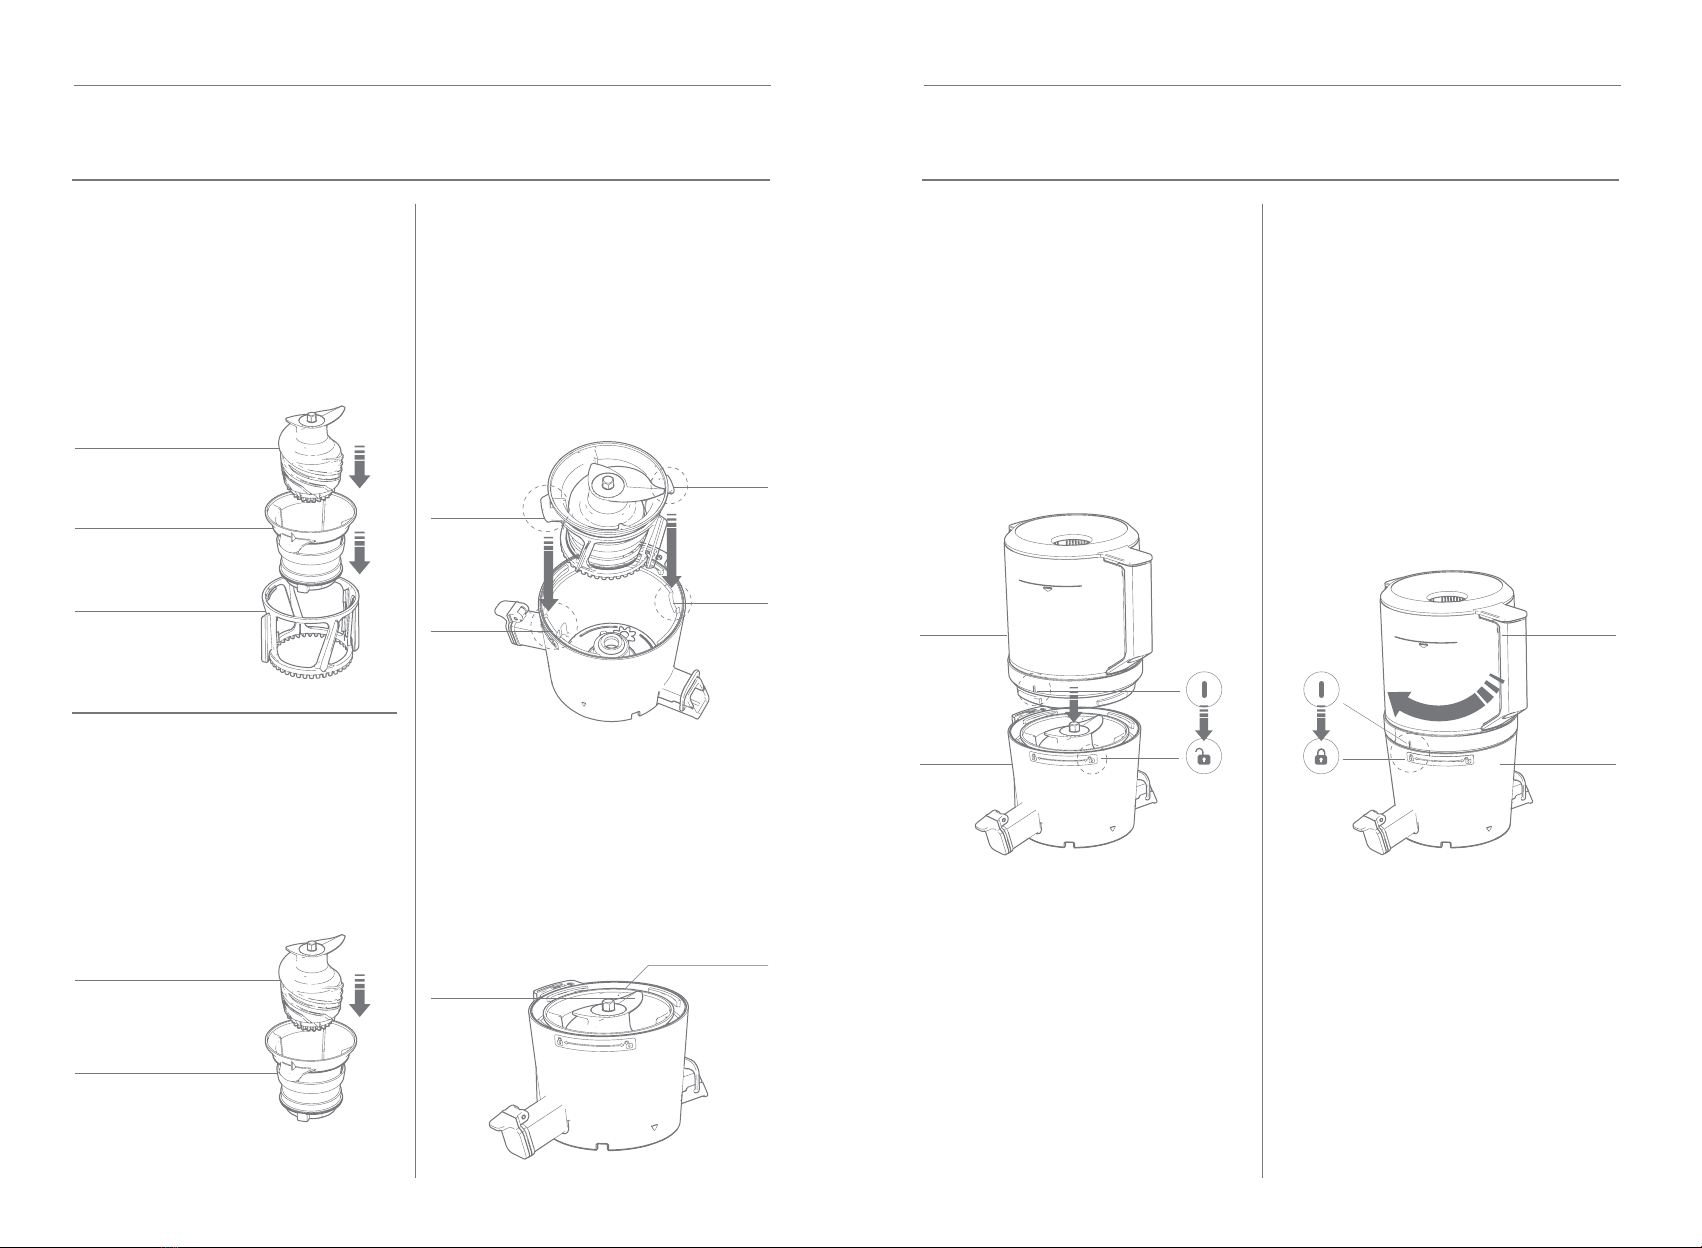
• THE CHAMBER SET CANNOT BE
ASSEMBLED OR DISASSEMBLED WHILE
ON THE BASE.
OVER THE MINIMUM 100ML MARK
AND BELOW THE MAXIMUM 2,000ML
MARK. PLEASE USE THE RECOMMENDED
AMOUNT. If water or food ingredients are
lled over the maximum limit, they may
overow.
• DO NOT TOUCH SHARP BLADES WITH
BARE HANDS. USE A CLEANING TOOL
SUCH AS A CLEANING BRUSH TO CLEAN
THE BLADES AND BOTTOM OF JUG.
• BLADES ARE NOT REMOVABLE FROM
BLENDER JUG. DO NOT ATTEMPT TO
SEPARATE THE BLADES FROM THE JUG,
IT WILL CAUSE DAMAGE TO THE PRODUCT.
• THE BLENDER BLADES CAN ROTATE
AT HIGH SPEEDS WHEN IN USE. IF
THE BLENDER PRODUCES SMOKE OR
EXCESSIVE HEAT TEMPERATURES, PLEASE
STOP OPERATION IMMEDIATELY AND
CONTACT NAMA CUSTOMER SERVICE.
• USE THE PUSHER FOR COLD
INGREDIENTS ONLY AND, TO PREVENT
OVERHEATING, DO NOT USE THE
MANUAL MODE FOR OVER 5 MINUTES
CONTINUOUSLY. Do not insert hot
ingredients to cook. For hot ingredients,
cool them at room temperature before
placing them in the container.
• WHEN MAKING A SMOOTHIE, IF FROZEN
INGREDIENTS ARE STUCK TOGETHER IN
LARGE CHUNKS, ALLOW TO THAW AND
BREAK UP INTO SMALLER PIECES BEFORE
PLACING INTO BLENDER JUG.
• PROCESSING EXTREMELY HARD SPICES
SUCH AS NUTMEG OR HARD SEEDS LIKE
PITS OF STONE FRUITS MAY DAMAGE
THE BLADES.
• NEVER BLEND BOILING HOT LIQUIDS.
ALLOW TEMPERATURE TO DROP BEFORE
INSERTING INTO BLENDER JUG.
• CAUTION WHEN BLENDING HOT LIQUIDS
OR INGREDIENTS. DO NOT EXCEED MAX
LIMIT 1 LITER OR 33.8 OZ. IN JUG.
• DO NOT LEAVE BLENDER UNATTENDED
WHEN IN USE.
• ONLY USE THE PUSHER PROVIDED WITH
THIS PRODUCT WHEN BLENDER IS IN USE.
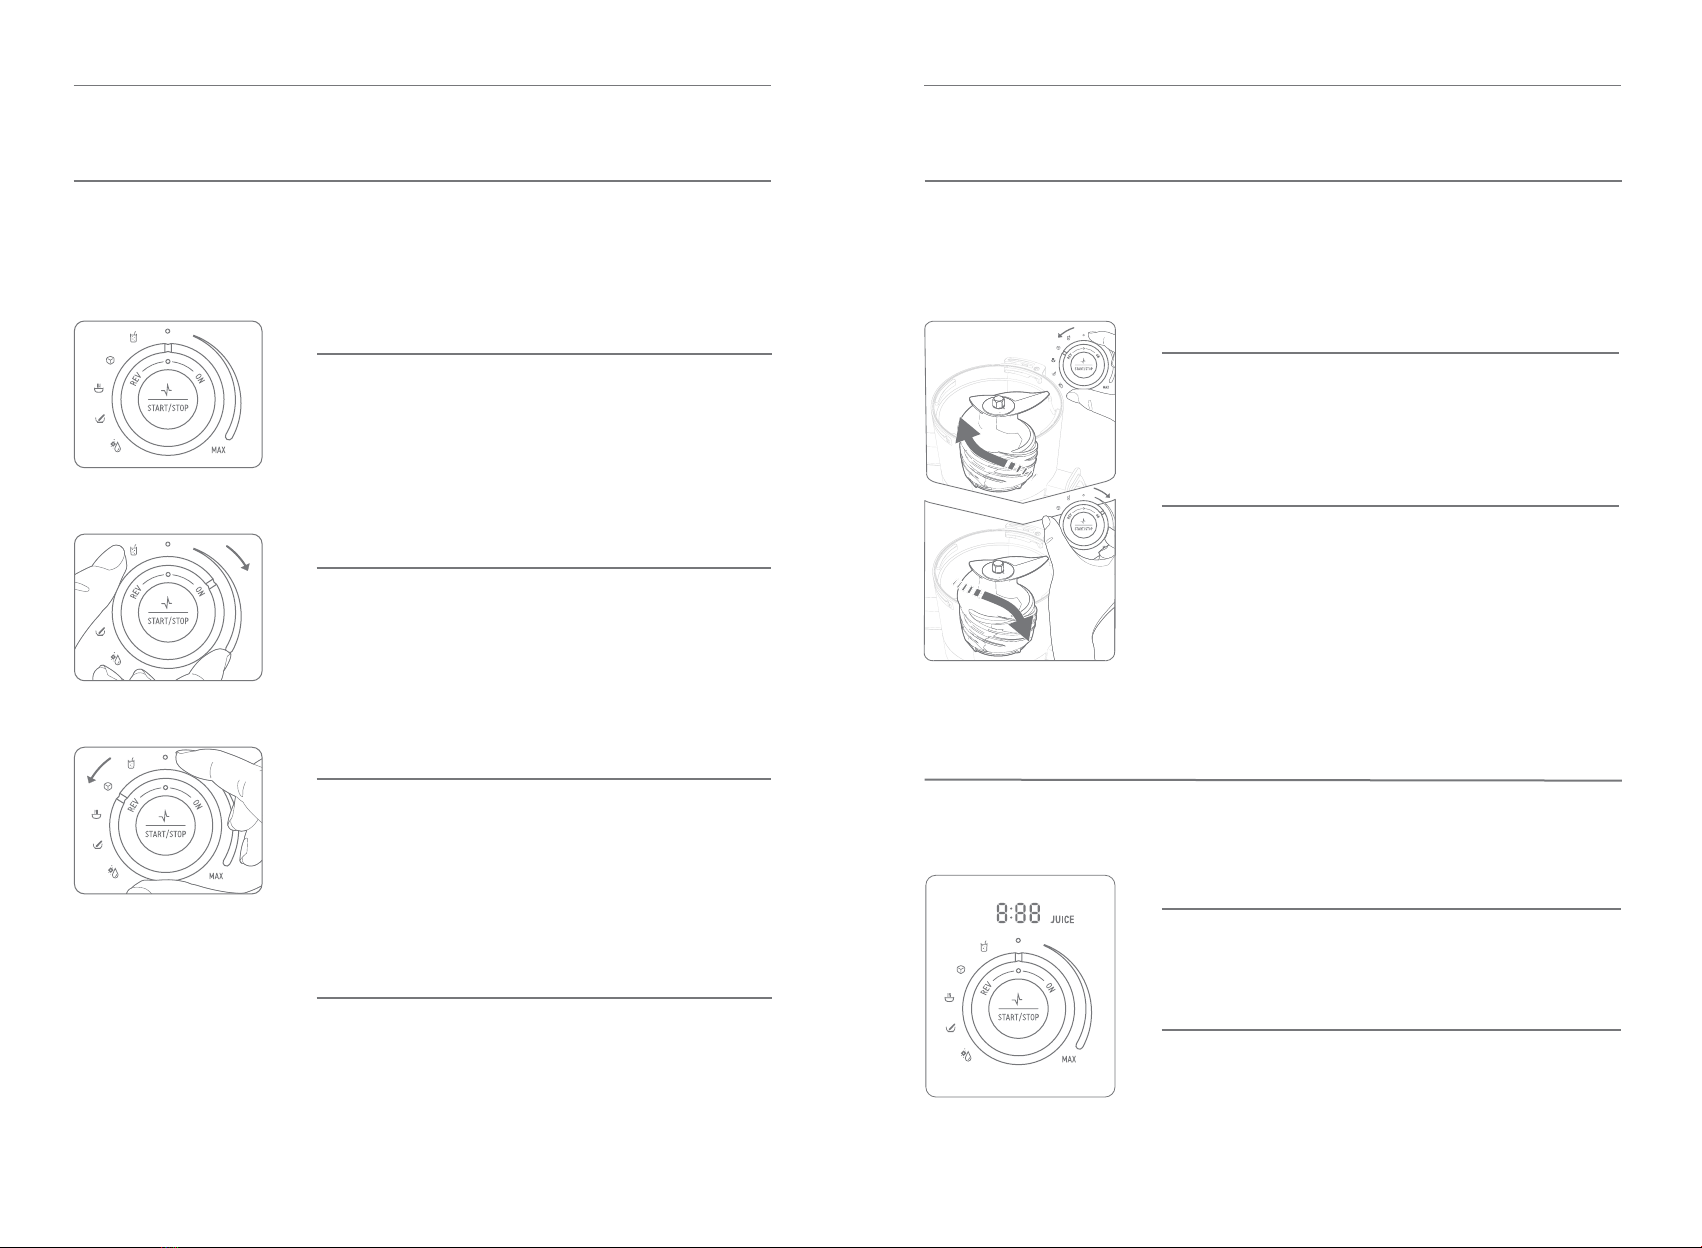
Cautions During Operation

09
NAMA C2 JUICER OPERATION

10 11
JUICER JUICER
Auger
Strainer
Spinning
Brush
Hopper Lid
BASE PARTS
Chamber
Hopper Base
Pusher
(same for blender)
Power Cord
ACCESSORIES
HOPPER PARTS CHAMBER PARTS CHAMBER DETAILS
HOPPER DETAILS
BASE DETAILS
Pulp
Container
Juice
Container
Sorbet
Attachment
Cleaning
Brush
Juice Cap
Gasket
Juice Outlet Lock Loop
Juice Cap Pulp Outlet
Release Tab
Hopper Lid
Maximum Fill Line
Hopper Handle
Processing Blade
Guide Mark on Hopper Control Knob
Drive Shaft
Pulp Outlet
Seal Gasket
Pulp Outlet
Gasket
STRAINER DETAILS
Juice Strainer
Smoothie Strainer
PARTS AND ACCESSORIES DETAILS

12 13
JUICER JUICER
STEP 1
ASSEMBLE INNER
COMPONENTS
SORBET
ASSEMBLY
STEP 2
PLACE COMPONENTS
INTO CHAMBER
Place the auger into either the juice or
smoothie strainer.
Then place the combined auger and
strainer into the spinning brush.
Place the auger into the sorbet
attachment. Do not assemble the
spinning brush and move to step 2.
Remove pulp outlet gasket on pulp
outlet lever under the chamber.
Locate the LARGE and SMALL WINGS
on the outer rim of the strainer. Next,
locate the corresponding LARGE AND
SMALL CUTOUTS inside the chamber.
Place the strainer set assembly into the
chamber.
Press the auger down rmly, so the top
blade of the auger sits FLUSH with the
top of the strainer.
Large
Wing
Small
Wing
Small
Cutout
Spinning Brush Large
Cutout
Strainer
Top
Auger
Blade
STEP 1
ALIGN VERTICAL GUIDE
WITH UNLOCK SYMBOL
STEP 2
ROTATE HOPPER
TO LOCK
Align the vertical Guide mark on the
hopper with the Unlock symbol on the
chamber. Press hopper down to t
onto chamber.
Be sure components are pressed into
the chamber so the auger sits ush with
the top edge.
Next, rotate the hopper clockwise until
the Guide mark on the hopper is aligned
with the Lock symbol on the chamber.
If the hopper will not rotate to lock
properly, please check to make sure the
internal components of the chamber are
assembled correctly.
Hopper Hopper
Chamber Chamber
GUIDE MARK
ON HOPPER
UNLOCK
SYMBOL ON
CHAMBER
GUIDE MARK
ON HOPPER
LOCK
SYMBOL ON
CHAMBER
Strainer
Auger
Note:
Spinning brush is not used
for sorbet strainer assembly.
Note:
The top of the auger and strainer must be
ush with chamber to install the hopper.
Sorbet
Attachment
Auger
ASSEMBLING THE CHAMBER ASSEMBLING THE HOPPER

14 15
JUICER JUICER
Back of Base
Power Cord
HOPPER
DISASSEMBLY
LID REMOVAL LID RELEASE
MAX FILL LINE PULP OUTLET LOOP PLANT - BASED MILKS
For plant-based milks such
as almond milk, it is best
to add ingredients through
the top hole in the hopper
while the machine is ON.
The pulp outlet loop can
be rotated up to lock or
downwards to unlock for
cleaning.
Do not ll ingredients past
the maximum ll line on
the hopper.
Squeeze the release tab to
unlock the hopper lid.
Hopper lid can be
removed for cleaning.
You must lift the chamber
set from the base before
you can unlock the
chamber.
LOCK
UNLOCK
OPEN
Hopper
Handle
Control Knob
on Base
STEP 1
FITTING CHAMBER SET
ASSEMBLY ON BASE
STEP 2
PLUGGING IN BASE
Align the handle of the hopper vertically
with the control knob on the base, and
place the chamber set onto the base.
Ensure the arrows on the chamber and
base are aligned for correct assembly.
First insert the power cord into the back
of the base and then the plug into the
power outlet.
Note:
Sometimes the driveshaft is not
aligned with bottom of auger and the
chamber set needs to rotate to either
side to engage driveshaft and then
rotated back to align the arrows on
the chamber and base.
FINAL ASSEMBLY TIPS

16 17
JUICER JUICER
CONTROL KNOB AND DISPLAY
Ensure the juicer is OFF with control knob in Center - O position prior
to plugging in power cord to power outlet.
Using the Control Knob and REV if the juicer stops working.
Details illuminated when juicing.
WHEN JUICING
- JUICE is blinking
- 0:00 timer counts up
DURING STANDBY MODE
- JUICE is solid illumination
- Timer paused
STEP 1
Turn the control knob to REV. Press and hold Start/Stop button for
3-5 seconds then release. Repeat this 2-3 times. REV rotates the
auger in reverse direction to push the ingredients backwards to help
dislodge any ingredients that are stuck.
STEP 2
After completing REV step, and the machine stops completely, turn
the knob to ON and press Start/Stop button to start juicing again.
If the juicer does not work after these steps, turn control knob to
center position, unplug the juicer, then disassemble and clean the
chamber set parts before operating the juicer again.
Center - O
Stops the operation of the product.
To turn OFF and stop the operation of the juicer, turn the control
knob to center position.
ON
Starts the motor and makes juice.
Turn control knob to ON position and press Start/Stop button.
The timer will start counting up and JUICE will illuminate solid.
To stop, press the Start/Stop button or turn the control knob to
center position.
REV
Turns the auger in reverse if the juicer stops due
to a jam.
Turn control knob to REV position, press and hold the Start/Stop
button to turn the auger in reverse, release the button to stop.
STANDBY MODE
Pauses the juicer in standby mode during operation.
While the juicer is in operation, press the Start/Stop button to
pause and place juicer in standby mode.

18 19
JUICER JUICER
Squeeze the release tab
inside the hopper handle
and open the lid.
Insert ingredients into the
hopper below the Maximum
Fill Line.
See the Layering Guide
on Page 21 for information
about the best order to add
ingredients.
Close the hopper lid until
you hear the click of the
lid locking.
Make sure the juice and
pulp containers are in
place by each outlet.
Turn the control knob to the
ON position and press the
Start/Stop button.
To add more ingredients
while the juicer is running,
you can add them through
the center hole in the hopper
lid. Use the pusher to help
press ingredients downward.
As a safety measure, the
machine will not run if the
hopper lid is open.
Empty the pulp container
as needed to prevent it
from overowing.
Pulp may still continue
to come out after the last
ingredient is inserted.
It can take a minute for
the last ingredient to go
through the juicer.
Once the last ingredient
is inserted, let the juicer
continue to run for one
minute to allow all of the
juice to be extracted.
Once juicing is complete,
turn the knob to the OFF
position.
The juicer will come to a
complete stop 3 seconds
after it is switched OFF.
For any residual juice left
in the chamber, you can pour
by lifting and tilting the entire
chamber set towards the
open juice spout.
4 5 6
7 8 9
HOW TO OPERATE
1 2 3

20 21
JUICER JUICER
INGREDIENTS LAYERING GUIDE
Preparing ingredients for the best results.
1. If you have any food allergies, be sure to choose ingredients that are safe
for you to ingest.
2. Although the hopper allows you to load larger pieces of ingredients,
cutting ingredients into smaller pieces will result in optimal juice extraction.
3. Do not overload ingredients into the hopper above the Maximum Fill Line.
4. Do not use any frozen ingredients with juice or smoothie strainer. Frozen
ingredients can be used only with the sorbet attachment when making sorbet.
APPLE, PEAR,
KIWI
Fruits like apple, pear, and
kiwi can be added with
seeds and peels. However,
apple seeds contain
toxicity, so we recommend
removing them.
POMEGRANATE,
GRAPES
Cut pomegranate in half,
submerge in water, and
extract the seeds only to
juice. Separate each grape
from the stalk.
GRAPEFRUIT, MELON,
ORANGE, LEMON
Remove the skin from a
watermelon, melon, orange,
grapefruit, and lemon. Cut
them into smaller pieces for
optimal juice extraction.
MANGO, CHERRY,
PEACH, PLUM
Fruits like mango, cherry,
peach, or plum have
hard seeds or pits. Please
remove all hard seeds
and pits before juicing
because they will cause
damage to the juicer.
GINGER, CELERY,
KALE, CHARD
For brous or stringy
ingredients, cut into 2-3 inch
pieces or smaller will give the
best results. This will help to
prevent strong bers from
getting twisted around the
processing blade or auger.
CARROTS, BEETS,
SWEET POTATOES
When juicing root vegetables
like carrots, beets, or sweet
potatoes, cutting into smaller
pieces (1-3 inches) will give
optimal juice extraction.
Root vegetables may have
dirt on the surface and may
damage the product. Be
sure to wash thoroughly if
juicing with the skin on.
Loading ingredients for the best results.
By adding softer and leafy ingredients to the bottom of the hopper and harder
ones on top, you create a natural pressure that helps move the fruits and
vegetables down through the processing blade and into the auger more easily.
The diagram below illustrates various examples of how you could layer the
ingredients in the hopper to provide optimal performance.
NOTE: For safety, the lid
must be securely closed for
your juicer to turn on.
HARD
MEDIUM
SOFT
LEAFY
carrots, beets, ginger
melons, cucumber, celery
lemon, pineapple, kiwi
spinach, lettuce, kale

22 23
JUICER JUICER
Insert auger into sorbet
attachment. Align the large
and small wings on sorbet
attachment with large
and small cutouts on the
chamber.
Add frozen fruit ingredients
one-by-one into the hole
of the hopper lid. If using
multiple ingredients, mix
the loading order to get the
best sorbet blend.
Continue to assemble the
hopper as you would for
juicing. Place the pulp
container under the pulp
outlet to catch the sorbet.
When nished, turn juicer
to the OFF position. Wait
for it to completely stop.
Remove the chamber set, then
disassemble before washing.
HOW TO OPERATE FOR SORBET
1 2
5
SORBET INGREDIENTS
Preparing ingredients for the best results.
1. Choose frozen fruits such as strawberries, blueberries, mango chunks, pineapple
chunks, etc. that will t into the hole in the hopper lid. Alternatively you can
freeze fresh fruits.
2. Allow frozen ingredients to thaw for about 5 minutes before inserting.
3. Insert ingredients one by one, rotating between dierent ingredients to allow
for mixture of sorbet.
4.When creating sorbet with multiple ingredients, you can mix the sorbet with a
spoon to blend further. Eat immediately or freeze as desired.
5. Avoid ice, frozen liquids, hard seeds or pits from stone fruit (cherries, peaches,
etc.) as these can damage the sorbet attachment.
FROZEN
BERRIES
Berry sorbet can be a healthy
dessert option due to its
high content of antioxidants,
vitamins, and ber found
in berries. They are packed
with nutrients such as
potassium, vitamin C, ber,
antioxidants, and avonoids.
FROZEN
MANGO
Mango sorbet is a nutritious
alternative to traditional ice
cream. Mangoes are high in
vitamin C, potassium, and
ber which minimize free
radical damage, regulate blood
pressure, and aid in digestion.
FROZEN
PEACHES
Homemade peach sorbet is
low in calories and an excellent
source of vitamins A and C,
potassium, antioxidants, ber,
and small amounts of calcium
and iron. Peaches may improve
digestion, boost immunity, and
skin health.
FROZEN
CHERRIES
Cherries are a sweet and
nutritious addition to any
diet. They are a great source
of ber, vitamin C, and
potassium, which minimize
the risk of inammation and
chronic diseases. Varieties
like tart cherries may even
improve sleep quality.
FROZEN
PINEAPPLE
Pineapple sorbet is packed
with vitamin C, manganese,
potassium, and bromelain,
an enzyme that aids in
digestion. Some studies
suggest that the combination
of disease-ghting
antioxidants and bromelain
may have anti-inammatory
and anti-cancer properties.
FROZEN
BANANA
Banana sorbet is a healthy
treat and good source
of potassium, vitamin C,
and ber. These nutrients
help with digestion, blood
pressure, and immunity.
Additionally, it’s naturally
sweet and a great way to
satisfy your sweet tooth.
Turn juicer to the ON
position. Note: Sorbet
exits the pulp outlet.
TIPS:
• Use frozen fruit that ts into the hole of the hopper lid.
• Allow frozen fruit to thaw for 5 minutes before loading.
• Avoid ice, frozen liquid, and hard seeds or pits found in stone fruit.
• The spinning brush is not needed to make sorbet.
• Sorbet may overshoot the container, so keep an eye on it as it dispenses.
Recommended Fruits:
4
3

24 25
JUICER JUICER
SILICONE PARTS
The silicone parts can be disassembled for deep cleaning. These are
not necessary to remove each time you use the juicer.
PULP OUTLET GASKET
Located inside the pulp outlet, this gasket helps
to separate the pulp from the juice.
To remove, hold the silicone piece and pull
upwards or away from the outlet.
To install, match the corners with the prole of
the pulp outlet and press down rmly into place.
PULP OUTLET SEAL GASKET
Located inside the pulp outlet, this gasket helps
to seal the pulp outlet.
To remove, hold the silicone piece and pull
upwards or away from the outlet.
To install, hold the silicone piece upright, t into
the slot, and press rmly into place.
JUICE CAP STOPPER
Located inside the juice outlet, this is used to
stop or control the ow of juice.
To remove, pull the silicone stopper starting from
one corner.
To install, insert one edge of the plastic juice cap
into the silicone stopper and then press around
the perimeter.
HOPPER GASKET
Located on the bottom of the hopper, this gasket
helps to seal the hopper to the chamber.
To remove, hold the silicone ring and pull
downwards.
To install, pull the silicone ring upwards so it ts
into its groove. You may need to stretch the ring
as you work your way around the circle.
CHAMBER GASKET
Located in the center of the chamber, this gasket
seals the chamber around the drive shaft.
To remove, hold the silicone ring and pull upwards
from one side.
To install, press one side of the ring into the slot
rst, and then work your way around the circle.
Be sure to check the ring is a smooth circular
shape without any folds or bunches.
SPINNING BRUSH BLADES
Located on the spinning brush, these blades wipe
the outside of the strainer and the inside of the
chamber at the same time.
To remove, hold the inside of the blade and pull
inwards to the center of the ring.
To install, slide the blade through the slot from
inside to outside. Then, pull the blade outwards,
until it locks into place.

26 27
JUICER JUICER
HOW TO DISASSEMBLE AND CLEAN
* After the product stops operating completely,
unplug the power cord with your dry hands.
The motor is still slowing down after the
appliance is turned o, so wait about 3 seconds
before separating the chamber.
01 SEPARATE CHAMBER SET FROM BASE.
TURN HOPPER COUNTERCLOCKWISE SO
THE GUIDE MARK IS ALIGNED WITH UNLOCK
SYMBOL ON CHAMBER TO OPEN AND PULL
OFF PARTS IN ORDER.
02. WASH PARTS UNDER RUNNING WATER
WITH CLEANING BRUSH.
03. WASH CHAMBER WITH PULP OUTLET COVER
AND JUICE CAP WIDE OPEN.
04. WIPE BASE WITH A DRY TOWEL OR SOFT
CLOTH.
05. FOR SILICONE GASKETS, YOU CAN DETACH
AND WASH THEM FOR DEEP CLEANING.
06. YOU CAN STERILIZE AND CLEAN THE
PRODUCT BY SOAKING THE PARTS IN WARM
WATER DILUTED WITH ABOUT 3.5 OZ. (100
G) BAKING SODA AND/OR 3.5 OZ. (100 G)
CITRIC ACID FOR ABOUT 30 MINUTES OR
OVERNIGHT MORE THAN 12 HOURS FOR
DEEPER CLEANING. YOU CAN ALSO TRY
TO USE A 50% VINEGAR AND 50% WARM
WATER SOLUTION WITH BAKING SODA
AND/OR CITRIC ACID.
* Be sure to clean and air dry the appliance
completely after use and store it at a clean
place. Failure to clean the product right after
use can cause its stainless steel components
and other parts to corrode or discolor due to
salt and pulp of the ingredients. In addition,
contaminants may dry up and get stuck inside
the product, making disassembly or cleaning
dicult or adversely aecting the product’s
performance. For long-term storage, clean
the appliance with the cleaning brush in
advance. Do not clean the product with boiling
water or subject it to high temperatures. Do
not use abrasive cleaning tools like kitchen sink
cleaner or a stainless-steel sponge. Do not use
a dishwasher or dish dryer for the product.
STRAINERS AND ATTACHMENTS
Your Nama juicer comes with two strainers and a sorbet attachment.
JUICE
STRAINER
This strainer has small, ne holes for minimizing pulp in your juice.
Great for also making silky smooth plant-based milks. (Note: this is
the strainer that comes pre-assembled with your juicer)
SMOOTHIE
STRAINER
This strainer has larger holes for making thick and pulpy juice.
Great if you like pulp and ber. Also used to make smoothies or soups.
SORBET
ATTACHMENT
This strainer does not have holes and is used for making delicious
frozen sorbets.

29
NAMA C2 BLENDER OPERATION

30 31
BLENDER BLENDER
Dosing Cap
BASE PARTS
Lid
Jug Base
Power Cord
ACCESSORIES
JUG PARTS
JUG DETAILS
BASE DETAILS
Control Knob
Drive Shaft
Pusher
Arrow
Padding
Dosing Cap Lock
Lid Clip
Maximum Fill Line
Jug Handle
Blade Assembly
Middle Notch
(same for juicer)
PARTS AND ACCESSORIES DETAILS

32 33
BLENDER BLENDER
Control
Knob
Center
Position
Back of
Base
Power
Cord
STEP 1
PREPARE THE
BASE
STEP 2
ASSEMBLY OF
LID AND JUG
Turn the control knob so the indicator
is in the top center position.
Connect the base to power by rst
inserting the power cord into the back
of the base and then plug the power
cord into outlet.
Insert dosing cap into the center hole on
the lid and turn clockwise to lock it.
Place the lid onto the jug with the
corners aligned with the top of the
jug and press down rmly to secure
lid clips.
Dosing
Cap
Lid
Clip
Lid
STEP 3
FITTING JUG ASSEMBLY
ON BASE
STEP 4
BLENDER READY
FOR OPERATION
Note: The blender jug can be installed
in two dierent positions for user
preference, with the handle in front
right corner or front left corner.
Ensure the control knob indicator is in
the center position. When installed
correctly the display will be in blender
standby mode and show auto preset
icons on the left of control knob and
“BLEND” will be solid illumination left
side of LED display.
Arrow
on Base
Install the blender jug with each of the
four corner surfaces so that bottom of
jug aligns with the corners on top of
base and the middle notch on bottom
of jug is aligned inside the arrow on
top of the base.
Middle
Notch
ASSEMBLY

34 35
BLENDER BLENDER
CONTROL KNOB AND DISPLAY BLENDING MODES OVERVIEW
Manual Mode
•Manual mode has variable
speed control which allows
user to adjust the speed
throughout the blending
operation. Turning the
control knob clockwise
increases the speed up to
MAX. Turning the control
knob counterclockwise
decreases the speed.
•Turn the control knob
clockwise and set the
indicator to desired speed.
•Press the Start/Stop button
to start blender.
•To increase speed, turn the
control knob clockwise up
to maximum speed MAX.
•To decrease speed,
turn the control knob
counterclockwise down
to minimum on speed
range indicator.
•To stop blending, either
press the Start/Stop
button or turn control knob
counterclockwise to top
center position.
Auto Modes
•Turn the control knob to select
the desired preset program and
the display will show the preset
time. Press the start button
to start blending and it will
automatically stop when the
program is complete. Program
can be paused during operation
by pressing the stop button
and then resume program by
pressing the button again.
•To stop operation, turn control
knob back to center position.
Manual Mode - Pulse
•Using the pulse function,
rst select pulse speed by
turning the control knob to
desired speed. The pulse
will operate at the speed
selected, turn the control
knob to MAX to operate
motor at maximum speed.
•Press and hold Start/Stop
button for at least 1 second
to start pulse and release the
button to stop pulse. Once
the button is pressed the
display time will count down
from 1:00 minute and when
button is released the display
time is 0:00.
Variable Speed
Smoothie
Clean
Mill
Soup
Ice Crush
Auto
Modes
Manual
Mode
Details illuminated when blending.
BLEND Light
BLEND will be solid
illumination once the jug is
installed on base.
BLEND will blink once any
blending mode has activated.
BLEND will be solid
illumination when any mode
is paused or canceled.
Timer Light
When base is powered without
jug installed, a dash will move
around display.
In manual mode, timer will
count up starting at 0:00.
In auto modes, timer will
count down from selected
program time.

36 37
BLENDER BLENDER
HOW TO OPERATE
•Secure the dosing cap on the lid and install the
lid onto the jug.
•Install jug onto the base, please refer to How to
Assemble Blender on page 32.
•Secure the dosing cap on the lid and install the
lid onto the jug.
•Install jug onto the base, please refer to How to
Assemble Blender on page 32.
•Turn the control knob to desired speed and
press Start/Stop button.
•To stop operation press Start/Stop button
or turn control knob to center position.
•Turn the control knob to desired speed for
pulse, press and hold Start/Stop button for at
least 1 second to pulse and release button to
stop pulse.
MIN/MAX Speed Control Dial Preset Modes
Pulse Mode Preset Program Options
•Secure the dosing cap on the lid and install the
lid onto the jug.
•Install jug onto the base, please refer to How
to Assemble Blender on page 32.
•Turn the control knob counterclockwise to
select desired auto preset program.
•Press the Start/Stop button to start blending.
Blending will stop automatically when program
is complete.
•To pause program during operation, press
Start/Stop to pause and press Start/Stop to
resume program.
MANUAL MODE AUTO MODE
Auto
Program Purpose of
Auto Program Recommended
Amount of Use Program
Operation Time
Smoothie Smoothies using vegetables,
fruits, nuts, powders, etc. Min. 100ml/Max. 1,000ml 1 min.
Ice Crush Sorbets and slushies using
ice and frozen fruits
Min. 100ml/Max. 500ml
(refer to recipe) 1 min.
Soup Soup Min. 100ml/Max. 500ml
(refer to recipe) 7 min. 30 sec.
Mill Grinding dry ingredients Max. 200g 1 min.
Clean For cleaning with soap
and water Min. 100ml/Max. 1,000ml 1 min.
11
1
2 2
2
This manual suits for next models
1
Table of contents
Other nama Juicer manuals