manuals.online logo
Brands
  1. Home
  2. •
  3. Brands
  4. •
  5. Nano Soft Water
  6. •
  7. Water Filtration System
  8. •
  9. Nano Soft Water 9 Stage LG Re-Mineralizer Supplement

Nano Soft Water 9 Stage LG Re-Mineralizer Supplement

Popular Water Filtration System manuals by other brands

Atlantic Ultraviolet Mighty Pure MP16A owner's manual

Atlantic Ultraviolet

Atlantic Ultraviolet Mighty Pure MP16A owner's manual

SunSun CBG-500 Operation manual

SunSun

SunSun CBG-500 Operation manual

Hayward XStream Filtration Series owner's manual

Hayward

Hayward XStream Filtration Series owner's manual

Contech DownSpout StormFilter Operation and maintenance

Contech

Contech DownSpout StormFilter Operation and maintenance

Teka Airfilter MINI operating instructions

Teka

Teka Airfilter MINI operating instructions

Wisy LineAir 100 Installation and operating instructions

Wisy

Wisy LineAir 100 Installation and operating instructions

Schaffner Ecosine FN3446 Series User and installation manual

Schaffner

Schaffner Ecosine FN3446 Series User and installation manual

Pentair FLECK 4600 SXT Installer manual

Pentair

Pentair FLECK 4600 SXT Installer manual

H2O International H20-500 product manual

H2O International

H2O International H20-500 product manual

Renkforce 2306241 operating instructions

Renkforce

Renkforce 2306241 operating instructions

Neo-Pure TL3-A502 manual

Neo-Pure

Neo-Pure TL3-A502 manual

STA-RITE VERTICAL GRID DE FILTERS S7D75 owner's manual

STA-RITE

STA-RITE VERTICAL GRID DE FILTERS S7D75 owner's manual

Applied Membranes W-G844EM Operation and maintenance manual

Applied Membranes

Applied Membranes W-G844EM Operation and maintenance manual

BEGA 116 Instructions for use

BEGA

BEGA 116 Instructions for use

WATA Standard operating instructions

WATA

WATA Standard operating instructions

Price FFU series Installation and service manual

Price

Price FFU series Installation and service manual

Gaggenau BRITA INTENZA 467873 manual

Gaggenau

Gaggenau BRITA INTENZA 467873 manual

Brita SAFF-100 user guide

Brita

Brita SAFF-100 user guide

manuals.online logo
manuals.online logoBrands
  • About & Mission
  • Contact us
  • Privacy Policy
  • Terms and Conditions

Copyright 2025 Manuals.Online. All Rights Reserved.

LG Re-Mineralizer 9 Stage Reverse
Osmosis Drinking Water System Installation:
Push each of the 4 Color Coded tubes into the top of
the Metal Rack’s 4 Color Coded Compression Fitting
Inlet Ports below:
1. Green=Supply Line Port; 2. Blue=Faucet Port;
3. Yellow=Tank Port; 4. Red = Drain Port.
7
DRILLING THE HOLE FOR THE FAUCET
NOTE: SAFETY GLASSES SHOULD BE WORN TO PROTECT YOUR EYES WHILE
DRILLING THE FAUCET WHOLE.
1) For best results, a 1/2” drill bit for a non air gap faucet or 7/8” dill bit for an air gap faucet
should be used to drill a hole into your sink for the auxiliary faucet.
2) Carefully select the faucet location making sure it will have a neat water fall pattern and
that the faucet stud will be accessible from below once the whole is completed.
3) For Porcelain Sink: Before starting the drill motor, apply rm downward pressure on the
bit until a crunching occurs. This will help keep the drill from moving when starting the
hole. Use a special porcelain hole cutter.
4) For Stainless Steel Sink: Before using the selected bit, an indent should be made with
a center punch to keep the drill bit from moving. A small pilot hole will also aid the drill
process.
5) For best results, keep steady rm pressure while drilling the hole. Too little pressure
during the start will cause excess wear on the bit and progress will be slow.
6) Once the hole is complete, clean the area of metal chips and roughness around the
hole. Metal chips will stain porcelain.
For granite use a special diamond core bit only, help cool bit with water.
Warning: It is highly recommended for granite slate countertops, to use the
assistance of a trained professional to drill the hole for the faucet. Serious damage
can occur to the counter if done by an inexperienced person.
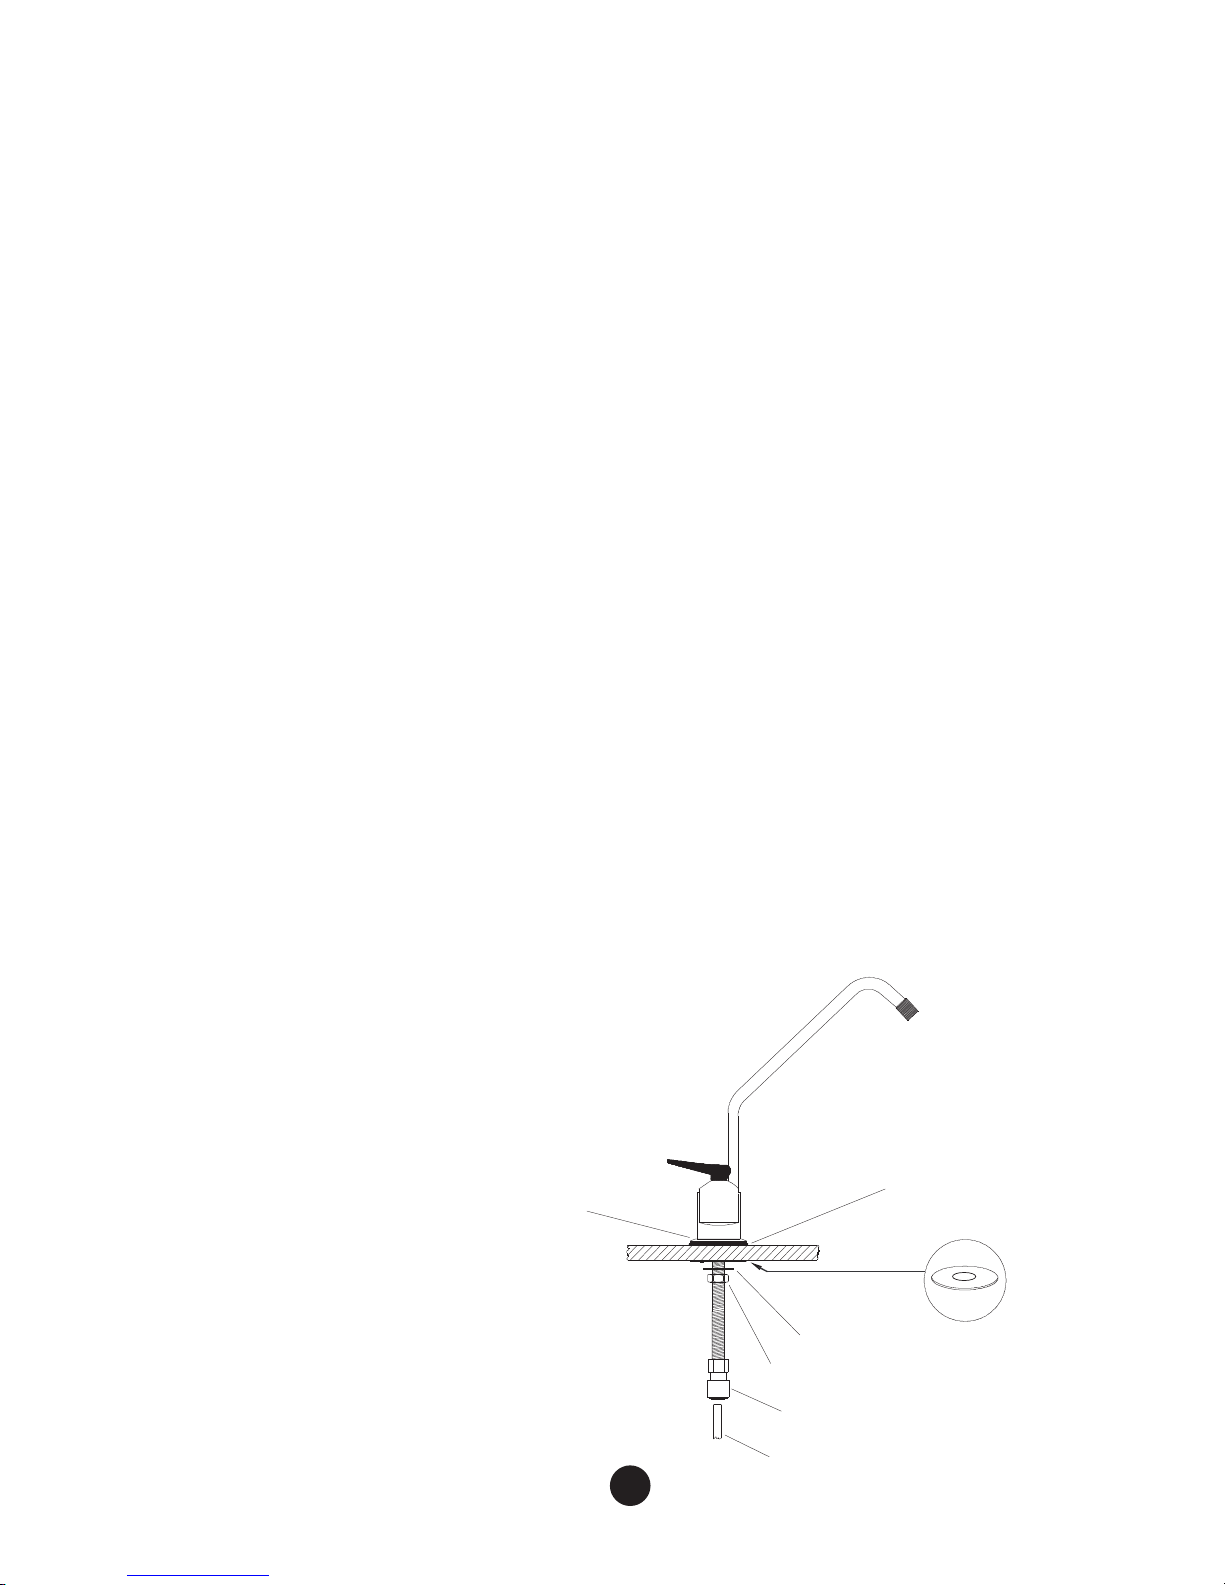
MOUNTING THE FAUCET
Standard Faucet
1) Drill a ½” hole in the sink or the counter top, or use an
existing hole.
2) Slide chrome cover plate and rubber gasket on
to stem of faucet and place faucet onto sink,
with the stem going through the hole.
3) Place metal slotted
washer over threaded
stem of faucet.
4) Tighten nut from under
the counter surface to lock the faucet into place.
5) Thread the faucet connector onto threaded stem
of faucet. Do not use Teon tape.
6) Connect blue 3/8” tubing to faucet connector.
Rubber gasket
Chrome cover plate
Faucet connector
3/8” X 7/16”
Faucet nut
Metal toothed washer
Big metal washer
Sink or counter top material
Blue 3/8” tubing
(Fig. 4 A)