NanoCam Plus NCP-DVR100 User manual

Full HD Dash Camera
with WiFi & Supercapacitor
NCP-DVR100
USER MANUAL
Your Safety. Our Priority


1
CONTENTS
1.0 CAUTION ................................................................................................................................ 2
2.0 INTRODUCTION...................................................................................................................... 2
3.0 MICRO SD CARD WARNING .................................................................................................... 3
3.1 Formatting the inserted Micro SD Card ............................................................................. 3
4.0 PACKAGE CONTENTS............................................................................................................. 4
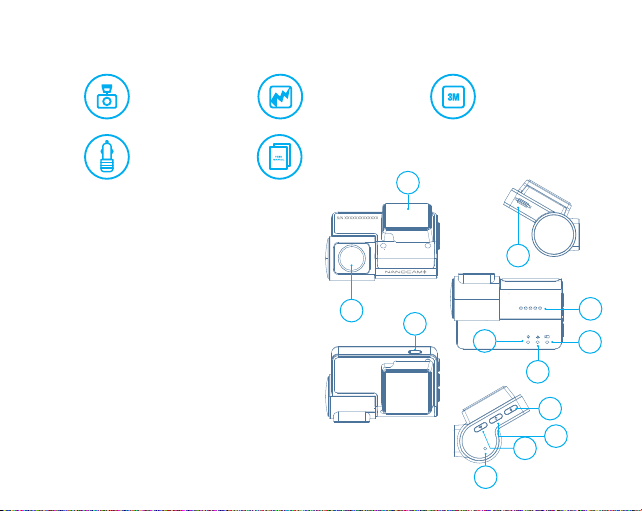
5.0 PRODUCT OVERVIEW ............................................................................................................. 4
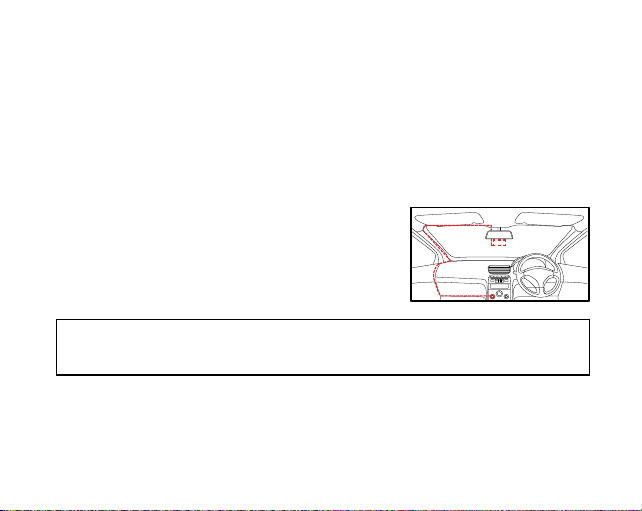
6.0 INSTALLATION INSTRUCTIONS ............................................................................................. 5
7.0 SOUND ALERTS...................................................................................................................... 6
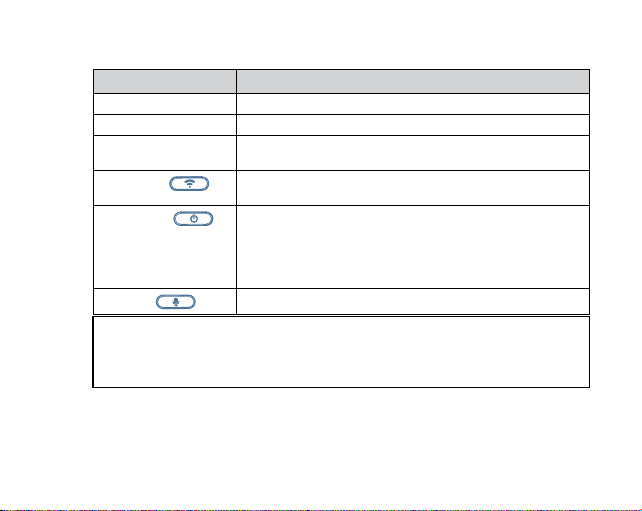
8.0 KEY FUNCTIONS .................................................................................................................... 7
9.0 DOWNLOADING AND INSTALLING THE NCP-DVR100 APP..................................................... 8
10.0 NCP-DVR100 APP OPERATION..............................................................................................10
11.0 SETTINGS .............................................................................................................................11
12.0 PLAYBACK , DELTE AND DOWNLOAD THE FILES FROM THE DASH CAMERA TO PHONE ......12
12.1 App Video Playback........................................................................................................... 13
12.2 Downloading videos from the App.................................................................................... 13
12.3 Sharing videos on Social Media........................................................................................ 13
12.4 NCP-DVR100 App Settings ............................................................................................... 14
13.0 PRODUCT SPECIFICATIONS ..................................................................................................16
14.0 WARRANTY TERMS & CONDITIONS ......................................................................................17

2
1.0 CAUTION
• Ensure you are using your dash camera within your countries’ road laws. Please make
sure you are familiar with your local road legislation before use.
• Please set the time and date before you start using this device to record.
• The notifications given by the dash camera are suggestions only, please always remain
alert and aware of the actual road conditions.
• The system is to be used for non-commercial use only, within the limits permitted by
relevant laws.
• Avoid using the dash camera in the vicinity of any devices that emit radio interference (eg.
microwave ovens).
• It is considered normal for the dash camera to get warm while using it.
IT IS HIGHLY RECOMMENDED THAT YOU FORMAT BOTH USED OR NEW MICRO SD CARDS
BEFORE USE.
2.0 INTRODUCTION
This product and its safety features will help improve your driving experience. However, like
most after-market safety enhanced devices, they are designed to assist and aid the driver.
They are not designed to replace the skill, ability, and awareness of the person operating the
vehicle.
Please read through these instructions before attempting to install this product.
For the latest manual and product updates, please visit our website at
www.nanocamplus.com.au or www.nanocamplus.co.nz

3
3.0 MICRO SD CARD WARNING
This dash camera can only be used with Micro SD Cards, Class 10 or above with 32GB - 128
GB storage capacity. Please format your Micro SD card before use.*
NOTE:
• Formatting the Micro SD card will permanently remove the data on the inserted Miro SD
card and prepare it for use with the dash camera.
*Micro SD cards are not included and will need to be purchased separately.
3.1 FORMATTING THE INSERTED MICRO SD CARD
Please download the NCP-DVR100 App and connect your dash camera with the downloaded
App by following the steps as outlined on page 8.
Please select SETTINGS and press FORMAT SD CARD.
The dash camera will format the Micro SD card and will communicate via the unit's audio
commands that the Micro SD card has been formatted.
NOTES ON INSTALLATION
1. It is advisable to install the dash camera near the rearview mirror, at the top centre of
the windshield.
2. Place the lens within the windscreen wiper range to ensure it has a clear recording view
when it rains.
3. Do not touch the lens with your fingers. Fingerprints left on the lens will result in
unclear videos or photos. If photos or videos are blurred, please clean the lens gently
with a microfibre cloth.
4. Only use the included charging cable to power the dash camera.

4
4.0 PACKAGE CONTENTS
NCP-DVR100
Dash Cam x1
12/24V Power
Adaptor x1 User Guide x1
3M
Adhesive x1
Electrostatic
Film x1
5.0 PRODUCT OVERVIEW
CAMERA
1. Adhesive sticker
2. Speaker vent
3. Camera lens
4. Recording indicator LED
5. Power connected LED
6. WIFI connected LED
7. Mini USB connector (for power)
8. Microphone
9. WIFI On/Off
10. Power & Recording On/Off
11. Microphone On/Off
12. Micro SD Card slot
12
1
32
6
54
9
11
10
8
7

5
6.0 INSTALLATION INSTRUCTIONS
1. OPTIONAL: Select the electrostatic film from the box and adhere it to the front windshield
in the recommended position (as shown below). Please wipe the glass before adhering it
and push out the bubbles between the static film and the glass before installation.
2. Remove the protective film from the adhesive sticker of the NCP-DVR100 and position the
dash camera in the middle of the (optional) electrostatic film. Press down on the base of
the bracket with your hand for 30 seconds to ensure that the sticker adhesive is attached
to the electrostatic film. Adjust the camera by rotating the barrel until the entire road (in
front of the car) is in the camera frame.
3. Run the NCP-DVR100 cable along the top of the front
windshield through the A pillar and around and under
the storage compartment of the passenger side of
your vehicle to the 12/24v adaptor port. Connect the
12/24v adaptor to the car power.
NOTE:
• The electrostatic film will help you easily remove the dash camera from the windshield.
This film is included in the package contents.

6
7.0 SOUND ALERTS
The NCP-DVR100 will communicate commands and updates to the driver via pre-recorded
voice alerts. This information will keep you updated on the status of your dash camera. Audio
notifications will come through the in-built speaker of the NCP-DVR100 and are specified
below.
• Take a picture
• Your Micro SD card is damaged, please
replace
• Format complete
• Format failed
• Your Micro SD card is full, please
replace or reformat
• Please connect your smartphone to
format the Micro SD card
• Please connect your smartphone to
synchronise time
• Please insert your Micro SD card
• The video is now locked
• Recording is now off
• Recording is now on
• Battery will shut down once fully
charged
• Power is disconnected and this device
will now shut down
• Start recording
• Recording has stopped
• Please replace the MicroSD card
• Timelapse video
• Warning tone
• Voice control is now off
• Voice control is now on
• WIFI is connected
• WIFI is disconnected
• WIFI is off
• WIFI is now turned on

7
8.0 KEY FUNCTIONS
OPERATION FUNCTION
Recording indicator The indicator light will flash BLUE whilst recording.
WIFI indicator light The indicator light will flash GREEN when connected to WIFI.
Charging indicator light A Red light will be constant when charging. The Red light will
turn off once charging is complete.
Down button Short press to take a photo, hold for 3 seconds to turn on/off
WIFI.
Power button Power on/off : Hold down for 3 seconds to power on /off.
Reset: Hold down for 8~10 seconds to reset the device and
again for 3 seconds to power on.
Recording: Quicly press to start/stop recording once power
is on.
Up Button Quickly press to turn sound on or off.
NOTE:
• This device features a supercapacitor instead of a Li-ion battery to enhance the
safety of the product. It requires a constant power supply to work, and it is always
recommended to keep it connected to the car charger.

8
9.0 DOWNLOADING AND INSTALLING THE NCP-DVR100 APP
To take advantage of all the functions of the NCP-DVR100 you will need to connect it via WiFi
with the NCP-DVR100 App on your smartphone. Your smartphone (via the App) can also
function as a screen where you can monitor and review driving footage.
All major settings on the NCP-DVR100 are edited through the NCP-DVR100 App. The system
requirements for your smartphone are below:
iPhone: iPhone 5 or later using iOS 10.0 and above.
Samsung Galaxy: S3 and later using Android 6.0 and above.
For you to correctly connect your smart device to your NCP-DVR100 you will need to download
and install the NCP-DVR100 App from the App store. Alternatively you can scan the QR code at
the bottom of this page to download it. You will need to connect your smartphone to the NCP-
DVR100’s WiFi signal using your smartphone's WiFi settings.
For Android devices
Please search NCP-DVR100 in Google Play Store for installation.
For iOS devices
Please search NCP-DVR100 in the iOS App Store for installation.
Or scan the below QR code:

9
For a step-by-step guide on connecting to your dash cam to your smart device via WiFi please
follow the steps below:
1. On your smart device, download the NCP-DVR100 App from the Google Play store (if you
are using an Android device) or the iOS App store if you are using an iPhone.
2. Turn on the NCP-DVR100 and allow 2 minutes for the WiFi connection.
3. Once the App is downloaded and installed on your smartphone and the dash camera has
been turned on, open your phone's WiFi settings and connect to the wireless connection
named NCPDVR100.
4. When prompted enter the password 12345678
WIFI Name: NCP-DVR100_XXXXXX
Password: 12345678
5. Once connected, open the NCP-DVR100 App. You can now access the live-recording
screen for the front camera as well as stored videos and other dash cam settings.
6. You can open the NCP-DVR100 App to connect the camera to the dash camera WiFi
network. (For Android users only)
PLEASE NOTE:
• WiFi connection does not create an Internet connection.

10
10.0 NCP-DVR100 APP OPERATION
To use the NCP-DVR100 App, your smart device will need to be connected to the dash
camera's WiFi connection. For instructions on connecting please see "9.0 Downloading and
installing the NCP-DVR100 App" on page 8 of this manual.
After connecting with the dash camera's
WIFI, follow the below steps to use the App:
1. Press Connect Camera to connect with
the dash camera.
2. Press to open the local library of
folders to access videos and photos
saved from the dash camera to your
phone, via the App.
3. Press to check the Firmware
version and for instructions on how to
work the APP user manual.
4. After connecting with the camera, the
screen will change to live view. Whilst
in live view you can adjust the position
of the lens or position of the dash
camera.
5. Press to enter settings.
6. Press to change to full screen.
7. Press to change the Video recording resolution.
8. Press to START and STOP RECORDING & press to change to Picture Mode.
1
2 3
5
67
8
4

12
12.0 PLAYBACK , DELTE AND DOWNLOAD THE FILES FROM THE DASH CAMERA TO PHONE
1. Press to select files.
2. Press to cancel and go back to the
previous menu.
3. Press to select all files or select
individual files by pressing on the
in the top left hand corner of
the preview image.
4. After selection(s) is made press
to download the files to your
phone.
5. Press to delete selected files
from your dash camera.
1 3 52
4

13
12.1 APP VIDEO PLAYBACK
For Video Playback, please follow the instructions below:
1. Open the NCP-DVR100 App.
2. Press CONNECT CAMERA.
3. Click on the VIDEO FOLDER and select the video you would like to view.
12.2 DOWNLOADING VIDEOS FROM THE APP
To download videos to your smartphone photo reel, please follow the instructions below:
1. Open the NCP-DVR100 App.
2. Press the button.
3. Press the button.
4. Select video/videos and press the button.
5. The download will start and automatically save footage to your phone. This data can be
accessed through the NCP-DVR100 App in the Folder named Local.
12.3 SHARING VIDEOS ON SOCIAL MEDIA
To share videos on social media, please follow the instructions below:
1. Open the NCP-DVR100 App.
2. Press the button.
3. Open the Local folder on the NCP-DVR100 App. All downloaded files can be accessed via
the local folder.
4. Select the files you want to share, and then press the share button below.
5. Select the social media application you wish to share your footage to.

14
12.4 NCP-DVR100 APP SETTINGS
PLEASE NOTE:
• To access settings, please stop recording by pressing the button below the live
screen.
MENU SETTING DESCRIPTION
Video Resolution 1080p 30fps, 720p 30fps Adjusts the video resolution.
Microphone On, Off You can turn the in-built microphone on or off.
Please note, if you turn off the microphone
there will be no sound on your recorded videos.
Volume Off, Low, Mid, High Allows you to adjust the sound level of the
inbuilt speaker.
Loop Duration 1, 3 and 5 minutes Loop recording allows you to set the duration
of video the camera will record before creating
a new clip.
Time Lapse FPS OFF, 1 FPS, 2 FPS, 3
FPS, 4 FPS
The time lapse function will only work when
the unit is connected with a 3 wire, hard wire
kit (sold separately). The dash camera will
sense the car is not in motion and will record
in time lapse mode to help save memory.
G Sensor Off, High, Mid, Low Both date and time will be stamped on
recorded videos.

15
NCP-DVR100 APP SETTINGS CONTINUED
MENU SETTING DESCRIPTION
Stamp On, Off ON will Stamp Date and Time on all recorded
Videos.
WI-FI Name This setting allows you to change the name of
the DVR WIFI.
WI-FI Password 12345678 You can change the supplied password to help
ensure the privacy of your recorded videos. If
you forget your password, you can reset it in
the dash camera by holding down the power
button on the dash camera for 8-10 seconds or
by selecting Factory Reset in the App menu.
Micro SD Card
Info
Indicates how much memory has been used on
the Micro SD Card.
Factory Reset Resets the DVR to original, factory settings.
Format SD Card Formats the SD card. Deletes all recorded data from the Micro SD
Card.
Version N/A Firmware version.

16
13.0 PRODUCT SPECIFICATIONS
CPU MSTAR G-sensor Built-in
Sensor Pixel 200W Loop record Yes
Lens 130° Park mode Supported
Sensor 200W Pixel Resolution 1920*1080P 30FPS
Battery Supercapacitor Video Format TS/MOV
Mic 42db Photo format JPG
Speaker 8Ω1W Frequency 50HZ/60HZ
Power interface 5V 1A Timestamp Supported
WIFI Supported Photograph Supported
Working
Temperature -20°C ~70°C Storage Micro SD Card Class
10 (Max 128GB)

17
14.0 WARRANTY TERMS & CONDITIONS
Our goods come with guarantees that cannot be excluded under the Australian Consumer
Law. You are entitled to a replacement or refund for a major failure and for compensation
for any other reasonably foreseeable loss or damage. You are also entitled to have the goods
repaired or replaced if the goods fail to be of acceptable quality and the failure does not
amount to a major failure.
This warranty is provided in addition to your rights under the Australian Consumer Law.
Directed Electronics Australia Pty Ltd (Directed Electronics) warrants that this product is
free from defects in material and workmanship for a period of 12 months from the date of
purchase or for the period stated on the packaging. This warranty is only valid where you
have used the product in accordance with any recommendations or instructions provided by
Directed Electronics.
This warranty excludes defects resulting from alterations of the product, accident, misuse,
abuse or neglect. In order to claim the warranty, you must return the product to the retailer
from which it was purchased or if that retailer is part of a National network, a store within
that chain, along with satisfactory proof of purchase. The retailer will then return the goods to
Directed Electronics.
Directed Electronics will repair, replace or refurbish the product at its discretion. The retailer
will contact you when the product is ready for collection. All costs involved in claiming this
warranty, including the cost of the retailer sending the product to Directed Electronics, will be
borne by you.
Ph: +61 03 8331 4800
Email: [email protected]om.au

18
INDEMNITY
You agree to defend, indemnify and hold harmless Nanocam Plus and its subsidiaries and
affiliates from and against any and all claims, proceedings, injuries, liabilities, losses, costs
and expenses (including reasonable legal fees), including but not limited to, claims alleging
negligence, invasion of privacy, copyright infringement and/or trademark infringement
against Nanocam Plus and its subsidiaries and affiliates, relating to or arising out of your
breach of any provision of these terms, your misuse of Nanocam Plus products or its services,
or your unauthorized modification or alteration of products or software.
WARRANTY AND WARRANTY DISCLAIMER
Nanocam Plus has a limited warranty, whereby Nanocam Plus warrants to you and only to
you that this Nanocam Plus product will be free from defects in materials and workmanship
for one (1) year from the date of your purchase (unless a longer warranty period is required by
law). The specifics of this Nanocam Plus limited warranty are covered in this manual.
To the extent possible under governing law, other than the above product warranty for the
Nanocam Plus product you understand and agree that the Nanocam Plus products and
services are provided on an “as is” and “as available” basis.
Nanocam Plus makes no warranty that the Nanocam Plus products and services will
meet your requirements or that use of the Nanocam Plus products and services will be
uninterrupted, timely, secure or error-free. Nor does Nanocam Plus make any warranty as to
the accuracy or reliability of any information obtained through Nanocam Plus (including third
party content), that any defects in the Nanocam Plus products or services be corrected or
that the Nanocam Plus products or Nanocam Plus services will be compatible with any other
specific hardware or service.
Table of contents
Other NanoCam Plus Dashcam manuals

NanoCam Plus
NanoCam Plus NCP-DVRHD2 User manual

NanoCam Plus
NanoCam Plus NCP-DVR720 User manual

NanoCam Plus
NanoCam Plus NCP-DVRWIFI User manual

NanoCam Plus
NanoCam Plus NCP-DVRT1 User manual

NanoCam Plus
NanoCam Plus NCP-DVR2K User manual

NanoCam Plus
NanoCam Plus NCP-DVRGWS User manual

NanoCam Plus
NanoCam Plus NCP-BDVR1 User manual

NanoCam Plus
NanoCam Plus NCP-DVR2K User manual

NanoCam Plus
NanoCam Plus NCP-DVR4K User manual

NanoCam Plus
NanoCam Plus NCP-DVRGPSWIFI User manual