NAUTICA AERO NTDR01 User manual


Thank you for purchasing an original
Nautica Aero - NTDR01
You are getting a high-quality product that’s built to combine technology and
design for your everyday use.
Please read the below info carefully to get the most out of your new product.
This guide is ENGLISH only. For other languages and more detailed info
on care, use and warranty, please visit technofashion.com

NAUTICA
AERO NTDR01
REMOTE
CONTROLLER
MICRO USB
CHARGING CABLE
PROPELLERS
(X4)
PROPELLER
GUARDS (X4)
PROPELLER
MOUNTING TOOL
REPLACEABLE
BATTERY (X2)
CARRYING
BAG
USER’S
MANUAL
WHAT’S IN THE BOX
4

AIRCRAFT DIAGRAM
HOW TO USE AERO NTDR01
Camera
Motors
Front LEDs
Propellers Propellers
Motors
Landing Gears Landing Gears
5

Rear LEDs
Battery Latch
Battery
Power ON/OFF
Landing Gears
Battery Level LED
Landing Gears
Downward Vision System
Vents
Wifi Antenna
6

REMOTE CONTROLLER DIAGRAM
L1 Button
Photo shooting
and video recording L2 Button
Callback
R2 Button
Headless mode
R1 Button
Mode switch /
Changing speed
Automatic Takeoff /
Landing
Trim Left
Button
Joystick
Joystick
Trim Right
Button
Trim Forward
Button
Emergency
Landing Button
Power ON/OFF
Trim Backward
Button
Antenna
Phone
Holder
7

HOW TO PREPARE FOR FLIGHT
Installing the Propeller
Your Nautica Aero NTDR01 comes with pre-installed
propellers, you would not need to install them prior
to your first flight.
If you need to replace the propellers, however, follow
these steps:
1. Loosen the propeller holding apparatuses with the
help of the included mounting tool, as shown in
the image.
2. Displace the old propeller and put the holding
apparatus back onto the new propeller.
3. Make sure the new propeller is locked by screwing
the apparatus back.
1. Place the propeller guards to each wing as shown in
the image.
Installing the Propeller Guards
Pay attention to the correct placement of the
propellers to ensure that your drone can takeoff
successfully. Incorrect placement of the
propellers will hinder your drone’s ability for
flight.
Four propeller guards included in the package
ensure that your drone’s propellers are
protected from damages in any unexpected
hits or crashes.
Your NauticaAero NTDR01 comes with 4 extra
propellers to ensure you will be able to replace
them in a situation of breakage or loss. 8

Installing and Recharging the Battery
Your Nautica Aero NTDR01 comes with the battery
pre-installed and fully charged. When you need to
recharge the battery, follow the steps below.
1. Push the battery latch and pull the battery out of its
compartment.
2. To recharge the battery, insert one end of the
included micro USB charging cable to the battery
and the other end to a 5V adapter or an operating
computer with a USB charging port. It will take
approximately 4 hours the battery to be fully
charged.
3. After charging is completed, slide the battery into
its compartment back as shown in the image, until
you hear a clicking sound. Ensure that the latch at
the rear of the battery is completely locked.
Installing the Remote Controller
1. Open the battery compartment of the remote
controller by turning the screw counterclockwise.
2. Insert the 3*1.5V alkaline batteries (not included) to
the battery compartment, as shown in the image.
Pay attention that the batteries are correctly
placed according to their positive and negative
magnetic poles.
3. Lastly, close the battery compartment by turning
the screw clockwise.
Downloading the Application
Easily download the Nautica AERO application to your
smartphone for free via scanning the below QR codes.
Keep in mind that you need a QR code reader
application on your smartphone to be able to scan the
codes. Search Google Play or Apple Store for a free QR
code reader to install if you do not already have one
installed in your smartphone.
1.
Battery Latch
Battery
Micro USB
Charging Port
1 2 3
1 2 3
9

PREFLIGHT CAUTIONS
• Do not pilot your drone at night, or in rainy, snowy,
foggy and windy weather.
• Do not pilot your drone over water.
Connecting Your Drone With Remote Controller
When you turn your Nautica Aero NTDR01 and its
remote controller ON by switching the power buttons,
they will automatically pair with each other.
The Nautica AERO application enables you to control
your drone via your smart device. For more information
on how to control your drone via the Nautica AERO
app, please consult the “How to use Nautica AERO
app” section of this manual.
Before the Flight
Prior to piloting your Nautica Aero NTDR01 please
read the following guidelines and recommendations.
• Make sure that you have authorization to pilot the
Aero NTDR01 in the area you intend to fly. In some
areas flying a drone is not permitted, such as
military bases, parks, cities and airports.
• Check local regulations prior to flying. You are
required to keep visual contact with your drone, do
not take your drone out of line of sight.
• Check local regulations regarding Wi-Fi and wireless
networks.
• Check local regulations regarding video recording,
storage and use.
• Local regulation may require a license or specific
documents in order to pilot the Nautica Aero
NTDR01.
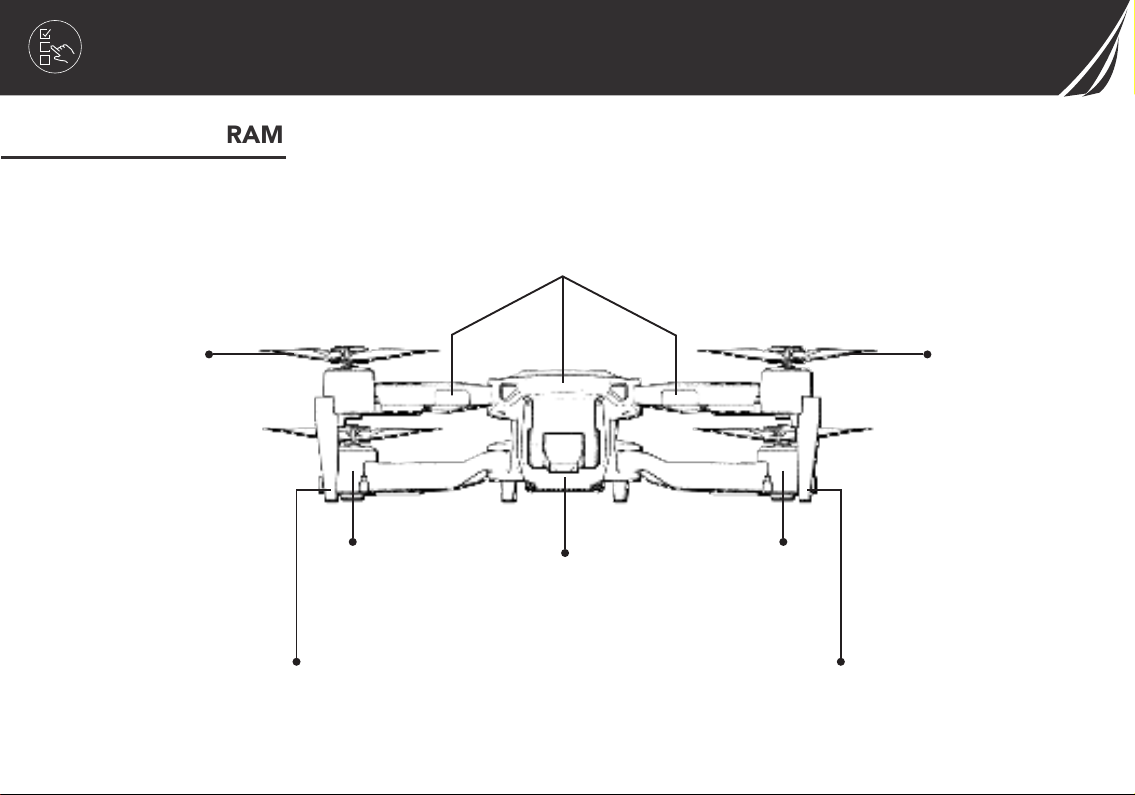
• Check the propellers carefully and make sure they
are correctly and securely installed.
• Before taking your drone off, practice with the
remote controller for some time. This will help you
experience the sensitivity of the remote beforehand.
• Make sure to calibrate your Nautica Aero NTDR01.
See below for instructions on how to calibrate your
drone.
10

Power
ON/OFF
How to Calibrate Your Drone
After turning your drone and the remote controller ON,
place the former to a flat surface. As shown in the image,
pull back the joysticks simultaneously towards the outer
corners.
After the sound beep, the LEDs of the drone will flash for
2 seconds, indicating that your Nautica Aero NTDR01
has been calibrated and is ready to takeoff.
Flight With Remote Control
Make sure the drone and the remote controller are
both ON and connected and your drone is calibrated
as explained above. Also make sure you read all
instructions above for flight preparation and other
instructions in the “Safety and Maintenance” section of
this user manual.
When taking off, the rear should be faced towards you,
while the front should direct forward.
Pay attention to the direction of your drone
before the flight. The front of the drone is
where the main camera is located, as shown in
the image.
The optimum flight duration is 13-14 minutes.
HOW TO FLY NAUTICA AERO NTDR01
The range of the remote controller is 164 ft /50 m
max. Bear in mind that the drone may not return
to home in the event that it exceeds this range.
11

Auto Takeoff
Auto Landing
Trim Right: Drone will trim right
while moving left.
Trim Left: Drone will trim left
while moving right.
Movements and Trim
Auto Takeoff: Drone will
takeoff from the ground for
about up to 5 ft/1.5 m high
and stay suspended in the air.
Auto Landing: Drone will
securely land in the closest
surface while in the air. When
pushed for a while, drone will
throttle and make an
emergency landing.
Automatic Takeoff and Landing
1. Place Nautica Aero NTDR01 on a flat and dry
surface.
2. Push the automatic takeoff/landing button on the
remote control. Your drone will takeoff and hover at
about 5 ft / 1.5 m from the ground.
3. If you push the left joystick forward, the drone will
gain altitude while it will lose altitude if the left
joystick is pushed backward. When you leave the left
joystick ensuring that it goes back to its original
position, the drone will remain steady at its current
location.
4. During the flight, push the automatic takeoff/landing
button once more to enable your drone to
12

Trim Forward: Drone will trim
forward while moving
backward.
Trim Backward: Drone will
trim backward while moving
forward.
Left joystick pushed left or
right: Drone will turn left or
right.
Left joystick pushed upward:
Drone will ascend.
Left joystick pulled back:
Drone will descend.
Right joystick pushed
upward: Drone will move
forward.
Right joystick pulled back:
Drone will move backward.
Right joystick pushed
left or right: Drone will
move left or right.
Headless Mode
When R2 button is pushed on the remote controller,
the headless mode becomes activated. In this mode,
the drone starts to move in accordance with the
directions commanded by the remote. The camera
direction is not recognized by the drone anymore.
Callback
This feature enables your drone to fly back to the
location of the remote controller.
13

Mode Switch / Changing Speed
The R1 button of the remote controller enhances wind
resistance of your drone or enables you to make sharper
movements.
The default speed mode of Nautica Aero NTDR01 is
30%. The R1 button pushed once, the speed increases
to 60%, with the device delivering two beep-sound
notifications. Pushed once more, the R1 button
enhances the speed to maximum of 100%, notifying the
pilot with a three beep sounds.
At the maximum speed, push R1 button once more to
go back to 30% speed level, with one-beep notification
sound.
R2 Button
Headless mode
L2 Button
Callback
Camera
R1 Button
Mode Switch /
Changing Speed
L1 Button
Photo Shooting
and Video Recording
The camera is located at the front on the
Nautica
Aero
NTDR01. The camera located
under the drone is for stabilization only. Hit the
L1 button once for taking a photo. Push and
hold the L1 button for starting to record a
video.
Photo Shooting and Video Recording
14

Flight With Smartphone
If you wish to fly and navigate your Nautica Aero
NTDR01 with your smartphone rather than the
remote controller, follow these guidelines.
Make sure you installed the Nautica AERO app on
your smartphone, as explained in the “Downloading
application” section of this manual.
1. Turn your drone ON by switching the POWER
button.
2. Turn on the Wifi connection on your smartphone,
then select NAUTICA-NTDR01-******* from the
available connections list.
3. Enter the application once the connection
between your device and the drone has been
established.
4. You will come up with a screen like this:
15

Back to
Main Menu
Photo
shoot Video Gallery
Speed
Mode
Turn ON/OFF
Auto Takeoff /
Landing Gyro
Turn ON
the Motors
Settings
Auto
Takeoff
Trim
Auto
Landing
Camera
Zoom
Emergency
Landing
Trim Trim
Reverse
The Camera
Add Music
to Video
Camera
Setting VR Box
Mode
Calibrate Headless
Mode
HSS
System
16

Auto Takeoff and Landing
Turn ON the autopilot function by tapping TURN ON
AUTOPILOT button. Auto takeoff and landing
buttons will appear on the screen (see the image
Application Screen).
Movements
First tap the ON button and it will activate the joystick
function on the application. (See the image
Application Screen). Use these virtual joysticks just as
the physical ones on the remote control to navigate
the movements of your drone. Consult “Movements
and Trim” section under “Flight with Remote
Control” to understand how to use joysticks for
controlling drone movements.
Photo and Video Shoot With Hand Sense
The Hand Sense system of Nautica A
ero
NTDR01
enables you to take photos and videos with your hand
movements during the flight and lets these images to be
saved on your smart device.
In order to enable this function, go to Settings as shown
in the previous image (See Flight with smartphone
section) and choose. You will then see a frame on the
screen after turns yellow.
Show your hand with your palm open to the camera
, placing it in the frame on the screen. The camera
will shoot a photo after 3 seconds.
Show your hand to the camera making a fist , placing
it in the frame, and the camera will start video-recording
after 3 seconds.
17

Gyro
Another way of controlling your drone’s movements is
activating “Gyro” by tapping on the related button
on the application screen. It enables to control drone
movement by tilting your smartphone.
17

TECHNICAL SPECIFICATIONS
Input 4.2V / 0.6A
Battery Capacity 1800 mAh
Max Flight Time up to 14 min
Video Resolution HD 1080p
Max Speed 11.1 mph (5 m/s)
Camera Resolution 2MP
Max Transmission Distance up to 70 m
Max Video Transmission Distance up to 20 m
Autopilot Take Off and Landing Yes
Emergency Landing Yes
Flight Modes 3 modes
Palm Shutter Yes
Foldable Design Yes
Product Dimensions 14*12.4*2.75 in / 355*315*70 mm
Product Weight 7.58 oz / 215 g
Charging Port Micro USB 18

SAFETY AND MAINTENANCE
Before using your Nautica Aero NTDR01, read the
following precautions carefully to ensure optimal
product performance.
This product is a toy that should be used with care
and safety. Please use the product according to the
specified instructions and do not attempt to repair it
without professional assistance.
Do not expose your Nautica Aero NTDR01 and its
electronic parts to extremely hot (fire, direct
sunlight, etc.) or cold conditions.
Extreme temperatures may cause the unit to
explode or overheat which may in turn result in
lower performance and a shorter life span.
Also avoid applying high pressure or penetration to
the unit with sharp objects.
Do not touch the charging port of the product with
wet hands.
WARNING
Not suitable for ages 14 and under.
+14
19
Table of contents
Other NAUTICA Drone manuals
Popular Drone manuals by other brands

YUNEEC
YUNEEC H520 owner's guide

TRENDTRADING
TRENDTRADING TURIBNE PRO MAX manual

Hangzhou Qifei Intelligence Technology
Hangzhou Qifei Intelligence Technology 3WD4-QF-10B user manual

Overmax
Overmax X-bee drone 1.0 user manual

XDynamics
XDynamics EVOLVE user manual

PowerVision
PowerVision PowerEgg quick guide