Nautronic NAUCON-1000 User manual

NAUCON-1000 – USER MANUAL | 1
User manual
Take control …
Learn about the NAUCON-1000
with this complete User manual
User manal
Danmarksvej 1
DK-8660 Skanderborg
www.nautronic.com
Tel.: +45 8651 1166

NAUCON-1000 USER MANUAL
4 GengtoknowyourNAUCON-1000
5 Indicatoricons
6 StartsengupyourNAUCON-1000
6 Generalsetup
8 Advancedsetup
9 Servicemenu
14 Boardzonessetup
SETTING UP SPORT
18-19 Basketball
20-21 Handball
22 Volleyball
23 Icehockey
24 Tennis
25 Floorball
26 Futsal
27 Bandy
28 Soccer
29 Minihockey
30 Boxing
31 Waterpolo
32 Americanfootball
33 Basket3X3
34 Netball
35 Inlinehockey
36 Wrestling
37 Intervaltraining
38 Squash/Badminton
38 Baseball

NAUCON-1000 – USER MANUAL | 3
EXTRA SCOREBOARD FEATURES
40 Editteamlineups
41 Correctmenu
42 ResultsshowingonanA-Hboard
42 Sideconsolesetup
43 Totalreset
44 Howtocheckthesowareversion
45 UpdangtheNAUCON-1000soware
47 Import/Exportsengs
TROUBLE SHOOTING
48 Troubleshooting
49 Diagnosticsmenu
50 Diagnostictroubleshootingguide

4| NAUCON-1000 – USER MANUAL
1On/o
Turn the NAUCON-1000 on and off.
When turning off the control panel you
must confirm by pressing ACCEPT on
the touch screen.
2Game reset
Reset display, you must confirm by
pressing ACCEPT on the touch screen.
3Menu
A menu on the touch screen will show
(Fig. 1, page 6).
4Setup
A menu on the touch screen will show.
5Manual horn
Press to blow the horn.
6Time reset
Resets time and sets next period time.
You must confirm by pressing ACCEPT
on the touch screen.
7Start
Game clock starts.
8Stop
Game clock stops.
9Undo
Undo the latest change.
10 OK
Confirm any changes made to the setup.
ABC
You can also use the click buttons referring
to the buttons on the touch screen.
Wirelesscommunicaon
Home
Guests
Getting to know your NAUCON-1000
Subtract Home Score Touch screen
Add Home Score Add Guest Score
Subtract Guest Score
1
A
4
6
2
B
7
5
3
C
89 10

NAUCON-1000 – USER MANUAL | 5
Automatic horn on
Automatic horn off
Battery fully charged
Battery working
Battery charging
Battery low
Battery really low – charge now!
Battery critically low – charge now!
All zones active
Multiple zones active
All zones disabled
Zone 1-4
COLLISION – another NAUCON-1000 is
transmitting in the same zone.
*Change or disable zones. See more on
page 7.
*Note you might see the flashing collision
warning even when all zones are turned
off.
Indicator icons
THE INDICATOR ICONS will show in the top right corner of the touch screen.
Except in the setup menus.
00
00 1. 2. 3. 4. 5.
TIEBREAK
CORRECT
MENU
NEXT
SET
PLAYER
NAME
SETS
PLAYER
NAME
SETS
GAMESGAMES
SERVESERVE
POINTPOINT
TENNIS

6| NAUCON-1000 – USER MANUAL
Fig. 1 – Select sport:
1Select sport
The choices of sports are listed in a
menu – to scroll the menu press PAGE
1/3 MORE. Choose a sport and you are
ready to start/setting up.
2Version …
Shows the latest version of software
installed on the NAUCON-1000 unit.
Fig. 1 – Bottom buttons:
AGeneral setup
Enter GENERAL SETUP menu. For de-
tails see the section, starting below.
BPage 1/3 more
Press PAGE 1/3 MORE to scroll the pag-
es in the menu.
Start setting up your NAUCON-1000
General setup
When starting your NAUCON-1000 it will start up in a default sport. If setting up for the
first time the NAUCON-1000 will start in basketball. To exit the sport press the MENU
click button on the console and then press EXIT SPORT.
In this part of the manual you can learn more about the general setup of your NAU-
CON-1000. You can enter the GENERAL SETUP menu from the SELECT SPORT menu.
Fig. 2 – General setup “Page 1/2”:
1Date,yearandmeofday
You can change the day, month, year and
time of day. Once set, the NAUCON-1000
unit will transmit the changes to the
Scoreboard. It will now receive time,
date and year information from the main
scoreboard. The NAUCON-1000 does not
have a built-in timer.
2Language
Scroll through the various languages.
3Start-up sport
Set the default .
GENERAL
SETUP
PAGE 1/3
MORE
BASKETBALL
HANDBALL
VOLLEYBALL
ICE HOCKEY
TENNIS
FLOORBALL
FUTSAL
BANDY
SELECT SPORT
VERSION …
Fig. 1 – Select sport
2
A B
1
DATE
DAY / MONTH
12
ENGLISH
BASKETBALL
LEFT
0/0 00:00
LANGUAGE
CANCEL
CHANGES
PAGE 1/2
MORE
DEFAULT
SETTINGS
SERVICE
MENU
ACCEPT
CHANGES
TEXT FLOW
DIRECTION
DATE
YEAR (20XX)
BOARD ZONE
SELECTION MENU
BOARD INFO
TIME OF DAY
START-UP SPORT
GENERAL SETUP MENU
Fig. 2 – General setup menu, page 1/2. The bot-
tom buttons are elaborated on the next page.
1
4
2 5
3 6

NAUCON-1000 – USER MANUAL | 7
4Textowdirecon
Adjust the direction of the rolling text
line. LEFT or RIGHT.
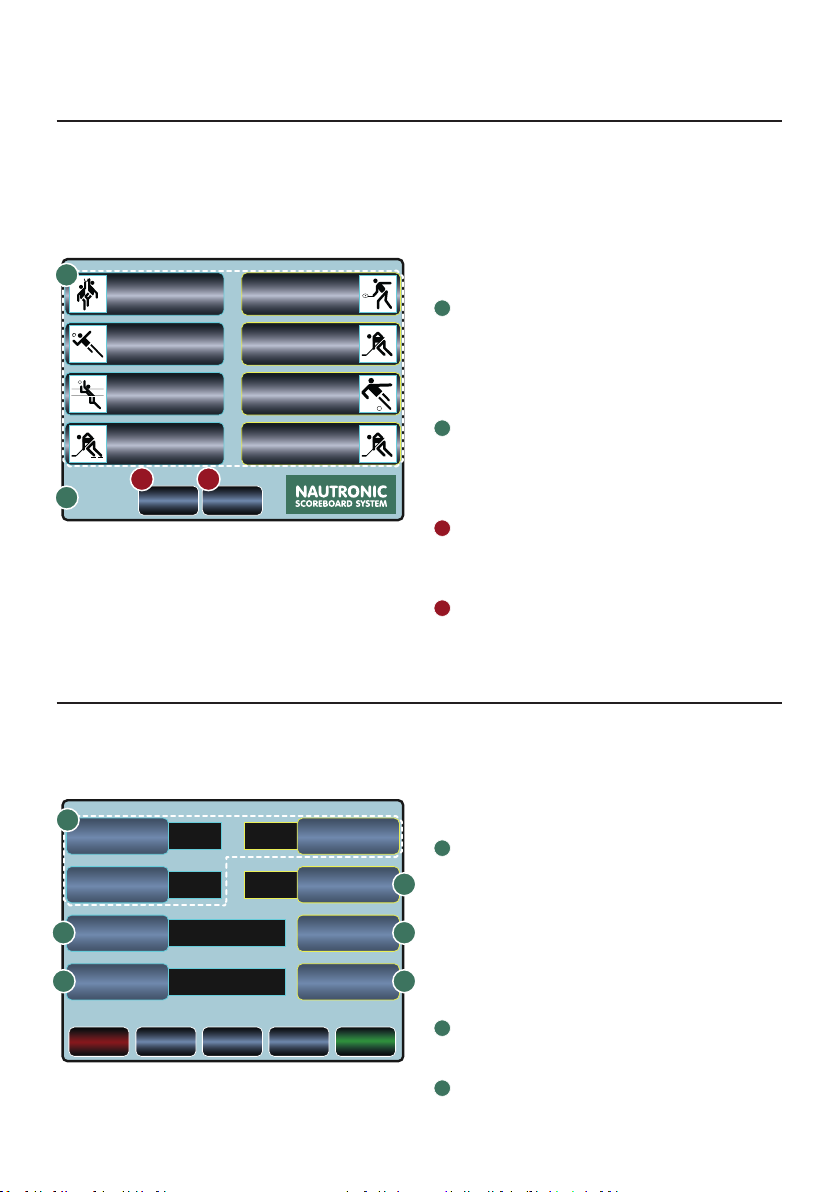
5Boardzoneseleconmenu
Turns the zones ON and OFF. As default,
all zones are on. If another NAU-
CON-1000 are transmitting in the same
zone, they might interfere.
6Board info
The NAUCON-1000 starts searching for
scoreboards in the activated zones.
connected to the NAUCON-1000,
the addresse*1from the scoreboard,
sideboard, sideboard or shot clocks
are displayed on the touch screen.
*1
An address is a reference number
(10-69) in the BOARD ZONES SETUP
menu, see page 14.
Fig. 3 – General setup “Page 2/2”:
7Boardwatch–onandome
By default the clock on the board will
start up at 07:00 and turn off again at
midnight. You can change both settings.
Set the clock to be on or off at all time:
The clock is always on.
The clock is always off.
8Key click
Turn ON or OFF a sound for the buttons
on the touch screen or/and the physical
click buttons on the console.
9Backlight level
Adjusts the light intensity of the touch
screen. 1 is lowest and 5 is highest
intensity. Lower level will extend the
battery performance.
10 Dimmingmeoutaerkeypress
Time before dimming the backlight on
the touch screen (0-99 min.).
11 Dim backlight during game
Adjusts the light intensity of the touch
screen during the game (0-99% of the
backlight level).
Fig. 3 and 4 – Bottom buttons:
ACancel changes
Exists the setup menu without saving
any changes made. A warning will
appear before existing to the previous
screen.
BService menu
Enter the SERVICE MENU.
Please ask your local sales partner for
a password to enter this menu.
CPage (1/2) 2/2 more
Press PAGE (1/2) 2/2 MORE to scroll the
pages in the menu.
DDefault settings
Press DEFAULT SETTINGS if you want to
return to the NAUCON-1000’s default
settings.
EAccept changes
Press ACCEPT changes if you want to
save your changes. You will then return
to the SELECT SPORT menu.
BOARD WATCH
ON TIME
DIMMING TIMEOUT
AFTER KEYPRESS
BOARD WATCH
OFF TIME
OFF
7:00
5
3
24:00
50%
ON
BACKLIGHT LEVEL
CANCEL
CHANGES
PAGE 2/2
MORE
DEFAULT
SETTINGS
SERVICE
MENU
ACCEPT
CHANGES
TOUCH KEY CLICKKEY CLICK
DIM BACKLIGHT
DURING GAME
GENERAL SETUP MENU
Fig. 3 – General setup menu, page 2/2
7
8
9
10
11
C D E
A B

8| NAUCON-1000 – USER MANUAL
Advanced setup
When you have selected a sport, you can press the MENU click button on the console
which will bring you to the EXTRA MENU where you can change the advertising or ex-
port the game log to a USB stick. (Fig. 4)
EDIT
ADVERTISING
IMPORT
ADVERTISING
VISITORS
ADVERTISING TEAM LINEUP
HIDE
0
HIDE
RETURN
TO SPORT
EXIT
SPORT
GAME LOG
EXPORT TO USB
ADVANCED
ADVERTISING
EXTRA MENU
Fig. 4 – Extra menu
A B
4
5
6
2
3
1
Fig. 4 – Screen called Extra menu:
1Editadversing
Editing the advertising string (max.
1.000 characters). When pressed, you
will get a new screen with a keyboard
(as in Fig. 36, page 40). The advertising
text will show in the HOME/GUEST team
text display.
2Adversing
Toggles between HIDE and SHOW
advertising on the scoreboard. Default
is HIDE.
3Importadversing
Insert a USB stick with a CSV file*1
containing your text and press IMPORT
ADVERTISING.
4Game log export to USB
Insert a USB stick to export a CSV file.*2
and press GAME LOG EXPORT TO USB.
The file contains log from when the
console was turned on.
*1+2A CSV file is a Comma Separated
Values file.
5Team lineup
Toggles between HIDE and SHOW line-
ups on the scoreboard. Default is HIDE.
6Advancedadversing
You can edit 4 strings and set them as
still text (max. 32 characters) or rolling
text (max. 1.000 characters).
Fig. 4 – Bottom buttons:
AReturn to sport
You will return to the sport you have
already chosen. Changes made will take
effect.
BExit sport
where you can select sport or enter
GENERAL SETUP MENU.

NAUCON-1000 – USER MANUAL | 9
Service menu
From the GENERAL SETUP MENU (see page 6) you can access the SERVICE MENU.
Insert 1166 as password on the onscreen keyboard to get access to the SERVICE MENU.
Fig. 5 – “Page 1/7”:
1Import/exportconguraon
Choose either to import or export con-
figurations from/to a USB stick.
To import a saved configuration-file,
(config.csv): Insert a USB stick and press
IMPORT CONFIGURATION.*1
To export the configuration from the
NAUCON-1000 to a USB stick:
Insert a USB stick and press EXPORT
CONFIGURATION.*2
*1+2 A screen will show with the follow-
ing text: “PLEASE WAIT!! IMPORTING/
EXPORTING CONFIGURATION TO USB
DRIVE.” The import/export is done
when the NAUCON-1000 returns to the
SERVICE MENU.
2Time in use (hours)
This displays the hours the NAU-
CON-1000 unit has been in use since last
charge.
3Change setup password
Enter a new four digit code for the SET-
UP MENU.
Default password is 0000 (No pass-
word).
4Import logo from USB
To import a new start-up logo and mi-
ni-logo: Insert a USB stick with the log-
os*3and press IMPORT LOGO FROM
USB. A screen will show with the follow-
ing text: “PLEASE WAIT!! IMPORTING
LOGO FROM USB DRIVE.” The import
is done when the NAUCON-1000 returns
to the SERVICE MENU.
*3LOGO REQUIREMENTS:
Start-up logo – must be:
Filename must be: logo.bmp
Mini logo – must be:
Filename must be: minilogo.bmp
5Change service password
Enter a new four digit code for the SER-
VICE MENU.
Default password is 1166.
6Import languages
To import new languages to the NAU-
CON-1000 unit: Insert a USB stick with
a supported language file supplied by
Nautronic a/s and press IMPORT LAN-
GUAGE.
A screen will show with the following
text: PLEASE WAIT!! IMPORTING LAN
GUAGES FROM USB DRIVE.
IMPORT
CONFIGURATION
1
ON
CANCEL
CHANGES
PAGE 1/7
MORE
DEFAULT
SETTINGS
ACCEPT
CHANGES
EXPORT
CONFIGURATION
CHANGE SERVICE
PASSWORD
IMPORT LANGUAGES
FROM USB
COMBINED TEAM
TEXT DISPLAYS
CHANGE
SETUP PASSWORD
TIME IN USE
(HOURS)
IMPORT LOGO
FROM USB
SERVICE MENU
Fig. 5 – Service menu “Page 1/7”
1
7
5
6
2
4
3

| NAUCON-1000 – USER MANUAL
The import is done when the NAU-
CON-1000 returns to the service menu.
7Combined team text displays
ON: The home and guest team’s text
shares the same display.
OFF: Each team text has its own text
display.
Default is ON.
Fig. 6 – “Page 2/7”:
8Team text display length
You can edit the length of the team text
displayed on the scoreboard. Default is
Board type)
9Show score by
The rolling text in the text line writes
“SCORED BY <NAME>”. Default is ON.
10 Show previous sets in …
Choose between four possible places,
where previous sets can be shown.
Default is SCORE.
SCORE: The previous set scores are
shown in the upper player scores in the
side scoreboards.
NO.: The previous set scores are shown
in the upper player numbers on the side
scoreboards.
MAIN: The previous set scores are
shown in the main scoreboard.
SEP.: The previous set scores are shown
in seperate section.
11 Merge player no. in player text display
ON: Both player name and number will
be shown in the text display.
OFF: Only the player name will be
shown in the text display.
Default is OFF.
12 Lealignguestteamtext
Align the text in GUEST display to
the left. Default is OFF and therefore
aligned to the right.
13 Use game horn for shot clock
Enable or disable the use of the main
scoreboard’s horn for shot clocks.
Default is OFF.
14 Merge 2xminor penalty (2+2=4)
Enable or disable the adding of penal-
ties. When enabled, the penalties are
added instead of being shown separate-
ly.*4Default is OFF.
*4 Example:-
utes penalties are given, the digit will
show 4 (2+2=4)
15 Showplayerfoulmiddlesecon
ON: When a player foul is given, it
shows in the middle section of the
scoreboard for 15 seconds and then
only team fouls will show.
OFF: Only team fouls will show.
Default is ON.
TEAM TEXT
DISPLAY LENGTH
ON
ON
CANCEL
CHANGES
PAGE 2/7
MORE
DEFAULT
SETTINGS
ACCEPT
CHANGES
LEFT ALIGN
GUEST TEAM TEXT
USE GAME HORN
FOR SHOT CLOCK
MERGE 2
x
MINOR
PENALTY (2+2=4)
SHOW PLAYER FOUL
MIDDLE SECTION
SHOW PREVIOUS
SETS IN
SHOW
SCORE BY
MERGE PLAYER
NUMBER IN PLAYER
TEXT DISPLAY
SERVICE MENU
20
SCORE
OFF
OFF
OFF
OFF
Fig. 6 – Service menu “Page 2/7”
8
9
10
11
12
13
14
15

NAUCON-1000 – USER MANUAL | 11
Fig. 7 – “Page 3/7”:
1Time-outhornsignalme
Changes the length of the automatic
horn blowing when pressing time-out in
2Gamehornsignalme
Changes the length of the automatic
horn blowing at the end of a game.
3Wireless power
Choose between four settings regarding
wireless power: OFF, LOW, HIGH and
BOOST. The wireless range of the NAU-
CON-1000 will then be adjusted.
OFF: Radio power off, wired only.
LOW: Minimum power.
HIGH: Maximum power.
BOOST: Used for test-purpose only.
Default is HIGH.
4Basketball shot clock led
ON: The shot clock led stripe turns on
when the shot clock runs out.
OFF: The shot clock led stripe is disa-
bled.
Default is ON.
5Shotclockhornsignalme
Change the length of the automatic
horn blowing when the shot clocks
6Board zones setup
This is where you enter the board zone
setup. See a more detailed description
on page 14.
7Basketball shot clock blank at reset
ON: The shot clocks will show as blank/
black until the game starts.
OFFif set
according to the 24 second rule.
Default is OFF.
8Defaultme-outmefor:
Basketball: 1 min.
TIME-OUT HORN
SIGNAL TIME
2
1:00
CANCEL
CHANGES
PAGE 3/7
MORE
DEFAULT
SETTINGS
ACCEPT
CHANGES
SHOT CLOCK HORN
SIGNAL TIME
BOARD ZONES
SETUP
WIRELESS
POWER
GAME HORN
SIGNAL TIME
BASKETBALL
SHOT CLOCK
LED
BASKETBALL
SHOT CLOCK
BLANK AT RESET
BASKETBALL
TIME-OUT TIME
SERVICE MENU
2
HIGH
2
OFF
ON
Fig. 7 – Service menu “Page 3/7”
1
4
7
2
5
8
3
6

12 | NAUCON-1000 – USER MANUAL
Fig. 8 – “Page 4/7”:
9Defaultme-outmefor:
Basketball Euroleague: 30 sec.
Handball: 1 min.
Futsal: 1 min.
Minihockey: 30 sec.
Floorball: 30 sec.
Ice hockey: 30 sec.
Inline hockey: 30 sec.
10 Basketball extra shot clock digit
You can set the shot clocks to count
down for the last 5 sec. Default is OFF.
Fig. 9 – “Page 5/7”:
11 Defaultme-outmefor:
Bandy: 30 sec.
Volleyball tech: 1 min.
Am. football: 1:30 min.
Basketball 3x3: 30 sec.
Volleyball: 30 sec.
Water polo: 1 min.
Netball: 1 min.
11 Am.footballinvertmeout
You can choose how the timeouts
should be shown.
ON: The timeouts will be shown when
used.
OFF: All timeouts will be shown but
removed when used.
Default is ON.
Fig. 10 – “Page 6/7”:
1Test menu
Testing the function of the characters on
the scoreboard.
How to test it:
Press TEST MENU and note the red
number showing in the small display
and the characters on the scoreboard.
The numbers are referring to the board:
1– All the diodes on the scoreboard
should light up.
2– All numbers on the scoreboard are
counting up.
3– Checking if all addresses referring to
the digits are working.
4– Text displays turn fully ON,
one line at a time.
1:00
0:30
CANCEL
CHANGES
PAGE 4/7
MORE
DEFAULT
SETTINGS
ACCEPT
CHANGES
BASKETBALL
EXTRA SHOT CLOCK
DIGIT
FLOORBALL
TIME-OUT TIME
ICE HOCKEY
TIME-OUT TIME
FUTSAL
TIME-OUT TIME
MINIHOCKEY
TIME-OUT TIME
INLINE HOCKEY
TIME-OUT TIME
BASKETBALL
EURP LEAGUE
TIME-OUT TIME
HANDBALL
TIME-OUT TIME
SERVICE MENU
0:30
1:00
0:30
OFF
0:30
0:30
BANDY
TIMEOUT TIME
1:00
1:00
CANCEL
CHANGES
PAGE 5/7
MORE
DEFAULT
SETTINGS
ACCEPT
CHANGES
VOLLEYBALL
TIME-OUT TIME
WATER POLO
TIME-OUT TIME
AM. FOOTBALL
INVERT TIME
NETBALL
TIMEOUT TIME
BASKETBALL 3X3
TIME-OUT TIME
AM. FOOTBALL
TIME-OUT TIME
VOLLEYBALL TECH
TIME-OUT TIME
SERVICE MENU
0:30
1:30
1:00
0:30
OFF
0:30
Fig. 8 – Service menu “Page 4/7” Fig. 9 – Service menu “Page 5/7”
910 11
12

NAUCON-1000 – USER MANUAL | 13
2Test handles
Press a button on the handle connected
to the NAUCON-1000. There are several
kinds of handles. Note the number
showing in the small display on the touch
screen.
The numbers should be:
1– Start game time
2– Stop game time
3– Start/stop shot clock time
4– Reset shot clock time
34
3Upload font to text displays – i.e. language
Insert a USB stick with a CSV file con-
taining the language that appears in the
advertisement/text display and press
the button. Note: You can not change
the actual font.
4Adversing(1-4)displaylength
Set the length of the advertising text
showing on the scoreboard. Default
(and maximum)
5Onmanualhornusemeouthornoutput
It is possible to use the timeout horn
output when pressing the manual horn
button. Default is OFF.
Fig. 11 – “Page 7/7”:
1Change protocol
Changes the communication protocol
NG08: For NT/NS/NB/NQA/NW score-
boards from 1998 and forward.
If set to NG08:
scoreboards.
are disabled.
be set to OFF.
2Scroll text on events
ON: The scroll text will be shown on the
text lines.
OFF: No scroll text will be shown on the
text lines.
Default is ON.
3License accepted
ON: indicates that the license has been
accepted.
OFF: If set to off the license will be
shown the next time the NAUCON-1000
will be turned on.
4Handballenabletransferpenales
Enable or disable the possibility to
transfer the penalty to the team from
a player that already have a active
penalty.
Default is OFF.
CANCEL
CHANGES
PAGE 7/7
MORE
DEFAULT
SETTINGS
ACCEPT
CHANGES
SERVICE MENU
LICENSE
ACCEPTED
CHANGE
PROTOCOL
NG12 ON
OFFON
HANDBALL ENABLE
TRANSFER
PENALTIES
SCROLL TEXT
ON EVENTS
Fig. 11 – Service menu “Page 7/7”
CANCEL
CHANGES
PAGE 6/7
MORE
DEFAULT
SETTINGS
ACCEPT
CHANGES
SERVICE MENU
32
OFF
TEST HANDLES
ADVETISING 1
DISPLAY LENGTH
UPLOAD FONT
TO TEXT DISPLAYS
ADVETISING 3
DISPLAY LENGTH
ON MANUAL HORN
USE TIMEOUT
HORN OUTPUT
ADVETISING 2
DISPLAY LENGTH
ADVETISING 4
DISPLAY LENGTH
TEST
MENU
0
32
0
32
32
Fig. 10 – Service menu “Page 6/7”
1
3
2
5
1
2
3
44

14 | NAUCON-1000 – USER MANUAL
ZONES DESCRIPTION
A zone is a group of scoreboards that are
controlled by the same NAUCON-1000.
Each zone has a color:
The addresses shown on the touch screen
are used as identification of the score-
board in a chosen zone. It is the zone se-
lection that determines which scoreboards
are receiving communication.
BOARD ZONE SELECTION: Please contact
Nautronic at service@nautronic.com and
include serial number and scoreboard
model type. Type “Zone config” in subject.
CONFIGURING THE ZONES
IN THE NAUCON-1000
If multiple wireless or wired scoreboard
systems are installed in the same arena,
you must configure BOARD ZONE SETUP
and BOARD ZONE SELECTION.
It is possible to have up to four inde-
pendent scoreboard systems each with a
NAUCON-1000 control panel in the same
arena.
If using more than 4 the scoreboards
must be wired.
If more than one scoreboard is placed in
the same arena each must have a unique
address – learn more on page 15.
WHEN CONFIGURING THE BOARD
ZONES SETUP the scoreboard must be
turned on, as the NAUCON-1000 transmits
the information to the scoreboard.
BOARD ZONE SELECTION MENU:
you toggle between ON and OFF for
each zone. The NAUCON-1000 will only
control scoreboard systems in zones set to
ON. All zones are ON as default. Enter the
BOARD ZONE SELECTION MENU from
GENERAL SETUP MENU.
STANDARD SCOREBOARD ADDRESSES/
REFERENCE NUMBERS
Default is 51.
Board zones setup
HOW TO CONFIGURE one or more NAUCON-1000. Go to the BOARD ZONES SETUP
menu from the SERVICE MENU. See how to get there on page 9.
10 11 12 13 14 15 16 17 18 19
20 21 22 23 24 25 26 27 28 29
30 31 32 33 34 35 36 37 38 39
40 41 42 43 44 45 46 47 48 49
50 51 52 53 54 55 56 57 58 59
60 61 62 63 64 65 66 67 68 69
SHOW INFO
CLEAR
ZONES
CANCEL
CHANGES
ZONE 1ZONE 2ZONE 3ZONE 4
ACCEPT
Blue Green Red Yellow
ZONE 1
ON ON
ON ON
CANCEL
CHANGES
ACCEPT
CHANGES
ZONE 2
ZONE
3Z
ONE 4
BOARD ZONE SELECTION MENU

NAUCON-1000 – USER MANUAL | 15
LOCATE THE SCOREBOARD’S ADDRESS:
beside the
power-connector – the address number
is written on a silver-colored label.
displayed in the HOME score, when the
scoreboard is powered on.
also be displayed through the NAU-
CON-1000 BOARD DIAGNOSTICS
MENU, this requires that the score-
board address is set to a zone in the
BOARD ZONES SETUP menu.
ASSIGN AN ADDRESS TO A ZONE
Each scoreboard address is assigned to a
zone. Press the address number until it
has the color of the desired zone. When
pressing ACCEPT*2
the new board zone information is trans-
mitted to the highlighted scoreboard
addresses.
*2The scoreboard must be turned on and
within range of the NAUCON-1000 when
pressing ACCEPT.
CONFIGURING ZONE(S)
To set up four scoreboards each with their
own NAUCON-1000, as Fig. 14, follow the
description on page 14.
USE THE SAME PROCEDURE WHEN
SETTING UP ONE, TWO OR THREE NAU-
CON-1000 CONTROL PANELS.
Scoreboard 1
COURT 2COURT 3COURT 4
COURT 1
Scoreboard 4Scoreboard 3Scoreboard 2
Fig. 12 – Arena with four independent main scoreboard setups, each with its own
NAUCON-1000. Described on the following page.

16 | NAUCON-1000 – USER MANUAL
Scoreboard 1 – blue, zone 1
Address 11 is configured to function in
Zone 1 on court 1.
IE. ADDRESS NO. IS REFERRING TO:
11: Main scoreboard
21: Home sideboard
31: Guest sideboard
41 & 42: Shot clocks
Scoreboard 2 – green, zone 2
IE. ADDRESS NO. IS REFERRING TO:
12: Main scoreboard
22: Home sideboard
32: Guest sideboard
43 & 44: Shot clocks
Scoreboard 3 - red, zone 3
Address 13 is configured to function in
Zone 3 on court 3.
IE. ADDRESS NO. IS REFERRING TO:
13: Main scoreboard
23: Home sideboard
33: Guest sideboard
45 & 46: Shot clocks
Scoreboard 4 – yellow, zone 4
Address 14 is configured to function in
Zone 4 on court 4.
IE. ADDRESS NO. IS REFERRING TO:
14: Main scoreboard
24: Home sideboard
34: Guest sideboard
47 & 48: Shot clocks
If only one NAUCON-1000 is set up for four individual scoreboards, all of the above
zones will highlight at the same time.
10 11 12 13 14 15 16 17 18 19
20 21 22 23 24 25 26 27 28 29
30 31 32 33 34 35 36 37 38 39
40 41 42 43 44 45 46 47 48 49
50 51 52 53 54 55 56 57 58 59
60 61 62 63 64 65 66 67 68 69
SHOW INFO
CLEAR
ZONES
CANCEL
CHANGES
ZONE 1ZONE 2ZONE 3ZONE 4
ACCEPT
Fig. 13 – Zones setup for four individual NAUCON-1000. Scoreboards with three
sideboards and two shot clocks. Referring to the drawing, Fig. 12 on the previous page.
10 11 12 13 14 15 16 17 18 19
20 21 22 23 24 25 26 27 28 29
30 31 32 33 34 35 36 37 38 39
40 41 42 43 44 45 46 47 48 49
50 51 52 53 54 55 56 57 58 59
60 61 62 63 64 65 66 67 68 69
SHOW INFO
CLEAR
ZONES
CANCEL
CHANGES
ZONE 1ZONE 2ZONE 3ZONE 4
ACCEPT
10 11 12 13 14 15 16 17 18 19
20 21 22 23 24 25 26 27 28 29
30 31 32 33 34 35 36 37 38 39
40 41 42 43 44 45 46 47 48 49
50 51 52 53 54 55 56 57 58 59
60 61 62 63 64 65 66 67 68 69
SHOW INFO
CLEAR
ZONES
CANCEL
CHANGES
ZONE 1ZONE 2ZONE 3ZONE 4
ACCEPT
10 11 12 13 14 15 16 17 18 19
20 21 22 23 24 25 26 27 28 29
30 31 32 33 34 35 36 37 38 39
40 41 42 43 44 45 46 47 48 49
50 51 52 53 54 55 56 57 58 59
60 61 62 63 64 65 66 67 68 69
SHOW INFO
CLEAR
ZONES
CANCEL
CHANGES
ZONE 1ZONE 2ZONE 3ZONE 4
ACCEPT

SETTING
UP SPORT
User manal

18 | NAUCON-1000 – USER MANUAL
Fig. 14a – “Page 1/3”:
1Edit lineups
Choose either to edit HOME or GUEST
team lineup. You will enter a screen
where you can change the name and
number of the players, see page 40.
2Periodme
Set the length of a period. Default: 10 min.
3Breakme
Set the length of the breaks between
4Extendedbreakme
Set the length of an extended break.
5Extendedperiodme
Set the length of an extended period.
Default is 5 minutes.
6Half-mebreakme
Set the length of the half-time break.
Default is 15 minutes.
7Count mode
You can change between whether the
game clock is counting up or down by
pressing COUNT MODE.
Default is DOWN.
Fig. 14b – “Page 2/3”:
8Preme
Set the length of the pre time / the
time counting down before the match.
Default is 0 minutes
9Shotclockme
Set the count down of seconds for the
10 Automachorn
You can change between turning the au-
tomatic horn ON or OFF. Default is ON.
Basketball setup
Choose BASKETBALL from the SELECT SPORT MENU. Then press the SETUP click button
on the console and you will see a menu like shown below, Fig. 14a.
EDIT HOME
TEAM LINEUP
EXTENDED
BREAK TIME
PERIOD TIME
10:00
2:00
2:00
5:00
15:00
BREAK TIME
CANCEL
CHANGES
PAGE 1/3
MORE
DEFAULT
SETTINGS
ACCEPT
CHANGES
EDIT GUEST
TEAM LINEUP
EXTENDED
PERIOD TIME
HALF-TIME
BREAK TIME
COUNT MODE
BASKETBALL SETUP
SHOT CLOCK
TIME
0:00
24
4
14
ON
AUTOMATIC HORN
CANCEL
CHANGES
PAGE 2/3
MORE
DEFAULT
SETTINGS
ACCEPT
CHANGES
SHOT CLOCK
SHORT TIME
SHOW SIDEBOARDS
ON
LIST
PLAYER NUMBER
SELECTION
BASKETBALL
SHOT CLOCK
AUTO START
OFF
PRE TIM
EP
ERIODS
BASKETBALL SETUP
Fig. 14a – Setup basketball menu “Page 1/3” Fig. 14b – Setup basketball menu “Page 2/3”
1
47
2 5
36
8
9
10
11
12
13
14
15

NAUCON-1000 – USER MANUAL | 19
ON
CANCEL
CHANGES
PAGE 3/3
MORE
DEFAULT
SETTINGS
ACCEPT
CHANGES
BASKETBALL
SHOT CLOCK
AUTO STOP
BASKETBALL SETUP
15
PENALTY
SHOW TIME
Fig. 14c – Setup basketball menu “Page 3/3”
11 Playernumberselecon
Choose whether scores and penalties
are given to a specific player or to the
whole team. Default is LIST.
LIST: Choose player number from a list.
TYPE: Type player number.
OFF: Scores and penalties are
given to the whole team.
12 Periods
Sets the number of periods in the
match. Default is 4.
13 Shotclockshortme
Set the counting length of the shot
clock’s
14 Show sideboards
Turning the sideboards ON or OFF.
Default is ON.
15 Basketball shot clock auto start
ON: Autostarts the shot clock when the
game time is started
OFF: Shot clock time is started manually
with a remote control.
Default is ON
Fig. 14c – “Page 3/3”:
16 Basketball shot clock auto stop
ON: Stops the shot clock when the game
time is stopped.
OFF: Shot clock time will continiue run-
ning when the game time is stopped.
Default is ON
17 Penaltyshowme
Sets the time that a player number foul
is shown on the scoreboard.
Default is 15 sec.
Basketball setup
16 17

| NAUCON-1000 – USER MANUAL
Handball setup
Fig. 15a – “Page 1/2”:
1Edit lineups
Choose either to edit HOME or GUEST
team lineup. You can change the names
and numbers of the players, see page
40.
2Periodme
Set the length of a period. Default is 30
minutes.
3Half-mebreakme
Sets the length of the half-time break.
Default is 10 minutes.
4Extendedhalfmebreakme
-
tended periods. Default is 1 minute.
5Extendedperiodme
Sets the length of an extended period.
Default is 5 minutes.
6Extendedbreakme
Sets the break time between ordinary
game time and extended game time.
Default is 1 minute.
7Connuousperiodme
Choose whether the timer should start
over or continue counting from the
previous period. Default is OFF.
Example: If set to ON and a period, 30
minutes, has ended the next period will
start counting from 30 and up to 60
minutes.
Fig. 15b – “Page 2/2”:
8Count mode
Toggle between wheather the game
clock is counting up or down by pressing
COUNT MODE. Default is UP.
9Automachorn
Turns the automatic horn ON or OFF.
Default is ON.
10 Show sideboards
Turns the sideboards ON or OFF. Default
is ON.
11 Always show cards
ON: shows yellow and red card buttons
when player number selection is set to
OFF. OFF: Hides yellow and red card
buttons when player number selection
is set to OFF. DEFAULT is off.
Choose HANDBALL from the SELECT SPORT MENU. Then press the SETUP click button
on the console and you will see a menu like shown below, Fig. 15a.
EDIT HOME
TEAM LINEUP
PERIOD TIME
30:00
10:00
1:00
5:00
OFF
1:00
CANCEL
CHANGES
PAGE 1/2
MORE
DEFAULT
SETTINGS
ACCEPT
CHANGES
EDIT GUEST
TEAM LINEUP
EXTENDED
PERIOD TIME
EXTENDED
BREAK TIME
HALF-TIME
BREAK TIME
EXTENDED HALF TIME
BREAK TIME
CONTINUOUS
PERIOD TIME
HANDBALL SETUP
ON
0:00
CANCEL
CHANGES
PAGE 2/2
MORE
DEFAULT
SETTINGS
ACCEPT
CHANGES
PLAYER NUMBER
SELECTION
OFF
AUTOMATIC HORN
COUNT MOD
EP
RE TIME
SHOW SIDEBOARDS
ON 2
OFF
ALWAYS SHOW
CARDS
PERIODS
HANDBALL SETUP
Fig. 15a – Setup Handball “Page 1/2” Fig. 15b – Setup Handball “Page 2/2”
12
13
14
1
47
25
3 6
8
9
10
11
Other manuals for NAUCON-1000
3
Table of contents
Other Nautronic Accessories manuals
Popular Accessories manuals by other brands

Vision
Vision ZP3113IN-7 Installation & operation manual

Panasonic
Panasonic Schottky Barrier Diodes MA3X721 (MA721) Specifications

Genius
Genius AGAMAPAD 9X12 datasheet

Omron
Omron E3NW-ECT Operation manual

DIGITAL YACHT
DIGITAL YACHT GPS160 Installation and instruction manual

Omega Engineering
Omega Engineering OSXL-101 user guide