Naxa NCA-615 User manual

In-Dash MP3 Player and Receiver with Bluetooth®
and Flip-Down Faceplate
NCA-615
Instruction Manual
Please read carefully before use and keep for future reference.

Page 2 Naxa Electronics
Important Safety Information
READ THIS MANUAL THOROUGHLY BEFORE USING
THIS UNIT. KEEP THIS MANUAL FOR FUTURE REF-
ERENCE.
Precautions & Warnings
• Toreducetheriskofre,electricshock,andinterfer-
ence,donotattempttorepairthisunityourself.Refer
allservicetoaqualiedtechnician.
• SomeMP3/WMAlesmaynotbeplayable.
• Keepthevolumeatareasonableleveltoavoiddistract-
eddriving.Highvolumelevelsmaymakeitdifcultto
concentrateontrafcandroadconditionswhiledriving.
• Ifthecarhasbeenindirectsunlightforanextended
period,youmayneedtoreducethetemperatureinside
thecarbeforeturningonandusingtheunit.
• Ifthebatteryisdisconnected,discharged,orchanged,
thepresetmemoryoftheunitwillbelostandrequire
reprogramming.
• Theunitisdesignedtobeinstalledinalevel,horizontal
position.Foroptimalperformance,avoidinstallingthe
unitatanangle.
• Neveruseexcessiveforcewhenremovingorattaching
thefaceplate.Donottightlygripthedisplayandbut-
tonstoavoiddamage.
• ALWAYSLOWERTHEVOLUMEBEFORETURNINGOFFTHEUNIT
ORSWITCHINGTHEIGNITIONOFF.

www.naxa.com Page 3
Table of Contents
Important Safety Information ...................... 2
At a Glance ....................................................... 5
Electrical Connections.....................................7
Installation Guide ........................................... 8
InstallationProcedures..................................................... 8
InstallationOpening................................................... 8
AttachingtheFaceplatetotheChassis..........................9
Todetachthefaceplate:..................................................10
Remote Control .............................................. 11
Pairing a Bluetooth®Device ..........................12
Troubleshooting .............................................13
Thank You ........................................................ 4
In the Box ......................................................... 4
Warnings and Precautions.............................14
Specications .................................................16
Support ...........................................................16

Page 4 Naxa Electronics
Thank You
We know you have many choices when it comes to
technology; thank you for choosing us here at Naxa
Electronics.Establishedin2001inLosAngeles,Califor-
nia,wearededicatedtodeliveringproductsthaten-
tertainanddelight.
We trust that you will be happy with your purchase.
Pleasereadthismanualcarefullyandsaveitforrefer-
ence.YoumayalsondthelatestFAQ,documentation,
andotherproductmaterialatourwebsite.Comevisit
usonthewebatwww.naxa.comandseeallthatwe
havetooffer!
In the Box
Pleasetakeamomenttomakesurethatyouhaveev-
erythinginthelistbelow.Althoughwemakeeveryef-
forttoensurethateachNaxadeviceissecurelypacked
andsealed,weknowalotcanhappeninbetweenus
andyou.Ifanythingismissing,checkbackwithyour
localretailertogetimmediateassistance.Iftheycan-
nothelpyou,pleasecontactourNaxaSupportteamat
www.naxa.com/naxa_support.
• NCA-615mainunit&faceplate
• Faceplatecase
• Remotecontrol
• Installationkit

www.naxa.com Page 5
At a Glance
1 2
1
43 5 6 7 8 105 6 7 8 9
NCA-615
MIC
IR
INTRPT RDM-10 +10AUX
USB
AMS
CLKBND
EQ SCN
MUTE
MODE
1/
MODE
Power.Presstoturntheunitonandtochange
theactivesourcemode:Radio,USB,CARD,AUX
IN,BT.(USB&CARDmodesareonlyavailable
whenmediaisdetectedbytheplayer.)
Pressandholdtoturntheunitoff.
2Volume/
Options
Rotatetoadjustthevolumelevel.
Presstocyclethroughtheoptionsmenuand
rotatethedialtoadjusttheoptions:Bass,
Treble,Balance,Fader,LoudOff,EQOff,Loc/DX,
Stereo,Vol.
3 USB/CARD/BT:Presstoskiptotheprevious
track.
RADIO:Presstoautoscandowntothenext
station.Pressandholdtotunetoalower
frequency.
4USB/CARD/BT:Presstoskiptothenexttrack.
RADIO:Presstoautoscanuptothenextstation.
Pressandholdtotunetoahigherfrequency.
5 /1 USB/CARD/BT:Presstostart/pause/resumeplay.
RADIO:Presetstation1.
6 INT/2 USB/CARD:Presstochangetheintromode.
RADIO:Presetstation2.
7RPT/3 USB/CARD:Presstochangetherepeatmode.
RADIO:Presetstation3.
8RDM/4 USB/CARD:Presstochangetherandommode.
RADIO:Presetstation4.
9–10/5 USB/CARD:Presstoskipback10tracks.
RADIO:Presetstation5.
10 +10/6 Presstoskipforward10tracks.
RADIO:Presetstation6.

Page 6 Naxa Electronics
12 13
17
NCA-615
MIC
IR
INTRPT RDM -10 +10AUX
USB
AMS
CLKBND
EQ SCN
MUTE
MODE
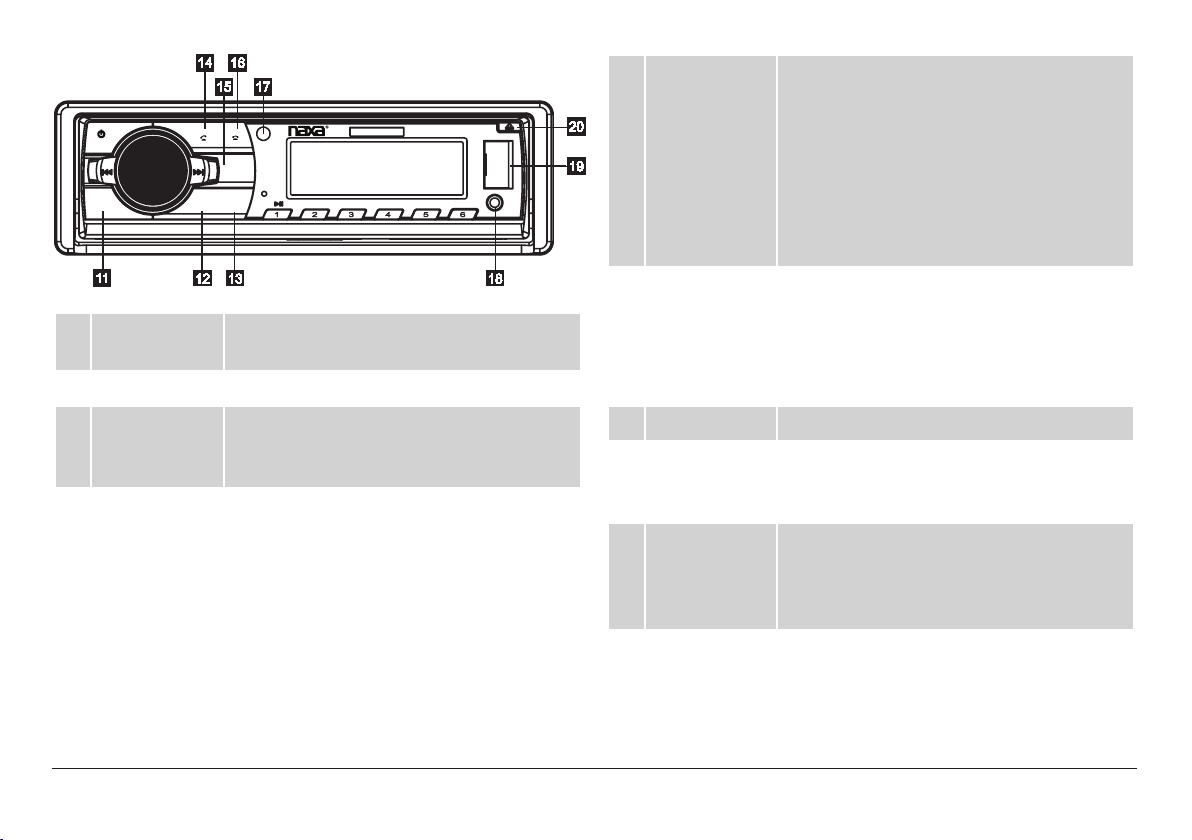
11 MUTE Presstotemporarilydisable/restorethe
sound.
12 EQ Presstochangetheaudioequalizer.
13 SCN Presstoscanforradiostations.Theradio
willplayeachstationfor5secondsbefore
automaticallymovingtothenextone.
14 BAND/[CALL] BT:Answer/makephonecallswhencon-
nectedtoasmartphone.Pressonce;“--”
willashonthescreen.Then:
• Pressagaintoredialthelastnumber,or
• Usetheremotekeypadtoenteraphone
number,thenpressagaintoplacethecall.
RADIO:Presstochangetheradioband(FM1,
FM2,FM3,AM1,AM2).
15 AMS USB/CARD:Presstoentertracksearch
mode,thenrotatethevolumedialtoscan
throughthetrack.
Radio:AutomaticMemorySave.Press
toscanforthestrongestradiostation
signalsandautomaticallysavethemto
presetmemory.Theradiocansaveupto
6stations.
16 CLK/[END] CLOCK:Pressoncetodisplaythetime.
Pressandholdtosetthetime.
BT:Rejectanincomingphonecallorend
acallwhenconnectedtoasmartphone
withBluetooth.
17 IR Remotesensor.
18 AUX
connector
AUXmode.3.5mmstereoconnectionfor
deviceswith3.5mmline-outorhead-
phoneoutput.
19 USBport USBmode.LoadUSBmemorystickshere.
TheUSBportisdesignedformediaplay-
backfromashmemorydevices.Itisnot
designedtochargehigh-powerdevices.
20 Release Presstoipdownthefrontpanelinorder
toaccesstheSDslot,resettheunit,orto
removethefaceplate.

www.naxa.com Page 7
21 SDcardslot SDmode.LoadanSDmemorycardhere.
22 RESET Presstoresetthesystem.Alloptionswill
returntotheirfactorydefaultsettings.
PressRESETifthedisplayisfrozenorthe
systemisotherwiseunresponsive.
Electrical Connections

Page 8 Naxa Electronics
Installation Guide
Installation Procedures
First complete the electrical connections, and then
checktomakesureeverythingissecureandcorrect.
Installation Opening
Thisunitcanbeinstalledinanydashboardhavingan
openingasshownbelow.
The dashboard must be 4.75–5.56mm thick in order
to be able to support the unit.
Insert the mounting sleeve into the dashboard and
bendthemountingtabsoutwithascrewdriver.Make
surethatthelocklever isushwiththemounting
collarandisnotprojectingbeyond.

www.naxa.com Page 9
Attaching the Faceplate to the
Chassis
1. Aligntheindentationontherightofthefaceplate
withtheright“bulge”ofthechassis.
2. Slidethefaceplateinandholdittotheleft;atthe
sametime,bringtheotherendofthefaceplateto-
wardsthechassis,makingsuretoaligntheinden-
tationwiththe“bulge.”

Page 10 Naxa Electronics
3. Flipthefaceplateupuntilitclicksintoplaceand
attachestothechassis. To detach the faceplate:
1. Press the RELEASE button to ip the faceplate
down.
2. Gently push the faceplate to the left to release it
fromthechassis,thenpullitawayfromthechassis.

www.naxa.com Page 11
Remote Control
1. PowerOn/Off
2. PreviousTrack
3. Mute,Delete
4. Play/Pause,Preset1/Keypad1
5. RandomPlay,Preset/Keypad4
6. Stereo,Keypad7
7. Mode,Keypad*
8. PresetEQ(Flat/Pop/Class/
Rock),Keypad0
9. Local,Keypad#
10. Loudness,Keypad8
11. AMS,Keypad9
12. Previous10Tracks,Preset/
Keypad5
13. Next10Tracks,Preset/
Keypad6
14. IntroPlay,Preset/Keypad2
15. RepeatPlay,Preset/Keypad3
16. ClockDisplay/Set,EndCall
17. NextTrack
18. AudioControl,Function
19. Band,AnswerCall
20.VolumeControl(Up,Down)
Note: When operating the remote
controlforthersttime,youmust
pull out the protective plastic tab
from the batery compartment
found on the back of the remote
control.

Page 12 Naxa Electronics
Pairing a Bluetooth®Device
A Bluetooth enabled device must be pairedwith the
receiverbeforeusingthemtogetherforthersttime.
Afteradevicehasbeenpaired,thereceiverwillauto-
maticallyconnecttoitwhenplacedinBT(Bluetooth)
mode.
Note:Onlyonedeviceatatimecanbe connectedto
thereceiver.Useyourdevicetounpairwiththereceiver
beforeattemptingtopairanotherdevice.
1. MakesureBluetooth®isenabled onyourdevice.
Enableitifithasn’t.
2. PressMODEonthereceiveruntilthedisplayreads
BT.
3. UseyourdevicetosearchforavailableBluetooth
devices(i.e.,yourreceiver).Thisfunctionisusually
intheBluetoothsettingsmenu;refertoyourde-
vice’sinstructionmanualtolearnmore
4. The receiverwill announce itself as “NAXA NCA-
615.”Selectthereceiver.
Notes:
Ifthe pairing processfails,turnthereceiveroff, press
MODEtoplaceitinBTmodeagain,andrepeatsteps1-4.
Makesurethatthevolumeofyourdeviceissettoits
maximum level; then use the receiver to adjust the
volumetoacomfortablelevel.
Thespeakercannotbepairedwithmorethanonede-
viceatatime.
PressMODEuntilthedisplayreadsBT.

www.naxa.com Page 13
Troubleshooting
Ifyou suspect somethingiswrong,immediatelyturn
thepoweroff.Donotusetheunitwhileitisexhibit-
ingabnormalbehavior(forexample,nosound,orifit
is smoking and emitting a foul smell). Continuingto
usetheunitinthisstatecouldleadtoareorelectric
shock.DiscontinueuseimmediatelyandcontactNaxa
TechnicalSupport(www.naxa.com/naxa_support/)..
ѥѥNever attempt to repair the unit by your-
self. There are dangerous, high-voltage
components inside.
General
Thereisno
powerorsound.
Thecar’sengineswitchisnoton.Turnyour
car’signitionswitchto“ACC”or“ON.”
Theunitwasnotinstalledsecurely.Check
allofthecablesandconnections.
Thefusehasburnedout.Replacethefuse.
Thevolumelevelmaybesetto“0”orMUTE
maybeenabled.
Radio
Thereisalot
ofstaticinthe
broadcast.
Thestationsignalistooweak.Selectan-
otherstationwithastrongersignallevel.
Mysavedpreset
stationshave
beenlost.
Thebattery/powercablemaynotbese-
curelyconnected.Connectthebatterycable
totheterminalthatisalwayslive.
USB / SD
TheUSBorSD
cardisloaded
butthereisno
sound.
TheUSBorSDcardhasnotbeensecurely
loaded.Removeitandtryagain.
TheUSBorSDcardmaybedamaged,orit
maynotcontaincompatiblemusicles.Try
anotherUSBdriveorSDcard,ortryloading
differentlesontoit.

Page 14 Naxa Electronics
Warnings and Precautions
Thelightningashwitharrowheadsymbolwithinanequilateral
triangleis intendedto alerttheusertothepresenceofunin-
sulated“dangerousvoltage”withintheproduct’senclosurethat
may be of signicant magnitudeto constitute risk of electric
shock
Theexclamationpointwithinanequilateraltriangleisintended
toalerttheusertothepresenceofimportantoperationandser-
vicinginstructionsintheliteratureaccompanyingtheappliance.
CAUTION
• Donotblocktheventilationopeningsorholes.
• Donotplaceanynakedames(suchaslightedcandles)ontheap-
paratus.
• Whendiscardingbatteries,followalllocalrulesandlawsgoverningthe
disposalofbatteries.Considertheenvironmentalimpactofyouractions!
• Topreventreorshockhazard,donotexposethisappliancetorain
ormoisture.
WARNING:
Thisproductcontainslead,achemicalknowntotheStateofCaliforniato
causecancerandbirthdefectsorotherreproductiveharm.Wash hands
after handling.
FCC NOTICE
ThisdevicecomplieswithPart15oftheFCCRules.Operationissubjectto
thefollowingtwoconditions:(1)thisdevicemaynotcauseharmfulinter-
ference,and(2)thisdevicemustacceptanyinterferencereceived,includ-
inginterferencethatmaycauseundesiredoperation.
Note: This equipment has been tested and found to comply with the
limitsforaClassBdigitaldevice,pursuanttoPart15oftheFCCRules.
Theselimitsaredesignedtoprovidereasonableprotectionagainstharm-
fulinterferencein a residentialinstallation.This equipment generates,
usesandcanradiateradiofrequencyenergyand,ifnotinstalledandused
inaccordancewiththeinstructions,maycauseharmfulinterferenceto
radiocommunications.However,thereisnoguaranteethatinterference
willnotoccurin a particularinstallation.Ifthisequipment doescause
harmfulinterferencetoradioortelevisionreception,whichcanbede-
terminedbyturningtheequipmentoffandon,theuserisencouragedto
trytocorrecttheinterferencebyoneormoreofthefollowingmeasures:
• Reorientorrelocatethereceivingantenna.
• Increasetheseparationbetweentheequipmentandreceiver.
• Connecttheequipmentintoanoutletonacircuitdifferentfromthat
towhichthereceiverisconnected.
• Consultthedealeroranexperiencedradio/TVtechnicianforhelp.

www.naxa.com Page 15
CAUTION ON MODIFICATIONS
Anychangesormodicationsnotexpresslyapprovedbythegranteeof
this device may void the authority granted by the FCCto operate the
equipment.

Page 16 Naxa Electronics
Specications
Installation Options In-dash,singleDIN
Faceplate Detachable,Flip-down
Display Type LCD
Disc Support --
Bluetooth®Version ????????
Removable Memory
Support
USB,SD,SDHC
Playable Media
Formats
MP3,WMA
Radio Tuner AM/FMwithdigitalpresettuning
AM:530–1710kHz
FM:87.5–107.9MHz
Input 3.5mmAUXaudio
Power Output (max) 4audiochannels(4x25W)
Power Source DC12V
Fuse 15A
Note:Productareimprovedcontinuously.Wereservetherighttomodify
theproductandspecicationswithoutpriornotice.
Support
Ifyouhaveproblemswithyourdevice,pleaseconsult
the instructions in this manual. Please also visit us
onthewebatwww.naxa.comtogetuptotheminute
news,alerts,and documentationforyour device.For
additional assistance, please contact Naxa Technical
Support.
NAXA Technical Support
2320East49thSt.
Vernon,CA90058
http://www.naxa.com/naxa_support/

www.naxa.com Page 17


Table of contents
Other Naxa Car Receiver manuals
Popular Car Receiver manuals by other brands

Boss Audio Systems
Boss Audio Systems 758DBI user manual

Panasonic
Panasonic CQC700U - AUTO RADIO/CD DECK operating instructions

Pioneer
Pioneer Super Tuner IIID DEH-P7100BT quick start guide

CrimeStopper
CrimeStopper CS-9719MX supplementary guide

JVC
JVC KD-R705 Product highlights

Pioneer
Pioneer DEH-P8000R Service manual