Naxa NX-685 User manual

INSTRUCTIONMANUAL
UP
ANGAUX
USB/DVD/VCD/MP3/CDPLAYER
54 RDM 6
-10 +10 REL
VOL
+
_
SEL
BND
EQ
CLK A.P
DN
21 INT 3RPT
RST
M
MU MOD EJ
VIDEO
TM
Remark:Anyinformationsubjecttochangewithoutfurthernotice
FullyCompatibletoThese
FormatsofFiles:DVD,MP4,
VCD,JPEG,MP3,WMA,CD.
SLOW_FWD
A-B
ZOOM
AUDIO
INT
LOC
ST
CLK
5
9
6
-10
1
+10
2
+SETUP
SEL
MU MODE
PWR
EQ
SUBTITLETITLE/PBC
RPT RDM
SEARCH APS
P/N
0/10
7
10+
8
34
0K
MENU
BAND
PROG OSD LOUD STEP
NX-685
U.S.PatentNos.6,836,549;6,381,747;7,050,698;6,516,132;and5,583,936.
THISPRODUCTINCORPORATESCOPYRIGHTPROTECTION
TECHNOLOGYTHATISPROTECTEDBYU.S.PATENTSAND
OTHERINTELLECTUALPROPERTYRIGHTS.USEOFTHIS
COPYRIGHTPROTECTIONTECHNOLOGYMUSTBE
AUTHORIZEDBYMACROVISION,ANDISINTENDEDFOR
HOMEANDOTHERLIMITEDVIEWINGUSESONLYUNLESS
OTHERWISEAUTHORIZEDBYMACROVISION.REVERSE
ENGINEERINGORDISASSEMBLYISPROHIBITED.
ManufacturedunderlicensefromDolbyLaboratories.
Dolbyandthedouble-DsymbolaretrademarksofDolbyLaboratories.
IMPORTANTINFORMATIONREQUIREDBYTHEFCC
ThisdevicecomplieswithPart15oftheFCCRules.Operationissubjecttothefollowingtwo
conditions:(1)thisdevicemaynotcauseharmfulinterference;and(2)thisdevicemustaccept
anyinterferencereceived,includinginterferencethatmaycauseundesirableoperation.
NOTE:ThisequipmenthasbeentestedandfoundtocomplywiththelimitsforaClassBdigital
device,pursuanttoPart15oftheFCCRules.Theselimitsaredesignedtoprovidereasonable
protectionagainstharmfulinterferenceinaresidentialinstallation.
Thisequipmentgenerates.usesandcanradiateradiofrequencyenergyand,ifnotinstalledand
usedinaccordancewiththeinstructions,maycauseharmfulinterferencetoradioelevation
reception,whichcanbedeterminedbyturningtheequipmentoffandon.Theuserisencouraged
totrytocorrecttheinterferencebyoneormoreofthefollowingmeasures:
*Reorientorrelocatethereceivingantenna.
*Increasetheseparationbetweentheequipmentandreceiver.
*Connecttheequipmentintoanoutletonacircuitdifferentfromthattowhichthereceiveris
connected.
*Consultthedealeroranexperiencedradio/TVtechnicianforhelp.
4TouchScreenFoldDownDetachableDVD
CarStereoSystemWithPLLElectronicTuning
AM/FMStereoRadio&USB/SD/MMCInputs
PDF created with FinePrint pdfFactorytrial version http://www.pdffactory.com

!
CAUTION
RISKOFELECTRICSHOCK
DONOTOPEN
!
CAUTION:TOREDUCETHERISKOFELECTRICSHOCK,DONOTREMOVE
COVER(ORBACK).NOUSERSERVICEABLEPARTSINSIDE.REFER
SERVICINGTOQUALIFIEDSERVICEPERSONNEL.
Thelighteningflashwitharrowheadsymbol,withinanequilateraltriangle,is
intendedtoalerttheusertothepresenceofuninsulateddangerousvoltage
withintheproductsenclosurethatmaybeofsufficientmagnitudetoconstitute
ariskofelectricshocktopersons.
Theexclamationpointwithinanequilateraltriangleisintendedtoalertuserto
thepresenceofimportantoperatingandmaintenance(servicing)instructions
intheliteratureaccompanyingtheappliance.
CLASS1LASERPRODUCT
Laserproductsymbol:locatedontherearpaneloftheunit,indicatethisplayerisaclass
laserproduct,onlyuseweaklaserandnohazardousradiationoutsideoftheunit.
1.Readthroughthisinstructionmanualbeforeinstallationanduse.
2.Donottouchthepowerplugwithwethand.
3.Switchoffthemainpowerwhentheunitisnotinuse.(Disconnectthepowerplugfrom
thepoweroutletwhenyoudonotintendtousetheunitforaprolongedperiodoftime.)
Beforemovingtheunit,removethediscfromtheunit/trayfirst.
4.Donotopenthecoverortouchanyofthecomponentsexposedoutoftheunit,onlyfor
qualifiedtechnicians.
5.Donotexposetheunitunderdirectsunlightornearbyobjectsthatradiateheattoavoid
damagetheunit.
6.Donotplacetheunitinmoistandhumidconditions,whicheffectthepick-upoftheunit
leadtooutofwork.
7.Placetheunitonaflatsurfaceandventilativecondition.Pleaseensuretheventilation
holesarenotcoveredtoavoidoverheatingandmalfunction.
8.Clearthepanelandcasewithsoftdryclothonly,donotapplyanykindofthinner,
alcoholorsprays.
9.Theapparatusshallnotbeexposedtodrippingorsplashingandthatnoobjectsfilled
withliquids,suchasvases,shallbeplacedontheapparatus.
WARNING:TOREDUCETHE
RISKOFFIREORELECTRIC
SHOCK,DONOTEXPOSE
THISAPPLIANCETORAINOR
MOISTURE.
PRECAUTION
PDF created with FinePrint pdfFactorytrial version http://www.pdffactory.com

1.BeforeOperation...........................................................................................3
1.1Glossary................................................................................................3
1.2Precautions............................................................................................3
1.3MaintenanceandCleaningofDiscs..........................................................4
1.4BatteryInformationoftheRemoteControl.................................................4
1.5TheRemoteControlDescription...............................................................5
1.6DescriptionoftheFaceandTopSideoftheFrontPanel..............................6
1.7DescriptionoftheUnitChassisFacetAfterremovingtheFrontPanel...........6
1.8DescriptionoftheUnitChassisFacetAfterSlidingDowntheFrontPanel.....6
1.9DescriptionoftheRearCabinet...............................................................7
1.10DescriptionoftheWiringHarness.............................................................7
1.11UnitInstallation.......................................................................................8
2.CommonOperation........................................................................................9
3.RadioOperation...........................................................................................10
4.Disc,USBandMMC/SDCardOperation.........................................................11
4.1Load/unloadDisc,USBorCard...............................................................11
4.2PausePlayback.....................................................................................13
4.3StopPlayback.......................................................................................13
4.4SelectChapter/TrackwiththeUP/DNorthe>>|/|<<Buttons......................13
4.5SelectChapter/TrackwiththeNumberButtons.........................................13
4.6SelectChapter/TrackwiththeRoot/PBCMenu.........................................13
4.7PlaybackwithSpeed..............................................................................14
4.8PlaybackwithSlowSpeed......................................................................14
4.9Displaystillframestepbystep................................................................15
4.10PlaybackRepeatedly............................................................................15
4.10.1One/AllRepeat.................................................................................15
4.10.2A-BRepeat.......................................................................................15
4.11PlaybackinScanMode.........................................................................16
4.12PlaybackfromaspecifiedChapter/TrackoraSpecifiedTime...................16
4.13PlaybackinRandom.............................................................................16
4.14PlaybackinDifferentView-Angle...........................................................16
4.15PlaybackinZoomMode........................................................................16
4.16ChangetheCaptionLanguage..............................................................17
4.17ChangetheAudioLanguage.................................................................17
4.18ChangetheVideoSignalSystem..........................................................17
4.19LookoverthePlaybackStatus..............................................................17
4.20ProgramPlayback...............................................................................18
4.21PlaybackIMAGEfiles..........................................................................18
4.22PlaybackMP4files..............................................................................19
4.23ESPandFunction..........................................................................19
4.24TheDVDSystemMenuSetupOperation................................................19
*TheRegionCode.................................................................................23
5TheTroubleShooting...................................................................................24
6.Specification...............................................................................................25
Contents
ID3
.
6.Specification
GeneralSpecification
PowerSupplyRequirement..................................................DC12V
MaximumPowerOutput...................4x25W(measuredatDC14.4V)
Dimensions(wxhxd)...........................................178x50x167mm
DVDDeckSpecification
Format.....................................DVD/VCD/JPEG/MP4/MP3/WMA/CD
VideoSystem....................NTSC/PAL/PAL-M/PAL-N/AUTO(optional)
AudioSystem..............................................................24bit/96KHz
LoadingSystem..........................................................AutoLoading
MountingAngle.................................................................0to+/-30
Video
VideoType...................................................................16:9and4:3
VideoOutputlevel......................................Composite:1.00.2Vp-p
Loadimpedance:75ohms
HorizontalResolution................................................................500
Audio
AudioOutput(Analogaudio)..........................................2.0Vrms
FrequencyResponse.............................20Hz~20KHz(at1KHz0dB)
S/NRatio(Audio).............................................90dB
Separation..............................................................................50dB
Radio
FMSection
Frequencyrange..............................................87.5MHz-107.9MHz
Usablesensitivity......................................................................3uV
I.FFrequency....................................................................10.7MHz
AMSection
Frequency..........................................................530KHz-1710KHz
Specification
Specification
(at1KHz0dB)
Specification
≥
+0-1.0
PDF created with FinePrint pdfFactorytrial version http://www.pdffactory.com

1.BeforeOperation
1.1Glossary
PBC(playbackcontrol)
Itisakindofsignal(menu)recordedinthediscwithSVCDorVCD2.0
formatusedfortheplaybackcontrol.ForthediscscontainedPBC,Itcan
playbackinteractivesoftwarewiththemenudisplayedonmonitorscreen.
Ifthedisccontainstillimages,itcanplaybackhighdefinitionofstillimage.
Title
Generally,thetitleistheimportantpartofDVDdisc.forexample,the
themepartofmovieistitle1,thepartdescribedhowtomakemovieistitle
2,thecastistitle3,etc.Everytitlecontainaserialnumberthatiseasyto
lookup.
Chapter
Atitlecanbedividedintoseveralblocks,sothateveryblockcanbeoperated
asaunit,theunitiscalledchapter.Thechaptercontainaunitatleast.
Track
ItisthebiggestcomponentofVCD.Generally,everysongofkaraokedisc
isatrack.
1.2Precautions
Safety
1.PowerSource:Theunitshouldbeconnectedtopowersupplyonlyof
thetypedescribedintheoperatinginstructionsorasmarkedontheunit.
2.Theunitisdesignedfornegativeterminalofthebatterywhichis
connectedtothevehiclemetal.Pleaseconfirmitbeforeinstallation.
3.Donotallowthespeakerwirestobeshortedtogetherwhentheunitis
switchedon.Otherwiseitmayoverloadorburnoutthepoweramplifier.
4.Donotinstallthedetachablepanelbeforeconnectingthewire.
5.Theprotectivecaseistosafelykeepthefrontpanel(seethephoto).
1.Donotusethisunitwhenwaterandmoistureisnearit.
2.IfmoistureformsinsidetheLens,itmaynotoperateproperly.Tocorrect
thisproblem,waitaboutonehourforthemoisturetoevaporate.
3.Ifthecarinteriorisextremelyhot,donotusetheplayeruntilthecarhas
beendrivenforawhiletocoolofftheinterior.
Environment
FRONTPANEL
PROTECTIVECASE
5.TheTroubleShooting
Pleasereadtheuser’smanualcarefullybeforeusingtheDVDplayer.Ifyouhaveanytroubles
inusingthisplayer,trytosolvetheproblemsbythesuggestionsmentionedbelow.Ifyoucan
notremovethetroubleafterusingallthesuggestions,pleasecontactthecompanyorthe
technicalservicecenterauthorizedbyus.Forthesakeofyoursafety,pleasedonotopenthe
coverandrepairtheplayerbyyourself,ifthat,itmaycauseelectricshock.
NOPICTURE,SOUNDANDINDICATION
*Ensurethatthepowerswitchison.
*Ensurethatthewallinletisok.
*Ensurethatthepowercordisnotdamagedorthefuseisnotblown.
*Ensurethatthepowerplugisconnectedtotheinlettightly.
NOSOUNDBUTHAVEPICTURE
*Ensurethattheplayer’saudiooutputhasagoodconnectionwithmonitor’saudioinput.
*Checkwhethertheaudioconnectorisdamaged.
*Checkwhetheryouhaveturneddownthevolume.
*EnsurethatyouhavesettherightAUDIOsetupoftheplayer.
*Ensurethattheaudioisnotundermute.
NOPICTUREBUTHAVESOUND
*Ensurethattheplayer’svideooutputhasagoodconnectionwithmonitor’svideoinput.
*EnsurethatyouhaveturnedyourmonitortotheAVinputchannelconnectingtoyourplayer.
*Checkwhetherthevideoconnectorisdamaged.
*EnsurethatyouhavesettherightVIDEOsettingsoftheplayer.
BLACKANDWHITEPICTUREORSCREENROLLING
*EnsurethatyouhavesettherightTVSYSTEM(e.g.PAL,NTSC)setting.
FLAWSOFPICTUREORSOUND
*CheckwhetherthesettingofAUDIOisright.
*Checkwhetherthediscisscratchedorstained.
*CheckwhethertheAVconnectorandtheoutputterminalisstained.
*CheckwhetherthereiscondensationinsidetheLens.Ifso,leavetheplayeroffforanhour
orso,thentryagain.
*Checkwhethertheinstallationangleislessthan30.
DISPLAYNODISC ORBADDISC
*Ensurethatyouhaveputthedisconthetray.
*Checkwhetherthediscisputinthereverseside.
*Checkwhetherthediscisdistorted.
*Checkwhetherthediscisstainedorscratchedbadly.
*Ensurethatthediscformatiscompatibletotheplayer.
*Ensurethatthetemperatureinsidethecarisnottoohigh.Ifso,coolofftilltheambient
temperaturereturnstonormal.
*Replaceanotherdisctoinsertitintothedisccompartment.
REMOTECONTROLISINSENSITIVEORDOESNOTWORK
*Checkthebatteriesofremotecontrolandmakesurethattheyaretobepowerfuland
goodconductivity.
*DirecttheremotecontroltotheIRsensoroftheplayer.
*CheckwhethertherearesomeobstaclesbetweentheremotecontrolandIRsensor.
SOMEFUNCTIONBUTTONSDONOTWORK
*Turnoffthepower,thenturnonagain.
*Resettheunittozero,thenturnonagain.
*Removethefrontpanelfromtheunit,theninstallitagainandthenturnonagain.
THERADIODOESNOTWORK
*Checkwhethertheantennacableisconnectedfirmly.Ormanuallytuneforastation.
°
PDF created with FinePrint pdfFactorytrial version http://www.pdffactory.com

1.3MaintenanceandCleaningofDiscs
DiscMaintenance
1.Toh
1.
Donotusepetrel,thinner.commerciallycleaneroranti-staticspraycan
damagetheunit.
keepthediscclean,andlethediscbyitsedge,donottouchthedisc
surfaceoftheplayside.
2.Donotstickpaperortapeonthedisc.Ifthereisglue(oranalog)onthe
discsurface,mustwipeitupbeforeusing.
3.Donotexposethedisctodirectsunlight,ornearbyheatsourcessuchas
caliduct,orleaveitinacarparkedindirectsunlightwheretherecanbea
considerableriseintemperature.
4.Putthediscinsidedisccasetokeeptemperatureafterfinishingplayback.
Beforeplaying,wipethediscwithacleanlint.wipethediscoutwardsfrom
thedisccenter.
2.
DiscCleaning
1.4BatteryInformationoftheRemoteControl
ReplaceBatteryintheRemoteControl
NoteabouttheBatteryoftheRemoteControl
:
1.Beforeusingtheremotecontrolforthefirsttime,pulltheinsulating
sheetoutoftheremotecontrolasthedirectionindicatedbythe
arrow.(seefig.1)
2.PressthemovableblockholdasthedirectionindicatedbytheAarrow
(Seefig.2),thenpullthebatteryholderoutoftheremotecontrolas
thedirectionindicatedbytheBarrow(seefig.2).
3.Replacetheoldbatterybyanewbatterywith(+)polaritysideupward.
(Seefig.3).
4.Insertthebatteryholdertotheoriginalpositioninremotecontrol.
(Seefig.3).
:
1.Lithiumbattery:CR20253V.
2.BatteryLife:6monthswithnormaluseinnormalroomtemperature.
3.Improperuseofbatterymaycauseoverheatingorexplosion,sothat
Resultininjuryorfire.
4.Batteryleakagemaycausedamagetotheremotecontrol.
5.Donotshortthebattery.
6.Donotthrowthebatteryintothefire.
7.Toavoidtheriskofaccident,keepthebatteryoutofreachofchildren.
Fig.1 Fig.2 Fig.3
A
B
+sideup
*TheRegionCode
Q:NotbegintoplaybackbuttodisplayREGIONERRORafterinsertingdiscinto
disccompartment.Why?
A:BecausetheDVDplayeranddischasrespectiveregioncode.Iftheregioncodes
ofthemarenotmatchwitheachother,theDVDplayercannotplaythedisc.
Appendix:TheregioncodeofDVD:
TheMotionPictureAssociationofAmerica(MPAA)dividedtheworldinto6
regions,andnamedeveryregionacode,namelyregioncode.Theregioncodes
andthecountriesorareasrepresentedbytheregioncodesasfollows:
Region1:America,Canada,East-PacificInlands;
Region2:Japan,WestEurope,North Europe,Egypt,SouthAfrica,MiddleEast;
Region3:Taiwan,HongKong,SouthKorea,
Thailand,indonesia,etc.;
Region4:Australia,NewZealand,CentralSouthAmerica,SouthPacificInlands;
Region5:Russia,Mongolia,IndianPeninsula,MiddleAsia,EastEurope,North
Korea,NorthAfrica,North-westAsiaetc.;
Region6:Chinamainland.
Basically,whenaDVDmoviediscfortheversionofregion6wasdecidednotto
issue,weneedtopurchaseanotherDVDplayerthatcanplaytheDVDmoviedisc
fortheversionofnon-region6.Inordertoviewthisdisc,viewerwhodoesnothave
thenon-region 6DVDplayerfacilitieswillhavetospendextrasumofmoneytobuy
it.Theproblemscausedfromtheareacodeinconsistencybetweenthediscandthe
DVDplayerhaspushedfortheproductionofUnlock-VersionDVDplayerfacilities,
andsomeDVDdiscsetsallowusertomodifytheareacodesforalimitednumberof
times.Butnotethatonlythediscsproducedbythe8biggestfilmmakingcompanies
ofAmericarestrictso,theyarenotoneoforiginalDVDformat.Thatistosay,the
DVDmoviediscsnotproducedby
South-eastAsiancountriesinclude
the8biggestfilmmakingcompaniesofAmerica
werenotrestrictedbytheruleofregioncode.Generally,theyarecalled
FreeRegionCodediscsorFullRegiondiscs.The8biggestfilmmakingcompanies
ofAmericaareasfollows:
1.WarnerBros;
2.Columbia;
3.20thCenturyFOX;
4.Paramount;
5.Universal;
6.UA(UnitedArtist);
7.MGM(MetroDogwynMayer);
8.WaltDisney
PDF created with FinePrint pdfFactorytrial version http://www.pdffactory.com

1.5TheRemoteControlDescription
16.SEARCHBUTTON
17.RDMBUTTON
18.RPTBUTTON
19.SUBTITLEBUTTON
20.TITLE/PBCBUTTON
21.ANGLE/STBUTTON
22.ZOOMBUTTON
23.AUDIOBUTTON
24.CLKBUTTON
25.A-BBUTTON
26.INTBUTTON
27.EQBUTTON
28.LOC/SLOW-FWDBUTTON
29.MUTEBUTTON
30.STOPBUTTON
31.VOLUME-BUTTON
32.<BUTTON
33.OKBUTTON
34.VOLUME+BUTTON
35.BANDANDP/NBUTTON
36.PROGBUTTON
37.OSDBUTTON
38.LOUDBUTTON
39.STEPBUTTON
1.TILTBUTTON
2.MENUBUTTON
3.POWERBUTTON
4.^BUTTON
5.>>|BUTTON
6.>BUTTON
7.|<<BUTTON
8.vBUTTON
9.SELBUTTON
12.10+BUTTON
13.SETUPBUTTON
14.MODEBUTTON
15.APSBUTTON
10.PLAY/PAUSEBUTTON
11.NUMBER(0~10,+10
-10)BUTTONS
1
2
3
4
5
6
7
98
10
11
12
13
14
15
16
17
18
19
20
21
22
23
24
25
26
27
28
29
30
31
32 33
34
35
SLOW_FWD
A-B
ZOOM
AUDIO
INT
LOC
ST
CLK
5
9
6
-10
1
+10
2
+SETUP
SEL
MU MODE
PWR
EQ
SUBTITLETITLE/PBC
RPT RDM
SEARCH APS
P/N
0/10
7
10+
8
34
0K
MENU
BAND
PROG OSD LOUD STEP
Itisforadjustingthehueofthevideooutput.
Itisforadjustingthesaturationofthevideooutput.
Itisforadjustingthesharpnessofthevideooutput.
Itisforselectingyourdesiredsoundeffectwhenthereisnotcentralspeaker
andsub-woofer.Thereare3mode:LT/RT,STEREO,VSS.
LT/RT:WhenplayingadiscwithPROLOGICDolbystereoeffect,choosethe
item,soitwilloutputaudiosignalwithvividtheatreeffect.
STEREO:Ifyouchoosetheitem,whenoutputtingaudiosignalwith5.1channels,
itwilloutputtheleftandrightchannelsofsignal;whenoutputtingaudiosignal
with2channels,itwilloutputthecommon2channelsofstereosignal.
VSS:Ifyouchoosetheitem,whenplayingadiscrecordedwith5.1channels,
themainchannelspeakerscanoutputaudiosignalwithVSSeffect.
Itisforselectingaudiooutputmode
LINEOUT:Itcanlinearlycompresstheaudiosignal.Sothevolumelevelislower.
Youshouldselecttheitematnight.
RFREMOD:Itcanmakethevolumelevelhigher.Youshouldselectitatdaylight.
AfterselectingthecompressionmodeofLINEOUT,settheitem,soyoucan
adjustthelinearcompressionratio.IfyousetittobeFULL,thePeak-to-Peak
valueoftheaudiosignalistheminimum;ifyousetittobeOFF,thePeak-to-
Peakvalueisthemaximum.
Itisforselectingadesiredaudiooutputmodefortheleftandrightwaysofsignal.
ItismainlyforKaraokeofAc3.Thereare4modesinallasfollows:
STEREO,MONOL,MONOR,MIXMONO.
HUE
SATURATION
SHARPNESS
4.24.5SPEAKERSETUP
4.24.6DIGITALSETUP
OPMODE
DYNAMICRANGE
DUALMONO
DOWNMIX
PDF created with FinePrint pdfFactorytrial version http://www.pdffactory.com

1.6DescriptionoftheFaceandTopSideoftheFrontPanel
1.7DescriptionoftheUnitChassisFacetAfterremovingtheFrontPanel
1.8DescriptionoftheUnitChassisFacetAfterSlidingDowntheFrontPanel
LEDindicators
*TheLEDindicatorslightallthetime,theycanhelpyouoperateduringdarkness.
26PINFEMALECONNECTOR
TAMPON-PICK
26PINFEMALECONNECTOR:whenthereissomedirtontheconnector,
pleasewipeitawayfromtheconnector.
Thetopsideofthefrontpanel
Thefaceofthefrontpanel
1.POWER/MUTEBUTTON
2.ANG(i.e.TILT)BUTTON
3.RELEASEBUTTON
4.MODEBUTTON
5.CLKBUTTON
6.SELBUTTONANDVOLKNOB
7.EQBUTTON
8.SMALLMONITOR
10.BAND/TELBUTTON
11.UPandDNBUTTONS
12.A.P/HANGUPBUTTON
13.EJECTBUTTON
14.1/PLAY/PAUSEBUTTON
15.2/INTBUTTON
16.3/RPTBUTTON
17.4/RDMBUTTON
18.5/-10BUTTON
19.6/+10BUTTON
20.USBJACK
21.RESETBUTTON
22.AUXJACK
23.CARDSLOT
9.IRREMOTESENSOR
ThisitemisforselectingthelanguageoftheSYSTEMMENUandalloperating
promptinterfacedisplayedduringplayback.
Thisitemisforselectingaaudiolanguage.
Thisitemisforselectingasubtitlelanguage.
Thisitemisforselectingadiscmenulanguage.
thereisonlyANALOGmode,i.e.SPDIF/OFF,notoptional.
Itisforselectingyourdesiredbasicmusictone(fromlowtohigh).
4.24.2LANGUAGESETUP
OSDLANGUAGE
AUDIOLANG
SUBTITLELANG
MENULANG
4.24.3AUDIOSETUP
AUDIOOUT
KEY
4.24.4VIDEOSETUP
BRIGHTNESS
CONTRAST
Itisforadjustingthebrightnessofthevideooutput.
Itisforadjustingthecontrastofthevideooutput.
23 Cardslot
1
23
4
5
610
7
9
811
12
1314 15 16
17 18 19 20
21
22
UP
ANGAUX
USB/DVD/VCD/MP3/CDPLAYER
54 RDM 6
-10 +10 REL
VOL
+
_
SEL
BND
EQ
CLK A.P
DN
21 INT 3RPT
RST
M
MU MOD EJ
VIDEO
TM
PDF created with FinePrint pdfFactorytrial version http://www.pdffactory.com

1.10 DescriptionoftheWiringHarness
YELLOW
MEMORYB+
BLACK(GND)
IGNITIONSWITCH
BLUEAUTOANT
GREEN
WOOFERLINEOUT(optional)
RED
FRONT
REAR
RIGHT
SP
FRONT WHITE
WHITE/BLACK
GREEN/BLACK VIOLET/BLACK
GRAY/BLACK
GRAY
VIOLETGREEN
REAR
LEFT
SP
REDR
WHITEL
RCALINEOUT
FUSED
FILTER
BOX1A
&10A
FUSES
WIRINGCONNECTINGSOCKET
WIRINGCONNECTINGPLUG
1.9DescriptionoftheRearCabinet
Connectingtheparkingbrakelinetotheparkingbrakesystembuiltinthecar
Parkingbrake
Parkingbrakeswitch
(insidethecar)
Parkingbrakeline(lightblue)
Tometallicbodyorchassisofthecar
NOTES:
1.Onlyspeakerswith4ohmsimpedancemaybeused.
2.Ensurethattheblueautoantennacabledoesnotmakecontact
withanygroundconnection.
Note:1.afterconnectingtheParkingLine,thevideoonthesmallmonitorofthefrontpanelwillbedisplayonlyafter brakingthecar.
2. UsetheclipendofaGroundLineprovidedbymanufacturertoconnecttheFixingScrewBolt,useanotherendoftheGround
Linetoconnectthenegativepoleofthepowersource.Otherwise,thevideoonscreenmaybeflashes.
AM/FMAntenna BLACK BLACK
BLACK RearViewCamera
YELLOW
Reversalline White
WIRINGHARNESS
SOCKET
ParkingLineGREEN
GRAY
GRAY
VIDEOOUT
YELLOW
YELLOW
FixingScrewBolt
FortheDVDSystemMenu,thereare6setuppagesinall.Theydisplayasfollows:
4.24.1SYSTEMSETUP
TVSYSTEM
TVTYPE
DEFAULT
ThisproductsupportsoutputofvariousTVsystem.
IfyourTVsethasonlyNTSCorPALsystem,thescreenwillblinkandbecome
colorlesswhenawrongTVsystemisselected.Inthiscase,presstheN/Pbutton
toswitchtherightTVsystemtomatchtheTVcolorsystem.
ThesetupitemisformatchingTVscreensize.
4:3PS:ChoosetheitemwhenconnectingaTVsetwith4:3screen.Whenplaying
thepictureswith16:9size,theleftandrightpartsofthevideowillbecutout,
anddisplayinfullscreen.
4:3LB:ChoosetheitemwhenconnectingaTVsetwith4:3screen.Whenplaying
thepictureswith16:9size,thetopandbottompartsoftheTVscreenwillbe
turnedintoablacksquarerespectively.
16:9:ChoosetheitemwhenconnectingaTVsetwith16:9widescreen.
Thisitemisformakingallsetupitemschangebacktooriginalstatus.
PDF created with FinePrint pdfFactorytrial version http://www.pdffactory.com

1.11UNITINSTALLATION
INSTALLATIONINSTRUCTION
TOBOOSTUPTHECAPABILITYOF
ANTI-JAMMING,PLEASEFIXTHE
METALSTRAPONTHEMETAL
CONNECTEDTOTHEBOTTOM
BRACKETOFTHECAR.
METALSTRAP
DASHBOARD
SLIDINGMETALHOUSING
TODRAWTHECHASSISOUTOFTHE
SLIDINGMETALHOUSING,INSERT
THELEFTANDRIGHTKEYPLATES
INTOTHERIGHTPOSITIONOFTHE
2SIDESOFCHASSIS.
FRONTPANEL
PLASTICTRIMOUT
UNITCHASSIS
SELECTTHEPROPERFIXER
FORFIXINGTHESLIDING
METALHOUSING.
NOTE TOINSTALLTHEFRONTPANEL
BACKINTOTHEPANELHOUSING,
FIRSTLYINSTALLTHELEFTSIDE
BACKINTOTHERIGHTPOSITION,
THENPUSHTHERIGHTSIDEBACK
TOTHEPANELHOUSINGTILLIT
CLIPSINTOTHEPOSITION.
REMOVETHESLIDING
METALHOUSING
RESETBUTTON
PRESSRESETBUTTONTORESUME
THEDISTORTEDPROGRAMWHEN
THELCDDISPLAYIMPROPERLYOR
SOMEBUTTONSAREINVALID.
TOREMOVETHEFRONTPANEL
FROMTHEPANELHOUSING,
FIRSTLYPRESSTHERELBUTTON
TODETACHTHEFRONTPANEL
FROMTHEPANELHOUSING,THEN
HOLDTHEFRONTPANELUPWARD
ALITTLEANDTHENREMOVEIT.
REMOVETHEDECKTRANSPORT
SCREWSBEFOREOPERATING.
3.DuringJPEGplayback,pressoneofthe>/</^/vbuttonstochangetheangleof
viewingpicturethatisdisplayingasfollows:
>:90degcw;<:90degccw;^:UP<-->DOWN;v:LEFT<-->RIGHT
DuringJPEGplayback,pressthePROGbuttontochangethemodeofrefreshpicture.
DuringJPEGplayback,presstheSTOPbuttontostopplayingandreturntotheroot
menu.
*DuringJPEGplayback,thefollowingbuttonsarenotavailable:SLOW-FWD,
SUBTITLE,TITLE,ANGLE,AUDIO,RDM,INTandA-B.
*InJPEGmode,theotheroperationsaresameasonesinMP3/WMAmode.
1.TherootmenuisdisplayedonTVwhenbeginning toswitchonMp4mode,thenitwill
automaticallyplaythefirstfile.
Duringplayback,presstheSTOPbuttontostopplayingandreturntotherootmenu.
2.Whendisplayingtherootmenu,pressthedirectionbuttonstoselectyourdesired
FOLDER,fileorfilesorticon,thenpresstheOKorPLAYbuttontoopentheFOLDER,
openthefilesofthefilesorticonorplaytheselectedfile.
Whendisplayingtherootmenu,youcanalsousethenumberbuttonstoselectthe
serialnumberofthefileandplaythefile.
*TheANGLE,PROG,RDM,INTandTITLE/PBCbuttonarenotvalid.
*TheotherfunctionsaresameasonesinDVDmode;buttheRPTfunctionissameas
oneinMP3/WMAmode.
ThereisESPfunctionforallformatsofdiscs.
InMP3/WMAmode,duringplayback,theinformationofthefilename,foldername,
willbescrollingontheLCDdisplay.Aslongasthe
currentplayingmusiccontainsrelevanttaginformationinversion1.0/2.0
format,the3itemsunderlinedabovewillbescrollingontheLCDdisplay;otherwise,
theywillnot.
1.PresstheSETUPbuttonontheremotecontrollertoaccesstheDVDSystemMenuon
themonitor.
2.Thereare6setuppagesinallfortheSystemMenu.Pressthe>or<buttontoselect
andesiredsetuppage.
3.Pressthe^orvbuttontoselectansetupitemintheselectedsetuppage.
4.Pressthe>buttontoenterthesetupitem.Thenpressthevor^buttontoselecta
desiredmodeofthesetupitem,finallypresstheOKbuttontoconfirmit.
*Pressthe<buttontoreturntotheupperlevel.
*PresstheSETUPbuttonagainorusethedirectionbuttonstohighlighttheitemofthe
EXITSETUPandthenpresstheOKbuttontoexittheSystemMenu.
4.22PlaybackMP4files
4.23ESPandFunction
songstitle,artistandalbum
4.24TheDVDSystemMenuSetupOperation
ID3
MP3ID3
PDF created with FinePrint pdfFactorytrial version http://www.pdffactory.com

2.CommonOperation
1.Toturnon/offtheunit
Inpoweroffmode,pressthePOWERbuttontoturnontheunit.
Inpoweronmode,longpressthePOWERbuttononthefrontpanelorbrieflypress
thePOWERbuttonontheremotecontrollertoturnofftheunit.
2.Toselectfunctionmode
PresstheMODEbuttontoselectRADIO,DISC(After
insertingadisc),USB(AfterinsertingaUSBstorage),
CARD(AfterinsertingaMMCorSDcard),AUXmode.
Duringplayback,tappingtheiconafterpoppingup
KeyboardinterfacecanpopupModeMenuasright.
thentaponeiconinittoselectyourdesiredmode.
3.Toadjustsoundlevel
RotatetheVOLknobonthefrontpanelorpressorhold
the+or-buttonontheremotecontrollertodirectlyadjustthevolumelevel.
4.Tomutesound
PresstheMUTEbuttonontheremotecontrollertoturnon/offMUTEmode.
BrieflypressingthePOWERbuttononthefrontpanelalsocanturnon/offMUTEmode.
InMUTEmode,theMUTEmodecanbereleasedbypressingthefollowingbuttons:
MUTE,EJECT,VOLor+/-,POWER(onthefrontpanel),MODE.
5.Todisplayandadjusttheclocktime
PresstheCLKbuttontodisplayclocktimeonthesmallmonitorofthefrontpanel.
LongpresstheCLKbuttontochangethecolorofthehouroftheclock,thenrotate
theVOLknobonthefrontpanelorpressthe+or-buttonontheremotecontrollerto
adjustthehour;andthenbrieflypresstheSELbuttontochangethecoloroftheminute
oftheclock,thenrotatetheVOLknobonthefrontpanelorpressthe+or-buttonon
theremotecontrollertoadjusttheminute.
6.ToselectapresetEQmode
PresstheEQbuttontoselectthepresetmusicequalizercurves:POP,ROCK,CLAS,
EQFLAT.Thesoundeffectwillbechanged.
7.Toremovethefrontpanel
PresstheRELEASEbuttononthefrontpaneltodetachthefrontpanelfromtheunit,
thenyoucanremovethefrontpanel.
8.Toselectaoptimalangleofthefrontpanel
PresstheANGbuttonrepeatedlytoselectaoptimalangleasfollows:
-->ANGLE0-->ANGLE1-->ANGLE2-->ANGLE3-->ANGLE4-->
9.Toturnon/offLOUDmode
PresstheLOUDbuttonontheremotecontrollertoturnon/offLOUDmode.
WhenturningonLOUDmode,itwillenhancebasslevelimmediatelywhenthebassis
notenough.
10.Toresettheunit
PresstheRESETbuttontorehabilitatethedistortedprogramtozerowhendisplayis
wrongorsoundisdistortedorthefunctionbuttonsarenoteffective.
ModeMenu
Itallowsyoutoentertheorderinwhichyouwantsomechapters/tracksin
DVD/VCD/MP3/WMA/CDtoplay.
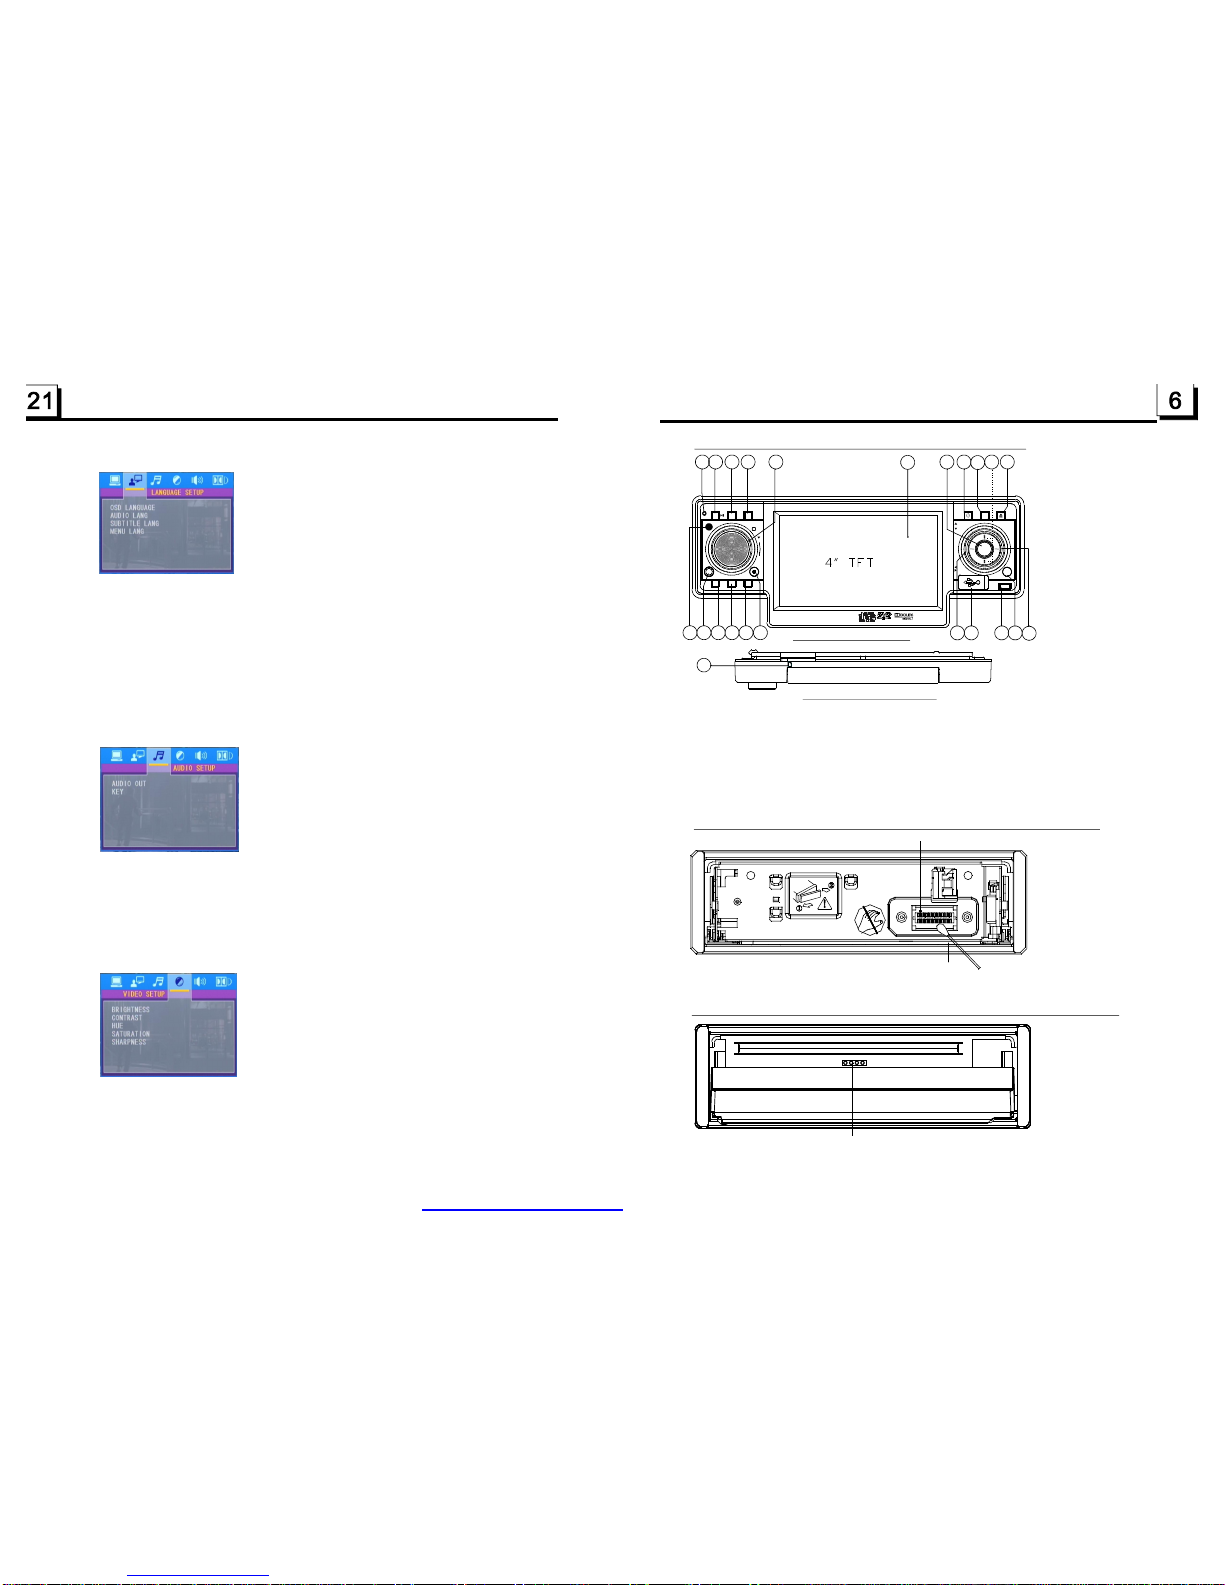
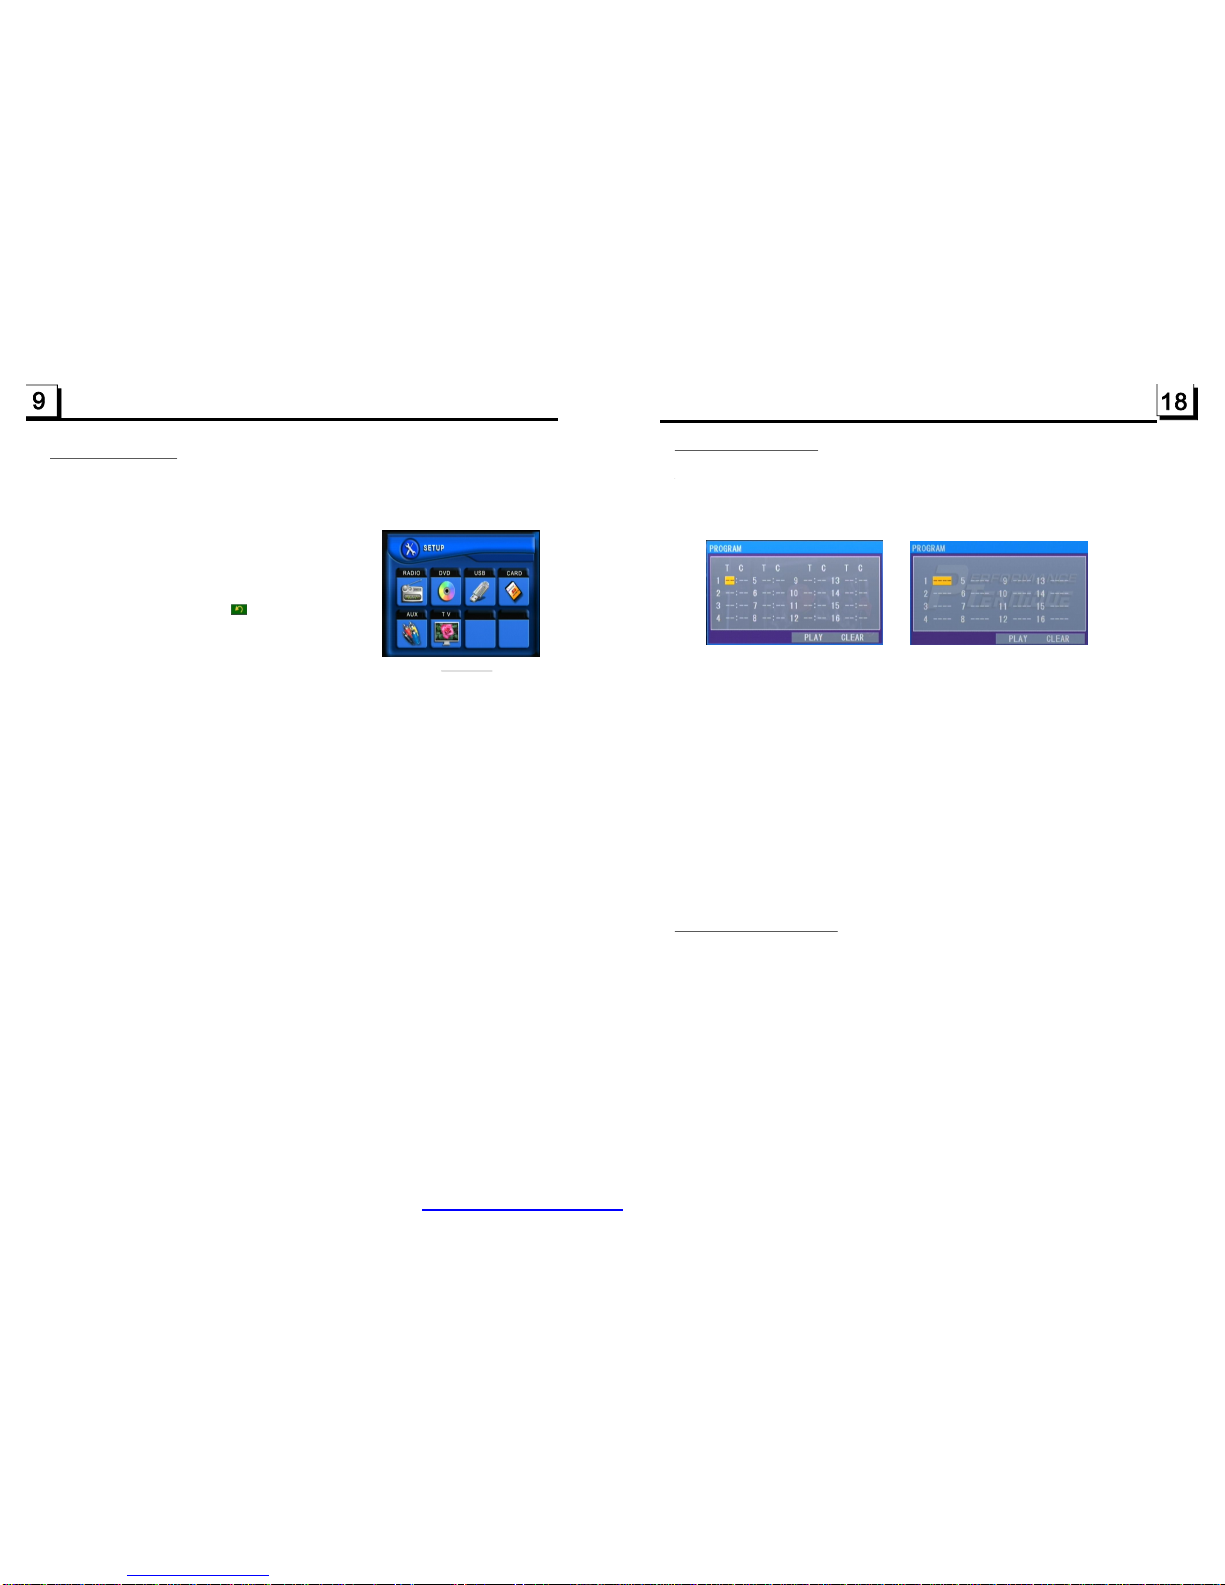
1Duringplayback,pressthePROGbuttontoenteraprograminterfaceas
follows:
forDVD/MP3/WMAforVCD/CD
2Usethedirectionbuttonstomovecursorontothedesiredplaceforinputting
thesequencenumber.
3Usethenumberbuttontoinputdesiredsequencenumberoftitle/chapter/
trackwithdesiredsequence.
4UsethedirectionbuttontomovecursorontoPlayitem,thenpresstheOK
buttontoplaytheprogrammedtitles/chapters/tracksinprogrammedorder;
onlypressingthePLAYbuttonalsocanplaytheprogrammedtitles/chapters
/tracksinprogrammedorder.
*Toexitprogramplayback,firstlypresstheSTOPbutton,thenpressthePLAY
buttontoentersequenceplayback;orpressthePROGbuttontwiceagain.
*Toremovetheallprogrammedsequencenumbers,movethecursoronto
Clearitem,thenpresstheOKbutton.
*Tochangetheprogrammedsequence,movethecursorontotheitemyou
wanttochange,inputthedesiredsequencenumber.
*DuringVCDplayback,ifitisinPBCONmode,atthesametimeofentering
thestateofprogramplayback,itturnsoffPBCmode.
1.TherootmenuisdisplayedonthemonitorwhenbeginningtoswitchonIMAGE
mode.Atthetime,itplaysMP3/WMAfile.(theTITLEorMENUbuttonisnot
available).
Intherootmenu,theleftfilesorticonisforMP3/WMAfile;themiddlefilesort
iconisforJPEGfile;therightfilesorticonisforVIDEOfile.Ifoneofthese3
filesortdoesnotexist,youcannotmovecursorontothefilesorticon.
2.Whendisplayingtherootmenu,pressthedirectionbuttonstoselectyour
desiredFOLDER,fileorfilesorticon,thenpresstheOKorPLAYbuttonto
opentheFOLDER,orplaytheselectedfile,orplayonlythissortoffile.
Whendisplayingtherootmenu,youcanalsousethenumberbuttonsto
selecttheserialnumberofthefileandplaythefile.
WhenyouselecttheJPEGfilesorticon,pressthe^or>buttontoselectthe
firstJPEGfile,thenpressthevbuttontoselectthedesiredJPEGfile,finally
presstheOKorPLAY/PAUSEbuttontodisplaytheJPEGpictureinfullscreen
fromtheselectedJPEGpicture.
4.20ProgramPlayback
4.21PlaybackIMAGEfiles
PDF created with FinePrint pdfFactorytrial version http://www.pdffactory.com

11.Todogeneralsetup
Todogeneralsetup,firstpopupModeMenuasinitem2,
thentaptheiconintheModeMenutopopupGENERAL
SETUPinterfaceasright.
Intheinterface,selectoneofCLOCKSET,RDSMODE
(availableonlyforRDSmodel),OSDLANGandRADIO
FREQontheleftsidebytappingthem,thensetthemby
tappingsomeiconsontherightsideaccordingly.
12.Todocalibration
TopopupCalibrationinterfaceduringmediaplayback,first
presstheSTOPbuttontwice,thenpresstheZOOMbutton,finallypressthe^,v,<and>buttons
inturn.
Intheinterface,youcanhavecalibrationbyaccurately tappingthecrosscursor.
1.EnterRADIOmode
WhenyouuseMODEbuttonorModeMenutoenterRADIO
mode,itwilldisplayRADIOinterfaceasright.
InRADIOinterface,tappingtheiconcanenterMode
Menu;tappingtheiconcanturnonoroffTFTdisplay;
tappingtheiconcanpopupAUDIO&VIDEOSETUP
interfaceasright;theothericonsaresameasonesinthe
unitpanelorintheRemoteControl.
IntheAUDIO&VIDEOSETUPinterface,youcanadjust
VOLUME,TREBLE,BASS,BALANCE,FADER,BRIGHT-
NESS,CONTRAST,COLOR,HUE;youcanalsoturnon
oroffDBAS,MBP,LOUD;youcanstillselectyourdesired
transparencymode(bySTD)andEQmode(byEQ);tapping
theiconcanreturnbacktothepreviousstatus.
2.BANDBUTTON
InRADIOmode,presstheBANDbuttonontheremotecontrolleroronthefrontpanelto
selectyourdesiredradiobandofandAM2,andthewordmeanswhich
bandisselectedwillbedisplayedonthesmallmonitorofthefrontpanel.
3.TUNE/SEEKUP/DOWNBUTTONS
InRADIOmode:
1)LongpresstheUP/DNbuttononthefrontpanelorthe>>|/|<<buttonontheremotecontroller
toautomaticallysearchup/downforaavailablestationfromthecurrentfrequency.
2)BrieflypresstheUP/DNbuttononthefrontpanelorthe>>|/|<<buttonontheremote
controllertomanuallysearchupordownwithstepbystepforyourdesiredstationfromthe
currentfrequency.
4.APSBUTTON
InRADIOmode:
1)WhenlongpressingtheAPSorA.Pbutton,theradiosearchesfromthelowestfrequencyand
checksthesignalstrengthleveluntil1cyclesearchisfinished.Andthenthe6strongeststations
arepresettothecorrespondingpresetnumbermemorybank.TheASoperationisimplemented
intheeachbankoftheselectedband.WhentheASoperationisfinished,itwillscaneachpreset
stationfor5secondsinFMorAMbandfromM1asbrieflypressingAPSorA.Pbutton.After
3.RadioOperation
FM1,FM2,FM3,AM1
RADIOinterface
AUDIO&VIDEOSETUPinterface
GENERALSETUP
ZOOMx2,ZOOMx3,ZOOMx4,ZOOMx1/2,ZOOMx1/3,ZOOMx1/4,ZOOMOFF.
Pressoneofthe^/v/>/<buttonstoselecttheareayouwanttoenlarge.
InthestateofDVDplaying,presstheSUBTITLEbuttonrepeatedlyto
selectthelanguageofthecaptionorturnoffthecaption.(dependonthe
mediaused.)
InthestateofVCD/MP3/WMA/CDplaying,thebuttonisnotavailable.
1.InthestateofDVDplaying,presstheAUDIObuttonrepeatedly
ontheIRremotecontrollertoselectthedesiredlanguagetype.
(dependonthemediaused)
2.InthestateofVCDplaying,presstheAUDIObuttonrepeatedlyto
selectthesoundmodeoftheMONOL,MONOR,MIXMONOandStereo,
nolanguagefunction.
3.InthestateofCD/WMA/MP3playing,theAUDIObuttonisinvalid.
DuringplaybackofDVD/VCD,presstheBAND(P/N)buttononthefront
panelorontheremotecontrollerrepeatedlytochangetheVIDEOSIGNAL
SYSTEMmode.
timeoftheplayingchapter,
theremainedtimeoftheplayingchapter,theelapsed
theremainedtimeoftheplayingtitle,
2.InthestateofVCD/CDplaying,presstheOSDbuttonrepeatedlyonthe
remotecontrollertoturnon/offtheplaybackstatus.Whenitison,itwill
displaytheinformationsuchas:theserialnumberoftheplayingtrack,the
elapsedtimeoftheplayingtrack,theremainedtimeoftheplayingtrack,the
elapstedtimeofthedisc,theremainedtimeofthedisc.
3.InthestateofMP3/WMAplaying,presstheOSDbuttonrepeatedlyon
theremotecontrollertoturnon/offtheplaybackstatus.Whenitison,itwill
displaytheinformationsuchas:theserialnumberoftheplayingtrack,the
elapsedtimeoftheplayingtrack,theremainedtimeoftheplayingtrack.
4.16ChangetheCaptionLanguage
4.17ChangetheAudioLanguage
4.18ChangetheVideoSignalSystem
4.19LookoverthePlaybackStatus
1.InthestateofDVDplaying,presstheOSDbuttonrepeatedlyonthe
remotecontrollertoturnon/offtheplaybackstatus.Whenitison,itwill
displaytheinformationsuchas:theserialnumberoftheplayingtitle,the
serialnumberoftheplayingchapter,theelapsed timeoftheplayingtitle,
etc.
PDF created with FinePrint pdfFactorytrial version http://www.pdffactory.com

finishingacircleofscanning,itwillresumebroadcastingontheM1.(Itcanstore3x6
stationsforFMand2x6stationsforAMinall)
2)WhenbrieflypressingtheAPSorA.Pbuttononthefrontpanelortheremotecontrol,
theradiowillscaneachpresetstationfor5secondsinFMorAMbandfromM1.
Afterfinishingacircleofscanning,itwillresumebroadcastingontheM1.
NOTE:InFMband,FM1,FM2,FM3ischeckedoneatatime.
InAMband,ischeckedoneatatime.
5.PRESETSTATION[1-6]BUTTONS
InRADIOmode:
1)Tomemorizethecurrentfrequencyonthecurrentband,longpressanyoneofthesix
preset buttons(1-6).
2)Torecallthepresetmemoryonthecurrentband,pressoneofthepresetbuttons[1-6].
6.STEREO/MONOBUTTON
PresstheSTbuttonontheremotecontrollertoselecttheSTEREOorMONOsound
modeforFMband.
7.LOCBUTTON
1)InRADIOmode,whenthesignalofthedistanceradiostationareveryweakandthe
receivingeffectisbadduringtuning,checkwhetherthereisthewordLOConLCD.If
thereisthewordLOConLCD,pressthisbuttontoturnofftheLOCfunction,thentune
againforthedistanceradiostation;
2)InRADIOmode,whenthesignalofthelocalradiostationaretoostrongto leadthatthe
interferencetothereceivingeffectduringtuning,pressthisbuttontoturnontheLOC
functiontodisplaythewordLOConLCD,thentuneagainforthelocalradiostation.
AM1,AM2
Toplayfilesinadisc,presstheEJECTbuttontoslidedownthefrontpanel,then
insertthediscintothediscslot,thenthefrontpanelwillslidebacktotheprevious
angleandautomaticallyplay.
Tounloadthediscinthediscslot,presstheEJECTbuttontoslidedownthefront
panelandejectdiscinthediscslotandthenyoucanremovethedisc.
*Beforeslidingdownthefrontpanel,youmustpushthemonitortothefrontpanel
tillyoucannotdoitagain.
USB,and
.1Load/unloaddisc,USBorCard
4.Disc,MMC/SDCardOperation
4
4.11PlaybackinScanMode
4.12Playbackfromaspecifiedchapter/trackoraspecifiedtime
4.13PlaybackinRandom
4.14PlaybackinDifferentView-Angle
4.15PlaybackinZoomMode
1.InthestateofVCD(PBCOFF)/CDplaying,presstheINTbuttontoplay
theprevious15secondspartofeachtrackonthedisc.PresstheINTbutton
againtoresumenormalplayback.
2.InthestateofDVD/MP3/WMAplaying,theINTbuttonisnotavailable.
1.InthestateofDVDplaying,presstheSEARCHbuttontodisplaya
interfaceandhighlightthetitleitem,thenusethenumberbuttonstoinput
theserialnumberofthetitle;usethedirectionbuttonstohighlightthechapter
item,thenusethenumberbuttonstoinputtheserialnumberofthechapter;
youcanstillusethedirectionbuttonstohighlightthetimeitem,thenusethe
numberbuttonstoinputthedesiredtimetostartplayback;finallypressthe
OKorPLAYbuttontoplaytheselectedchapterorplayfromtheselectedtime.
2.InthestateofVCD/MP3/WMA/CDplaying,presstheSEARCHbuttonto
displayainterfaceandhighlightthetrackitem,thenusethenumberbuttons
toinputtheserialnumberofthetrack;youcanstillusethedirectionbuttons
tohighlightthetimeitem,thenusethenumberbuttonstoinputthedesired
timetostartplayback;finallypresstheOKorPLAYbuttontoplaytheselected
trackorplayfromtheselectedtime.
InthestateofDVD/VCD(PBCOFF)/MP3/WMA/CDplaying,pressthe
RDMbuttontoswitchbetweenRANDOM(ON)/RANDOMOFF.Whenin
RANDOM(ON)mode,itwillplayinrandom.
1.InthestateofVCD/MP3/WMA/CDplaying,theVIEW-ANGLEbuttonon
theIRremotecontrollerisnotavailable.
2.InthestateofDVDplaying,presstheVIEW-ANGLEbuttonrepeatedly
ontheIRremotecontrollertoviewindifferentangle.(Thisfunctionisonly
fortheDVDmediawithANGLEfunction)
InDVD/VCDmode,duringplayback,presstheZOOMbuttoncontinuously
toenlargeacertainareaoftheimagesonthescreenwiththesemultiples:
PDF created with FinePrint pdfFactorytrial version http://www.pdffactory.com

ToplayfilesinaUSBorCard,inserttheUSBorCard
intotheUSBjackorCardSlot,thenitwillautomati-
callyplay.
TounloadtheUSBintheUSBjack,presstheSTOP
buttontwiceandthenremovetheUSB.
TounloadtheCardintheCardSlot,presstheSTOP
buttontwiceandthenpushthecardfirstlyandpullit
outoftheCardSlot.
:Ifthedisc,USBorcardincludesfolder(for
MP3/WMA/MP4/JPEGfiles),afterloading,itwill
displayarootasright.Onthebottomsideoftheroot,
theiconisforaudiofiles;theiconisfor
imagefiles;theiconisforVideofiles.Iffilesof
these3filesortdoesnotexist,youcannotmove
cursorontothefilesorticon.
:Duringplayback,tappingtheiconin
theroot(forMP3/WMA/MP4/JPEG)oranyplaceon
thescreen(forCD/VCD/DVD/MP4/JPEG)canpop
upthekeyboardinterfaceasright.
:TappingitcanpopupModeMenu.
:Sameasthecorrespondingbuttons
ontheRemoteControl.
:Sameasthecorrespondingbuttononthe
RemoteControl.
:Sameasthecorrespondingbuttononthe
RemoteControloronthefrontpanel.
:SameastheTITLEbuttonontheRemote
Control(availableonlyforDVD).
:Tappingitcanstopplaybackandpopupthe
root.(existonlyforMP4/JPEG)
:Tappingoneofthemcanselectnextor
previouschapter/track.
:Tappingoneofthemcanswitchonbetween
thespeedlevelsoffastbackwardorforward.
:TappingitcanpopuptheAUDIOinterfaceof
theSETMenuasright.Intheinterface,youcan
adjustthelevelsofVOLUME,BASS,TREBLE,
BALANCEandFADER;canturnonoroffLOUD,
DBASandMBP;canselectyourdesiredEQmode.
TappingiconcanpopuptheTFTVIDEOinter-
faceoftheSETMenuasright.Intheinterface,
youcanadjustthelevelsofBRIGHTNESS,CON-
TRAST,COLORandHUE;youcanalsoadjust
TransparencybytappingUSER,STDY,BRIG,
SOFTandSHAR.
TappingEXITiconcanexittheSETMenu.
Remark
Remark
RootinterfaceforMP3/WMA/MP4/JPEG
Keyboardinterface-1
Keyboardinterface-2
SETMenu-1
SETMenu-2
Duringslowforward,pressthePLAYbuttontoresumenormalplayback.
Thefunctionisonlyforvideo.
Iftheunitiscurrentlyplayingvideo,presstheSTEPbuttonconsecutively
todisplaystillframestepbystep.
PressthePLAYbuttontoresumenormalplayback.
1.InthemodeofDVDplayback:
PresstheRPTbuttontoselectREPCHAPTER,REPTITLE,REPALL
orREPOFF.
2.InthemodeofVCD(PBCOFF)/CDplayback:
presstheRPTbuttontoselectREPONE,REPALLorOFF.
WhenitisinthestateofPBCON,duringVCDdiscplaying,theRPT
buttonarenotavailable.
3.InthemodeofMP3/WMAplayback:
PresstheRPTbuttontoselectREPONE,REPDIR,REPALLorOFF.
Pressthebuttonifyouwanttorepeataspecificsegmentonadisc
thatyoudefine:
1.Pressthebuttonatapoint(A)whereyouwantittobethestartpoint
oftherepeatsegment.Pressthebuttonagainatapoint(B)whereyou
wantittobetheterminalpointoftherepeatsegment.Thenitwillplaythe
segmentrepeatedly.
2.TocanceltheA-Brepeatmodeandresumenormalplayback,pressthe
buttonforthethirdtime.
4.9Displaystillframestepbystep
4.10PlaybackRepeatedly
4.10.1ONE/ALLRepeat
4.10.2A-BRepeat
A-B
A-B A-B
A-B
Note:
DuringVCD/MP3/WMA/CDplayback,pointsAandBmustbewithinthe
sametrack.
DuringDVDplayback,pointsAandBcanbeselectedfromdifferentchapters.
PDF created with FinePrint pdfFactorytrial version http://www.pdffactory.com

4.2PausePlayback
.3StopPlayback
.4SelectChapter/TrackwiththeUP/DNorthe>>|/|<<Button
.5SelectChapter/TrackwiththeNumberButtons
.6SelectChapter/TrackwiththeRoot/PBCMenu(Ifthediscincludesthe
root/PBCmenu)
InthestateofDVD/VCD/CD/MP3/WMAplaying,pressthePAUSE
buttononIRremotecontrollertopausetheplayback,pressthePLAY
buttontoresumenormalplayback.
4
InthestateofDVD/VCD/MP3/WMA/CDplaying,presstheSTOPbutton
oncetopausetheplayback,thenpressthePLAYbuttontoresumethenormal
playback;presstheSTOPbuttontwicetofullstoptheplayback,thenpress
thePLAYbuttontostartplaybackfromthebeginningofthefirstchapter/track.
4
PresstheUP/DNbuttononthefrontpanelorthe>>|/|<<buttononthe
remotecontrollerduringplaybacktoselectthenextorlastchapter/trackto
playback.
Note:PresstheUP/DNorthe>>|/|<<buttonmultipletimestoadvance
multiplechapters/tracksforwardorbackward.
4
InthestateofDVD/VCD(PBCOFF)/MP3/WMA/CDplaying,pressone
ofthe1~9andthe0/10numberbuttonstodirectlyselectandplaythe1stto
10thtrack/chapter(the0/10buttonisusedasthe10button).
Ifyouwanttoplaythetrack/chapterthatsserialnumberisbiggerthan10,
usethe10+,1~9and0/10button.Forexample1,toplaythe13thtrack/
chapter,firstlypressthe10+buttononce,thenpressthe3button.For
example2,toplaythe34thtrack/chapter,firstlypressthe10+buttonfor3
times,thenpressthe4button.(the0/10buttonisusedasthe0button)
Note:longpressingthe+10or-10buttoncanplaythenext10orlast10
chapter/track(onlyforMP3/WMA).
4
InthestateofDVDplaying
1.PresstheTITLEbuttonontheremotecontrollertodisplaythetitlelist.
2.Pressthedirectionbuttonstoselectyourdesiredtitle,andthenpresstheOK
orPLAYbuttontoopentherootmenuoftheselectedtitle.
3.Pressthedirectionbuttonstoselectyourdesiredchapter,finallypressthe
OKorPLAYbuttontoplaytheselectedchapter.
Duringplayback,pressingtheMENUbuttoncandirectlydisplaytheroot
menuofthetitlethatisplaying.
InVCDmode
1.WhenstartingtoturnonthePBCfunction,itwillplayfromthebeginningof
thedisctillitdisplaythePBCmenuonTVscreenifthediscincludethePBC
menu.
2.Pressthenumberbuttonstoselectyourdesiredtrack toplay.
InMP3/WMAmode
1.Therootmenuisdisplayedonthemonitorscreenallthetime(andtheTITLE
orMENUbuttonisnotavailable).
2.PressthedirectionbuttonstoselectyourdesiredFOLDER,thenpressthe
OKorPLAYbuttontoopentheFOLDER,andthenpressthedirectionbuttons
toselectyourdesiredfile,finallypresstheOKbuttontoplaytheselectedfile.
InCDmode,theTITLE,PBC,MENUbuttonsaredisabled.
Duringnormalplayback,longpresstheUP/DNbuttononthefrontpanelor
the>>|/|<<buttonontheremotecontrollercontinuouslytofastforwardsor
backwardsatthefollowingspeeds:x2,x4,x8,x20,normal.
Duringspeedplayback,pressthePLAYbuttontoresumenormalplayback.
Duringplayback,presstheSLOW_FWDbuttontoexecutetheSlowForward
function.
WitheachconsecutivepressingoftheSLOW_FWDbutton,theplayback
speeddecreases.ThespeedlevelsinSlowForwardasfollows:
x1/2,x1/3,x1/4,x1/5,x1/6,x1/7,normal.
4.7PlaybackwithSpeed
4.8PlaybackwithSlowSpeed
PDF created with FinePrint pdfFactorytrial version http://www.pdffactory.com

Fabricado bajo licencia de Dolby Laboratories.
Dolby y el símbolo de Doble-D son marca registrada de Dolby Laboratories.
Patentes en E.U.A. No. 6,836,549; 6,381,747; 7,050,698; 6,516,132 y 5,583,936
NX-685
MANUAL DE OPERACIÓN
Sistema de Audio y Video para Automóvil 4 en 1
Con reproductor de disco versátil digital (DVD) / Conector USB
/ Ranura para tarjeta de memoria / Radio AM/FM y Pantalla de
toque
FAVOR DE LEER COMPLETAMENTE EL MANUAL ANTES DE OPERAR ESTE PRODUCTO.
CONSERVAR EL MANUAL PARA FUTURAS REFERENCIAS
COMENTARIO: CUALQUIER INFORMACIÓN ESTA SUJETA A CAMBIOS SIN PREVIO AVISO.
ESTE REPRODUCTOR INCORPORA LA TECNOLOGÍA DE DERECHOS DE AUTOR
PROTEGIDO POR LAS LEYES DE E.U.A. LAS PATENTES Y OTROS DERECHOS DE
AUTOR SON PROPIEDAD DE MACROVISION. EL USO DE ESTOS DERECHOS DE
AUTOR DEBE SER AUTORIZADA POR MACROVISION Y ESTA DISEÑADA PARA EL
HOGAR Y OTROS USOS LIMITADOS A MENOS QUE EXISTA UNA AUTORIZACIÓN
POR MACROVISION CORPORATION. LA REINGENIERÍA O EL DESENSAMBLADO
DEL REPRODUCTOR ESTA PROHIBIDO.
Compatible con los
siguientes formatos de
archivo: DVD, MP4, VCD,
JPEG, MP3, WMA, CD

PRECAUCIÓN
PRECAUCIÓN: PARA REDUCIR EL RIESGO DE CHOQUE ELÉCTRICO NO REMOVER LA
CUBIERTA (O TAPA), DENTRO DE ESTE APARATO NO HAY PARTES QUE EL USUARIO
PUEDA DARLE SERVICIO, EN SU CASO ACUDIR A UN CENTRO DE SERVICIO AUTORIZADO
O CON PERSONAL CALIFICADO.
El símbolo del relámpago con punta de flecha dentro de un triangulo
equilátero, es diseñado para advertir al usuario de VOLTAJES PELIGROSOS
no aislados dentro del aparato que pueden ser de suficiente magnitud para
constituir un riesgo de choque eléctrico para las personas.
El símbolo de exclamación dentro de un triangulo equilátero, es diseñado para
alertar al usuario de la presencia de instrucciones importantes de operación,
mantenimiento y servicio que acompañan al producto.
El símbolo de producto láser clase 1 es localizado en la parte posterior de la unidad, este indica que
el reproductor es un producto láser clase 1, este usa un láser de baja emisión y no emite radiación
peligrosa hacia fuera de la unidad.
1. Leer completamente el manual de operación antes de instalar y operar este producto.
2. No tocar la clavija y/o el cordón de alimentación con las manos húmedas o mojadas.
3. Si la unidad no va ser usada, apagar el interruptor principal. (Desconectar la fuente de
alimentación principal cuando la unidad no va ser usada por un periodo largo de tiempo). Antes
de mover la unidad, remover primero el disco de la unidad o bandeja.
4. No remover las cubiertas o tocar cualquier componente expuesto hacia fuera de la unidad, esto
debe ser realizado solo por personal calificado.
5. No exponer la unidad a los rayos directos del sol o cerca de objetos radiadores de calor para
evitar daños a la misma.
6. No colocar la unidad en lugares con humedad y polvo, esto puede dañar el rayo láser y
provocar mal funcionamiento.
7. Colocar la unidad sobre una superficie nivelada y estable con adecuada área de ventilación.
Asegurarse que las ranuras de ventilación no son cubiertas para evitar sobrecalentamiento
interno y mal funcionamiento de la unidad.
8. Limpiar el panel y el estuche con una tela suave, limpia y seca. No usar ningún tipo de químicos
como thiner, alcohol o rocíos.
9. Esta unidad no debe ser expuesta al goteo o salpicadura de agua y no debe colocar objetos
llenos con líquidos, como son vasos encima de la unidad.
PR
O
D
UC
T
O
R LA
S
ER
C
LA
S
E 1

6. ESPECIFICACIONES
Especificaciones Generales
Fuente de alimentación: 12 Vcc
Potencia máxima de salida: 4 x 25 W (Medidos a 14,4 Vcc)
Dimensiones: 178 x 50 x 167 mm
Especificaciones sección de DVD
Formato: DVD/VCD/JPEG/MP4/MP3/WMA/CD
Sistema de video: NTSC/PAL/PAL-M/PAL-N/AUTO (Opcional)
Sistema de audio: 24 bit / 96 kHz
Sistema de carga: Carga automática
Angulo de montaje: 0 +/- 30 º
Especificaciones de Video
Tipo de video: 16:9 y 4:3
Nivel de salida de video: Compuesto: 1,0 +/- 0,2 Vpp
Impedancia de carga: 75 ohm
Resolución horizontal: 500 líneas
Especificaciones de Audio
Salida de audio (audio analógico) 2,0 Vrms
Respuesta de frecuencia: 20 Hz – 20 kHz (a 1 kHz 0 dB)
Rango de señal a ruido (Audio): ≥90 dB (a 1 kHz 0 dB)
Separación: 50 dB
Especificaciones de Radio
Sección de FM
Rango de frecuencias: 87,5 – 107,9 MHz
Sensitividad: 3 µV
Frecuencia IF: 10,7 MHz
Sección de AM
Rango de frecuencias: 530 – 1710 kHz
NOTA: Las especificaciones y el diseño de este producto están sujetos a cambios sin previo aviso para mejoras de
los mismos.
ÍNDICE
1. Antes de la operación 3
1.1 Vocabulario 3
1.2 Precauciones 3
1.3 Mantenimiento y limpieza de los discos 4
1.4 Información de las baterías del control remoto 4
1.5 Descripción del control remoto 5
1.6 Descripción del frente del panel frontal 6
1.7 Descripción del frente del chasis después de remover el panel frontal 6
1.8 Descripción del frente del chasis después de deslizar el panel frontal 6
1.9 Descripción de la parte posterior del gabinete 7
1.10 Descripción de los conectores de entrada/salida 7
1.11 Instalación de la unidad 8
2. Operación común 9
3. Operación del Radio 10
4. Operación básica del Disco, memoria USB o tarjeta MMC/SD 11
4.1 Cargar /Descargar un disco, memoria USB o tarjeta MMC/SD 11
4.2 Pausar reproducción 13
4.3 Detener reproducción 13
4.4 Seleccionar capitulo/pista con los botones UP/DN o /13
4.5 Seleccionar capitulo/pista con los botones numéricos 13
4.6 Seleccionar capitulo/pista con la Raíz / Menú PBC 13
4.7 Reproducción a velocidad rápida 14
4.8 Reproducción a velocidad lenta 14
4.9 Reproducción por pasos 15
4.10 Repetir reproducción 15
4.10.1 Repetir Una/Todas 15
4.10.2 Repetir una sección A-B 15
4.11 Introducción de la reproducción 16
4.12 Reproducción de un especifico capitulo/pista o de un tiempo especifico 16
4.13 Reproducción aleatoria (Al azar) 16
4.14 Reproducción de diferentes ángulos 16
4.15 Reproducción en modo de acercamiento 16
4.16 Cambiar idioma del subtitulo 17
4.17 Cambiar el idioma de audio 17
4.18 Cambiar el sistema de señal de Video 17
4.19 Observar el estado de reproducción 17
4.20 Programar reproducción 18
4.21 Reproducción de disco de imágenes en formato JPEG 18
4.22 Operación MP4 19
4.23 Función de antivibración e ID3 19
4.24 Menú de ajustes del sistema DVD 19
* Código de región 23
5. Guía para la solución de problemas 24
6. Especificaciones 25

1. Antes de la operación
1.1 Vocabulario
PBC (Control de reproducción)
Es un tipo de señal (menú) grabado en un disco con formato SVCD o VCD2.0 usado para el control
de la reproducción. Para los discos que contienen PBC, pueden reproducirse con un menú
interactivo desplegado en la pantalla del monitor. Si el disco contiene imágenes detenidas, este
puede reproducir en alta definición la imagen detenida.
Titulo
Generalmente, el título es la parte importante de disco de DVD. Por ejemplo, la parte del tema de la
película es el titulo 1, la parte que describe como hacer la película es el titulo 2, los roles de la
película es el titulo 3, etc. Cada titulo contiene un número de serie que es fácil de buscar.
Capitulo
Un título puede ser dividido en varios bloques, para que cada bloque pueda operarse como una
unidad, la unidad se llama capítulo. El capítulo contiene una unidad por lo menos.
Pista
Es el componente más grande de VCD. Generalmente, cada canción de un disco karaoke es una
pista.
1.2 Precauciones
Seguridad
1. Fuente de poder: La unidad solo debe ser conectada al tipo de fuente de poder descrita en el
manual de operación o marcada en la unidad.
2. La unidad esta diseñada para la terminal negativa de la batería que es conectada al chasis del
automóvil. Favor de confirmar esto antes de hacer la instalación.
3. No permitir que los cables de las bocinas entren en corto circuito con la unidad cuando esta es
encendida. De otra forma esto puede sobrecargar o quemar el amplificador de poder.
4. No instalar el panel frontal antes de conectar los cables de conexión.
5. El estuche protector es para mantener seguro el panel frontal (ver imagen)
Medio ambiente
1. No usar esta unidad en lugares expuestos al agua o con humedad.
2. Si se forma condensación en el lente láser, este puede no operar adecuadamente. Para corregir
este problema, apagar la unidad y esperar cerca de una hora para que la condensación se
evapore.
3. Si el interior del automóvil es extremadamente caliente, no usar la unidad hasta que el
automóvil este circulando para disminuir la temperatura en el interior.
5. Guía para la solución de problemas
Favor de leer el manual de operación cuidadosamente antes de operar la unidad. Si tiene algún problema al operar
la unidad, intentar solucionar el problema siguiendo la guía que se enlista a continuación. Si no puede solucionar el
problema después de usar la guía, favor de llevar la unidad al centro de servicio autorizado para su revisión y
reparación. Por seguridad no intente abrir y reparar la unidad usted mismo para prevenir riesgos de fuego o choque
eléctrico.
NO HAY IMAGEN, SONIDO E INDICACIÓN
•Asegurarse que el interruptor de poder esta encendido.
•Asegurarse que la fuente de poder esta conectada.
•Asegurarse que el cordón de alimentación no esta dañado o el fusible abierto.
•Asegurarse que el cordón de alimentación esta conectado adecuadamente.
HAY IMAGEN PERO SIN SONIDO
•Asegurarse que la salida de audio de la unidad esta conectado adecuadamente a la entrada de audio del
monitor.
•Verificar que los conectores de audio no estén dañados.
•Verificar que el volumen no este ajustado al nivel mínimo.
•Asegurarse que están ajustados correctamente los ajustes de Audio de la unidad.
•Asegurase que la salida de audio no esta activada en modo de silencio.
HAY SONIDO PERO SIN IMAGEN
•Asegurarse que la salida de video de la unidad esta conectado adecuadamente a la entrada de video del
monitor.
•Asegurarse que esta ajustado el monitor en el modo de audio/video (A/V).
•Verificar que el conector de video no este dañado.
•Asegurarse que están ajustados correctamente los ajustes de Video de la unidad.
IMAGEN EN BLANCO Y NEGRO O PANTALLA DESPLAZANDOSE
•Asegurarse que esta ajustado el sistema de TV adecuado (por ejemplo, PAL, NTSC, AUTO).
FALLAS EN LA IMAGEN O SONIDO
•Asegurarse que los ajustes de Audio son los correctos.
•Asegurarse que el disco no esta rallado o sucio.
•Asegurarse que los conectores y los cables de Audio y Video no estén sucios.
•Asegurarse que no haya condensación en el lente láser. Si es así, dejar la unidad apagada por una hora e
intentarlo de nuevo.
•Asegurarse que el ángulo de instalación no es mayor a 30º.
LA PANTALLA DESPLIEGA NO DISCO O DISCO MALO
•Asegurarse que hay un disco colocado en la bandeja.
•Asegurarse que el disco fue colocado de manera correcta.
•Asegurarse que el disco no este ondulado o doblado.
•Asegurarse que el disco no este rallado o sucio.
•Asegurarse que le formato del disco es compatible con la unidad.
•Asegurarse que la temperatura en el automóvil no es demasiado alta. Si es así, bajar la temperatura en el
interior del automóvil.
•Colocar otro disco en el compartimiento.
EL CONTROL REMOTO NO OPERA
•Asegurarse que las baterías del control remoto estén cargadas y en buen estado.
•Dirigir de manera directa el control remoto al sensor infrarrojo de la unidad.
•Asegurarse que no hay obstáculos entre el control remoto y el sensor infrarrojo de la unidad.
ALGUNOS BOTONES DE FUNCIÓN NO OPERAN
•Apagar la unidad, entonces encenderla nuevamente.
•Restablecer la unidad, entonces encenderla nuevamente.
•Remover el panel frontal de la unidad, instalar el panel frontal de nuevo y encender la unidad.
EL RADIO NO OPERA
•Asegurarse que la antena de cable esta conectada firmemente o sintonizar manualmente la estación.

* Código de región
Pregunta: ¿No empieza la reproducción y la pantalla despliega ERROR DE REGIÓN después de
insertar el disco en el compartimiento?
Respuesta: Esto es porque el reproductor de DVD y el disco DVD tienen diferente código de región.
Si el código de región del disco DVD no coincide con el código de región del reproductor, el disco no
puede reproducirse.
Apéndice: El código de región de un DVD:
La Asociación de películas de América (MPAA) dividido el mundo en 6 regiones, y nombró cada
región con un código de la región. El código de región y los países o áreas se representan por los
códigos de región como sigue:
Región 1: EEUU, Canadá, Islas del Pacífico Este.
Región 2: Japón, Europa del Este, Norte de Europa, Egipto, Sudáfrica, Medio Este.
Región 3: Sureste de Asia incluida Taiwán, Hong Kong, Corea del Sur, Tailandia,
Indonesia, etc.
Región 4: Australia, Nueva Zelanda, América del Sur y Central, Islas del Pacífico Sur.
Región 5: Rusia, Mongolia, India, Asia media, Europa del Este, Corea del Norte, África del Norte,
Noreste de Asia, etc.
Región 6: China.
Básicamente cuando una película en un disco DVD región 6 no se reproduce, necesitamos adquirir
un reproductor región 6 para reproducir el disco DVD lo que causara excesivos gastos de dinero. Los
problemas debido a la inconsistencia de los códigos de región entre el reproductor y el disco DVD ha
empujado a la producción de reproductores que para facilitan modificar el código de región un
número de veces para la reproducción de los discos DVD. Algunos discos producidos por las
grandes compañías de producción de películas más grandes de América restringen esto, ellos no
manejan ningún formato original DVD. Es decir, los discos de película DVD producidos por las 8
grandes compañías de producción de películas no producidas con la regla de código de región,
generalmente son llamados discos de código de región libre o discos multi región. Estas 8 grandes
compañías son:
1. Warner Bross
2. Columbia
3. 20Th Century Fox
4. Paramount
5. Universal
6. UA (United Artist)
7. MGM (Metro Dogwyn Mayer)
8. Walt Disney
1.3 Mantenimiento y limpieza de los discos
Mantenimiento de los discos
1. Mantener los discos limpios, sujetar los discos por el borde, evitar tocar las superficies del disco.
2. No pegar etiquetas o cintas adheribles sobre los discos. Si hay pegamento (o algo similar) sobre
la superficie del disco, debe limpiar el disco antes de usarlo.
3. No exponer los discos a los rayos directos del sol o cerca de superficies radiadoras de calor o
dejarlo dentro del automóvil estacionado bajo los rayos directos del sol ya que esto puede
alcanzar una temperatura alta considerable.
4. Mantener los discos dentro de su estuche después de cada uso para mantenerlos en buen
estado.
Limpieza de los discos
1. Antes de reproducir los discos, limpiarlos con una tela suave, limpia, seca y libre de pelusa.
Limpiarlos con movimientos rectos del centro hacia fuera, Nunca con movimientos circulares.
2. No usar petróleo, thiner, limpiadores químicos, rocíos antiestáticos para limpiar los discos, estos
pueden dañar las superficies de los discos.
1.4 Información de la batería del control remoto
Reemplazando la batería del control remoto
1. Antes de usar el control remoto por primera vez, jalar la etiqueta aislante en el control remoto en
la dirección indicada por la flecha (ver fig. 1).
2. Presionar el seguro del compartimiento de la batería en la dirección indicada por la flecha A (ver
fig. 2), entonces jalar el compartimiento de la batería hacia fuera del control remoto como se
indica en la flecha B (ver fig. 2).
3. Reemplazar la batería gastada por una batería nueva con el lado positivo dirigido hacia arriba
(ver fig. 3).
4. Insertar el compartimiento de la batería en el control remoto de nuevo como se indica en la
flecha (ver fig. 3).
Notas acerca de la batería del control remoto
1. Batería tipo botón de litio tamaño CR2025 o similar de 3 Vcc.
2. Tiempo de vida de la batería: 6 meses en operación normal a temperatura ambiente normal.
3. El uso inadecuado de la batería puede causar sobrecalentamiento o explosión, lo que puede
resultar en lesiones o fuego.
4. La fuga de ácido de la batería puede causar daños al control remoto.
5. No cortocircuitar las terminales de la batería.
6. No exponer ni lanzar las baterías al fuego.
7. Para evitar riesgos de accidentes, mantener las baterías lejos del alcance de los niños.

1.5 DESCRIPCIÓN DEL CONTROL REMOTO
1. BOTÓN DE INCLINAR
2. BOTÓN DE MENÚ "MENU"
3. BOTÓN DE PODER "PWR"
4. BOTÓN DE DIRECCIÓN ""
5. BOTÓN DE SIGUIENTE/AVANZAR ""
6. BOTÓN DE DIRECCIÓN ""
7. BOTÓN DE PREVIO/REGRESAR ""
8. BOTÓN DE DIRECCIÓN ""
9. BOTÓN SELECCIÓN "SEL"
10. BOTÓN DE REPRODUCIR/PAUSAR "I"
11. BOTONES NUMÉRICOS (0-10, +10, -10
12. BOTÓN DE 10+
13. BOTÓN DE AJUSTE "SETUP"
14. BOTÓN DE MODO "MODE"
15. BOTÓN DE RASTREO/PREFIJAR "APS"
16. BOTÓN DE BÚSQUEDA "SEARCH"
17. BOTÓN DE ALEATORIO "RDM"
18. BOTÓN DE REPETIR "RPT"
19. BOTÓN DE SUBTITULO "SUBTITULE"
20. BOTÓN DE TITULO/PBC "TITLE/PBC"
21. BOTÓN DE ÁNGULO/ST "ST"
22. BOTÓN DE ACERCAMIENTO "ZOOM"
23. BOTÓN DE AUDIO "AUDIO"
24. BOTÓN DE RELOJ "CLK"
25. BOTÓN DE REPETIR A-B
26. BOTÓN DE INTRODUCCIÓN "INT"
27. BOTÓN DE ECUALIZADOR "EQ"
28. BOTÓN DE LOCAL/AVANCE LENTO "LOC"
29. BOTÓN DE SILENCIO "MUTE"
30. BOTÓN DE DETENER ""
31. BOTÓN DE VOLUMEN –
32. BOTÓN DE DIRECCION ""
33. BOTÓN DE ACEPTAR "OK"
34. BOTÓN DE VOLUMEN +
35. BOTÓN DE BANDA/SISTEMA "BAND / P/N"
36. BOTÓN DE PROGRAMA "PROG"
37. BOTÓN DE DESPLIEGUE EN PANTALLA
"OSD"
38. BOTÓN DE BAJOS "LOUD"
39. BOTÓN DE PASOS "STEP"
COLOR "HUE"
Esto es para ajustar el color de la salida de video.
SATURACIÓN "SATURATION"
Esto es para ajustar la saturación de la salida de video.
NITIDEZ "SHARPNESS"
Esto es para ajustar la nitidez de la salida de video.
4.24.5 AJUSTE DE LAS BOCINAS "SPEAKER SETUP"
MEZCLA "DOWNMIX"
Esta función es para seleccionar el efecto de sonido deseado cuando no hay bocina central y
subwoofer. Existen 3 modos: LT/RT, STEREO, VSS
LT/RT: Al reproducir un disco con efecto PRO LOGIC Dolby estéreo, seleccionar esta opción,
obtendrá una señal de salida de audio con efecto de teatro en vivo.
STEREO: Si selecciona esta opción, cuando la señal de salida de audio es de 5.1 canales, obtendrá
la salida a través de los canales izquierdo y derecho; cuando la salida de audio es a través de 2
canales, la salida será a través de los canales de señal estéreo comunes.
VSS: Si selecciona esta opción, al reproducir un disco grabado con 5.1 canales, la bocina del canal
principal la salida de audio puede tener efecto VSS.
4.24.6 AJUSTE DIGITAL "DIGITAL SETUP"
MODO OP "OP MODE"
Esto es para seleccionar el modo de salida de audio.
LINE OUT: Esto es una compresión lineal de la salida de audio. El nivel de volumen es bajo.
Seleccionar esta opción durante la noche.
RF REMOND: Este proporciona un nivel de volumen alto. Seleccionar esta opción durante el día.
RANGO DINÁMICO "DYNAMIC RANGE"
Después de seleccionar el modo de compresión LINE OUT, puede ajustar el rango de compresión
lineal. Si selecciona lleno "FULL", los valores pico a pico de la señal de audio son mínimos; si
selecciona desactivado "OFF", los valores pico a pico son de la señal de audio son máximos.
DUAL / MONOAURAL "DUAL MONO"
Esto es para seleccionar el modo de salida de audio deseado para los canales de señal izquierdo y
derecho. Esto es principalmente para Karaoke de AC3. Hay 4 modos:
ESTÉREO, MONOAURAL IZQUIERDO "L", MONOAURAL DERECHO "R" y MEZCLA
MONOAURAL.
Table of contents
Languages:
Other Naxa Car Stereo System manuals