NEBTIME UN 600A User manual

MODEL: UN 600A
ULTRASONİK NEBULİZATÖR
“ULTRASONIC NEBULIZER / USER GUIDE“
“KULLANIMDAN ÖNCE KILAVUZU DİKKATLİCE OKUYUNUZ“
Please read this manual carefully before use

İÇİNDEKİLER
2
DİKKAT
KULLANIM
KİTAPÇIĞINI
OKUYUNUZ
ÜRETİM
TARİHİ
ÜRETİCİ
FİRMA
SERİ NO
1.
GENEL BİLGİLER 4
2.
KULLANIM ALANLARI 4
3.
MONTAJRESMİ VE YEDEK PARÇALİSTESİ 6
4.
KURULUM 8
5.
GÜVENLİK 14
6.
ÇALIŞTIRMA 14
7.
CİHAZ AYARLARININ DEĞİŞTİRİLMESİ 18
8.
UYARI SİSTEMİ 20
9.
BAKIM 22
10.
TEMİZLİK VE DEZENFEKTE 24
11.
TEKNİK ÖZELLİKLER 24
12.
ARIZA 26
13.
AKSESUVAR LİSTESİ 26
14.
GARANTİ 28
15.
SERTİFİKALAR 30
16.
ÜRETİCİ FİRMA BİLGİLERİ 30
CİHAZETİKETİNDE KULLANILAN SEMBOLLER
SN
KONULAR
SAYFA NO

3
CONTENTS
CAUTION
READ THE
USER MANUAL
DATE OF
MANUFACTURE
MANUFACTURER
SERIALNUMBER
SUBJECTS
PAGE NO
1. GENERAL INFORMATION
5
2. FIELDS OF USE
5
3. ASSEMBLING DRAWING AND
SPARE PARTS LIST
7
4. INSTALLATION
9
5. SAFETY
15
6. OPERATION
15
7. CHANGING DEVICE SETTINGS
19
8. WARNING SYSTEM
21
9. MAINTANENCE
23
10. CLEANING AND DISINFECTION
25
11. TECHNICAL PROPERTIES
25
12. BREAKDOWN
27
13. ACCESSORIES
27
14. GUARANTEE
29
15. CERTIFICATES
31
16. MANUFACTURER INFORMATION
31
GLOSSARY OF SYMBOLS
SN

1.GENEL BİLGİLER
4
NEBTIME ultrasonik nebulizatör cihazları, sıvıların, aerosol ve buhar tedavisinde
kullanılmasını sağlamak amacı ile üretilmiş cihazlardır.
Sıvılarınbuhara dönüştürülmesinde ,ısıtma tekniği yerine ,frekans kullanılır.
Mikroprosessörlü elektronik sistem tarafından oluşturulan frekanslar ,
piezoseramik kristal vasıtası ile, mekanik titreşimlere dönüştürülür. Bu
titreşimler sayesinde , kavanoz içerisindeki sıvı, ısıtılmadan buharlaştırılır.
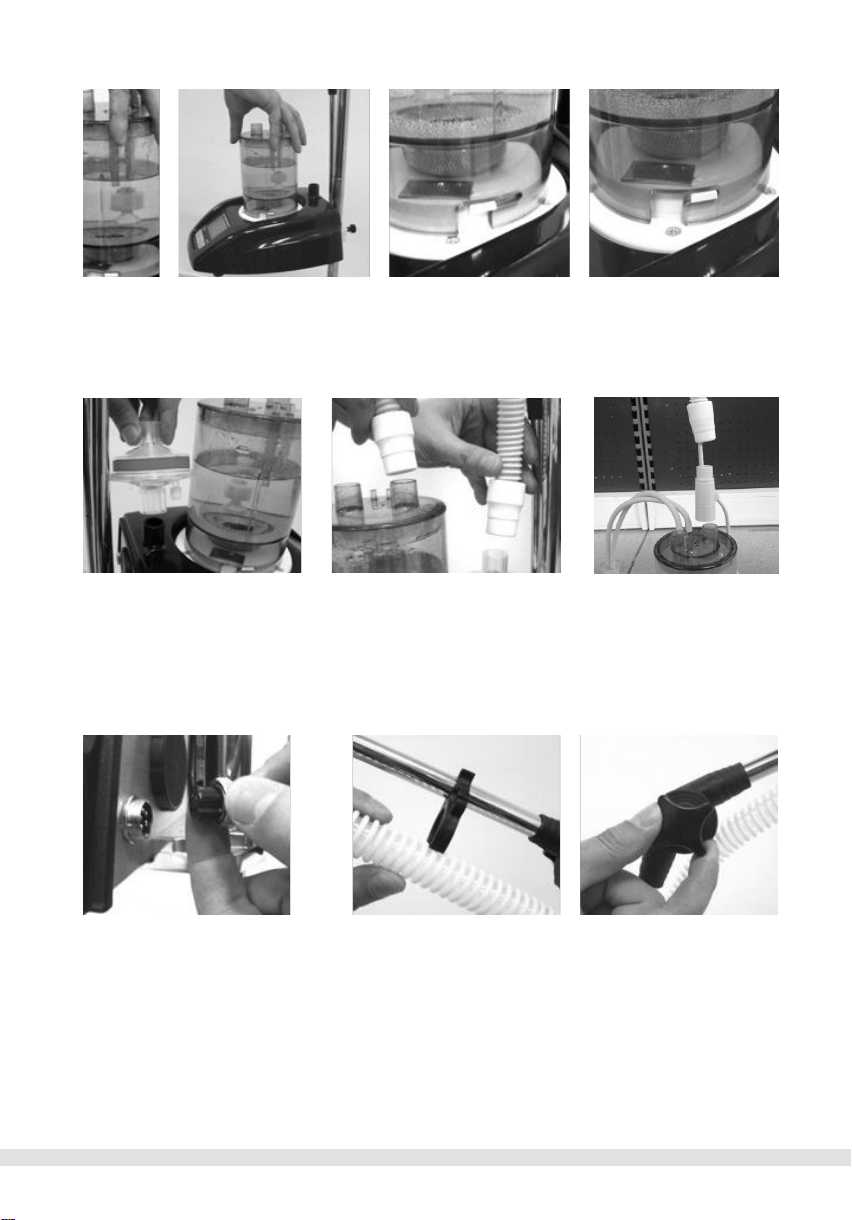
Ayrıca, cihaz içerisinde bulunan birfan, dışortamdan hava çeker.Buhava, bir
bakteri filitresi üzerinden geçirilerek temizlenir ve sıvı kabına basılır.Sıvı kabı
içerisinde sürekli oluşan buhar, bu hava basıncı ile dışarıya itilir ve hortum
vasıtası ile hastaya ulaştırılır. Elde edilen bu buhar , eğer istenirse çıkıştaki bir
ısıtıcı ileısıtılabilir.
NEBTIME ultrasonik nebulizatör sahip olduğu
Mikroprosessör kontrolü
128 * 64 likit kristal ekranı
Kontrol panosu ve tuş takımı
Görsel ve işitsel uyarı sistemleri
Ayarlanabilen buhar şiddeti, fan hızı, zamanlayıcı, ısıtıcı seviyesi
Sıvı beslemeünitesi
Plastik gövdesi
Bakteri filitresi
Düşük enerji tüketimi
Piezoseramik kristalin kolay değişimi
Çıkış buharıısıtıcısı
İlaçlı uygulama
Özellikleri ile sizlere kullanım kolaylığı sağlayacak şekilde üretilmiştir.
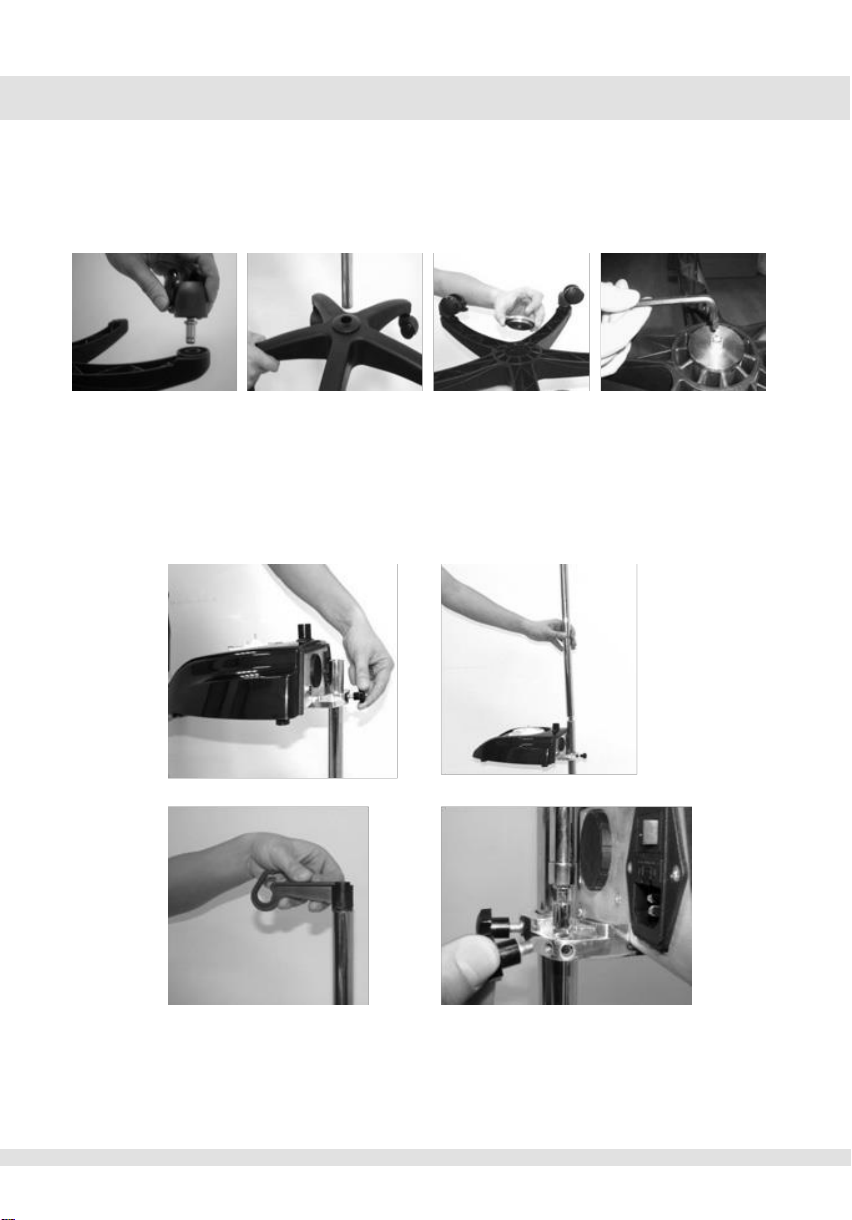
Ayrıca cihazda kullanılan tek parça ayak sistemide kurulum kolaylığı
sağlamaktadır.
2.KULLANIM ALANLARI
Soluma gazlarının ve narkotik gazların nemlendirilmesi
Akut ve kronik bronşitler
Bronşiyal astım
Pnömoni
Spesifik ve spesifik olmayan akciğer hastalıkları
Bronkoskopi öncesi lokal anestezi
İlaç ve su nebulizasyonu
Ortam nemlendirme

5
1.GENERAL INFORMATION
NEBTIME ultrasonic nebulizer devices are produced to ensure the
use of liquids in aerosol and steam treatment.
In the transformation of liquids into steam form instead of heating method
frequency is applied. Frequencies formed by microprocessors electronic system
by means of piezo-ceramic crystal are transformed into mechanical vibrations.
By means of those vibrations, liquid preserved in the pot is evaporated without
heating. Moreover, a fan located in the device absorbs air from the external
environment. That air being absorbed passing along a bacterium filter is
purified and pressed into the liquid reservoir. The steam which is continuously
formed in the liquid container is pushed out with this air pressure and
delivered to the patient by means of the hose
. That composed steam can be
heatedbyaheater
at the outlet.
NEBTIME ultrasonic nebulizator is manufactured to enable practical use
with
microprocessor control
128*64 LCD
Control panel and key pad
Visual and audio warning systems
Adjustable steam power intensity, fan speed, timer, heater level
Liquid feedingunit
Plastic body
Bacterium filter
Low energy consumption
Easy to replace Piezoceramic crystal
Outlet steam heater
Drug containing implementation.
Atthesametimesinglecomponentfootsystemappliedinthedevices provide
practical installation.
2. FIELDS OF USE
Moisturizing respiration and narcotic gases.
Acute and chronic bronchitis
Bronchial asthma
Pneumonia
Specific and non-specific lung diseases
Pre-bronchoscopy local anesthesia
Drug and water nebulization
Ambient humudification

3. CİHAZ MONTAJ RESMİ VE YEDEK PARÇA LİSTESİ
6

7
3. ASSEMBLING DRAWING AND SPARE PARTS

4.KURULUM
8
NEBTIME ultrasonic nebulizatör cihazınızı , ambalajından çıkardıktan sonra,
kurulumunu gerçekleştirmek için aşağıdaki sırayı takip ediniz. Kurulum
sırasında herhangi bir sorun ile karşılaşırsanız lütfen yetkili teknik servisi
arayınız.
Tekerleri, standayağına hafifcebastırarak takınız. Stand altparçasını ( heriki
tarfında somun dişi olan parçanın , küçük delikli olan tarafı aşağıya gelecek ),
stand ayağı içerisine yerleştiriniz.
Flanş parçaşını stand ayağının arka kısmına yerleştiriniz.
M8 civatayı , bir alien anahtar yardımı ile flanş ve stand alt parçasını tutacak
şekilde iyicesıkınız.
Cihazı, gövdesindeki arka tutacak tarafından stand alt parça üzerine geçiriniz.
Cihazın yerden yüksekliğini ayarladıktan sonra kelebek vida ilesabitleyiniz
Stand üst parçayı, alt parça üzerine vidalayarak sabitleyiniz.
Stand askısını, üst parka içine geçecek şekilde yerleştiriniz.
Standkolunu,cihazınarkatutacağınatakınızvekelebekvidailesabitleyiniz.

9
After taking out the NEBTIME nebulizator device from its packing, for
installation please follow below instructions. During installation, if you
encounter any difficulty please contact with your authorized technical
service personnel.
Install the casters by gently pressing down on the stand. Place the
lower part (the part with the female thread on both sides with the small
hole facing downwards) into the stand.
Place the flange part on the back of the stand leg.
Tighten the M8 bolt with the help of an allen wrench to hold the flange and the
lower part of the stand
.
Place the device on the lower part of the stand by the rear handle on the body.
After adjusting the height of the device from the ground, fix it with a butterfly
screw.
Place the stand hanger so that it engages in the upper part.
Attach the stand arm to the rear handle of the device and fix it with the butterfly
screw
4. INSTALLATION

10
Sıvı kavanozunu üst kapağın çatal çubuklarının ucuna kadar doldurunuz ( steril
su tavsiye edilir )ve kapağını sıkıca kaparak, cihazın üzerine yerleştiriniz.
Kavanozu saat yönünde çevirerek , yerine kilitleyiniz.
Bakteri filitresini, cihazın hava çıkışına takınız .
Kısa hava hortumunun , bir ucunu bakteri filitresinin çıkışına, diğer ucunu
kavanozun bir çıkışına takınız. Eğer ısıtıcı kullanılacak ise , kavanozun diğer
çıkışa ısıtıcıyı takınız. Isıtıcının çıkışınada uzun buhar hortumunu takınız. Eğer
ısıtıcı kullanılmayacak ise , uzun hortumu direk kavanoz çıkışına takınız.
Isıtıcının kablosunun ucundaki soketi, cihazın arkasındaki erkek sokete takınız
(eğer takarken sorun olursa, soketi sağa sola çevirerek yerine gelmesini
sağlayınız ). Soket üzerindeki somunu karşıya sıkınız.
Uzun hortumu, stand kolu üzerindeki kelepçelere geçiriniz.
Stand kolunun pozisyonunu , eklem parçaları üzerindeki kelebek vidaları
gevşeterek ayarlayınız ve tekrar sıkınız.

11
Fill the liquid jar up to the end of the bars on the upper lid (sterile water is
advisable) close the lid firmly andfix it on the device.
lock on its place by turning the jar in the clockwise.
Place the bacterial filter on the air outlet of the device.
Place one tip of the short hose to the outlet of the bacterial filter and the
other tip to the outlet of the jar.
Iftheheaterisintendedtobeusedheaterwillbemountedontheotheroutletof
the jar. Also, place the long steam hose on the outlet of the heater.
If the heater is not intended to be used directly place the long hose to the outlet
of the jar.
Fix the socket of the heater cable to the male socket of the device located on
the back side (if you experience difficulty while fixing turn the socket to the
right and left side enable its location on place). Squeeze the bolt on the socket
totheacrossside.Fitthelonghoseonthecuffsoverthestand.
Arrange position of the stand byloosening the butterfly screws on the joint
components and squeeze again.

12
Besleme şişesine, şişe askısını resimdeki gibi takınız. Contası takılmış kapağı,
şişeye sıkıca takınız. Silikon hortumları kapağa takınız
Şişe hortumlarını kavanoz kapağı üzerindeki küçük deliklere sıkıca takınız.
Şişe askısını, şişe ters duracak şekilde stand askısına takınız.Şişeden akan
su, kavanozu en üst seviyeye kadar doldurursa, şişe kapağı düzgün oturmamış
demektir. Kavanozdaki suyu boşaltarak işlemi tekrarlayın.Şise içerisindeki
sıvı,kavanozdaki sıvı seviyesi azaldıkça , otomatik besleme yapar, kavanozdaki
sıvı seviyesi sabit kalır.
Cihazın yerden yüksekliğini arka tutacak üzerindeki kelebek vida ile ayarlayınız.
Cihazınızınkurulumunutamamladınız veçalıştırmayahazırhalegetirdiniz.

13
Fix the bottle straps on the feeding bottle as shown in the drawing. Firmly fix
the lid molded its bolt on the bottle. Fix the silicon hoses to the lid.
Firmlyfixthebottlehosesintothesmallholeslocatedonthejarlid.Fixthe
bottle sling into the stand sling keeping the bottle turned upside down. Ifthe
water flowing out from the bottle fills the jar until the highest level itmeans
that
the bottle lid is not fixed. Repeat the action by emptying the
water in the jar.
Liquid in the bottle carries out automatic feeding as the liquid
level in the
bottle isdecreased. Liquid level inthe jar remains same.
Adjust the height ofthe device from the ground level bythe butterfly screw on
the back handle.
Youhavecompletedtheinstallationofthedeviceandmadeitreadytooperate.

14
5. GÜVENLİK
Cihazın kullanımı öncesinde kullanım kılavuzunu baştan sona dikkatlice
okuyunuz.
Cihazın elektrik kablosunu takacağınız prizin, elektiksel voltaj değerinin, cihaz
çalışma voltaj değerine uygunluğunu kontrol ettirmeniz önerilir.
Cihaz taşınması esnasında elektrik kablosunu prizden mutlaka çıkarınız.
Cihazı ısı kaynaklarına çok yakın konumda çalıştırmayınız.
Cihazın hava filitre deliklerine bir cisim sokmayınız.
Cihaza çoçukların müdahele etmesini engelleyiniz.
Cihazı kullanımı bittikten sonra, açma-kapama düğmesinden kapatınız ve
elektrik kablosunu prizden çıkarınız.
Cihazın üzerine su dökmeyiniz.
Arıza durumunda bu kitapçığın ARIZA bölümünü okuyunuz
Doktorunuzun tavsiye ettiği sıvılar dışında hiçbir sıvıyı buharlaştırmak için bu
cihazı kullanmayınız.
6.ÇALIŞTIRMA
Cihazınızda, ilaç uygulaması yapacaksanız, ilaç kabına ilacınızı yerleştirdikten
sonra, kavanoz kapağının içine sıkıca takınız.Sonrada kavanoz kapağını
kavanoza takınız.Eğer buhar uygulaması yapmayacaksanız, kapağı kavanozo
ilaç kabı olmadan takınız. Cihazı kullanılacak yere yerleştiriniz ve teker kilitlerini
basarak kilitleyiniz.Masa üstü modelleri yere koymayınız. Spiral kolu kullanıma
en uygun hale getiriniz.
Elektrik fişinin birucunu cihaza
diğer ucunu prize takınız ve
cihazın arkasındaki açma –
kapama düğmesine basarak
çalıştırınız. Cihazın kullanımı
bittiğinde yine buradan
kapatınız.

15
5. SAFETY
Read the guide book carefully before use.
It is recommended that you check that the electrical voltage of the socket to
which you will connect the device's power cord corresponds to the operating
voltage of the device
.
During the transportation the electricity cable of
the device must be taken
out from the fuse.
Do not operate the device very close to heat sources.
Donotstick any substance into the airfilter holes ofthe device.
Keep the device awayfrom thechildren.
After operating the device, turn off on the turn on/off switch
and take out
the electricity cable from the fuse.
Do not pour water on the device.
In case of any breakdown read the BREAKDOWN section of this guide.
Except the liquid materials recommended by your doctor never use that device
for evaporating any liquid.
6.OPERATION
If you attempt to use drugs on your device. After putting drug into its pot,
firmly fix into the jar lid. Later on, fix the jar lid on the jar. If you do not
attempt steam application fix the lid on the jar without the drug pot.
Assemble the device where it is going to be used and lock compressing the
wheel locks. Do not put the on tabletop models on the ground Adjust the
spiral arm for the
most optimum use.
Plug in the one end of the
electrical cable to the
device
and the other end to
the on/off
switch on the back
side of the
device. Turn off
from here when the
device
operation is over.

16
CihazaçılıncaönceNEBTIME logolu ekran
gelir.
Sistem kendini kontrol ettikten sonra
eğer herhangi birsorun yoksa‘’STANDBY
PRESS BUTTON ‘’ ekranı gelir.Eğer cihazda
birsorun varsa , size görsel veişitsel uyarı
verir.
Cihazı çalıştırmak için
STANDBY butonunu 1 saniye basılı tutunuz.
Cihaz çalışmaya başlayacak ve yandaki
ekran çıkacaktır.
Eğer ısıtıcı kablosu takılı değilse yada kablo
takılı olduğu halde ısıtıcı ile ilgili başka bir
sorun varsa yandaki ekranda olduğu gibi
HEATER DISCONNECTED yazısı ile sizi
uyaracaktır.Fakat bu durum cihazınızın
çalışmasını engellemez , cihaz çalışmaya
devam eder.

17
When the device opens NEBTIME logo
will
appear on the screen.
If the system does not have any
problems after checking itself
you will
see “STAND BY PRESS BUTTON” on the
screen. If there is a problem with the
device, it will give you a visual and
audible warning.
For the operation of the device.
Press on the STANDBY button 1 second.
The device will start and the this
screen
will appear.
If the heater cable is not plugged in or if
there is a problem with the heater while
the cable is plugged in, HEATER
DISCONNECTED will warn you as it is on
the screen
. However, this does not
prevent your device from working, the
device will continue to work.

7.CİHAZAYARLARININDEĞİŞTİRİLMESİ
18
Menü butonu : Fonksiyonların ayar menülerine
girmek için kullanılır. Her basmada mevcut
fonksiyonun ayarını kaydeder ve sonraki fonksiyon
ayar menüsünegeçer.
Seviye ayar butonları : Sağ taraf seviyeyi artırır, sol
taraf azaltır.
1.
ayar menüsü: Cihazın ayarlarının
değiştirilebilmesi için , cihaz çalışır durumdayken
, menü butonuna 1kez basılarak AEROSOL ( buhar
şiddeti ) ayar menülerine girilir.Sağ-sol butonları
ile istenen seviye 1 –10 aralığında ayarlanır.Tekrar
menu butonuna basılarak buradan çıkılır ve 2.
ayar menüsüne girilir.
2.
ayar menüsü, AIRFLOW (hava üfleme şiddeti)
dir.Sağ-sol butonları ile istenen seviye 1 –10
aralığında ayarlanır.Tekrar menü butonuna
basılarak buradan çıkılır ve 3. ayar menüsüne
girilir.
3.
ayar menüsü, TIMER ( zamanlayıcı ) dır.5-10-
15 -20-30-40-50-60-90-120 dakika ve sürekli
çalışma modu aralığında sağ-sol butonları ile
istenen seviyeye ayarlanır.Tekrar menü butonuna
basılarak buradan çıkılır ve 4. ayar menüsüne
girilir.
4.
ayar menüsü, HEATER ( ısıtıcı şiddeti )dir.Eğer
ısıtıcıtakılıisevekullanılacaksasağ-sol butonları
ile istenen seviye 1 –10 aralığında ayarlanır.Tekrar
menü butonuna basılarak buradan çıkılır.
Cihaz normal çalışma moduna dönmüş olur.

7
–
CHANGING DEVICE SETTINGS
19
Menu button: Used to enter the setting
menus of the functions. Saves the setting
of the current function at each press and
goes to the next function setting menu.
Level adjustment buttons: Right side increases
level and left side decreases.
1.
Adjustment menu: In order to change the
settings,
when the device isoperating press once
on the menu button you will enter to AEROSOL
(steam power) adjustment menus
.
With the
right-left buttons, the desired level can be
adjusted between 1 –10.
press the menu
button to exit and enter the 2nd adjusment
menu
.
2.
Adjustment menu, AIRFLOW (air blowing
intensity. With the right and left buttons
desired level is adjusted in 1-10 range. Press
the menu button again to exit and enter the
3rd adjusment menu.
3.
Adjustment menu, TIMER. In 5-10- 15- 20-30-
40-50-60-90-120 minutes, it can be adjusted to
the desired level with right-left buttons in the
continuous operation mode range. Press the
menu button again to exit and enter the 4th
adjusment menu.
4.
Adjustment menu is the HEATER (heater
intensity).If the heater is installed and to be
used, the desired level can be adjusted
between 1 - 10 with right-left buttons. Press
the menu button again to exit. The device
returns to normal operation mode.

20
Ayarlar otomatik olarak hafızaya kaydedilir ve sizin
tarafınızdan değiştirilene kadar sabit kalır.Normal
çalışma modunda her fonksiyonun resmi altında
ayarlandığı değer ve kaç dakika sonra kapanacağı
gözükmektedir.
Örneğin yandakiekranda
Buhar10,hava2,sure120dakika,ısıtıcı8,kalan
süre 120 dakika olarak gözükmektedir.
Cihaz ayarlandığı sürenin sonunda kendiliğinden
kapanır ve STANDBY moduna geçer. Tekrar
çalıştırmak için STANDBY butonuna 1 sn basılı
tutmanız yeterlidir.Sistem en son yapılan ayarlar
ile çalışmaya tekrar başlar.
Çalışan cihazıbeklemeye almak için yine STANDBY
butonuna 1 sn basılı tutmanız gereklidir.
CİHAZI KULLANMAYACAĞINIZ ZAMAN MUTLAKA
ARKASINDAKİ AÇMA-KAPAMA BUTONUNA
BASARAK KAPATINIZ.
8. UYARI SİSTEMİ
Isıtıcı uyarısı : Eğer ısıtıcı kullanmıyorsanız ve
ısıtıcı kablosunu cihazın arkasındaki sokete
takmadıysanız cihaz normal çalışma modunda
HEATER DISCONNECTED yazısı ile görsel uyarı
verir. Fakat sesli uyarı vermez. Cihaz sorunsuz
çalışmaya devameder.
Sıvı seviyesi uyarısı : Eğer sıvı kavanozu yerine tam
oturmadıysa, kavanoz içerisindeki sıvı seviyesi
minimum seviyeye düştüyse sistem yandaki
ekrandaki gibi PLEASE ADD LIQUID IN TO THE
CHAMBER yazısı ile görsel uyarıyı verir,sesli
olarak alarm çalar ve cihaz çalışmasını durdurur.
Kavanozu tam olarak yerine oturtunuz ve normal
seviyeye kadar sıvı ilave ediniz.
Table of contents
Languages:
Other NEBTIME Respiratory Product manuals