NEC E321 Guide

ISSUED: 03-26-10 SHEET #: 125-9106-3 08-04-10
Maximum UL Load Capacity: 150 Ib (68 Kg)
NEC DISPLAY SOLUTIONS OF AMERICA, INC.
Model: WMK3257
Installation andAssembly - Flat Screen Wall
Mount for NEC models:
ASPV32, ASPV40, E321, E421, E461,
LCD3210, LCD3215, LCD4020, LCD4215,
LCD4615, LCD4620, LCD5220, LCD5710,
M40, M46, P401, P461, P521, P551, S401,
S461, S521, SC40, SC46, V321, V421, V461,
X461HB, X461UN
R
This product is intended for use with UL
Listed products and must be installed by a
qualified professional installer.

2 of 7 ISSUED: 03-26-10 SHEET #: 125-9106-3 08-04-10
Note: Read entire instruction sheet before you start installation and assembly.
Table of Contents
Parts List..............................................................................................................................................................................3
Installation to Double Wood Stud Wall..................................................................................................................................4
Installation to Solid Concrete or Cinder Block .......................................................................................................................5
InstallingTiltBrackets...........................................................................................................................................................6
Installing Flat Panel Screen to Wall Plate.............................................................................................................................7
Forcustomercarecall(800)865-2112 or (708) 865-8870.
• Do not begin to install this product until you have read and understood the instructions and warnings contained in this
InstallationSheet.Ifyouhaveanyquestionsregardinganyoftheinstructionsorwarnings,pleasecallcustomercare
at1-800-865-2112.
• This product should only be installed by someone of good mechanical aptitude, has experience with basic building
construction, and fully understands these instructions.
• Makesurethatthe supporting surface will safely support the combined load of the equipment and all attached hard-
wareand components.
• Neverexceed the UL Listed Maximum Load Capacity of 150 lb (68 kg).
• If mounting to wood wall studs, make sure that mounting screws are anchored into the center of the studs. Use of an
"edgeto edge" stud finder is highly recommended.
• Always use an assistant or mechanical lifting equipment to safely lift and position equipment.
• Tighten screws firmly,butdonot overtighten. Overtightening candamage the items, greatly reducingtheir holding
power.
• Thisproduct isintended forindoor use only.Useof thisproduct outdoorscouldlead to productfailure andpersonal injury.
• Thisproduct was designed and intendedtobe mounted to the followingsupportingsurfaces checked below with the
hardware included in this product as specified in the installation sheet.To mount this product to an alternative support-
ing surface, contact customer care at 1 800 865-2112.
• This product was designed to be installed on the following wall construction only;
WALLCONSTRUCTION ADDITIONALHARDWAREREQUIRED
xWood Stud None
xWoodBeam None
xSolidConcrete None
xCinderBlock None
MetalStud Do not attach except with Peerless accessory kit for metal studs;
Contact Customer Service for Peerless accessory kit for metal studs.
Brick ContactCustomer Service(not evaluated byUL)
Other or unsure? ContactCustomer Service
WARNING
(notevaluatedby UL)

3 of 7 ISSUED: 03-26-10 SHEET #: 125-9106-3 08-04-10
F
Tools Needed for Assembly
•studfinder("edgetoedge"studfinder is recommended)
•phillipsscrewdriver
•drill
•1/4" bit for concrete and cinder block wall
•5/32" bit for wood stud wall
•level
Accessories
•4 piece Metal Stud Fastener Kit (ACC 415) (Not UL listed)
C
A
BDE
J
Before you begin, make sure all parts shown are included with your product.
Parts may appear slightly different than illustrated.
IGH
KL
M
PARTS LIST
#traP.ytQnoitpircseD
A
7971-0021etalpllaw
B4071-1021tekcarbtlittfel
C3071-1021tekcarbtlitthgir
D30C-510-1S54wercsdoow5.2
x41#
E0230-0954rohcnaetercnoc
F6" - 4 mm security allen wrench 1 560-9646
G0501-0254wercsniptekcosmm21x6M
H4559-0254wercsniptekcosmm0
2x6M
I6301-0854rehsawitlum
J8601-0254wercsniptekcosmm51x8M
KM5 x 6 mm socket pin serrated washer head screws 8 510-1114
L1171-1022stekcarbnoisnetxe
M5411
-0651hcnerwnellaytirucesmm4-"41

4 of 7 ISSUED: 03-26-10 SHEET #: 125-9106-3 08-04-10
Wall plate (A) can be mounted to two studs that are 16" apart. Use a stud finder to locate the edges of the studs.
Useofanedge-to-edgestudfinderishighlyrecommended.Based on their edges, draw a vertical line down each
stud’s center. Place wall plate on wall as a template. Level plate, and mark the center of the four mounting holes.
Make sure that the mounting holes are on the stud centerlines. Drill four 5/32" (4 mm) dia. holes 2-1/2" (65 mm)
deep. Make sure that the wall plate is level, secure it using four #14 x 2.5" wood screws (D) as shown in figure 1.2.
Skip to step 2 on page 6.
Installation to Double Wood Stud Wall
1
• Installermust verify that the supporting surface willsafelysupport the combined load of the equipment andall attached
hardwareandcomponents.
• Tightenwood screws so that wall plateisfirmly attached, but do not overtighten.Overtightening can damage the
screws,greatly reducing theirholding power.
• Never tighten in excess of 80 in. • lb (9 N.M.).
• Make sure that mounting screws are anchored into the center of the stud. The use of an "edge to edge" stud finder is
highlyrecommended.
• Hardwareprovided is for attachment ofmount through standard thickness drywallor plaster into wood studs.Installers
areresponsible to providehardware for othertypes of mounting situations(not evaluated byUL).
WARNING
fig. 1.1
D
A
STUD

5 of 7 ISSUED: 03-26-10 SHEET #: 125-9106-3 08-04-10
Installation to Solid Concrete or Cinder Block
1Make sure that wall plate (A) is level, use it as a
template to mark four mounting holes. Drill four 5/16"
(8 mm) dia. holes to a minimum depth of 2.5" (64
mm). Insert anchors (E) in holes flush with wall as
shown(right). Place wall plate over anchors and
secure with #14 x 2.5" screws (D). Level, then
tightenall fasteners.
• When installing this wall mount on cinder block, verify that you have a minimum of 1-3/8" of actual concrete thickness
in the hole to be used for the concrete anchors. Do not drill into mortar joints! Be sure to mount in a solid part of the
block, generally 1" minimum from the side of the block. Cinder block must meetASTM C-90 specifications. It is
suggested that a standard electric drill on slow setting is used to drill the hole instead of a hammer drill to avoid
breakingout the back of the hole whenenteringa void or cavity.
• Concrete must be 2000 psi density minimum. Lighter density concrete may not hold concrete anchor.
• Makesurethatthe supporting surface will safely support the combined load of the equipment and all attached hard-
wareand components.
WARNING
• Always attach concrete anchors directly to load-
bearingconcrete.
• Neverattach concreteanchors to concretecovered
withplaster, drywall, or other finishingmaterial. If
mountingto concrete surfacescoveredwith a finishing
surfaceis unavoidable(not evaluatedby UL), the
finishingsurface must becounterbored as shown
below. Be sure concrete anchors do not pull away
fromconcrete when tightening screws.If plaster/
drywall is thicker than 5/8", custom fasteners must be
supplied by installer. (not evaluated byUL)
WARNING
• Tighten screws so that wall plate is firmly attached,
but do not overtighten. Overtightening can damage
screws, greatly reducing their holding power.
• Never tighten in excess of 80 in. • lb (9 N.M.).
WARNING
D
A
E
solid concrete cinder block
CUTAWAY VIEW
INCORRECT CORRECT
wall
plate
wall
plate
plaster/
drywall
plaster/
drywall
concrete concrete
1
3
2
E
Drill holes and insert anchors (E).
Place plate (A) over anchors (E) and secure with screws (D).
Tighten all fasteners.
A
E
D
concrete
surface

6 of 7 ISSUED: 03-26-10 SHEET #: 125-9106-3 08-04-10
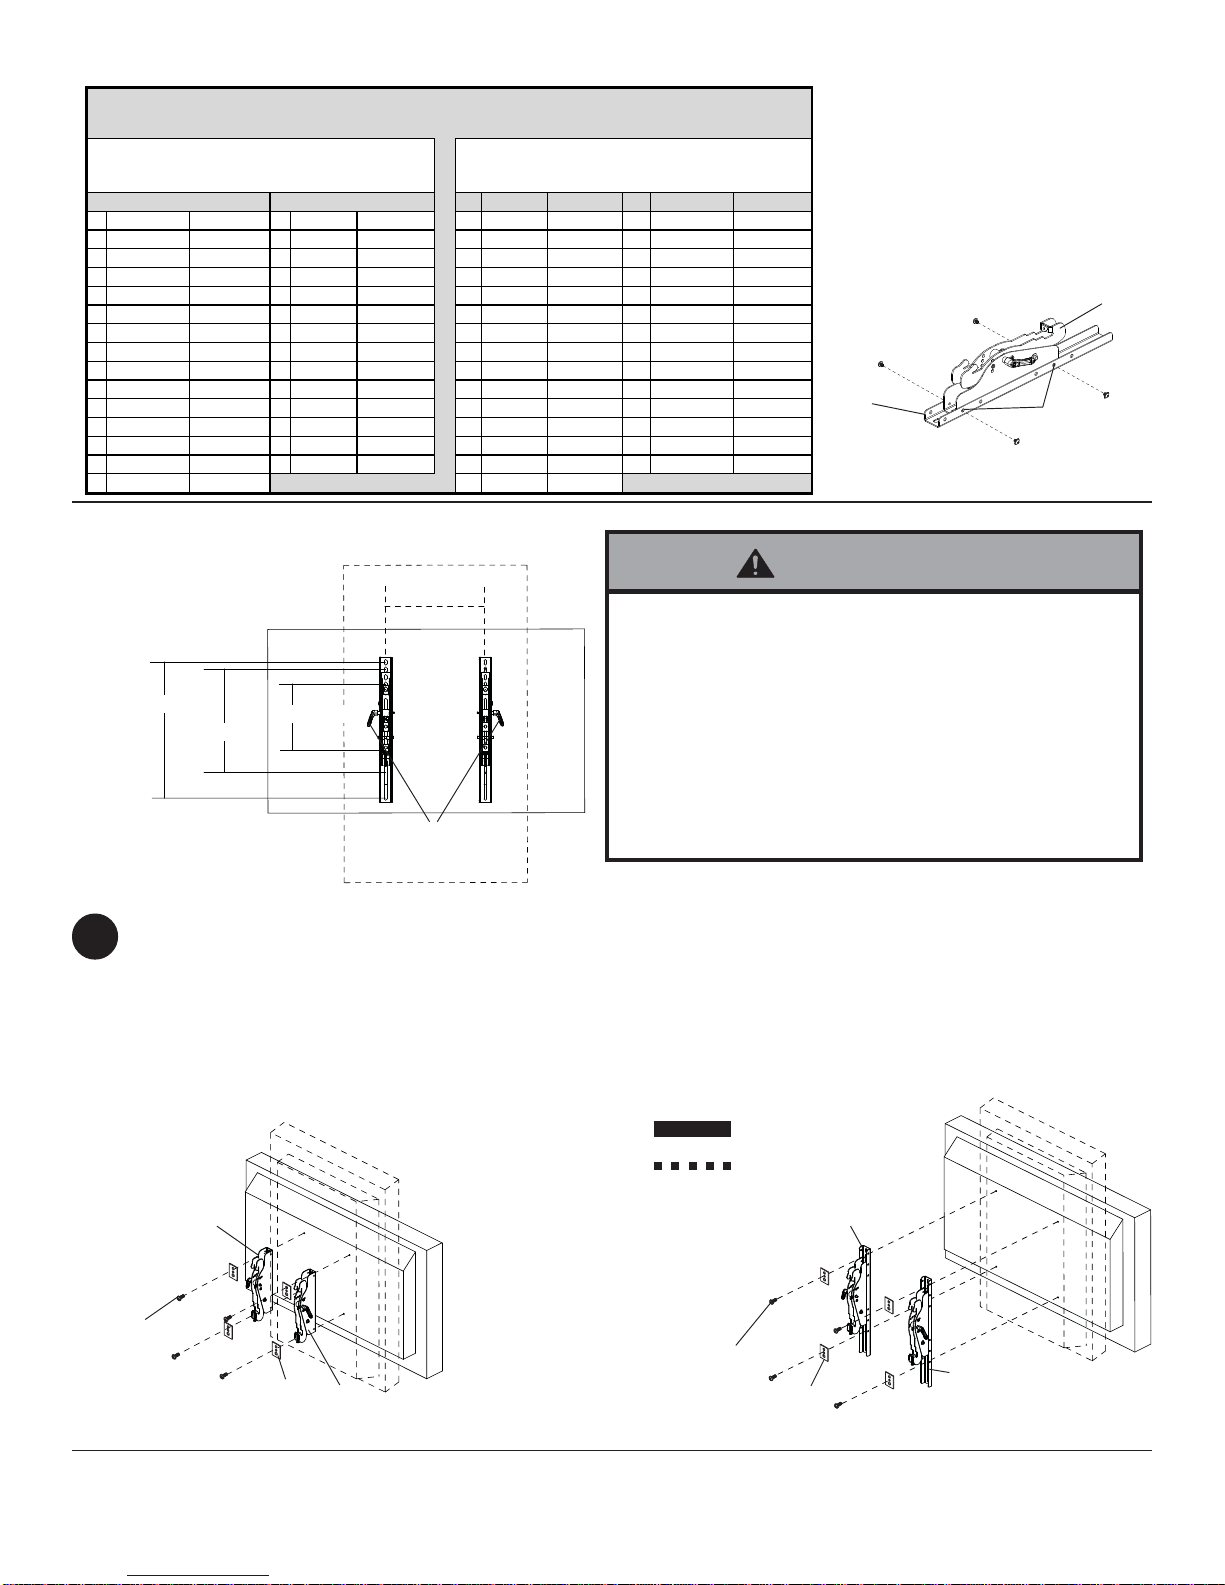
LANDSCAPEPORTRAIT
RecommendedHolePatternRecommendedHolePattern
A200mmX200mmC400mmX400mmA200mmX200mmC400mmX400mm
B300mmX300mm D400mmx200mm B300mmX300mm D200mmx400mm
ScreenScrewSize ScreenScrewSize ScreenScrewSize ScreenScrewSize
AASPV32 M6x12 BP401 M6x12 AASPV32 M6x12 BP401 M6x12
AASPV40 M6x12 BP461 M6x12 AASPV40 M6x12 BP461 M6x12
AE321 M6x12 CP521 M6x12 AE321 M6x12 CP521 M6x12
DE421 M6x12 CP551 M6x12 DE421 M6x12 CP551 M6x12
DE461 M6x20 BS401 M6x12 DE461 M6x12 BS401 M6x12
ALCD3210 M6x12 BS461 M6x12 ALCD3210 M6x12 BS461 M6x12
ALCD3215 M6x12 CS521 M6x12 ALCD3215 M6x12 CS521 M6x12
DLCD4020 M6x12 ASC40 M6x12 DLCD4020 M6x12 ASC40 M6x12
DLCD4215 M6x12 ASC46 M6x12 DLCD4215 M6x12 ASC46 M6x12
DLCD4615 M6x12 DV321 M6x12 DLCD4615 M6x12 DV321 M6x12
DLCD4620 M6x12 DV421 M6x12 DLCD4620 M6x12 DV421 M6x12
CLCD5220 M6x12 DV461 M6x12 CLCD5220 M6x12 DV461 M6x12
DLCD5710 M8x15 BX461HB M6x12 DLCD5710 M8x15 BX461HB M6x12
DM40 M6x12 BX461UN M6x12 DM40 M6x12 BX461UN M6x12
DM46 M6x12 DM46 M6x12
To prevent scratching the screen, set a cloth on a flat, level surface that will support the weight of the screen. Place
screen face side down. If screen has knobs on the back, remove them to allow the tilt brackets to be attached. Place
tilt brackets (B and C) on back of screen as shown in fig. 2.2. Note: Be sure to attach tilt brackets with handles facing
outward as in figure 2.2.Align tilt brackets to screen mounting holes as recommended by chart below.Attach the tilt
brackets to the back of the screen using the appropriate combination of screws, either M6 x 12 mm socket pin screw
(G), M6 x 20 socket pin screw (H) or M8 x 15 mm socket pin screw (J) and multi-washers (I) as shown in figures 2.3
and 2.4. Verify that all holes are properly aligned, and then tighten screws using security allen wrench (F).
2
Installing Tilt Brackets
Use Chart to Determine Orientation and Screws
Portrait
Landscape
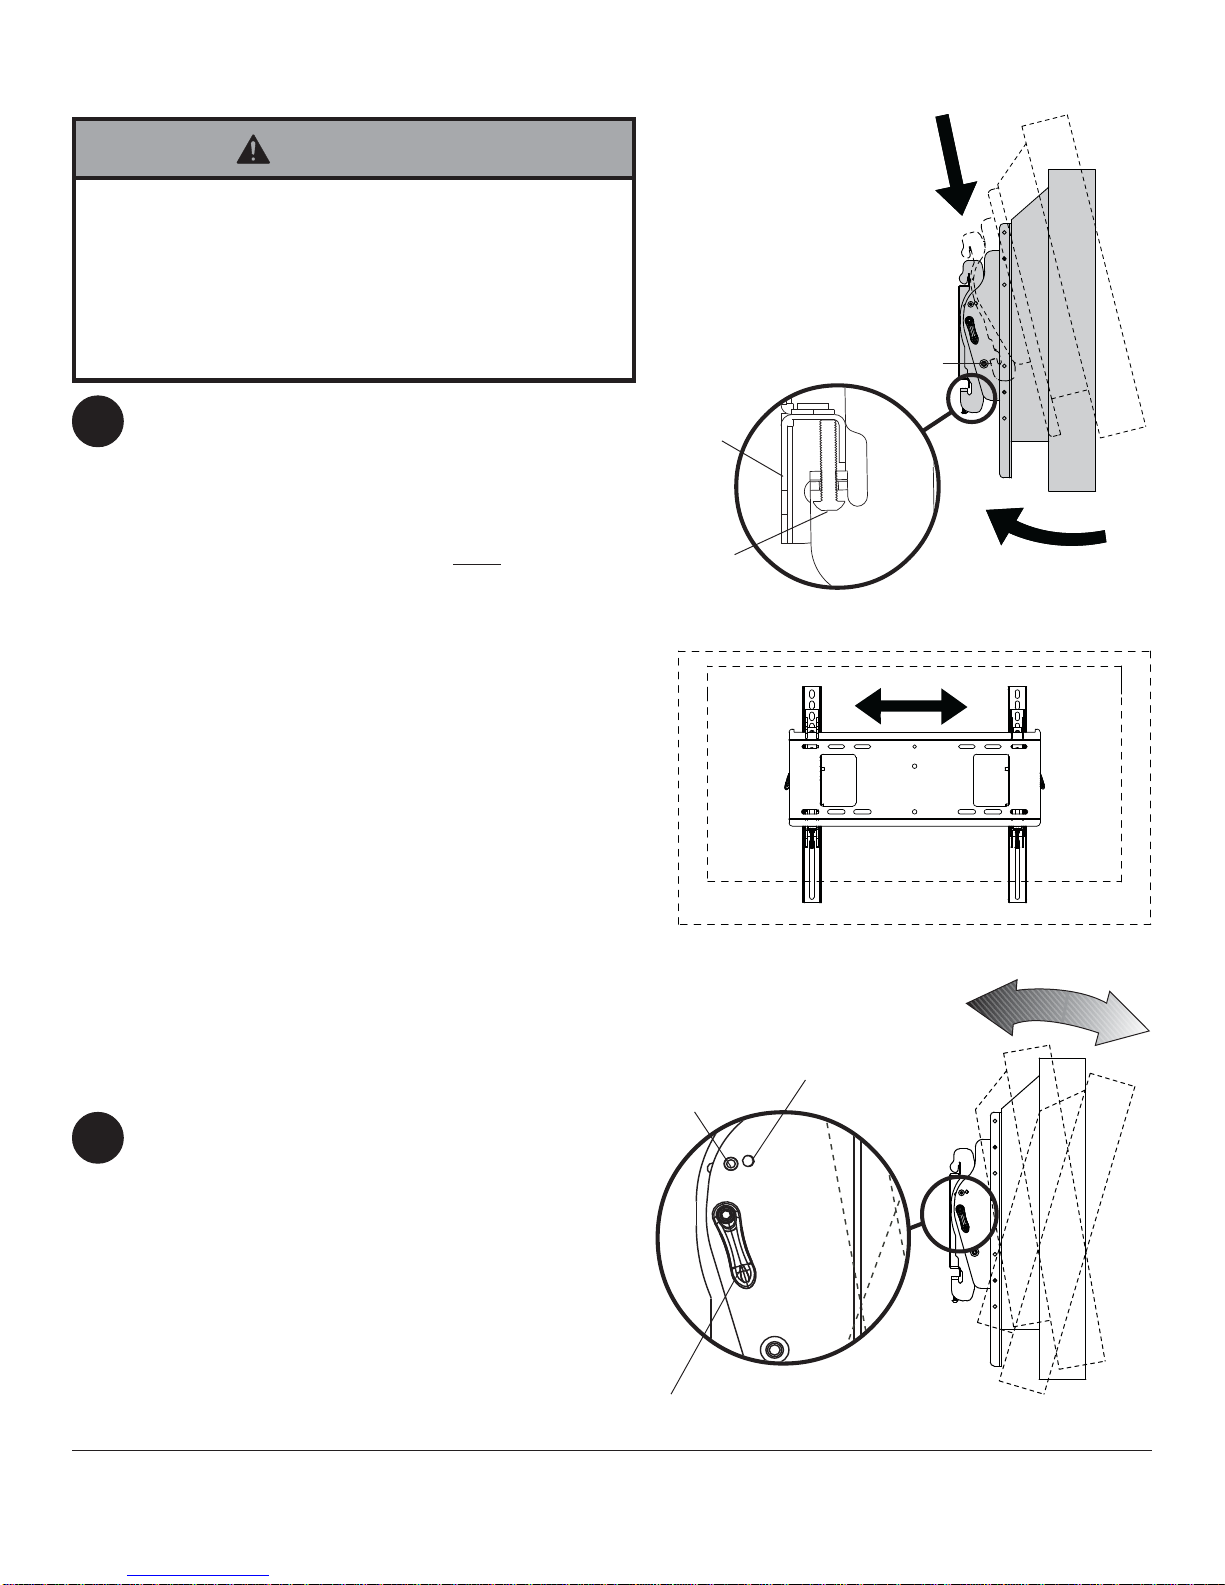
USINGEXTENTIONBRACKETS
USING TILT BRACKETS ONLY
HANDLES
FACEOUT
Secure extension brackets (L) to left
tilt bracket (B) with four M5 x 6 mm
socketpin serrated washer head
screws(K).
Height of tilt brackets may be
adjustedusing holesabove and
belowcenter mounting location
holes.
NOTE: Repeatusing right tilt
bracket(C).
• Tightenscrews so adapter brackets are firmly
attached. Do not tighten with excessive force.
Overtighteningcan cause stress damage to screws,
greatlyreducing their holdingpower and possibly
causingscrew heads to become detached. Tightento
40 in. • lb (4.5 N.M.) maximum torque.
• If screws don't get three complete turns in the screen
inserts or if screws bottom out and bracket is still not
tightly secured, damage may occur to screen or
productmay fail.
WARNING
MAX Distance 400 mm
USETILTBRACKETONLY
WHENMOUNTINGTO
SCREENUSING200X200
fig 2.4
fig 2.3
fig 2.2
fig 2.1
*Use multi-washers (I) to attach tilt
brackets (B and C) to your screen
when using M6 x 12 mm socket pin
screw (G), M6 x 20 socket pin
screws(H).
M8screws do not require
multi-washers(I)G, H
or J
B
C
I*
G, H
or J I*
B
C
LKB
400mm 200mm
300mm
CENTER
MOUNTING
LOCATIONS

7 of 7 ISSUED: 03-26-10 SHEET #: 125-9106-3 08-04-10
©2009,PeerlessIndustries,Inc.Allrightsreserved.
Allotherbrandandproductnamesaretrademarksorregisteredtrademarksoftheirrespectiveowners.
Mounting and Removing Flat Panel Screen
DETAIL 2 fig 4.1
For preset tilt angles use Increlok™ and for custom tilt
angleuseratchet handle.
INCRELOK™:The screen can be locked into a
pre-set tilt position of -5°, 0°, 5°, 10°or 15°. Use
locator hole to find tilt position hole and tilt screen to
align holes. Tighten IncreLok™ tilt locking screws on
both tilt brackets to lock tilt as shown in detail 2.
Ratchet Handle: Loosen ratchet handle (refer to step
3 for tension adjustment of handle). Push or pull from
top or bottom of screen to adjust tilt as shown in figure
4.1. The tilt can be adjusted to a maximum of 15°
forwardor 5°backward.
TensionAdjustment of Ratchet Handle:Adjust
tension in tilt brackets (B & C) by rotating ratchet
handle. NOTE:If obstructionprevents ratchet handle
fromrotating, pull handle out while turning will allow
handleto reposition without tightening. Release and
turn handle to tighten or loosen.
Mounting Screen: Ratchet handle must be in the up or
down position or interference will occur while hooking tilt
brackets to wall plate (A). Slowly hook tilt brackets (B
& C) onto wall plate (A) and swing screen down as
shown in fig. 3.1. Tilt bracket hooks must fully engage
wall plate. Using phillips screw driver or security allen
wrench (F), turn safety/security screws on tilt brackets
(B & C) clockwise till screw tip securely contacts wall
plate as shown in cross section.
Screen Adjustment: Screen can be adjusted
horizontally by loosening safety/security screws on tilt
brackets (B & C) three full turns.Adjust screen as
shown in figure 3.2. Tighten safety/security screws on
tilt brackets till screw tip securely contacts wall plate
as shown in cross section.
Removing Screen: To remove screen from mount,
loosen safety screws, swing screen away from mount,
and lift screen off of mount.
3
Adjusting the Tilt Angle of the Flat
Panel Screen
4
• Always use an assistant or mechanical lifting equipment
to safely lift and position the flat panel screen.
• Donot tighten screwswith excessive force. Overtightening
can cause damage to mount. Tighten screws to 40 in. • lb
(4.5N.M.) maximum torque.
• Becareful not to pinch fingerswhen pushing screen from
the bottom.
WARNING
fig 3.2
IncreLok™
TILTLOCKING
SCREW
SAFETY/
SECURITY
SCREWCROSS SECTION
AB
&
C
fig 3.1
RATCHET
HANDLE
LOCATOR
HOLE
RATCHET
HANDLE
Visit the Peerless Web Site at www.peerlessmounts.com For customer care call 1-800-729-0307 or 708-865-8870.
Other manuals for E321
2
This manual suits for next models
28
Table of contents
Other NEC TV Mount manuals