NEC PF32W01 User manual

SWITCHING THE SET ON AND OFF
1
CONTENTS
CCOOLLOOUURRTTEELLEEVVIISSIIOONN
LLIMPORTANT SAFETY INSTRUCTIONS 2
LLPREPARATION 4
LLSAFEGUARDS 6
LLIDENTITY OF FEATURES ON LOCAL AND REMOTE CONTROL 7
LLINSTALLATION
-Inserting Batteries into the Remote Control Unit 9
-Aerial connection 9
-Mains connection 9
-Connecting the External Equipment 10
-Switching the set on and off 11
-On screen display menu 11
-Language selection 12
-Automatic Tuning the TV Channels 12
-Program Edit 13
-Manual Channel Setting 14
-Fine tuning 15
-Tilt 15
LLDAILY USE
-Recall 16
-Selecting a Program Number 16
-Picture Control 16
-Sound Control 17
-Timer 20
-Screen Format 21
-Still 21
LLTELETEXT 22
LLTROUBLESHOOTING 24
LLSPECIFICATIONS 25
LLNEC SERVICE CENTRES 26

2
CCOOLLOOUURRTTEELLEEVVIISSIIOONN
CAUTION: TO REDUCE THE RISK OF ELECTRIC
SHOCK, DO NOT REMOVE COVER (OR BACK).
NO USER SERVICEABLE PARTS INSIDE. REFER
SERVICING TO QUALIFIED SERVICE PERSONNEL.
This symbol indicates high voltage is
present inside. It is dangerous to
make any kind of contact with any
internal part of this product.
This symbol alerts you that
important literature concerning
operation and maintenance has been
included with this product.
To prevent damage which may result in fire or
electric shock hazard, do not expose this appliance
to rain or moisture.
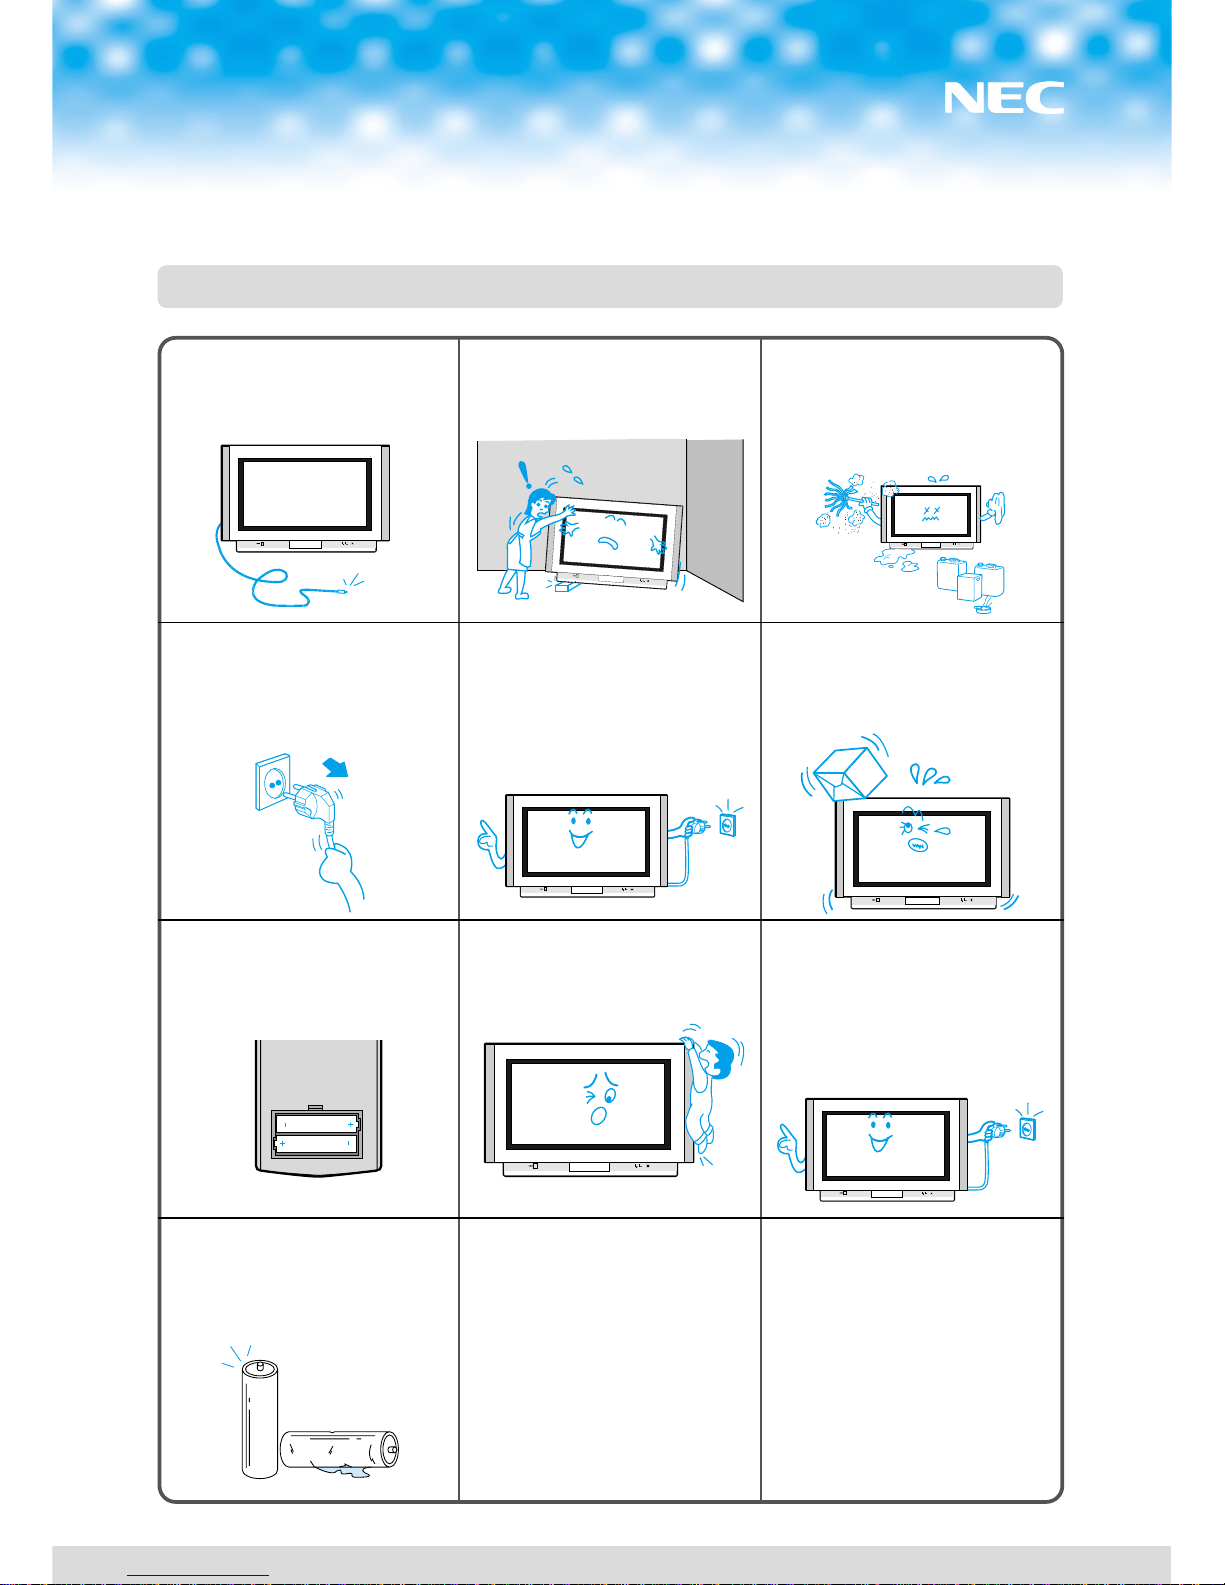
Important safety information
Always be careful when using your TV
receiver. To reduce the risk of fire, electrical
shock, and other injuries, keep these safety
precautions in mind when installing, using,
and maintaining your machine.
• Read all safety and operating instructions
before operating the TV receiver.
• Retain the safety and operating
instructions for future reference.
• Heed all warnings on the TV receiver and
in the operating instructions.
• Follow all operating and use instructions.
• Unplug the TV receiver from the wall
outlet before cleaning. Use a damp cloth;
do not use liquid or aerosol cleaners.
• Never add any attachments and/or
equipment without approval of the
manufacturer. Such additions may result in
the risk of fire, electric shock, or other
personal injury.
• Do not use the TV receiver where contact
with or immersion in water is a
possibility, such as near bath tubs, sinks,
washing machines, swimming pools, etc.
• Provide ventilation for the TV receiver.
The unit is designed with slots in the
cabinet for ventilation to protect it from
overheating. Do not block these openings
with any object. Do not place it near a
radiator or heat register.
• Operate your TV receiver only from the
type of power source indicated on the
marking label. If you are not sure of the
type of power supplied to your home,
consult your appliance dealer or local
power company.
• Protect the power cord. Power supply
cords should be routed so that they are
unlikely to be walked on or pinched by
items placed on or against them. Pay
particular attention to cords at plugs,
convenience receptacles, and the point
where they exit from the unit.
• Unplug the TV receiver from the wall
outlet and disconnect the antenna or
cable system during a lightning storm or
when left unattended and unused for long
periods of time. This will prevent damage
to the unit due to lightning and power-
line surges.
Important safety instructions

3
CCOOLLOOUURRTTEELLEEVVIISSIIOONN
• Avoid overhead power lines. An outside
antenna system should not be placed in the
vicinity of overhead power lines or other
electric light or power circuits or where it
can fall into such power lines or circuits.
When installing an outside antenna system, be
extremely careful to keep from touching the
power lines or circuits. Contact with such
lines can be fatal.
• Do not overload the wall outlet or extension
cords. Overloading can result in fire or
electric shock.
• Do not insert foreign objects through
openings in the unit, as they may touch
dangerous voltage points or damage parts.
Never spill liquid of any kind on the TV
receiver.
• Do not attempt to service the TV receiver
yourself. Refer all servicing to qualified
service personnel. Unplug the unit from the
wall outlet and refer servicing to qualified
service personnel under the following
conditions:
– when the power-supply cord or plug is
damaged
– if liquid has been spilled on or objects
have fallen into the unit
– if the TV receiver has been exposed to rain
or water
– if the TV receiver does not operate
normally by following the operating
instructions
– if the TV receiver has been dropped or the
cabinet has been damaged
– when the TV receiver exhibits a distinct
change in performance
If you make adjustments yourself, adjust only
those controls that are covered by the
operating instructions. Adjusting other
controls may result in damage and will often
require extensive work by a qualified
technician to restore the TV receiver to
normal.
• When replacement parts are required, be sure
the service technician uses replacement parts
specified by the manufacturer or those that
have the same characteristics as the original
part. Unauthorized substitutions may result in
additional damage to the unit.
• Upon completion of any service or repairs to
this TV receiver, ask the service technician to
perform safety checks to determine that the
TV receiver is in a safe operating condition.

4
CCOOLLOOUURRTTEELLEEVVIISSIIOONN
• When a problem occurs,
immediately stop all operations.
•
Do not place any liquid container on top
of the TV. If water spills into the TV, a
short-circuit may occur which could
result in fire or electric shock.
• Do not place any objects on top of the
TV. If any foreign objects get inside, it
can cause damage to or premature
failure of the unit.
•
When installing this unit on a wall or
ceiling, please consult an Authorized
Service Center. Improper mounting
can result in personal injury or
damage to the unit.
•
During a lightning storm, do not
touch the unit. Doing so may result
to an electric shock.
•
Do not place the TV on sloped or
unstable surfaces. The unit may fall
off or tip over causing injury and
damage.
•
Do not do anything that might
damage the power cable.
Damaging the power cable may
result in fire or electric shock.
•
Do not handle the power cord with
wet hands. Doing so may cause
electric shocks.
•
Do not overload wall outlets and
extension cords. Doing so may
result in power failure.
•
Do not make any modifications.
(Never attempt to disassemble this
unit yourself) The internal
components of this unit is high
voltage which may cause electric
shocks.
•
Do not place the TV in sunlight or
near heating units. Doing so may
cause damage to or cause premature
failure of the unit.
•
Do not cover the ventilation holes.
Doing so may cause the TV to
overheat, which can cause fire or
damage to the internal components.
Preparation
IMPORTANT SAFETY INSTRUCTIONS

5
CCOOLLOOUURRTTEELLEEVVIISSIIOONN
•
Do not pull or hang the connecting
cable. Any damage to the cable can
result in electric shocks or fire.
•
Do not rest the TV on top of other
objects.
•
Do not place the TV in a humid or dusty
place or any place near oil, smoke or
steam. Built-up dust can increase
humidity which might damage the
insulation and cause fire.
•
Do not pull the power cord to
remove the power plug from the wall
outlet. Doing so can cause fire or
electric shock.
•
If the TV is not in use for a long
period of time, unplug the power
cord from the wall outlet. It will
conserve electricity.
•
Do not place any heavy objects on
the unit. If any foreign objects get
inside, please consult an Authorized
Service Center.
•
When inserting batteries, to ensure
proper installation, check the
polarity.
•
Do not lean or step on the TV.
•
Be sure to disconnect all cables
before moving the TV. Moving the
unit with its cables attached might
damage the cables which, in turn,
can cause fire or electric shock.
•
Do not combine a used battery with
a new one. Batteries should always
be replaced as a pair. Always use
new batteries when replacing the old
set.
SAFETY PRECAUTIONS

6
SAFEGUARDS
Water and Moisture: Never install the set in the following places : in the bathroom, in a wet basement.
Do not place any containers with liquid (e.g. flower vases) on the set.
Heat : Never place the set near heat sources(e.g. radiator).
Ventilation : Do not cover the ventilation openings in the cabinet.
Never place the set in a confined space such as a bookcase or built-in cabinet,unless
proper ventilation is provided.
Object Entry : Do not insert foreign objects, such as needles and coins, into the ventilation openings.
Lightning Strike : You should disconnect your set from the mains and the aerial system during
thunderstorms.
Cleaning : Unplug the set from the mains before cleaning.
Connecting to External Equipment : Turn the power off before connecting, to prevent electric discharge
CCOOLLOOUURRTTEELLEEVVIISSIIOONN
- The appliance is not intended for use by young children or infirm persons without supervision;
- Young children should be supervised to ensure that they do not play with the appliance.
- The surface of the TV screen is coated with a thin film which can easily be damaged.
Be very careful with it when handling the TV.
- Should the TV screen become soiled, wipe it with a soft dry cloth.
Never rub it forcefully.
Never use any cleaner or detergent on it.

TOP PANEL CONTROLS AND FRONT PANEL LIGHTS
7
IDENTITY OF FEATURES ON LOCAL AND REMOTE CONTROL
CCOOLLOOUURRTTEELLEEVVIISSIIOONN
SIDE PANEL INPUTS
MENU TV/VIDEO MUTE
123 4
1. On/Off
2. Timer Indicator
3. Power Indicator
4. Remote Control Signal Sensor
VIDEO
AUDIO
R
L
S-VIDEO
VIDEO
INPUT
AUDIO
INPUT
S-VHS
INPUT

SWITCHING THE SET ON AND OFF
REAR
REMOTE CONTROL
8
CCOOLLOOUURRTTEELLEEVVIISSIIOONN
Manufactured under license from Dolby Laboratories.
"Dolby", “Pro Logic”, and the double D symbol
are trademarks of Dolby Laboratories.
TV TXT
VOLUME VOLUME
DOWN DOWN
(CURSOR LEFT)
MENU MENU
POWER POWER
PR NUMBER PAGE NUMBER
0-9 0-9
SLEEP NOT USED
NOT USED HOLD
NOT USED CANCEL
STILL REVEAL
RECALL SUBPAGE
NOT USED R
NOT USED G
TV TXT
PR UP PAGE UP
(CURSOR UP)
VOLUME UP VOLUME UP
(CURSOR RIGHT)
PR DOWN PAGE DOWN
(CURSOR DOWN)
NORMAL NOT USED
VIDEO NOT USED
TXT TV
SOUND MODE NOT USED
MUTE MUTE
NOT USED INDEX
NOT USED SIZE
ZOOM NOT USED
DOLBY SURROUND NOT USED
NOT USED C
NOT USED Y

9
CCOOLLOOUURRTTEELLEEVVIISSIIOONN
INSERTING BATTERIES INTO THE REMOTE CONTROL UNIT
AERIAL CONNECTION
MAINS CONNECTION
INSTALLATION
If the set is moved or placed in a different direction, the MAIN POWER button must be switched off for at least 15
minutes in order to take out a colour strain on the screen.
Press down the battery compartment grip and slide the cover.
Insert the batteries supplied (two 1.5V, type AAA).
Make sure that the polarity matches with the (+) and (-) marks inside of the battery compartment.
For better picture and sound quality, an effective aerial installation is the most important.
When using an outdoor aerial, it is usually connected to the set by means of 75 ohm coaxial cable.
Plug the mains cable into the power socket with 220V - 240V / 50Hz AC.

CONNECTING EXTERNAL EQUIPMENT
10
CCOOLLOOUURRTTEELLEEVVIISSIIOONN
When connecting other equipment, please ensure you turn the main switch OFF to
prevent any damage to the equipment.
AV1 & AV2 & AV3 & DVD(COMPONENT)
Press the TV/VIDEO button on the remote controller or on the top panel of the set.
The on-screen display will change as shown:
AV1 -> AV2 -> AV3 -> DVD -> TV
The "AV1" will be displayed on the screen with the current program number.
In AV mode, you can change the TV program number with the UP/DOWN button or the number
button 0..9.
*Vertical Synchronization by means of 100 Hz Scan.might be unstable in REW and CUE Function
with only 2-Head VCR.
AV 1, 2, 3 is used to connect a VCR, a CAMCODER, or S-video camcoder. Component is used to
connect a DVD.
AV out from component input will be black and white
External Surround Speaker Jack
You can connect external speakers ( impedance : 8 ohm, nominal output power : more than
5watts.) to this jack for improved sound quality.
Make sure that the polarity matches with the (+) and (-) mark on the speaker.
•VCR RCA INPUT
•VCR S-VIDEO INPUT
VCR DVD
•DVD COMPONENT INPUT
•DVD RCA INPUT
(No Component INPUT)
•DVD S-VIDEO INPUT
COMPONENT INPUT
Y
Cb
Cr
L
R
V
L
R
AV1
IN AV2
IN
S-VIDEO 1 S-VIDEO 2
AV
OUT
RS
8‰/5W LS
8‰/5W
Manufactured under license from Dolby Laboratories.
"Dolby", Pro Logic , and the double D symbol
are trademarks of Dolby Laboratories.
S-VIDEO
+
AUDIO OUT AV OUT AV OUT
S-VIDEO
+
AUDIO OUT
COMPONENT
+
AUDIO OUT

SWITCHING THE SET ON AND OFF
ON SCREEN DISPLAY MENU
11
Switching On
•Switch the set on with the MAIN POWER (ON/OFF) button.
The INDICATOR will illuminate in Red.
That means the set is on stand-by mode.
•Press PR UP or DOWN button on the Top of set or POWER button( ) or PR UP/DOWN button or
one of the NUMBER button (0..9) on the remote controller.
The set will be switched on and then the INDICATOR will be changed in Green from Red.
Switching Off
•Press POWER button( ) on the remote controller to return the set to its stand-by mode.
•If you don't use the set for extended periods of time, turn it off with MAIN POWER (ON/OFF) button .
The MENU button ( ) on the remote controller is
used to call up the Main menu and also to return
to either the Main menu or a previous menu.
The PR UP / DOWN buttons on the remote
controller or on the Top of the set are used to
move the selection bar up or down the menus,
change data.
The Volume ( ) UP button on the remote
controller or on the Top of the set are used to call
up sub-menus, adjust levels.
CCOOLLOOUURRTTEELLEEVVIISSIIOONN
Menu
Sound
Timer
Language
Install
Picture
Position Access
Return
M

12
CCOOLLOOUURRTTEELLEEVVIISSIIOONN
LANGUAGE SELECTION
•Press the Menu button to call up the Main menu.
•Move the selection bar to the Language with UP or DOWN button.
•Press the VOLUME UP button.
Then the languages will be displayed.
•Press the UP/DOWN button to choose the language you want .
•Press the MENU button to return to Main Menu .
AUTOMATIC TUNING THE TV CHANNELS
Install
Manual Tune
Fine Tune
Edit
Tilt
Auto Setup
Position Start
Return
M
Deutschland
France
Italia
Sverige
Switzerland
Nederland
Ireland
Espa a
East Europe
Australia
Others
Great Britain
Auto Setup C02 Pr01
Please wait!
•Call up the Install menu from the Main menu.
•Place the selection bar on Auto setup and press the
RIGHT button.
Then the country names will be displayed.
•Place the selection bar on the country you require
with UP/DOWN button.
•Press the RIGHT button.
Auto setup will begin, your stations will be located
and stored.
•Please wait until the Edit menu appears.
If you don’t want to edit program now, escape from
menu with the MENU button.
You can edit it later.
Warning:
This television has been factory pretuned to channels 2, 7, 9, 10 and 28.
If the auto search function is activated, these preset channels will be
deleted and channels tuned to 1, 2, 3 ETC..

13
CCOOLLOOUURRTTEELLEEVVIISSIIOONN
PROGRAM EDIT
The EDIT menu shows you information as follows:
- Program position assignment : Program number and
Station name, Real channel number
- Picture information : PAL, SECAM, SECAM-F
- Sound information : B/G, L/L’, I, D/K
- Skip information : YES, NO
NB: Terrestrial transmissions in Australia are PAL - B/G.
I.E. picture information is PAL.
sound information : B/G
•Press Menu Button.
•Press the selection bar to Install with
UP/DOWN button, then press RIGHT button.
•Press the selection bar to Edit with
UP/DOWN button, then press RIGHT button.
DELETING THE PROGRAM POSITIONS
•Position the selection bar to program number to delete
with the UP/DOWN buttons.
Note that you can move the selection bar when the
cursor is on the Pr ( program no. ).
•Press the DELETE (Yellow) button.
MOVING THE PROGRAM POSITIONS
•Position the selection bar to program number you want
to move.
•Press the MOVE(Green) button. The colour of
selection bar will be changed in Purple from Blue.
•Position the new blue selection bar to new program
number.
•Press the MOVE(Green) button.
SKIPPING THE CHANNELS
•Select SKIP "YES" or "NO" with the SKIP (Red) button.
You can also use the UP/DOWN button after moving the
cursor to Skip.
•The program marked with SKIP "YES" is skipped when
changing channel using the UP / DOWN button.
A skipped program number can be selected using the
NUMBER button 0..9, will be displayed in Cyan.
ENTER A STATION NAME
•Move the cursor to Name.
Then a letter from the Alphabet, Number and symbols
will appear.
•You can enter a station name with the UP / DOWN and
LEFT/RIGHT buttons.
Position Skip
Cursor Move
Return Delete
M
Edit
Pr Name Ch Picture Sound Skip
02 ----- C07 France L/L’No
03 ----- C11 SECAM D/K No
04 ----- C25 PAL I No
05 ----- C35 PAL I No
06 ----- C50 SECAM D/K Yes
07 ----- C50 SECAM D/K Yes
FR1-- C02 PAL B/G No
01
Position Skip
Cursor Move
Return Delete
M
Edit
Pr Name Ch Picture Sound Skip
02 ----- C07 France L/L’No
03 ----- C11 SECAM D/K No
05 ----- C35 PAL I No
06 ----- C50 SECAM D/K Yes
07 ----- C50 SECAM D/K Yes
01 FR1-- C02 PAL B/G No
----- C25 PAL I No
04
Adjust Skip
Cursor Move
Return Delete
M
Edit
Pr Name Ch Picture Sound Skip
02 ----- C07 France L/L’No
03 ----- C11 SECAM D/K No
04 ----- C25 PAL I No
05 ----- C35 PAL I No
06 ----- C50 SECAM D/K Yes
07 ----- C50 SECAM D/K Yes
01 FR1-- C02 PAL B/G No
ABCDEFGHIJKLMNOPQRST
UVWXYZ+-. 0 23456789
1
1

14
CCOOLLOOUURRTTEELLEEVVIISSIIOONN
MANUAL CHANNEL SETTING
•Press the NUMBER buttons (0..9) or the UP / DOWN
button to select a program number you want.
•Locate the selection bar on the Manual tune at the
Install menu.
•Select the system with Picture(Cyan) button.
Select the "SECAM-F" for a French stations and
"PAL or SECAM" for the others.
•Press the RIGHT or LEFT button.
A tuning screen will appear and a cursor will move
from left to right / from right to left.
If you want to stop tuning, press the MENU button.
After searching a station, the tuning screen will
disappear and then the channel will be memorized
automatically.
SEARCHING A CHANNELS IN THE EDIT MENU
You can also search a channel at the Edit menu.
Refer to page 13 about program Edit.
•Position a selection bar to Pr number you want.
•Position the cursor to the Picture with LEFT / RIGHT button.
•Select the system (PAL or SECAM, SECAM-F) of channel you want to search
with the UP / DOWN button.
•Position the cursor to C(or S) entry position with LEFT / RIGHT button.
For special channels, select the "S" with UP / DOWN button.
Position the cursor to channel number entry position with LEFT / RIGHT button.
Search a channel with UP/DOWN button.
Position Adjust
Return Picture
M
PAL
Install
Auto Setup
Fine Tune
Edit
Tilt
Manual Tune
Install
Auto Setup
Fine Tune
Edit
Tilt
ManualTune
Manual Tune C02 Pr01
PAL
Adjust Skip
Cursor Move
Return Delete
M
Edit
Pr Name Ch Picture Sound Skip
02 ----- C07 France L/L’No
03 ----- C11 SECAM D/K No
04 ----- C25 PAL I No
05 ----- C35 PAL I No
06 ----- C50 SECAM D/K Yes
07 ----- C50 SECAM D/K Yes
01 FR1-- C PAL B/G No
02

FINE TUNING
15
If you are unable to get a good picture or sound
because of a poor broadcasting signal, it is possible to
adjust the fine tuning.
Move the selection bar to Fine tune and press the
RIGHT / LEFT button to activate fine tuning up or
down.
Note that it operates while the RIGHT / LEFT button is
being pressed.
The change is memorized automatically.
TILT
Adjust “Tilt” function.
•Press “PR”buttons to select “Tilt.
•Press the RIGHT or LEFT buttons to level a tilted
picture.
•Note: The effect of the earth’s magnetic field can
vary with location. As a result, the picture may project
on a slight tilt, or out of square alignment with the
face of the picture tube.
CCOOLLOOUURRTTEELLEEVVIISSIIOONN
Install
Auto Setup
Manual Tune
Edit
Tilt
Fine Tune
Fine Tune 493.75MHz
Position Adjust
Return
M
Install
Auto Setup
Manual Tune
Fine Tune
Edit
Tilt

16
CCOOLLOOUURRTTEELLEEVVIISSIIOONN
RECALL
SELECTING A PROGRAM NUMBER
PICTURE CONTROL
DAILY USE
The RECALL button is used to display the current status:
program number, station name, sound system, clock.
This display appear for 5 seconds.
The set has totally 100 program numbers, 0..99.
The NUMBER buttons 0..9 are used for direct program selection.
To select two-digit program, press the second numbered button within two seconds.
You can also select a program number by pressing step by step the UP/DOWN buttons.
BRIGHTNESS,CONTRAST,COLOUR, SHARPNESS
•Press the MENU button.
•Press the RIGHT button to call up the Picture menu.
•You can select each function with the UP / DOWN buttons.
•The levels of each function can be adjusted the LEFT / RIGHT buttons to suit your
viewing conditions, the lightning conditions of the room and your preference.
For Hue control Tint is displayed only when receiving a NTSC signal from external jack.
The adjusted levels are stored automatically at Favourite mode.
Smart Picture Selection
When you press the NORMAL button repeatedly you can call up three picture settings
stored in memory :
NORMAL I -> NORMAL II -> FAVOURITE ->
(hard picture) (soft picture) (user adjustable)

SOUND CONTROL
17
VOLUME CONTROL
Adjust the volume with the VOLUME( ) DOWN / UP buttons on the Top of the
set, or with the LEFT/RIGHT button on the remote control.
MUTE
Pressing the MUTE( ) button to turns the sound off.
The mute symbol will be displayed. The sound returns
if the button is pressed once more.
SOUND CONTROL
•Press the MENU button.
•Place the selection bar to the Sound with UP/DOWN button.
•Press the RIGHT button to call up Sound menu.
•Select the required function by moving the selection bar with the UP / DOWN
buttons.
•Press the RIGHT button to call up the each sub-menus.
CCOOLLOOUURRTTEELLEEVVIISSIIOONN

18
CCOOLLOOUURRTTEELLEEVVIISSIIOONN
Equalizer :
There are four possible choice considering your
preference:
"Favourite, Music, Speech, Flat".
In Favourite mode you can adjust a level at each
frequency band with LEFT/RIGHT button .
Dolby Pro Logic :
There are four possible choice considering your preference:
"Normal, Wide, 3 Stereo, Off”
Smart Sound Selection
When you press the sound effect button repeatedly,
you can call up easily one of the following: Dolby
Surround
Available only for Dolby Surround Mode.
Position Return
M
Wide
3 Stereo
Off
Normal
Sound
Equalizer
Balance
Center
Surround
Test Noise
Pro Logic
Pro Logic Settings
LL“Test Noise”
To hear a test tone that lets you hear the volume of your surround sound system, move the
cursor to “Test Noise”, and press the “VOLUME B”button. You will hear a test tone between the
left, center, right, and rear surround speakers.
When you enable the noise sequencer, it will continue in all channels until you disable it.
For the best surround quality, NEC recommends that you adjust the sound equally among all
speakers. For example, the volume of the front speakers should match
the volume of the rear speakers.
LL“Pro Logic” mode
Normal:
This mode is used when the Center speaker cannot easily and accurately reproduce the low
frequencies. The bass from the center channel is reproduced by the Left and Right (or
Subwoofer).
WIDE:
This mode is used when the Center speaker is able to
reproduce the low frequencies.
3 STEREO:
This mode should be selected when no Surround channel information will be reproduced by the
Left and Right speakers.
Manufactured under license from Dolby Laboratories. "Dolby", “Pro Logic”, and the double D symbol
are trademarks of Dolby Laboratories.
Sound
Pro Logic
Balance
Center
Surround
Test Noise
Equalizer
Position Access
Return
M
Position Adjust
Return
M
100
300
1 K
3 K
10K
Music
Speech
Flat
Favourite
Sound
Pro Logic
Balance
Center
Surround
Test Noise
Equalizer
"Favourite, Music, Speech, Flat, Normal, Wide, 3 Stereo, Off, Favourite ...”

19
CCOOLLOOUURRTTEELLEEVVIISSIIOONN
Balance :
Balance the loudness of the left and right speaker .
Center & Surround :
Adjust the Center speaker & Surround speaker
Volume with the VOLUME V/Wbuttons.
Test Noise :
Test each speaker’s sound output.
SOUND MODE
There may be cases of stereo broadcasts where excessive noise will be heard due
to weak incoming signal.
You may be able to eliminate this noise by selecting the MONO mode.
Press the Sound Mode ( ) button to change to MONO from
STEREO.
Then the "MONO" colour will be changed in Red.
Pressing this button again will change it back to stereo.
During a bilingual program transmission, pressing the Sound Mode button will
change the language to the second channel (DUAL II).
Pressing again will change it back to the main channel (DUAL I).
"Left Center Right Surround Left...”

20
CCOOLLOOUURRTTEELLEEVVIISSIIOONN
TIMER
SETTING THE CLOCK
•Position the selection bar to the Timer in the Main Menu.
•Press the RIGHT button.
•Place the cursor to Hour / Minute with LEFT /RIGHT button.
•Set the hour / minute with the UP/DOWN buttons.
•Place the cursor to Clock with LEFT/RIGHT button and then press the Menu
button to complete.
Note that if you turn the TV off with MAIN POWER (ON/OFF) button, the clock
setting is lost and must be reset if necessary.
Automatic clock setting and correction
Even though you turn the TV off with MAIN POWER (ON/OFF) button, the
clocks will be set and corrected automatically, if channel which broadcasts the
teletext is received.
This function is only available for the countries as follows:
Deutschland, Great Britain, France, Italy, Sweden,
Switzerland, Netherlands, Ireland, Australia.
SETTING THE WAKE UP TIME / PROGRAM
•Confirm the Clock is set.
Wake up time is only available when Clock is set
•Select the Wake up to "YES".
The Wake up time and Wake up prog. will be
displayed.
•Set Wake up time and prog. in a same way to the
above for Clock.
The set will switch on to this time and program
number.
Menu
Picture
Sound
Language
Install
Timer
Adjust Cursor
Return
M
Clock --:--
Time 00:05
Prog. Pr01
Wake up Yes
Table of contents
Other NEC TV manuals