nedis AIPU100CWT User manual

ned.is/aipu100cwt
Air Purifier
Suitable for: 20 m2
AIPU100CWT

aQuick start guide 4
cKurzanleitung 7
bGuide de démarrage rapide 10
dVerkorte handleiding 13
jGuida rapida all’avvio 16
hGuía de inicio rápido 19
iGuia de iniciação rápida 22
eSnabbstartsguide 25
gPika-aloitusopas 28
fHurtigguide 31
2Vejledning til hurtig start 34
kGyors beüzemelési útmutató 37
nPrzewodnik Szybki start 41
xΟδηγό γρήγορη εκκίνηση 44
1Rýchly návod 47
lRychlý návod 50
yGhid rapid de iniiere 53

1
2
4
5
6
7
3
1
2
3
4
5
6
7
8
A
B

4
aQuick start guide
Air purier AIPU100CWT
For more information see the extended manual online:
ned.is/aipu100cwt
Intended use
The product is intended to purify the air in a room.
The purier can lter the air in a room up to 20 m2.
Any modication of the product may have consequences for safety, warranty
and proper functioning.
Main parts (image A)
LED display
LED light
Air outlet
Power cable
Air inlet
Air lter
Filter cover
Interface (image B)
On/o button
Sleep mode button
Fan speed indicator
Fan speed button
Light button
Anion button
Fan speed indicator
Filter indicator
Safety instructions
-
WARNING
• Read the instructions before use.
• Only use the product as described in this manual.
• Do not use a damaged product.
• Do not connect a bound cable to the power outlet.
• Only use the product indoors.
• Do not use the product in wet or damp environments.
• Do not place the product near gas, an electric burner or a heated oven.
• Do not cover ventilation openings.

5
• Do not insert any objects into the product.
• Do not place items on top of it.
• If servicing is needed, refer to qualied personnel.
• Do not let the power cable touch hot surfaces.
• Do not use the power cable to carry the device.
• Do not unplug the product by pulling on the cable. Always grasp the plug
and pull.
Removing the packaging
1. Open A7.
2. Take out A6.
3. Remove the packaging and reïnstall A6.
4. Close A7.
4Do not place the product within 40 cm of the wall to ensure proper
operation.
5. Plug A4in a power outlet.
Using the product
1. Press B1to switch on the product.
2. Press B4to increase / decrease the fan speed.
4B3indicates the selected fan speed.
3. Optionally, choose one of the following:
• B2to select ‘sleep’.
• B6to select ‘anion’.
4Keep the windows closed while the product is switched on.
Set sleep mode
1. Press B2to select sleep mode.
4In sleep mode, the product operates as quiet as possible.
2. Press B2or B1to exit this mode.
Set anion mode
1. Press B6to select anion mode.
4The product releases millions of anions per second.
2. Press B6or B1to exit this mode.

6
Troubleshooting
Problem Solution
The product does not
switch on.
Connect to a power outlet.
Check if the power cord is damaged.
Make sure A7is closed.
The product is making
strange noises. Make sure A6is placed in the correct way.
Press B4to increase the speed
Replace A6.
Poor purication quality. Do not block ventilation openings and make sure
that there is enough space around the product.
Make sure A6is placed in the right way.
Make sure the room is smaller than 20 m2.
Replace A6.
The product spreads an
unpleasant odour.
Make sure the room has a relative humidity
below 85 %.
Replace A6.
B8illuminates after
replacing A6.
Press and hold B8for 3 seconds to reset.
Specications
Product Air purier
Article number AIPU100CWT
Dimensions (l x w x h) 215 Ø x 460 mm
Applicable area < 20 m2
Clean air delivery rate 200 m3/ h
Noise level 32 - 50 dB
Operating temperature -10 °C - 40 °C
Operating humidity < 95 % RH
Power supply 220 - 240 VAC ~ 50 / 60 Hz
Rated power 35 - 40 W
Standby power < 0.5 W

7
cKurzanleitung
Luftreiniger AIPU100CWT
Weitere Informationen nden Sie in der erweiterten
Anleitung online: ned.is/aipu100cwt
Bestimmungsgemäße Verwendung
Das Gerät dient zur Reinigung der Raumluft.
Der Luftreiniger kann die Luft in Räumen bis zu 20 m2Grundäche ltern.
Jegliche Modikation des Produkts kann Folgen für die Sicherheit, Garantie und
ordnungsgemäße Funktionalität haben.
Hauptbestandteile (Abbildung A)
LED-Display
LED-Licht
Luftauslass
Stromkabel
Lufteinlass
Luftlter
Filterabdeckung
Schnittstelle (Abbildung B)
Ein/Aus-Schalter
Sleep-Modus-Taste
Lüfterdrehzahl-Anzeige
Lüfterdrehzahl-Taste
Light Taste
Anionentaste
Lüfterdrehzahl-Anzeige
Filter-Anzeige
Sicherheitshinweise
-
WARNUNG
• Lesen Sie vor der Verwendung die Anweisungen.
• Verwenden Sie das Produkt nur wie in dieser Anleitung beschrieben.
• Verwenden Sie keinesfalls ein beschädigtes Produkt.
• Schließen Sie keine zusammengebundenen Kabel am Stromnetz an.
• Verwenden Sie das Produkt nur innerhalb von Gebäuden.
• Verwenden Sie das Produkt nicht in nassen oder feuchten Umgebungen.
• Platzieren Sie das Produkt nicht in der Nähe von Gas, einem Elektrobrenner
oder einem aufgeheizten Ofen.

8
• Verdecken Sie keinesfalls die Belüftungsönungen.
• Führen Sie keine Objekte in das Produkt ein.
• Legen Sie keine anderen Gegenstände darauf.
• Wenden Sie sich im Servicefall bitte an Fachkräfte.
• Lassen Sie das Stromkabel keine heißen Oberächen berühren.
• Tragen Sie das Gerät nicht am Stromkabel.
• Ziehen Sie das Produkt niemals am Kabel aus der Steckdose. Halten Sie
immer den Stecker fest und ziehen Sie daran.
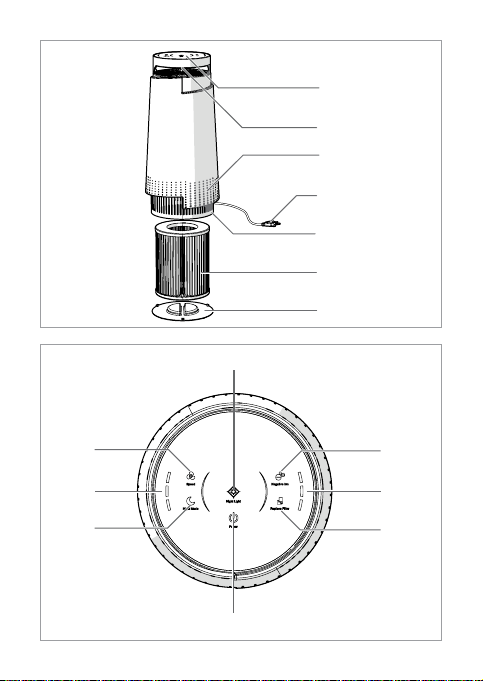
Auspacken
1. Önen Sie A7.
2. Nehmen Sie A6heraus.
3. Entfernen Sie die Verpackung und setzen Sie A6wieder ein.
4. Schließen Sie A7.
4Platzieren Sie das Produkt nicht näher als 40 cm an einer Wand, um einen
ordnungsgemäßen Betrieb sicherzustellen.
5. Stecken Sie A4in eine Steckdose.
Verwenden des Produkts
1. Drücken Sie B1, um das Produkt einzuschalten.
2. Drücken Sie B4, um die Lüfterdrehzahl zu erhöhen/zu verringern.
4B3zeigt die ausgewählte Lüfterdrehzahl an.
3. Optional können Sie eine der folgenden Optionen auswählen:
• B2zur Auswahl der Sleep-Funktion 'Sleep'.
• B6zur Auswahl ‘anion’.
4Achten Sie darauf, dass die Fenster geschlossen sind, während das Produkt
in Betrieb ist.
Ruhemodus einstellen
1. Drücken Sie B2, um den Sleep-Modus auszuwählen.
4Im Sleep-Modus läuft das Produkt möglichst leise.
2. Drücken Sie B2in B1, um diesen Betriebsmodus zu verlassen.
Anionenmodus einstellen
1. Drücken Sie B6, um den Anionenmodus einzustellen.
4Das Produkt gibt Millionen von Anionen pro Sekunde ab.
2. Drücken Sie B6in B1, um diesen Betriebsmodus zu verlassen.

9
Problemlösung
Problem Lösung
Das Produkt lässt sich
nicht einschalten.
Schließen Sie es an eine Steckdose an.
Überprüfen Sie, ob das Stromkabel beschädigt ist.
Vergewissern Sie sich, dass A7geschlossen ist.
Das Produkt macht
seltsame Geräusche. Vergewissern sie sich, dass A6richtig eingesetzt
wurde.
Drücken Sie B4, um die Drehzahl zu erhöhen.
Tauschen Sie A6aus.
Schlechte
Reinigungsqualität.
Blockieren Sie keine Belüftungsschlitze und
sorgen Sie dafür, dass das Produkt ausreichend
Freiraum hat.
Vergewissern sie sich, dass A6richtig eingesetzt
wurde.
Vergewissern Sie sich, dass der Raum kleiner als
20 m2ist.
Tauschen Sie A6aus.
Das Produkt erzeugt
einen unangenehmen
Geruch.
Vergewissern Sie sich, dass die relative
Luftfeuchtigkeit im Raum unter 85 % liegt.
Tauschen Sie A6aus.
B8leuchtet auf,
nachdem A6
ausgetauscht wurde.
Zum Zurücksetzen halten Sie B8etwa 3
Sekunden gedrückt.
Spezikationen
Produkt Luftreiniger
Artikelnummer AIPU100CWT
Größe (L x B x H) 215 Ø x 460 mm
Einsatzbereich < 20 m2
Reinluftdurchsatz 200 m3/ h
Geräuschpegel 32 - 50 dB
Betriebstemperatur -10 °C - 40 °C
Betriebsfeuchtigkeit < 95 % RLF
Stromversorgung 220 - 240 VAC ~ 50 / 60 Hz

10
Nennleistung 35 - 40 W
Standby-Leistung < 0,5 W
bGuide de démarrage rapide
Puricateur d'air AIPU100CWT
Pour plus d'informations, consultez le manuel détaillé en
ligne: ned.is/aipu100cwt
Utilisation prévue
Le produit est destiné à purier l'air dans une pièce.
Le puricateur peut ltrer l'air dans une pièce jusqu'à 20 m2.
Toute modication du produit peut avoir des conséquences sur la sécurité, la
garantie et le bon fonctionnement.
Pièces principales (image A)
Achage LED
Lampe LED
Sortie d’air
Câble d'alimentation
Entrée d'air
Filtre à air
Couvercle du ltre
Interface (image B)
Bouton Marche/Arrêt
Bouton de mode veille
Indicateur de vitesse du ventilateur
Bouton de vitesse du ventilateur
Bouton Light
Bouton d’anions
Indicateur de vitesse du ventilateur
Voyant du ltre
Consignes de sécurité
-
AVERTISSEMENT
• Lisez les instructions avant utilisation.
• Utilisez le produit uniquement comme décrit dans le présent manuel.
• Ne pas installer ou utiliser un appareil endommagé.

11
• Ne pas connecter un câble relié à la prise de courant.
• Utilisez le produit uniquement à l'intérieur.
• Ne pas utiliser le produit dans des environnements humides ou mouillés.
• Ne pas placer le produit à proximité d’un brûleur à gaz, d’une plaque
électrique ou d’un four chaud.
• Ne couvrez pas les orices de ventilation.
• Ne pas insérer d’objets dans le produit.
• Ne pas placer d’objets dessus.
• Si un entretien est nécessaire, consultez un personnel qualié.
• Ne pas laisser le câble d'alimentation toucher des surfaces chaudes.
• Ne pas utiliser le câble d’alimentation pour transporter l’appareil.
• Ne débranchez pas le produit en tirant sur le câble. Saisissez toujours la che
et tirez.
Retirer l’emballage
1. Ouvrez A7.
2. Sortez A6.
3. Retirez l’emballage et réinstallez A6.
4. Fermez A7.
4Ne pas placer le produit à moins de 40 cm du mur an d’assurer un bon
fonctionnement.
5. Branchez A4sur une prise de courant.
Utiliser le produit
1. Appuyez sur B1pour mettre le produit sous tension.
2. Appuyez sur B4pour augmenter / réduire la vitesse du ventilateur.
4B3indique la vitesse du ventilateur sélectionnée.
3. Sinon, choisissez l’une des options suivantes :
• B2pour sélectionner ‘veille’ (sleep).
• B6pour sélectionner ‘anion’.
4Laissez les fenêtres fermées lorsque le produit est en marche.
Régler le mode veille
1. Appuyez sur B2pour sélectionner le mode veille.
4En mode veille, le produit fonctionne aussi silencieusement que possible.
2. Appuyez sur B2de B1pour quitter ce mode.

12
Régler le mode anions
1. Appuyez sur B6pour sélectionner le mode anions.
4Le produit libère des millions d'anions par seconde.
2. Appuyez sur B6de B1pour quitter ce mode.
Dépannage
Problème Solution
Le produit ne se met pas
sous tension.
Connectez-le à une prise de courant.
Vériez si le cordon d'alimentation est
endommagé.
Assurez-vous que A7soit fermé.
Le produit émet des
bruits étranges. Assurez-vous que A6soit placé de la bonne
manière.
Appuyez sur B4pour augmenter la vitesse
Replacez A6.
Mauvaise qualité de
purication.
Ne bloquez pas les ouvertures de ventilation et
assurez-vous qu’il y ait susamment d’espace
autour du produit.
Assurez-vous que A6soit placé de la bonne
manière.
Assurez-vous que la pièce soit inférieure à 20 m2.
Replacez A6.
Le produit répand une
odeur désagréable.
Assurez-vous que la pièce ait une humidité
relative inférieure à 85 %.
Replacez A6.
B8s’allume après avoir
remplacé A6.
Appuyez et maintenez B8pendant 3 secondes
pour eectuer une réinitialisation.
Spécications
Produit Puricateur d'air
Article numéro AIPU100CWT
Dimensions (L x l x H) 215 Ø x 460 mm
Zone applicable < 20 m2
Débit de diusion d'air pur 200 m3/ h
Niveau sonore 32 - 50 dB

13
Température fonctionnement -10 °C - 40 °C
Humidité en fonctionnement < 95 % HR
Source d’alimentation 220 - 240 VAC ~ 50 / 60 Hz
Puissance nominale 35 - 40 W
Alimentation en veille < 0,5 W
dVerkorte handleiding
Luchtreiniger AIPU100CWT
Zie voor meer informatie de uitgebreide handleiding
online: ned.is/aipu100cwt
Bedoeld gebruik
Het product is bedoeld om de lucht in een ruimte te zuiveren.
De reiniger kan de lucht in een ruimte tot 20 m2lteren.
Elke wijziging van het product kan gevolgen hebben voor veiligheid, garantie en
correcte werking.
Belangrijkste onderdelen (afbeelding A)
LED-scherm
LED lamp
Luchtuitlaat
Stroomkabel
Luchtinlaat
Luchtlter
Filterdeksel
Interface (afbeelding B)
Aan/Uit knop
Slaapstand knop
Indicator voor ventilatorsnelheid
Knop voor ventilatorsnelheid
Light knop
Anion-knop
Indicator voor ventilatorsnelheid
Filter indicator
Veiligheidsvoorschriften
-
WAARSCHUWING
• Lees de instructies voor gebruik.

14
• Gebruik het product alleen zoals beschreven in deze handleiding.
• Neem een beschadigd product niet in gebruik.
• Sluit geen gebundelde kabel aan op het stopcontact.
• Gebruik het product alleen binnenshuis.
• Gebruik het product niet in een natte of vochtige omgeving.
• Plaats het product niet in de buurt van gas, een elektrische brander of een
verwarmde oven.
• De ventilatieopeningen niet afdekken.
• Steek geen voorwerpen in het product.
• Leg geen voorwerpen bovenop de deken.
• Als onderhoud nodig is, raadpleeg dan bevoegd personeel.
• Laat het netsnoer niet met hete oppervlakken in aanraking komen.
• Gebruik het netsnoer niet om het apparaat te dragen.
• Trek de stekker niet uit het stopcontact door aan de kabel te trekken. Pak
altijd de stekker vast en trek eraan.
De verpakking verwijderen
1. Open A7.
2. Verwijder A6.
3. Verwijder de verpakking en herinstalleer A6.
4. Sluit A7.
4Plaats het product niet op minder dan 40 cm van een muur om een goede
werking te garanderen.
5. Steek A4in een stopcontact.
Het product gebruiken
1. Druk op B1om het product aan te zetten.
2. Druk op B4om de ventilatorsnelheid te verhogen/verlagen.
4B3geeft de geselecteerde ventilatorsnelheid aan.
3. Of kies een van de volgende opties:
• B2om ‘sleep’ te selecteren.
• B6om ‘anion’ te selecteren.
4Houd de vensters gesloten terwijl het product aan staat.
De slaapmodus instellen
1. Druk op B2om de slaapstand te selecteren.
4In de slaapstand werkt het product zo stil mogelijk.
2. Druk op B2of B1om deze modus te verlaten.

15
Stel de anion-modus in
1. Druk op B6om de anion-modus te selecteren.
4Het product geeft miljoenen anionen per seconde vrij.
2. Druk op B6of B1om deze modus te verlaten.
Probleem oplossing
Probleem Oplossing
Het product gaat niet aan. Sluit het product aan op een stopcontact.
Controleer of het netsnoer beschadigd is.
Zorg ervoor dat A7gesloten is.
Het product maakt
vreemde geluiden. Zorg ervoor dat A6op de juiste manier
geplaatst is.
Druk op B4om de snelheid te verhogen
Vervang A6.
Slechte
zuiveringskwaliteit.
Blokkeer de ventilatieopeningen niet en zorg
ervoor dat er voldoende ruimte rond het product
is.
Zorg ervoor dat A6op de juiste manier
geplaatst is.
Zorg ervoor dat de ruimte kleiner dan 20 m2is.
Vervang A6.
Het product verspreidt
een onaangename geur.
Zorg ervoor dat de relatieve luchtvochtigheid in
de kamer minder dan 85 % is.
Vervang A6.
B8gaat branden nadat
A6vervangen zijn.
Houd B83 seconden lang ingedrukt om het
te resetten.
Specicaties
Product Luchtreiniger
Artikelnummer AIPU100CWT
Afmetingen (l x b x h) 215 Ø x 460 mm
Toepassingsoppervlakte < 20 m2
Schone luchttoevoersnelheid 200 m3/ u
Geluidsniveau 32 - 50 dB

16
Bedrijfstemperatuur -10 °C - 40 °C
Operationele vochtigheid < 95 % RH
Voeding 220 - 240VAC ~ 50 / 60 Hz
Nominaal vermogen 35 - 40 W
Sluipverbruik < 0,5 W
jGuida rapida all’avvio
Puricatore d’aria AIPU100CWT
Per maggiori informazioni vedere il manuale esteso online:
ned.is/aipu100cwt
Uso previsto
Il prodotto è inteso per la puricazione dell’aria di un ambiente.
Il puricatore può ltrare l’aria in un ambiente con area massima di 20 m2.
Eventuali modiche al prodotto possono comportare conseguenze per la
sicurezza, la garanzia e il corretto funzionamento.
Parti principali (immagine A)
Display LED
Spia LED
Uscita dell’aria
Cavo di alimentazione
Ingresso dell’aria
Filtro dell’aria
Coperchio del ltro
Interfaccia (immagine B)
Pulsante di accensione/
spegnimento
Pulsante modalità Sleep
Indicatore di velocità della ventola
Pulsante di velocità della ventola
Pulsante Light
Pulsante anioni
Indicatore di velocità della ventola
Indicatore ltro

17
Istruzioni di sicurezza
-
ATTENZIONE
• Leggere le istruzioni prima dell’uso.
• Utilizzare il prodotto solo come descritto nel presente manuale.
• Non utilizzare un prodotto danneggiato.
• Non collegare un cavo multicoppia alla presa elettrica.
• Utilizzare il prodotto solo in interni.
• Non utilizzare il prodotto in ambienti umidi o bagnati.
• Non posizionare il prodotto accanto a gas, bruciatori elettrici o forni riscaldati.
• Non coprire le aperture per la ventilazione.
• Non inserire alcun oggetto nel prodotto.
• Non poggiare alcun oggetto su di essa.
• Se è necessaria la manutenzione, rivolgersi a personale qualicato.
• Non lasciare che il cavo di alimentazione tocchi le superci calde.
• Non utilizzare il cavo di alimentazione per trasportare il dispositivo.
• Non scollegare il prodotto tirandolo per il cavo. Aerrare sempre la presa e
tirare.
Rimozione dell’imballaggio
1. Aprire A7.
2. Estrarre A6.
3. Rimuovere l’imballaggio e reinstallare A6.
4. Chiudere A7.
4Non collocare il prodotto entro 40 cm dalla parete per assicurarne il corretto
funzionamento.
5. Inserire A4in una presa elettrica.
Utilizzo del prodotto
1. Premere B1per accendere il prodotto.
2. Premere B4per aumentare/diminuire la velocità della ventola.
4B3indica la velocità della ventola selezionata.
3. Opzionalmente scegliere una delle possibilità seguenti:
• B2per selezionare ‘sleep’.
• B6per selezionare ‘anion’.
4Tenere le nestre chiuse quando il prodotto è acceso.

18
Impostazione della modalità Sleep
1. Premere B2per selezionare la modalità Sleep.
4In modalità Sleep, il prodotto funziona il più silenziosamente possibile.
2. Premere B2di B1per uscire da questa modalità.
Impostazione della modalità anioni
1. Premere B6per selezionare la modalità anioni.
4Il prodotto rilascia milioni di anioni al secondo.
2. Premere B6di B1per uscire da questa modalità.
Risoluzione dei problemi
Problema Soluzione
Il prodotto non si
accende.
Collegare a una presa elettrica.
Vericare che il cavo di alimentazione non sia
danneggiato.
Assicurarsi che A7sia chiuso.
Il prodotto emette rumori
anomali. Assicurarsi che A6sia disposto in modo
corretto.
Premere B4per aumentare la velocità
Sostituire A6.
Scarsa qualità di
puricazione.
Non ostruire le aperture di ventilazione e
assicurarsi che vi sia spazio a sucienza intorno
al prodotto.
Assicurarsi che A6sia disposto in modo
corretto.
Assicurarsi che l’ambiente sia più piccolo di 20 m2.
Sostituire A6.
Il prodotto emette un
odore sgradevole.
Assicurarsi che l’umidità relativa dell’ambiente sia
inferiore a 85 %.
Sostituire A6.
B8si accende dopo
aver sostituito A6.
Tenere premuto B8per 3 secondi per
ripristinare.
Speciche
Prodotto Puricatore d’aria
Numero articolo AIPU100CWT

19
Dimensioni (p x l x a) 215 Ø x 460 mm
Area applicabile < 20 m2
Tasso di erogazione aria pulita 200 m3/ h
Livello di rumorosità 32 - 50 dB
Temperatura di funzionamento -10 °C - 40 °C
Umidità d’esercizio < 95 % UR
Alimentazione 220 - 240 VAC ~ 50 / 60 Hz
Potenza nominale 35 - 40 W
Potenza in standby < 0,5 W
hGuía de inicio rápido
Puricador de aire AIPU100CWT
Para más información, consulte el manual ampliado en
línea: ned.is/aipu100cwt
Uso previsto por el fabricante
El producto está diseñado para puricar el aire en una habitación.
El puricador puede ltrar el aire en una habitación de hasta 20 m2.
Cualquier modicación del producto puede tener consecuencias para la
seguridad, la garantía y el funcionamiento adecuado.
Partes principales (imagen A)
Pantalla LED
Indicador LED
Salida de aire
Cable de alimentación
Entrada de aire
Filtro de aire
Tapa del ltro
Interfaz (imagen B)
Botón ON/OFF Botón de modo dormir

20
Indicador de velocidad del
ventilador
Botón de velocidad del ventilador
Botón Light
Botón aniónico
Indicador de velocidad del
ventilador
Indicador de ltro
Instrucciones de seguridad
-
ADVERTENCIA
• Lea las instrucciones antes de usarla.
• Utilice el producto únicamente tal como se describe en este manual.
• Nunca utilice un producto dañado.
• No conectar un cable atado a la toma de corriente.
• Este producto es para uso exclusivo en interiores.
• No utilice el producto en entornos húmedos o mojados.
• No colocar el producto cerca de gas, un quemador eléctrico o un horno
calentado.
• No cubra las aberturas de ventilación.
• No introduzca objetos en el producto.
• No coloque artículos encima de ella.
• Si se necesita mantenimiento, remítase a personal cualicado.
• No dejar que el cable de alimentación toque supercies calientes.
• No use el cable de alimentación para transportar el dispositivo.
• No desenchufe el producto tirando del cable. Sujete siempre el enchufe y tire
de él.
Retirar el embalaje
1. Abra A7.
2. Extraiga A6.
3. Retire el embalaje y reinstale A6.
4. Cierre A7.
4No coloque el producto a menos de 40 cm de la pared para garantizar un
funcionamiento apropiado.
5. Enchufe A4a una toma de corriente.
Uso del producto
1. Pulse B1para encender el producto.
2. Pulse B4para aumentar/reducir la velocidad del ventilador.
4B3indica la velocidad del ventilador seleccionada.
Table of contents
Languages:
Other nedis Air Cleaner manuals
Popular Air Cleaner manuals by other brands

Asept-Air
Asept-Air LIFE CELL 2550 Purity Plus owner's manual

Campbell Hausfeld
Campbell Hausfeld PA208503 Operating instructions and parts manual

AERATE
AERATE AR1320 manual

Fellowes
Fellowes AeraMax Pro AM 3S PC manual

Field Controls
Field Controls Trio Plus user manual

Olimpia
Olimpia Sitali DF100 Pure instruction manual