Neilsen CT2279 User manual

2" AIR DIE GRINDER CT2279
Ref no. XX822
ORIGINAL INSTRUCTIONS
Cannon Tools Limited
Address: 20 Station Road, Rowley Regis, West Midlands, B65 0JU.U.K.
SAVE THESE INSTRUCTIONS AND PRECAUTIONS.
READ ALL PRECAUTONS AND INSTRUCTIONS BEFORE USE.

1
EC DECLARATION OF CONFORMITY
We CANNON TOOLS LTD
20 Station road, Rowley Regis, West Midlands,B65 0JU.U.K.
Declare that the following machine complies with the appropriate basic safety
and health requirements of the EC Directive based on its design and type, as
brought into circulation by us.
In case of alteration of the machine, not agreed upon by us, this declaration
will lose its validity.
Product description: 2" AIR DIE GRINDER
Model: CT2289 (Ref no.XX822)
Applicable EC Directives:
EC Machinery Directive 2006/42/EC
Harmonized standards
EN ISO 11148-9:2011
20 Station Road, Rowley Regis, West Midlands, B65 0JU.U.K.
Mr. Gurcharan Tony Singh Sanghera
Managing Director
CANNON TOOLS LTD
2020-09-25

2
1.SAFETY INSTRUCTIONS
WARNING– When using tools, basic precautions should always be followed,
including the following:
General
To reduce the risks of electric shock, fire, and injury to persons, read all
the instructions before using the tool.
Work area
a. Keep the work area clean and well lighted. Cluttered benches and dark
areas increase the risks of electric shock, fire, and injury to persons.
b. Do not operate the Air Angle Die Grinder in explosive atmospheres,
such as in the presence of flammable liquids, gases, or dust. The Air
Angle Die Grinder is able to create sparks resulting in the ignition of the dust
or fumes.
c.Keep by standers, children, and visitors away while operating the Air
Angle Die Grinder. Distractions are able to result in the loss of control of the
tool.
Personal safety
a. Stay alert. Watch what you are doing and use common sense when
operating the tool. Do not use the tool while tired or under the influence of
drugs, alcohol, or medication. A moment of inattention while operating the tool
increases the risk of injury to persons.
b. Dress properly. Do not wear loose clothing or jewelry. Contain long hair.
Keep hair, clothing, and gloves away from moving parts. Loose clothes,
jewelry, or long hair increases the risk of injury to persons as a result of being
caught in moving parts.
c. Avoid unintentional starting. Be sure the switch is off before connecting to
the air supply. Do not carry the Air Angle Die Grinder with your finger on the
switch or connect the tool to the air supply with the switch on.
d. Remove adjusting keys and wrenches before turning the tool on. A wrench
or a key that is left attached to a rotating part of the tool increases the risk of
personal injury.
e. Do not overreach. Keep proper footing and balance at all times. Proper
footing and balance enables better control of the tool in unexpected
situations.
f. Use safety equipment. A dust mask, non-skid safety shoes and a hard hat
must be used for the applicable conditions. Wear heavy-duty work gloves
during use.
g. Always wear eye protection. Wear ANSI-approved safety goggles.
h. Always wear hearing protection when using the tool. Prolonged exposure to

3
high intensity noise is able to cause hearing loss.
i. Risk of Electric Shock. This Air Angle Die Grinder is not provided with an
insulated gripping surface. Contact with a ″live″ wire will also make exposed
metal parts of the tool ″live″ and shock the operator.
j. Avoid body contact with grounded surfaces such as pipes, radiators, ranges
and refrigerators. There is an increased risk of electric shock if your body is
grounded.
k. Explore the workpiece to avoid contact with hidden wiring. Thoroughly
investigate the workpiece for possible hidden wiring before performing work.
Contact with live wiring will shock the operator.
Tool use and care
a. Use clamps or another practical way to secure and support the workpiece
to a stable platform. Holding the work by hand or against the body is unstable
and is able to lead to loss of control.
b. Do not force the tool. Use the correct tool for the application. The correct Air
Angle Die Grinder will do the job better and safer at the rate for which the tool
is designed.
c. Do not use the tool if the switch does not turn the tool on or off. Any tool that
cannot be controlled with the switch is dangerous and must be repaired.
d. Disconnect the tool from the air source before making any adjustments,
changing accessories, or storing the tool. Such preventive safety measures
reduce the risk of starting the Air Angle Die Grinder unintentionally. Turn off
and detach the air supply, safely discharge any residual air pressure, and
release the throttle and/or turn the switch to its off position before leaving the
work area.
e. Store the Air Angle Die Grindere. when it is idle out of reach of children and
other untrained persons. A die grinder is dangerous in the hands of untrained
users.
f. Maintain the tool with care. A properly maintained tool is easier to control.
g. Check for misalignment or binding of moving parts, breakage of parts, and
any other condition that affects the tool’s operation. If damaged, have the Air
Angle Die Grinder serviced before using. Many accidents are caused by
poorly maintained tools. There is a risk of bursting if the tool is damaged.
h. Use only accessories that are identified by the manufacturer for the specific
tool model. Use of an accessory not intended for use with the specific tool
model, increases the risk of injury to persons.
Service
a. Tool service must be performed only by qualified repair personnel.
b. When servicing the Air Angle Die Grinder, use only identical replacement
parts. Use only authorized parts.

4
c. Use only the lubricants supplied with the tool or specified by the
manufacturer.
Air source
a. Never connect to an air source that is capable of exceeding 200 psi. Over
pressurizing the tool may cause bursting, abnormal operation, breakage of
the tool or serious injury to persons. Use only clean, dry, regulated
compressed air at the rated pressure or within the rated pressure range as
marked on the tool. Always verify prior to using the tool that the air source has
been adjusted to the rated air pressure or within the rated air-pressure range.
b.Never use oxygen, carbon dioxide, combustible gases or any bottled gas as
an air source for the tool. Such gases are capable of explosion and serious
injury to persons.
Vibration Precautions
This tool vibrates during use. Repeated or long-term exposure to vibration
may cause temporary or permanent physical injury, particularly to the hands,
arms and shoulders. To reduce the risk of vibration-related injury:
a. Anyone using vibrating tools regularly or for an extended period should first
be examined by a doctor and then have regular medical check-ups to ensure
medical problems are not being caused or worsened from use. Pregnant
women or people who have impaired blood circulation to the hand, past hand
injuries, nervous system disorders, diabetes, or Raynaud’s Disease should
not use this tool. If you feel any medical or physical symptoms related to
vibration (such as tingling, numbness, and white or blue fingers), seek
medical advice as soon as possible.
b. Do not smoke during use. Nicotine reduces the blood supply to the hands
and fingers, increasing the risk of vibration-related injury.
c. Wear suitable gloves to reduce the vibration effects on the user.
d. Use tools with the lowest vibration when there is a choice.
e. Include vibration-free periods each day of work.
f. Grip tool as lightly as possible (while still keeping safe control of it). Let the
tool do the work.
g. To reduce vibration, maintain tool as explained in this manual. If abnormal
vibration occurs, stop immediately.

5
SPECIFICATIONS
Operating pressure: 6.3 Bar(90Psi)
Free speed: 20000/min
Air consumption: 4cfm
Collet size: 1/4"(6mm)
Air inlet: 1/4"
COMPONENTS AND CONTROLS
INITIAL TOOL SET UP
Read the entire Important Safety Information section at the beginning of
this manual including all text under subheadings therein before set up
or use of this product.
Note: For additional information regarding the parts listed in the following
pages, refer to the Assembly Diagram near the end of this manual.
Air Supply
To prevent explosion: Use only clean, dry, regulated, compressed air to power
this tool. Do not use oxygen, carbon dioxide, combustible gases, or any other
bottled gas as a power source for this tool.
Collet
Collet cap
Safety Lock
Throttle
Spindle
Regulator knob
Air inlet

6
1. Incorporate an in-line oiler, shut-off valve, regulator with pressure gauge,
and filter for best service, as shown in the diagram above. An in-line shut
off valve is an important safety device because it controls the air
supply even if the air hose is ruptured.
Note: If an automatic oiler system is not used, add a few drops of Pneumatic
Tool Oil to the airline connection before operation. Add a few more drops after
each hour of continual use.
2. Attach an air hose to the compressor’s air outlet. Connect the air hose
to the air inlet of the tool. Other components, such as a connector and
quick coupler, will make operation more efficient, but are not required.
WARNING! To prevent serious injury from accidental operation: Do not
install a female quick coupler on the tool. Such a coupler contains an air
valve that will allow the air tool to retain pressure and operate accidentally

7
after the air supply is disconnected.
Note: Air flow, and therefore Air Angle Die Grinder performance, can be
hindered by undersized air supply components.
3. The air hose must be long enough to reach the work area with enough
extra length to allow free movement while working.
4. Release the Throttle. Close the in-line shutoff valve between the
compressor and the tool.
5. Turn on the air compressor according to the manufacturer’s directions and
allow it to build up pressure until it cycles off.
6. Adjust the air compressor’s output regulator so that the air output is enough
to properly power the tool, but the output will not exceed the tool’s
maximum air pressure at any time. Adjust the pressure gradually, while
checking the air output gauge to set the right pressure range.
7. Inspect the air connections for leaks. Repair any leaks found.
8. If the tool will not be used at this time, turn off and detach the air supply,
safely discharge any residual air pressure, and release the throttle to
prevent accidental operation.
OPERATING INSTRUCTIONS
Read the entire Important Safety Information section at the beginning
of this manual including all text under subheadings therein before set
up or use of this product. Inspect tool before use, looking for damaged,
loose, or missing parts. If any problems are found, do not use tool until
repaired.
Tool Set Up
WARNING! To prevent serious injury from accidental operation: Turn off the tool,
detach the air supply, safely discharge any residual air pressure in the tool, and
release the throttle and/or turn the switch to its off position before performing any set
up, inspection, maintenance, or cleaning procedures.
To prevent serious injury: Do not adjust or tamper with any control or component in
away not specifically explained within this manual. Improper adjustment can result in
tool failure or other serious hazards.
Installing an Accessory
1. Use the Wrench to hold the Spindle in place while, at the same time,
loosen the Collet Cap.
2. Slide the accessory (sold separately) into the Collet opening. The

8
accessory must be rated to at least the maximum speed of the Die Grinder.
3. Use the Wrench to hold the Spindle in place, while tightening the
Collet Cap .
WARNING! Do not use with cutoff wheels, saws or any attachment that requires
safety guard. This tool does not have a safety guard.
Adjusting the Air Flow
Rotate the Regulator Knob to adjust the amount of air flow from lowest to
highest (1 to 4 on the Knob).
Work Piece and Work Area Set Up
1. Designate a work area that is clean and well-lit. The work area must
not allow access by children or pets to prevent distraction and injury.
2. Route the air hose along a safe route to reach the work area without
creating a tripping hazard or exposing the air hose to possible damage. The
air hose must be long enough to reach the work area with enough extra length
to allow free movement while working.
3. Secure loose workpieces using a vise or clamps (not included) to prevent
movement while working.
4. There must not be hazardous objects (such as utility lines or foreign objects)
nearby that will present a hazard while working.
General Operating Instructions
Note: Make all set up adjustments to tool before connecting air supply.
1. If an automatic oiler is not used, add a few drops of Pneumatic Tool
Oil to the airline connection before use. Add a few drops more after
each hour of continual use.
2. Mark the workpiece area where you wish to grind.
3. With both hands, grip the Die Grinder so that your thumbs rest on the
Throttle and Safety Lock.
4. Keep the accessory off the surface of the workpiece until it reaches
operating speed.
5. Press the Safety Lock forward while pressing down on the Throttle.
NOTE: The Die Grinder’s speed is variable. Vary the pressure placed on the
Throttle to vary the speed of the tool. Use only enough speed as needed to
cut the workpiece.
6. Slowly and carefully place the accessory onto the surface of the workpiece.
7. Keep steady pressure, but do not force the tool, as you will stall the unit.
Use only enough pressure to do the job properly.
8. The tool’s air flow can be controlled with the Regulator Knob on the unit

9
or with the compressor’s air regulator. If the tool requires more force to
accomplish the task, verify that the tool receives sufficient, unobstructed
airflow (CFM). Then either:
a. Turn off and disconnect the tool, adjust the Regulator Knob, then resume
usage.
OR
b. With the tool still turned on, increase the pressure (PSI) output of the
compressor regulator up to the maximum air pressure rating of this tool.
CAUTION! To prevent injury from tool or accessory failure: Do not exceed
the tool’s maximum air pressure rating of 90 PSI.
If the tool still does not have sufficient force at maximum pressure and
sufficient airflow from both regulators, then a larger tool may be required.
9. To prevent accidents, turn off the tool, detach the air supply, safely
discharge any residual air pressure in the tool, and release the throttle
after use. Clean external surfaces of the tool with a clean, dry cloth, a thin
coat of tool oil. Then store the tool indoors and out of children’s reach.
MAINTENANCE
Your tool requires lubrication before every use.
Disconnect the air supply form the tool before lubricating.
Position the tool so that the inlet is facing up. Put in one to two drops of high
speed spindle oil or 3-in-l oil into the air inlet.
Operate the tool briefly to circulate oil after adding.
NEVER use detergent oil or additives.
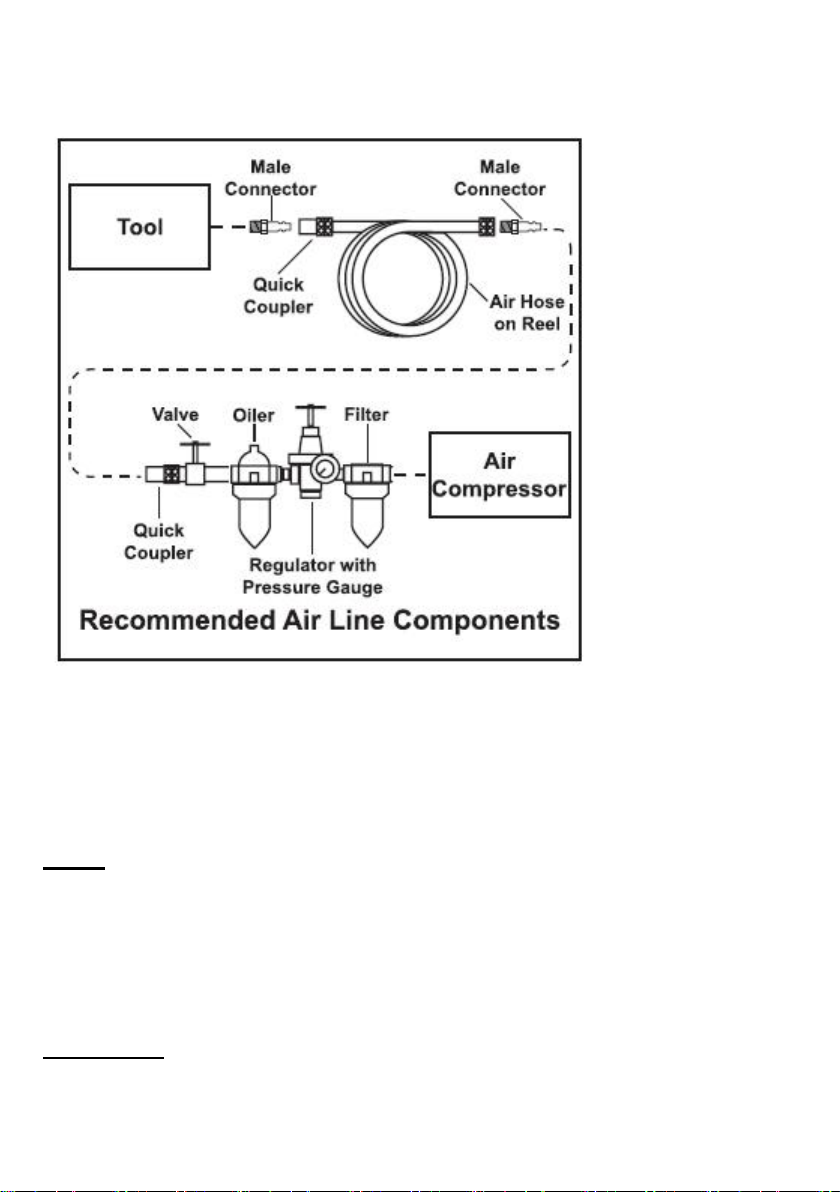
If an in-line oiler is used,manual lubrication through the air inlet is not required
on a daily basis.
TROUBLE SHOOTING
Most air tool problems occur because humid and/or dirty air gets into the
line.Be sure to use an air filter to get rid of the moisture and minute particles.
Oil,either too much or too little,is another problem area.
Make sure the tool is oiled either manually through the air inlet,or
automatically with the in-line oiler as depicted.

10

11
CANNON TOOLS LTD
Add: 20 station road, Rowley Regis, west midlands,B65 0JU.U.K.
Made in China
Table of contents
Other Neilsen Grinder manuals