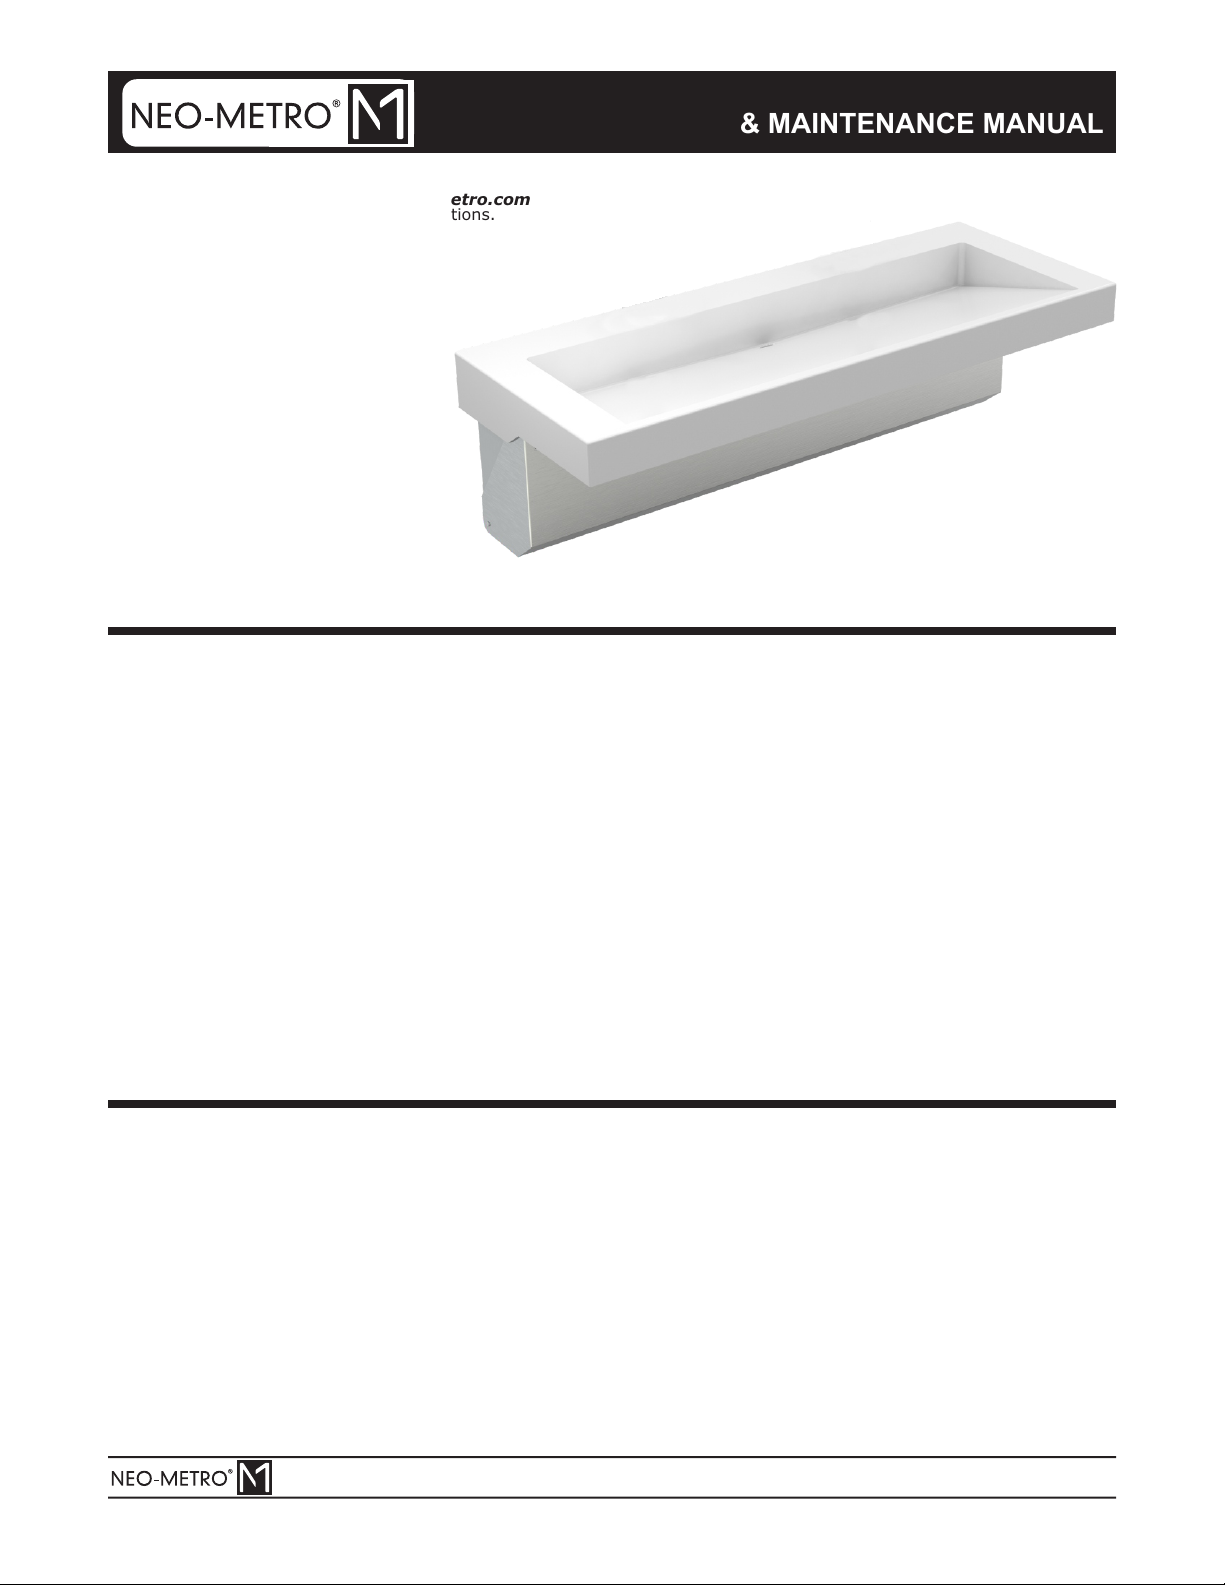
Neo-metro SLAB-EDGE 9152 Instruction manual
Troubleshooting.....................................11 - 12
Components & Repair Parts . . . . . . . . . . . . . . . . . . . . . . . . . . . 14 - 15
Warranty Information . . . . . . . . . . . . . . . . . . . . . . . . . . . . . . . . . . . . 16
Cleaning and Maintenance. . . . . . . . . . . . . . . . . . . . . . . . . . . . . . . . 13
Accessibility Comparison . . . . . . . . . . . . . . . . . . . . . . . . . . . . . . . . . . 3
Rough-Ins . . . . . . . . . . . . . . . . . . . . . . . . . . . . . . . . . . . . . . . . . . . . . . 5
TABLE OF CONTENTS
Prior to Installation . . . . . . . . . . . . . . . . . . . . . . . . . . . . . . . . . . . . . . . 2
Dimensional Data . . . . . . . . . . . . . . . . . . . . . . . . . . . . . . . . . . . . . . . . 4
Installation . . . . . . . . . . . . . . . . . . . . . . . . . . . . . . . . . . . . . . . . . . . 6 - 9
Finished Layouts . . . . . . . . . . . . . . . . . . . . . . . . . . . . . . . . . . . . . . . 10
REQUIRED ITEMS FOR INSTALLATION - NOT SUPPLIED
®
CORTERRA
ADA/OBC COMPLIANT
WASH BASIN
MODEL 9152
®
SLAB-EDGE
?Chalk Line
?Hammer
?Plumbers Putty
?7/16" Hex Wrench
?1/2" NPS Supply Angle Stops
?Carpenters Level
?Teflon Tape
?9/32” Fixture Wall Anchors and
Anchoring Hardware (and Appropriate Tools)
?9/16” Fixture Wall Anchors and
Anchoring Hardware (and Appropriate Tools)
Part #: 6216-014-000 Page 1 of 16
Please visit www.neo-metro.com
for most current specifications.
INSTALLATION, OPERATIONS
& MAINTENANCE MANUAL
NEO-METRO FIELD SERVICE
TOLL FREE 800-743-8259 • LOCAL 626-855-4866 • FAX 626-855-4863
Date: 03/07/19

Page 2 of 16
Part #: 6216-014-000 Date: 03/07/19
INSTALLATION, OPERATIONS
& MAINTENANCE MANUAL
NEO-METRO FIELD SERVICE
TOLL FREE 800-743-8259 • LOCAL 626-855-4866 • FAX 626-855-4863
Please visit for most current specifications.www.neo-metro.com
NOTE: Receptacle(s) must be wired to a GFCI protected circuit. Fixture must be earth
grounded per N.E.C. (National Electrical Code).
Teflon tape is recommended on all threaded waste and supply connections to reduce the
possibility of leaks.
Prior to installation, supply lines must be flushed of all foreign material such as pipe
dope, chips, or solder. Debris or foreign material in water supply may damage valve.
Provide: 110-120 VAC/60Hz/3A (MAX) electrical receptacle for factory supplied
120VAC/9VDC, 100mA plug-in transformer when -SO and -SOS options are selected.
Provide: 110-120 VAC/60Hz/15A dedicated circuit when Dyson Air Blade Faucet
selected. Refer to Dyson installation instructions for more information.
Important: Some options may slightly alter installation. To ensure proper installation
review the manual thoroughly and verify rough-ins before beginning any work. File this
manual with the owner or maintenance personnel upon completion of installation.
Industry standard wall backing, for wall hung fixtures, is required. Installer provided wall
anchors and wall anchoring hardware must be appropriate for wall construction, and
have a minimum pull-out rating of 1000 lbs. (453.6 kg).
ANSI, UFAS or ADA compliance is subject to the interpretation and requirements of the
local code authority and is the responsibility of the installer for verification.
Single Temp Valve Assembly: Recommended working water pressure is 30 PSI (2.07
bars) minimum to 100 PSI (6.89 bars) maximum. Maximum temperature is 130°F
(54.4°C). Maximum outlet temperature is recommended is 105°F (40.6°C). Valve
assembly must be drained prior to being subjected to freezing temperatures. A
checkstop is provided with this valve assembly.
T/P Mixing Valve Assembly: Recommended working water pressure is 30 PSI (2.07
bars) minimum to 100 PSI (6.89 bars) maximum. Maximum hot water temperature is
180°F (82°C). Temperature adjustment range is 95°F-110°F (43°C-48°C). Valve
assembly must be drained prior to being subjected to freezing temperatures. The valve
assembly has a check integral to the inlet however, angle stop is to be provided by the
installer.

ACCESSIBILITY COMPARISONS
Page 3 of 16
ADA ages
6 thru 12
ADA
Adult
OBC
(Ontario Building Code)
34" RIM
MAX
22"
33
4"
34" RIM
MAX
27"
17"
9"
22"
33
4"
31" RIM
MAX 27"
17"
9"
22"
33
4"
17"
9"
OBC
PROFILE
33" RIM
MAX
22"
33
4"
34" RIM
MAX
17"
9"
BCBC
(British Colombia Building Code)
ADA ages
6 thru 12
Part #: 6216-014-000 03/07/19
INSTALLATION, OPERATIONS
& MAINTENANCE MANUAL
NEO-METRO FIELD SERVICE
TOLL FREE 800-743-8259 • LOCAL 626-855-4866 • FAX 626-855-4863
Please visit for most current specifications.www.neo-metro.com
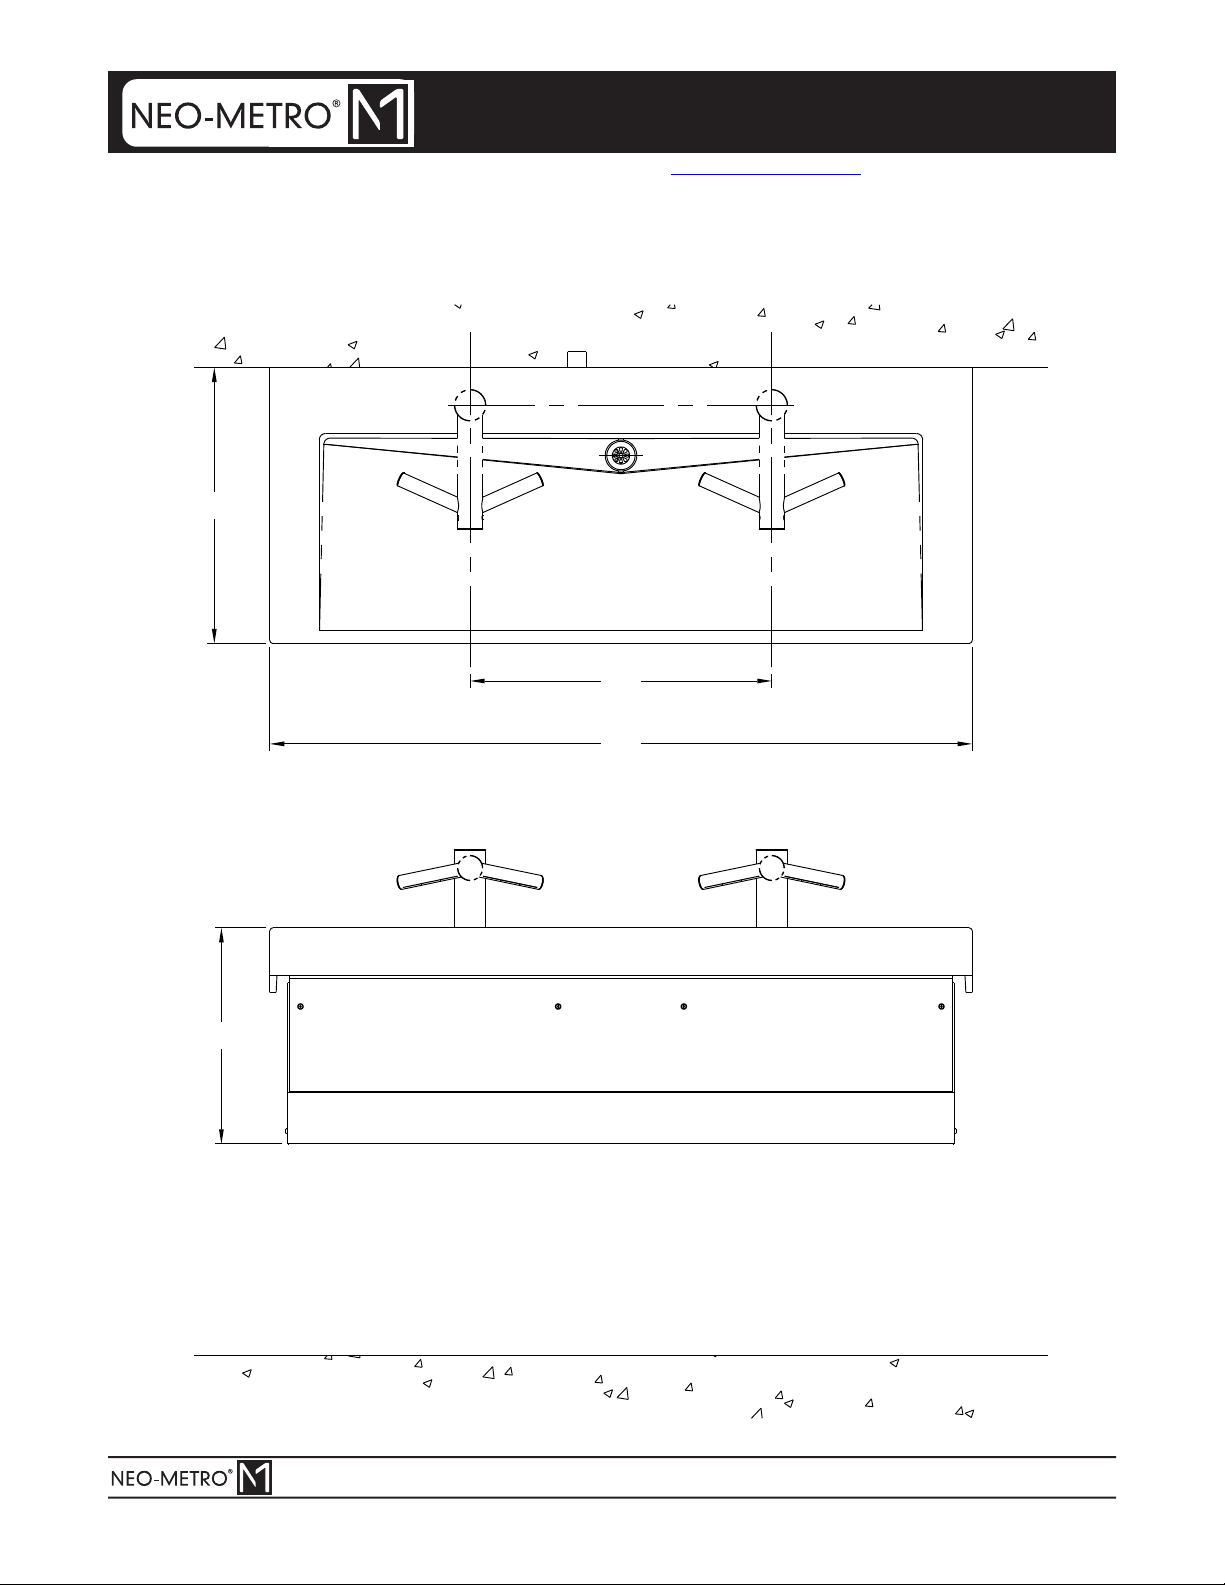
DIMENSIONAL DATA
Page 4 of 16
Part #: 6216-014-000 Date: 03/07/19
INSTALLATION, OPERATIONS
& MAINTENANCE MANUAL
NEO-METRO FIELD SERVICE
TOLL FREE 800-743-8259 • LOCAL 626-855-4866 • FAX 626-855-4863
Please visit for most current specifications.www.neo-metro.com
56"
22"
17"
24"
ROUGH-IN DIMENSIONS
MOUNTING PLUMBING
Page 5 of 16
Part #: 6216-014-000 Date: 03/07/19
INSTALLATION, OPERATIONS
& MAINTENANCE MANUAL
NEO-METRO FIELD SERVICE
TOLL FREE 800-743-8259 • LOCAL 626-855-4866 • FAX 626-855-4863
Please visit for most current specifications.www.neo-metro.com
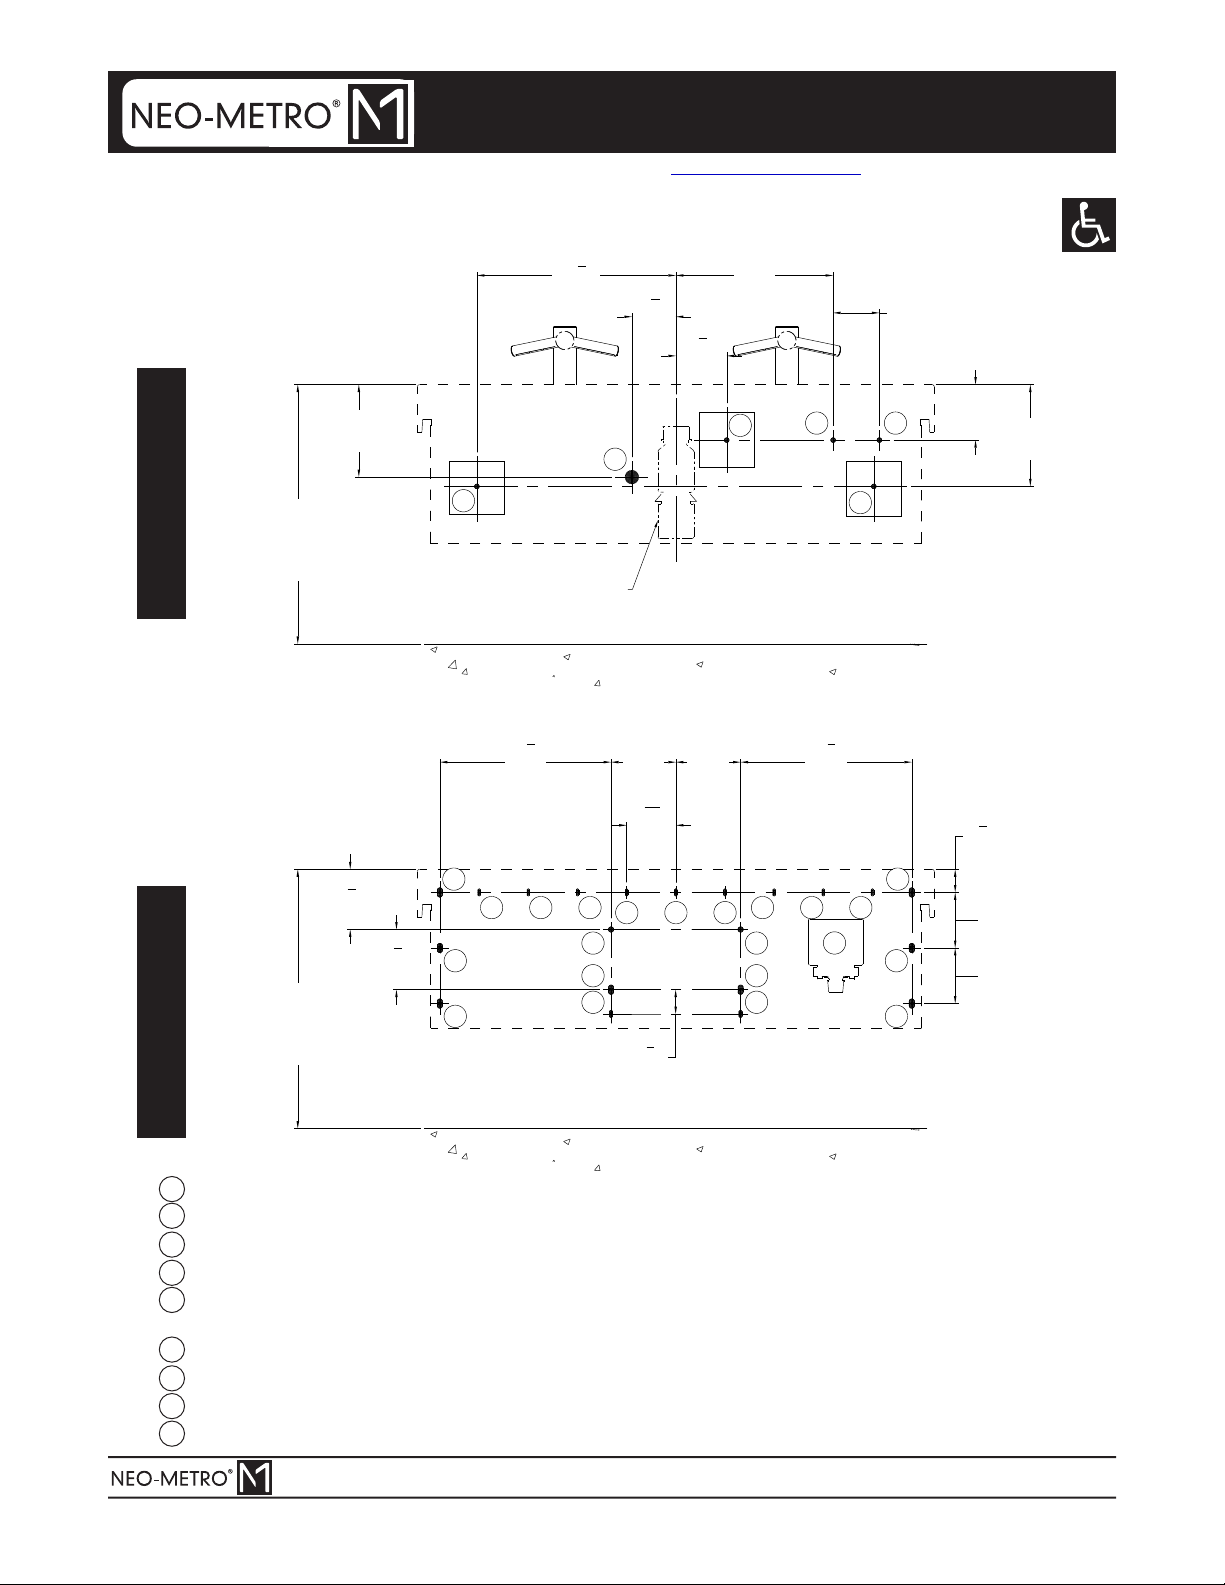
A - 110-120 VAC/60Hz/15A dedicated circuit when Dyson Air Blade Faucet selected
B - Waste Outlet for 1-1/2" O.D. P-Trap by others
C - Valve Mounting Area
D - Supply Stub-Outs with Stops for Valve 1/2" NPT Hot & Cold Supply Inlets
E - 120VAC, 60 Hz, 3A (Max.) GFCI Protected, Electrical Receptacle when -SO and -SOS options are
selected
F - Wall Anchoring Ø9/16” x 1” Long, Angle Bracket Mounting Slots, 8 Places
G - Wall Anchoring Ø9/32” x 3/4” Long, Enclosure Mounting Slots, 13 Places
I - Wall Anchoring Ø3/8” x 3/4” Long, Trap Cover Mounting Slots, 2 Places
H - Wall Anchoring Ø9/16” Mounting Hole, Support Bracket Mounting, 2 Places
31" [787] ADA (6-13)
34" [864] ADA ADULT
34" [864] BCBC
33" [838] OBC
21
2"
[64]
6"
[152] Typ.
6"
[152] Typ.
31" [787] ADA (6-13)
34" [864] ADA ADULT
34" [864] BCBC
33" [838] OBC
61
2"
[165]
61
2"
[165]
25
8"
[67]
G G G G G G G G G
F F
H H
10"
[254]
A
211
2"
[546]
11"
[279]
43
4"
[121]
Optional -SOS Sensor
Operated Soap Profile
(Shown For Reference)
DD
A
6"
[152]
E
51
2"
[140]
B
5"
[127]
17"
[432]
C
I I
181
2"
[470]
7"
[178]
55
16"
[135]
Typ.
F
F
F
F
F
F
7"
[178]
181
2"
[470]

FIXTURE ANCHORING
Page 6 of 16
Part #: 6216-014-000 Date: 03/07/19
INSTALLATION, OPERATIONS
& MAINTENANCE MANUAL
NEO-METRO FIELD SERVICE
TOLL FREE 800-743-8259 • LOCAL 626-855-4866 • FAX 626-855-4863
Please visit for most current specifications.www.neo-metro.com
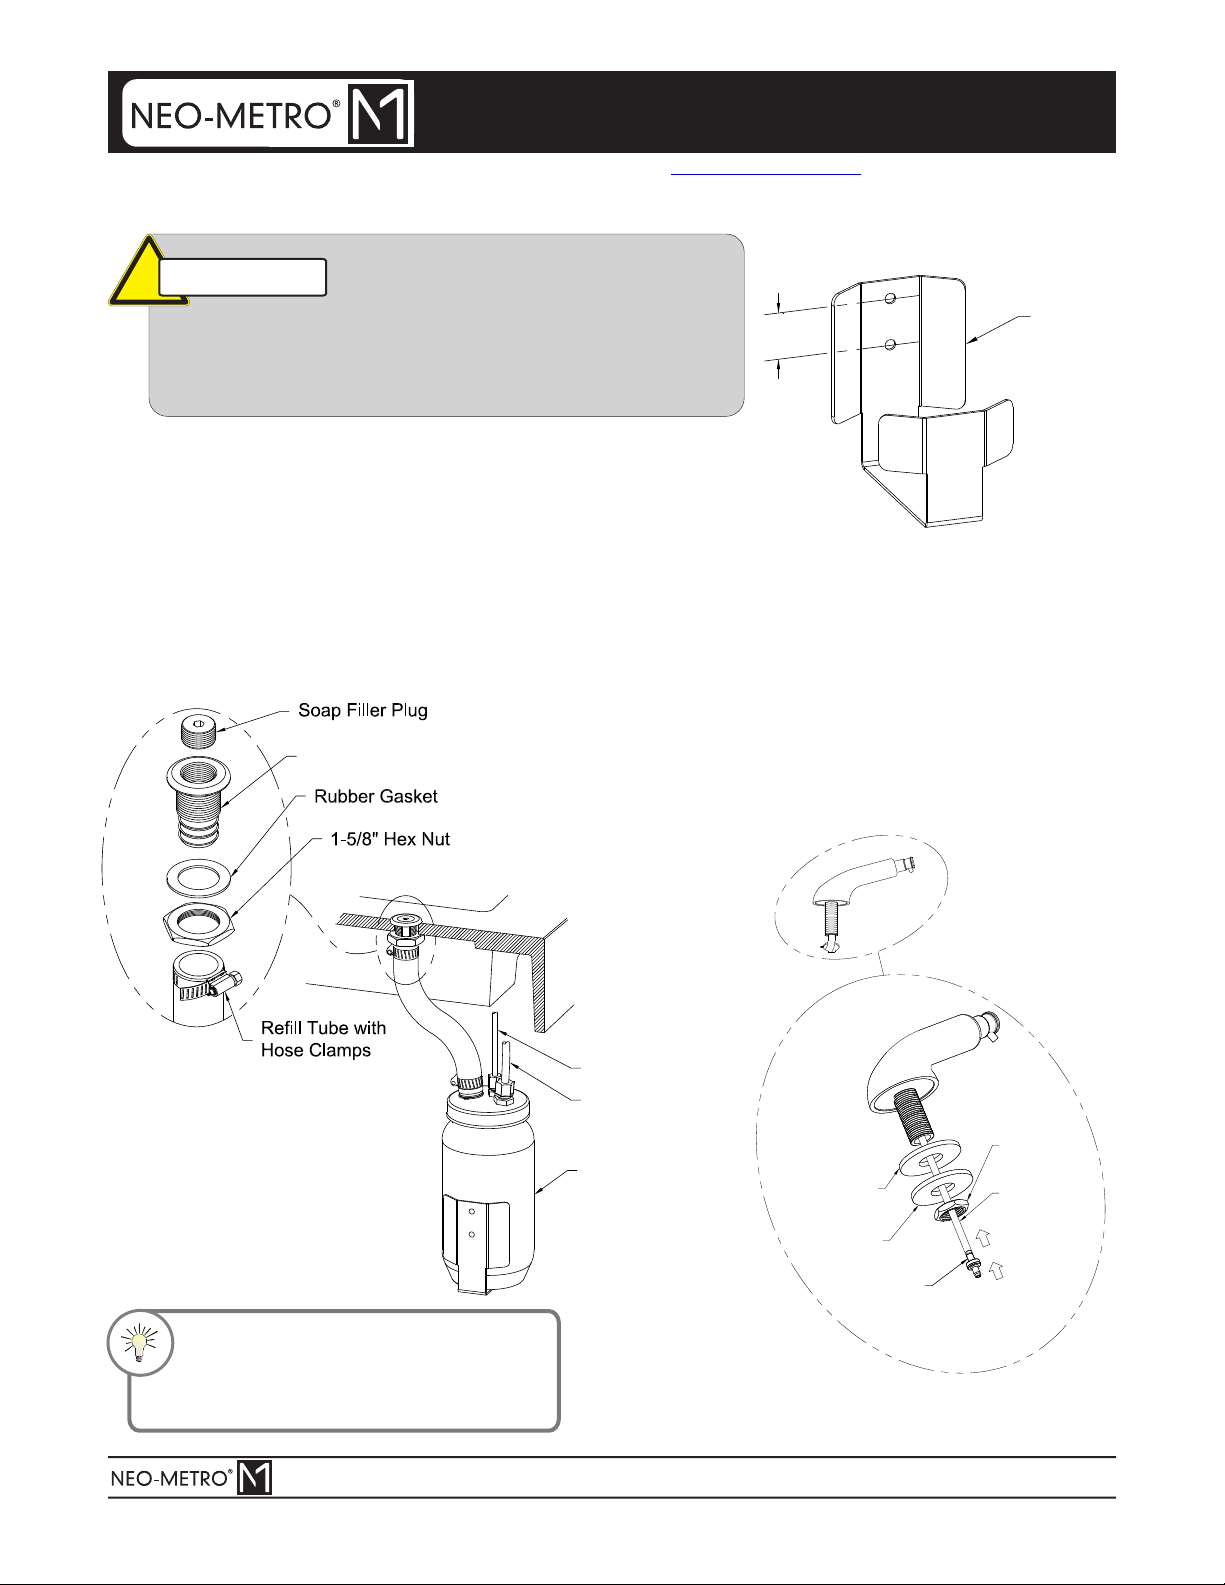
Locate and mount the mounting bracket to a finished wall. Locate and install P-Trap
1enclosure anchors provide by others.
NOTE: It may be advantageous to install to the deck, faucets,
soap dispensers or other accessories prior to wall mounting.
Hang deck and P-Trap enclosure onto mounting bracket , level
3and mount to the finished wall using 1/2” mounting hardware
supplied by others.
Assemble deck to P-Trap enclosure using the 1/4”-20 hardware
2provided. (6 places)
1/4"-20 UNC X 1/2" HEX
HEAD CAP SCREW
(PROVIDED)
1/4" MOUNTING BOLTS
(PROVIDED BY OTHERS)
When P-Trap enclosure is in the
4closed position, secure P-Trap
enclosure by securing cover catch
to bottom of counter deck.
Install grid strainer and close elbow to
4basin bowl using plumber's putty.
2. Rubber Gasket
3. Flat Fiber Washer
4. 1-1/2" -16 UNI Rough Chrome Brass
Jam Nut
5. 1-1/2"-16 x 1-1/4" UNI Close Ell
with 3/8" NPT Clean-Out Plug
1. Grid Strainer w/ 1-1/2" -16 UNE Threads
WASTE PLUMBING
Assemble waste piping using teflon tape on all
5threaded connections and make up waste
connections to 1-1/2” P-Trap.
HINT: Teflon tape is recommended on all
threaded waste and supply connections.
Page 7 of 16
NOTE: ADD TEFLON TAPE TO ITEM (1) BEFORE
ASSEMBLING ITEM (5)
1
2
3
4
5
71
2"
Part #: 6216-014-000 Date: 03/07/19
INSTALLATION, OPERATIONS
& MAINTENANCE MANUAL
NEO-METRO FIELD SERVICE
TOLL FREE 800-743-8259 • LOCAL 626-855-4866 • FAX 626-855-4863
Please visit for most current specifications.www.neo-metro.com
CUT TO FIT TAILPIECE
AS NEEDED

5) Turn on fixture and allow water to flow for 2
minutes. Measure water temperature at
outlet. If water is not at desired temperature,
adjust as necessary.
NOTE: Installation should be in accordance with
accepted plumbing practices.
1) Locate suitable place for mounting the valve
assembly. Valve assembly should be
accessible for service and adjustment and
as close to the point-of-use as possible.
Wall anchors and anchoring hardware are
by others.
2) Connect hot and cold water to supply
valve using 1/2” NPTE connections by others.
3) Connect outlet of tempering valve to
spout using 1/2” NPT connections
provided (Refer to pg.8).
4) Turn on hot and cold water supplies. If any
leaks are observed, hand-tighten
connections as necessary to stop leaks
before proceeding.
1) Loosen locknut.
2) Turn on fixture and run water for at least 2
minutes. Allow supply temperature to
stabilize.
3) Turn temperature stem counter-clockwise
for hotter or clockwise for colder outlet
temperature.
4) Tighten locknut to prevent accidental or
unauthorized temperature adjustment.
5) Re-check outlet temperature.
Temperature Adjustment
Valve Assembly Installation:
VALVE INSTALLATION & ADJUSTMENT
!IMPORTANT
Flush supply lines of all foreign material such
as pipe dope, pipe chips, solder, sand etc.
before making up supply connections.
HINT: Angle stops are recommended
and is the responsibility of the installer.
LOCKNUT
WARMER
TEMPERATURE
STEM
Page 8 of 16
1
2
1
(For -MXTP Option):
Part #: 6216-014-000 Date: 03/07/19
INSTALLATION, OPERATIONS
& MAINTENANCE MANUAL
NEO-METRO FIELD SERVICE
TOLL FREE 800-743-8259 • LOCAL 626-855-4866 • FAX 626-855-4863
Please visit for most current specifications.www.neo-metro.com
OPTIONAL ACCESSORY INSTALLATION & ASSEMBLY
Some soaps contain corrosive additives that can cause rust in
soap dispensers. Acorn Engineering Company recommends
user/ maintenance personnel review MSDS reports of soap and
possible corrosive additives noted.
!WARNING
Rubber
Gasket
Washer
Black end of
Check Valve
Direction
of Flow
3/8" Nut
3/8" O.D.
Tube
Install soap reservoir to wall inside P-Trap
enclosure using mounting brackets provided as
shown. Wall anchors and anchoring hardware
provided by installer.
A.
Install soap filler assembly to deck as shown.
B.
Attach 1-1/4" O.D. refill tube to soap filler
assembly and soap reservoir with provided hose
clamps.
C.
Install soap dispenser(s) onto deck. NOTE:
Gasket and Washer are located beneath the
deck.
D.
Attach 3/8" O.D. Tubing to the dispenser(s) and
reservoir. NOTE: Check Valve must be field
spliced into tubing and installed with respect to
direction of flow.
E.
HINT: For best results install soap
reservoir fill hole directly below soap filler
on deck with refill tube as short and
straight as possible to facilitate refill of
soap without backup or overflow.
Page 9 of 16
Soap Filler Adapter
Ø3/8" OD Tube
Ø1/4" OD Vent Tube
Soap Reservior
Mounting
Bracket
1-1/4"
Part #: 6216-014-000 Date: 03/07/19
INSTALLATION, OPERATIONS
& MAINTENANCE MANUAL
NEO-METRO FIELD SERVICE
TOLL FREE 800-743-8259 • LOCAL 626-855-4866 • FAX 626-855-4863
Please visit for most current specifications.www.neo-metro.com

Page 10 of 16
MODEL #9152-WD04-SOS
MODEL #9152-WD04-PDM
FINISHED LAYOUTS
(SHOWN FOR REFERENCE)
Part #: 6216-014-000 Date: 03/07/19
INSTALLATION, OPERATIONS
& MAINTENANCE MANUAL
NEO-METRO FIELD SERVICE
TOLL FREE 800-743-8259 • LOCAL 626-855-4866 • FAX 626-855-4863
Please visit for most current specifications.www.neo-metro.com

TROUBLE SHOOTING FOR 9 VOLT DC SENSOR OPERATED VALVES
Normal Valve Function: 9 Volt DC sensor operated valve has flow time of 90 seconds maximum.
To reactivate, the user must move out of and return to the sensing area.
CONDITION: WATER DOES NOT FLOW
Indicators Probable Cause
Solution
Sensor flashes continuously
every 2 seconds when
hands are within range.
Low battery warning Replace battery
Circuit breaker tripped. Reset circuit breaker
Replace battery
Defective 9V DC transformer
Transformer polarity crossed Replace transformer (sensor may be
damaged and need replacement).
Unit is in “Security Mode” after
90 seconds of constant detection.
Remove sources of detection and
wait 30 seconds before checking.
Range is too short. Increase range.
Range is too long. Decrease range and wait 30 seconds.
Sensor is picking up a highly
reflective surface. Eliminate cause of reflection and wait
30 seconds before checking.
Sensor does not flash
when the user’s hands
are within range.
Defective sensor. Replace sensor.
Stops or water main closed.
Bad sensor to solenoid connection.
Debris or scale in
solenoid assembly.
Remove solenoid, pull out plunger
and spring, and clean with scale
remover solution or pressurized air.
Debris or scale in diaphragm. Remove diaphragm and clean
Sensor flashes once
when user’s hands are
within range.
Remove strainer and clean.
CONDITION: FALSE TRIGGERING;
WATER FLOWS CONTINUOUSLY
Indicators Probable Cause
Solution
Remove diaphragm and clean. Sensor flashes when user’s
hands are within range. Diaphragm is defective or torn.
Sensor is dirty or covered. Clean or uncover sensor and
wait 30 seconds.
Decrease range and wait 30 seconds.
Sensor does not flash when
users hands are within range. Range too long or highly
reflective surface, sunlight, bright
lights etc. are triggering sensor. Eliminate cause of reflection or
correct lighting problem.
CONDITION: WATER FLOWS
CONTINUOUSLY BUT STOPS
WHEN HANDS ARE WITHIN RANGE
Indicators Probable Cause
Solution
Water runs continuously when
sensor not activated. Sensor
flashes when hands are within
range and water shuts off.
Solenoid polarity crossed. Disconnect solenoid and
reverse polarity.
Battery completely used up.
Replace transformer.
Open stops or water main.
Ensure wires make proper contact.
Debris or scale in strainer.
Replace diaphragm.
Debris or scale in diaphragm
Page 11 of 16
Part #: 6216-014-000 Date: 03/07/19
INSTALLATION, OPERATIONS
& MAINTENANCE MANUAL
NEO-METRO FIELD SERVICE
TOLL FREE 800-743-8259 • LOCAL 626-855-4866 • FAX 626-855-4863
Please visit for most current specifications.www.neo-metro.com

CONDITION: WATER DOES NOT FLOW
Probable Cause Solution
Water main closed. Open water main.
Checkstops closed. Open checkstops.
Debris or scale in checkstop strainer
. Remove checkstop strainer and clean.
Air leaks from 1/8” O.D. tubing or fittings. Replace damaged tubing or fitting.
Pushbutton air diaphragm leaks. Replace pushbutton air diaphragm.
Servomotor diaphragm center hole is blocked.
Servomotor upper diaphragm is damaged.
Low or no water pressure at supplies. Increase water pressure to 30 PSI minimum.
CONDITION: WATER DRIPS, WON'T SHUT OFF
Probable Cause Solution
Servomotor diaphragm offset hole is blocked.
Servomotor seat is damage Replace servomotor seat.
Servomotor plate or diaphragm is obstructed.
Servomotor timer assembly is damaged. Replace servomotor timer assembly.
Probable Cause Solution
Valve riser tubing is crimped. Straighten valve riser tubing.
Debris or scale in checkstop strainer
. Remove checkstop strainer and clean.
Blockage in valve flow control. Remove blockage.
Low water pressure at supplies. Increase water pressure to 30 PSI minimum.
Lime deposits in hot water pipes.
CONDITION: REDUCED WATER FLOW
Probable Cause Solution
Air leaks from 1/8" O.D. tubing or fittings. Replace damaged tubing or fitting.
Pushbutton air diaphragm leaks. Replace pushbutton air diaphragm.
Remove blockage.
Replace servomotor upper diaphragm.
Remove cause of obstruction.
Remove blockage.
TROUBLE SHOOTING FOR OPTIONAL PUSHBUTTON OPERATED VALVES
Normal Valve Function: Hand pushbutton operated valve has an adjustable flow time from
5 to 60 seconds.
Remove lime deposits with appropriate
cleaning solution.
CONDITION: PREMATURE WATER SHUT OFF
Page 12 of 16
Part #: 6216-014-000 Date: 03/07/19
INSTALLATION, OPERATIONS
& MAINTENANCE MANUAL
NEO-METRO FIELD SERVICE
TOLL FREE 800-743-8259 • LOCAL 626-855-4866 • FAX 626-855-4863
Please visit for most current specifications.www.neo-metro.com

CARE, CLEANING, AND REPAIR
OF CORTERRA SOLID SURFACE
®
CARE AND CLEANING OF STAINLESS
STEEL SURFACE
FOR HIGH POLISH STAINLESS STEEL
Note: High polish stainless steel surfaces should never
come into contact with any abrasive cleaning brush, cloth or
cleaning agent.
RECOMMENDED CLEANING MATERIALS
- Sponge – natural or artificial
- Nylon or other soft-bristle material brush
- Soft cloth (as used on automobile finishes)
RECOMMENDED CLEANING SOLUTIONS
- Hand dishwashing liquid/soft water solution
- Mild soap/soft water solution
- 3M Stainless Steel Cleaner/Polish
- White vinegar/soft water solution
(for brightening, removing oil and
hard water deposits)
- CLR Brand Cleanser or baking soda/soft
water solution (for brightening, removing
hard water deposits)
- Club soda and sponge
SOAP SYSTEMS
Acorn soap reservoirs and dispensers provide a dependable
operation over long term when proper maintenance is
performed and the correct soap is being used. The most
common problem with soap systems is that the wrong
viscosity (thickness) of soap is being used or high acidic pH
levels are in the ingredients. Soap thickness can be best
explained as no thicker or thinner than normal household
liquid dish soap. The pH level of the soap should be 6.5 to
8.5; more acidic soaps will corrode the metal parts and
degrade rubber or plastic components.
FOR TOUGH PROBLEMS
- CRES Cleaner specifically for rust stains (available from
Acorn)
- Tarn-X for general stains
- #7 chrome polish
- Silver polish
To remove stubborn spots or to treat a scratch
(Standard Satin Finish Only):
Use of synthetic, abrasive, general-purpose pads such as
Scotch Brite is recommended. Apply the stainless steel
cleaner/polish to the synthetic, abrasive pads and
CAREFULLY rub out spot with cleaner/ polish. Be sure to
rub in the direction of the grain! Do not allow steel wool to
come in contact with the stainless steel. Steel particles can
embed into the stainless steel surface and create rust!
CORTERRA SOLID SURFACE
®
Acorn's densified solid surface material is composed of
recycled solid-surface polymer resin, aluminum trihydrate
and fillers. It is resistant to stains, impact and burns and
complies with ANSI Z124.3. It is attractive, durable and easy
to maintain.
To remove smudges and fingerprints:
Wipe surfaces with a quality Stainless Steel Cleaner/Polish.
Apply using a soft non-abrasive cloth, wipe surfaces with
stainless steel cleaner/polish.
ROUTINE CLEANING
Corterra should be kept clean at all times. If maintained,
®
Corterra surfaces will retain their new, clean appearance
®
indefinitely. Wash with a non-abrasive all purpose cleaner
and water, then rinse. Wipe dry. (Never use cleaners with
strong chemicals such as toilet bowl cleaners, rust
removers, ceramic cook top cleaners, laquer thinners or
oven cleaners). To remove persistent stains use a Scotch
Brite pad and an abrasive cleaner or a solution of household
bleach and water (1 part water to 1 part bleach).
To remove rust stains:
Wipe surfaces with CRES (available from Acorn) or
equivalent cleaner. Use recommended solutions. Apply
using a soft non-abrasive sponge. Rinse surfaces
immediately after application. Always follow cleaner product
directions provided. Afterwards, using a soft, non-abrasive
cloth, wipe surfaces with stainless steel cleaner/polish.
Stainless steel should be kept clean at all times. If
maintained, stainless steel surfaces will retain their new,
clean, polished appearance indefinitely. To remove water
spots or rust spots, stainless steel cleaner/polish on a cloth
is recommended.
Soap reservoirs and dispensers should be maintained
periodically to clear residue. This should be done in hot
water to clean the internal components. The valve should be
pumped multiple times to thoroughly clean any residue
inside. The reservoir and tubing should also be flushed and
cleaned with hot water. In cases of extreme clogs, the
dispenser should be disassembled and the parts thoroughly
cleaned. IF SPOTS ARE STUBBORN OR IF YOU WISH TO TREAT A
SCRATCH: synthetic, abrasive, general-purpose pads such
as Scotch Brite are recommended. Apply the stainless steel
cleaner/polish to the synthetic, abrasive pad and
CAREFULLY rub out spot with cleaner/polish. Be sure to
rub in the direction of the grain! Do not allow steel wool to
come in contact with stainless steel. Steel particles can
embed into the stainless steel surface and create rust.
NORMAL CLEANING
Clean weekly or more often, as needed
(especially high polishing surfaces)
REPAIRING SURFACE DAMAGE
Surface damage, such as minor chips, scratches, burn
marks and graffiti can be repaired with a fine grit abrasive
cleanser, such as a Scotch-Brite pad or fine grit sandpaper.
For more serious physical damage caused by vandals, an
Acorn Solid Surface Repair Kit is available. Contact the
factory for details. Refer to drawing #9927-160-002.
WARNING: Some soap contains corrosive additives that
can cause rust on stainless steel surfaces. Acorn
recommends user/ maintenance personnel review MSDS
reports of soap and possible corrosive additives noted.
Page 13 of 16
Part #: 6216-014-000 Date: 03/07/19
INSTALLATION, OPERATIONS
& MAINTENANCE MANUAL
NEO-METRO FIELD SERVICE
TOLL FREE 800-743-8259 • LOCAL 626-855-4866 • FAX 626-855-4863
Please visit for most current specifications.www.neo-metro.com

¼"-20 x 1/2" Long
Stainless Steel, Hex Head, Cap Screw, 0206-004-000
0332-004-000
¼"-20 x 1" Thick Fender Washer
COMPONENTS & REPAIR PARTS
Description Part No. Diagram
0337-050-000
1/4" Stainless Steel Helical Lock Washer
Page 14 of 16
Part #: 6216-014-000 Date: 03/07/19
INSTALLATION, OPERATIONS
& MAINTENANCE MANUAL
NEO-METRO FIELD SERVICE
TOLL FREE 800-743-8259 • LOCAL 626-855-4866 • FAX 626-855-4863
Please visit for most current specifications.www.neo-metro.com
(Deck Mounted Short Faucet)
Dyson Airblade™ Wash + Dry
3040-091-000
ST70-12 1/2” NPT Mixing Valve
ST70-12 Valve Bracket Assembly
7802-101-001
7842-020-001
MOUNTING HARDWARE
SPOUTS
VALVE

COMPONENTS & REPAIR PARTS
Description Part No. Diagram
ENCLOSURES
Grid Strainer w/ Close Elbow
4926-062-001
ELECTRIC HARDWARE CONTINUED:
P-Trap Waste Assembly
4970-040-003
Mounting Bracket
Mounting Bracket 6216-204-199
WASTE ASSEMBLY
9 VDC Battery-Pak Assy
(6 AA Batteries Not Included)
Battery-Pak Mounting Bracket
0710-358-001
6155-013-199
P-Trap Enclosure 6216-200-002
Page 15 of 16
-PDM SOAP OPTION
Soap Filler Assembly 1391-008-001
Part #: 6216-014-000 Date: 03/07/19
INSTALLATION, OPERATIONS
& MAINTENANCE MANUAL
NEO-METRO FIELD SERVICE
TOLL FREE 800-743-8259 • LOCAL 626-855-4866 • FAX 626-855-4863
Please visit for most current specifications.www.neo-metro.com
WARRANTY INFORMATION
Acorn warrants that all of its products are guaranteed against defective material or poor workmanship for a period of
one year from date of shipment. Acorn's liability under this warranty shall be discharged by replacing without charge
F.O.B. City of Industry, California, any goods, or part thereof, which appears to the company upon inspection to be of
defective material or not of first class workmanship, provided that claim is made in writing to the company within
reasonable period after receipt of the product. Where claims for defects are made, the defective part or parts shall be
delivered to the company, prepaid, at City of Industry, California for inspection. Acorn will not be liable for the cost of
repairs, alterations or replacement, or for any expense connected therewith made by the owner or his agents, except
upon written authority from the Acorn City of Industry office. Acorn will not be liable for any damages caused by
defective materials or poor workmanship, except for replacements, as above provided. Contact local Acorn
Representative for complete terms and conditions.
M A I L A DD R E S S
P. O . B O X 3 52 7
C I T Y O F I N D U S T R Y, C A 9 1 7 4 4 U . S . A .
P H Y S I C A L A D D R E S S
1 5 1 2 5 P R O C TO R AV EN U E
C I T Y O F I N D U S T R Y, C A 9 1 7 4 6 U . S . A .
T O L L F R E E 8 0 0 - 4 8 8 - 8 9 9 9 • L O C A L 6 2 6 - 3 3 6 - 4 5 6 1
FA X 6 2 6 - 9 6 1 - 2 2 0 0 • W E B w w w. a c o r n e n g . c o m
Page 16 of 16
Part #: 6216-014-000 Date: 03/07/19
INSTALLATION, OPERATIONS
& MAINTENANCE MANUAL
NEO-METRO FIELD SERVICE
TOLL FREE 800-743-8259 • LOCAL 626-855-4866 • FAX 626-855-4863
Please visit for most current specifications.www.neo-metro.com
Table of contents
Other Neo-metro Plumbing Product manuals

Popular Plumbing Product manuals by other brands

AJAX Systems
AJAX Systems WaterStop Jeweller user manual

JOOLCA
JOOLCA JCA11001 user guide

Zip Water
Zip Water HydroTap G5 installation instructions

SeasonsComfort
SeasonsComfort Westwind 211821 quick start guide

Hans Grohe
Hans Grohe Xuniva S 350/350 60151450 Assembly instructions

newform
newform BLINK 70800 instructions

Spectrum Brands
Spectrum Brands Pfister Kenzo R89-1DF Maintenance & Care Guide

RUVATI
RUVATI RVH9201 quick start guide

American Standard
American Standard CADET 3 FloWise 2829.128 Specifications

Hans Grohe
Hans Grohe iBox 13595000 Assembly instructions

BK RESOURCES
BK RESOURCES MSHS-72F1 Assembly instructions

Bradley
Bradley Verge LVGD1 Installation


