NEO TOOLS 75-200 User manual

1
neo-tools.com
PL Instrukcja obsługi
GB Instruction manual
RU Инструкция по эксплуатации
UA Інструкція з експлуатації
HU Használati Utasítás
RO Instructiuni de deservire
CZ Návod k obsluze
SK Návod na obsluhu
GR Οδηγίες χρήσης
IT Manuale d’uso

2
neo-tools.com
PL
GB
RU
UA
HU
RO
CZ
SK
GR
IT
DALMIERZ LASEROWY: 3
Laser Range Finder 12
Лазерный дальномер 21
Далекомір лазерний 31
Lézeres távolságmérő 41
Telemetru cu laser 50
Laserový dálkoměr 59
Laserový diaľkomer 68
Αποστασιόμετρο λέιζερ 77
Telemetro laser 87

neo-tools.com
3
INSTRUKCJA UŻYTKOWANIA
DALMIERZ LASEROWY:
75-200
UWAGA:
Przed przystąpieniem do użytkowania urządzenia, należy uważnie
przeczytać niniejszą instrukcję i zachować ją do dalszego wykorzystania.
Nieprzestrzeganie zasad bezpieczeństwa zawartych w instrukcji obsługi
może doprowadzić do uszkodzenia urządzenia oraz być przyczyną obrażeń
ciała.
OSTRZEŻENIE: Nie wolno patrzeć bezpośrednio w wiązkę światła
laserowego.
Należy przestrzegać niżej podanych zasad bezpieczeństwa.
1. Nie wolno wprowadzać żadnych modyfikacji w urządzeniu.
2. Urządzenie laserowe należy użytkować zgodnie z zaleceniami producenta.
3. Nigdy nie wolno umyślnie kierować wiązki laserowej w kierunku ludzi lub
zwierząt.
4. Nie wolno kierować wiązki światła laserowego ku oczom osób postronnych i
zwierząt. Promieniowanie lasera może uszkodzić narząd wzroku.
5. Zawsze należy się upewnić czy światło lasera nie jest skierowane na
powierzchnie odbijające. Powierzchnia odbijająca wiązkę lasera mogłaby
wówczas, odbić taką wiązkę w kierunku operatora, lub osób trzecich.
6. Nie należy pozwalać dzieciom na obsługę tego urządzenia. Nie dopuszczać
dzieci do miejsca pracy podczas ustawień i w czasie używania urządzenia.
7. Nieużywany sprzęt przechowywać w suchym miejscu niedostępnym dla
dzieci.
8. Nie wolno wymieniać zespołu laserowego na urządzenie innego typu.
Wszelkie naprawy powinny być wykonane przez serwis producenta.
Urządzenie zostało wyposażone w laser klasy 2 zgodnie z EN 60825-1:2007.
Przeznaczenie
Urządzenie przeznaczone jest do pomiaru odległości jak również do
pomiaru pola powierzchni i objętości. Dodatkowo dalmierz posiada w
funkcję pomiaru pośredniego (zgodnie z twierdzeniem Pitagorasa) który
pozwala na obliczanie wysokości. Pomiar dynamiczny pozwala na wykonanie
ciągłego pomiaru. Urządzenie należy użytkować wyłącznie w suchych
pomieszczeniach.
W czasie pracy należy działać ściśle według poniższych instrukcji, aby zapewnić
jak najlepsze działanie urządzenia. Zastosowanie inne niż opisane poniżej jest
niedozwolone i może prowadzić do uszkodzenia produktu.
Dalmierz laserowy zasilany jest przez 2 baterie 1,5V AAA. Poziom naładowania
baterii pokazany jest na wyświetlaczu w prawym górnym rogu. Jeśli ikona baterii
nie posiada żadnej kreski, należy wymienić baterie w urządzeniu na nowe.
Wymiana baterii:
1. Naciśnij zaczep blokady, aby zdjąć pokrywę baterii.
2. Włóż 2 nowe baterie AAA, zwróć uwagę na znak polaryzacji baterii, aby
załadowane baterie prawidłowo.
4
neo-tools.com
3. Zamknij pokrywę baterii.
UWAGA:
1. Należy wymienić baterię na nową, gdy poziom naładowania baterii jest
zerowy.
2. Należy wyjąć baterię, gdy urządzenie nie jest używane przez dłuższy czas.
3. Należy zwrócić uwagę na poprawną biegunowość podczas wkładania
baterii.
4. Nie należy używać starych i nowych baterii jednocześnie. Baterie wymieniać
w tym samym momencie, mieszanie starych i nowych baterii może
doprowadzić do wylania baterii i uszkodzenia urządzenia.
5. Baterie należy przechowywać poza zasięgiem dzieci. Nie wolno pozostawiać
baterii w ich zasięgu, ponieważ mogą one zostać przez nie połknięte.
6. Akumulatorów /baterii nie należy wrzucać do odpadów domowych,
nie wolno ich wrzucać do ognia lub do wody. Uszkodzone lub zużyte
akumulatory należy poddawać prawidłowemu recyklingowi zgodnie z
aktualną dyrektywą dotyczącą utylizacji akumulatorów i baterii.
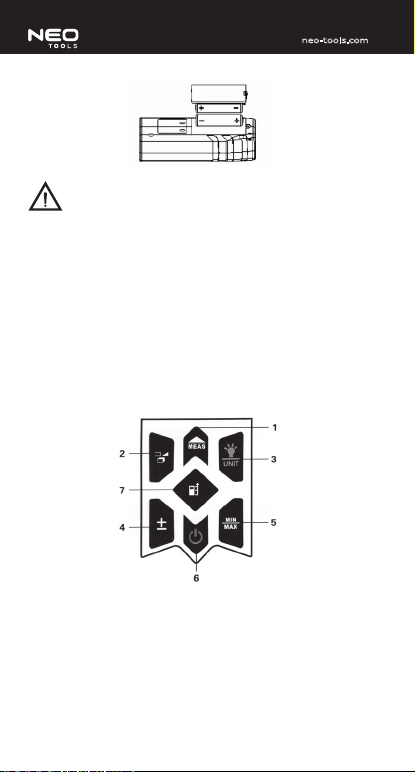
Panel przycisków
1. Przycisk pomiarowy.
2. Pomiar pośredni.
3. Podświetlenie / Wybór jednostki pomiaru.
4. Przycisk : dodawanie/odejmowanie.
5. Przełącznik wartość maksymalna / minimalna.
6. Włącznik/Wymaż.
7. Przycisk, punktu odniesienia.
neo-tools.com
5
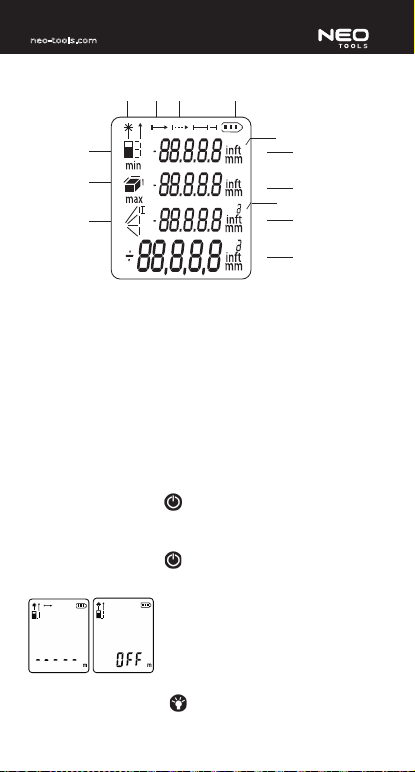
Wyświetlacz LCD-instrukcja:
1 2 1 1
8
10
11
12
13
7
6
5
9
1. Wskaźnik laserowy.
2. Pomiar pojedynczy
3. Pomiar ciągły.
4. Poziom naładowania baterii.
5. Podstawa pomiaru(punk odniesienia).
6. Pomiar pola powierzchnia / pomiar objętości.
7. Pomiar pośredni ( Pitagoras).
8. Jednostka pomiaru.
9. Wykładnik.
10. Ekran pozycja 1.
11. Ekran pozycja 2
12. Ekran pozycja 3.
13. Ekran główny.
Włączenie urządzenia
1. Przed uruchomieniem upewnij się,że bateria została włożona poprawnie.
2. Naciśnij przycisk zasilania, aby włączyć urządzenie.
3. Pojawi się na kilka sekund ekran początkowy ze wszystkimi ikonami,
następnie wyświetlacz przejdzie automatycznie w tryb pomiaru. Ikona
baterii pojawi się po prawej stronie wyświetlacza.
4. Naciśnij przycisk zasilania , przetrzymaj przez 2 sekundy, aby wyłączyć
urządzenie.
Na wyświetlaczu pojawi się napis OFF.
Podświetlenie wyświetlacza
Naciśnij przycisk podświetlenia przytrzymaj przez 2 sekundy, ekran się
podświetli.

6
neo-tools.com
Ponownie naciśnij przycisk podświetlenia, aby wyłączyć funkcję.
Przełącznik jednostki miar
Naciśnij przycisk urządzenia UNIT, aby zmienić jednostkę pomiaru. Każde
kolejne wciśnięcie powoduje cykliczną zmianę jednostki.
Włącz sekwencje:
m -> mm -> in -> ft.
Punkt odniesienia
Domyślnie, jako punkt odniesienia do pomiaru, brana jest tylna część dalmierza.
Możliwe jest ustawienie dwóch punktów odniesienia : część tylna i część przednia
dalmierza. Aby zmienić punkt odniesienia, należy wcisnąć przycisk , każde
wciśnięcie zmienia cyklicznie punkt odniesienia.
Sekwencja zmian: tył -> przód
Pomiar odległości
OSTRZERZENIE!
Po włączeniu urządzenia aktywny będzie wskaźnik laserowy. Należy zwrócić
uwagę na symbol wskazujący pracę/wyłączenie wskaźnika laserowego.
Pomiar pojedynczy
1. Po uruchomieniu urządzenia należy odczekać kilku sekund aż pojawi się
na wyświetlaczu, funkcja pomiaru.
2. Naciśnij przycisk , aby rozpocząć podświetlanie wskaźnikiem
laserowym obiektu mierzonego.
3. Po nakierowaniu wiązki lasera na wybrany punkt, ponownie wciśnij przycisk,
aby wykonać pomiar.
4. Urządzenie potwierdza wykonanie pomiaru, poprzez wyświetlenie wartości
zmierzonej na ekranie.
5. Naciśnij przycisk zasilania , aby usunąć zmierzoną wartość.
6. Po zakończeniu pomiaru światło lasera wyłączy się automatycznie.
neo-tools.com
7
Automatyczne wyłączanie
Jeśli przerwa w pracy trwa dłużej niż:
– 20 sekund, następuje automatyczne wyłączenie światła lasera,
– 60 sekund, następuje automatyczne odcięcie zasilania.
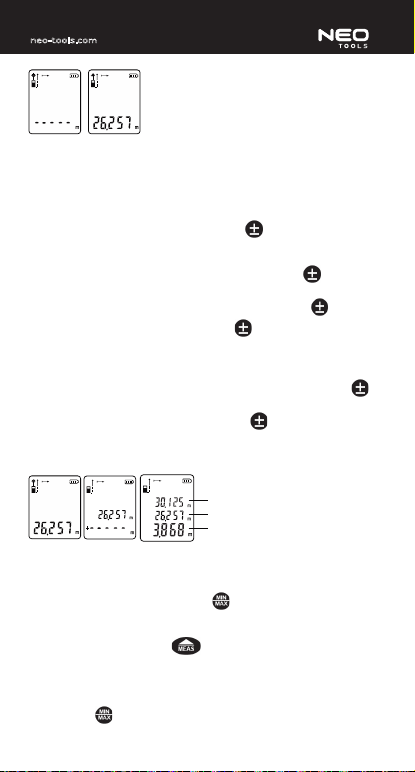
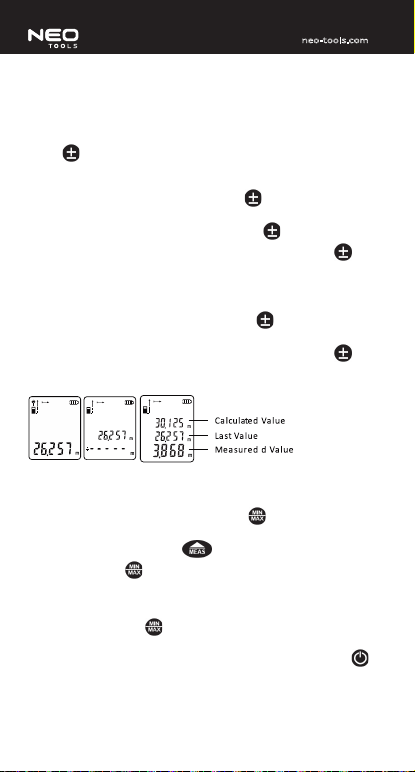
Dodawanie pomiarów
Kalkulację sumy wykonujemy przy użyciu przycisku , każdy wykonany pomiar
będzie dodawany do poprzedniego. Suma poszczególnych pomiarów będzie
wyświetlana na ekranie.
1. Po wykonaniu pierwszego pomiaru należy wcisnąć przycisk (tak aby na
wyświetlaczu pojawił się znak,,+”
2. Należy wykonać kolejny pomiar i ponownie nacisnąć przycisk .
3. Każdy kolejny pomiar i wciśnięcie przycisku spowoduje dodanie wyniku
do poprzedniego. Na dolnym ekranie będzie wyświetlona aktualna suma.
Odejmowanie pomiarów
1. Po wykonaniu pierwszego pomiaru należy dwukrotnie wcisnąć przycisk
( tak aby na wyświetlaczu pojawił się znak,,-”).
2. Każdy kolejny pomiar i wciśnięcie przycisku spowoduje odjęcie od
poprzedniego wyniku wartości zmierzonej. (należy zwracać uwagę aby na
wyświetlaczu pojawiał się znak,,-”) Na dolnym pasku ekranu pojawia się
wynik odejmowania.
wartość przeliczona
ostatni pomiar
wartość początkowa
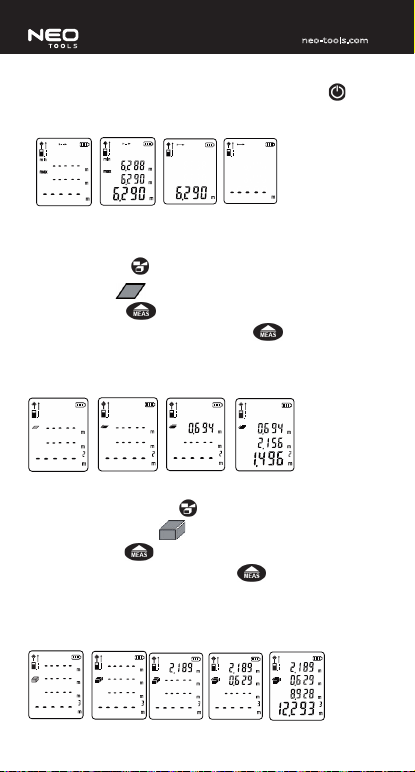
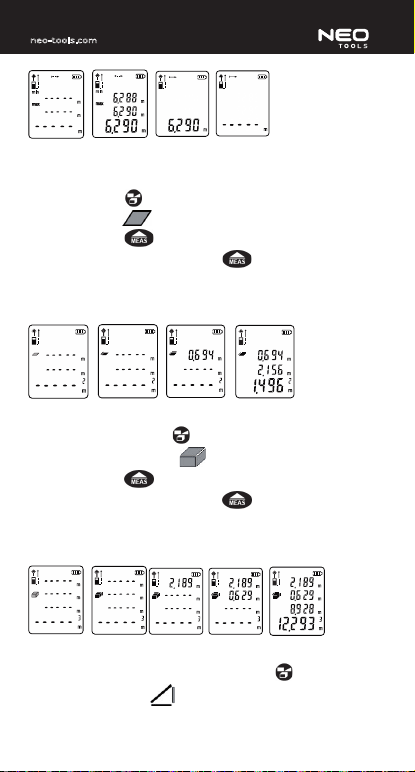
Pomiar ciągły
Domyślnie, każdy pomiar ustawiony jest jako pomiar pojedynczy.
1. Naciśnij przycisk pomiaru ciągłego aby wprowadzić tryb ciągłego
pomiaru, trzymaj urządzenie nieruchomo, kontroluj odległość pomiaru do
10 metrów.
2. Naciśnij przycisk pomiaru, aby rozpocząć pomiar ciągły, naciśnij
przycisk aby zatrzymać pomiar ciągły.
3. Główny ekran pokazuje pomiar wartości końcowej, na ekranie wyświetlacz
pokazuje odpowiednio, również minimalną i maksymalną wartość.
4. Gdy pomiar ciągły jest zatrzymany, naciśnij ponownie przycisk ciągłego
pomiaru , aby powrócić do trybu pojedynczego pomiaru. Wartość
8
neo-tools.com
końcowa po raz ostatni zostanie wyświetlona na ekranie głównym.
5. Gdy kończymy pomiar ciągły, należy nacisnąć przycisk zasilania, aby
powrócić do trybu pojedynczego pomiaru, wszystkie wartości pomiarowe
zostaną skasowane.
Funkcje pomiarowe
Pole powierzchni.
1. Naciśnij przycisk określający tryb pomiaru, na ekranie pojawi się
migający znak informujący o wyborze pomiaru pola.
2. Naciśnij przycisk, aby włączyć laser.
3. Następnie ponownie naciśnij przycisk pomiaru , postępuj zgodnie z
instrukcjami wyświetlanymi na ekranie, aby zmierzyć długość i szerokość.
Po zmierzeniu dwóch wartości, urządzenie automatycznie przeliczy wartość
powierzchni i wyświetli na ekranie głównym.
4. Po zakończeniu pomiaru, laser wyłączy się automatycznie
Pomiar objętości
1. Kilkakrotnie naciśnij przycisk określający tryb pomiaru, aż na ekranie
pojawi się migający znak informujący o pomiarze objętości.
2. Naciśnij przycisk , aby włączyć laser.
3. Nacisnąć ponownie przycisk pomiaru , postępuj zgodnie z
instrukcjami wyświetlanymi na ekranie, tak aby zmierzyć długość,
szerokość i wysokość. Po wykonaniu pomiaru trzech wartości, urządzenie
automatycznie przeliczy podane wartości i wyświetli na ekranie wyniki
pomiaru objętości.
4. Po zakończeniu pomiaru, laser wyłączy się automatycznie.

neo-tools.com
9
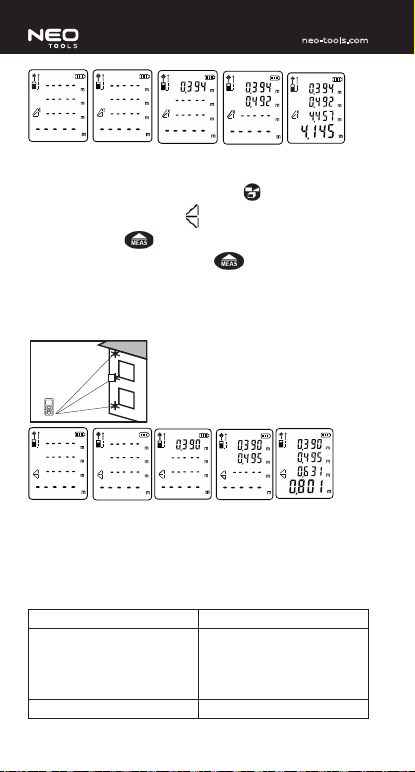
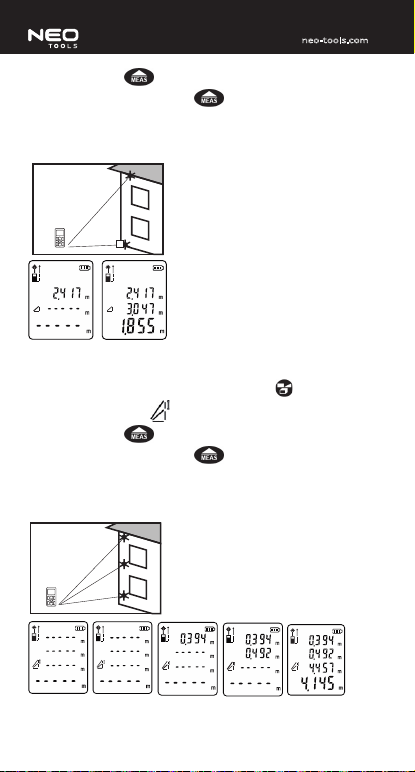
Pomiar pośredni, zgodnie z twierdzeniem Pitagorasa
1. Kilkakrotnie naciśnij przycisk trybu pomiaru , aż na ekranie pojawi się
migający znak .
2. Naciśnij przycisk, aby włączyć laser.
3. Naciśnij ponownie przycisk pomiaru , pomiary należy wykonywać
zgodnie ze wskazówkami pojawiającymi się na ekranie dalmierza oraz
rysunkami zamieszczonymi poniżej. Po pomiarze dwóch wartości,
urządzenie automatycznie wyliczy wartość drugiej przyprostokątnej
potrzebnej do uzyskania i wyświetli na ekranie głównym.
4. Po zakończeniu pomiaru, urządzenie wyłączy automatycznie światło lasera.
2
1
Pośredni pomiar (podwójny Pitagoras odejmowanie)
Wyznaczanie wysokości cząstkowej na podstawie trzech pomiarów.(różnica)
1. Kilkakrotnie naciśnij przycisk trybu pomiaru , aż na ekranie pojawi się
migający znak .
2. Naciśnij przycisk, aby otworzyć pomiaru światła laserowego.
3. Naciśnij ponownie przycisk pomiaru , pomiary należy wykonywać
zgodnie ze wskazówkami pojawiającymi się na ekranie głównym oraz
rysunkami zamieszczonymi poniżej. Po pomiarze trzech wartości,
urządzenie automatycznie przeliczy wartość wysokości potrzebnej do
uzyskania i wyświetli na ekranie głównym.
4. Po zakończeniu pomiaru, urządzenie wyłączy automatycznie światła lasera.
2
1
3
10
neo-tools.com
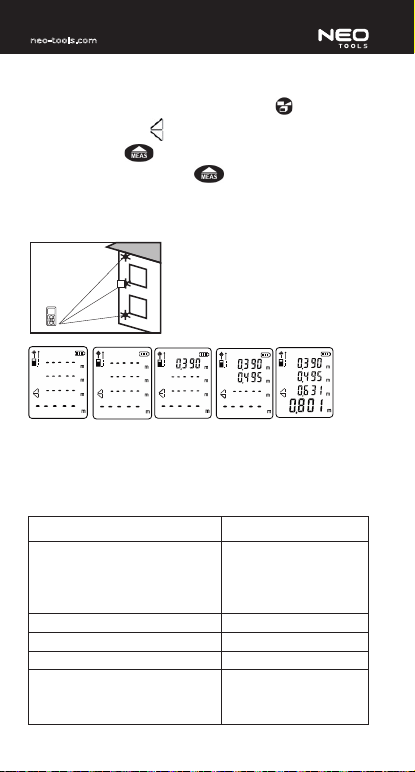
Pośredni pomiar (podwójny Pitagoras - dodawanie)
Pomiar w wykorzystaniem trzech punktów.
1. Kilkakrotnie naciśnij przycisk trybu pomiaru , aż na ekranie pojawi się
migający na wyświetlaczu znak .
2. Naciśnij przycisk , aby otworzyć pomiaru światła laserowego.
3. Naciśnij ponownie przycisk pomiaru , pomiary należy wykonywać
zgodnie ze wskazówkami pojawiającymi się na ekranie głównym,
oraz zamieszczonymi rysunkami poniżej. Po pomiarze trzech wartości,
urządzenie automatycznie przeliczy wartość wysokości potrzebnej i
wyświetli na ekranie głównym.
4. Po zakończeniu pomiaru, urządzenie wyłączy automatycznie światła lasera.
2
1
3
Zapisywanie pomiarów
Wyniki pomiarów zapisywane są automatycznie w pamięci urządzenia. Aby
wyświetlić zapisane wyniki, należy wcisnąć przycisk MEAS i chwilę przetrzymać
aż nastąpi podświetlenie ekranu. Kolejne przyciśniecie przycisku MEAS powoduje
wyświetlenie wyników pomiaru.
Specykacja techniczna
Bateria 2 baterie 1,5V AAA
Typ pomiarowy Pomiar długości
Pomiar ciągły
Pomiar pola/objętości
Pośredni pomiar długości
Zakres pomiarowy 0,03-60 m
neo-tools.com
11
Jednostka m/mm/in/ft
Podstawa pomiaru przód/tył
Urządzenie laserowe Światło laserowe
650 nm długość fali
<1 mW klasa II
Dokładność pomiaru ± 2 mm
Czas pomiaru 1-2 s
Żywotność baterii 8000 pomiarów
Temperatura pracy -10°C ÷+50°C
Temperatura przechowywania -10°C ÷+60°C
Automatyczne
wyłączanie
laser 20 s
dalmierz 60 s
Wymiary 111,2 x 48 x 28,3 mm
Masa z baterią 90 g
Konserwacja
Do czyszczenia należy używać czystej wilgotnej szmatki, aby usunąć kurz. Nie
należy stosować substancji żrących lub lotnych aby wyczyścić urządzenie.
Elementy optyczne należy czyścić podobnie jak okulary lub obiektywy aparatów.
Ochrona środowiska
Produktów zasilanych elektrycznie nie należy wyrzucać wraz z domowymi
odpadkami, lecz oddać je do utylizacji w odpowiednich zakładach.
Informacji na temat utylizacji udzieli sprzedawca produktu lub miejscowe
władze. Zużyty sprzęt elektryczny i elektroniczny zawiera substancje
nieobojętne dla środowiska naturalnego. Sprzęt nie poddany recyclingowi
stanowi potencjalne zagrożenie dla środowiska i zdrowia ludzi.
Baterie/Akumulatory
Akumulatorów /baterii nie należy wrzucać do odpadów domowych,
nie wolno ich wrzucać do ognia lub do wody. Uszkodzone lub zużyte
akumulatory należy poddawać prawidłowemu recyklingowi zgodnie z
aktualną dyrektywą dotyczącą utylizacji akumulatorów i baterii. Zużyte
baterie można oddawać w punktach zbiórki a także wszędzie tam, gdzie
prowadzi się sprzedaż baterii/akumulatorów

12
neo-tools.com
INSTRUCTION MANUAL
LASER RANGE FINDER
75-200
CAUTION:
Before using the device read this manual carefully and keep it for future
reference. Failure to follow safety rules from this manual may cause tool
damage or body injuries.
WARNING: Do not look directly at the source of laser beam.
Follow the below safety rules.
1. Do not modify the tool.
2. Use the laser device in accordance with the manufacturer’s instructions.
3. Do not intentionally point the laser beam at people or animals.
4. Do not point the laser beam at bystanders’or animals’ eyes. Laser radiation
may damage your vision.
5. Always make sure the laser beam is not directed at reflective surfaces.
Reflective surface could project the beam at operator or bystanders.
6. Do not allow children to operate the device. Do not allow children in the
workplace when setting up and using the device.
7. When not using, store the device in a dry place, beyond reach of children.
8. Do not replace the laser unit with device of other type. All repairs must be
carried out by the manufacturer service.
The tool is equipped with class 2 laser device in accordance with EN
60825-1:2007.
Intended use
The device is designed to measure length, area and volume. Additionally,
the range nder features option of indirect measurements, that uses
Pythagorean theorem to calculate height. Dynamic measurement allows for
continuous measurements. Use the tool indoors in dry environment only.
Observe the following instructions when working for the best device operation.
Any use other than described below is not allowed and may cause device damage.
The laser range finder is powered from 2 x 1.5 V AAA batteries. Battery level is
indicated on the display in the upper right corner. When the battery sign does not
display even one bar, replace the device batteries with new ones.
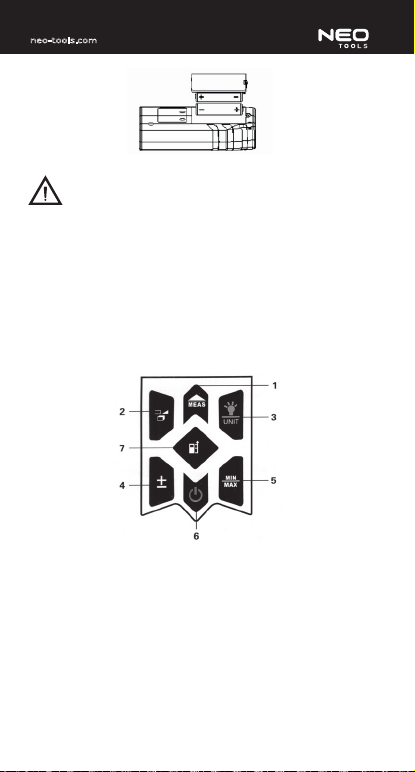
Battery replacement:
1. Press the lock catch to remove the battery cover.
2. Insert 2 new AAA batteries, observe polarity for correct connection.
3. Close the battery cover.
neo-tools.com
13
CAUTION:
1. Replace batteries with new ones when batteries are empty.
2. Remove batteries when the device will not be used for a long time.
3. Observe polarity for correct connection when inserting batteries.
4. Do not use old and new batteries together. Replace all batteries at a time.
Using old and new batteries may cause battery leaking and damage the
device.
5. Store batteries beyond reach of children. Do not leave batteries within reach
of children to prevent from swallowing.
6. Do not dispose the batteries with household wastes, do not throw in fire
or water. Damaged or worn out batteries should be properly recycled in
accordance with applicable directive for battery disposal.
Buttons panel
1. Measurement button
2. Indirect measurement
3. Backlight / measurement unit selection
4. Button: adding/subtracting
5. Switch: maximum / minimum value
6. Power / Clear
7. Reference button
14
neo-tools.com
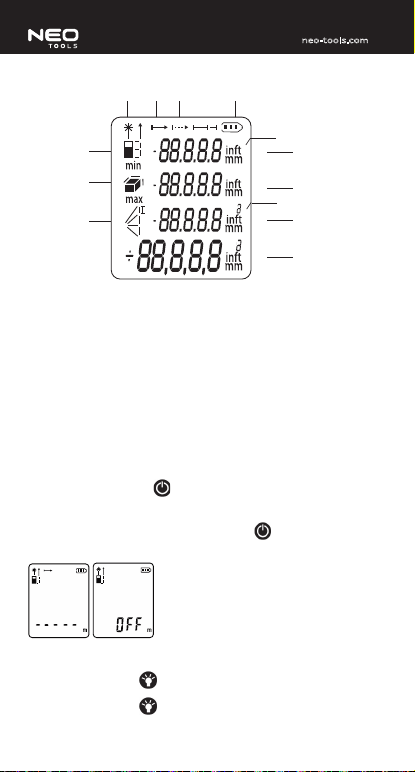
LCD display - instructions:
1 2 1 1
8
10
11
12
13
7
6
5
9
1. Laser pointer
2. Single measurement
3. Continuous measurement
4. Battery level
5. Measurement base (reference point)
6. Area / volume measurement
7. Indirect measurement (Pythagorean theorem)
8. Measurement unit
9. Exponent
10. Display, position 1
11. Display, position 2
12. Display, position 3
13. Main display
Switching on
1. Before switching on, make sure the battery is inserted correctly.
2. Press the power button to switch on the tool.
3. You will see initial screen with all items, then display will go to measurement
mode. Battery icon is located in the right section of the display.
4. To switch off the device, press the power button and hold for 2 seconds.
Display will show OFF sign.
Display backlight
Press the backlight button and hold for 2 seconds to switch on the backlight.
Press the backlight button again to switch off the backlight.

neo-tools.com
15
Measurement unit selector
Press the UNIT button to change measurement unit. Press the button
repeatedly to cycle through the units.
Cycle sequence:
m -> mm -> in -> ft.
Reference point
By default rear surface of the range finder is the reference point. You can set up
two reference points: rear or front surface of the range finder. Press the button
to change the reference. Pressing the button again will cycle through the setting.
Cycle sequence: back -> front
Distance measurement
WARNING!
Switching the tool on will activate the laser pointer. Notice the indicator for
laser pointer on/o.
Single measurement
1. After switching the device on wait a few seconds until measurement
function appears on the display.
2. Press the button to indicate measured object with the laser pointer.
3. Once the laser beam points the right spot, press the button again to
make a measurement.
4. The device will confirm the measurement and display measured value.
5. Press the power button to clear the measured value.
6. After measurement the laser light switches off automatically.
16
neo-tools.com
Automatic switching
If the idle time lasts longer than:
– 20 seconds: laser beam goes off automatically,
– 60 seconds: the device switches off automatically.
Adding measurements
Button allows to calculate total value, each measured value is added
to the previous measurement. The display will show total value of all single
measurements.
1. After the first measurement press the button (the display should show
the + sign);
2. Make another measurement and press the button again.
3. Each time after making a measurement and pressing the button the
value will be added to the previous one. The bottom section of the screen
will show current value.
Subtracting measurements
1. After the first measurement press the button twice (so the display
shows the - sign).
2. Each time after making a measurement and pressing the button the
value will be subtracted from the previous one (make sure the display shows
the - sign). The bottom section will show the subtraction result.
Continuous measurement
By default each measurement is single measurement.
1. Press the button for continuous measurement to enter this mode, hold
the device still and control the measured distance is up to 10 metres.
2. Press the measurement button to start the continuous measurement,
press the button to stop it.
3. The main display shows the end value, the screen also shows the minimum
and maximum values.
4. When the continuous measurement is stopped, press the continuous
measurement button again to return to single measurement mode. The
main display will show the end value for the last time.
5. Once the continuous measurement is finished, press the power button
to return to single measurement mode. This will reset all the measurement
values.
neo-tools.com
17
Measurement functions
Area
1. Press the button to enter the measurement mode, the screen will show
flashing symbol to indicate the area measurement.
2. Press the button to switch on the laser.
3. Press the measurement button again and follow the on screen
instructions to measure length and width. Once two measurements are
taken, the device will automatically calculate area and show it on the main
display.
4. After measurement the laser light switches off automatically.
Volume
1. Repeatedly press the button to define the measurement mode, until the
screen shows flashing symbol to indicate the volume measurement.
2. Press the button to switch on the laser.
3. Press the measurement button again and follow the on screen
instructions to measure length, width and height. After making three
measurements the device automatically calculates given values and shows
the measured volume on the screen.
4. After measurement the laser light switches off automatically.
Indirect measurement (Pythagorean theorem)
1. Repeatedly press the measurement mode button until the display
shows flashing symbol .
18
neo-tools.com
2. Press the button to switch on the laser.
3. Press the measurement button and make the measurements in
accordance with the on screen instructions and figures below. After making
two measurements the device will automatically calculate the second
cathetus and will display the value on the main screen.
4. After measurement the laser light switches off automatically.
2
1
Intermediate measurement (double Pythagorean with subtraction)
Measuring partial height based on three measurements (difference).
1. Repeatedly press the measurement mode button until the display
shows flashing symbol .
2. Press the button to start laser measurement.
3. Press the measurement button and make the measurements in
accordance with the on screen instructions and figures below. After making
three measurements the device will automatically calculate measured
height and will display the value on the main screen.
4. After measurement the laser light switches off automatically
2
1
3
neo-tools.com
19
Intermediate measurement (double Pythagorean with adding)
The measurement uses three points.
1. Repeatedly press the measurement mode button until the display
shows flashing symbol .
2. Press the button to start laser measurement.
3. Press the measurement button and make the measurements in
accordance with the on screen instructions and figures below. After making
three measurements the device will automatically calculate measured
height and will display the value on the main screen.
4. After measurement the laser light switches off automatically.
2
1
3
Storage of measurements
Measurement results are automatically stored in the device memory. To display
stored results, press MEAS button and hold until screen backlight switches on.
Press the MEAS button again to display measurement value.
Technical specication
Battery 2 x AAA 1.5 V
Measurement mode Length meas.
Continuous meas.
Area/volume meas.
Indirect length meas.
Measurement range 0.03–60 m
Unit m/mm/in/ft
Measurement reference base Front/rear
Laser device Laser light
Wavelength 650 nm
<1 mW, class II
20
neo-tools.com
Measurement accuracy ± 2 mm
Measurement time 1-2 s
Battery life 8000 measurements
Operating temperature -10°C ÷+50°C
Storage temperature -10°C ÷+60°C
Automatic switching
off
laser 20 s
range finder 60 s
Dimensions 111,2x48x28,3 mm
Weight with battery 90g
Maintenance
Use clean, damp cloth for cleaning to remove dust. Do not use caustic or volatile
substances to clean the device. Clean optical elements like glasses or camera lenses.
Environment protection
Do not dispose of electrically powered products with household
wastes, they should be utilized in proper plants. Obtain information
on waste utilization from your seller or local authorities. Used up
electric and electronic equipment contains substances active in natural
environment. Unrecycled equipment constitutes a potential risk for
environment and human health.
Batteries
Do not dispose the batteries with household wastes, do not throw in fire
or water. Damaged or worn out batteries should be properly recycled
in accordance with applicable directive for battery disposal. Hand over
worn out batteries to special collection points and sales points where
batteries are available.
Table of contents
Languages:
Other NEO TOOLS Test Equipment manuals


Popular Test Equipment manuals by other brands


EL-CELL
EL-CELL PAT-Cell-Gas user manual

Promax
Promax GV-798+ instruction manual

WABCO WÜRTH
WABCO WÜRTH W.EASY ADAS Calibration manual

Sea & Sea
Sea & Sea YS-60 TTL user guide

Pro's Kit
Pro's Kit MT-7063 user manual

Kyoritsu Electrical Instruments Works, Ltd.
Kyoritsu Electrical Instruments Works, Ltd. 3165 instruction manual


