Neodynamics Neonavia User manual
neonavia®
User Manual


Table of contents
1 Introduction...................................................................................................................................................................................................2
1.1 About this manual......................................................................................................................................................................................... 2
1.2 Intended use.........................................................................................................................................................................................................2
1.3 Indications for use..........................................................................................................................................................................................2
1.4 Contraindications............................................................................................................................................................................................ 2
1.5 Potential complications...........................................................................................................................................................................2
1.6 Manufacturer information......................................................................................................................................................................3
2 Safety information................................................................................................................................................................................ 4
2.1 Safety definitions............................................................................................................................................................................................4
2.2 Warnings....................................................................................................................................................................................................................4
2.3 Cautions.....................................................................................................................................................................................................................5
2.4 Symbols on the product......................................................................................................................................................................... 5
3 Product overview.....................................................................................................................................................................................9
3.1 Included in the delivery...........................................................................................................................................................................9
3.2 Base unit – overview....................................................................................................................................................................................9
3.3 Driver – overview............................................................................................................................................................................................10
3.4 Probes – overview........................................................................................................................................................................................ 10
3.5 Product description...................................................................................................................................................................................... 11
4 Installation....................................................................................................................................................................................................13
4.1 Site requirements..........................................................................................................................................................................................13
4.2 Power requirements...................................................................................................................................................................................13
4.3 To install NeoNavia biopsy system...........................................................................................................................................13
5 Operation.......................................................................................................................................................................................................16
5.1 To prepare for biopsy................................................................................................................................................................................16
5.2 To perform a biopsy....................................................................................................................................................................................17
5.3 To turn o the NeoNavia biopsy system and disassemble the probe after biopsy........25
6 Maintenance..............................................................................................................................................................................................27
6.1 To clean and inspect the base unit.........................................................................................................................................27
6.2 To do an electrical safety test......................................................................................................................................................28
6.3 To maintain the driver.............................................................................................................................................................................28
7 Troubleshooting....................................................................................................................................................................................29
7.1 To troubleshoot NeoNavia biopsy system......................................................................................................................29
7.2 To troubleshoot the driver................................................................................................................................................................35
7.3 To troubleshoot the CorePulse probe................................................................................................................................ 35
7.4 To troubleshoot the FlexiPulse probe.................................................................................................................................37
7.5 To troubleshoot the VacuPulse probe................................................................................................................................39
8 Recycling.........................................................................................................................................................................................................41
8.1 To recycle the NeoNavia biopsy system.............................................................................................................................41
9 Technical data.........................................................................................................................................................................................42
9.1 Conformity...........................................................................................................................................................................................................42
9.2 Weight and dimensions........................................................................................................................................................................42
9.3 Electrical specifications........................................................................................................................................................................42
9.4 Electromagnetic compatibility (EMC)...................................................................................................................................42
table of contents 1
neodynamics

1 Introduction
This document shows the necessary information to operate NeoNavia®biopsy system.
1.1 About this manual
This NeoNavia user manual gives you the instructions you need to safely:
• install
• operate, or
• do maintenance on the system.
Keep this manual for future reference.
Notice: Use NeoNavia only as directed in this manual. All use, other than that
described in this manual, is seen as unintended use. Do not modify NeoNavia.
Unauthorized modifications void the warranty.
1.2 Intended use
The NeoNavia biopsy system is intended for obtaining tissue samples from both breast
lesions and axillary lymph nodes for diagnostic analysis of breast abnormalities.
1.3 Indications for use
The CorePulse™, FlexiPulse™and VacuPulse™probes are intended to provide tissue from
breast lesions and axillary lymph nodes for histologic examination.
The NeoNavia biopsy system is to be used only by healthcare professionals in hospitals or
healthcare facilities.
1.4 Contraindications
NeoNavia is for diagnostic use only and is not indicated for therapeutic use.
NeoNavia is contraindicated for those patients where increased risk of complications may
be associated with percutaneous removal of tissue samples upon the physician’s judgment.
Patients receiving anticoagulant therapy or who may have bleeding disorders may be at
increased risk.
1.5 Potential complications
Potential complications are those associated with any percutaneous removal/biopsy
technique for tissue collection.
Potential complications are limited to the region surrounding the biopsy site and include
hematoma, hemorrhage, infection, pain, and tissue adherence to the biopsy needle while
removing it from the breast.
2introduction
neonavia user manual

1.6 Manufacturer information
Contact us at: Information
Manufacturer Address
NeoDynamics AB
Lejonvägen 14
SE-181 32 Lidingö
Sweden
Send a letter to note your specific area of in-
terest.
Please include your customer name and ac-
count number, your contact information and
your question.
Phone
+46(0)8 522 79661
Contact a customer service representative be-
tween the hours 9:00 – 16:00 CET.
Please have your customer name and account
number ready so that a member of our cus-
tomer service team can assist you as quickly
and eciently as possible.
Email
Send an email to note your specific area of in-
terest to our customer service team.
Please include your customer name and ac-
count number, your contact information and
your question. A member of our customer
service team will contact you within 24 hours.
Fax
+46(0)8 522 79686
Please include your customer name and ac-
count number, your contact information and
your question. A member of our customer
service team will contact you within 24 hours.
Website
www.neodynamics.com
Complete the
Contact Us
form on the NeoDy-
namics website.
A member of our customer service team will
contact you within 24 hours.
introduction 3
neodynamics
2 Safety information
This chapter contains the safety information. Before you install, operate or do maintenance
on the system, you must know the safety information given in this manual. Follow the
instructions in this manual to prevent injuries or damage to the equipment.
If a serious incident that involves NeoNavia biopsy system occurs, contact NeoDynamics AB
and the competent authority of your country.
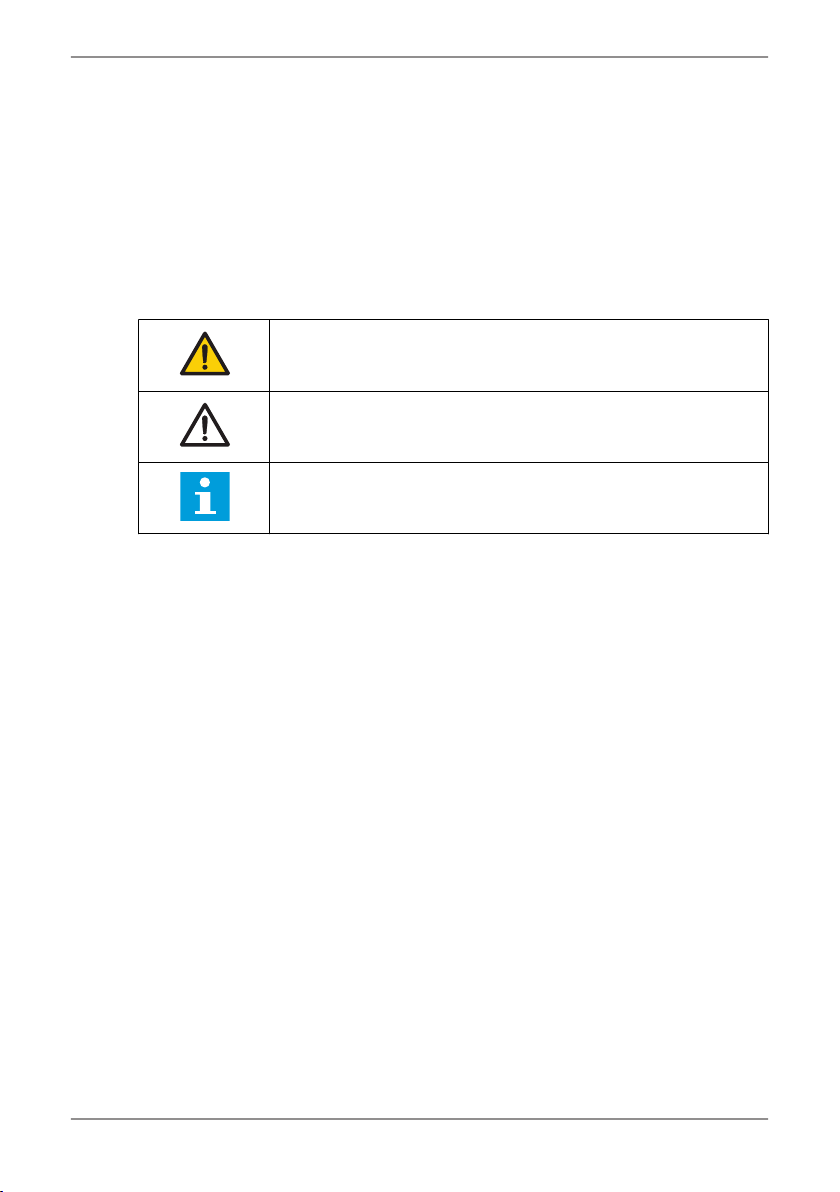
2.1 Safety definitions
This user manual contains WARNINGS, CAUTIONS and NOTICES that are applicable for the
safe operation of NeoNavia biopsy system.
WARNING means that injury or death is possible if the instructions are
not followed.
CAUTION means that damage to equipment is possible if the instruc-
tions are not followed.
NOTICE means that the information is important for trouble-free and
optimal use of the device.
2.2 Warnings
• Do not make changes to the NeoNavia biopsy system, except for changes given in the
user documentation, without authorization from the manufacturer.
• Do not use the NeoNavia biopsy system near active HF surgical equipment or the RF
shielded room of a system for magnetic resonance imaging (MRI).
• Do not use components or accessories that are not supplied or recommended by
NeoDynamics AB. Using improper accessories may result in increased electromagnetic
emissions or decreased electromagnetic immunity of the NeoNavia biopsy system and
lead to improper operation.
• Only connect NeoNavia to a supply mains with protective earth. Risk of electrical
shock.
• Do not use a multiple socket-outlet or an extension cord.
• Use ultrasound guidance when you operate NeoNavia, to visualize the movements of
the device. Do not use MRI or stereotactic guidance.
• Do not re-sterilize NeoNavia biopsy probes. They are intended for single patient use
only. The use of re-sterilized components, intended for single patient use only, can
result in infection or injury of the patient.
• Do not use NeoNavia biopsy probes more than once. They are intended for single
patient use only. If components that are intended for single patient use only are used
again, it can result in infection or injury of the patient.
• Do not use NeoNavia biopsy probes if the sterile package is broken or damaged or if
the Use by date has passed.
• Do not use NeoNavia biopsy probes if any part of the device that is intended for
patient contact has been in contact with a non-sterile surface. If this is the case,
NeoNavia biopsy probe must be disposed of according to the instructions in this
manual.
• Do not bend the sampling needle. If the sampling needle is bent, do not use the probe.
• Do not use a damaged probe. Discard the probe as referred to in local laws and
regulations.
4safety information
neonavia user manual

• Use applicable personal protective equipment following local guidelines (for example
gloves), during operation and maintenance of NeoNavia, to prevent exposure to
biohazards.
• Before using NeoNavia adjacent to ultrasound equipment, make sure to verify normal
operation by following the instructions in 5.1.
• Make sure that the driver cable is secure when moving NeoNavia. A loose cable can trip
the operator.
• Do not submerge or spray liquids directly on any parts of the NeoNavia biopsy system.
2.3 Cautions
• Do not transport NeoNavia outside of normal hospital conditions, e.g. outdoors or to a
dierent facility.
• Do not use NeoNavia when the power cord is wound around the cover, handle or any
other part of the base unit.
• Do not sit on the tray or the handle of the base unit. This might damage or break the
base unit. It can also overturn the base unit and lead to operator injury.
• Only use NeoNavia when the driver cable is free from external pressure. Objects or
persons standing on the cable may lead to reduced performance and damage to the
cable.
• Floors should be wood, concrete or ceramic tile. If floors are covered with synthetic
material, see 9.4.2 for more information.
• Do not manually manipulate the probe before attaching it to the driver. The probe
might become unusable.
2.4 Symbols on the product
2.4.1 Symbols on the devices
Symbol Description Where
0413
Complies with Directive 93/42/EEC on
medical devices. • Base unit
• Driver
ETL listed mark • Base unit
• Driver
Follow instructions for use • Base unit
• Driver
Manufacturer • Base unit
• Driver
Serial number • Base unit
• Driver
Electronic waste, disposal according to
WEEE • Base unit
• Driver
safety information 5
neodynamics
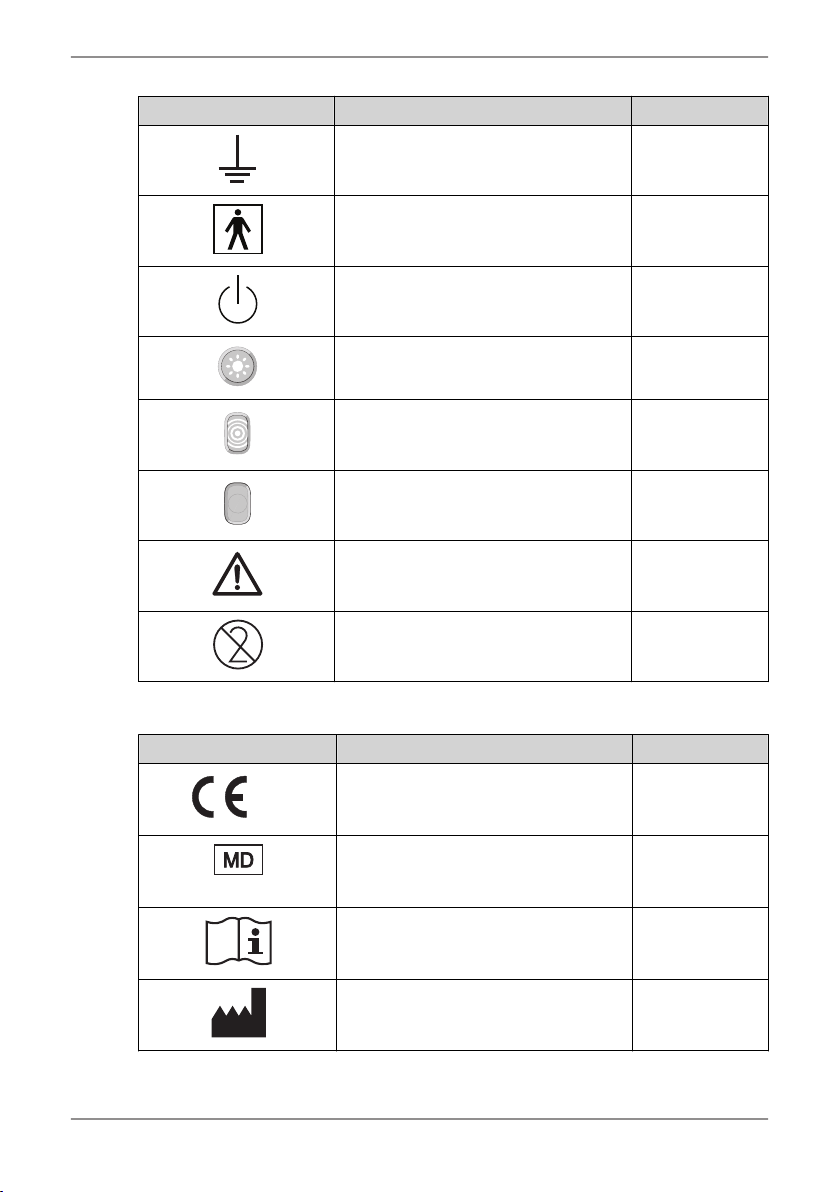
Symbol Description Where
Ground/Earth • Base unit
Type BF Applied part • Base unit
Stand-by • Base unit
Light symbol • Driver
Pulse symbol • Driver
Sampling symbol • Driver
Caution • Probes
Do not reuse • Probes
2.4.2 Symbols on the packaging
Symbol Description Where
0413
Complies with Directive 93/42/EEC on
medical devices. • Base unit
• Driver
• Probes
Medical Device • Base unit
• Driver
• Probes
Consult operating instructions • Base unit
• Driver
• Probes
Manufacturer • Base unit
• Driver
• Probes
6 safety information
neonavia user manual
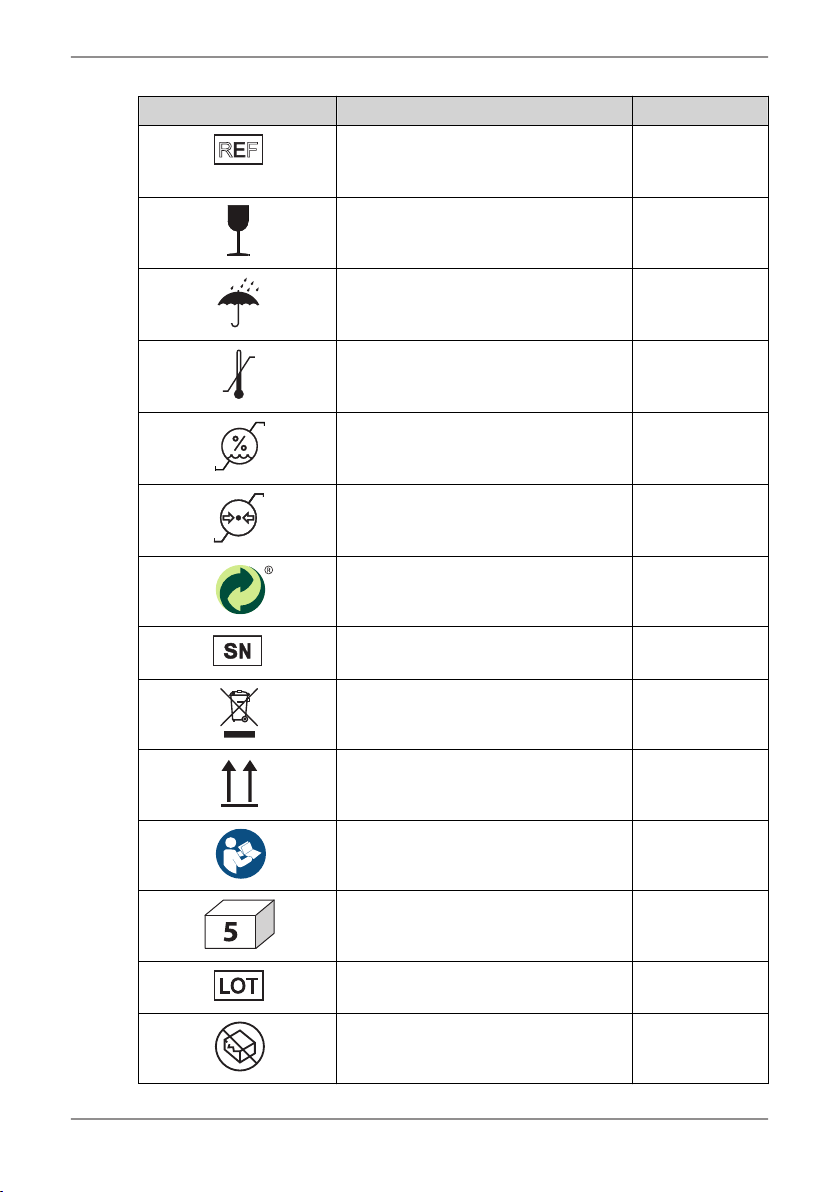
Symbol Description Where
REF
Catalogue number (Reference or model
number) • Base unit
• Driver
• Probes
Fragile, handle with care • Base unit
• Driver
• Probes
Keep dry • Base unit
• Driver
• Probes
Temperature limits • Base unit
• Driver
• Probes
Humidity range • Base unit
• Driver
• Probes
Atmospheric pressure range • Base unit
• Driver
• Probes
Producers' responsibility for packaging • Driver
• Probes
Serial number • Base unit
• Driver
Electronic waste, disposal according to
WEEE • Base unit
• Driver
This way up • Base unit
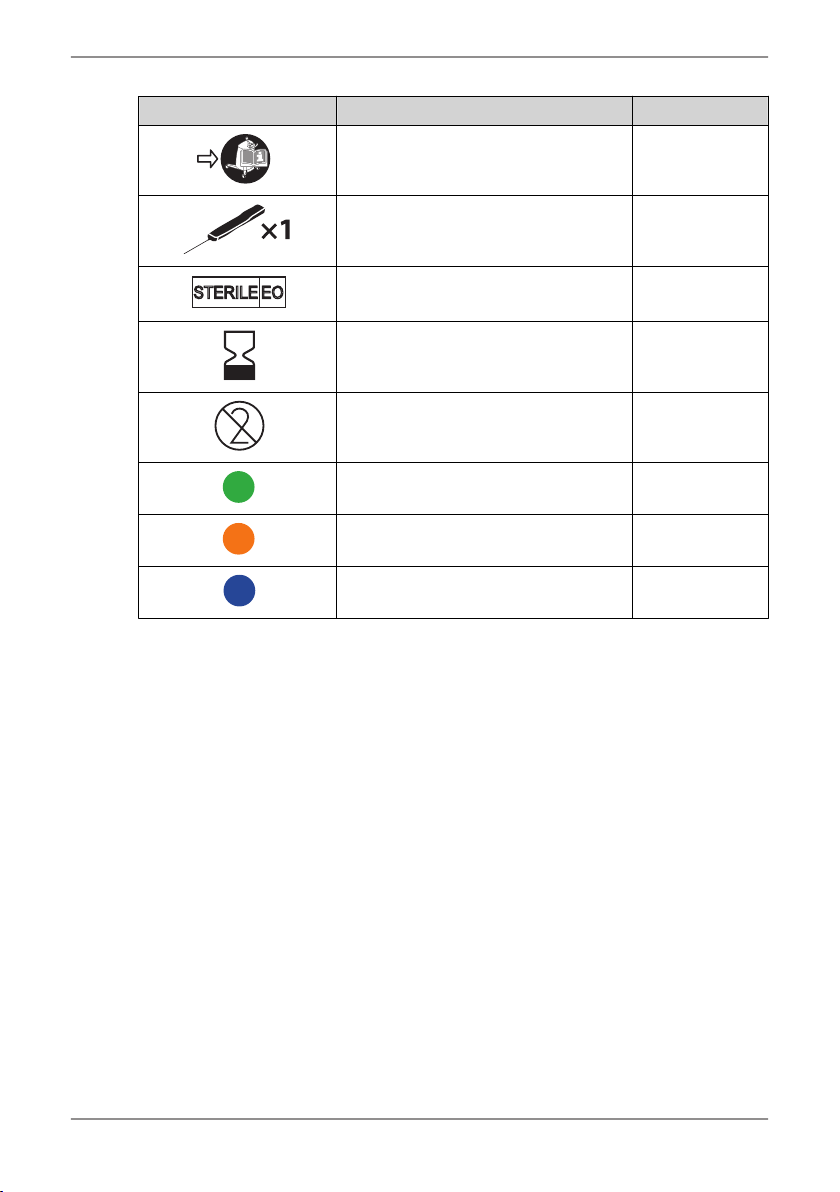
Follow the instructions for use • Probes
Quantity of products included in the box • Probes
Lot number • Probes
Do not use if damaged • Probes
safety information 7
neodynamics
Symbol Description Where
Refer to the NeoNavia biopsy system
user manual • Probes
The sterile package contains 1 probe
(REF# 2102, 2103 or 2104) • Probes
STERILE EO
Sterilized using ethylene oxide • Probes
Use by date (YYYY-MM) • Probes
Do not reuse • Probes
Contains CorePulse probe • Probes
Contains FlexiPulse probe • Probes
Contains VacuPulse probe • Probes
8 safety information
neonavia user manual
3 Product overview
3.1 Included in the delivery
Base unit delivery
The items in the list below are included in the delivery of the base unit, REF# 1102:
• 1 Base unit
• 1 Holder
• 1 Power cord (length: 3 m)
• 1 NeoNavia biopsy system user manual
Driver delivery
The items in the list below are included in the delivery of the driver, REF# 1103:
• 1 Driver
• 1 NeoNavia biopsy system user manual
Probe shipping box
The items in the list below are included in the delivery of the probes, CorePulse REF# 2103,
FlexiPulse REF# 2104, VacuPulse REF# 2102:
• 2 product boxes. Each product box contains 5 probes.
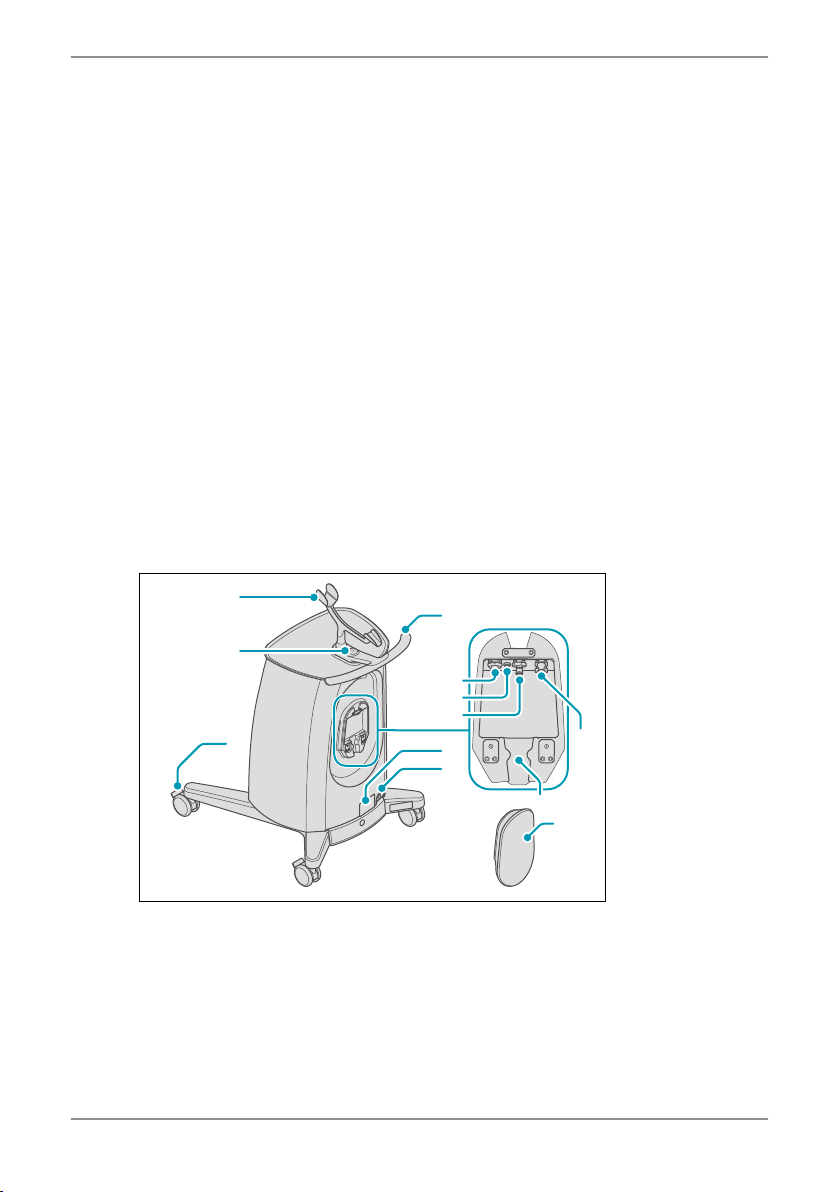
3.2 Base unit – overview
1
9
8
4
12
2
3
6
5
7
10
11
1. Holder for the driver
2. On/O button and status indicator
3. Wheel with locking mechanism
4. Handle
5. Electrical connector
6. Ground connection
7. Vacuum connector
8. Machine plate
9. Mains power connector
10. Pressurized air connector
11. Cable holder
12. Cover
product overview 9
neodynamics

3.3 Driver – overview
5
6
67
8
9
2
4
1
3
1. Driver status indicator
2. Light button
3. Sampling button
4. Pulse button
5. Light
6. Release buttons
7. Pressurized air connector
8. Vacuum connector
9. Electrical connector
3.4 Probes – overview
3.4.1 CorePulse – overview
1
2
3
1. Sampling needle
2. Protective sleeve
3. Fastener
10 product overview
neonavia user manual

3.4.2 FlexiPulse – overview
1
2
3
4
1. Sampling needle
2. Protective sleeve
3. Fastener
4. Vacuum chamber
3.4.3 VacuPulse – overview
1
2
4
3
5
1. Sampling needle
2. Protective sleeve
3. Fastener
4. Tissue basket
5. Vacuum chamber
3.5 Product description
NeoNavia biopsy system incorporates pulse technology and is designed to obtain tissue
samples from breast lesions or axillary lymph nodes for histological evaluation. The system
is composed of a base unit, a driver and three dierent types of sterile single use probes.
Each needle type utilizes pulses with the intention to improve precision and control when
inserting and positioning the biopsy needle in a suspicious lesion.
NeoNavia must be operated together with ultrasound imaging guidance.
The components of the system are designed to operate safely when used together for the
diagnostic sampling as referred to in this manual.
product overview 11
neodynamics

3.5.1 Component description
• The base unit supplies NeoNavia with power.
• The driver is attached to the base unit and controls the operation of NeoNavia during
the procedure. The base unit and the driver are non-sterile.
• The probes are attached to the driver. The sampling needle on the probes is the
Applied Part. This means the part that comes into physical contact with the patient in
order for the NeoNavia biopsy system to perform its function. The probes are delivered
sterile and intended for single-use only.
3.5.2 Pulse Technology description
Pulse Technology enables a safe and user controlled insertion and positioning of the
sampling needle. The pneumatic driver, powered by the base unit, enables a short and
distinct stepwise progression of the needle. This facilitates ease of access and flexibility in
sampling even in very small lesions in delicate and dicult locations. The pulses are
completely user controlled through the pulse button on the driver.
12 product overview
neonavia user manual
4 Installation
4.1 Site requirements
• NeoNavia must only be used in hospitals or healthcare facilities.
• NeoNavia must have access to electrical power, see 9.3.
• NeoNavia must only be operated, transported or stored as shown in the specified
environmental conditions in the table below.
Parameter Approved range
Temperature, operation 15°C to 30°C
Temperature, transport -20°C to 60°C
Temperature, storage 10°C to 40°C
Relative humidity, operation 30 % to 75 % RH
Relative humidity, storage and transport 10 % to 90 % RH
Atmospheric pressure, operation 80 kPa to 106 kPa
Atmospheric pressure, storage and transport 60 kPa to 106 kPa
4.2 Power requirements
NeoNavia must be connected to a supply mains with protective earth when it is operated.
The operation voltage must be 220-240 VAC/50 Hz, single phase. For more information
about electrical requirements, see 9.3.
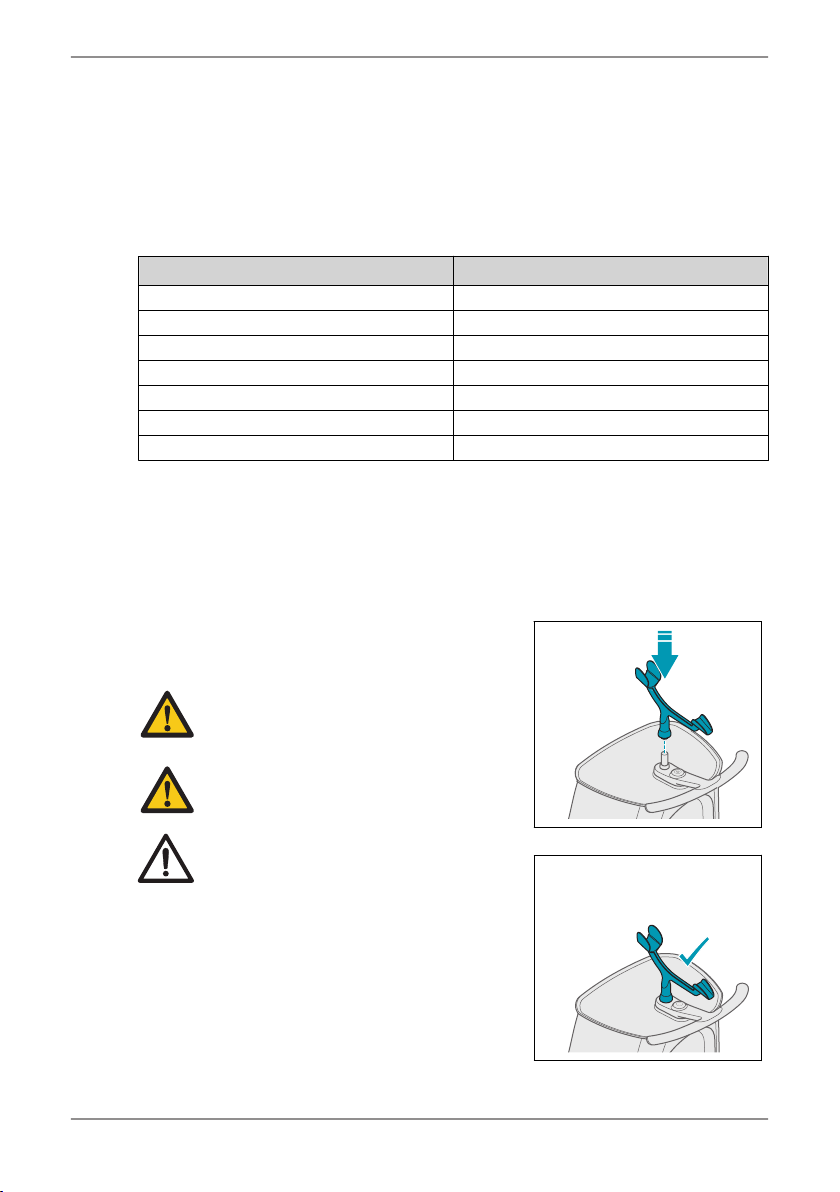
4.3 To install NeoNavia biopsy
system
This instruction contains information
about the installation of NeoNavia.
Warning: Only connect
NeoNavia to a supply mains
with protective earth. Risk of
electrical shock.
Warning: Do not use a
multiple socket-outlet or an
extension cord.
Caution: Do not use
NeoNavia when the power
cord is wound around the
cover, handle or any other
part of the base unit.
4.3.1 To install the driver
1.
2.
installation 13
neodynamics

3.
4.
5.
6.
7.
8.
9.
10.
14 installation
neonavia user manual
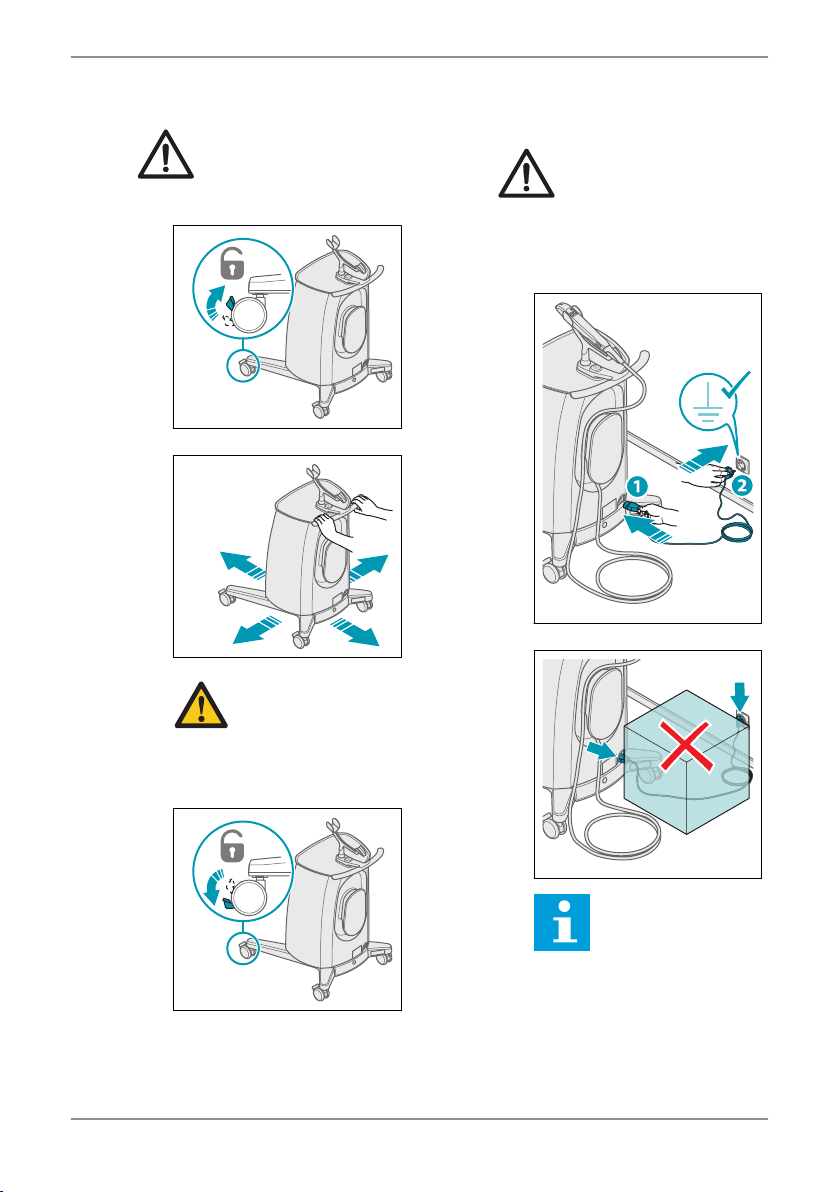
4.3.2 To move and park NeoNavia
Caution: Floors should be
wood, concrete or ceramic
tile. If floors are covered
with synthetic material, see
9.4.2 for more information.
1.
×4
2.
Warning: Make sure
that the driver cable is
secure when moving
NeoNavia. A loose
cable can trip the
operator.
3.
×4
4.3.3 To connect NeoNavia to the wall
socket
Caution: Make sure not to
block the access to the
appliance inlet. It must be
possible to remove the
power cable from the
appliance inlet to make sure
that NeoNavia is without
power.
1.
2.
Notice: NeoNavia will
go into stand-by mode
if it is not used for 10
minutes. Start
NeoNavia, see chapter
5.2.2.
installation 15
neodynamics
5 Operation
5.1 To prepare for biopsy
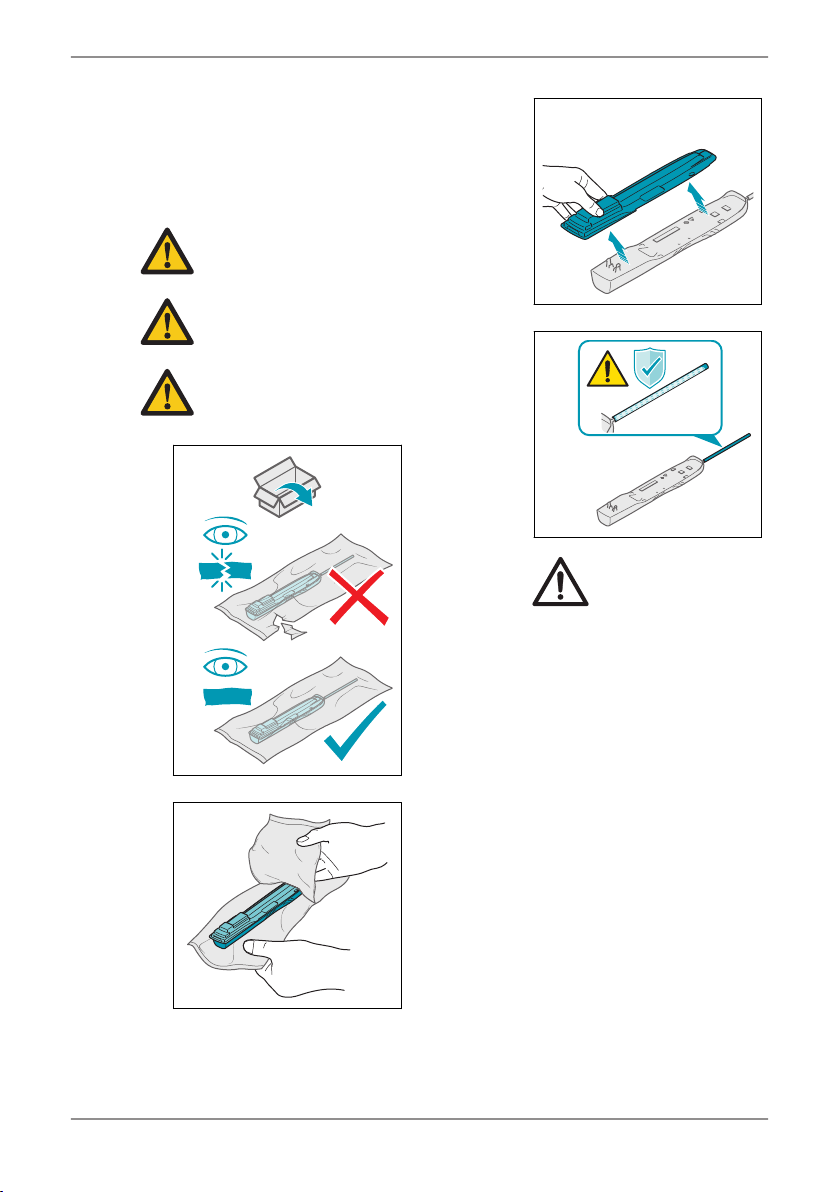
5.1.1 To unpack the probe
Warning: Make sure that the
sterile packaging is not
damaged.
Warning: Do not remove the
protective sleeve from the
sampling needle.
Warning: Do not bend the
sampling needle. If the
sampling needle is bent, do
not use the probe.
1.
2.
3.
4.
Caution: Do not
manually manipulate
the probe before
attaching it to the
driver. The probe might
become unusable.
16 operation
neonavia user manual

5.1.2 To attach the probe
1.
2.
5.1.3 To prepare the sampling area
1. Use standard technique and
follow local guidelines to
disinfect and anesthesize relevant
areas.
2. Use a scalpel to make a small
incision.
5.2 To perform a biopsy
Warning: Use applicable
personal protective
equipment following local
guidelines (for example
gloves), during operation
and maintenance of
NeoNavia biopsy system, to
prevent exposure to
biohazards.
Warning: Use ultrasound
guidance when you operate
NeoNavia biopsy system, to
visualize the movements of
the device. Do not use MRI
or stereotactic guidance.
Warning: Do not use
NeoNavia biopsy probes
more than once. They are
intended for single patient
use only. If components that
are intended for single
patient use only are used
again, it can result in
infection or injury of the
patient.
Warning: Do not use a
damaged probe. If the
sampling needle is bent, do
not use the probe.
Caution: Do not use
NeoNavia when the power
cord is wound around the
cover, handle or any other
part of the base unit.
Caution: Make sure that the
driver cable is free from
external pressure. Objects or
persons standing on the
cable may lead to reduced
performance and damage to
the cable.
Notice: Take special care
when the sampling site is
close to a biopsy site
marker clip or other
implanted devices.
5.2.1 The buttons on the driver
The pulse button
The pulse button moves the needle
forward in short steps. Use if manual
penetration of the tissue is
problematic.
operation 17
neodynamics
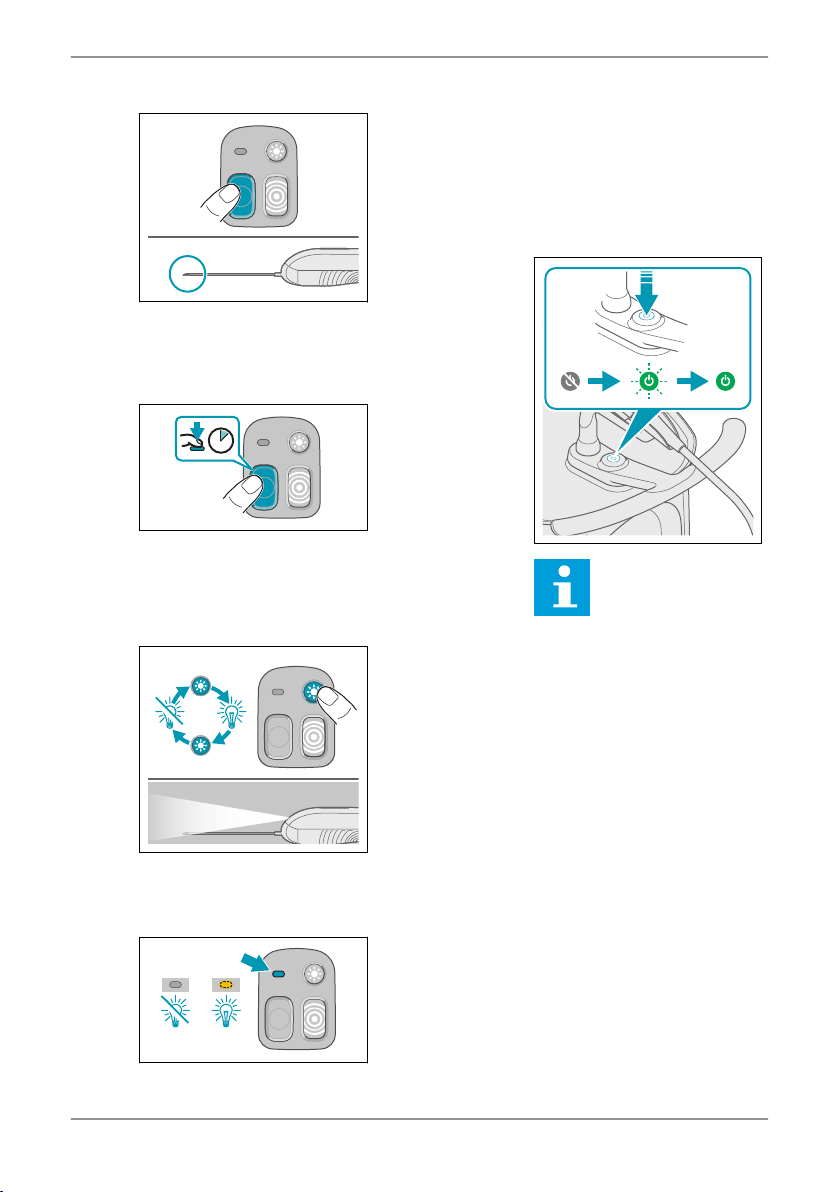
The sampling button
The sampling button is used to take
the biopsy samples. The functionality
of the button varies depending on the
probe that is connected to the driver
and, for some probes, on how long the
button is pressed.
A long press on the sampling button is
longer than 0.5 seconds. In the manual
this image is used to show when a long
press is needed.
The light button
The light button activates and
deactivates the light.
The Driver status indicator
The driver status indicator is
automated and not directly controlled
by the user. It indicates the dierent
states of the probes in the sampling
processes with a steady light.
The driver status indicator flashes
when something is wrong with the
driver or the attached probe. See 7.2
5.2.2 To start the base unit
1.
Notice: A system self-
test is performed every
time NeoNavia starts
up. If the system self-
test is successfull the
On/O button turns
green, if the system
self-test is not
successfull the On/O
button turns red. If the
On/O button turns
red, see 7.1.
18 operation
neonavia user manual
Table of contents
Popular Medical Equipment manuals by other brands


Getinge
Getinge Arjohuntleigh Nimbus 3 Professional Instructions for use

Mettler Electronics
Mettler Electronics Sonicator 730 Maintenance manual

Pressalit Care
Pressalit Care R1100 Mounting instruction

Denas MS
Denas MS DENAS-T operating manual

bort medical
bort medical ActiveColor quick guide

AccuVein
AccuVein AV400 user manual


