NeoTract UroLift System UL400 User manual
INDICATIONS FOR USE
The UroLift System is indicated for the treatment of symptoms due to
urinary outow obstruction secondary to benign prostatic hyperplasia
(BPH), including lateral and median lobe hyperplasia, in men 45 years
of age or older.
CONTRAINDICATIONS
The UroLift System should not be used if the patient has:
• Prostate volume of >80 cc
• A urinary tract infection
• Urethra conditions that may prevent insertion of delivery system
into bladder
• Urinary incontinence due to incompetent sphincter
• Current gross hematuria
STERILE. The UroLift® System has been sterilized using gamma
sterilization. For single-use only and must not be resterilized.
The UroLift System is inoperable after single use.
Not made with natural rubber latex.
WARNING: Do not use if package is opened or damaged. A non-sterile
device may result in patient infection.
STORAGE CONDITIONS:
Store device at room temperature.
UroLift® System UL400
Instructions for Use
Box Contents:
Catalog No. REF UL400-4 (4 Trays)
Tray Contents:
• 1 UroLift® System
• 1 UroLift® Handle Release Tool
Manufactured By:
NeoTract,® Inc.
4155 Hopyard Road
Pleasanton, CA 94588 USA
Tel: 877.408.9628, +1 925.401.0700
Fax: +1 925.401.0699
Email: uroliftcustomer@teleex.com
Device Dimensions
DIMENSION VALUE
Needle Diameter 19 Gauge
(0.042 in.)
Maximum Deployed
Needle Depth
33 mm
(1.299 in.)
Suture Component Diameter 0.38 mm
(0.015 in.)
L00136-01 Rev A 03/2019 NeoTract® Instructions for Use, UroLift® System Page 1 of 4
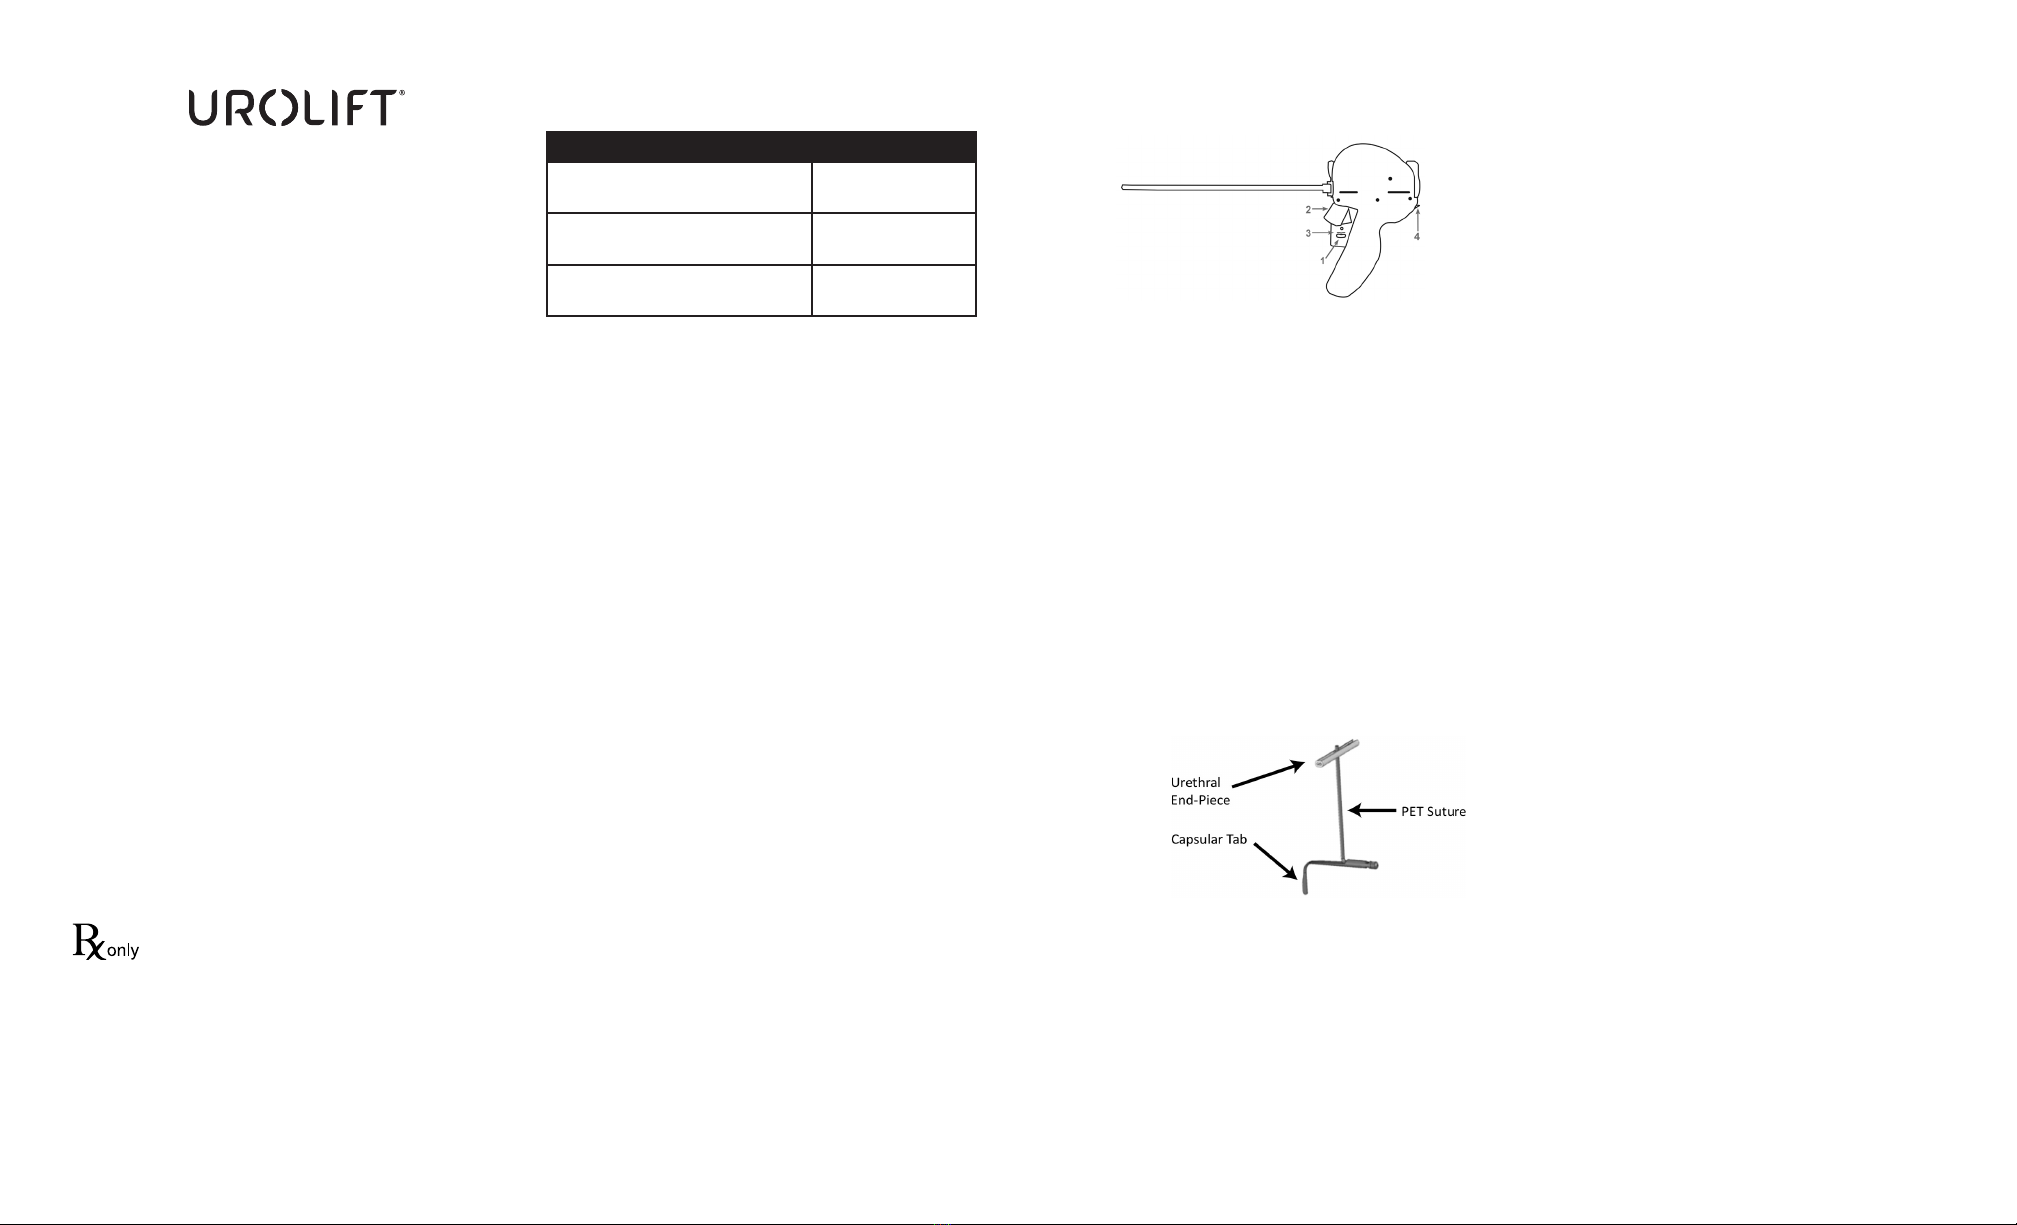
PRODUCT DESCRIPTION
The UroLift System (UL400) is comprised of two main components:
UroLift Delivery Device and UroLift Implant.
The Delivery Device (Figure 1) is designed to access the prostatic
urethra and deliver one implant through the lobes of the prostate.
Using the Delivery Device, the implant is delivered in 4 basic steps:
• Needle Safety Lock (1) is released.
• Needle Trigger (2) is depressed, deploying the needle and Capsular
Tab to the capsular side of the prostate. The needle extends 33 mm
from the tip of the device.
• Retraction Lever (3) is depressed, resulting in delivery of the
Capsular Tab with suture under tension.
• Urethral Release (4) is pressed, deploying the Urethral End-Piece
and cutting excess suture.
The Delivery Device is then withdrawn. This process is intended to
increase the luminal prostatic urethral opening thereby relieving
lower urinary tract symptoms associated with BPH. On average, 4 to
6 implants are typically placed per patient. The maximum number
recommended to be placed per patient is 10 implants.
The implant (Figure 2) consists of a Capsular Tab connected by
monolament suture to the Urethral End-Piece.
Treatment with the UroLift System does not preclude follow up
treatment with the UroLift System, transuretheral resection of the
prostate (TURP) or laser vaporization of the prostate. Retreatment via
other therapies has not been studied.
The materials used in the implant are well established for use in
medical device implants and elicit minimal acute inammatory
reaction in tissue. The suture is made from PET (Polyethylene
Terephthalate), the Capsular Tab is made from nitinol (nickel titanium
alloy), and the Urethral End Piece is made from stainless steel. The
implant is not absorbed, nor is any signicant change in tensile
strength known to occur in vivo.
WARNINGS AND PRECAUTIONS
• Read all instructions prior to using the UroLift System.
• Do not use if patient has known allergy to nickel, titanium, or
stainless steel.
• The UroLift System is intended for Single Patient Use Only – DO
NOT RESTERILIZE. Resterilization may result in device malfunction
including incomplete needle deployment or failed implant delivery
requiring further physician intervention. The UroLift System is
provided sterile. Sterility will be maintained only if package is
unopened and undamaged. The user should inspect packaging
integrity prior to use. If damage is detected or sterile packaging
compromised, user should not use the product and should return it
to NeoTract, Inc.
• Users should be familiar with performing sterile transurethral
surgical procedures and cystoscopic techniques. Patient should be
placed in balanced lithotomy position.
• Training is required prior to using the UroLift System. Physician
and Sta Training Program entails a) a didactic session; b) clinical
video review; and c) hands-on device use. The program focuses
on patient selection, procedure preparation, device operation, and
implantation technique. Please contact NeoTract Customer Service
at (925) 401-0700 for UroLift System training information.
• Store device at room temperature. Avoid exposure to prolonged
elevated temperatures.
• After use, the device may be a potential biohazard and should
be handled accordingly. Dispose of device in accordance with
accepted medical practice and applicable local and federal laws
and regulations.
Note: Other relevant warnings and precautions are included with the
associated section or process step for emphasis as described below.
OPERATING INSTRUCTIONS
Read all instructions prior to using the UroLift System.
ANCILLARY EQUIPMENT
• 2.9 mm 0° telescope (i.e. NeoTract REF UL-SCOPE or equivalent)
• 20F sheath (i.e. NeoTract REF UL-SHEATH or equivalent)
• Visual Obturator (i.e. NeoTract REF UL-VO or equivalent)
• Cystoscopy camera, light box/cable and monitor
• Standard uid irrigation system including new, sterile uid tubing
• Standard endoscopic grasper kit†
†It is recommended to have a grasper kit (or an equivalent standard
urology instrument for foreign body retrieval) in the event that it is
desired or necessary to retrieve or remove part of the implant during
the procedure.
All equipment compatibility should be veried prior to use.
The ancillary equipment, including the telescope, sheath, visual
obturator, and grasper kit must be sterilizable per the respective
manufacturer’s instructions and should be sterilized prior to use.
Figure 2
UroLift® Implant
Figure 1
UroLift® Delivery Device

HANDLING COMPONENTS
Care must be taken to avoid mishandling components. Users should
be cautious when handling components to avoid inadvertent
punctures. When surgical instruments and accessories from
dierent manufacturers are employed together, rst ascertain their
compatibility prior to commencing with the procedure.
1. PREPARATION
1.1. Read and thoroughly understand all instructions.
1.2. Conrm that packaging components are unopened
and undamaged.
WARNING: Do not use if package is damaged or opened.
1.3. Inspect all components for any damage that may have occurred
during shipment or other handling.
CAUTION: Do not use if device is damaged.
1.4. While holding the handle end (heavy end) of tray, peel back the
cover to access the sterile contents.
1.5. Remove lid of tray using sterile technique.
WARNING: Failure to maintain the sterility of the UroLift® System
and ancillary equipment could lead to infection.
1.6. Remove device from packaging using sterile technique by lifting
device from tray by grasping handle.
CAUTION: Do not lift device by the steel shaft.
1.7. Inspect device tip and conrm that needle is not visible.
Inspect Needle Safety Lock and conrm that it is in the locked
(forward) position.
CAUTION: Do not use if the Needle is exposed or Safety Lock is in
the unlocked (rear) position.
2. DEVICE INSERTION, AND POSITIONING:
CAUTION: Avoid placing pressure on the camera head to
position the Delivery Device. Image should be round on the video
monitor. A dark crescent or a portion of image missing is evidence
of excessive load on the camera head. Excess pressure could
compromise device performance or damage telescope.
2.1. Delivery Device insertion
2.1.1. Assemble the 2.9 mm 0° telescope (NeoTract REF UL-SCOPE or
equivalent), visual obturator, and 20F sheath.
2.1.2. Insert the telescope assembly in the urethra and visualize the
urethra and bladder by advancing it through the urethra and
into the bladder.
2.1.3. Remove the telescope and visual obturator, leaving the sheath
in the bladder.
2.1.4. To install the telescope, insert 2.9 mm 0° telescope (NeoTract
REF UL-SCOPE or equivalent) into device with the telescope
lightpost at 12 o’clock. Keep forward pressure on the telescope,
hold telescope lightpost at 12 o’clock and secure the scope lock
by rotating clockwise until nger tight. Do not overtighten.
CAUTION: Overtightening the scope lock may result in damage
to the Delivery Device.
2.1.5. Insert the Delivery Device (with 2.9 mm telescope installed) into
the sheath and lock the sheath lock.
2.2. Delivery Device positioning
2.2.1. Locate the treatment site by visualizing the prostatic fossa from
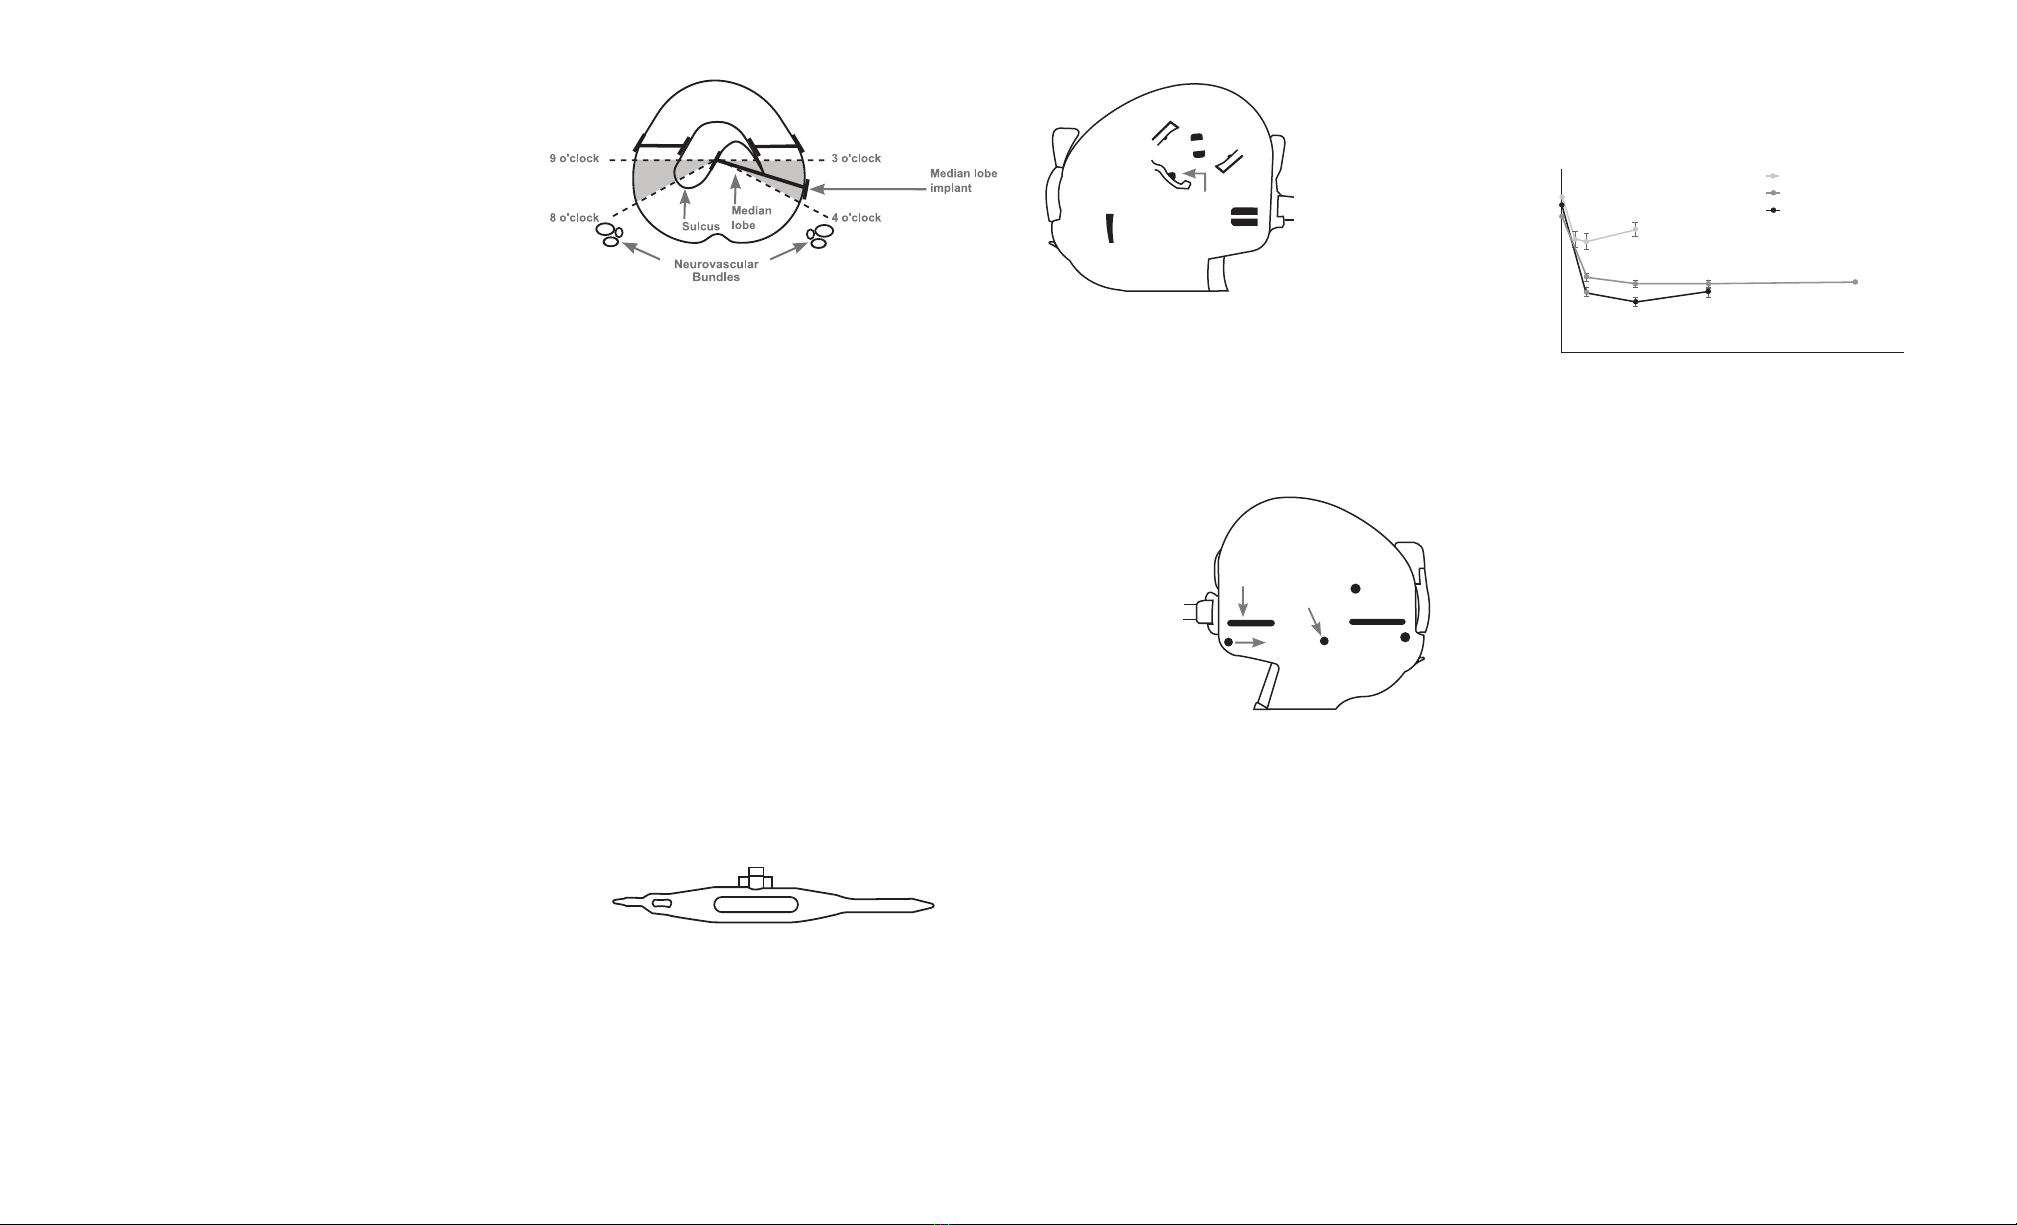
the bladder neck to the verumontanum.
2.2.2. To avoid external prostatic structures (e.g. neurovascular
bundles), position the Delivery Device tip in the anterior aspect
of the prostate in either the 2-3 or 9-10 o’clock position (Figure
3).Orient the tip to ensure the needle deploys laterally (needle
deploys in line with the Delivery Device handle).
As with cystoscopy, keep device parallel to the prostatic
fossa and avoid excessive instrument movement throughout
positioning and deployment.
To obtain the desired urethral opening, implants should be
placed throughout the length of both lateral prostate lobes
at approximately 1 cm intervals starting approximately 1.5 cm
distal to the bladder neck with implants paired on the left and
right sides.
WARNING: Failure to deploy the implant as described above
could lead to nerve damage, bleeding, pain, infection, damage
to the gastrointestinal tract or stula formation.
CAUTION: Deploying too close (<1 cm) to the bladder neck
may result in implants that are exposed to the bladder vesicle.
Improperly placed implants could lead to encrustation and may
need to be removed.
2.2.3. Position the Delivery Device such that the Deployment
Target (Figure 4) is against the target prostatic lobe in the
lateral direction.
2.2.4. To achieve desired amount of urethral opening, angle Delivery
Device laterally (pivot about external urinary sphincter),
applying slight pressure to the Delivery Device tip via Delivery
Device handle.
WARNING: Do not use the cystoscopy camera head to apply
pressure to the prostate tissue as this could compromise UroLift
System performance.
WARNING: To avoid inadvertent needle advancement, do
not place nger on Needle Trigger when positioning Delivery
Device once Needle Safety Lock is unlocked.
3. IMPLANT DEPLOYMENT
While holding the Delivery Device distal tip stable against the
target tissue:
3.1. Unlock the Needle Safety Lock (Step 1, Figure 5).
3.2. Lightly depress the Needle Trigger to deploy the needle (Step 2,
Figure 5). The UroLift System needle extends 33 mm, which is
sucient to reliably access the prostatic capsule based on cadaver
and clinical studies.
CAUTION: Do not depress the Retraction Lever during the
Needle Trigger pull.
3.3. After a brief pause, depress the Retraction Lever (Step 3, Figure
5) fully to retract needle and deploy Capsular Tab. Squeeze the
Retraction Lever again to ensure complete retraction.By this
action, the Capsular Tab is delivered from the tip of the extended
needle and is then tensioned back towards the prostatic capsule
until it seats on the capsular surface. The Needle is now in the
retracted (not exposed) position and is contained within the
Delivery Device.
CAUTION: Failure to depress the Retraction Lever completely
may result in incomplete needle retraction, Urethral End-Piece
misdeployment, loose Urethral End-Piece, or incomplete
suture cut.
CAUTION: Avoid contact with the Urethral Release button
when depressing the Retraction Lever. Contact with the Urethral
Release button while depressing the Retraction Lever may
result in inadvertent deployment of the Urethral End-piece and
unintentionally cutting the suture.
3.4. Slightly reduce the compression applied to the prostatic lobe.
Suture tension is now maintained by the Delivery Device. The
suture will be against the edge of the keyhole that is closest in
the cystoscope view (Figure 6).
3.5. If the suture is not against the closest edge of the keyhole,
slowly move the device proximally toward the bladder to get the
suture against the closest edge of the keyhole. When the suture
is properly positioned, a white line will typically appear half-way
up the suture showing reection of the cystoscopy light (Figure
6). Hold this position and continue to the next step. If the suture
is not visible in the keyhole, slightly advance the Delivery Device
toward the bladder and check again. If the suture is still not
visible, the capsular tab may have deployed inside the prostate
and the implant will not be formed correctly. In this case, remove
the device from the patient and discard. Use a new device and
increase the compression angle to avoid recurrence of this issue.
CAUTION: Failure to position suture against closest edge
of keyhole (Figure 7) may result in Urethral End-Piece
misdeployment or incomplete suture cut.
Figure 4
Cystoscopic view of Delivery
Device tip showing Deployment
Target, needle will Extend/
Deploy in the2-3 o’clock
position in this image.
Deployment
Target
L00136-01 Rev A 03/2019 NeoTract® Instructions for Use, UroLift® System Page 2 of 4
Figure 5
UroLift® Delivery Device
Figure 6
Image of Delivery Device
tip showing suture against
closest edge of keyhole.
Figure 7
Image of Delivery Device tip
showing suture not against
closest edge of keyhole .
Figure 3
Prostatic schematic –
placement of
UroLift® Implants
3.6. Press the Urethral Release button toward the telescope (Step
4, Figure 5) to deploy Urethral End-Piece and cut the excess
suture. After the Urethral Release button is pressed, the complete
implant has been deployed. No further implants can be delivered
using the same Delivery Device.
3.7. Angle the Delivery Device towards the midline and advance
into the bladder. As with cystoscopy, keep device parallel to
prostatic fossa. When advancing the Delivery Device proximally
into the bladder, maintain the handle horizontal in the 9-10 or
2-3 o’clock orientation.
3.8. Once positioned in bladder, the Delivery Device should be
oriented in the anterior-posterior orientation and can be
removed from the cystoscopy sheath.
3.9. To deploy more implants, remove Delivery Device from the
Sheath and replace with a new UroLift® System.
To obtain the desired urethral opening, place implants
throughout the length of both lateral prostate lobes at
approximately 1 cm intervals starting 1.5 cm distal to the
bladder neck with UroLift Implants paired on the left and
right sides.
CAUTION: When advancing ancillary equipment and/or
devices and when deploying additional implants, be careful
not to disrupt previously deployed implants.
4. MEDIAN LOBE PROCEDURE
4.1 If the lateral lobes are secured out of the anterior aspect of the
urethra from bladder neck to verumontanum and obstruction
persists due to a median lobe, place additional implant(s)
as follows.
4.2. Using the Delivery Device tip at sulcus, slowly compress the
median lobe posteriorly until it enters the prostatic fossa.
4.3. Once the median lobe is within the prostatic fossa, angle the
Delivery Device tip in either the 3-4 or 8-9 o’clock position
(Figure 8), and place the implant as described in section 3.
Implant Deployment. Lower the Delivery Device handle such that
it is parallel to the midline prior to deploying needle.
4.4. If required, additional implants can be placed in either the 3-4 or
8-9 o’clock positions).
CAUTION: If no portion of the intravesical tissue can be manipulated
into the prostatic fossa, no implant should be deployed.
CAUTION: When treating the prostate median lobe, the Capsular
Tab of the implant should not be implanted posterior to the 4 and 8
o’clock positions on the prostatic capsule (Figure 8) to avoid external
prostatic structures (e.g., neurovascular bundles, gastrointestinal tract).
WARNING: Failure to deploy the implant as described above could
lead to nerve damage, bleeding, pain, infection, damage to the
gastrointestinal tract or stula formation.
CAUTION: Deploying too close (<1 cm) to the bladder neck
may result in implants that are exposed to the bladder vesicle.
Improperly placed implants could lead to encrustation and may
need to be removed.
5. FINAL CYSTOSCOPY
5.1. Perform a cystoscopy of the urethra and bladder to conrm
the desired eect has been achieved. Conrm that all implant
components are well apposed to mucosal tissue within the
prostatic urethra. Remove implants that are not well apposed.
5.2. Ensure implants are not present in the bladder or extending
into the bladder vesicle. If present, remove implant using
graspers. Also cystoscopically assess the trigone and ureter
orices for any damage. Remove implants that may
compromise a ureteral orice.
CAUTION: Failure to remove implants exposed to bladder urine
could lead to encrustation, urinary symptoms and possible
subsequent intervention for removal.
6. MANUAL RELEASE INSTRUCTIONS FOR USE
6.1. Retract Lever Release
6.1.1. If the needle does not retract, insert Tip 2 of Handle Release
Tool (Figure 9) into hole on right side of case (Figure 10). Tip
3 should point toward the Retraction Lever. While still inserted,
turn and hold Handle Release Tool clockwise with light nger
pressure, approximately 5-10 degrees, and gently depress the
Retraction Lever. The needle may have been prevented from
retracting because of bone contact. Therefore for the next
deployment slightly decrease the tissue compression.
6.1.2. Finish retracting the Needle as normal.
6.2. Monolament Suture Release
6.2.1. If it is desired to cut the monolament suture without
delivering Urethral End-Piece, insert Tip 3 of Handle Release Tool
(Figure 9) into hole on left side of case (Figure 11).
CAUTION: If an unattached Urethral End-Piece is in the urinary
tract, remove it.
6.3. Manual Suture Cut
6.3.1. If the suture was not cut after pressing the Urethral Release
Button, insert Tip 3 of Handle Release Tool (Figure 9) into hole
on left side of case (Figure 11).
6.3.2. If the suture is still not cut, insert Tip 1 of Handle Release Tool
into the slot on the front left side of the case and slide the
Handle Release Tool from front to back.
SUMMARY OF CLINICAL STUDY RESULTS
The L.I.F.T. study enrolled a total of 206 subjects randomized 2:1 (140
UroLift: 66 Control) at 19 investigational sites. The 3 month ITT primary
endpoint was met: reduction in IPSS was 88% greater in the UroLift
arm as compared to the Control arm (IPSS reduction of 11.1±7.7 UroLift
vs. 5.9±7.7 Control, p=0.003). The 12 month ITT primary endpoint was
also met: UroLift subjects experienced a 45.5% IPSS reduction (97.5%
CI lower bound of 38.3%) from baseline. UroLift subjects experienced
symptom relief by 2 weeks, additional improvement to 3 months and
sustained improvement at 12 months (Figure 12).
All ITT secondary endpoints were met. For the UroLift subjects,
Qmax was improved 63.5% at 3 months and sustained to 54.8% at 12
months, p<0.001; QoL was improved 47.8% at 3 months and sustained
to 48.1% at 12 months, p<0.001; and BPHII was improved 56.5% at
3 months and sustained to 55.0% at 12 months, p<0.001. All endpoints
were statistically superior to Control at the 3 month comparison
(Qmax, QOL, BPHII p-values of 0.005, <0.001, <0.001, respectively).
The MedLift (subjects with obstructive median lobe) study enrolled
45 subjects at 9 US Investigational sites. The 6 month endpoint was
met; the lower bound of the 95% lower condence limit of the mean
percent improvement in IPSS over baseline for the UroLift system
was 50.8%.
SAFETY
The primary safety endpoint in the L.I.F.T. and MedLift studies was
achieved if <10% of patients required post-operative catheterization
for more than 7 days. Only1.4% (2/140) in the L.I.F.T study and
2.2% (1/45) in the MedLift study required extended post-operative
catheterization. The mean postoperative catheter duration averaged
over the entire population was 0.9 days in the L.I.F.T. study and 1.2
days in the MedLift study. Mean return to preoperative activity was
8.6 days in the L.I.F.T. study. A majority (86%) of MedLift subjects had
≥ 70% recovery per VAS by one month.
The proportion of UroLift subjects who experienced de novo
sustained sexual dysfunction (sustained erectile dysfunction or
anejaculation) was assessed as a safety endpoint in L.I.F.T. None (0.0%)
of the 140 UroLift subjects experienced de novo sustained sexual
dysfunction (erectile or ejaculatory dysfunction).
Adverse events associated with UroLift System Treatment were
comparable to other minimally invasive surgical therapies as well
as standard cystoscopy. The majority of the adverse events in the
UroLift group occurred within 7 days of treatment. Most were mild
to moderate and resolved within 2-4 weeks following treatment. The
device related events reported through one year in the L.I.F.T. study
included dysuria (35.7% of subjects), hematuria (27.1%), pelvic pain
(18.6%), micturition urgency (10.0%), urinary incontinence (7.9%),
calculus urinary (7.1%), retention (5.7%), nocturia (5.0%), pollakiuria
(5.0%), and bladder spasm (4.3%) . Adverse events most observed
through 6 months in the MedLift study were blood clot in urine
(57.8%), dysuria (48.9%), hematuria (24.4%), micturition urgency
(8.9%), urinary retention (6.7%), urge incontinence (6.7%), and painful
ejaculation (6.7%).
L00136-01 Rev A 03/2019 NeoTract® Instructions for Use, UroLift® System Page 3 of 4
Figure 11
Suture Release
and Manual Suture Cut
Handle
Left Side
Insert Tip 1 Here
Insert Tip 3 Here
Slide
Figure 10
Retraction Lever Release
Handle
Right Side
Insert Tip 2 Here
123
Figure 9
Handle Release Tool with Tip Numbering
30
25
20
15
10
5
0
0 2 4 6 8 10 12 14
Mean IPSS Score
Month Post - Treatment
L.I.F.T.: Treatment
L.I.F.T.: Control (Sham)
MedLIFT
Figure 12
Mean IPSS at each follow-up interval – Active and Control arms.
Note: Mean +/- standard error
Figure 8
Prostatic schematic-placement of UroLift® Implants in median lobe

L00136-01 Rev A 03/2019 NeoTract® Instructions for Use, UroLift® System Page 4 of 4
NeoTract, Inc.
4155 Hopyard Road
Pleasanton, CA 94588 USA
Tel: 877.408.9628, +1 925.401.0700
Fax: +1 925.401.0699
www.urolift.com
© 2019 NeoTract, Inc. All rights reserved.
Printed in the USA.
DISCLAIMER AND PATENTS
PATENTS
For a list of patents owned by NeoTract, Inc. visit
https://www.urolift.com/patents.
DISCLAIMER
The exclusions and limitations set out above are not intended to
and should not be construed so as to contravene any mandatory
provisions of applicable law. If any part or term of this disclaimer is
held by a court of competent jurisdiction to be illegal, unenforceable,
or in conict with applicable law, the validity of the remaining portions
of this disclaimer shall not be aected, and all rights and obligations
shall be construed and enforced as if this disclaimer did not contain
the particular part or term held to be invalid.
DISCLAIMER OF WARRANTY
ALTHOUGH THE UROLIFT® SYSTEM AND ITS COMPONENTS
THE “PRODUCT”) HAS BEEN MANUFACTURED UNDER CAREFULLY
CONTROLLED CONDITIONS, NEOTRACT,® INC., AND ITS AFFILIATES
(HEREINAFTER “NEOTRACT”) HAS NO CONTROL OVER THE CONDITIONS
UNDER WHICH THIS PRODUCT IS USED. NEOTRACT THEREFORE
DISCLAIMS ALL WARRANTIES, BOTH EXPRESS AND IMPLIED, WITH
RESPECT TO THE PRODUCT INCLUDING, BUT NOT LIMITED TO, ANY
IMPLIED WARRANTY OF MERCHANTABILITY OR FITNESS FOR A
PARTICULAR PURPOSE. NEOTRACT SHALL NOT BE LIABLE TO ANY
PERSON OR ENTITY FOR ANY MEDICAL EXPENSES OR ANY DIRECT,
INCIDENTAL, OR CONSEQUENTIAL DAMAGES CAUSED BY ANY USE,
DEFECT, FAILURE, OR MALFUNCTION OF THE PRODUCT, WHETHER A
CLAIM FOR SUCH DAMAGES IS BASED UPON WARRANTY, CONTRACT,
TORT, OR OTHERWISE. NO PERSON HAS ANY AUTHORITY TO BIND
NEOTRACT TO ANY REPRESENTATION OR WARRANTY WITH REGARD TO
THE SYSTEM.
SYMBOLS
SYMBOL DEFINITION
Manufacturer
Attention, see
Instructions for Use
Prescription Only:
Federal law restricts this
device to use by or on the
order of a physician
Do Not Reuse
Catalogue Number/
Part Number
Do Not Use if Package is
Damaged
Sterile (radiation)
gManufacturing Lot Number
Quantity In Package
HUse By Date
MR MR Conditional
MR
Other adverse events included but were not limited to PSA elevation,
urinary tract infection, hypotension, residual urine, urine ow
decrease, abdominal pain, constipation, ejaculation disorder, erectile
dysfunction, improperly placed implant, hematospermia, urinary
hesitation, urine ow decrease, hemorrhoids, hypertonic bladder,
penile pain, proctalgia, pyrexia, and residual urine.
The following can potentially occur as a result of pelvic or urological
procedures including but not limited to adhesion formation, adverse
tissue reaction, bleeding, contracture, epididymitis, gastrointestinal
complications, injury to the urinary tract or adjacent organs, foreign
body sensation or migration, device failure, need for additional
procedure, nerve damage, prostatitis, orchitis, sepsis, sphincter injury,
and stricture that could lead to serious outcomes.
MRI SAFETY INFORMATION
Non-clinical testing has demonstrated that the UroLift® Implant is MR
Conditional. A patient with this device can be safely scanned in an MR
system immediately after placement meeting the following conditions:
• Static magnetic eld of 3.0 Tesla or less
• Maximum spatial gradient magnetic eld of 1,500 Gauss/cm
(15T/m)(extrapolated)
• Maximum MR system reported, whole body averaged specic
absorption rate (SAR) of 4 W/kg for 15 minutes of scanning
(i.e., per pulse sequence) (First Level Controlled Operating Mode)
Under the scan conditions dened above, the Implant is expected
to produce a maximum temperature rise of 2.4°C after 15 minutes of
continuous scanning (i.e., per pulse sequence).
In non-clinical testing, the image artifact caused by the device extends
approximately 15 mm from the Implant when imaged with a gradient
echo pulse sequence and a 3.0 Tesla MRI system.
The safety of the delivery system has not been evaluated in the MR
environment, and therefore, the delivery system should not be used
within the MR environment.
Patient implant cards are provided to inform the patient that the UroLift
Implant is MR Conditional and can safely be scanned only under specic
MR conditions.
Table of contents
Popular Medical Equipment manuals by other brands


Getinge
Getinge Arjohuntleigh Nimbus 3 Professional Instructions for use

Mettler Electronics
Mettler Electronics Sonicator 730 Maintenance manual

Pressalit Care
Pressalit Care R1100 Mounting instruction

Denas MS
Denas MS DENAS-T operating manual

bort medical
bort medical ActiveColor quick guide

AccuVein
AccuVein AV400 user manual


