Nesco PC8-25 Technical specifications

8 QT Digital Pressure Cooker
(Model PC8-25)
Care/Use Guide
7,6 L Autocuiseur Numérique
(Modèle PC8-25)
Guide d’entretien et d’utilisation

The Metal Ware Corp
1700 Monroe St., P.O. Box 237
Two Rivers, WI 54241-0237
Phone: 1-(800) 288-4545
TABLE OF CONTENTS
Important Safeguards .............................................................................................................1 - 3
Parts........................................................................................................................................................4
Functions .............................................................................................................................................5
Regulator Knob Instructions.....................................................................................................6
Operation ...................................................................................................................................... 7 - 9
Care and Cleaning ........................................................................................................................10
Tips and Hints, Troubleshooting.............................................................................................11
Cooking charts.........................................................................................................................12 - 13
Recipes.........................................................................................................................................14 - 17
One Year Limited Warranty ...................................................................................................... 18
TABLE DES MATIÈRES
Mesures de Précaution Importantes ........................................................................ 19 - 21
Pièces ...................................................................................................................................................12
Fonctions .......................................................................................................................................... 23
Instrucciones reguladoras de presión..............................................................................24
Fonctionnement ..................................................................................................................25 - 28
Entretien et de Nettoyage........................................................................................................29
Consiels et Astuces, Dépannage................................................................................30 - 31
Garantie Limitée d’un an........................................................................................................... 32
TECHNICAL SPECIFICATIONS
Specification / Caractéristiques: 1300 W., 120 VAC, 60Hz
POUR LES ACCESSOIRES ET
LES PRODUITS SUPPLÉMENTAIRES
NESCO®is a registered trademark of The Metal Ware Corp
NESCO®est une marque de commerce enregistrée de la société The Metal Ware Corp
Français
English

1
English
CAUTION MARKS AND SYMBOLS
This is the safety alert symbol. This symbol is placed in the manual
to alert you to the potential for bodily injury or death.
UNDERSTANDING SIGNAL WORDS:
Signal words are used to identify safety information within the text of this
manual.
DANGER
Indicates an imminently hazardous situation which, if not voided,
will result in death or serious personal injury.
WARNING
Indicates a potential hazard or unsafe situation which, if not
avoided, could result in death or serious personal injury or product
damage.
CAUTION
Indicates a potential hazard or unsafe practice, which if not avoided
may result in minor personal injury or product damage.
NOTICE
This display is used to address practices not related to physical
injury.
!
!
!
!
!

2
- This product is designed for household use only -
When using electrical appliances, basic safety precautions should always be followed,
including the following:
IMPORTANT SAFEGUARDS
1. READ ALL INSTRUCTIONS BEFORE USE.
2. Do not touch hot surfaces. Use handles or knobs.
3. To protect against electrical shock and personal injury, do not immerse this
appliance, including cord and plug, in water or other liquid.
4. This appliance is not intended for use by persons (including children) with reduced
physical, sensory or mental capabilities, or lack of experience and knowledge,
unless they have been given supervision or instruction concerning use of the
appliance by a person responsible for their safety.
5. Close supervision is necessary when any appliance is used by or near children.
6. Unplug from outlet when not in use and before cleaning. Allow to cool completely
before putting on or taking o parts, and before cleaning.
7. Do not operate any appliance with a damaged cord or plug or after the appliance
malfunctions or has been damaged in any manner. To avoid hazards, return appliance to
NESCO
®
Factory Service Department for examination, repair or adjustment.
8. The use of accessory attachments not recommended by the manufacturer may
result in fire, electric shock or injury to persons.
9. Do not use outdoors.
10. Do not let cord hang over edge of table or counter, or touch hot surfaces.
11. Do not place on or near a hot gas or electrical burner or in a heated oven.
12. Intended for counter top use only,
do not use for other than its intended use
.
13. Operate appliance only when all parts are fully engaged and secured.
14. It is recommended that appliance not be moved when it contains hot oil or other hot
liquid. If it must be moved, use extreme caution.
15. Use extreme caution when releasing pressure or while removing the lid. Serious
burns can result from escaping steam.
16. While the unit is in operation, never attempt to remove the lid or bypass safety
features.
17. To reduce the risk of electrical shock, cook only in the removable cooking pot.
18. Do not fill the cooking pot more than 50% full with food or 60% full with liquid. When
cooking foods that expand during cooking do not fill the unit over 50% full.
19. Foods such as applesauce, cranberries, pearl barley, oatmeal or other cereals, split
peas, noodles and pasta, or rhubarb should not be cooked under pressure in the
pressure cooker. These foods tend to foam, froth and sputter, and may block the
floating valve.
20. Caution should be used when moving appliances containing hot food or liquid.
21. WARNING: Never deep fry or pressure fry in the pressure cooker. It is dangerous and
may cause a fire, serious damage or injury.
22. WARNING: Spilled foods can cause serious burns. Keep appliance and cord away
from children. Never drape cord over edge of counter top, never use outlet below
counter top and never use with an extension cord.
23. Do not cover the appliance or have it near flammable material including curtains,
draperies or walls while in use.
24. Never cover the regulator knob while in use. Severe injury or damage may result.
25. When cooking food under pressure, a minimum 2 cups (0,5 L) of liquid must be used.
26. Do not lift the appliance by the cover handle, always use side handles.
SAVE THESE INSTRUCTIONS
English

3
Grounded 3 prong plug: This appliance has a 3-prong (grounding) plug for use
in a 3-prong (grounding) outlet to minimize the possibility of electric shock. This
applance should only be used with a 120V, 60 Hz grounded outlet. Failure to follow
these instructions could result in fire, electrical shock, serious injury or death.
If the plug does not fully fit into the outlet, contact a qualified electrician to inspect
and repair the problem. Do NOT attempt to modify the plug in any way. Do NOT use
an adapter. Failure to follow these instructions could result in fire, electrical shock,
serious injury or death.
Short Cord Instructions: A short power supply cord is provided to reduce the risk
resulting from becoming entangled in or tripping over a longer cord.
BEFORE FIRST USE
1. Read and follow all instructions and save for reference. Remove all packaging and
labels.
2. Clean all parts following instructions in the ‘Care and Cleaning’ section.
3. Wipe the base with a damp cloth and dry completely. Never use abrasive
cleaners or scouring pads to clean parts of this appliance.
4. TO REDUCE RISK OF ELECTRICAL SHOCK HAZARD NEVER IMMERSE THE
BASE OR CORD IN WATER OR ANY OTHER LIQUID.
English

4
PARTS
1Base 7 Removable Sealing Gasket
2Pressure Regulator Knob 8 Regulator Filter
3Cooking Pot, removable 9 Control Panel
4Power Cord 10 Floating Valve
5Cooking Rack 11 Twist and Lock Lid
6Serving Spoon and Measuring
Cup
12 Condensation Cup
5
12
107 8 11
4
2 31
96
English

5
FUNCTIONS
1. Base - Do not immerse in water! Contains the electronic controls and heater.
2. Pressure Regulator Knob - Controls the cooking function. Align the dots for
desired setting. PRESSURE for cooking under high or low pressure and rice setting.
STEAM for keep warm, steam and to release pressure from unit.
3. Cooking Pot - 8 L. removable, with non-stick coating for easy cleanup and durable
aluminum alloy for even heating.
4. Power Cord -
Removable for easy storage. Be sure plug is attached to the base securely
.
5. Cooking Rack - Use when cooking multiple food items or steaming.
6. Serving Spoon / Measuring Cup - Use to stir or serve. Protects the surface of the
cooking pot. 6 oz. cup to measure ingredients or to remove excess liquid.
7. Sealing Gasket - Creates air tight seal necessary for pressure cooking and is
removable for easy cleaning.
8. Regulator Filter - Protects regulator valve from larger pieces of food that could
cause blocking. Check that it is clean and in place.
9. Control Panel - Buttons that control the functions of the unit.
• KEEP WARM - Reheats food or keeps food warm for serving.
• STEAM - Quickly boils water to steam foods like vegetables or rice.
• SLOW COOK - Cooks recipes slowly and at a low heat to retain the natural flavors
and tenderness.
• SAUTÉ/BROWN - To brown/sauté meat before pressure cooking for better results.
• TIME DELAY - Allows you to delay the cooking process by up to 8 hours. CAUTION:
Perishable foods should not be left at room temperature for more than 2 hours (1
hour if above 90°F).
• RICE - One touch setting for cooking rice. Defaults to 10 mins. at high pressure.
• LOW PRESSURE - Controls cooking pressure at 5 pounds above atmospheric pressure.
• HIGH PRESSURE - Controls cooking pressure at 10 pounds above atmospheric pressure.
• START /STOP - Controls power to the control board.
10. Floating Valve - Safety valve engages when pressure is built in the cooker and will
not allow lid to be removed.
11. Locking Lid - Has a safety feature that does not let you open the lid until the
pressure has dropped to a safe level.
12. Condensation Cup - Collects excess condensation during cooking process. Slide
out to remove and push in to lock.
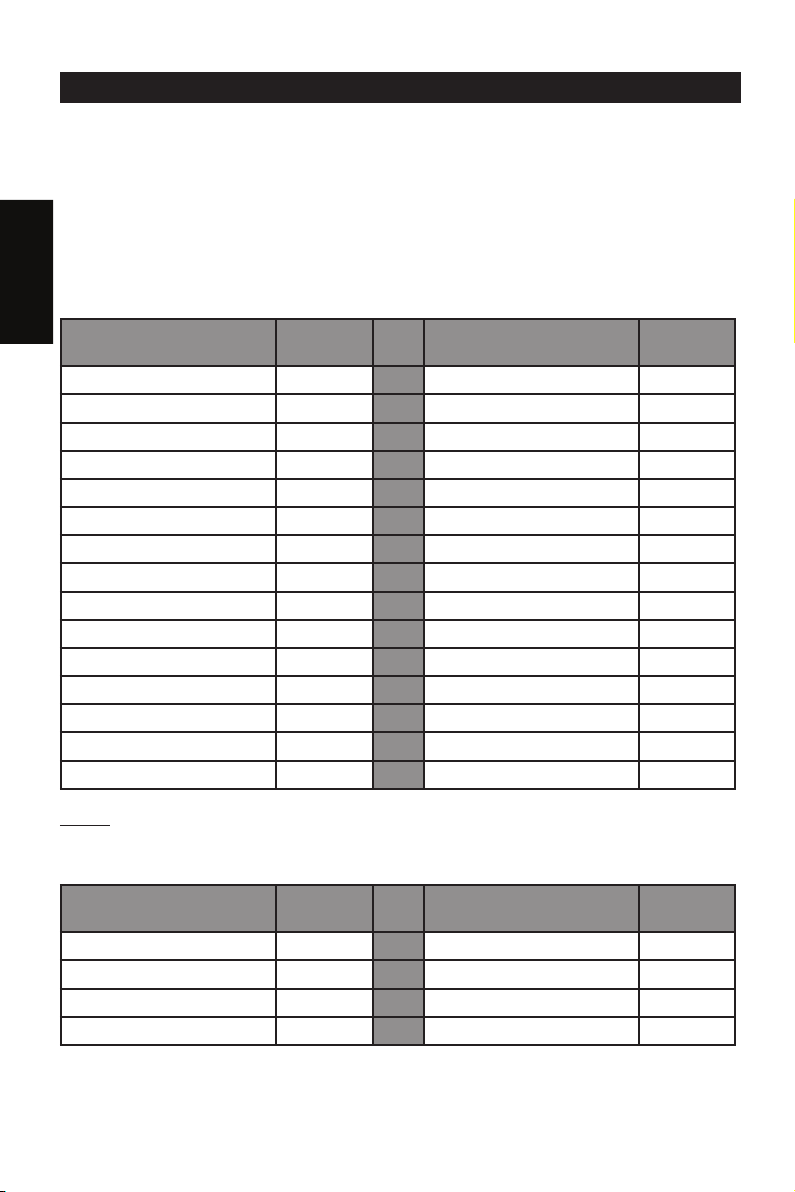
FUNCTION SETTING DEFAULT TIME TOTAL TIME
HIGH AND LOW PRESSURE 1 MINUTE 1 MIN. TO 2 HRS
RICE 10 MINS. 5 TO 30 MINS.
TIME DELAY 30 MINS. 8 HRS.
SAUTÉ/BROWN
N 30 MINS. 1 TO 30 MINS.
SLOW COOK 4 HRS. 30 MINS. TO 12 HRS.
STEAM 15 MINS. 1 MIN. TO 2 HRS.
KEEP WARM NONE NONE
English
6
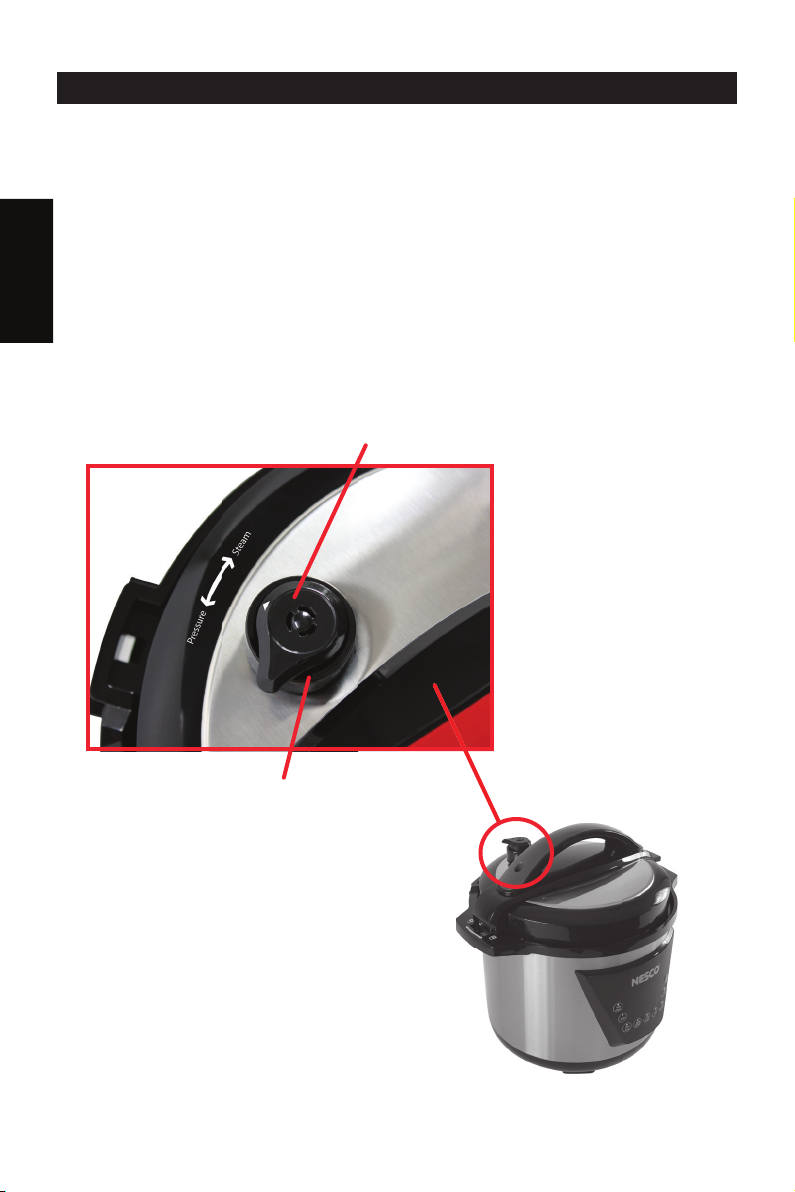
PRESSURE REGULATOR INSTRUCTIONS
The Pressure Regulator Knob controls the cooking function. Align the
ARROW on the regulator knob To the direction of the Steam/Pressure mark
on the lid.
Use the STEAM setting for keep warm, slow cook, steam and to release
pressure at the end of the pressure cooking cycle. Use the PRESSURE
setting for cooking under high or low pressure and rice setting.
To set regulator knob for STEAM setting - Turn the regulator knob to the
right as indicated on lid.
To set regulator knob for PRESSURE setting - Turn the regulator knob to
the left as indicated on the lid.
REGULATOR KNOB
REGULATOR MOUNT
English

7
OPERATION
1. Place the appliance on a flat, heat resistant and stable surface.
2. Before using your appliance, always check the lid to be sure the sealing gasket and
regulator filter are clean and positioned correctly. (see Care and Cleaning section).
Ensure gasket is not damaged or broken. If damaged, do not use the pressure
cooker and contact customer service 1-800-288-4545 for replacement.
3. To open the lid, grasp handle and turn until it stops, then lift to remove.
4. Place desired foods into cooking pot.
NOTE: The total volume of food and liquid must not exceed 60% of the capacity
of the cooking pot. For foods such as dried vegetables and beans, or rice and
grains, the total volume must not exceed 50% capacity. Overfilling may clog the
pressure limit valve, which can cause excess pressure to develop. Always use at
least 2 cups liquid when pressure cooking.
5. Check inside the cooker base where the heating plate and sensor are located to
be sure this area is clean and dry before inserting cooking pot.
6. Replace lid and turn until it locks into position.
7. Insert plug into 120 volt electrical outlet.
8. Set desired cooking function and time setting, then press START to begin. NOTE:
Cooker will begin countdown when the desired pressure is reached. Cooker will
automatically switch to KEEP WARM function after cooking times out, except when
using BROWN/SAUTE function which will automatically turn o.
FUNCTIONS
PRESSURE COOKING SETTING:
Before using, check to be sure that the sealing gasket and the pressure regulator
knob are clean and positioned properly (see Care and Cleaning section).
1. Plug the cord into an electrical wall outlet.
2. Position the cooking pot into the cooker base.
3. Place food in the cooking pot according to the recipe. NOTE: When cooking most
foods under pressure, unless stated otherwise add (16 oz.) of liquid to pot.
4. Place the lid on the cooker base and turn until it locks into place. (The locking pin
will click into place.)
5. Set regulator knob to PRESSURE.
6. Choose the desired cooking mode by pressing either the HIGH or LOW pressure
button on the control panel. The light on the button will flash and the digital
display will show 0:01 (This equals 1 minute cooking time.)
7. Set the desired time by pressing the button once for each additional minute or by
continuously holding the button down. The longest cooking time is 2 hours.
8. Press the START button to begin cooking. The indicator light will stop flashing.
9. The unit will begin to count down in minutes, after the pressure has been reached.
(The floating valve will rise when pressure is building up.) This ensures the lid is
locked and cannot be removed.
10. When finished cooking, allow pressure to release by using the ‘natural method’ or
‘quick release method’.
(continued on next page)
60% 50%
!
English

8
Natural Method:
CAUTION
KEEP HANDS AND FACE AWAY FROM ESCAPING
STEAM AS IT IS HOT AND CAN CAUSE INJURY.
After cooking, press the ‘STOP’ button and unplug cord. Let appliance stand
and allow pressure to drop naturally which takes from 10 to 20 minutes. After 20
minutes, using oven mitts or tongs, set the pressure regulator knob to ‘STEAM’ and
allow pressure to be released.
Quick Release Method:
CAUTION
KEEP HANDS AND FACE AWAY FROM
ESCAPING STEAM AS IT IS HOT AND CAN CAUSE INJURY.
After cooking, press the ‘STOP’ button and unplug cord. Using oven mitts or tongs,
move the pressure regulator knob to ‘STEAM’ and allow the pressure to be released.
!
WARNING:
• Do not touch the pressure regulator knob while in use to avoid burn injury
from steam.
• Keep hands and face away at all times. Use oven mitts when removing the
cooking pot or making adjustments to the regulator knob.
• Lid cannot be removed under pressure. Remove pressure by the NATURAL
or QUICK RELEASE methods. Remove the lid by turning to unlock and lifting it
away from you to avoid being burned by the steam.
!
NOTE:
• When full pressure is reached, cooking will begin and the timer will start to
count down. The raised float indicates you are cooking under pressure. The lid
is double-locked and cannot be opened while under pressure.
KEEP WARM SETTING:
This function can be used to keep recently cooked foods warm or to reheat.
1. Turn the pressure regulator knob to STEAM.
2. Press the KEEP WARM button.
Press the START button to begin the program.
3. The cooker will automatically switch to the KEEP WARM function after cooking
when using any program setting, except
SAUTÉ/
BROWN.
SAUTÉ/
BROWN SETTING:
This program allows you to sauté/brown your food before cooking it under
pressure. Brown meat or poultry for the best flavor and texture, unless otherwise
indicated in the recipe.
For best results, food should be patted dry with a paper towel before browning and
make sure the oil is hot before adding your meat or poultry.
1. Position the cook pot into the pressure cooker base.
2. Add small amount of oil as per recipe to the cooking pot. Do not use the lid.
3. Press the SAUTÉ/BROWN button. The light on the button will flash and the
display will read “0:30”.
4. Press the START button to begin heating.
5. After about one minute of preheating, add food and begin cooking.
6. NOTE: Do not leave pressure cooker unattended while cooking foods.
(continued on next page)
!
!
English

9
STEAM SETTING:
This program quickly brings liquid to a boil for steaming food or cooking rice.
1. Position the cook pot into the pressure cooker base.
2. Place the rack in the bottom of the removable cooking pot.
3. Add at least 16 oz. of water so that the bottom of the rack is above the liquid.
4. Add the food. Do not fill the pot more than two-thirds full. Note: If steaming rice,
put the rice in a smaller bowl and place on the rack. See “OPERATION” section.
5. Place lid onto the pressure cooker and turn to lock. Set the pressure regulator
knob to STEAM.
6. Press the STEAM button. The light on the button will flash and the digital display
will read ”0:15”.
7. Set the desired time by pressing the button once for each additional minute or
press and hold for rapid increase. The longest steaming time is 2 hours.
8. Press the START button to begin cooking.
!
CAUTION:
• The lid can be opened while cooking to check the food during the STEAM
cooking mode. Use caution and never place face over the pressure cooker
when removing the lid. Tilt lid away when lifting. Steam escapes as soon as the
lid is opened and can cause serious burns.
RICE SETTING:
1. Place ingredients into the cook pot. Do not fill cook pot more than 50% full.
When cooking rice, the maximum amount of rice is 1-1/2 cups uncooked white
rice plus 3 cups liquid.
2. Place lid on pressure cooker and turn it to lock. Then press RICE button. Default
time is 10 minutes, press button to adjust time.
3. When time is finished, allow the pressure to release by the “Natural” method,
which means to let it sit for about 15 minutes or until the floating valve releases
and the lid can be opened and removed.
SLOW COOK SETTING:
1. Place the cooking pot into the pressure cooker.
2. Place the food to be slow cooked in the cooking pot.
3. Place lid onto the pressure cooker and turn it to lock. Set the pressure regulator
knob to STEAM.
4. Press the SLOW COOK button. The light on the button will flash and the digital
display will read “4:00” (This equals 4 hours of cooking time).
5. Set the desired time by pressing the button once for each additional half hour or
by continuously holding the button down. The longest cooking time is 12 hours.
6. Press the START button to begin cooking. The indicator light will stop flashing.
7. The unit will begin to count down in one minute increments, after the unit
reaches cooking temperature.
(continued on next page)
English

10
TIME DELAY SETTING:
This function allows you to begin cooking food up to 8 hours later in half hour
increments. You can use the delayed time setting with slow cook, steam, high and
low pressure. CAUTION: Perishable foods such as meat and poultry products, fish,
cheese and dairy products cannot be left at room temperature for more than 2
hours. (No longer than 1 hour when the room temperature is above 90°F).
1. Select the desired cooking mode and time.
2. Press the DELAY TIME button for the delayed time setting. Press button to adjust
the time to delay. Default time :30 minutes, maximum time 8 hours.
3. Press the START button. Cooking will begin after delayed time has elapsed.
CARE AND CLEANING
Do not wash any parts of the pressure cooker in the dishwasher. Always clean
the pressure cooker after every use or if it has not been used for an extended period
of time.
1. Press STOP button and remove power cord from electrical outlet. Let cool before
cleaning.
2. Lid - Remove and wash in warm soapy water. Rinse and dry.
3. Gasket - Removed for cleaning and inspection (see instructions below).
How to remove and assemble sealing gasket.
1. Always check gasket for cracks or damage when cleaning.
2. Turn lid upside down and grasp gasket with thumb and index finger and
pull gently to remove from metal ring. Continue until gasket is fully removed
from metal ring.
3. Clean and inspect gasket for any cracks, scratches or is broken.
4. Install gasket by starting in one section and feed the gasket edge around
the metal ring located to the underside of the lid. Repeat this until the
gasket is fully wrapped around the metal ring with edges being even.
!
WARNING: Do not use gasket if damaged. Contact our customer support
representative. www.NESCO.com or toll free 1-800-288-4545
4. Cooking Pot - Wash the cooking pot with warm soapy water and dry. Do not put
into dishwasher as detergents may ruin the nonstick surface.
5. Base - Wipe the outer housing of base with a clean damp cloth. Do not
immerse base in water or any other liquid!
6. Condensation Cup - Remove the condensation cup by pulling down away from
base. Clean with warm, soapy water. Rinse and dry. Replace by pushing up until
it locks.
7. Power Cord - Wipe clean and inspect cord and plug for damage. Do not use if
damaged and contact us for replacement.
NOTE: Store the pressure cooker with the lid resting upside down on cooking
pot. This allows the gasket to keep shape and
keep stale odors from forming.
(continued on next page)
LIFT TO
REMOVE
PRESS TO
INSERT
English

11
Cleaning the Pressure Regulator Knob and Floating Valve:
Check that the regulator knob and floating valve are in good working order before
each use. Regulator knob will turn freely and the floating valve will slide easy with a
push of your finger. Be sure the small seal is in place around the floating valve.
Wash floating valve by following these directions.
1. After the unit has cooled, remove the lid.
2. Lift up the regulator knob to remove. Wipe knob with a cloth, rinse and dry.
3. Turn the lid over and use a brush to clean around the valve and filter. Make sure
the small rubber gasket is in-tact on bottom of floating valve. Do not cover
small holes with gasket.
4. Replace the regulator knob by aligning the knob in the hole and push to lock.
HINTS AND TIPS
• To ensure the best cooking performance when cooking under pressure, always
use at least 16 oz. of water or liquid in your recipes to enable enough steam to
be created to produce pressure.
• When using HIGH or LOW pressure settings the timer will not begin counting
down until full pressure is reached. It takes about 10 mins. to reach pressure.
• Pressure cooking is quicker than oven cooking, if you are unsure of the cooking
time, it is better to under cook and use the quick release method to check for
doneness. If not ready, continue cooking until finished.
• Perishable foods, such as meat, poultry and fish cannot be left out at room
temperature for no more than 2 hours. Therefore, when cooking perishable
foods do not set delay timer for longer than 2 hours (1 hr. if above 90°F/32C).
• Tougher, less expensive cuts of meat are better suited for the pressure cooker
because cooking under pressure breaks down the fibers for tender results.
• Fresh fruit should be cooked on low pressure.
• Add a tablespoon of oil to the water when cooking beans to reduce foaming.
TROUBLESHOOTING
• If your floating valve has not risen, but the timer is counting down,
perform the following steps:
1. Stop the pressure cooker by pressing the STOP button.
2. Turn the pressure regulator knob to STEAM, using oven mitts or tongs, release
in short bursts, until the pressure is fully released. Also referred to as the “quick
release method”.
3. Remove the lid and add liquid to have approximately 16 oz. of liquid in cooking
pot. Stir food to disperse liquid. Replace the lid and lock into position.
4. Press desired cooking function button and set desired cooking time.
5. Press the START button to resume cooking.
• If steam is leaking from under the cover, follow these steps:
1. Stop the pressure cooker by pressing the STOP button.
2. Turn the pressure regulator knob to STEAM, using short bursts, until the
pressure is fully released, also known as the quick release method.
3. Remove the cover and gasket. Check for tears or cracks. Do not use cooker if
any parts are damaged.
4. Check to be sure the gasket is positioned properly.
5. Check the contents of the cooking pot do not exceed 60% full.
6. If the cover still will not seal, call customer service at 1-800-288-4545.
English
12
COOKING CHART
VEGETABLES
• When pressure cooking vegetables use HIGH pressure setting and QUICK
RELEASE for pressure release.
• Before pressure cooking fresh vegetables, add 1 cup water and place a steam
rack into removable cooking pot. Place a layer of vegetables on rack. Cover and
lock lid in place. Turn regulator knob to ‘SEAL’. Cook for time indicated below.
• Remove vegetables, add desired seasonings and serve. NOTE: Cooking times
that exceed 7 minutes, add an extra 1/2 C water for each additional 5 minutes
cooking time so appliance does not boil dry.
Vegetables Time
(minutes)
Vegetables Time
(minutes)
Artichoke 9 to 11 Onions 4 to 5
Asparagus 1-1/2 to 2 Parsnips 2 to 4
Beans, green 2 to 3 Peas, in pods 2 to 3
Beets, small 11 to 13 Potatoes, sliced 5 to 7
Broccoli, flowerets 2 to 3 Potatoes, small 5 to 8
Broccoli, stalks 3 to 4 Potatoes, medium 11 to 15
Brussel Sprouts 3 to 5 Rutabagas, 1/2” thick 5 to 6
Cabbage, shredded 1-1/2 Spinach 2 to 3
Cabbage, quartered 3 to 4 Squash, acorn halved 6 to 8
Carrots, baby 4 to 5 Squash, sliced 1 to 3
Carrots, sliced 1 to 2 Tomatoes, quartered 2 to 3
Cauliflower 2 to 3 Tomatoes, whole 5 to 6
Corn on the Cob 3 to 5 Turnips, sliced 1 to 2
Egg Plant, sliced 2 to 3 Yams, whole 6 to 8
Okra 2 to 3 Zucchini, sliced 2 to 3
Fruits:
When pressure cooking fruits, follow the same guidelines as described above,
except select LOW pressure setting.
Fruits Time
(minutes)
Fruits Time
(minutes)
Apples, fresh 3 to 4 Peach 4 to 5
Apples, quartered 2 Pears 2 to 4
Apricots 2 to 4 Prunes 5 to 6
Figs, dried 5 to 6 Raisins 4 to 5
English

13
COOKING CHART
MEATS AND PULTRY
• When pressure cooking Meat or Poultry use HIGH pressure setting and QUICK
RELEASE for pressure release.
• Always cook meat or poultry with at least 1-3 cups of liquid. Preserved or salted
meats should be immersed in water.
• Unless indicated, the cooking times given below are for 3 pounds of meat or poultry unless
noted otherwise. All times are recommended and vary depending on quality and cut of
meat.
Type of Meat Time
(minutes)
Type of Meat Time
(minutes)
Beef, Pork, Lamb, cubed 15 to 20 Turkey Breast, whole 30 to 40
Beef / Veal:
Roast, brisket (3 - 4 lbs)
Shank, 1-1/2 in. thick
50 to 60
25 to 30
Fish:
Steaks, fillets, 3/4 in. thick
1-1/2 in. thick
3 to 4
6 to 7
Pork:
Loin roast (3 - 4 lbs)
Smoked butt
Ham shank
40 to 50
20 to 25
30 to 40
Chicken:
Boneless breast, thigh
Pieces (2 - 3 lbs)
Whole (3 - 4 lbs)
8 - 10
11 - 14
15 - 20
Dried Beans and Other Legumes:
• When pressure cooking beans or legumes use HIGH pressure setting and
NATURAL RELEASE for pressure release.
• Place beans or legumes in pressure cooker, add 3 cups of water for each cup of
food.
• Add 1 tablespoon of vegetable oil for each cup of water to cut down on foaming.
Do not add salt until after cooking.
Type of Legume Time
(minutes)
Type of Legume Time
(minutes)
Azuki 6 to 8 Kidney Beans, Red 4 to 5
Black Beans 2 to 3 Pinto 2 to 3
Black Eyed Peas 11 to 13 Red 5 to 7
Chick Peas (garbanzo) 3 to 5 Soybeans 5 to 6
Great Northern 3 to 4 Tepary 6 to 8
Grains:
Before cooking, soak certain grains, such as wheat berries in four times their
volume of lukewarm water for at least four (4) hours or overnight if required.
• Do not soak rice.
Type of Grain Time
(minutes)
Type of Grain Time
(minutes)
Rice, basmati – 1 1/2 C 7 to 8 Rice, brown – 1 1/2 C 7 to 8
Rice, converted – 1 1/2 C. 7 to 8 Rice, wild – 3 C 24 to 27
Rice, long grain – 1 1/2 C 7 to 8 Wheat, berries – 3 C 2 to 3
English

14
RECIPES
BBQ RIBS
1 Rack of Ribs, cut into pieces
1 (28 oz.) bottle of Barbeque sauce
2 C. Ginger ale
Pour ginger ale in cooking pot. Add: Cut rack of rib and your favorite rub or just salt
and pepper. Set regulator knob to PRESSURE. Place lid on cooker and lock it. Set
regulator knob to PRESSURE. Press the HIGH pressure button for 45 minutes. Press
start, the floating valve will rise when cooking pressure is reached and timer will
begin to countdown When finished, press STOP button and use the quick release
method to release the pressure by turning the regulator knob to STEAM in short
bursts. Pour out the ginger ale. Add the barbeque sauce and serve.
BEEF POT ROAST
4 lb. Beef pot roast 3 Tbsp Vegetable oil
1 large onion, chopped 4 C Beef broth
2 C Water
Salt and Pepper to taste
1 Bay leaf
Heat oil in cooker, using the BROWN setting to brown roast on both sides. Place
meat
on wire rack and add remaining ingredients. Cover and lock lid in place. Set
regulator
knob on SEAL. Program for HIGH pressure and cook for 45 minutes. Release
pressure
by using the natural release method. Cooker will beep and switch automatically to
the warm setting when cooking time is completed.
BUFFALO CHICKEN SLIDERS
3 lbs. boneless chicken breasts 3-1/2 C. hot or mild wing sauce
2 C. Water 3 pkgs. dinner rolls
1 (18 oz.) bottle Blue Cheese dressing Celery and Carrot sticks
Put chicken in cooking pot with 2 cups Hot sauce and water. Place lid on cooker
and lock it and set regulator knob to PRESSURE. Press the HIGH pressure button for
15 minutes. When finished, press STOP button and use the quick release method to
release the pressure by turning the regulator knob to STEAM in short bursts. Drain
excess juice and toss with remaining hot sauce.
To serve, shred chicken to each roll and top with dressing. Add side of celery and
carrot sticks.
English

15
RECIPES
CHICKEN STOCK
1-1/2 Tbsp. vegetable oil 3 lbs. chicken thighs
1/2 celery stalk, chunked (set aside leaves) 1 lb. carrots, cut 1”to 3” lengths
1 lbs. onions, quartered 1/2 bundle Parsley,
1 tsp. black peppercorn 1/2 Bay leaf
2 Tbsp. chicken flavored soup base 13 C. water or 2/3 full
Add oil, chicken thighs and celery leaves into the cooking pot. Select BROWN
button and press the START button, brown until meat is lightly golden brown. Add
the rest of the ingredients. Place lid on cooker and lock it and set regulator knob to
PRESSURE. Press the HIGH pressure button for 30 minutes. Use the natural release
method to release the pressure. Strain the stock using a seive or cheesecloth.
CHOCOLATE PUMPKIN CHEESECAKE
Crust:
1 C Chocolate wafer cookie crumbs 2 Tbsp butter, melted
Mix crumbs and butter together. Press into bottom of 8” spring form pan and set aside.
Filling:
2 C. water 2 (8 oz.) pkg. cream cheese, softened
1/3 C. packed brown sugar 1/3 C granulated sugar
1/4 C maple syrup
2 eggs, large
1/2 (15 oz.) can solid-pack pumpkin
4 tsp. cornstarch
2 tsp. vanilla extract 1-1/2 tsp. pumpkin pie spice
Topping:
1 C heavy whipping cream 3/4 C. maple sryup
1/2 C. chopped pecans, toasted
Blend cream cheese, sugars and maple syrup in bowl until smooth. Adding eggs;
beat on low just until blended. Whisk in the pumpkin, cornstarch, vanilla and
pumpkin pie spice.
Pour into spring form pan over crust. Add water and rack to cooker. Tear off a 20” piece
of aluminum foil and fold in half, lengthwise. This helps to remove pan after cooking is
complete.
Place spring form pan on foil strip and lower onto cooking rack. Cover and lock lid
in place. Turn regulator knob to PRESSURE. Program for HIGH pressure and cook
for 20 minutes. Release pressure by using the quick release method. Unlock and
open lid. Remove cheesecake from cooker by lifting up the ends of foil swing. Let
cool to room temperature before refrigerating 2-3 hours. For best results, refrigerate
overnight.
Topping: Toast pecans using BROWN/SAUTÉ function by adding nuts to cooking
pot and stir for 3-5 minutes or until lightly browned. Next, combine whipping
cream and maple syrup in cooking pot; bring to a boil using the BROWN/SAUTÉ
function stirring occasionally until sauce is slightly thiickened about 10-15 minutes.
Refrigerate until well chilled.
English

16
RECIPES
COUNTRY BOIL
2 lbs. Kielbasa, cut into pieces 2 lbs. extra large shrimp, peel/devein
1-1/2 lbs. baby red potatoes 3 corn on the cob, cut in half
4 C. water 2/3 C. Old Bay seasoning
1 Bay leaves
Place all ingredients into cooking pot and place lid on cooker and lock it. Set
regulator knob to PRESSURE. Press the HIGH pressure function for 15 minutes.
Press start, the floating valve will rise when cooking pressure is reached and timer
will begin to countdown.
When finished, press STOP button and use the quick release method to release the
pressure by turning the regulator knob to STEAM in short bursts.
COWGIRL CHILI
3 lbs. cooked ground meat 3 Tbsp. chili powder
2 Tbsp. garlic powder 1 tsp. cinnamon powder
1 C. water 1 (14.5 oz.) can beef broth
1 C. tomato sauce 1 red pepper, chopped
1 (14.5 oz.) can corn, drained 1 (14.5 oz.) can black beans, drained
Add ground meat into the cooking pot. Select BROWN/SAUTÉ button and cook
meat until brown, stir frequently. Add remaining ingredients and stir to mix. Place
lid on cooker and lock it. Set regulator knob to PRESSURE. Press the HIGH pressure
function for 5 minutes.
When finished, press STOP button and use the quick release method to release the
pressure by turning the regulator knob to STEAM in short bursts.
PINTO BEANS
3 lbs. Pinto beans, washed 12 C. water
1 Tbsp. Canola oil 1/2 C. garlic powder, to taste
Place all ingredients into cooking pot and place lid on cooker and lock it. Set
regulator knob to PRESSURE. Press the HIGH pressure function for 35 minutes.
Press start, the floating valve will rise when cooking pressure is reached and timer
will begin to countdown.
When finished, press STOP button and use the quick release method to release the
pressure by turning the regulator knob to STEAM in short bursts.
English

17
RECIPES
PORCINI RISOTTO
1-1/2 Tbsp. olive oil 1 medium yellow onion, peeled and chopped
2 cups Arborio rice 2/3 C. white wine
5 C. chicken stock 1-1/2 oz. dried porcini mushrooms, crushed
1 C. frozen peas 2/3 C. grated Parmesan cheese
Add oil and BROWN/SAUTÉ onions for 2 to 3 minutes or just until soft. Add the rice
and cook, stirring for 1 to 2 minutes. Add the wine and continue to stir until all the
wine has been absorbed. Stir in the chicken stock and mushrooms. Add cover and
lock into position. Press RICE setting for 7 minutes with the regulator knob in STEAM
position.
When finished, press STOP button and use the quick release method to release
the pressure by turning the regulator knob to STEAM in short bursts! Check the
tenderness of rice and stir until it has thickened.
Fold in the peas and cheese, and stir until well blended.
ROOT BEER PULLED PORK SANDWICHES
3 lbs. boneless country ribs 2 C. root beer
2 C. water 1-1/2 (18 oz.) bottles of barbeque sauce
6 hamburger buns
Add pork, root beer and water into cooking pot and place lid on cooker and lock it.
Set regulator knob to PRESSURE. Press the HIGH pressure function for 30 minutes.
When finished, press STOP button and use the quick release method to release the
pressure by turning the regulator knob to STEAM in short bursts.
Remove lid and check meat for tenderness, If meat does not shred with a fork, add
five more minutes on HIGH. Drain excess liquid, shred and mix in barbeque sauce.
Serve on a bun with side of coleslaw or salad.
VIDALIA ONION & POTATO SOUP
3 large Russet potatoes, peeled, cubed 3 C. Vidalia onions, chopped, sliced
2 celery stalks, chopped 3 Tbsp. butter
4 C. chicken broth 1-1/2 tsp. kosher salt
Pepper to taste 2-1/2 Tbsp. parsley, chopped
Preheat cooker on WARM. Heat butter and saute onions and celery for 3 minutes.
Add remaining ingredients and stir to mix. Place lid on cooker and lock it. Set
regulator knob to PRESSURE. Press the HIGH pressure function for 6 minutes.
When finished, press STOP button and use the quick release method to release the
pressure by turning the regulator knob to STEAM in short bursts.
Purée about 1-1/2 cups of the soup and return to cooking pot. Press WARM button
to reheat and serve.
English

18
English
ONE YEAR LIMITED WARRANTY
Your product warranty is good for one year from date of purchase against
all defects in material and workmanship. Should your product prove
defective within one year from date of purchase or receipt, return the unit,
freight prepaid, along with an explanation of the claim. Please package
your product carefully in its original box and packing material to avoid
damage in transit. We are not responsible for any damage caused to the
product in return shipment. Under this warranty, we undertake to repair or
replace any parts found to be defective.
This warranty is only valid if the product is used solely for household
purposes in accordance with the instructions. This warranty is invalid if
the unit is connected to an unsuitable electrical supply, or dismantled or
interfered with in any way or damaged through misuse.
We ask that you kindly fill in the details on your warranty card and return it
within one week from date of purchase. Send warranty card to:
PC8-25 • NESCO 8QT Digital Pressure Cooker
C/O MW
PO Box 237
Two Rivers, WI 54241-0237
Table of contents
Languages:
Other Nesco Electric Pressure Cooker manuals


