4
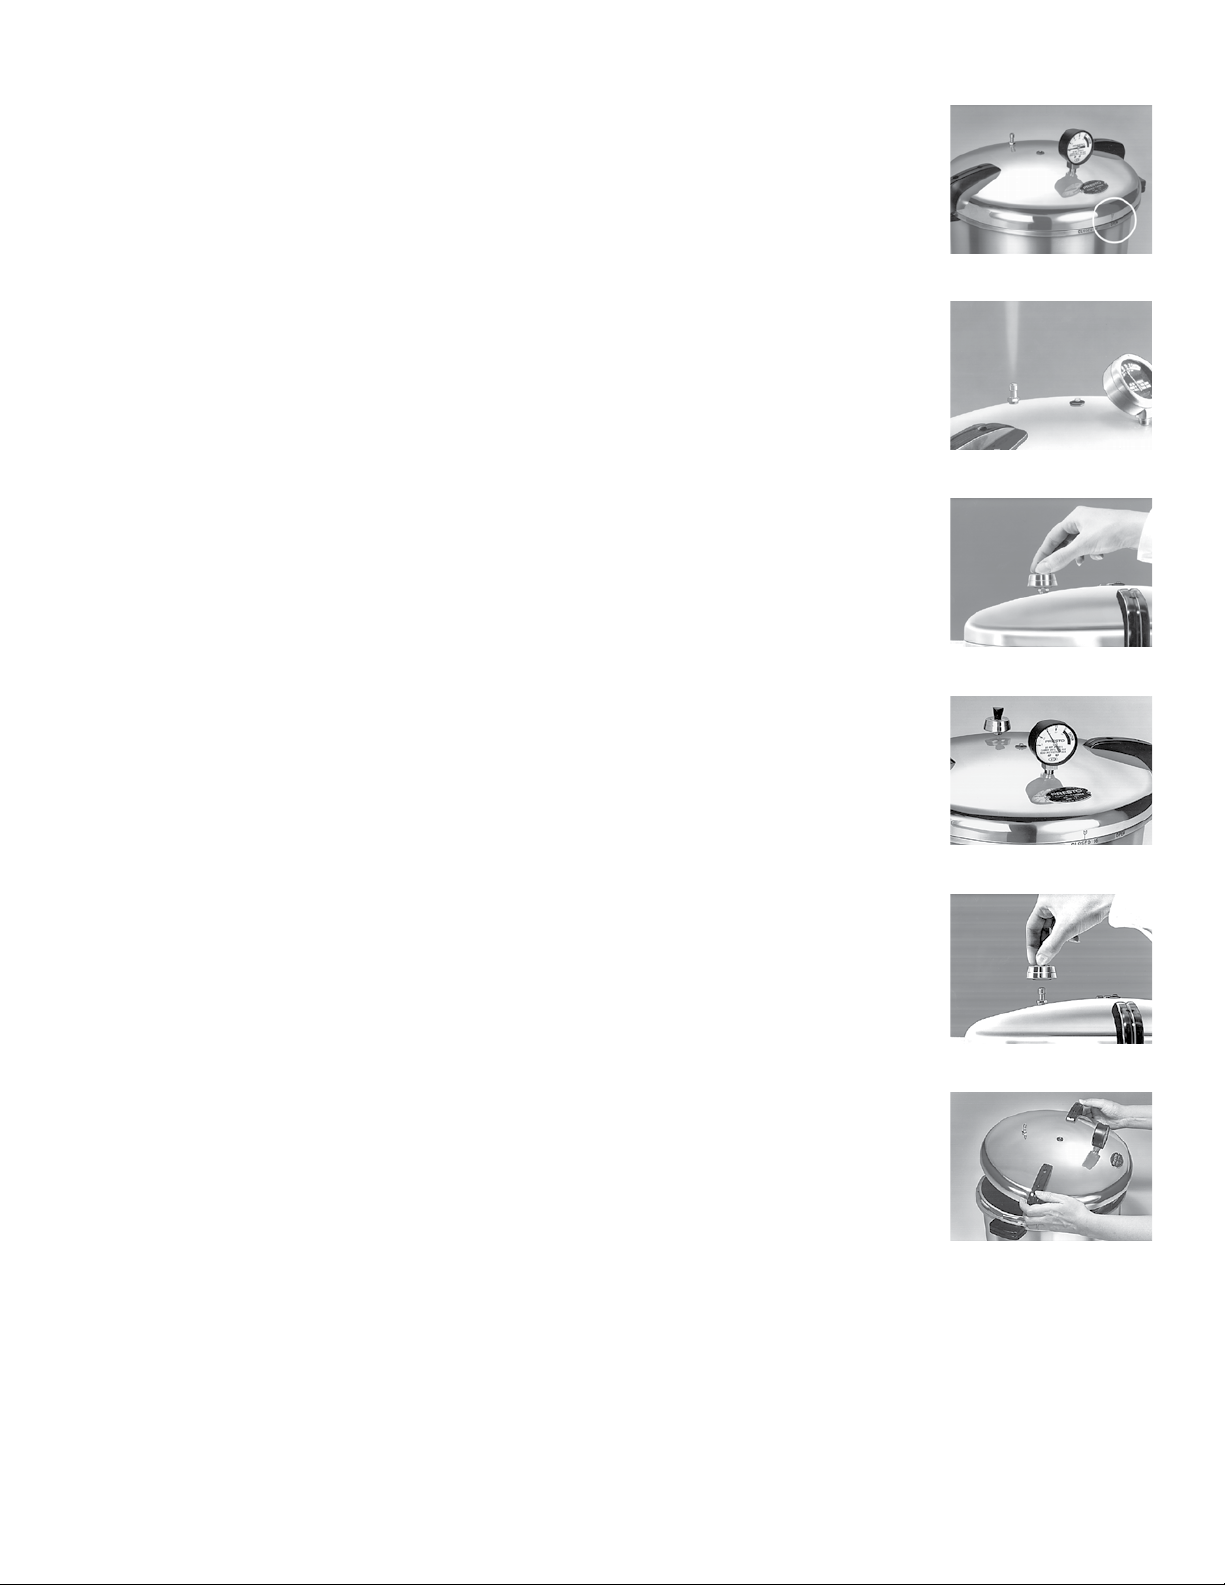
6. PlacecoveronCannerasfollows:
Models 7B-CA16, 21B-CA21, 01/CA16H-CA16H, 01/CA21H-CA21H: Place cover on Canner
aligning the arrow on the lid with the word “open” on the base and turn clockwise until arrow points
to“closed”(Fig.A).
Models 01/CAA12H, 01/CAA20H:PlacecoveronCanneraligningthearrowonthelidwiththemark
onthebodyhandle.Pressdownonthecoverhandlestocompressthesealingring.Turnclockwise
until cover handles are directly above body handles.
DonotbuildpressureinCanneruntilcoverhandlesaredirectlyaboveandbetweenlinesofbody
handles.Ifthecoverisdifculttoopenorclose,useapastrybrushorapieceofpapertowelingto
applyalightcoatingofcookingoiltotheundersideofthelugsontheCannerbody.Donotlubricate
the sealing ring.
7. ExhaustairfromtheCannerandjarsbyadjustingheattoarelativelyhighsettingtoobtainasteady
owofsteamfromtheventpipe(Fig.B).Reduceheartomaintainamoderatesteamow.Allow
steamtoowfor7to10minutes.
8. Placepressureregulatoronventpipe(Fig.C).
9. In a few minutes the automatic air vent will rise and seal the canner. If the automatic air vent does not
seal, touch the metal plunger gently with a spoon or knife. It is possible that foreign material in the
opening may have delayed the plunger from sealing readily.
10.HeatCannerusingarelativelyhighheatsettingonmostrangeburners.Processingtimebeginswhen
thepressuredialgaugeregisters thecorrectpressure(Fig.D).Adjusttheheattomaintaincorrect
pounds of pressure on the pressure dial gauge.
NOTE:Theformationofasmallamountofmoistureunderthepressureregulatorisnormalwhen
canningrstbegins.Thiscondensationisaresultofthetemperatureofthepressureregulatorbeing
lowerthantherestoftheCanner.Ifexcesscondensationcontinues,theventpipemaybelooseand
should be tightened with an adjustable wrench.
11. Atendofprocessingtime,turnburnertooffandremoveCanner.Letpressuredropofitsownaccord.
Donotquick-cool.IfthepressureintheCannerisreducedmorerapidlythanthepressureinthejars,
thejarsmaybreak.Pressureiscompletelyreducedwhentheautomaticairventhasdroppedandno
steam escapes when the pressure regulator is tilted.
12. Do not remove the pressure regulator until pressure is completely reduced and the automatic air vent
hasdropped.Removepressureregulatorfromventpipe(Fig.E).LetCannercool10minutes.Always
remove pressure regulator before opening the cover.
13.Toremovethecover,turncounterclockwiseuntilcoverhitsstop.Coverhandleswillbebeyondthe
body handles. If cover seems to stick or is hard to turn, do not force it open. Sticking may indicate
thatthereisstillpressureinsidetheCanner.Ifindoubtaboutpressurebeingcompletelyreduced,let
theCannerstanduntilcoolbeforeremovingthecover.
14.LifttheCannercovertowardyoutokeepsteamawayfromyouwhenopening(Fig.F).
15.RemovejarsfromCanner.
Cleaning
1. TheoutsidesurfaceofpolishedaluminumCannersmaybekeptbrightandshinybycleaningwith
a good silver polish or simply by washing with soap and water. Iron, various minerals in water, and
foodsmaydarkentheinsideoftheCannerbutthisdiscolorationwillinnowayaffectfoodcooked.
Thesestainsareharmlessandmayberemovedbyusingasolutionofwaterandcreamoftartar.For
eachquartofwater,useonetablespooncreamoftartar.PourenoughsolutionintotheCannertocoverthediscoloration(donotll
over⅔full),thenclosecoversecurely.Placepressureregulatoronventpipeandheatuntil15poundspressureisreached.Remove
Cannerfromheat;allowCannertostandtwotothreehours.Removepressureregulator,thenremovecoverandemptycontents.
Scour thoroughly with a soap impregnated steel wool cleaning pad; wash, rinse, and dry.
2. EachtimetheCanneriswashed,removethesealingringandwashinwarm,sudsywater,rinse,dry,andreplaceincover.
3. The automatic air vent can be easily removed for cleaning by pushing it through the opening from the top of the cover. After clean-
ing, insert by pushing automatic air vent into the opening from the underside of the cover. When in place the slightly rounded face
oftheautomaticairventwillbeexposedontheoutsideofthecover.Afterprolongeduse,theautomaticairventmaybecomehard
Fig. A
Fig. B
Fig. C
Fig. D
Fig. E
Fig. F