NESLING N501-021-102 User manual

IMPORTANT, RETAIN FOR FUTURE REFERENCE: READ CAREFULLY!
PARTS LIST
Please inspect before begining installation and contact us if any parts are missing.
4
2
3
3
6
7
9
12
13
10
10
11
11
1
5
8

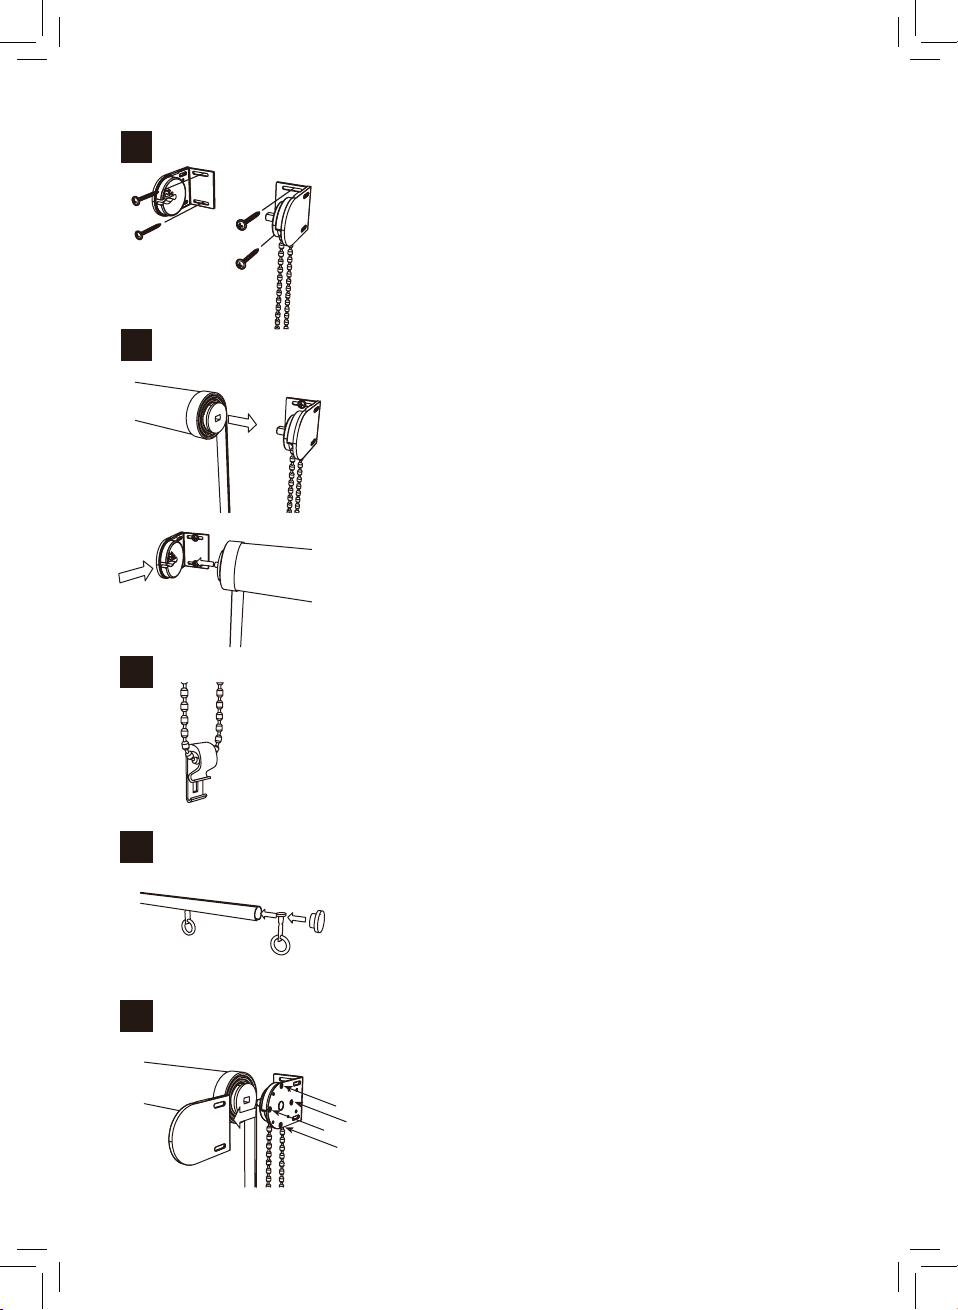
1. Mark The Holes
Determine how far apart your holes should be.
Install Brackets
Install the Clutch an Idle End Brackets.
The Clutch Unit Bracket will be on the right side and the Idle End Unit Bracket
should be on the left for standard installation. Do not tighten screws completely yet.
2. Install the Shade
First, insert the Clutch Plug into the Clutch Unit.
Then insert the Idle End Plug into the Idle End Unit, and snap the Idle End Plug
securely into place.
shade.
IMPORTANT:
Now go back an tighten the Bracket screws completely.
3. Install Tension Device
The Tension Device reduces potential hazards associated with having a loose chain
hanging from the shade.
First hold the Tension Device so the warning tag hangs beneath it.
tension Device and chain do not interfere with raising and lowering for any slack.
Do not twist, cross or slant the chain.
Holding the Tension Device upright, secure with screw. Use a screwdriver to lift the
front lip and slide chain thru.
4. Install Tie Downs (IF DESIRED)
moderate wind conditions.
NOTE:
If you choose to use the Tie Downs, you will need to install something to anchor
them to. Many customers have used: u- shaped hooks, s-shaped hooks or screws.
5. Adjusting Chain Tension
You can adjust chain tension if needed.
four (4) screws: turn counter clockwise. If chain tension is too loose (chain pulls too
In severe wind or prolonged exposure to wind,
First, remove the End Caps from either end of the Bottom Rail. Then,
slide the Tie Downs into the channel/groove. Reinstall the End Cap.
© 2018 Copyright Nesling B.V. www.nesling.com
THE PERFECT SHADOW
1
2
3
4
5
4
2
3
3
6
7
9
12
13
10
10
11
11
1
5
8
www.nesling.fr sur montage de vidéo notre visionner à pas N'hésitez
ATTENTION
composant
d'un remplacement de demande d'unelors servira vous il document,
ce soigneusement conserver de recommandons vous Nous :
.
e produitL :
Le MerciNesling Coolfit enrouleur à store votre de composants les tous apparaître fait détail de schéma .
éléments les tous de présence la vérifier de
.
REF.
°N .
Désignation Quantité
1 Réceptacle 1
1
3 Capuchon 2
1
1
6Chaînette 1
1
8Vis fixation de 5
9Baguette lestage de 1
10 Capuchon 2
11 Anneau fermeture de 2
12 xe alu enrouleurA 1
13 Store 1
2
4
5
7
Opturateur
tube du
Guide tube du
Fixation chaînette de basse
Réceptacle
Roulement
chaîne / Roulement
1
2
3
4
5
1. eR pérage perçage. de emplacements des
Dans
réceptacles deux les 2, et 1 éléments des
emplacements les repérer faut vous il temps, premier un -
.
Il axe en et écartement en aplomb,en précis, d'être ici convient .
La Nedroite à positionnée sera chaînette .
vis vos définitivement
encore pas serrez
.
2. Installation enrouleur. à storedu
Présentez
"clic". du l'obtention jusqu'à gauche, de réceptacle le dans
l'enrouleur placerezvous Puis, logement. le dans oblongue) (pièce
l'entraineur Insérez "chaînette" côté d'abord store le
Dès
maintien. parfait le garantir
de afin fortement, fixations, de vis 4 les serrerez vous lors,
réceptacles. les contre plaqué sera
l'enrouleur lorsque positiionnés correctement seront côtés 2Les
3. Mise chaînette de cavalier du place en
Lors
chaînette. la
de maintien aujuste sert guide ce tension, toute éviterez vous
fixation la de Lors chaînette. la de verticalité la à rapport par
axiale façon de cavalier ce fixerez vous logique toute en gêne,
ne rien que vérifier de convient il place, en mise sa de
manoeuvres les ainsi facilitant
main, en prise meilleure une permettra et incident tout évitera il
chaînette, votre de stabilité garnde plus une permet système Ce
.
4. Mise Cecibasse. position en fixation de anneaux des place en
obligation. une pas n'est
store votre stabiliser à calme temps pas servent, anneaux Ces .
Recommandation :Si
crochet de sorte
blocage, de système un sol, au place, ne mettre de conviendra
il anneaux ces d'utiliser décidez vous ,
.
Réglage
5. d'enroulement. système du traction la de
Il
vis4 de puis capuchon, le lesdéserrerretirer de suffit vous
il manoeuvrer à difficile tendu, trop semble vous mécanisme le
traction. de forcela régler de possible est vous
Si ,
Dansmontre d'une aiguilles des inverse sens
le dans
.
vis lesdites ressererez vous
contraire, cas le
.
Lors
store. votre d'enrouler simplement tout conseillons vous
nous non-utilisation, de périodes longues de vent, de rafales de
Nous
Nous
Coolfit Nesling enrouleur
à Store votre de maximum au profiter de souhaitons vous
www.
sur d'installation vidéo notre visionner de recommandons vous
fr.nesling.
!
Table of contents
Other NESLING Window Blind manuals

Popular Window Blind manuals by other brands


Griesser
Griesser Solomatic II operating instructions

Louvolite
Louvolite R4045 instructions

Horrex
Horrex UCS curved installation manual

Franc Gardiner
Franc Gardiner smartroll 32-1 Assembly instructions

HOMEDEPOT
HOMEDEPOT Designer's Touch 1702 quick start guide

HunterDouglas
HunterDouglas PowerView M40T instructions

HunterDouglas
HunterDouglas Cadence Installation operation care

HunterDouglas
HunterDouglas Pirouette PowerView+ Gen 3 Automation Installation operation care

HunterDouglas
HunterDouglas Vignette Tiered Instrallation, Operation, Care

Silent Gliss
Silent Gliss 2304 Fitting instructions

my home
my home Carpi Assembly instructions

HunterDouglas
HunterDouglas Sonnette Installation operation care