manuals.online logo
Brands
  1. Home
  2. •
  3. Brands
  4. •
  5. nest
  6. •
  7. Indoor Furnishing
  8. •
  9. nest HOMEBASE User manual

nest HOMEBASE User manual

HOMEBASE®
ASSEMBLY INSTRUCTIONS
PARTS
ASSEMBLY
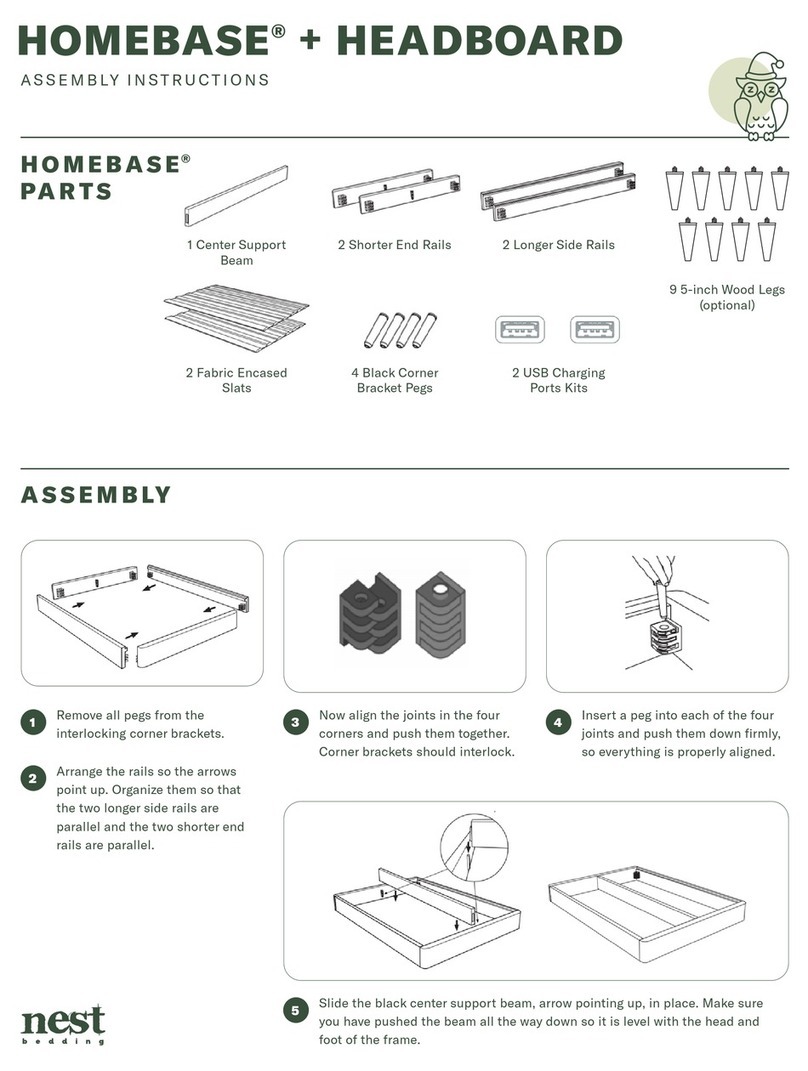
PARTS
1 Center Support Beam 2 Shorter End Rails 2LongerSideRails
4 Black Corner Bracket Pegs 2Fabric Encased Slates 9 5inch Wood Legs (optional)
2 USB Charging Ports Kits
PARTS
1 Center Support Beam 2 Shorter End Rails 2LongerSideRails
4 Black Corner Bracket Pegs 2Fabric Encased Slates 9 5inch Wood Legs (optional)
2 USB Charging Ports Kits
PARTS
1 Center Support Beam 2 Shorter End Rails 2LongerSideRails
4 Black Corner Bracket Pegs 2Fabric Encased Slates 9 5inch Wood Legs (optional)
2 USB Charging Ports Kits
PARTS
1 Center Support Beam 2 Shorter End Rails 2LongerSideRails
4 Black Corner Bracket Pegs 2Fabric Encased Slates 9 5inch Wood Legs (optional)
2 USB Charging Ports Kits
PARTS
1 Center Support Beam 2 Shorter End Rails 2LongerSideRails
4 Black Corner Bracket Pegs 2Fabric Encased Slates 9 5inch Wood Legs (optional)
2 USB Charging Ports Kits
PARTS
1 Center Support Beam 2 Shorter End Rails 2LongerSideRails
4 Black Corner Bracket Pegs 2Fabric Encased Slates 9 5inch Wood Legs (optional)
2 USB Charging Ports Kits
PARTS
1 Center Support Beam 2 Shorter End Rails 2LongerSideRails
4 Black Corner Bracket Pegs 2Fabric Encased Slates 9 5inch Wood Legs (optional)
2 USB Charging Ports Kits
1 Center Support
Beam
Remove all pegs from the
interlocking corner brackets.
Arrange the rails so the arrows
point up. Organize them so that
the two longer side rails are
parallel and the two shorter end
rails are parallel.
Now align the joints in the four
corners and push them together.
Corner brackets should interlock.
Slide the black center support beam, arrow pointing up, in place. Make sure
you have pushed the beam all the way down so it is level with the head and
foot of the frame.
Insert a peg into each of the four
joints and push them down firmly,
so everything is properly aligned.
2 Fabric Encased
Slats
4 Black Corner
Bracket Pegs
2 USB Charging
Ports Kits
2 Shorter End Rails 2 Longer Side Rails 7 5-inch Wood Legs
(regular)
2 5-inch Wood Legs
(smaller)
A s s e m b l y
Step 1.Remove all pegs from the interlocking corner
brackets.
Step 2. Arrange the rails so the arrows point up. Organize
them so that the two longer side rails are parallel
and the two shorter end rails are parallel.
1 3
5
4
2
A s s e m b l y
Step 3. Now align the joints in the four corners and push
them together. Corner brackets should interlock.
Step4. Insert a peg into each of the four joints and push
them down firmly, so everything is properly
aligned.
A s s e m b l y
Step 3. Now align the joints in the four corners and push
them together. Corner brackets should interlock.
Step4. Insert a peg into each of the four joints and push
them down firmly, so everything is properly
aligned.
A s s e m b l y
Step5. Slide the black center support beam, arrow
pointing up, in place. Make sure you have pushed
the beam all the way down so it is level with the
head and foot of the frame. 
| ASSEMBLY INSTRUCTIONSHOMEBASE®
ASSEMBLY
(Optional: Base can be assembled
with or without legs) Place the larger
legs on end rails and center support,
use the two smaller legs (circled
above) on the side rails.
Place one roll of support slats
along an end rail. Unroll the
slats towards the center of the
foundation, along the support
beam. Do this symmetrically with
the other roll of slats, starting at
the other end. Unroll towards the
center so the two sets of slats
meet in the middle.
Need Assembly Assistance?
We are available via Live Chat! at Nestbedding.com
Call us at 1-800-992-2001
Email us at customerservice@nestbedding.com
USB Charging Port
A. Set up USB Ports before slats are in place.
B. USB are already installed in side rails.
C. Connect them to the Y cable connector.
D. Then connect the Y cable connector to the
Power Supply unit.
E. Use the wire ties to tie up excess wires.
A s s e m b l y
Step6. (Optional: Base can be assembled with or without legs)
Screw in all 9 wood legs. And Flip frame over.
6
8
7
A s s e m b l y
Step8. Place one roll of support slats along an end rail. Unroll
the slats towards the center of the foundation, along
the support beam. Do this symmetrically with the
other roll of slats, starting at the other end. Unroll
towards the center so the two sets of slats meet in
the middle.
A s s e m b l y
Need Assembly Assistance?
We a e available via Live Chat!
at Nestbedding.com
Call us at 1-800-992-2001
Email us at:
custome se vice@nestbedding.com

Other nest Indoor Furnishing manuals

nest myERCOLINO 1119 Installation guide

nest

nest myERCOLINO 1119 Installation guide

nest HOMEBASE User manual

nest

nest HOMEBASE User manual

nest Dakota High Sleeper MG 7507 User manual

nest

nest Dakota High Sleeper MG 7507 User manual

Popular Indoor Furnishing manuals by other brands

KITCHEN KIT DOCU0040 instructions

KITCHEN KIT

KITCHEN KIT DOCU0040 instructions

Baxton Studio Amira Full Bed 20180 Assembly instructions

Baxton Studio

Baxton Studio Amira Full Bed 20180 Assembly instructions

BiGDUG KKVTDC1 Guide to Assembly & Usage

BiGDUG

BiGDUG KKVTDC1 Guide to Assembly & Usage

Coaster 202701KE Assembly instructions

Coaster

Coaster 202701KE Assembly instructions

Flair Montana Captain Bed Assembly instructions

Flair

Flair Montana Captain Bed Assembly instructions

Whittier Wood 499W Assembly instructions

Whittier Wood

Whittier Wood 499W Assembly instructions

Walker Edison AF40JER Assembly instructions

Walker Edison

Walker Edison AF40JER Assembly instructions

Royalcraft Berlin Assembly instructions

Royalcraft

Royalcraft Berlin Assembly instructions

Wampat W01L3183N Assembly instructions

Wampat

Wampat W01L3183N Assembly instructions

Plaisio MB-5050 Assembly instruction

Plaisio

Plaisio MB-5050 Assembly instruction

VIPACK PIMZ1415 Instructions for use

VIPACK

VIPACK PIMZ1415 Instructions for use

Okamura 865ZLE instruction manual

Okamura

Okamura 865ZLE instruction manual

Ameriwood HOME 7482341COM Assembly instructions

Ameriwood HOME

Ameriwood HOME 7482341COM Assembly instructions

BRW LARGO Classic LUS/8/8 Assembly manual

BRW

BRW LARGO Classic LUS/8/8 Assembly manual

Manhattan Comfort Crown 205GMC manual

Manhattan Comfort

Manhattan Comfort Crown 205GMC manual

FURNITUREBOX MAYFAIR Assembly guide

FURNITUREBOX

FURNITUREBOX MAYFAIR Assembly guide

BOX15 PARTY 411/78.1500.22 Assembly instructions

BOX15

BOX15 PARTY 411/78.1500.22 Assembly instructions

Furniture of America Kiki 5-tier Corner Ladder Display Bookcase... Assembly instructions

Furniture of America

Furniture of America Kiki 5-tier Corner Ladder Display Bookcase... Assembly instructions

manuals.online logo
manuals.online logoBrands
  • About & Mission
  • Contact us
  • Privacy Policy
  • Terms and Conditions

Copyright 2025 Manuals.Online. All Rights Reserved.