NetzHome WT07 User manual
Installing the APP
1. Before powering up the device, please install our free ‘NETZHOME ‘ APP onto your phone. The APP is available in an iOS version on the
Apple App Store and an Android version on the Google Play Store. Ensure your phone is connected to WIFI to complete account setup.
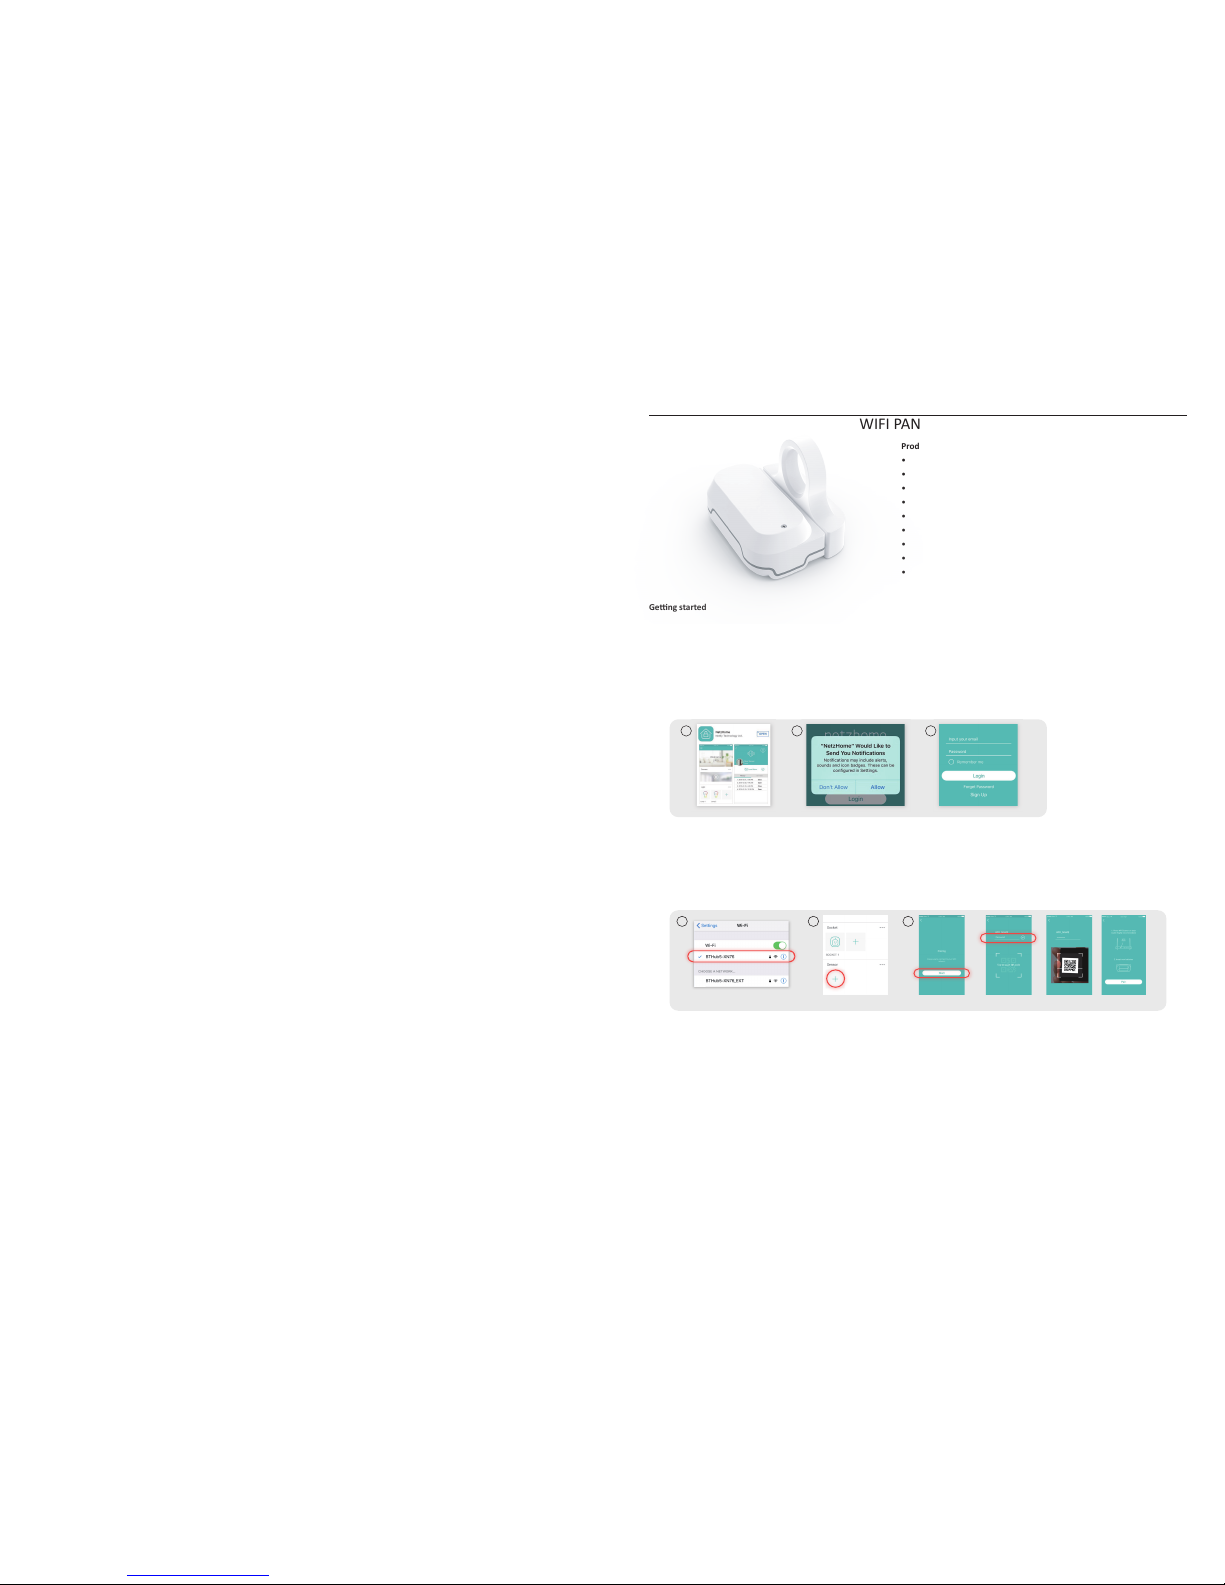
2. Once downloaded, click and open the APP. The following message will appear. Please click Allow (OK).
3. Now complete your User Profile by inpung your email address and a 6-20 digit password, click the REGISTER buon, check your email
and click the link in the email from “Nefy” to complete registraon.
WT07
WIFI PANIC KNOB
Product Specificaon
• Built-in WIFI module that sends all alerts to your Smartphone
• Super low power consumpon, typically only 2 x AAA baeries/year
• Separate low baery and loss of signal noficaons
• Life-me cloud service provided free of charge
• Powerful APP for your Smartphone provided free of charge
• APP records last 30 acvaons me and date stamped
• 3M double sided tape for permanent fixing included
• Blue LED for status indicaon
• Schedule up to 4 periods per day when unit is automacally turned off
Geng started
Congratulaons on your purchase of this powerful Panic Knob. Once the magnet (smaller part with the handle) is moved away from the reed
switch (built into the larger part), the unit will send an alarm signal to your smart phone via your home/business WIFI connecon. Such signal
is selectable as an Alarm Sound + Noficaon, Noficaon Sound + Noficaon or just a silent Noficaon. This product works together with
your smart phone and internet via WIFI. Please check that your smart phone is either an Android or iOS (iPhone) and that the latest firmware
has been installed. Please also check that your WIFI router is working properly and that its operang manual confirms that it operates on 2.4
GHz with WPA/WPA2 encrypon. NOTE: Do not use a 5GHz connecon.
Seng up your DEVICE
1. Go to the locaon in the Building where you eventually wish to install the Knob. Look at your smart phone and ensure you have a good
and steady WIFI connecon there. Now, exit the APP, open SETTINGS on your smart phone and click “Wi-Fi”. Check what is showing. If
you just have a main Router, it should be showing its reference name (or SSID). Each Router or Extender has its own unique reference
name or SSID. However, if you have a network with one or more extenders, it may also be showing, underneath, under “Choose a
Network”, the SSID of an overlapping Extender, as in the picture 1 above. In this case, check whether you are closest to the main Router or
to an Extender and manually select, if necessary, the alternave closest/strongest SSID. THIS IS VERY IMPORTANT. The Sensor will only
communicate Alarm signals to the WIFI Router or Extender that you are about to “pair” it to so it is essenal that you pair it to the closest/
strongest Wi-Fi signal.
2. Re-Open the App, scroll down to SENSOR and press “+”. This will take you to the “Pair New Device” page.
3. Press “Start”, then enter your Router’s Password and press “Tap to scan QR code”. Now, using your smartphone’s camera, move it so it is
directly over the QR code scker that is supplied with the device (this scker can also be found inside the baery compartment) and hold
it there unl your phone's screen changes to the Pairing Display.
connect WiFi Press “+” Press “Start”
1 32
Enter router password > Scan QR code > Pairing Screen
1
1 2 3
install click Allow register
IMPORTANT
1. Do not place any other magnets or magnezed materials close to a Sensor as this could cause a false trigger.
2. Make sure your WIFI router and its signal strength cover all the Sensors locaons. Please note that a WIFI signal may not penetrate
through concrete walls or solid doors and that, if it does, it is usually SEVERELY reduced. You may therefore need to add one or more WIFI
Repeaters to increase signal coverage. If you do this, then ensure that individual devices are paired to the closest Repeater or Router.
Since all Router/Repeater SSID’s are different, you must ensure that the Sensor is paired to the correct SSID (see seng up your WIFI
Device above).
3. Aer installing a Sensor, please test it at least a couple of mes to check the performance.
Trouble Shoong
CANNOT PAIR THE SENSOR SUCCESSFULLY
1. Check whether the Sensor has enough baery power. Always use new, good quality, Alkaline baeries.
2. If there are too many WIFI connecons around your Sensor, turn them off to avoid any disturbance and pair again.
3. Check that the router is working properly and that it operates on 2.4GHz.
4. Check that the SSID and password are correct.
DOESN’T WORK PROPERLY or LOSS OF SIGNAL ICON APPEARS
1. Check whether the Sensor is within coverage of your WIFI router/repeater. Move the Sensor or Router to a different locaon.
2. Check that the router is working properly.
3. Check the power level of the tag. If it shows a baery low icon in the APP, please replace the baeries.
4. Check that the magnet and reed switch are aligned correctly with the arrows directly opposite each other.
5. Check that the distance you have mounted the magnet away from the built-in reed switch is no more than 5mm.
Safety
FIRE, BATTERY AND ELECTRIC SHOCK HAZARDS
1. Do not drop, disassemble, open, crush, bend, deform, puncture, shred, microwave, incinerate, paint, or insert foreign objects into the
Sensor. Such acons could result in an electric shock. Clean the Sensor only with a dry cloth.
2. Do not expose the Sensor to extremely high or low temperatures or leave them in direct sunlight for extended periods of me.
3. Do not leave the Sensor near open flames such as cookers, candles or fireplaces.
4. It’s dangerous if you replace baeries incorrectly or with the wrong polarity. You should only use the same or equivalent type of baery to
replace a damaged or drained one. The Baery should not be exposed to an overheang environment such as extreme sunshine or fire.
Always use a good quality Alkaline baery for best results.
4
IMPORTANT. Since the WPS mode will not last long, please complete steps 4-6 as quickly as possible.
4. Move the device temporarily, right next door to the Router or Extender that you are pairing to and press the WPS buon on that router. If
there is no WPS buon, go to Step 5 below.
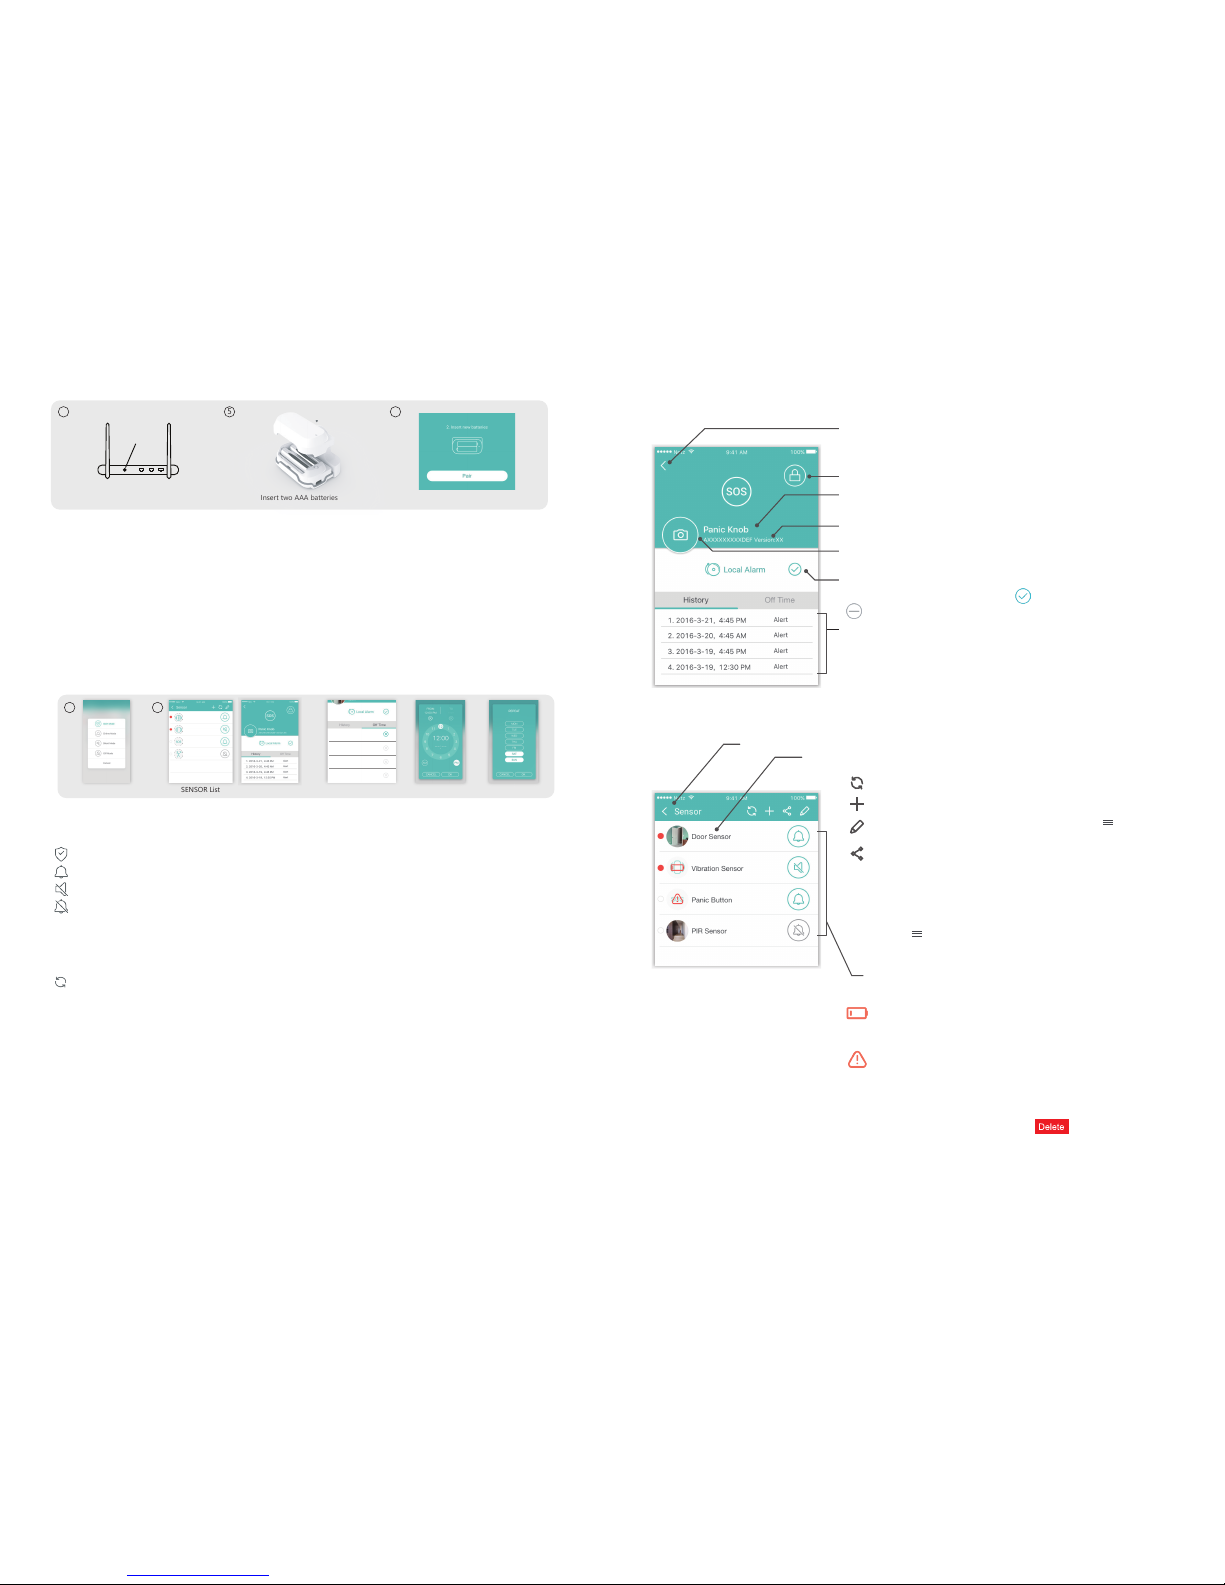
5. Carefully unscrew and open the baery cover. Insert two new, good quality Alkaline AAA baeries, ensuring correct polarity.
6. Press “Pair” on the App. The device will now automacally enter “Pairing Mode”.
7. The device will now start pairing to the Router or Extender . It can take up to 60 seconds for a “Pairing successful” message to appear. If
you see the message “Time out, try again”, disconnect the baeries from the sensor, reconnect them to enter pairing mode again and
repeat the process. If this error message connues, double check that the SSID on this page and the password both match the Router or
Extender to which you are aempng to pair the device to. Once pairing is successful, you can now close the baery door. Mount the
Panic Knob into a permanent locaon using the double sided tape provided.
How to use
1. Open the App’s Home Screen. Here you will see listed all the Devices that you have paired. Press > to the right of “Sensor”. This will take
you to the SENSOR List page where you can choose the Sound you will hear on your phone when an Alarm noficaon is received from a
Sensor. Press the icon on the right hand side of each Sensor to select the mode.
Alert Mode = Siren Sound (5 seconds repeated twice) + incoming Noficaon
Chime Mode = Short Alert Tone + incoming Noficaon
Silent Mode = No Siren, no Alert Sound, just the Noficaon
Off Mode = No Siren, no Alert Sound and no Noficaon (All alerts from the Sensor will sll be listed the DEVICE’s HISTORY page)
2. Whilst you are sll on the SENSOR page, Move the magnet away from the reed switch to test the Knob. You will see the blue LED flash
once followed, a few seconds later by a further two quick flashes, to indicate a noficaon Alert has been sent to the APP. If you see 3
flashes, it means the Alert has not been sent, so wait 20 secs and repeat the process. Depending on the Alert Mode you have chosen, this
will be audible or silent. You will see the noficaon appear on your phone and a red dot light up alongside the acvated Device. Press the
“Refresh” Buon in the middle of the top of the page to cancel the red dot. If you now press the Device’s name or picture, you will be
taken to its MAIN PAGE. On this page you can:
i) Toggle between turning a Local Alarm ON or OFF (On means that when the sensor is triggered, the oponal Netzhome WIFI socket with
built-in buzzer will also start go into alarm for 5 minutes, or unl manually turned off by pressing a buon on the socket.)
ii) Check the “History” which will list the last 30 noficaons me and date stamped.
iii) Click on “Off Time” to get to the “Device Disabled Sengs”. Here you can select up to 4 daily periods in which the Sensor is
automacally switched to Off Mode. You can also temporarily turn the Device to be always OFF by selecng the Off Mode - see 1
above.
a/ Tap on One of the 4 periods to take you to the Time Selecon Screen.
b/ “From” will be flashing. Click AM or PM at the boom of the screen. Select the Hour on the dial and click “From”. Now Select the
minute on the dial. Click “To” and repeat the procedure. Click OK to save.
c/ You will now be taken to the “Repeat” Screen. Click on the days of the week you wish to repeat the Device to be automacally
disabled for this period and click OK. The Disabled Time will now be displayed along with the illuminated days to which it applies.
2
4 5
Press “Pair”
6
Press WPS button on your Router Insert two AAA batteries
WPS/
Reset
2
SENSOR List i), ii)
1
4 different modes
iii)
b/ select time period c/weekly schedulea/ Tap on a period
PANIC BUTTON
PIR SENSOR
VIBRATION SENSOR
DOOR SENSOR
1. 19:00 - 23:30
--:-- - --:--
--:-- - --:--
--:-- - --:--
S M T W T F S
S M T W T F S
S M T W T F S
S M T W T F S
2.
3.
4.
KNOB
Advanced Informaon for the DEVICE MAIN PAGE
Advanced Informaon for the SENSOR PAGE
Press to return to the Device List
Indicates whether the Device is locked or unlocked.
A personalized descripon of the device.
• Press here to personalise, enter up to 20 characters and click OK to save.
This is the Device’s unique ID.
Personalized Photo for the Sensor. Press the Icon that is displayed as default here. Choose “Take
photo” or “From album” to create a personalized Photo.
Indicates whether the Sensor is also sending an Alert Signal to the oponal Netzhome Indoor
Siren (e.g. WIFI Socket w/ built-in buzzer). Press to toggle the Alert Signal ON or
to toggle the Alert Signal OFF
Event History giving Date and Time.
How to delete a DEVICE from the APP
iOS: On the SENSOR PAGE, hold and swipe the Devices Descripon to the le of your screen and press
Android: On the SENSOR PAGE, long press the Device Descripon, and then confirm with the prompt window for deleon.
3
Press to Refresh/Reset the Sensor Page aer and Alert and turn off an illuminated dot
Press to Add a new Device
Press to change the order of priority of your Device List. Drag the (3 lines on the right
hand side) and move it to a new posion in the list
Press to share an Alert Noficaon from a DEVICE with another Smartphone
1. Ensure that the free ‘NETZHOME’ APP has been installed on the other Smartphone
and complete the registraon process, following the procedure detailed in “Installing
the APP” above.
2. Press this symbol.
3. Now select the Sensor you wish to share, press the share symbol again and complete
the “Share Device to” box with the other user’s email address they used when
registering their user profile. Press “share” to share and exit.
4. Open the APP on that other User’s Smartphone and go to their MENU bar by
pressing at the top le of the Home Page. Press “Received Device”. The new
user can now choose whether to accept or reject Noficaons from those Devices
displayed here. Note that the new User can select, separately, on their APP’s Sensor
Page whether such noficaons are Audible, Silent or Off.
Press to choose the Sound you will hear on your phone when an Alarm noficaon is
received from a Sensor
“Low Baery”
• Although baeries should connue to last for up to a month aer this Icon appears,
you should change them immediately, respecng the correct polarity and using good
quality Alkaline baeries. Always test a Sensor aer replacing the baeries.
“Lost Connecon”
• The Sensor sends a “heartbeat’ signal to the Router every 4 hours. This Icon indicates
that contact has been lost between them
Press to return to the Home Page
Press to go to that device’s Main Page


