neuland LW-X User manual

Graphic Wall LW-X / LW-X ComfortAssembly instructionsNeuland

Dear customer, thank you for choosing to hire the Neuland Graphic Wall LW-X from the official Neuland partner for rental products. These instructions will help you to assemble and later dismantle the Graphic Wall LW-X yourself quickly and easily. The manufacturer Neuland provides a convenient video, illustrating the assembly of the Graphic Wall LW-X Comfort under the following link: www.youtube.com/watch?v=VD-Mriv73MYOr scan the code on the right with you mobile phone or a QR App to get to the video.If you should need support, please don't hesitate to call us up from Monday to Friday from 9.00 a.m. to 6.00 p.m. on 0049/6202-127550. Please note: The box is NOT disposable. It is important to store it safely together with the cardboard boards for return shipment!

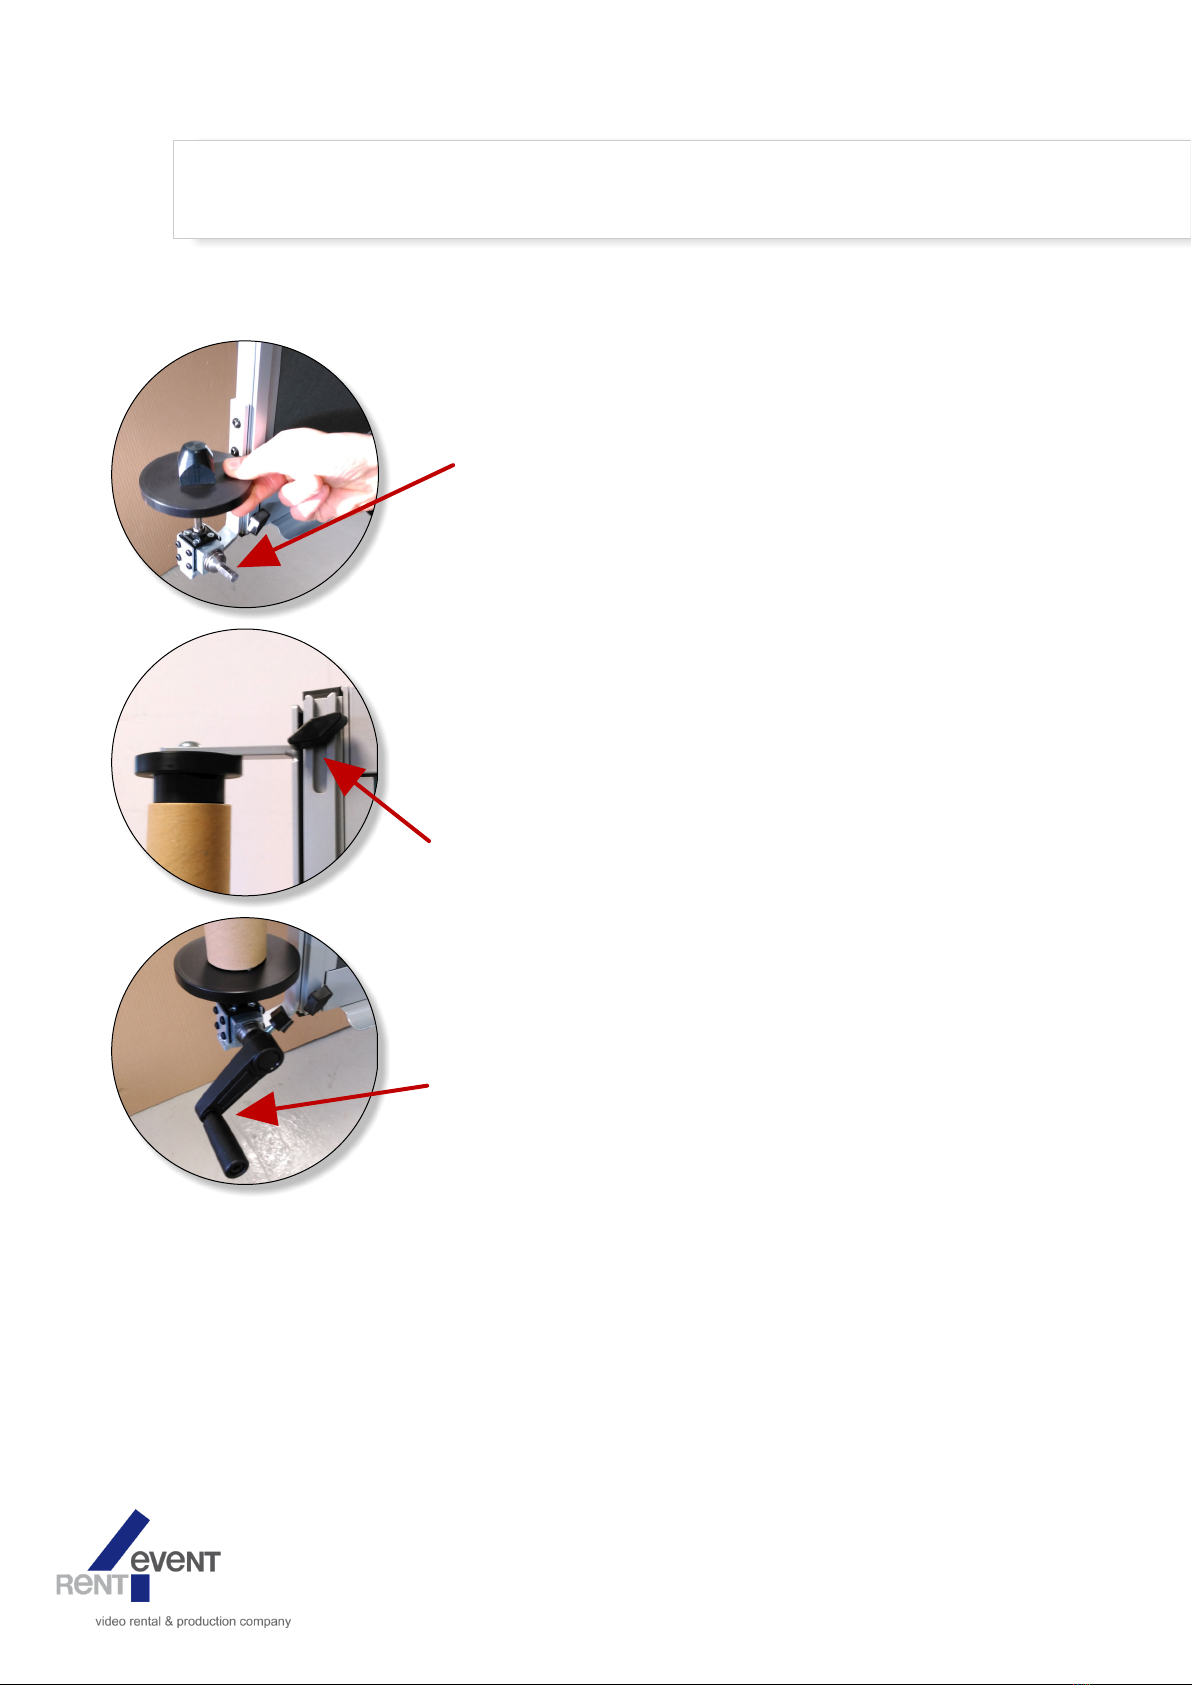
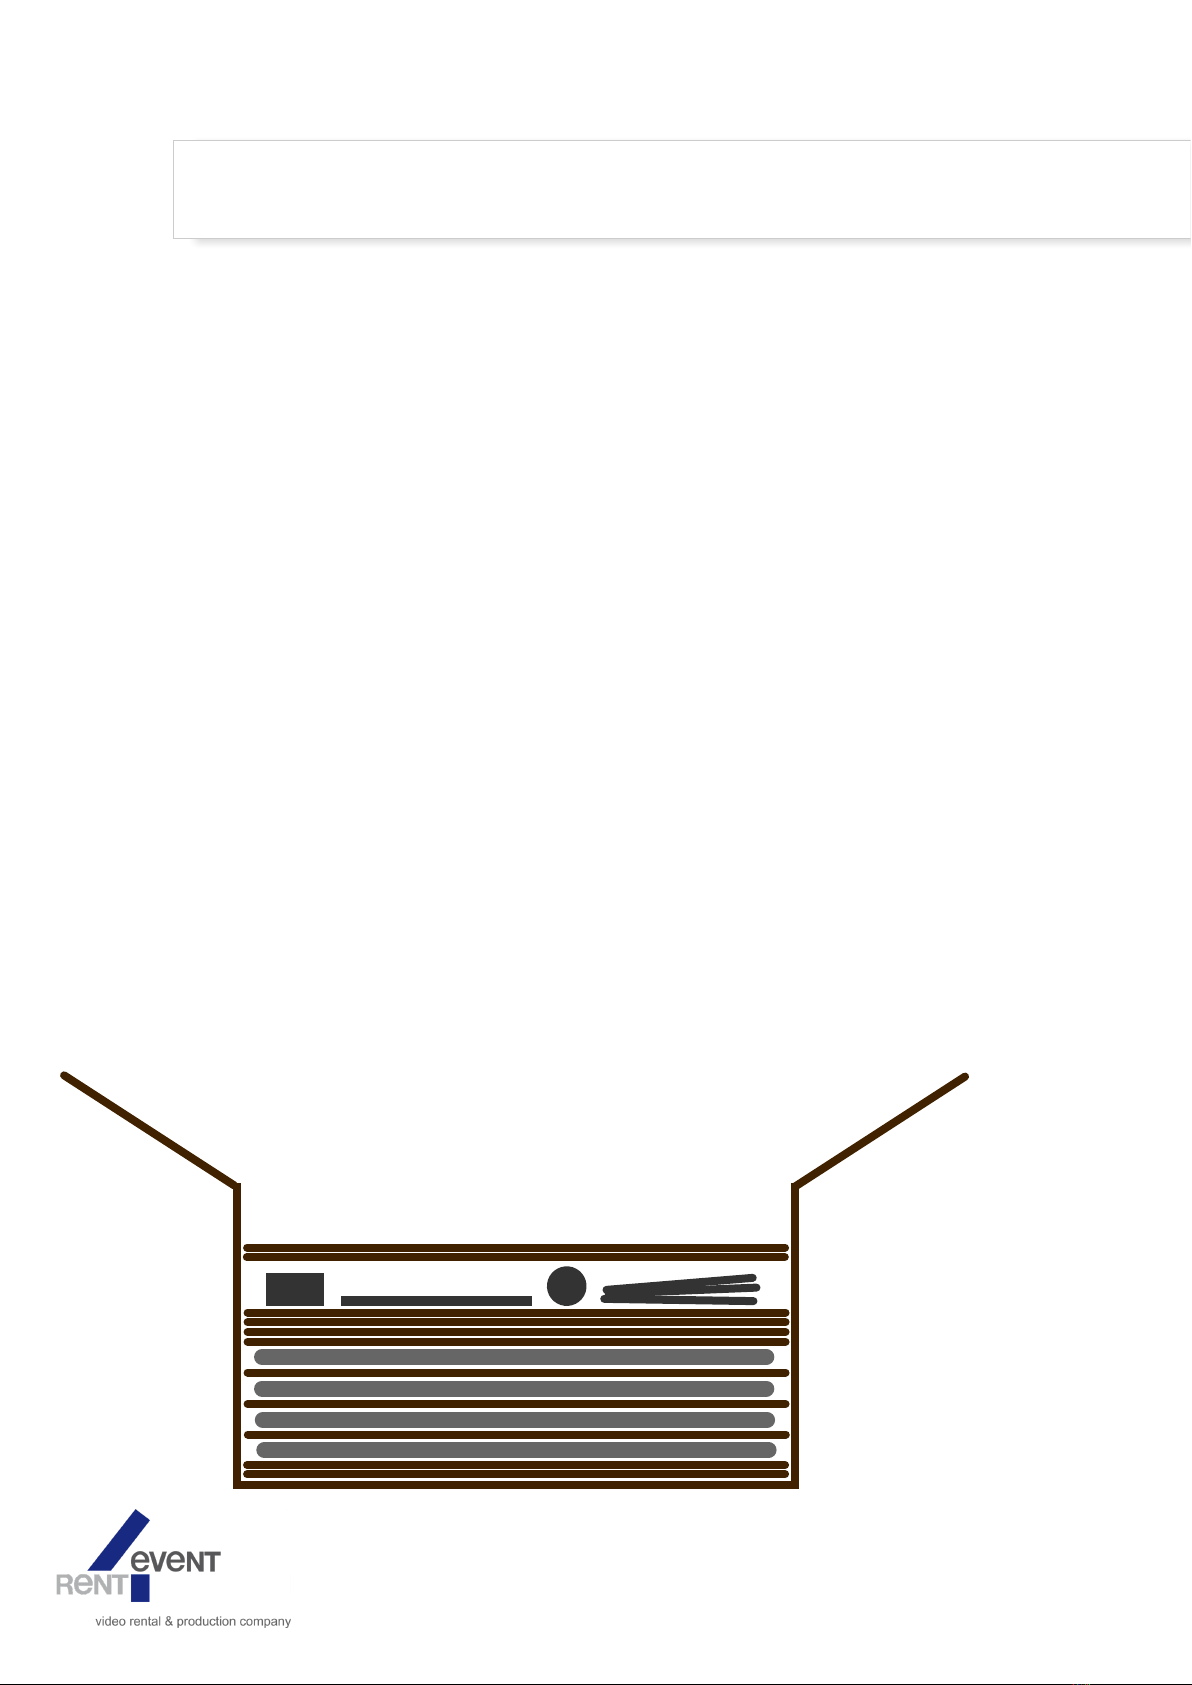
Packaging & scope of delivery Here you see the contents of the box for the Comfort option of the Graphic Wall LW-X, including the optional 25 m continuous paper roll. The 4 board segments are placed under the accessories shown on the photo and are respectively separated from each other by 1-2 cardboard boards. This photo will make repacking quite easy for you. On page 7 you will find a complete list of the scope of delivery. Please also read the packing recommendations for a safe return shipment on page 8. The following parts are only components of the Comfort option of the Graphic Wall LW-X (cranks, masking tape, optional continuous paper device, cardboard core. See page 7 for details)2 x end strips left/right with 2 winged screws each (only required for the standard option)4 x flat metal rails (spring lips) insert in the slot between the board segments4 x pen shelves2 x mounts LW-XSmall parts, screws, cranks etc.Not visible in this picture: 4 x board segments under 4-5 cardboard boards... plus this assembly instructionF

Step 1: Preparing the 4 board segments •Affix one pen shelf (silver-coloured, flat rails with indentation for pens and markers) each to the bottom of the board segments so that the storage surface points towards the front. Use 2 of the 8 flat M6 socket screws for each segment. •Three of the four board segments should be equipped with a black push-in fitting, right top and bottom. If this is not the case, please insert it yourself. Only the right board segment of the four does not require any push-in fitting. If they should be still mounted to this segment, please take them of (keep in bag/box).•The same applies to the silver-coloured flat metal rails: Insert one each into the slot on the right side of the three left board segments.•Now connect two segments to each other respectively (not yet all four). For that purpose insert the black push-in fitting on the right side of the board into the opening on the left side of the other board and tighten the screws firmly.

Step 2: Prop up Graphic Wall LW-X on its legs •Open the masking tape fixed to the mount•Successively release the locking buttons on all three telescopic legs and pull out the legs to the desired working height •Note: The black deposition hooks correspond to the height of the bottom edge of Graphic Wall LW-X•Now take a dual board segment which is already interlinked and place it centrally on a mount•Please take care to insert the black hooks through the provided openings of the pen shelf•Finally screw the winged screw on top of the mount into the thread at the top of the push-in fitting•Proceed accordingly with the other mount and the second dual board segment•Connect both middle segments to each other (again insert a metal rail into the slot of the boards) and now your 4-part Graphic Wall LW-X is ready for use•If you should have hired the standard option of the Graphic Wall LW-X, merely attach both end strips left and right to the slot of the board segments. Your Graphic Wall LW-X is ready. This step is omitted when assembling the Comfort option. Instead continue on the next page.

Step 3: Only for assembly of Graphic Wall LW-X Comfort •When assembling the Comfort option affix the left continuous paper device instead of the end strips. Please take care that the crankshaft is positioned on the bottom left of the Graphic Wall LW-X, it should face forward.•Affix the right continuous paper roll accordingly to the right side.•As we normally write from left to right, you should clamp the empty paper core onto the left side of the wall on which you then affix the beginning of the paper roll by using the masking tape, subsequently roll up the paper from right to left during your presentation. •Release this rail in order to pass the paper through underneath it.•Accordingly, you insert the paper roll here (without illustration) on the right side of the wall. Use the black plastic inserts for this purpose.•Finally attach the cranks to the left side of the cardboard core and the right side of the paper roll and the Graphic Wall LW-X Comfort is ready for use. We wish youa successful event!

Complete check list of the scope of delivery Graphic Wall LW-X •1 x this assembly instruction•1 x Allen key 4mm•2 x mounts with 6 x winged screws each•4 x board segments with 2 black push-in fittings each, right top and bottom (=8 push-in fittings in total, which each have 1 flat M6 hexagon screw = 8 hexagon screws in total for the push-in fittings.)•4 x pen shelves incl. 8 x flat M6 hexagon screws•4 x spring lips (flat metal connection of board slot, 3 are required)•1 x end strip left incl. 2 x winged screws•1 x end strip right incl. 2 x winged screws•Several cardboard boards, 2 each at the very bottom and between individual board segments, at least 4 between top board segment and accessories.Additionally for Graphic Wall LW-X Comfort •1 x continuous paper device left incl. 4 x winged screws•1 x continuous paper device right incl. 4 x winged screws•2 x metal plates & crank with 1 winged screw each•2 x plastic inserts black top & bottom for paper roll•1 x cardboard core•1 x masking tape•if required, optionally continuous paper to be ordered. The paper remains your property.Please take note of the packaging and shipping instructions on the next page!

Packaging and shipping instructions The following not only facilitates packing for return shipment of the Graphic Wall LW-X, but also ensures safe transport without damages to the fragile board segments. Thank you very much for considering the following aspects: •Please store the box and the cardboard board safely. They are not disposable but are needed for return shipment.•Please dismantle all parts exactly in the manner you received them. Particularly the 4 pen shelves (1 for each board) and the cranks etc. if you hired the Comfort option. Protruding parts may break away easily or cut into the neighbouring board segments •Please keep all small parts (hexagon keys, screws, cranks,...) in the plastic bag or plastic box provided as they can easily fall out of small holes in the cardboard box during transport. •Please use the cardboard boards generously to protect board segments. Particularly between the top board and the accessories you should use at least FOUR cardboard boards as pointy parts of the mount may otherwise cut into the top board segment. •The bottommost board segment in the box should best be placed on its back and the topmost with the reverse side pointing upwards in order to protect the more significant front in the event of damage. See sketch. Safe transport by generous distribution of cardboard boards. At least one of them should be placed between board segments, at least four cardboard boards between topmost board segment and accessories, like mounts etc.

rent4event GmbHScheffelstraße 34-3668723 Schwetzingen Mo-Fr 9:00-18:00 Uhr (+49) (0) 6202-127550 www.rent4event.de[email protected] All images © rent4event GmbH & Neuland Co. KGrent4event GmbH is official Neuland Partner for Rental Products
This manual suits for next models
1
Table of contents
Other neuland Office Equipment manuals
Popular Office Equipment manuals by other brands

Jason.L
Jason.L San Fran 3 Person Run Workstation installation guide

Jason.L
Jason.L Switch 4 Person workstations with Uniform... installation guide

Rhin-O-Tuff
Rhin-O-Tuff HD7700 Setup & operator manual

Jason.L
Jason.L Echo panel screen Assembly instructions

FP
FP ultimail Operator's manual

BENE
BENE NOOXS THINK TANK Assembly instructions

Emerson
Emerson Knurr Elimobil Trolley keyboard shelf Assembly instructions

silen
silen CHATBOX Assembly manual

Canon
Canon Puncher Unit-L1 Service manual

AMQ
AMQ Amobi Desk One Setup and user guide

Kimball Office
Kimball Office Footprint Assembly instructions

Posturite
Posturite DeskRite 350 Assembly instructions