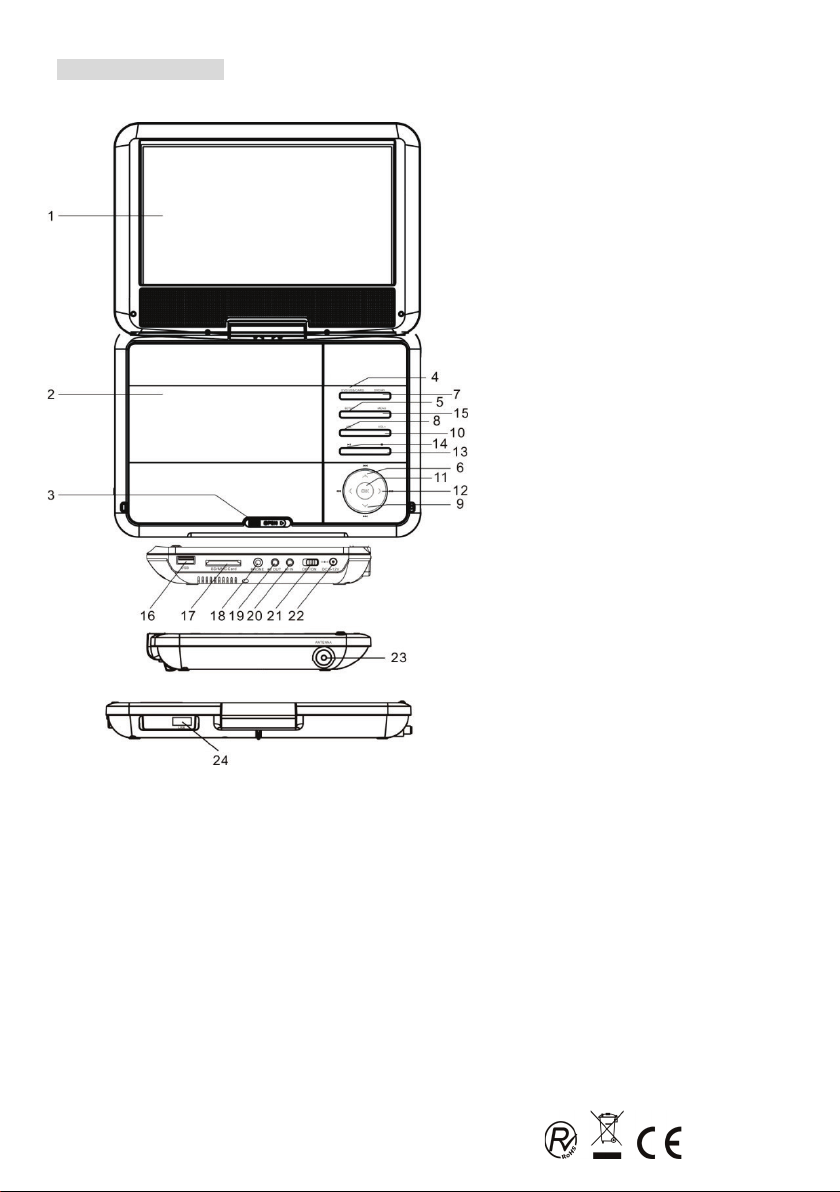
Nevir NVR-2766DVD-PUCT2 User manual

~ 0 ~
NVR-2766DVD-PUCT2
Reproductor DVD Portátil 9”(22,86cm) con TDT
MANUAL DE INSTRUCCIONES
Lea el manual con atención antes de usar el producto
Español
Español 1-11
English 12-24

~ 1 ~
NOTAS IMPORTANTES
Advertencias:
Para prevenir riesgos de incendio o descarga eléctrica, no exponga esta unidad a la lluvia o
a la humedad. En su interior contiene componentes de alto voltaje, por lo que no debe
tratar de abrir la cubierta. Únicamente se permite el mantenimiento de la unidad a personal
de servicio técnico cualificado.
Precaución:
- Este reproductor de DVD contiene un sistema diodo láser de clase 1.
- Lea atentamente este manual y familiarícese con las instrucciones antes de utilizar la
unidad.
- Una vez leído este manual, consérvelo para futuras consultas.
- Para evitar la radiación láser directa, no trate de abrir la cubierta. Cuando ésta se abra o
cuando el dispositivo de cierre se libere, irradiará un rayo láser visible. ¡No mire al rayo
láser!
- Para evitar dañar la óptica laser de la unidad, no tire ni empuje la bandeja del cargador
mientras esté funcionando. Apague la fuente de alimentación únicamente cuando se
muestra “NO DISC”.
- No coloque nunca objetos sobre la unidad ya que pueden afectar a la reproducción o
dañar el dispositivo.
- Si el enchufe y el conector se usan como un dispositivo de conectar y desconectar, deben
ser utilizados sin brusquedad.
- Mantenga la unidad lejos del agua o de alta humedad y evite poner sobre la unidad
cualquier utensilio que contenga líquido, como puede ser un florero.
FORMATOS COMPATIBLES
Generalmente esta unidad reproduce discos CD-R, CD-RW y MP3, aunque CD-R y
CD-RW no se indiquen en el display. Sin embargo, dada la variedad de los tipos de disco,
sistemas de grabación, sistemas operativos y softwares de grabación, no podemos
garantizar que se puedan reproducir todo tipo de discos CD-R o CD-RW. Esta unidad no
reproduce DVD-ROM, CD-ROM y es imposible reproducir discos en sistema de color
SECAM, ya que sólo reconoce PAL y NTSC.
El tipo de funciones y operaciones aplicables para un disco en particular depende de las
características del mismo. A veces, las funciones pueden diferir de las descripciones en
este Manual de Instrucciones. En este caso, siga las instrucciones dadas en la pantalla. El
presente manual sólo cubre los usos básicos del disco, así que usted debería leer también
las informaciones adjuntas al disco.
Si el signo INVALID KEY (tecla no válida) aparece en la pantalla, será porque usted ha
tratado de activar una función restringida en la fabricación del disco.
Este símbolo advierte al usuario
que el interior del producto
contiene alto voltaje
que supone gran peligro.
Este símbolo advierte al usuario
importantes instrucciones de uso.
Para reducir el riesgo dedescarga
eléctrica o incendio, no aabra
lacubierta. Para reparación, acuda a
personal de servicio
técnicocualificado.
Este símbolo indica que esta unidad

~ 2 ~
SOBRE LA UNIDAD
ELEMENTOS DEL PANEL FRONTAL/ TRASERO
1.Monitor LCD
2.Bandeja de DVD
3.Botón para Abrir
4.Botón DVD / USB / CARD
5.Botón Configuración
6.Botón Anterior
7.Botón DVD/AV
8.Botón Vol-
9.Botón Siguiente
10.Botón Vol +
11.Botón OK
12.Botón de avance / retroceso
rápido
13.Botón Stop
14.Botón Reproducir/Pausa
15. Botón Menú/PBC
16.Puerto USB
17.Ranura para tarjeta de memoria
18.Toma de auriculares
19.Salida AV
20.AV
21.Encender/Apagar
22.Entrada DC 12V
23.antena
24.Puerto USB para DVB-T2

~ 3 ~
SOBRE LA UNIDAD
MANDO A DISTANCIA
Observaciones:
Al usar el mando a distancia, diríjalo al sensor infrarrojo de la unidad (con un ángulo de
unos 45 grados.)
No coloque el mando a distancia cerca de fuentes de calor o en un ambiente húmedo o
mojado.
No sumerja el mando a distancia en el agua ni en ningún otro líquido.
No use al mismo tiempo pilas viejas y nuevas y siempre use el mismo tipo de pilas
Cambie las pilas cuando vea que el mando a distancia no funciona o lo hace
intermitentemente.
Insertar las pilas del mando a distancia(OPCIONAL):
1.Quite la tapa siguiendo la
dirección de la flecha.
2.Insert two 1.5V AAA batteries, paying
attention to the correct
polarities(+and-)
3.Ponga de nuevo la tapa de
las baterías.

~ 4 ~
MANDO A DISTANCIA: TECLAS Y FUNCIONES
NO.
NOMBRE
Función DVD
Modo TV Digital
1
MUTE
SILENCIO
SILENCIO
2 DVD/AV/DTV Cambiar entre modo
DVD/AV/DTV
Cambiar entre modo DVD/AV/DTV
3 EPG/SETUP
Entrar en el menú de
configuración de DVD
Mostrar o salir de GEP (Guía Electrónica
de Programas)
4 INFO/OSD Mostrar
título/capítulo/tiempo
Mostrar información sobre el programa
de Televisión
5 SEARCH/
RECALL( )
Ir al título/capítulo/duración
del DVD que desee ver.
Regresar a las funciones de programa
6 MENU
Entrar en el menú de
configuración de DVD
Entrar en el menú de configuración del TDT
7 CH+/UP Subir en las opciones de
menú
Subir en las opciones de menú Cambiar
canales en orden ascendente
8 VOL-/LEFT Mover hacia la izquierda en
los elementos de menú
Bajar volumen
9 FAV/ZOOM Reducir/ampliarla salida de
vídeo
Cambiar la configuración de los canales
favoritos
10 0-10+ Elegir pista o capítulo Cambiar de canal Introducir números y
letras en el menú
11 RED/PREV
Saltar al capítulo o pista
anterior Tecla de función auxiliar
12 GREEN/NEXT
Saltar al capítulo o pista
siguiente
Tecla de función auxiliar
13 POWER Encendido/En espera Encendido/En espera
14 DVD/USB/CARD
Cambiar entre modo
DVD/USB/CARD
Sin función
15 AUDIO Elegir el idioma de audio Elegir el idioma de audio
16 SUBTITLE Elegir subtítulos Cambiar opciones subtítulos ON/Off
17 EXIT/TITLE
Salir del DVD /regresar al
menú Salir de TDT
18 OK Pulsar para confirmar
selección
Pulsar para confirmar selección
19 VOL+/RIGHT
Mover a la derecha en los
elementos de menú Subir Volumen
20 CH-/DOWN
Bajar en las opciones de
menú
Bajar en las opciones de menú Cambiar
canales en orden descendente
21 DVD VOL+/- Subir Volumen Sin función
22 TV/RADIO/REPEAT
Repetirun título,
capítulo,pista otodo el disco.
Cambiar entre canales de televisión o
radio
23 TEXT/PROGRAM
Cambiar el orden de
reproducción
Empezar y detener el teletexto digital
24 STOP Detener la reproducción Sin función
25 PLAY/PAUSE Reproducir disco/ Pausa Sin función
26 BLUE/FWD Avance rápido Tecla de función auxiliar
27
YELLOW/REV
Retroceso rápido
Tecla de función auxiliar

~ 5 ~
CONEXIONES
CONEXIONES DEL SISTEMA
CABLESENOPCIÓN
ADVERTENCIA
Este producto es un dispositivo portátil normalmente utilizado en
ambientes exteriores o interiores, como puede ser dentro de un
vehículo. Por este motivo, el volumen de audio, incluso al máximo,
puede verse afectado por el propio ruido ambiente donde se utilice.
Para un volumen correcto de audio, se recomienda el uso de
auriculares.
PROTEJA SUSENTIDOAUDITIVO:
Los expertos desaconsejan el uso constante de aparatos estéreos que
se reproduzcan a alto volumen. La exposición constante a alto volumen
puede ocasionar pérdida auditiva. Si experimenta zumbidos en los
oídos pérdida de audición, suspenda su uso y consulte con un médico.

~ 6 ~
MENÚ DE CONFIGURACIÓN DEL REPRODUCTOR DVD
CONFIGURACIÓN GENERAL DEL MENÚ DE CONFIGURACIÓN
Al pulsar la tecla “CONFIGURACIÓN”, la página de configuración general aparece.
Cuando esto ocurre el sistema del DVD entra automáticamente en pausa
La opción de la contraseña viene bloqueada por defecto y por este motivo, inicialmente
usted no puede configurar la opción de Control Parental o cambiar la contraseña. Para que
funcione la opción Control Parental, el modo contraseña tiene que estar activado. Si usted
quiere configurar la opción de Control Parental, necesita introducir la contraseña
predeterminada, que es 0000, y luego pulsar ENTRAR para confirmar. Para cambiar la
contraseña, a usted se le solicitará la antigua contraseña, y luego otra nueva. Introduzca un
número de 4 cifras (ésta será su nueva contraseña).
Página de Configuración General
Formato de pantalla
Angulo
Idioma del menú
Subtítulos
Protector de pantalla
Último punto
Títulos Mp3
Página de Configuración del Audio
Configuracion de altavoz
Página de Configuración deVideo
Calidad
Calidad de la imagen
Formato pantalla
Página de preferencias
Tipo TV
PBC
Audio
Subtítulo
Menu del disco
Control parental
contraseña
Standard

~ 7 ~
MENÚ DE CONFIGURACIÓN DEL TDT
Cuando desee pasar al modo TDT, presione la tecla DVD/DVB(20) de su mando a distancia
GUÍA DE INSTALACIÓN
Si usted está usando esta unidad por primera vez o ha restaurado la configuración a los
valores predeterminados de fábrica, esta Guía de Instalación va a aparecer en la pantalla
de su televisión. Siga dicha guía para elegir el idioma preferente del menú y el país (región)
correcto para empezar la búsqueda de canales.
(1)Idioma OSD: Pulse el botón
Derecha/Izquierda para elegir un idioma.
(2)País: Pulse el botón Derecha/Izquierda
para elegir su país de residencia.
(3)Búsqueda de canales: Pulse el botón
Derecha u ENTER para empezar una
búsqueda automática de canales.
Si no se encuentra ningún canal durante el
proceso de búsqueda de canales, por favor,
revise sus conexiones de antena. Después que el proceso de escaneo termine, el receptor
va a guardar automáticamente los canales encontrados y emitir el primer canal en la lista.
MENÚ
La mayoría de las funciones están disponibles en el menú principal. Siga la información de
ayuda al pie del menú para modificar las opciones de preferencia. Se le requerirá una
contraseña cuando usted modifique las opciones avanzadas en el Menú. La contraseña
predeterminada es 000000.
Programa
Editar Programa
EGP
Ordenar
LCN
Imagen
Aspecto
Formato TV
Transparente
Búsqueda Canales
Auto-Búsqueda
Búsqueda Automática
País
Alimentación Antena
Hora
Intervalo Tiempo
Región
Zona Horaria
Temporizador
Encendido/apagado
Horario Verano
Opciones
Idioma OSD
Idioma Subtítulos
Idioma Audio
Sistema
Control Parental
Establecer Contraseña
Restablecer Valores por
defecto
Información
Actualización Software

~ 8 ~
GUÍA DE SOLUCIÓN DE PROBLEMAS
Problema
Solución
No enciende
•Conecte el enchufe de alimentación a la toma de
corriente
No hay imagen
•Verifique la conexión de la salida de vídeo del DVD a la
entrada de vídeo del televisor y luego ponga el
televisor en el modo adecuado (vídeo 1)
•Inserte el cable de vídeo correctamente y consulte el
manual para usuarios de su televisión
No hay sonido
•Conecte el cable de audio correctamente.
•Verifique la conexión de la salida de audio del DVD a la
entrada de audio del televisor u otro receptor y luego
pase a la fuente adecuada en el receptor. Consulte el
manual para usuarios de su amplificador de audio.
Imágenes en blanco y
negro
•Pulse el botón P/N en su mando a distancia
Imágenes en blanco y
negro
•El conector S-Vídeo está dañado ( pin doblado)
Las imágenes
reproducidas sufren
distorsión ocasional
•La distorsión de unas cuantas imágenes puede
aparecer debido a una transferencia de mala calidad
de vídeo/sonido a disco. Es especialmente frecuente
en discos fabricados entre 1997—1998.
•
El disco está rayado.
La luminosidad no es
estable o se producen
ruidos en las imágenes
reproducidas
•Conecte el reproductor de DVD directamente al
televisor y no a través de otra fuente. Lo que usted
está viendo es el efecto del circuito de protección de
copias requerido en todo reproductor de DVD.
•Si no tiene una salida de vídeo en su televisor, usted
necesita comprar un adaptador.
El reproductor de vídeo
de DVD no empieza la
reproducción
•Coloque el disco con el lado gráfico hacia arriba
•Coloque correctamente el disco sobre la bandeja de
disco
•Asegure que el disco no sufra rayaduras y huellas
digitales.
•Cancele la función de bloqueo parental o cambie el
nivel del bloqueo
•Apague la unidad , desconecte el enchufe y vuelva a
conectarlo
El MP3 no lee el disco o
salta al hacerlo
•Retire el disco ya que la edición de software usada
puede ser incompatible con el reproductor. .
El mando a distancia no
funciona debidamente
•·Reemplace las baterías con otras nuevas.

~ 9 ~
ESPECIFICACIONES TÉCNICAS
Especificaciones técnicas delDVD Portátil
Especificaciones técnicas de DVB-T2
Sintonizador
Conector de entrada
Rango de frecuencia de entrada
Número de entradas de RF
Impedancia de entrada
Conector de salida de RF
Bucle de salida
Demodulación
Estándar
Modos de intervalo de guarda
Tasa de modos FEC
Portadores/Constelación
Demodulación
Decodificador de vídeo
Estándar
Corriente de transporte
Decodificación de vídeo
Relación de aspecto
Decodificador de audio
Estándar
Decodificación de audio
Frecuencia de muestreo
Energía
Rango de entrada AC
Consumo en encendido
Consumo en espera (Standby)
IEC 16902. Hembra
VHF & UHF
1
75 ohm
(BYPASS) IEC 169-2 Macho
177,5—866 Mhz
ETSI EN300 744
1/32, 1/16, 1/8 de la duración de símbolo activo
1/2, 2/3, 3/4, 5/6, 7/8
Todos los modos están soportados, el no jerárquico incluído
COFDM (QPSK/QAM16/QAM64/QAM256) 2K y 8K
ISO/IEC 13818-2 y ISO/IEC 14496-10
ISO/IEC 13818-1
MPEG-2 SD/HD (MP@ML y MP@HL), MPEG-4 H.264/AVC
SD/HD
JPEG, AVI, VOB, MP3
4:3, 16:9
ISO/IEC13818-3 TR1011154
MPEG-1 y MPEG-2 de nivel I y II, Audio de Dolby Digital,
Audio de HE-AAC Digital
32 kHz, 22,1 kHz, 44,1 kHz, 48 kHz
AC220V-240V 50 Hz
<10W
<1W
Disco compatible: archivo de DVD/VCD/CD/Audio
Sistema de señal: PAL/NTSC/AUTO
Tamaño del panel: 9 pulgadas
Respuesta de frecuencia: 20Hz a 20KHz
Salida de vídeo: 1 Vp-p/75 ohmios, desequilibrada
Salida de audio: 1.8Vrms/10kOhm
Audio S/N: Mejor que 80 dB
rango dinámico: Mejor que 85 dB
Láser: Láser semiconductor, longitud de onda; 650nm/795nm
Fuente de alimentación: DC 12V
Consumo de energía: 18W Max
Temperatura de funcionamiento: 0 ~ 40C
Peso: 0.93kg
Dimensiones (An x P): 240x175x40mm
Compatible PANTALLA LCD: resolución de 630x234 píxeles

~ 10 ~
Según la directiva de Residuos de Aparatos Eléctricos y Electrónicos
(RAEE), los residuos AEE han de recogerse y tratarse por separado. Si
en un futuro necesita desprenderse de este producto NO lo ponga en los
residuos domésticos, envíelo a los puntos de recogidas de residuos
existentes en su área. De igual manera debe extraer los residuos de pilas
y/o acumuladores antes de la entrega del RAEE a través de los canales de
recogida separada habilitados al efecto (distribuidores y/o instalaciones de
las Entidades Locales)
Para dar cumplimiento a la Norma UNE EN-60335, indicamos que si el cable flexible se
daña únicamente puede ser sustituido por un taller de reparación reconocido por NEVIR
S.A. ya que se necesitan herramientas especiales.

~ 11 ~
NVR-2766DVD-PUCT2
PORTABLE DVD PLAYER 9''(22,86cm) WITH DVB-T2
User Manual
Please read this user manual before using or connecting this product.
And keep it handy for future reference.
English

~ 12 ~
IMPORTANT NOTICE
Warning
To prevent the risk of electric shock, do not expose this unit to rain or moisture. There are
high voltage components inside so do not attempt to
open the enclosure. Only qualified service technicians are allowed to maintain the unit.
Caution:
This DVD player contains a class 1 laser diode system..
Read this manual carefully and familiarize yourself with the instructions before operating.
After reading this manual, please keep for future reference.
To prevent direct laser radiation, do not attempt to open the enclosure. A visible laser beam
will radiate when the enclosure is opened or when the interlock device is released. Do not
stare at the laser beam.
To avoid damaging the loader of the unit , please do not pull or drag the tray of the loader
when operating , and switch off the power supply only when “NO DISC” is displayed.
Never place objects on top of the unit. Doing so may affect play back or damage the device.
If use power plug and appliance coupler as a make and break device. It should be operated
easily.
Keep the unit away from water or high humility. It is strongly forbidden to place any utensil
with liquid such as a vase on the top of the unit.
Multiformats
Usually the unit plays CD-R, CD-RW and Mp3 discs, although CD-R and CD-RW media
with not be indicated in the display. But due to the variety of disc types, recoding computer,
operating systems and burning software we canot guarantee that every CD-R or CD-RW is
palyable. The unit does not paly DVD-ROM, CD-ROM, ect. And there is no way to play back
discs in SECAM color system, just PAL and NTSC be supported.
The type of functions and operations that can be used for a particular disc vary depending
on the features of that disc. In some cases, there and operations may differ form the
description given in this Operations Manual only covers basic disc operations. Therefore
you should also read the information enclose to the Disc.
If this sign INVALID KEY appears on the screen, you have called up a function restricted by
the Disc manufacture.
Alert the user to the presence of
dangerous voltage within the
product’s enclosure.
Alert the user to the presence of
important operating instructions.
To reduce the risk of electric
shock or fire, do not open the
cover. Refer servicing to
qualified service personal.
This mark indicates this unit
belongs to class 1 laser
product.

~ 13 ~
ABOUT THE UNITS
Front/Rear panel identification
1.LCD monitor
2.DVD door
3.Open button
4.DVD/USB/CARD button
5.Setup button
6.Previous button
7.DVD/AV button
8.Vol- button
9.Next button
10.Vol+ button
11.OK button
12.Fast forward/Backward button
13.Stop button
14.Play/Pause button
15.Menu/PBC button
16.USB Port
17.Memory card slot
18.Earphone jack
19.AV out
20.AV in
21.Power ON/OFF switch
22.DC IN 12V
23.Antenna
24.USB Port for DVB-T2

~ 14 ~
ABOUT THE UNITS
Remote control panel identification
Remark:
When using, direct the remote control to the infra-red sensor on the product (within 45
degrees angle.
Do not put remote control near sources of heat or in an environment where moisture or
dampness is present.
Do not Immense the remote control in water or any other liquid.
Do not use old and new batteries and always use the same type of batteries.
Please replace batteries when you find the remote control does not work or works
intermittently.
Insert Remote batteries(OPTION)
1.Remote the battery cover in
the directions of the arrow.
2.Insert two 1.5V AAA batteries, paying
attention to the correct
polarities(+and-)
3.Replace the battery cove

~ 15 ~
Remote control buttons&functions
NO. Name Function in DVD Mode function in Digital TV Mode
1
MUTE
Mute
Mute
2 DVD/AV/DTV Switch DVD/AV/DTV mode Switch DVD/AV/DTV mode
3
EPG/SETUP
enter the DVD setup menu
Display or exit EPG
4 INFO/OSD Display Title/Chapter/Tim Display the TV program infirmation
5 SEARCH/
RECALL
Goto the title/chapter/time of
the DVD/VCD you want to
watch Back to program functions
6 MENU
Display/Exit the DVD/VCD
menu
Enter the DVB setup menu
7 CH+/UP Move up in menu items Move up in menu items/move up the
channel
8
VOL-/LEFT
Move left in menu items Volume down
9 FAV/ZOOM Reduce/Enlarge video output Favorite channel setting switch
10 0-10+ Select track or chapter
Change channels, Enter numbers and
letters into menu.
11 RED/PREV
Skip to the prev chapter or
track Auxiliary function button
12
GREEN/NEXT
Skip to the next chapter or tack
Auxiliary function button
13 POWER
Power/Standby
Power/Standby
14
DVD/USB/CARD
Switch DVD/USB/CARD mode
No Function
15 AUDIO
Select Audio Language
select Audio Language
16
SUBTITLE
Select language subtitle Switch Subtitle on/off
17 EXIT/TITLE
Select the DVD title/No
function Exit DVB
18 OK
Press to confirm the selected
menu
Press to confirm the selected menu
19 VOL+/RIGHT
Move right in menu items
Volume up
20 CH-/DOWN Move down in menu items
Move down in menu items/move down
the channel
21 DVD VOL+/- Volume up/down No Function
22 TV/RADIO/REPEAT Repeat a title, chapter,
track or the whole disc.
Switch the TV or Radio channel
23 TEXT/PROGRAM Change playback order Start & Stop digital teletext
24
STOP
Stop the playing No Function
25 PLAY/PAUSE
Play disc/Pause playback
No Function
26
BLUE/FWD
Fast Forward
Auxiliary function button
27 YELLOW/REV Reverse search Auxiliary function button

~ 16 ~
CONNECTION
SYSTEM CONNECTION
CABLES IN OPTION
This product is a portable device typically used in outdoor or indoor
environments, such as inside a vehicle. For this reason, the audio
volume, even at maximum, can be affected by ambient noise itself
where it is used.
For correct audio volume, the use of headphones is recommended.
PROTECT YOUR HEARING SENSE:
Experts advise against the constant use of stereos that play loud.
Constant exposure to high volumes can cause hearing loss. If you
experience ringing in the ears, hearing loss, discontinue use and
consult a physician.

~ 17 ~
THE SETUP MENU SYSTEM OF DVD PLAYER
Press the Setup button, the main setup appears.
When the main menu displayed the DVD system will auto pause.
The password option is initialized locked, and you cannot set the parental limit or change
the password. In order for the Parental feature word ,the password mode must be turned on.
If you want to set the parental limit, you will need to enter the default password, which is
0000, then press Enter to confirm. To change the password, you will be prompted for the old
password, then be prompted for a new. Enter a 4-digit number( this is your password ).
General setup page
TV Display
Angle Mark
OSD Lang
Captions
Screen Saver
Last Memory
Mp3 Lyric
Audio setup page
Speaker Setup
Video setup page
Quality
Panel Quality
Panel Display
Preference page
TV Type
PBC
Audio
Subtitle
Disc Menu
Parental
Password
Default

~ 18 ~
THE SETUP MENU SYSTEM OF DVB-T2
When you want to the DVB-T2 mode, press “DVD/DVB”(20) button of the remote control.
INSTALLATION GUIDE
If you ar using the unit for the first time or have restored the unit to Factory Default , the
installation Guide Menu will appear on you TV screen. Follow the help information that at
the bottom of the window to select preference menu language and suitable country (region)
and start channel search.
(1)[OSD Language] Press
RIGHT/LEFT(26/5) key to select a
language.
(2)[Country] Press RIGHT/LEFT(26/5)
key to select your country of residence.
(3)[Channel Search ] Press
RIGHT/LEFT(26/5) or ENTER(6) key to
begin Automatic channel search.
If no channels is found during the channel searching process, please check your antenna
connections and antenna are in working order, After the scanning process is completed the
receiver with automatically save the scanned channels and display the first channel in the
list.
MENU
Most functions are available in main menu. Follow the operation help information on the
bottom of the menu to modify the preference options. A password will be required when
modifying advanced options in the Menu. The Default password is “000000”.
Program
Program Edit
EPG
Sort
LCN
Picture
Aspect Ratio
TV Format
Transparent
Channel search
Auto Search
Manual search
Country
Antenna Power
Time
Time Offset
Country Region
Time Zone
Sleep
Power On/Off
Daylight Time
Option
OSD Language
Subtitle Language
Audio Language
System
Parental Guidance
Set Password
Restore Factory Default
Information
Software Update

~ 19 ~
TROUBLESHOOTING GUIDE
SYMPTOMS AND CORRECTION
Symptom
Correction
No power ●Connect the power plug into wall outlet securely
No picture ●Verify the connection from the DVD video output to the TV
video input. Then switch TV to appropriate mode (video 1)
● Connect the video cable into the jacks securely. Refer to
your television owner’s manual.
No sound ●Connect the audio cable into the jacks securely.
●Verify the connection from the DVD audio output to the TV
or receiver audio input. Then switch to the appropriate source
on the receiver. Refer to your audio amplifier owner’s manual.
Rolling b/w picture ●Press the P/N button on your remote control.
●Adjust the vertical hold on your TV.
Black & White picture ●Damaged S-Video connector (bent pin)
The playback picture
has occasional
distortion:
●A small amount of picture distortion may appear because
of a poor quality video/sound transfer to disc. This is
especially true of some discs manufactured between 1997
-1998.
●Scratched disc.
Brightness is unstable
or noises are produced
on playback picture
●Connect the DVD player directly through the TV and not
through other source. What you are viewing is the effect of
the copy protection circuitry required on all DVD players.
●If do not have a video input on your TV, you must purchase
an adapter from your dealer
The DVD video player
does not start playback
•Place the disc with the graphic side up.
•Place the disc on the disc tray correctly inside the guide.
•Make sure the disc is free from scratches & fingerprint.
•Cancel the parental lock function or change the parental lock
level.
•Turn the power off then disconnect the power plug and
reinsert it back into the wall outlet
Mp3 won’t read disc or
it skip
●Return the disc as the software edition used may not be
combatable with the player. Check web site for instruction.
●Use new editions of software such as Voyeur Audio station
4, Adaptec Easy CD Creator, NTI or Radios Toast Titanium.
●Make sure Mp3 files are not encoded with a variable bit rate
such as provided by real Networks.
The remote control
does not work properly
●Replace the batteries with new ones
Table of contents
Languages:
Other Nevir Portable DVD Player manuals