New Japan Radio NJZ1295 User manual

Date
March 13, 2020
- Specification -
Outdoor
500W AC/DC
Power Supply Unit(PSU)
Model No. NJZ1295
Input AC Voltage Range: 100 to 240 V
Output DC Power: 500 W
Output DC Voltage: +51 VDC
Copyright ©
New Japan Radio Co., Ltd.
Microwave Division
-Notice of Proprietary Information-
This document and contents are proprietary to New Japan Radio Co., Ltd.
This publication and contents may not be reproduced or distributed for any other purpose
without the written permission of New Japan Radio Co., Ltd.
Specifications listed in this document are subject to change at any time, without notice.
New Japan Radio Co., Ltd.
Microwave Division
Title:
Datasheet of NJZ1295
Reference No.:
DS-Z1295
Rev.:
02E
Sheet:
1 / 27
Released

NJZ1295
*Above specifications are subject to change without notice.
Reference No.:
DS-Z1295
Rev.:
02E
Sheet:
2
Caution
1. While New Japan Radio., Ltd.(NJR) continually strives to improve the quality and reliability of any products, failures would occur in
microwave products over time. For this reason, it is important that customers fulfill their responsibilities to ensure designed-in
safety – including failsafe functions, redundancy, and measures to prevent malfunctions and the spread of fire – in order to avoid
injuries, accidents, or social repercussions resulting from the failure of any product related to satellite communications on this
document (hereinafter, “the product”). Customers must pay careful attention to ensuring the safety of their equipment.
2. The product is designed and tested to function in accordance with its specifications. Do not use under conditions that deviate from
the product specifications included in the specifications. NJR assumes no responsibility and shall not be liable for any injuries,
accidents, or social repercussions resulting from the product being in a poor or damaged state because it was used under conditions
that depart from the specifications.
3. The product is covered by a warranty for one year following delivery unless otherwise stipulated in the contract or delivery
conditions. In the event of a failure for which NJR are responsible occurring during the warranty period, NJR undertake to repair or
replace the product free of charge. Note, however, that the warranty does not cover failures such as those listed here (see bullets
below), even if they occur within the warranty period. In addition, in the case of a product being repaired or replaced by us, the
starting date for the warranty period is still the original delivery date of the product.
Failure due to the product being used in conditions other than those stipulated in the data sheet, specification sheet, etc.
Failure due to modifications or repairs carried out by some entity other than our company
Failure determined to be the result of unsuitable maintenance or replacement of a consumable item that requires due
maintenance
Failure due to circumstances that were unforeseeable given the scientific/technological standards at the time of shipment
Other failures due to external factors such as fire, earthquake, flood and power supply anomalies for which NJR are not
responsible
In addition, the product warranty is limited to the provision of repair services or replacement at no cost. It does not cover secondary
damage (to equipment, business opportunities, profits, etc.) or any other damage that may have resulted from failure of the
product.
4. The product must be handled appropriately to ensure its continued reliability. Since it can be damaged by the intrusion of water,
dust, oil, chemicals, etc., it must be given appropriate protection. Even in the case of a product with an airtight construction, avoid
using it in an environment that exceeds the stated levels of waterproofing/dustproofing. Also, be sure to use connectors and
waveguides properly.
If replacement parts such as fans are included, proper maintenance is necessary. To maintain product performance and
functionality, it is necessary to conduct inspections and maintenance at appropriate intervals and exchange replacement parts when
necessary. Improper inspections or maintenance may result in failure.
In addition, the warranty does not cover the use of the product in areas where salt damage can be expected or where there is a
substantial presence of corrosive gases such as Cl2, H2S, SO2, and NO2. If the product is to be used in such areas, at the time of
installation you must take appropriate steps to protect the product.
5. If the product is to be used with equipment/systems that must meet special quality and reliability standards (aerospace equipment,
medical equipment, power generation control equipment, automotive/railway transportation equipment, safety equipment,
disaster prevention and security equipment, etc.), please consult with our sales staff in advance.
6. This product contains gallium arsenide (GaAs), classified as a harmful substance. To avoid danger, do not incinerate, crush, or
chemically treat the product in such a way that gases or dust are released. When disposing of the product, comply with all applicable
laws and regulations and do not treat it as general industrial waste or household waste.
7. When exporting a product or technology, observe export laws and regulations such as those governing foreign exchange and foreign
trade, and obtain any necessary licenses for export, service transactions, etc. NJR request that you do not use our products or the
technical data published on this document for developing weapons of mass destruction or for any other military purposes or
applications.
8. The product specifications in this document are subject to change without notice. If you are considering using a product, delivery
specifications must first be settled.

NJZ1295
*Above specifications are subject to change without notice.
Reference No.:
DS-Z1295
Rev.:
02E
Sheet:
3
Scope
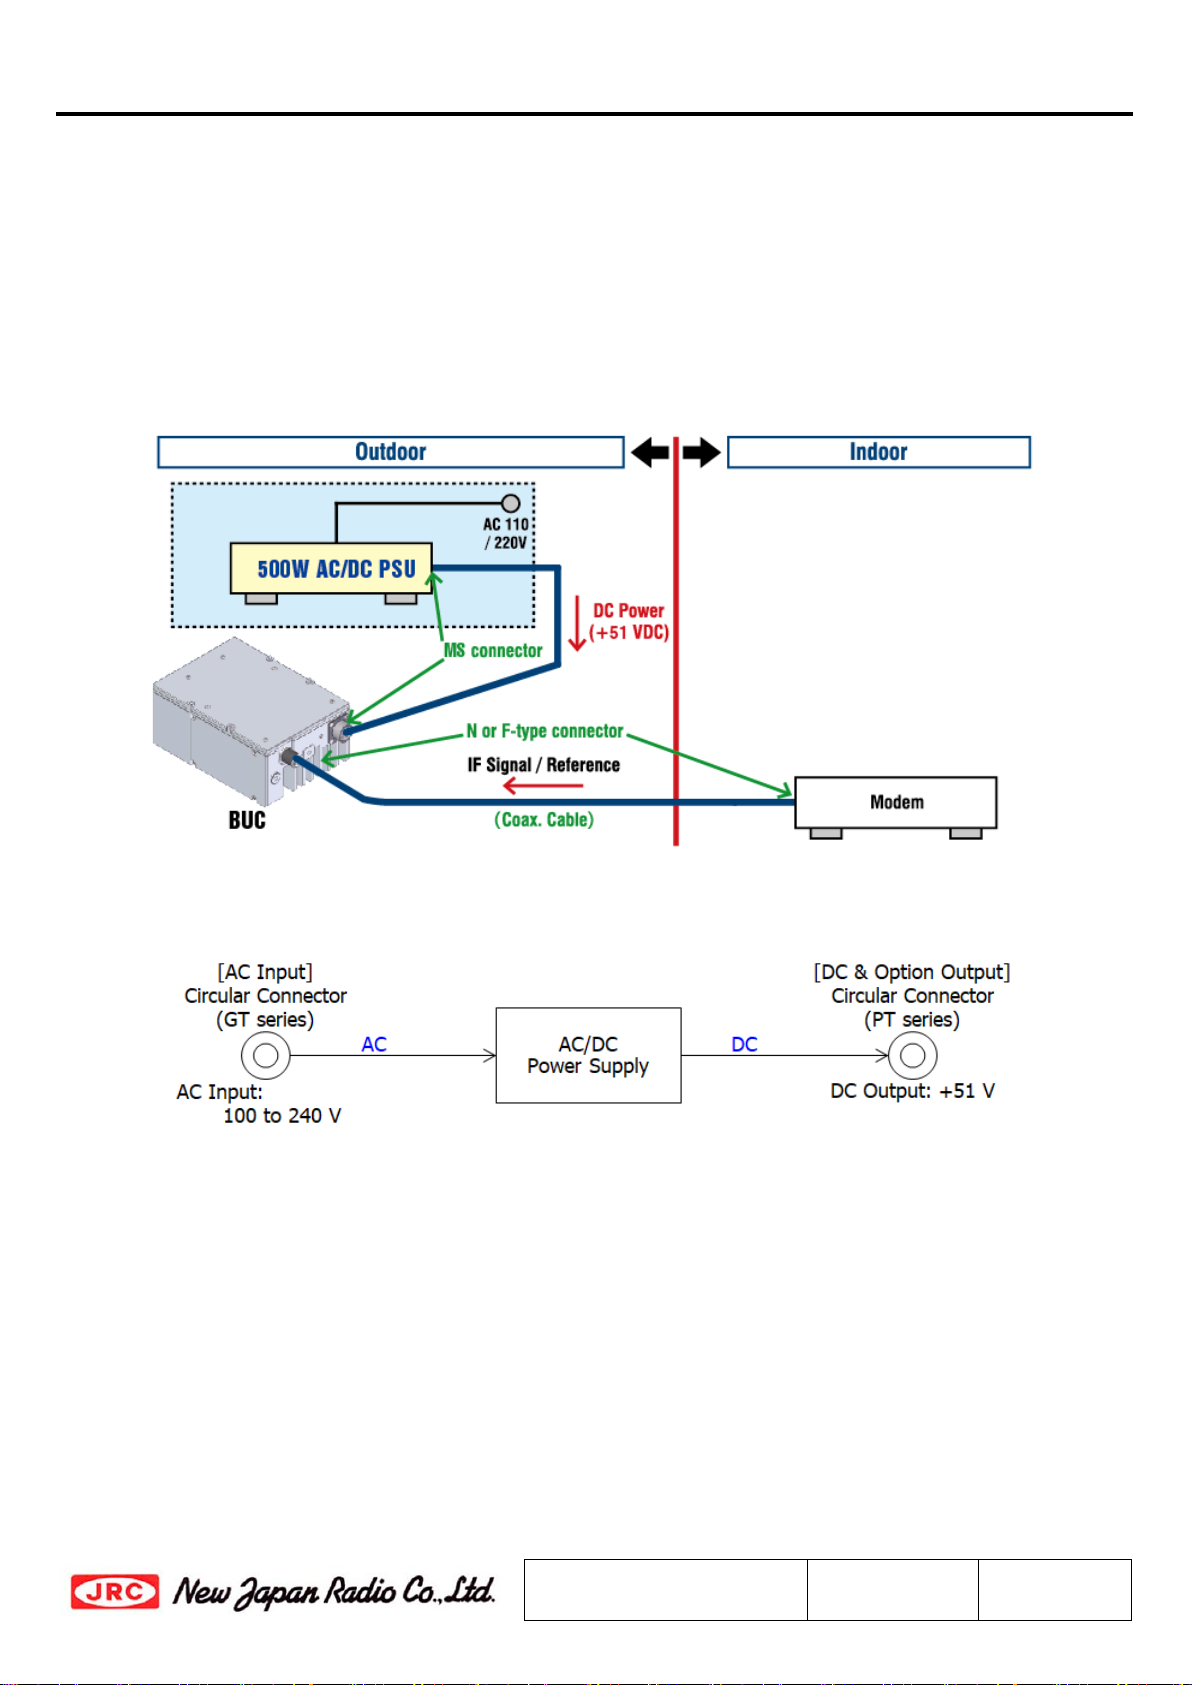
This Power Supply Unit(PSU) is intended for the satellite communication data uplink application in
C-band and Ku-band.
The features of the PSU are to provide the stable +51V DC power with up to 500W capacity to use the
high power BUCs of DC power operation. The unit employs the aluminum housing with corrosion-proof
treatment on the surface and has waterproof and dust-proof constructor in order to use perfectly as the
outdoor unit.
In addition the PSU complies with EC DIRECTIVE.
Fig.1 Connection Block Diagram
Fig.2 Functional Block Diagram

NJZ1295
*Above specifications are subject to change without notice.
Reference No.:
DS-Z1295
Rev.:
02E
Sheet:
5
1. Electrical Specifications
#
Items
Specifications
1.1.
Input AC Voltage Range
[Rated Range]
[Absolute Maximum Rating]
100 to 240 VAC
90 to 264 VAC
1.2.
Input AC Frequency Range 6 A max. @ 110 V Input
3 A max. @ 230 V Input
1.3.
Input AC Current
+51 VDC +/- 3 V
1.4.
Output Voltage 9.8 A max. (Output: +51 V / 500 W Load)
@110 V / 230 V Input
*Note 1
1.5.
Output Current 500 W at 110 V / 230 V Input
*Note 1
1.6.
Efficiency 85 % typ. @ 110 V Input & 500 W Load
88 % typ. @ 230 V Input & 500 W Load
*Note 2
1.7.
Maximum Output Power 0.96 typ. @ 110 V Input & 500 W Load
0.93 typ. @ 230 V Input & 500 W Load
*Note 2
1.8.
Power Factor 6 A max. @ 110 V Input
3 A max. @ 230 V Input
*Note1: The detail refers to a graph of the output power derating curve in below.
*Note2: The condition is 110 and 230 VAC as AC voltage input and no fan rotation.

NJZ1295
*Above specifications are subject to change without notice.
Reference No.:
DS-Z1295
Rev.:
02E
Sheet:
6
2. Mechanical Specifications
#
Items
Specifications
2.1.
Input Interface
[AC Input]
Unit Connector: GTS030-16-10P (025)
Mating Connector: GTS06CF-16-10S (025)
[Amphenol GT Connector]
Assignment:
2.2.
Output Interface
[DC Output]
Unit Connector: PT02E-12-3P (025)
Mating Connector: PT06E-12-3S (470)
[Amphenol PT Connector]
Assignment:
2.3.
Dimension & Housing
without Interface Connectors and Screws
250 (L) x 191 (W) x 118.1 (H) mm
[9.84” (L) x 7.52” (W) x 4.65” (H)]
2.4.
Weight 5.0 kg
[11 lbs.]
2.5.
Surface Finish
[Protective & Conformal Coating]
[Finish Paint]
Trivalent Chromate Treatment
Acrylic Paint, Ivory Color
2.6.
Cooling
Forced-air-cooled

NJZ1295
*Above specifications are subject to change without notice.
Reference No.:
DS-Z1295
Rev.:
02E
Sheet:
7
3. Environmental Specifications
#
Items
Specifications
3.1.
Temperature Range (Ambient)
[Operating]
[Storage]
-40 to +60 ºC
-40 to +75 ºC
3.2.
Humidity
0 to 100 %Rh
3.3.
Altitude
15,000 feet (4,572 m)
3.4.
Vibration (Survival) 3.2 G [31.3 m/s2] (3 axis, 10 Hz to 1 kHz)
1 mm p-p (3 axis, 5 to 50 Hz)
3.5.
Shock (Survival)
30 G [294.2 m/s
2
] (3 axis)
3.6.
Dust/Waterproof
(IP Code Rating)
IP67*Note 3
3.7.
Regulations EU Directive (CE Marking)
EMC - 2014/30/EU
Low Voltage - 2014/35/EU
RoHS - 2011/65/EU + (EU)2015/863
3.8.
Compliance Standard
[Safety]
[EMC]
IEC60950-1:2005+A1:2009+A2:2013
EN60950-1:2006+A11:2009+A1:2011+A12
:2012+A2:2013
Category and Group:
Overvoltage Category: II
Pollution Degree: 1
Material Group: IIIab
EN61000-3-2 (Harmonic Current Emission Test)
EN61000-3-3 (Voltage Fluctuations and Flicker Test)
EN61000-4-2 (ESD Test)
EN61000-4-3
(Radio-Frequency Electromagnetic Field Test)
EN61000-4-4 (Electrical Fast Transient/Burst Test)
EN61000-4-5 (Surge Test)
EN61000-4-6
(Conducted Disturbance Radio-Frequency Test)
EN61000-4-8 (Power Frequency Magnetic Field Test)
EN61000-4-11 (Voltage Dips and Interruptions Test)
EN55032-B (Disturbance Voltage Test)
3.9.
MTBF
(by Method of Parts Count Reliability
Prediction)
100,000 hours and more at +60 ºC
as Design Condition
*Note3: Conditioned on connection with all of enclosed mating connectors.

NJZ1295
*Above specifications are subject to change without notice.
Reference No.:
DS-Z1295
Rev.:
02E
Sheet:
8
4. Outline Drawing
CAUTION
Items
Description
Hot Surface Whole of body and heat sink is hot when this unit is powered, and even after power is
disconnected until it is cooled down.
Do not touch hot surface to avoid a burn hazard.
Waterproof Install all of mating connectors correctly and securely.
Do seal all of cable connection points from the connector to the cable sheath by usage
of self-amalgamating tape.
Fan Rotation Do not insert finger into the fan in every case and time to avoid injury also do not insert
any objects into the fan.
Keep any objects away from the fan. Incorrect usage may cause injury to self or others.

NJZ1295
*Above specifications are subject to change without notice.
Reference No.:
DS-Z1295
Rev.:
02E
Sheet:
11
6.2. Enclosed Accessories
Circular Connector, Qty (1), Mating Connector for AC Input,
GTS06CF-16-10S (025) [Amphenol GT Connector]
Circular Connector, Qty (1), Mating Connector for DC Output,
PT06E-12-3S (470) [Amphenol PT Connector]

NJZ1295
*Above specifications are subject to change without notice.
Reference No.:
DS-Z1295
Rev.:
02E
Sheet:
12
7. Handling Precautions
7.1. DANGER
This statement indicates an imminently hazardous situation which, if not avoided, will result in
death or serious injury.
Items
Description
Input Voltage Only input a AC voltage within the range indicated in specifications.
Do operate with the input voltage range between 100 and 240 V AC power with
50/60 Hz of AC frequency.
When applying higher voltage than specifications (264 V as absolute maximum
rating), it will not only cause this unit failure, but it may also result in electric
shock and fire.
Disassembling Do not disassemble the unit.
Disassembling will not only cause this unit
failure, but it may also result in
electric shock.
7.2. WARNING
This statement indicates a potentially hazardous situation which, if not avoided, could result in
death or serious injury.
Items
Description
Hot Surface Whole of body and heat sink is hot when this unit is powered, and even after
power is disconnected until it is cooled down.
Do not touch hot surface to avoid a burn hazard.
7.3. CAUTION
This statement indicates a potentially hazardous situation which, if not avoided, could result in
minor or moderate injury. The statement may also be used to indicate other unsafe practices or
risks of property damage.
Items
Description
Fan Rotation Do not insert finger into the fan in every case and time to avoid injury also do
not insert any objects into the fan.
Keep any objects away from the fan. Incorrect usage may cause injury to self or
others.
Connection DC power of +51 V voltage will output at DC output interface connector. Do not
connect the other than cable connected from the +51V operable BUC.
The connected equipment may be damaged when cable connecting modem, the
BUC other than the +51V operable BUC, or other equipment.

NJZ1295
*Above specifications are subject to change without notice.
Reference No.:
DS-Z1295
Rev.:
02E
Sheet:
13
7.4. NOTE
This statement is used to notify of installation, operation, or maintenance information that is
important, but not hazard-related.
Items
Description
Mounting Do not block airflow of this unit fan to keep the heat dispassion performance.
The install direction and space mentioned at Content 8.3.1 are recommended to
secure.
Grounding To reduce the risk of damage or broken by lightning surge, the unit should be
grounded by connecting the ground wire.
Torque
Management
Do not tighten with excessive torque when attaching screws/bolts.
The following value as tighten torque is recommended.
Screws/Bolts - M4: 1.15 to 1.4 N⋅m
Weatherproof The unit mounted in outdoor
should be conducted with adequately
weatherproof procedure.
Install all of mating connectors correctly and securely.
Do seal all of cable connection points from the connector to the cable sheath by
usage of self-amalgamating tape.
Input Voltage Do operate with the input voltage range between +100 and +240 V AC power.
Avoid applying more than the maximum voltage in this
range under any
conditions.
High
Temperature
Operation
It may cause damage and/or degradation of reliability / lifetime to operate the
unit in a condition where the ambient temperature exceeds the maximum value,
+60 °C, at operating temperature described in the specifications.
Vibration
/Shock
When vibration and/or shock impact exceeding the conditions described in the
specifications is applied, internal parts may be damaged.
Fan Maintenance The fan has its lifetime. The fan is to be replaced with a new one at appropriate
interval.
The recommendation interval of replacement is five(5) years.
Warranty The unit is covered by a warranty for one(1)
year following delivery unless
otherwise stipulated in the contract or delivery conditions.
Repairs may be possible under payment of charge even for the unit whose
warranty period has expired.
Opening, removing, disassembling and modifying any parts and components
(including the product label, sealing tape and screws)
without fan equipment
will immediately void the warranty.
In any case, the unit of invalid warranty cannot be repaired.

NJZ1295
*Above specifications are subject to change without notice.
Reference No.:
DS-Z1295
Rev.:
02E
Sheet:
14
8. Instructions Manual
8.1. Descriptions
This section describes the information of Connectors and etc.
Items
Description
Purpose
AC Input GTS030-16-10P(025)
[Amphenol / 3 pins, male]
100 to 240 V AC power input.
DC Output PT02E-12-3P(025)
[Amphenol / 3 pins, male]
DC power (+51 V nominal) is output
Chassis Ground
M4 Screw Hole
Common chassis ground / frame ground.
8.2. Basic Connection Overview
e.g.) for Ku 40W BUC: NJT8371 series
8.2.1. Connection Overview between BUC and PSU

NJZ1295
*Above specifications are subject to change without notice.
Reference No.:
DS-Z1295
Rev.:
02E
Sheet:
15
8.2.2. Connector Pin Assignment
a) DC Input at NJT8371 (Ku 40W BUC)
Unit Connector: PT02E-12-3P(025) [ Amphenol / 3 pins, male ]
Mating Connector: PT06E-12-3S(470) [ Amphenol / 3 sockets, female ]
* Mating connector is enclosed in the shipping package of NJT8371
b) M&C Input at NJT8371 (Ku 40W BUC)
Unit Connector: PT02E-14-19P(025) [ Amphenol / 19 sockets, male ]
Mating Connector: PT06E-14-19S(470) [ Amphenol / 19 pins, female ]
* Mating connector is enclosed in the shipping package of NJT8371
c) DC Output at NJZ1295 (500W AC/DC PSU)
Unit Connector: PT02E-12-3P(025) [ Amphenol / 3 pins, male ]
Mating Connector: PT06E-12-3S(470) [ Amphenol / 3 sockets, female ]
* Mating connector is enclosed in the shipping package of NJZ1295

NJZ1295
*Above specifications are subject to change without notice.
Reference No.:
DS-Z1295
Rev.:
02E
Sheet:
16
d) AC Input at NJZ1295 (500W AC/DC PSU)
Unit Connector: GTS030-16-10P(025) [ Amphenol / 3 pins, male ]
Mating Connector: GTS06CF-16-10S(025) [ Amphenol / 3 sockets, female ]
* Mating connector is enclosed in the shipping package of NJZ1295
8.3. Connection and Installation
This section describes basic installation for the PSU.
8.3.1. Setting
When installing the PSU, the following guidelines should be complied:
Check factors such as accessibility, power, signal, and cable connections and future expansion on
the installation location.
Plan for access to connector side of the PSU.
Ensure the location where the PSU operates has adequate ventilation around the fan intake and
exhaust. Ambient air temperature may not cool the PSU to acceptable operating temperatures
without adequate ventilation.
Arrange the PSU with the install direction and space in below
Available to use the mount bracket for Φ76 mast as option parts.
Install Direction and Space
The install direction and space in accordance with following are recommended to secure and to
keep the heat dispassion performance.
i) Install Direction
a) In case of “Horizontal Direction”
Cooling fan side shall be set to upward direction in below.

NJZ1295
*Above specifications are subject to change without notice.
Reference No.:
DS-Z1295
Rev.:
02E
Sheet:
17
b) In case of “Vertical Direction”
Connector side shall be set to downward direction in below.
ii) Space
More than 30mm of space at least from inlet/outlet of cooling fan must be reserved.
Do not block airflow of this unit fan to keep the heat dispassion performance.
The install direction and space mentioned are recommended to secure.
8.3.2. Connection
Two cables and one wire:
AC Power Cable
DC Power Cable between the PSU and BUC
Wire for Common Chassis Ground / Frame Ground
1) AC Power Cable
The PSU is directly powered by AC power source (100-240V). Low noise / low transient AC power
source is recommended.
The connection of AC power cable should be complied with the following steps:
Step 1: Assemble the AC power cable. Use a power cable with an outer diameter (O.D.) of 9 -
13 mm to properly assemble the mating connector (Model: GTS06CF-16-10S(025))
included in the shipment package. The connector pin assignment should be referred in
Item (d) of Section 8.2.2. The assembly method of mating connector is referred to

NJZ1295
*Above specifications are subject to change without notice.
Reference No.:
DS-Z1295
Rev.:
02E
Sheet:
18
appendix. The appropriate three-plug terminal should be selected according to the
outlet shape to be used, and assembled to the power cable at the opposite side of the
mating connector.
It is available to purchase the AC power cable of P/N: NJZ1290A03 as option part.
Step 2: Connect the mating connector (Model: GTS06CF-16-10S(025)) of the AC power cable
to the connector of AC Input of the PSU correctly and securely. And for to harden the
waterproof structure it is recommended that a cable connection point from the
connector to the cable sheath is sealed by usage of self-amalgamating tape.
Do not connect the AC power cable to the AC outlet before all of other connection steps.
2) DC Power Cable between the PSU and BUC
The PSU supplies +51V DC power to BUC though this connection cable.
The connection of the DC power cable between the PSU and BUC should be complied with the
following steps:
Step 1: Assemble the DC power cable. Use a power cable with an outer diameter (O.D.) of
10.9 mm. The cable length should refer to Section 8.3.4, and for the decision of cable
length it is needed to consider the voltage drop due to the conductor resistance of the
wires. Properly assemble the mating connector (Model: PT06E-12-3S(470)) included in
the shipment package of the PSU to the power cable. Properly assemble the mating
connector (Model: PT06E-12-3S(470)) included in the shipment package of the BUC to
opposite side of the aforementioned power cable. The pin assignment of connectors
should be referred in Item (a) and (c) of Section 8.2. The assembly method of mating
connector is referred to appendix.
It is available to purchase the DC power cable of P/N: NJZ1290A04 as option part.
Step 2: Connect the appropriate mating connector (Model: PT06E-12-3S(470)) of the DC
power cable to the connector of DC Output at the PSU correctly and se c u re l y. And for to
harden the waterproof structure it is recommended that a cable connection point from
the connector to the cable sheath is sealed by usage of self-amalgamating tape.
Step 3: Connect the appropriate mating connector (Model: PT06E-12-3S(470)) of the DC
power cable to the connector of DC Input at the BUC correctly and securely. And for to

NJZ1295
*Above specifications are subject to change without notice.
Reference No.:
DS-Z1295
Rev.:
02E
Sheet:
19
harden the waterproof structure it is recommended that a cable connection point from
the connector to the cable sheath is sealed by usage of self-amalgamating tape.
3) Wire for Common Chassis Ground / Frame Ground
The PSU can be had the chassis ground of the other equipment (e.g. modem) in common.
Connecting wire for common chassis ground from the chassis ground of the other equipment
should be complied with the following step:
Tools Required: #2 Phillips screwdriver
Step: Connect the wire from ground on the other equipment to the ground hole with M4 x 8
mm Philips pan head screw.
DC power of +51 V will output at DC output interface connector. Do not connect the other than
cable connected from the +51V operable BUC. The connected equipment may be damaged
when cable connecting modem, the BUC other than the +51V operable BUC
, or other
equipment.
Do not connect the AC power cable to the AC outlet before all of other connection steps.
To reduce the risk of damage or broken by lightning surge, the unit should be
grounded by
connecting the ground wire.

NJZ1295
*Above specifications are subject to change without notice.
Reference No.:
DS-Z1295
Rev.:
02E
Sheet:
20
Do operate with the input voltage range between +100 and +240 V AC power. Avoid applying
more than the maximum voltage in this range under any conditions.
Do seal all of cable connection points from the connector to the cable sheath by
usage of
self-amalgamating tape for to harden the waterproof structure
8.3.3. Start-up
Start-up will be immediately performed with the following step:
Step: Connect the AC power cable to the AC outlet
8.3.4. Recommendation Cable between PSU to BUC
Type and length of the signal cable from the PSU to BUC need to be chosen to satisfy that the PSU
output less than 500 W DC power, and an input voltage of BUC is more than input minimum voltage
such as 36 V.
The chart for total resistance* and maximum length is referred in below.
BUC Model
DC Power Requirement
of BUC
Total
Resistance
Maximum Length
Minimum
Input
Voltage
Maximum
Power
Consumption
0.5 SQ
Wire
Cable
0.75 SQ
Wire
Cable
1.25 SQ
Wire
Cable
NJT8371 series
+36 V
290 W
1.8 Ω
---
34 m
56 m
(*Note: Total resistance means sum number of both prime wire and return wire resistance.)
8.4. Maintenance
This section describes basic maintenance for the PSU.
8.4.1. Dust Removal
Regular dusting / dust removal will ensure the PSU to operate within operational specification.
Use a slightly damp cloth with excess moisture wringed out (not saturated, wet or dripping cloth)
to wipe away the dust that collects on the outside of the enclosure
A high, dusty environment will require frequent maintenance of vacuuming the dust off the
enclosure vents and circuit board.
8.4.2. Fan Field Replacement
The PSU requires to flow forced-air by the installed fan on rear panel for cooling.
It is recommended that the fan is to be replaced with a new one at five years interval.
The fan has its lifetime. The fan is to be replaced with a new one at appropriate interval. The
recommendation interval of replacement is 5 years.
This manual suits for next models
1
Table of contents
Other New Japan Radio Power Supply manuals
Popular Power Supply manuals by other brands

Circuit Specialists
Circuit Specialists CSI530S user manual

Texas Instruments
Texas Instruments TIDA-050034 Design guide

StarTech.com
StarTech.com ATXPOW300PRO Instruction guide

Wiesenfield
Wiesenfield WIE-EF-200 user manual

Low Noise Factory
Low Noise Factory LNF-PBA manual

Plantronics
Plantronics EU POWER SUPPLIES Declaration of conformity

Siemens
Siemens SITOP PSU8200 24 V/20 A user manual

Manson Engineering Industrial
Manson Engineering Industrial SPA-8230 user manual

LEF
LEF LE20DP user guide

AMC
AMC SPS200 Instructions for installation and operation

Thermaltake
Thermaltake Toughpower Grand 1200W user manual

Vimar
Vimar Eikon quick start guide