New Life Radiology DIGISMILE User manual

I
DIGISMILE
Digital Intraoral Scanner System

II
Manual Information Code: 11.029.0023-00
Version: V1.0
Copyright © New Life Radiology SRL. - 2021
This manual is only applicable to DIGISMILE digital intraoral
scanner system.
Declaration
This manual is a reference material for the operation, maintenance
and repair of the product. The user must use the product in strict
accordance with the manual. NEW LIFE RADIOLOGY assumes no
legal responsibility for any breakdowns or accidents caused by non-
compliance with this manual.
The copyright in any part of this manual is owned by NEW LIFE
RADIOLOGY. Without our prior written permission, no one may
copy, reprint, or translate it into any other language.
This manual contains proprietary information protected by copyright
laws, including but not limited to technical secrets, patent information
and other trade secrets. Users will be required to maintain
confidentiality and not to disclose any part of this manual to third
parties.
User access to this manual does not constitute our license to the
intellectual property rights of the product. The rights to modify, update
and interpret this manual are owned by NEW LIFE RADIOLOGY.
Responsibility of the manufacturer
NEW LIFE RADIOLOGY will be responsible for the safety, reliability
and performance of the product only on condition that: the assembly,
operation, expansion, regulation, improvement and repair and
maintenance of the product are carried out by persons authorized by
NEW LIFE RADIOLOGY; The electrical environment in the room
where the product is installed meets the related national standards
and the instrument is used in accordance with the instructions given
here. NEW LIFE RADIOLOGY, upon your request, will provide the
circuit diagram for a fee and other information to assist your technical
staff in repairing parts of the instrument which are classified by NEW
LIFE RADIOLOGY as serviceable for users.

III
Manual Application
This manual describes functions and operations of the digital
intraoral scanner system.
Readers
This manual is intended for clinic staff and other authorized users.
Legend and designation
Any legend provided in this manual is used for illustrative and
descriptive purposes only. Any legend and designation given as an
example in this manual is virtual and any similarity is coincidence.
Terminology
Warning
• Indicates operations or circumstances that can cause
personal injury or death.
Attention
Indicates operations or circumstances that can cause
equipment damage, data errors, or process errors.
Note
• Indicates any important information to understand.

IV
Contents
Chapter 1 Safety Guide….……………………. .…………...…..….. 1
1.1 Intended purpose….……………………. .……………....…….….1
1.2 Contraindications….……………………. .……………...….……. 1
1.3 Equipment….……………………. .……..……………….……….. 1
1.4 Operating conditions….……………………. .…………..…..…... 1
1.5 Warnings and notes….……………………. .…………..…..……. 2
1.5.1 Safety Notice….………………. .……………….…….……3
1.5.2 Warning….……………………. .………………...…………4
1.5.3 Note….……………………. .……....…….………..………..4
1.6 Description of symbols….……………………. ………....………..5
Chapter 2 Product Overview….…………………………...…. .…... 7
2.1 Product overview….……………………. .………………..……….7
Chapter 3 Installation and Connection….…………….…………...8
3.1 Device installation….……………….……. .…………….…..…… 8
3.2 Installation of the Euclide software……………….…………9
3.3 Computer….……………………. .……..…………..….……. 9
Chapter 4 Device Operation Guide….…………………..……….. 10
4.1 Installing and heating a scan tip….…………………….………. 10
4.2 Scanning….……………………. .……..…….…………...……... 11
4.2.1 Unilateral scanning….……………………….……. .…… 11
4.2.2 Bilateral scanning….………………………….…. .……...13
Chapter 5 Euclide Software Operation Guide…………..……… 16
5.1 Overview….……………………….…. .……..…………….….…. 16
5.1.1 System functions….……………. .……………...…….….16
5.1.2 Operating condition….………………………….…. .……16
5.2 Basic Exam Operations….……………………. ..…………….…17
5.2.1 Access to the system….…...………………. .…………...17
5.3 Software operations….……………………. .……..…………..…18
5.3.1 Access to Euclide software….………………………...….18

V
5.3.2 Adding patient information….……………………..…….. 18
5.3.3 Adding New Cases..……………. .……………...…….….20
5.3.4 Choice of indications….…………………………..…. .….20
5.3.5 Scanning….……………………. .……..…………...….….22
5.3.6 Editing Images….……………………. .…………..…..… 25
5.3.7 Deleting images….……………………. .………….…..…26
5.3.8 HD Photos….……………………. .……………….………26
5.3.9 Image Editing….……………………. .……………....…...28
5.3.10 Sending an order….…………………………….. .……. 32
5.4 System configuration….……………………………… .……..….33
5.4.1 User management….……………….……..……. .……...33
5.4.2 System settings….…………………….…….... .……..….34
5.5 Closing the software….……………………. ………...……..…...35
Chapter 6 Cleaning….……………………. .……………...…..…… 36
6.1 Cleaning the device….……………………. ………...……..…... 36
6.2 Changing and sterilizing the scanning tips………….………… 37
6.2.1 Methods for sterilizing the scan tip…………..…………..37
6.3 Maintenance….……………………. .……..…………...….……..38
6.3.1 Device maintenance….……………………….……. .….. 38
6.3.2 Computer data protection….……………………………. 38
Chapter 7 Accessories….……………………. .……..………….…39
Chapter 8 Troubleshooting….……………………. .…………….. 40
Chapter 9 Specifications and Parameters….………………..….41
Chapter 10 After Sales Service….……………………. ………..…42
Appendix 1 Manufacturer Information….……………………...…43

1
Chapter 1 Safety Guide
This section presents important safety information on the operation
of the product.
1.1 Intended purpose
This product can be used in medical institutions to perform oral
scanning, images of teeth and other tissues, making a 3D digital
model for CAD/CAM for prosthetic design and processing, which can
be used for restoration system and other applications.
1.2 Contraindications
This product should be used with caution in the presence of patients
with moderately or severely limited mouth.
1.3 Equipment
This product consists of a handpiece, tip, holder, power supply and
its Euclide software.
1.4 Operating conditions
Environmental conditions :
a) Ambient temperature: 10 ℃ ~ 30 ℃.
b) Relative humidity: <80%. Atmospheric pressure: 70kPa ~
110kPa.
A computer system (including monitor) that meets the requirements.
Item Recommended Minimum
CPU Intel i7-7700HQ,
Quad core CPU, 2.8
GHz
Intel i7-4700QM,
Quad core CPU, 2.4 GHz
RAM 16 GB RAM 16 GB RAM
Monitor
Standard CRT / LCD
with screen resolution
of 1920 x 1080
Standard CRT / LCD with
screen resolution of 1440
x 900
Operating
system
Windows 10
Professional (64-bit)
Windows 10 Professional
(64-bit)

2
Video Card
NVIDIA GeForce
GTX 1050 Ti
NVIDIA GeForce GTX
960M
USB port
USB 3.0 high speed
port
USB 3.0 high speed port
Table 1-1 Computer Configuration
1.5 Warnings and Notes
For safe and effective use of the system and to avoid system failures,
the user should first be familiar with the operations in the Windows
system, read this manual carefully and be familiar with the Euclide
Software and its applications. Users should pay particular attention
to the following warnings and precautions during operation.
Note
The System is not suitable for home use.
The images and screenshots provided in this manual are for
reference only.
1.5.1 Safety warning
Warning
Indicates operations or circumstances that can cause
personal injury or death.
Failure to operate the instrument and system in accordance
with the safety instructions can endanger the operator. The
manufacturer assumes no liability for any injury resulting
from improper operation.
The system must be installed by a qualified technician.
Before using this system, the user must be professionally
trained and carefully read this manual.
This system must not be used for treatment.
This system must not be used for family purposes.
Diagnosis and examination with this system should be
combined with clinical patient research and the diagnostic
result should be used as a reference for the physician only.
Explosion Hazard: This equipment should not be used in

3
environments exposed to a mixture of flammable anesthetic
gases and air or oxygen or nitrous oxygen.
This system is not equipped with a waterproof device and
therefore should not be used in places exposed to moisture
or water.
Do not spray liquids on or inside this equipment, otherwise
there is a risk of electric shock.
Do not spray any detergent on the product, in order to avoid
damage to the electronics and internal components by
organic solvents.
In the event of a fault, shut down the equipment immediately
and contact us or our authorized representative.
Risk of electric shock - Do not touch the power component
with wet hands. Be sure to touch the power cord with clean
and dry hands.
Make sure to use any non-medical device (eg external
printer) at least 1.5m away from the patient.
This system can only be connected to accessories supplied
or recommended by the manufacturer.
Pay attention and prevent any ESD and EMI of any other
instrument.
Using this instrument near any strong EMI source, such as
surgical electrical equipment or magnetic resonance
imaging, can cause adverse effects.
1.5.2 Attention
Caution
Before using this product, the user must inspect the main
unit and any accessories to avoid any damage that could
endanger the operator or compromise the performance of
the instrument. It is recommended to inspect the equipment
weekly or more frequently. If there is any obvious damage,
replace the damaged part before using this product.
In case the power cord is missing, damaged or unavailable,
choose an alternative power cord that meets the original
specifications and local codes.

4
Any device or accessory used must be disposed of in
accordance with local laws and regulations or returned to the
manufacturer or dealer for proper disposal.
Select a power cord with adequate rating to minimize the
risk.
No part of the system is user manageable, so any
maintenance must be done by our service personnel.
1.5.3 Note
Note
To avoid damage to the system, do not use the product in the
following environment:
Exposed to direct sunlight;
Exposed to strong temperature variations;
Exposed to dense dust;
Exposed to high humidity.
1.6 Description of symbols
Note
Refer to the operation manual
Recyclable
Part number
Serial number
Date of production

5
Information about the
manufacturer
This side up
Fragile
Protect from the rain
Maximum storage levels
Temperature limits
Relative humidity limit (non-
condensing)
Atmospheric pressure limit

6
Scan Tip
Chapter 2 Product overview
2.1 Product overview
The device is designed to acquire 3D images in the following ways:
Lower jaw
Upper jaw
Occlusal relation
The image below shows the main components of the device.
Scan tip: is reusable and must be cleaned and sterilized
before use.
Power Button: Long press the button to turn on/off the
device.
Scan Button: Press the button to start/pause scanning; long
press to stop scanning.
Holder: Place the device on the holder when not in use.
Scan Button
Power Button
Handpiece
Holder

7
Chapter 3 Installation and Connection
Chapter 5 Euclide Software Operation Guide
5.1 Overview
Euclide is the software of the NEW LIFE RADIOLOGY Digital
Intraoral Scanner. It contains three modules, including case creation,
scanning and image editing. Helps to acquire intraoral scan data in
"restorations", "orthodontics" and "implants".
5.1.1 System functions
Euclid consists of three modules, each with its specific functions.
Case creation form: add patients, dentists, indications and
processing scheme. And above all about focusing on and
managing patient information.
Scanning Module: Activate the camera to collect intraoral
data such as maxilla, mandible and occlusal relation.
Image Editing Module: Edit the scanned image, convert data
to STL / PLY format for archiving or sending and exporting
video.
5.1.2 Operating conditions
Please refer to Table1-1 for more details
5.2 Basic exams
This section mainly describes how to examine a patient with Euclide.
Make sure the device is well connected to the computer and adapter
before proceeding to the basic exams.
5.2.1 Logging in
Note
Before turning on the computer, make sure that the device is turned
on and well connected to the computer.
Press the power button on the computer to display the startup
information on the monitor. A few minutes later, the computer turns
on.
When the computer turns on, the login window appears. Enter a
correct username and password for login. (For various system
settings, the password may not be required to log in.)

8
5.3 Software operations
5.3.1 Access to Euclide software
1. Double-click Euclide's shortcut icons on your computer desktop to
open it and access the login screen, as shown below
2. Choose an account to access the main software screen
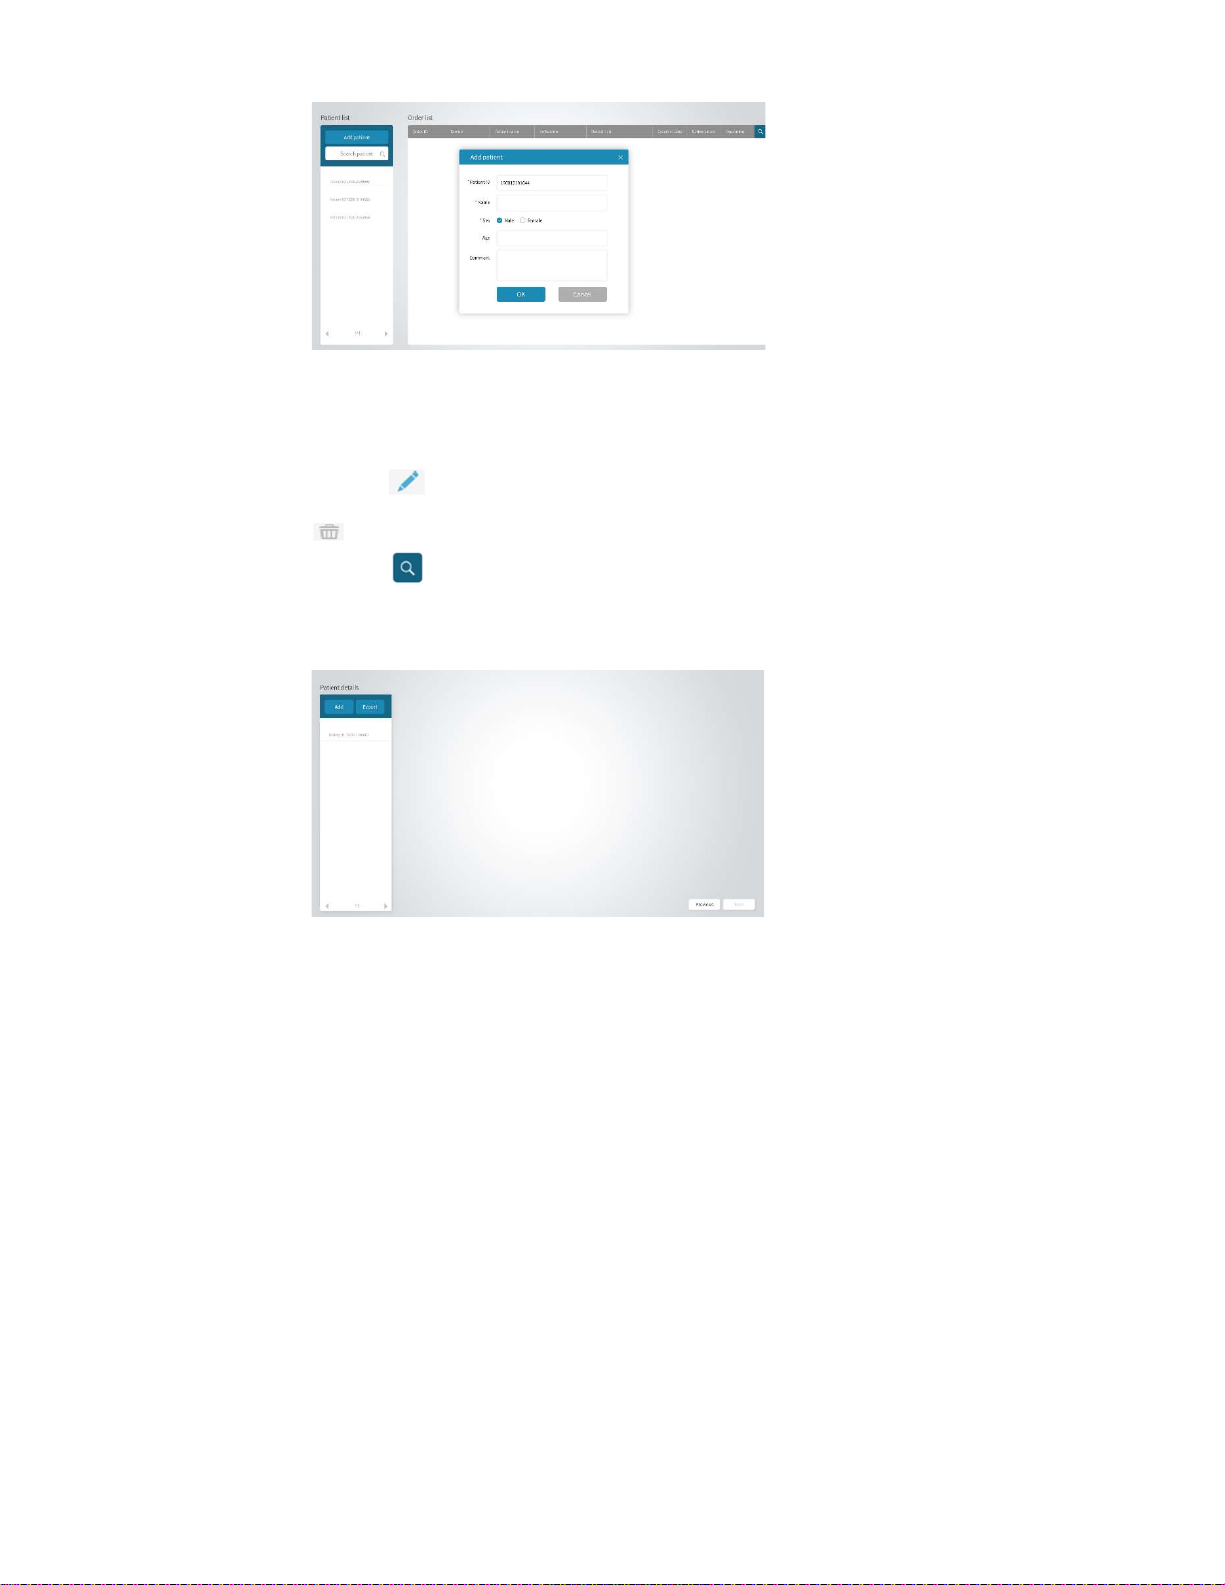
5.3.2 Adding Patient Information
1. Select Add Patient on the home screen to display a window as
below.
9
2. Add Patient ID, Name, Gender, Age and Annotations in the
window and click OK to add a new patient.
Note: Patient ID, Name and Genders are required fields.
3. The patient's name will be displayed in the patient list
4. Click on the right side of the patient name to edit patient
information again and click O K to confirm the information; or click
> OK to delete the patient.
5. Click up in the upper right corner of the screen to enter
keywords to search for in the patient list.
6. Click on a patient name in the patient list to enter the patient screen
as below.

10
5
3
5.3.3 Adding new cases
Click Add to enter the case creation screen as below.
5.3.4 Indications of choice
Indications of choice
1. Choose a dental laboratory and a delivery date.
2. Choose the desired exam items from the Patient Indication List.
Indications Items for exam
Restoration Complete crown, veneer, inlay/onlay,
missing teeth
Orthodontics Invisible appliance, stationary, jaw, PAN
Select the exam items from the restorations list then select the
material, color, restorations methods or bridge type accordingly.
6
1
2
4

11
3. Select the teeth that need restoration on the dentition. Information
about the process will appear on the right of the screen.
4. Click Add Special Question at the bottom of the screen, enter your
question and click OK in the pop-up dialog box. The request will be
displayed below.
5. Click Next to enter the scan screen.

12
5.3.5 Scanning
Scan Screen
N Poi Descrizione
1 Scan of the upper jaw
Scan the patient's teeth on the
upper jaw.
2 Lower jaw scan
Scan the patient's teeth on the
lower jaw.
3 Scan of occlusal relation
Scan the patient's teeth for the
occlusal relation.
4 Center
The image returns to the center of
the screen.
5 Rotate
Disable image pan and zoom,
enable image rotation.
6 PAN
Disable image rotation and zoom,
enable image panning.
7 Zoom
Disable image rotation and pan,
enable image zoom.
8 Full color
Exchange between full color and
solid color.
4
8
7
6
7
5
9 10 11
12 13 14
1 2
3

13
9 Scanning Click the icon to start scanning.
10 Preview Preview the scanned image.
11 Stop Stop scanning to get final data.
12 HD Photo Click HD photos to take oral photos.
13 Trim
Adjust the 3D image and eliminate
the extra parts.
14 Delete Delete the current image.
5.3.5.1 Scanning
Note: Since saliva on the tooth surface reflects light and
affects the accuracy of the scan, the teeth must be dry and
subjected to moisture isolation treatment prior to scanning.
Make sure the edge of the tooth is clearly exposed. If not, use a gingival
retraction cord to move the gums backward before scanning.
The scanning tip must be warmed up before scanning. Refer to Chapter 4
for details.
1. Click or in the scan screen.
Note: The image capture screen will show the upper jaw, lower jaw
and occlusal relation scan icons by default. The upper jaw
and lower jaw preset icons will only appear on the image
capture screen when they are checked in the newly added
indication screen.
2. Press the scan button on the device or click on the screen to
start scanning. A live dynamic window will appear on the
bottom right of the screen.

14
3. Let the scanning mirror of the scanning tip point towards the teeth
to be scanned. When scanning starts, the scanned image
will be displayed on the screen as below.
Note
When scanning starts, the scan icon on the screen changes to .
Click to pause scanning. If the image is incomplete, click to
continue scanning If the image is well formed, click • to stop
scanning and generate a 3D image.
You can also press the scan icon on the device to pause scanning
or long press the scan icon to stop scanning.
The scanned area will be displayed with a green frame.
4. After the scan is complete, a 3D image will be generated, as
below.

15
5. Follow steps 1-4 above to complete the scans of the upper jaw,
lower jaw, and occlusal relation.
Note
If the upper jaw scan and the lower jaw scan are performed, the
occlusal relation scan is required to proceed.
6. When the 3D image is generated, hold down the right mouse
button and drag the image to rotate it with the mouse; or hold down
the left and right mouse buttons at the same time to drag it; or scroll
the mouse wheel up and down to enlarge it accordingly.
5.3.6 Image Editing
Select at the bottom of the screen to change the image.
5.3.7 Deleting images
If the scanned image is not needed, select at the bottom of the
screen to delete it.
5.3.8 HD photos
1. Click on to complete the scan and acquire a 3D image on the
scan screen.
2. Click on at the bottom of the screen to access the photo
screen.
3. Place the scan tip on the teeth of interest. The scanned teeth will
be displayed in the central live window. Users can adjust the
brightness of the scanned image by adjusting the slider bar on the
window. Once the brightness is set, the device will keep it next scan.
Table of contents
Other New Life Radiology Medical Equipment manuals

Popular Medical Equipment manuals by other brands


Getinge
Getinge Arjohuntleigh Nimbus 3 Professional Instructions for use

Mettler Electronics
Mettler Electronics Sonicator 730 Maintenance manual

Pressalit Care
Pressalit Care R1100 Mounting instruction

Denas MS
Denas MS DENAS-T operating manual

bort medical
bort medical ActiveColor quick guide

AccuVein
AccuVein AV400 user manual


