Newbeem Smart Outlet User manual

Newbeem Smart Outlet User Manual v2.0
www.newbeem.com
Customer service: support@newbeem.com
Page1
Newbeem
SmartOutletUser
Manual
Newbeem Smart Outlet User Manual v2.0
www.newbeem.com
Customer service: support@newbeem.com
Page2
1.
Install software
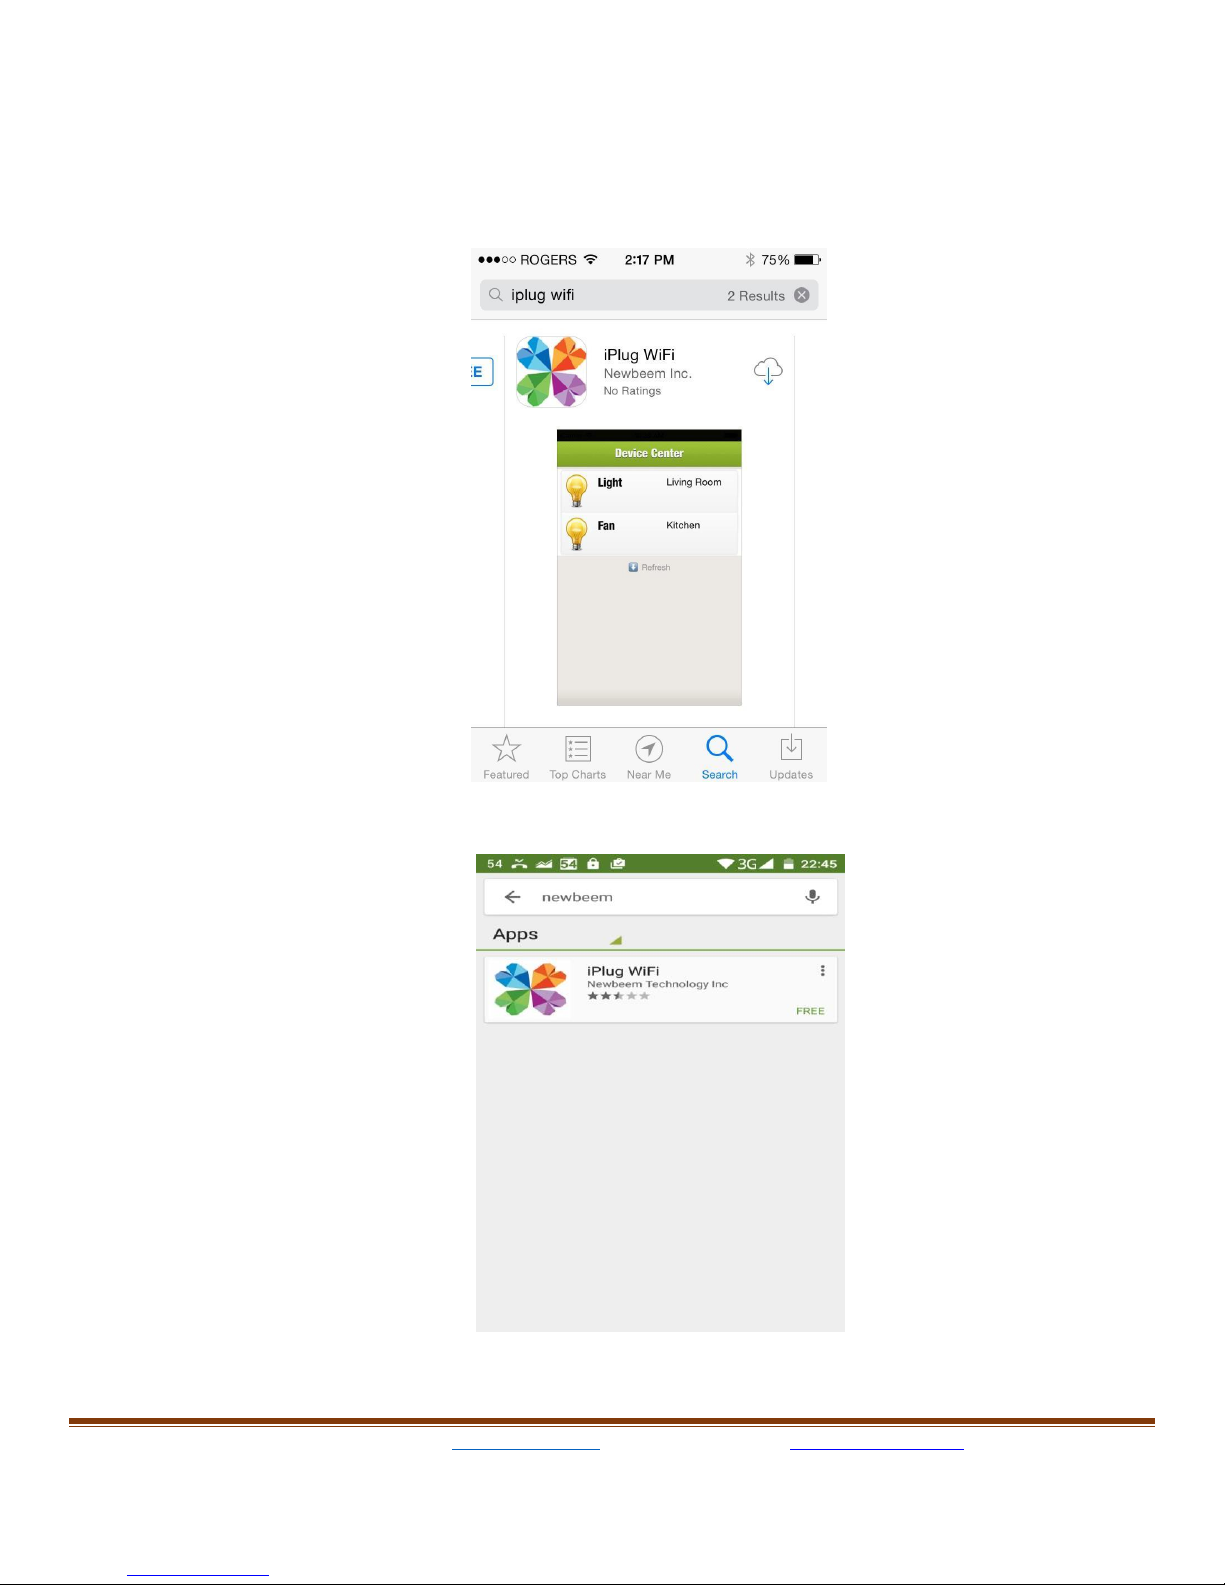
a.
ForiOSdevices,search“iPlugWi-Fi” or “newbeem” intheApple
store andinstall.
ForAndroiddevices, search “newbeem” on Google Play, and install.

Newbeem Smart Outlet User Manual v2.0
www.newbeem.com
Customer service: support@newbeem.com
Page3
2.
Install hardware
Plug smart outletintoanywalloutlet,waitfor20seconds,the userwill
see theredLEDindicatorlightturnson.IftheredLEDdoesnotturnon,
please return for replacement.
Plug in a small appliance in the Wi-Fi socket of the outlet.(with the Wi-
Fi icon below)
TheWi-Ficontrolledoutlethas a maximumpoweroutputof
200W,checkthedeviceorappliance powerratingbefore plugin,Donot
pluginadeviceoranappliance whichwillconsumemorethan200W
power.The dimmerfunctions of smartoutletwasintently designedfor
lightingsystem.
Newbeem Smart Outlet User Manual v2.0
www.newbeem.com
Customer service: support@newbeem.com
Page4
3.
Wi-Fi configuration
A.
IOSdevices:
Runthe“iPlug” appondevice,the“Device Center”pagewillshowup first.
Thiswillallowthe usertoconfigure allsmartoutletswhichhave been
pluggedin wall outlet.
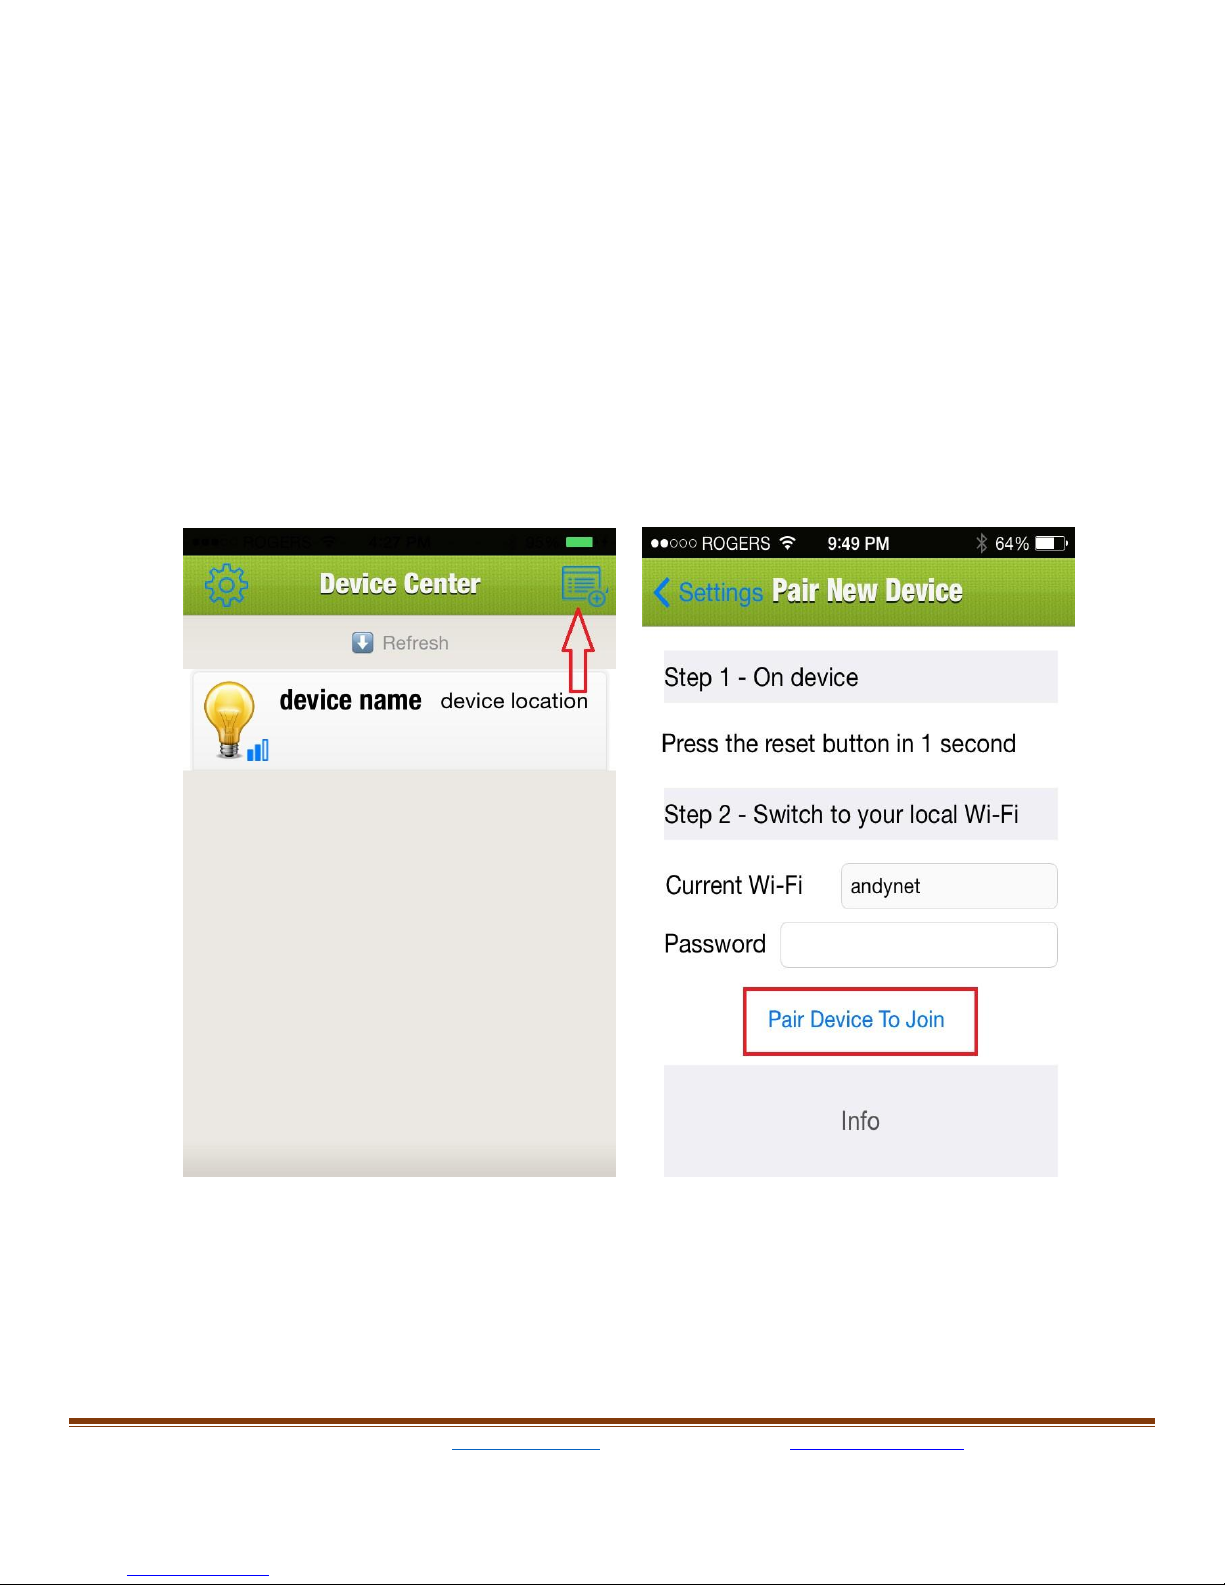
Tapthequickdeviceconfigureiconattherighttopofscreen,the“Pair
newdevice” pagewillshowup,homenetworkSSIDwillbefilledin
theWI-
FIfield automatically, type in the user’s home network password.
Push the reset button on the outlet then quickly release, the WiFi
network Led will blink slowly. If the LED is still solid and does not blink
please try again.

Newbeem Smart Outlet User Manual v2.0
www.newbeem.com
Customer service: support@newbeem.com
Page5
Go back to the App and tap the “Pair Device To Join” button, the WiFi
network LED will blink fast when the WiFi configuration is received
and it will blink faster when trying to connect the user’s WiFi network
and it will turn off when it joins the user’s WiFi network successfully.

Newbeem Smart Outlet User Manual v2.0
www.newbeem.com
Customer service: support@newbeem.com
Page6
B.
Android devices:
When the user opens the App the first time, the new device page will
show up with the instruction of connecting the user’s home WiFi
network. The user ‘s home network SSID will be filled in the WI-FI field
automatically, type in the user’s home network password.
Push the reset button on the outlet then quickly release, the WiFi
network LED will blink slowly. If the LED is still solid and does not blink
please try it again.
Go back to the App and tap the “Pair Device To Join” button, the WiFi
network LED will blink fast when the WiFi configuration is received
and it will blink faster when trying to connect the user’s WiFi network.
It will turn off when it joins the user’s WiFi network successfully.
Wait for the App to show "Pair Device Successfully."

Newbeem Smart Outlet User Manual v2.0
www.newbeem.com
Customer service: support@newbeem.com
Page7
4.
BasicOperation
Tap the device name, the “Device Setting” page will open up. Type in
the Name and Location then set the timer option. The app may
require updating if there is an update. On the top of this page, the user
can turn on/off lamp by sliding the button on the right side and can
adjust the brightness of the light by sliding the brightness bar.
Newbeem Smart Outlet User Manual v2.0
www.newbeem.com
Customer service: support@newbeem.com
Page8
5.
Set timer (Optional)
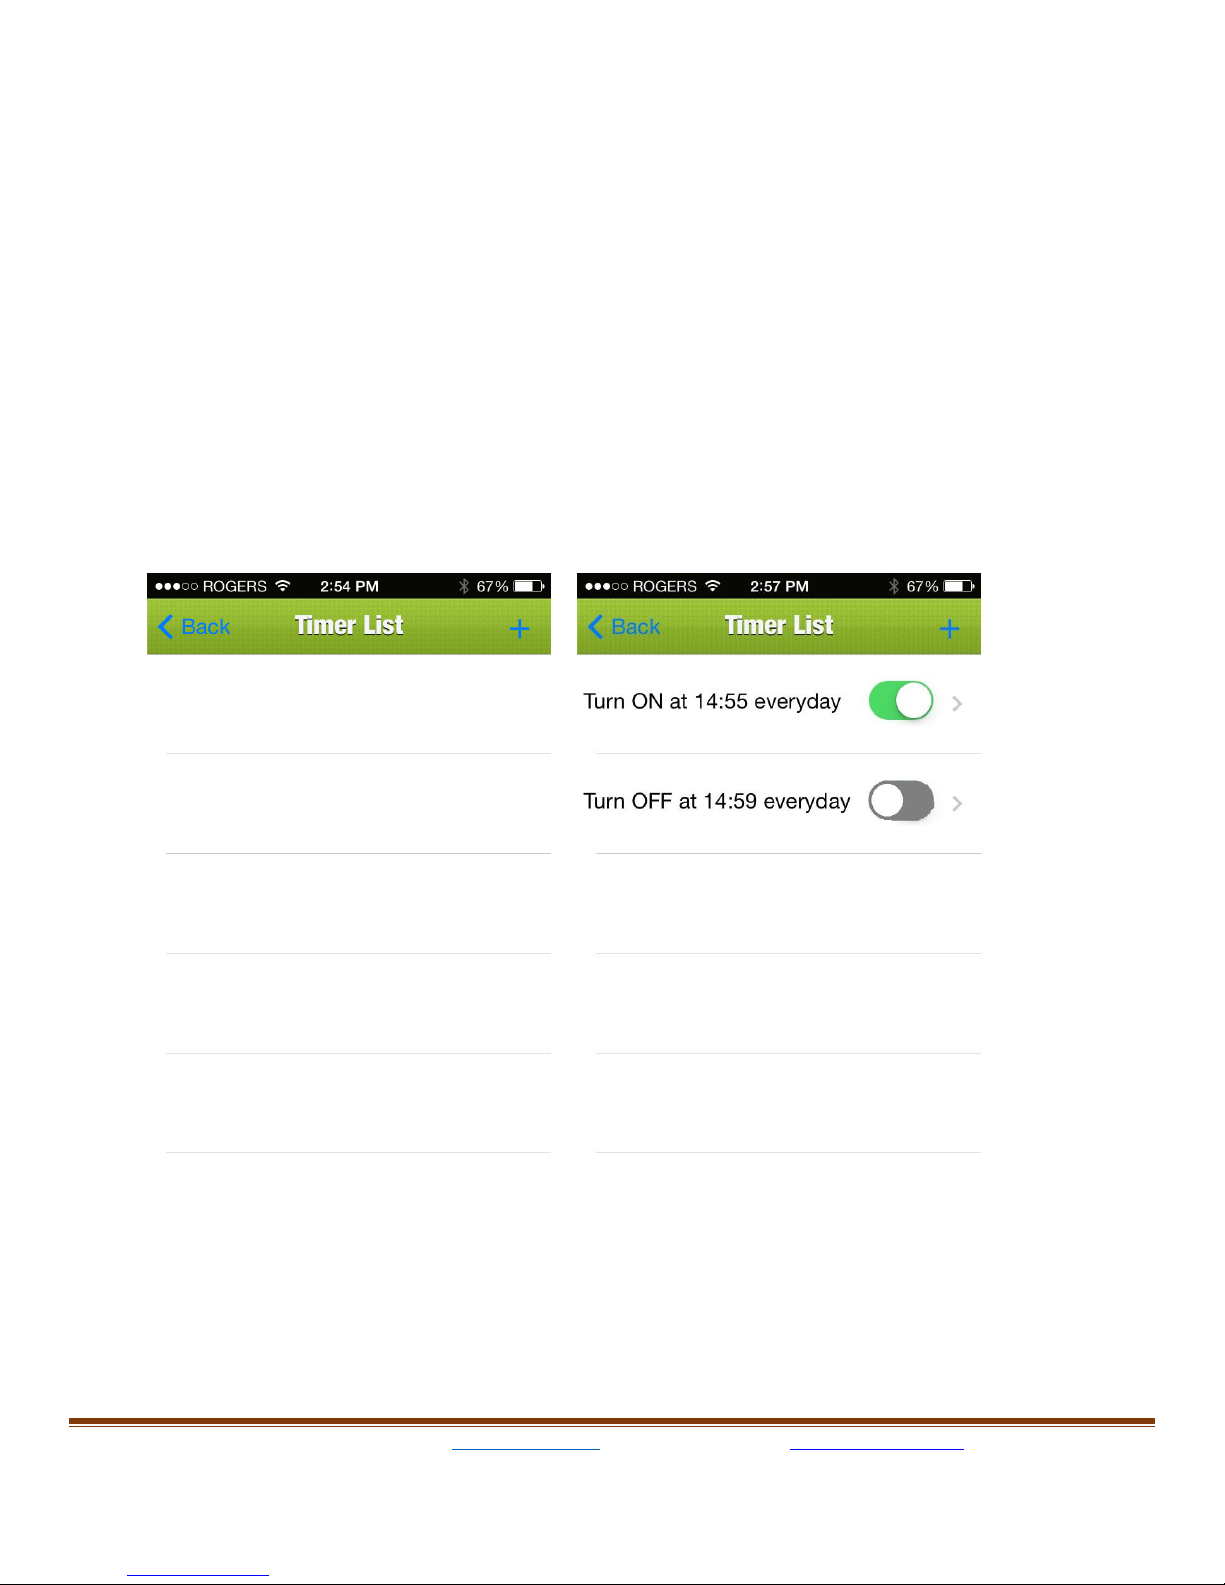
On device setting page, press “Timer” on right top of the screen (a
stopwatch icon) next to the device setting, it will show the “Timer List”
page; from there the user can add a timer by pressing “+” next to
Timer List. Once “+” is pressed, it will show another page called
“Timer”, to set the timer, just change "When" section to choose a time,
set "Turn" section to ON or OFF and brightness at that time and then
choose "Repeat" section to select the desired frequency.
Newbeem Smart Outlet User Manual v2.0
www.newbeem.com
Customer service: support@newbeem.com
Page9
6.
Remote control and Amazon Echo voice control
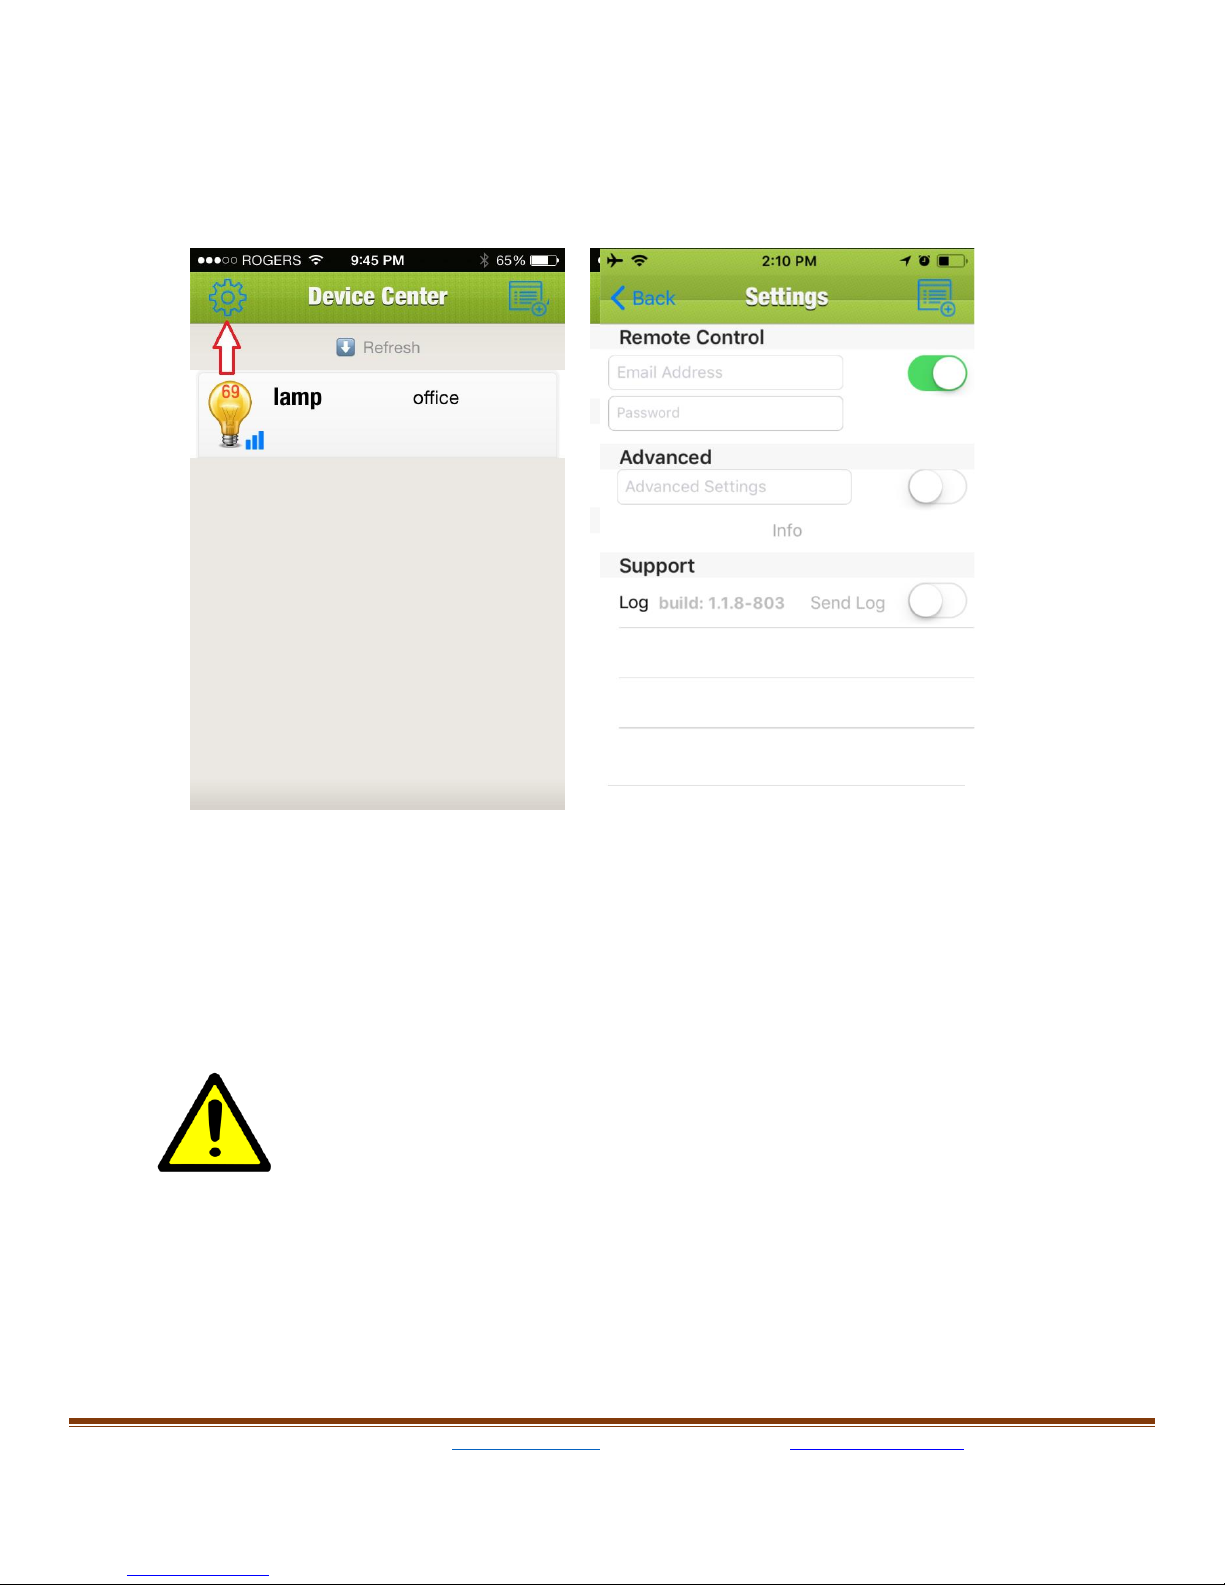
Tap the setting icon on Device Center page (teeth wheel icon), the
setting page will show up.
Type in the user email address and password then Flip the round
button in the “Remote Control" section will enable the remote control
feature.
Note that every time when a new device is added and
configured or an existing device is removed, user needs to Disable
and Enable the "Remote Control" again to update the devices to the
server.
Newbeem Smart Outlet User Manual v2.0
www.newbeem.com
Customer service: support@newbeem.com
Page10
Once the remote control feature is enabled, user can control the smart
outlet from anywhere in the world using WiFi or Cellphone network as
well as through Amazon Echo devices.
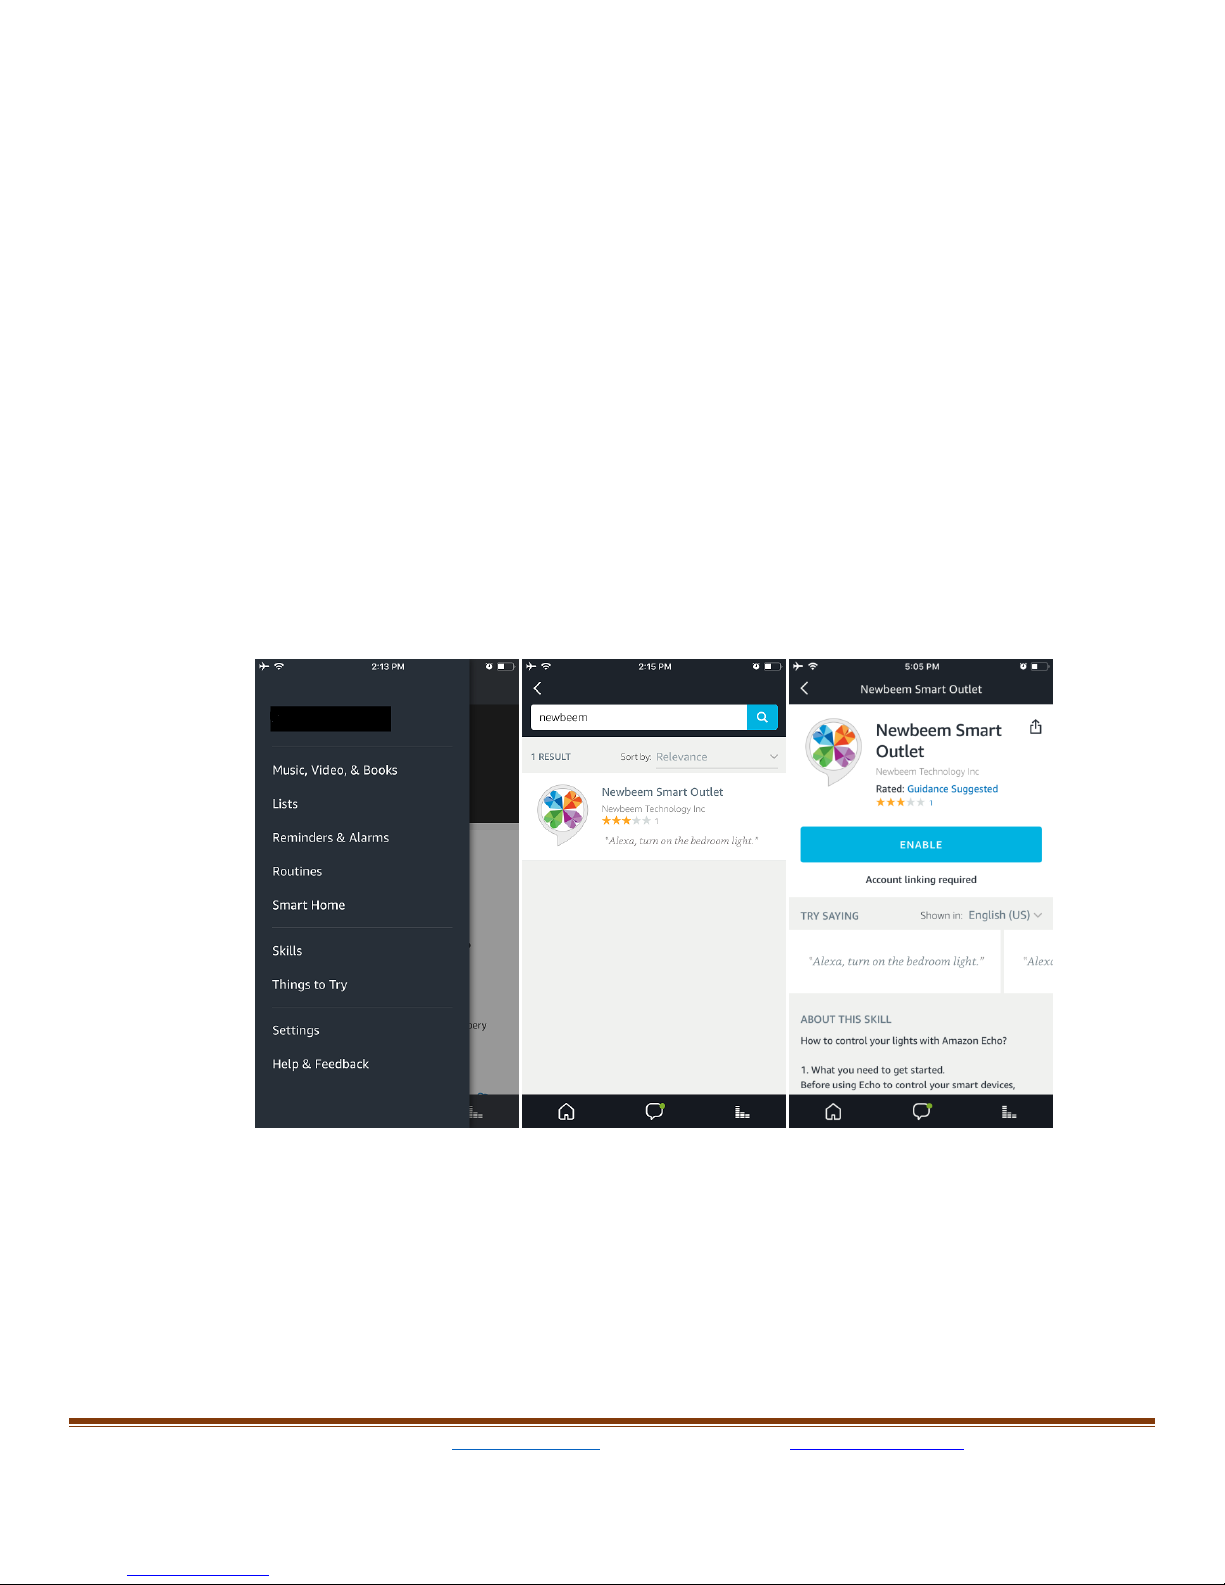
Open Amazon Alexa App and go to "Smart Home" then "Your Smart
Home Skills" then "Enable Smart Home Skills" and search for
"newbeem" and Tap the "Newbeem Smart Outlet" and then click
"Enable Skill".
On Login page, type in the same username and password used in the
"Remote Control" section in the App. After the authentication
succeeds the Alexa App will show "Newbeem Smart Outlet has been
successfully linked" message. By press "Done", the Alexa App can
now discovery the Newbeem Smart Outltet devices.

Newbeem Smart Outlet User Manual v2.0
www.newbeem.com
Customer service: support@newbeem.com
Page11
Once the discovery done, all of the available devices will show up in
the devices page and now the user can control it from voice command
like:
"Alexa, turn on the light", "Alexa, turn off the light", "Alexa, set light to
40%".

Newbeem Smart Outlet User Manual v2.0
www.newbeem.com
Customer service: support@newbeem.com
Page12
7.
Remote control and Google Home / Assistant voice control
Tap the setting icon on Device Center page (teeth wheel icon), the
setting page will show up.
Type in the user email address and password then Flip the round
button in the “Remote Control" section will enable the remote control
feature.
Note that every time when a new device is added and
configured or an existing device is removed, the user needs to Disable
and Enable the "Remote Control" again to update the devices to the
server.
Once the remote control feature is enabled, user can control the smart
outlet from anywhere in the world using WiFi or Cellphone network as
well as through Google Home devices and Google Assistant app .
Newbeem Smart Outlet User Manual v2.0
www.newbeem.com
Customer service: support@newbeem.com
Page13
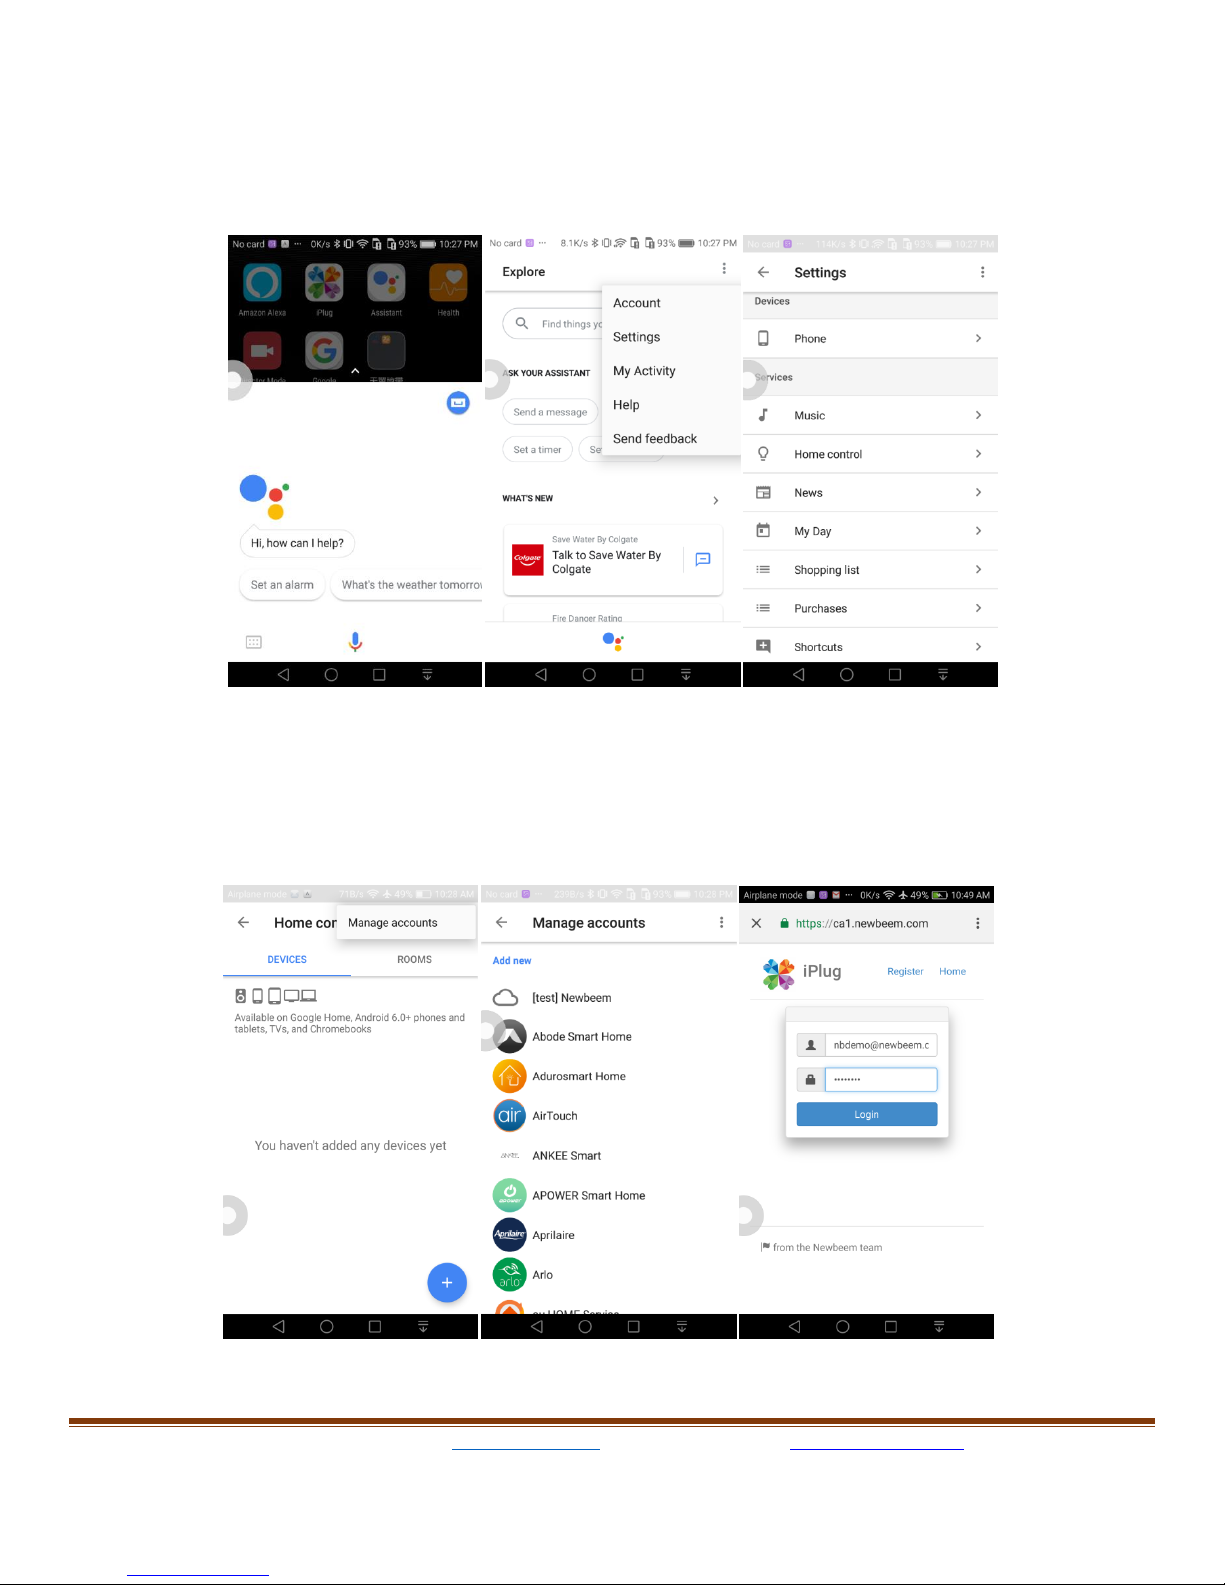
Open Google Assistant app and then click top-right corner to the
Explore page. Click top-right '3-dot' and select Settings page and then
click 'Home Control'
Click top-right '3-dots' to select Manage accounts and then choose
'Newbeem' to input the same username and password as those in
Remote Control in the iPlug app.

Newbeem Smart Outlet User Manual v2.0
www.newbeem.com
Customer service: support@newbeem.com
Page14
After the account linking successfully and room assignment and now
the user can control through Google Home devices or Google
Assistant app.

Newbeem Smart Outlet User Manual v2.0
www.newbeem.com
Customer service: support@newbeem.com
Page15
8.
Trouble shooting
If the WiFi LED keeps blinking slowly and does not change to fast
blinking after the user press "Pair Device to Join" button then it means
that the device does not receive the WiFi configuration. Please move
the device near the router and try again.
If the WiFi LED keeps blinking fast and does not turn off after the user
press "Pair Device to Join" button then it means that the device did
receive the WiFi configuration but could not connect to the WiFi.
Please make sure that the password is correct and do it again. If it is
still the same then please move the device near the router and try
again.
Once the Device joined the WiFi network then the WiFi LED will be
turned off. It will blink when it receives command from App or from
server and it should stay off most of the time.
If the smart outlet cannot be found locally after joining the local WiFi
and the WiFi LED is off then user can refresh the device center page
by scrolling down the page and the device WiFi LED will blink once it
receives queries from App.
After joining the local WiFi, the WiFi LED will be solid on in the
following cases:
1. The local WiFi is disconnected from the internet
2. The device could not connect to the server
3. The device is reset to factory default.
At above case 1 and 2, the WiFi LED will be turned off once the
connection is restored. In case 3, the user needs to do the paring
again.

Newbeem Smart Outlet User Manual v2.0
www.newbeem.com
Customer service: support@newbeem.com
Page16
Sometimes user needs to unplug the device and plug back in. The
WiFi LED should be first turned solid on and then fast blinking and
finally off. If the WiFi Led keeps solid on then please do paring again.
The first time configuration, it will take longer time for smart outlet to
connect to the user’s home network.
If the issue still exists, press the reset button on device and hold about
10 seconds then release, the WiFi LED should be solid on. Please do
paring again.
If the user’s home WiFi network name(SSID) has space or strange
characters. It will make outlet to have trouble to connect. Try to create
a WiFi with a simple name is the way to fix connection issue.
Sometimes a busy network environment, like watching a movie or
playing game on the internet will affect the communication of the
device. If such glitch is affect the normal operation then it might be a
good idea to create a dedicated WiFi network for those smart home
devices.
Finally please contact our support team for further
assistance:
support@newbeem.com

Newbeem Smart Outlet User Manual v2.0
www.newbeem.com
Customer service: support@newbeem.com
Page17
9.
Easy API
a.
Linux machine
b.
Windows machine
Other manuals for Smart Outlet
1
Popular Accessories manuals by other brands


JXCT
JXCT RS485 instruction manual

Banner
Banner L-GAGE LE250 IO-Link instruction manual

Watercool
Watercool HTSF2 series Assembly instructions

Teledyne Lecroy
Teledyne Lecroy PP019 user manual

elco
elco iNELS RFDSC-71N quick start guide

Network Technologies Incorporated
Network Technologies Incorporated E-SDS-TAA Installation instruction