Newgrind RHINO RLP800 User manual

RLP800 Users Manual
1
Equipment Uses
Concrete leveling, grinding and polishing
Terrazzo grinding and polishing
Stone grinding and polishing
Hardwood grinding, sanding and polishing
Glue, Thinset and mastic removal
Address:
103B-81 Golden Drive
Coquitlam, BC
Canada V
3K 6R2
Contact:
1-888-467-0242
sales@newgrind.com
Assembled in Canada using only the highest-quality USA components
RHINO RLP800
USER MANUAL

RLP800 Users Manual
2
Table of Contents
Equipment Uses................................................................................................................................................ 1
RLP800 Machine Diagram ...................................................................................................................................... 4
Machine Specifications ..................................................................................................................................... 5
Tooling .......................................................................................................................................................... 5
Average Production Rates............................................................................................................................. 5
Safety Instructions ............................................................................................................................................ 6
Work Area Safety .......................................................................................................................................... 6
Personal Safety ............................................................................................................................................. 6
Equipment Safety and Care .......................................................................................................................... 6
Service Safety ................................................................................................................................................ 7
Operating the Grinder ........................................................................................................................................ 8
Information about Carbon Monoxide ........................................................................................................... 8
Prior to starting the grinder .......................................................................................................................... 9
Starting the grinder ....................................................................................................................................... 9
Warming up ................................................................................................................................................ 10
Engine Inclination ....................................................................................................................................... 10
Adjusting the speed .................................................................................................................................... 10
Stopping the equipment ............................................................................................................................. 10
Emergency Stop .......................................................................................................................................... 10
Adjusting the handle ................................................................................................................................... 10
Using the biased weight kit ......................................................................................................................... 11
Changing the drive belt ............................................................................................................................... 11
Changing tools and accessories .................................................................................................................. 11
To change the tools: ................................................................................................................................... 11
Parts and accessories .................................................................................................................................. 12
Grinder Maintenance ........................................................................................................................................ 12
General Maintenance ................................................................................................................................. 12
Daily Maintenance ...................................................................................................................................... 12
Weekly Maintenance .................................................................................................................................. 12

RLP800 Users Manual
3
Monthly Maintenance ................................................................................................................................ 13
KAWASAKI Engine Maintenance ................................................................................................................. 14
Preparation ................................................................................................................................................. 14
Troubleshooting ............................................................................................................................................... 18
LIMITED EQUIPMENT WARRANTY OF SALE ................................................................................................................. 19
FORCE MAJEURE .................................................................................................................................................. 19
LIABILITY LIMITATIONS ......................................................................................................................................... 20
TERMS & CONDITIONS ........................................................................................................................................... 20
AGREEMENTS ...................................................................................................................................................... 22
RLP800 Users Manual
4
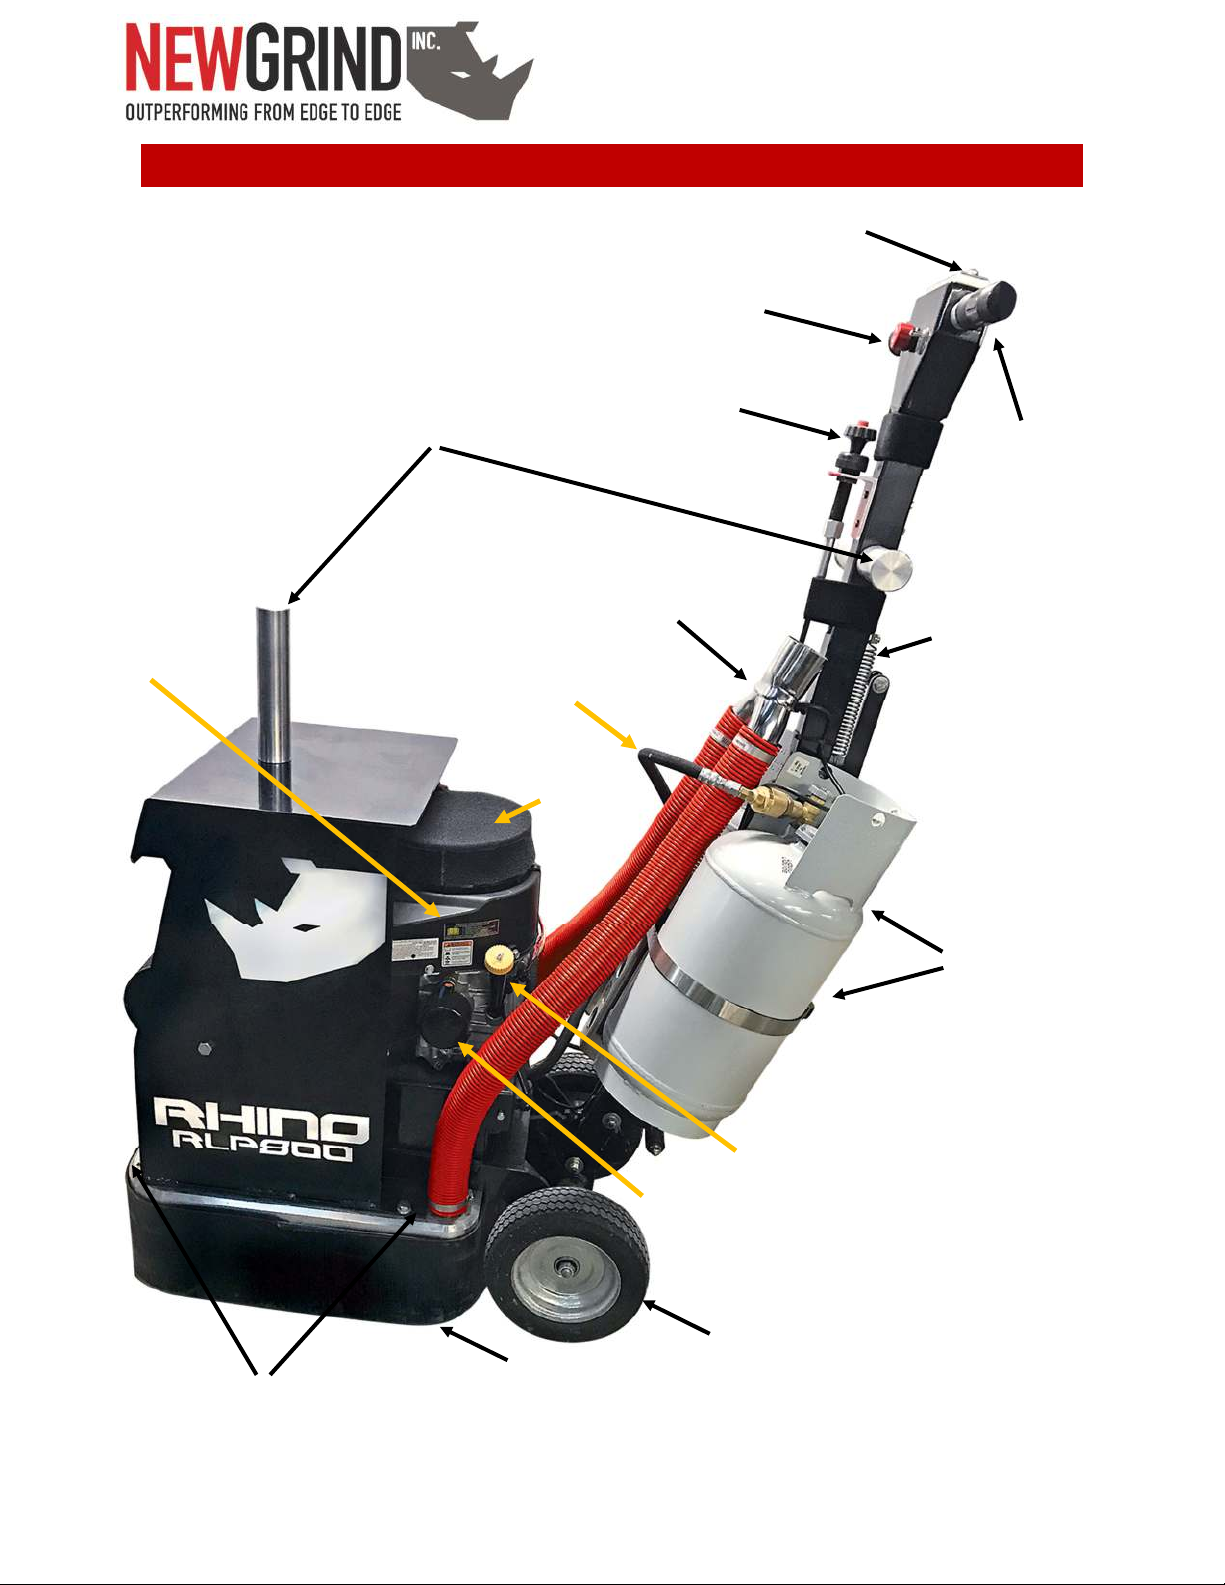
RLP800 Machine Diagram
Biased weight kit pegs
Emergency stop button
Choke/throttle cable
Multi-articulating handle
Dual propane tanks
Heavy duty wheels
Dual vacuum manifold
Propane fuel line connector
Engine oil gauge/fill port
Oil filter
Dust filter
18 HP Motor
Hand grips
Key start
Quick belt change bolts ½ “
UHMW dust skirt

RLP800 Users Manual
5
Machine Specifications
Power
Propane
HP
18 HP Kawasaki
Machine weight
800 lbs
Biased weight kit max weight
180 lbs
Combined weight
980
Disc speed
200-900 rpm
Variable speed control
YES
Number of grinding heads
6
Counter-rotating heads
YES
Disk size
7 inches
Grinding footprint
20 inches
Quick change tooling
YES
Quick belt changing system
YES
Wet or dry grinding
YES
UHMW floating dust skirt
YES
Multi-articulating handle
YES
Runs forward or reverse
YES
Can be used as an edger
YES – grinds to within 1/8 of the edge
Dual vacuum manifolds
YES
Tooling
Rhino Style tooling
YES
Standard trapezoid
YES
Average Production Rates
Extremely heavy removal
600 -1,000 sq./ft. per hour
Heavy removal
700 -1,200 sq./ft. per hour
Light removal
1,100 -1,500 sq./ft. per hour
Grinding and profiling
900 -1,300 sq./ft. per hour
Polishing
1,400 - 2,000 sq./ft. per hour

RLP800 Users Manual
6
Safety Instructions WARNING! Read and understand all instructions.
Failure to follow all instructions listed below, may result in electric shock, fire and/or
serious personal injury. SAVE THESE INSTRUCTIONS.
Work Area Safety
1. Keep your work area clean and well lit. Cluttered floors and dark areas invite accidents.
2. Do not operate equipment in explosive environments, such as in the presence of -
flammable liquids, gases or dust. Grinding can create sparks which may ignite the dust or
fumes.
3. Keep bystanders, children, and visitors away while operating equipment. Distractions can
cause you to lose control.
Personal Safety
1. DO NOT let comfort or familiarity with product (gained from repeated use) replace strict
adherence to equipment safety rules. If you use this equipment unsafely or incorrectly,
you can suffer serious personal injury.
2. Stay alert, watch what you are doing and use common sense when operating equipment.
Do not use equipment while tired or under the influence of drugs, alcohol, or
medication. A moment of inattention while operating equipment may result in serious
personal injury.
3. Adequate ventilation of your work area is very important when using equipment. Use a
dust mask or appropriate respirator. Due to the dusty nature during use of
4. Do not overreach. Always keep proper footing and balance. Proper footing and balance
will enable better control of the equipment in unexpected situations.
5. Use safety equipment. Always wear eye protection, dust mask, non-skid safety shoes,
hard hat and hearing protection.
Ordinary eye or sunglasses are NOT eye protection.
6. DO NOT Turn on equipment while the machine is tilted back. Any tooling fastened to the
machine can eject and become a lethal projectile.
Equipment Safety and Care
1. The equipment is designed to remove excess surface material. To prevent damage to the
equipment and/or serious personal injury, beware of protruding objects or other debris
on or embedded in the surface being finished.

RLP800 Users Manual
7
2. Turn the machine off before making any adjustments, changing accessories, or storing
equipment. Such preventive safety measures reduce the risk of starting the equipment
accidentally.
3. Maintain equipment with care. Keep tools and accessories in good condition. Properly
maintained tools with sharp cutting edges are less likely to fail and are easier to control.
4. Check for binding of moving parts, breakage of parts, and any other condition that may
affect the equipment's operation. If damaged, have equipment serviced before using.
Many accidents are caused by poorly maintained equipment.
5. Use only tools and accessories that are recommended by the manufacturer for your
equipment. Tools and accessories that may be suitable for style of equipment, may
become hazardous when used on another style of equipment.
6. Tools and accessories must be rated for at least the speed stated on the equipment serial
plate. Tools and other accessories running faster than rated speed can fly apart and
cause injury.
7. Due to the dusty nature during use of this equipment, be sure to clean equipment often
to remove dust accumulations. Carefully blow the dust out of the motor, VFD and dust
covered areas frequently.
8. Always install the dust skirt before operation.
9. Check the tools and accessories carefully for cracks or damage before operation. Replace
cracked or damaged tools or and accessories immediately.
10. Hold the equipment firmly with both hands during operation.
11. Do not leave the equipment running unattended.
12. Do not touch the tools immediately after operation; they may be extremely hot and
could burn your skin.
Service Safety
1. DO NOT modify the machine. Modifications will void warranty and could result in unsafe
operation of equipment.
2. Equipment service should be performed only by qualified repair personnel. Service or
maintenance performed by unqualified personnel could result in a risk of injury.
3. When servicing equipment, use only identical replacement parts. Use of unauthorized
parts may create a risk of electric shock or injury.
WARNING: Misuse or failure to follow the safety rules stated in this instruction
manual may cause serious personal injury. SAVE THESE INSTRUCTIONS.
RLP800 Users Manual
8
Operating the Grinder
DANGER! ALL internal combustion engines produce Carbon Monoxide (CO),
a highly toxic, invisible, odorless, tasteless gas that can cause injury and death within
minutes. Only operate machines with internal combustion engines in well ventilated
areas and always follow machine manufacturers operation instructions…
Information about Carbon Monoxide
WHAT IS CARBON MONOXIDE?
Carbon monoxide (CO) is a highly toxic, invisible, odorless, tasteless gas.
HOW IS CO GENERATED?
Carbon monoxide is generated through incomplete combustion of fuel in applications
such as automobiles, forklifts, and small engines.
HOW DOES CO POISON PEOPLE?
The human body depends on oxygen for the burning of fuel (food) to provide us with
the energy that allows our cells to live and function. Oxygen makes up approximately
21% of the atmosphere and enters our lungs when we breathe. In our lungs the oxygen
combines with the hemoglobin in the blood (oxyhemoglobin) and is carried in the blood
stream throughout the body where it releases oxygen to the cells.
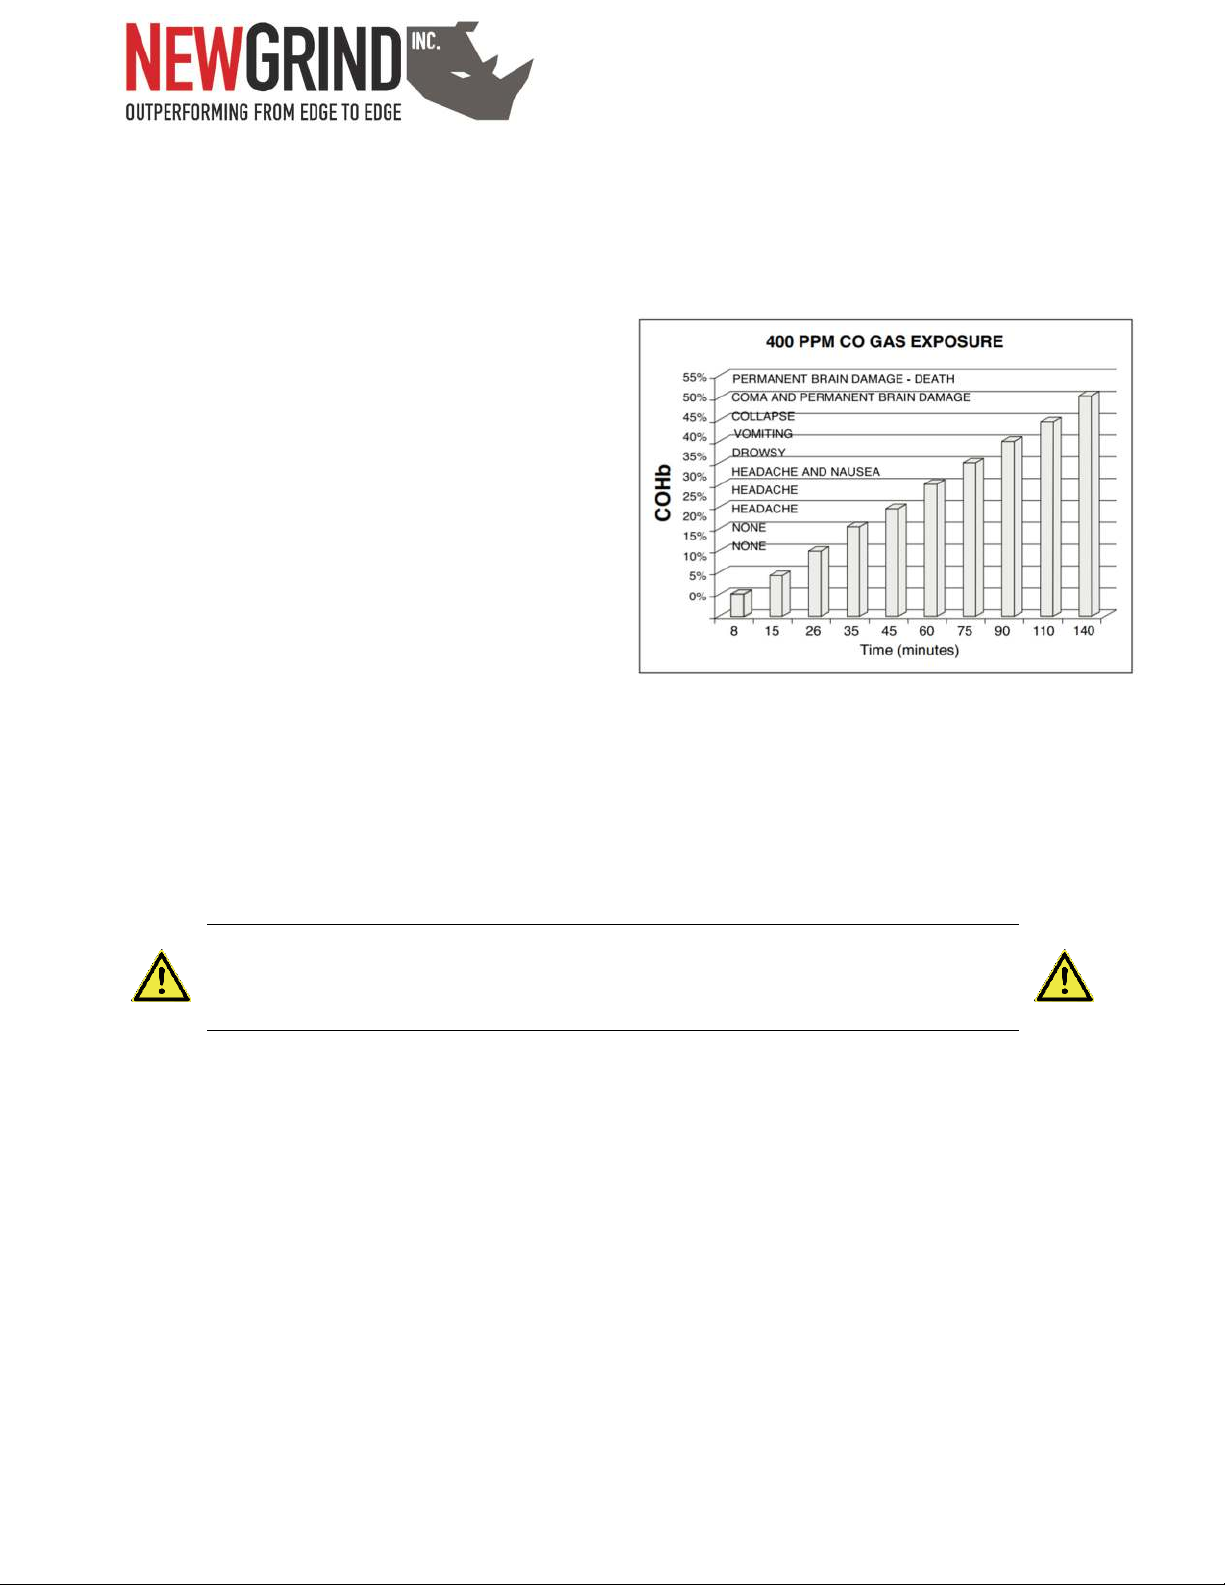
Carbon monoxide is dangerous because it bonds more tightly to the hemoglobin
(carboxyhemoglobin, COHb) than oxygen does. When CO combines with hemoglobin,
the hemoglobin's ability to combine with oxygen is lost. As the COHb concentration
rises, people become nauseous, unconscious and ultimately die (see below).
WHAT ARE THE SYMPTOMS OF CARBON MONOXIDE POISONING?
Many people often confuse carbon monoxide poisoning with the flu; the initial
symptoms being very similar. Different concentrations of CO over various lengths of time
cause different symptoms.
WARNING: The following symptoms may be related to CARBON MONOXIDE
POISONING and should be discussed with EVERYONE.
MILD EXPOSURE: Slight headaches, nausea, vomiting, running nose, sore eyes, fatigue
(often described as “Flu-like” symptoms).
RLP800 Users Manual
9
MEDIUM EXPOSURE: Severe throbbing headache, dizziness, drowsiness, confusion, fast
heart rate.
EXTREME EXPOSURE: Unconsciousness, convulsions, cardiorespiratory failure, brain
damage, death.
Many cases of CARBON MONOXIDE
POISONING indicate that while victims are aware
that they are not well, they become so disoriented
that they are unable to save themselves by either
exiting the building or calling for assistance. Older
adults, young children, pregnant women (and
their unborn children), and persons with medical
conditions are typically the first affected.
Prior to starting the grinder
1. Inspect the grinder to make sure all bolts are tight, and that tools are properly mounted
2. Check that propane tanks are properly mounted and that the gas connectors are secure
Starting the grinder
DO NOT LIFT THE EQUIPMENT OFF THE GROUND WHILE STARTING!
Doing so can cause the tools to release from the equipment and cause damage to
the surface being finished and harm to the user!
1. Open the valve on the propane tank
2. Move the throttle lever to half throttle position
3. Use full choke when the engine is cold, but in hot weather or when the engine is already
warm use half choke or leave the choke fully open
4. With the machine in an upright position, set the articulating handle to the desired
position.
5. Apply downward pressure on the handle to alleviate some pressure on the tools and
6. Put the switch key into the engine switch
7. Turn the key to the start position. Usually the engine will start within 3 seconds

RLP800 Users Manual
10
NOTE: Do not run the electric starter continuously for more than 5 seconds, otherwise the
battery may discharge quickly. If the engine does not start right away, wait 15 seconds and try
again
Warming up
1. After the engine starts, move the throttle lever on the equipment to halfway between
“FAST” and “SLOW”.
2. To warm up the engine, run it for 3 to 5 minutes with the throttle lever in the same load
position (halfway) before putting the equipment under load.
NOTE: Allow engine to warm up sufficiently (3 to 5 minutes at idle) before applying a load. This
will allow oil to reach all engine parts, and allow piston clearance to reach design specifications
Engine Inclination
The engine will operate continuously at angles up to 25 degrees in any direction.
NOTE: Do not operate the engine continuously at angles exceeding 25 degrees in any direction.
Engine damage could result from insufficient lubrication.
Adjusting the speed
1. Use the throttle lever to increase or reduce the speed.
Stopping the equipment
1. To stop the equipment, move the throttle lever to the slowest setting and,
2. Keep the engine idling for about 1 minute, then
3. Turn the engine switch or switch key to the “OFF” position.
Emergency Stop
1. Immediately turn the switch to the “OFF” position, or hit the emergency stop button.
Adjusting the handle
1. Make sure machine is off
2. Pull the hand latch or step on foot latch on the handle and move handle up or down to
the desired position.
Avoid stepping on or tangling handle control cable when adjusting the handle position.
Make sure that the latch clicks in place when the desired position is achieved.
WARNING: Failure to check for positive handle latch engagement could result in
damage to the equipment or injury to the user as the handle could release
unexpectedly when the machine is being operated or tilted back!

RLP800 Users Manual
11
Using the biased weight kit
The Rhino line of equipment was designed to be used with our biased weight kit, which
allows our machines to be loaded with weights to increase point pressure for very hard
floors and to rapidly expose aggregate.
Our unique patented biased weight system uses standard Olympic weight plates,
allowing placement on either side of the machine to increase pressure when grinding
edges with slab curl and high and low spots.
Weights can also be placed on the handle to alleviate pressure and weight from the
machine, enabling the Rhino to be easily and effectively used for soft & rained out slabs.
For best results and to increase production we highly recommend utilizing weights with
your Rhino grinder.
Changing the drive belt
To view a video on how to change the drive belt – please visit our website at:
www.newgrind.com
Changing tools and accessories
WARNING: Always turn grinder off and remove the key from the ignition before
performing any operations to the bottom of the machine!
When removing and inserting tool plates or adapter plates, be sure to inspect rubber grommets
for signs for wear and replace any damaged grommets.
WARNING: Using grommets that are damaged or missing can cause unexpected
equipment operation and increase the chance of tool plate / adapter plate ejection or
violent vibration leading to loss of control of equipment!
To change the tools:
1. Turn grinder off
2. Use the biased weight kit peg on the lower part of the handle to help you tilt the
machine back and gently lay it on it’s back.
WARNING: Do not attempt to replace tools that have recently been in use as they may be
hot and could cause injury
3. Grasp the tool plate firmly in both hands and pull it towards you
4. Remove the bolt from the back of the tool plate behind each tool to release the tool

RLP800 Users Manual
12
5. Hold the replacement tool up against the desired slot on the tool plate and
insert/tighten the bolt.
NOTE: Rhino tool plates have spaces for up to 6 tools. Using 3 evenly spaced tools per plate is
standard configuration.
6. Inspect the grommets to make sure they are not worn or missing
7. Re-attach the tool plate by pushing it back into place
8. Hold the plate firmly with both hands and jiggle it to make sure its properly attached
9. Repeat with each of the tool plates
WARNING: only use tools that have been designed for the machine, and make sure that
the same type of tool is being used on all plates/positions.
10. Gently tilt machine back to upright position by lifting the handle
11. Follow the procedure for starting the grinder
Parts and accessories
A full range of parts and accessories for all of our grinders is available on our website.
Grinder Maintenance
WARNING: Disconnect power before performing any maintenance, cleaning, or repair to
your equipment!
General Maintenance
When the equipment is not in use, make sure that the adapter plate assemblies have
something attached to them to protect the Velcro. Resting the machine directly on
unprotected Velcro will crush the fastening material causing the Velcro to become unusable.
Daily Maintenance
Wipe down the equipment after every job.
Gently remove dirt and debris from the Velcro hook material using a wire brush. This will
ensure maximum adhesion.
Check that the handle bolts are tight.
Vacuum or wipe underside of machine.
Check all fasteners and tighten if necessary.
Weekly Maintenance
Inspect handle wires for damage.

RLP800 Users Manual
13
Blow off motor fan with compressed air.
Remove tool plate holders and wipe down bearing shields with a damp cloth. Do not use
any sharp object or abrasive pad to clean the bearing shields. This can compromise the
bearing seal!
Re-install tool plate drivers using blue medium strength thread locking compound.
Using a soft scrub pad, remove any excess dirt build up from the bottom plate and back side
of pad drivers.
Inspect tool plate driver grommets for signs of wear. Replace grommets that show signs of
extensive wear.
Monthly Maintenance
Check all strain reliefs and make sure they are tight so as to avoid cords being pulled out of
the VFD or handle.
Remove tool plate drivers and inspect threads to make sure that there are no signs of cross
threading or stripping.
Clean and lubricate wheels.
Clean and lubricate latch mechanisms.

RLP800 Users Manual
14
KAWASAKI Engine Maintenance
Preparation
NOTE: These service intervals can be used as a basic guide. Service more frequently as
necessary by operating conditions
= Service more frequently under dusty conditions.
K = Service to be performed by an authorized Kawasaki dealer.
Maintenance
Daily
First
8HR
Every
25HR
Every
50HR
Every
100HR
Every
200HR
Every
250HR
Every
300HR
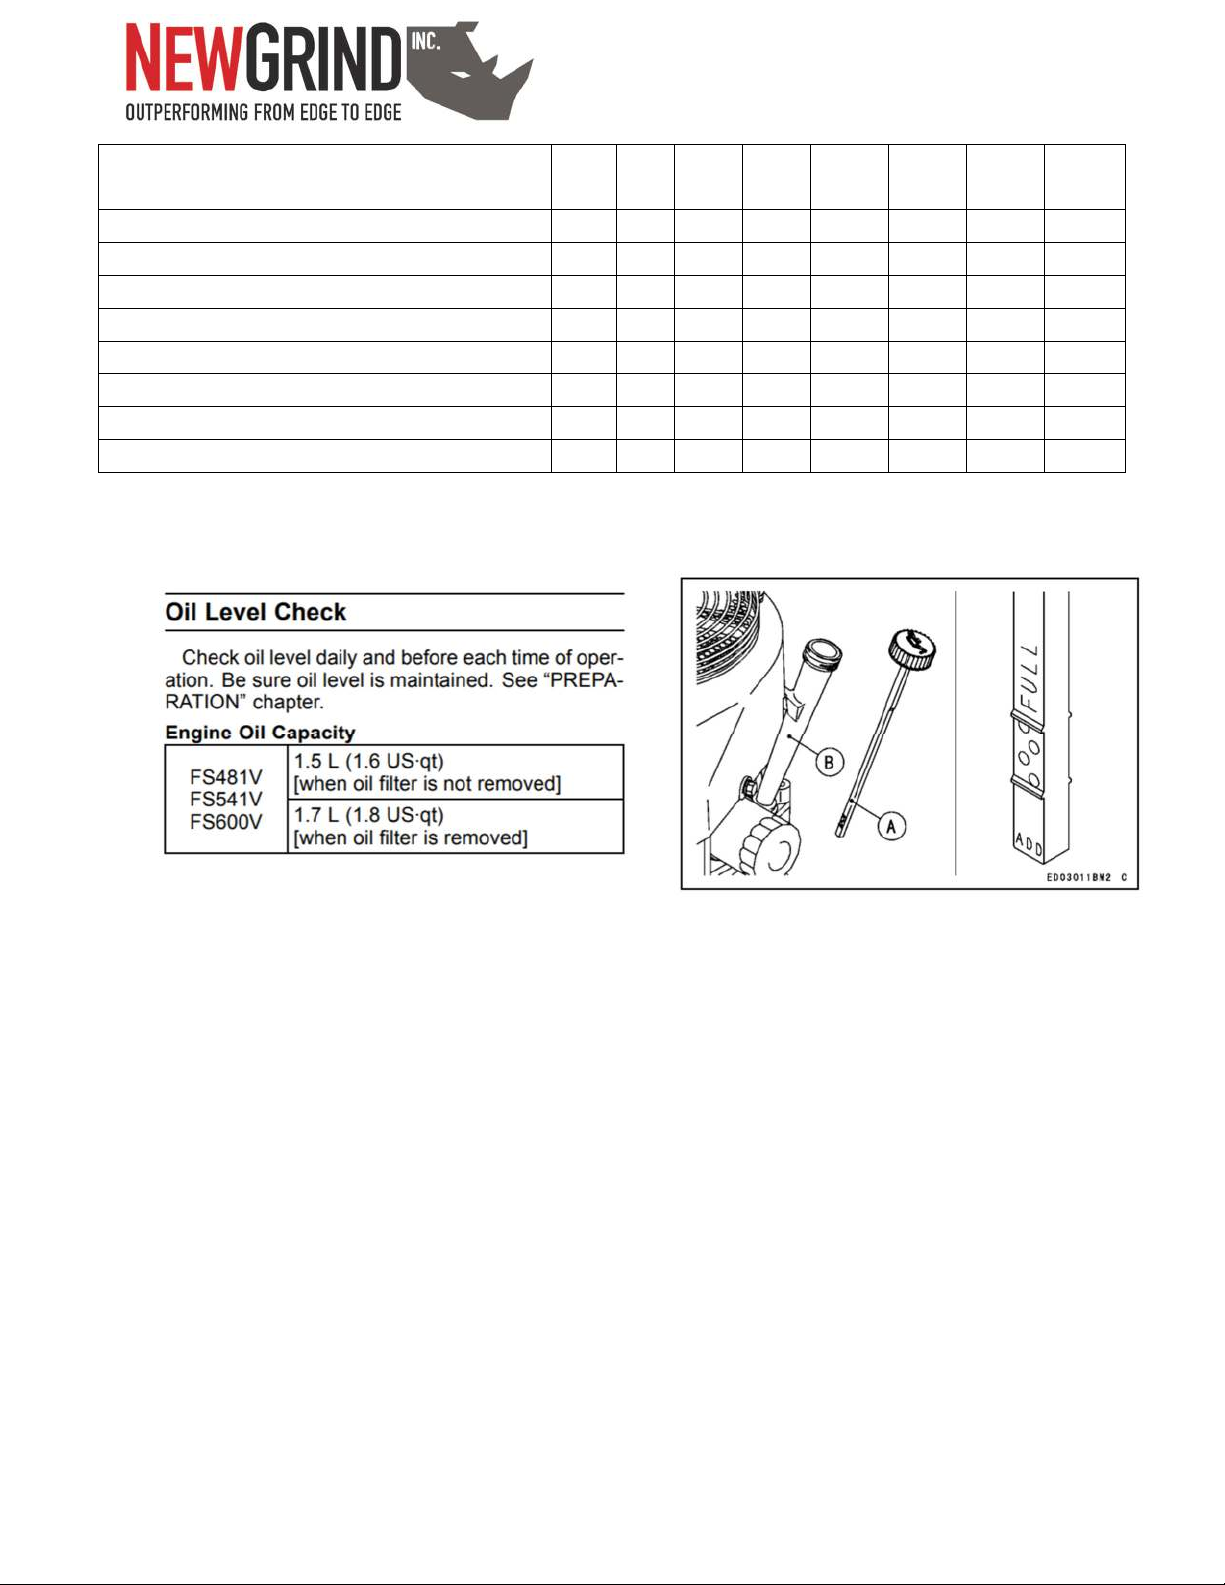
Check and add engine oil
Check for loose or lost nuts or screws
Check for fuel and oil leakage
Check battery electrolyte level
Check or clean air inlet screen
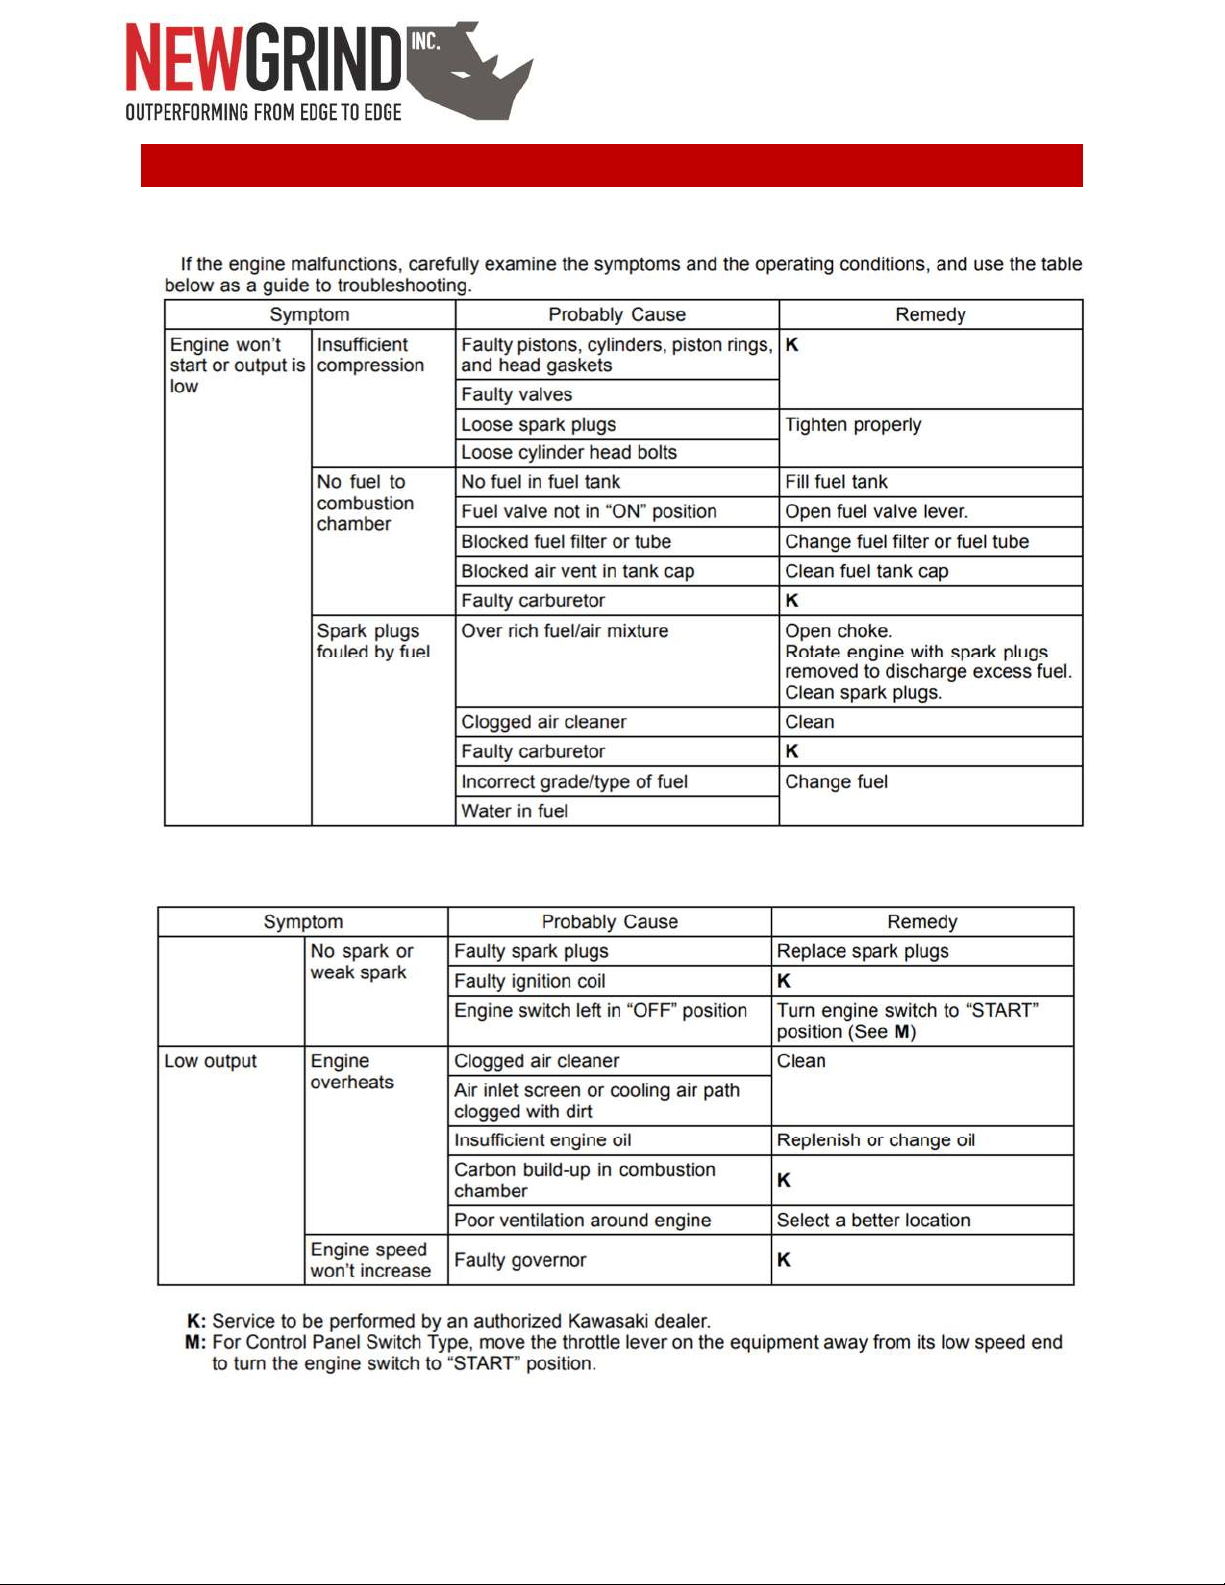
Clean air cleaner foam element
Clean air cleaner paper element
RLP800 Users Manual
15
K Clean dust and dirt from cylinder head
and cylinder head fins
Tighten nuts and screw
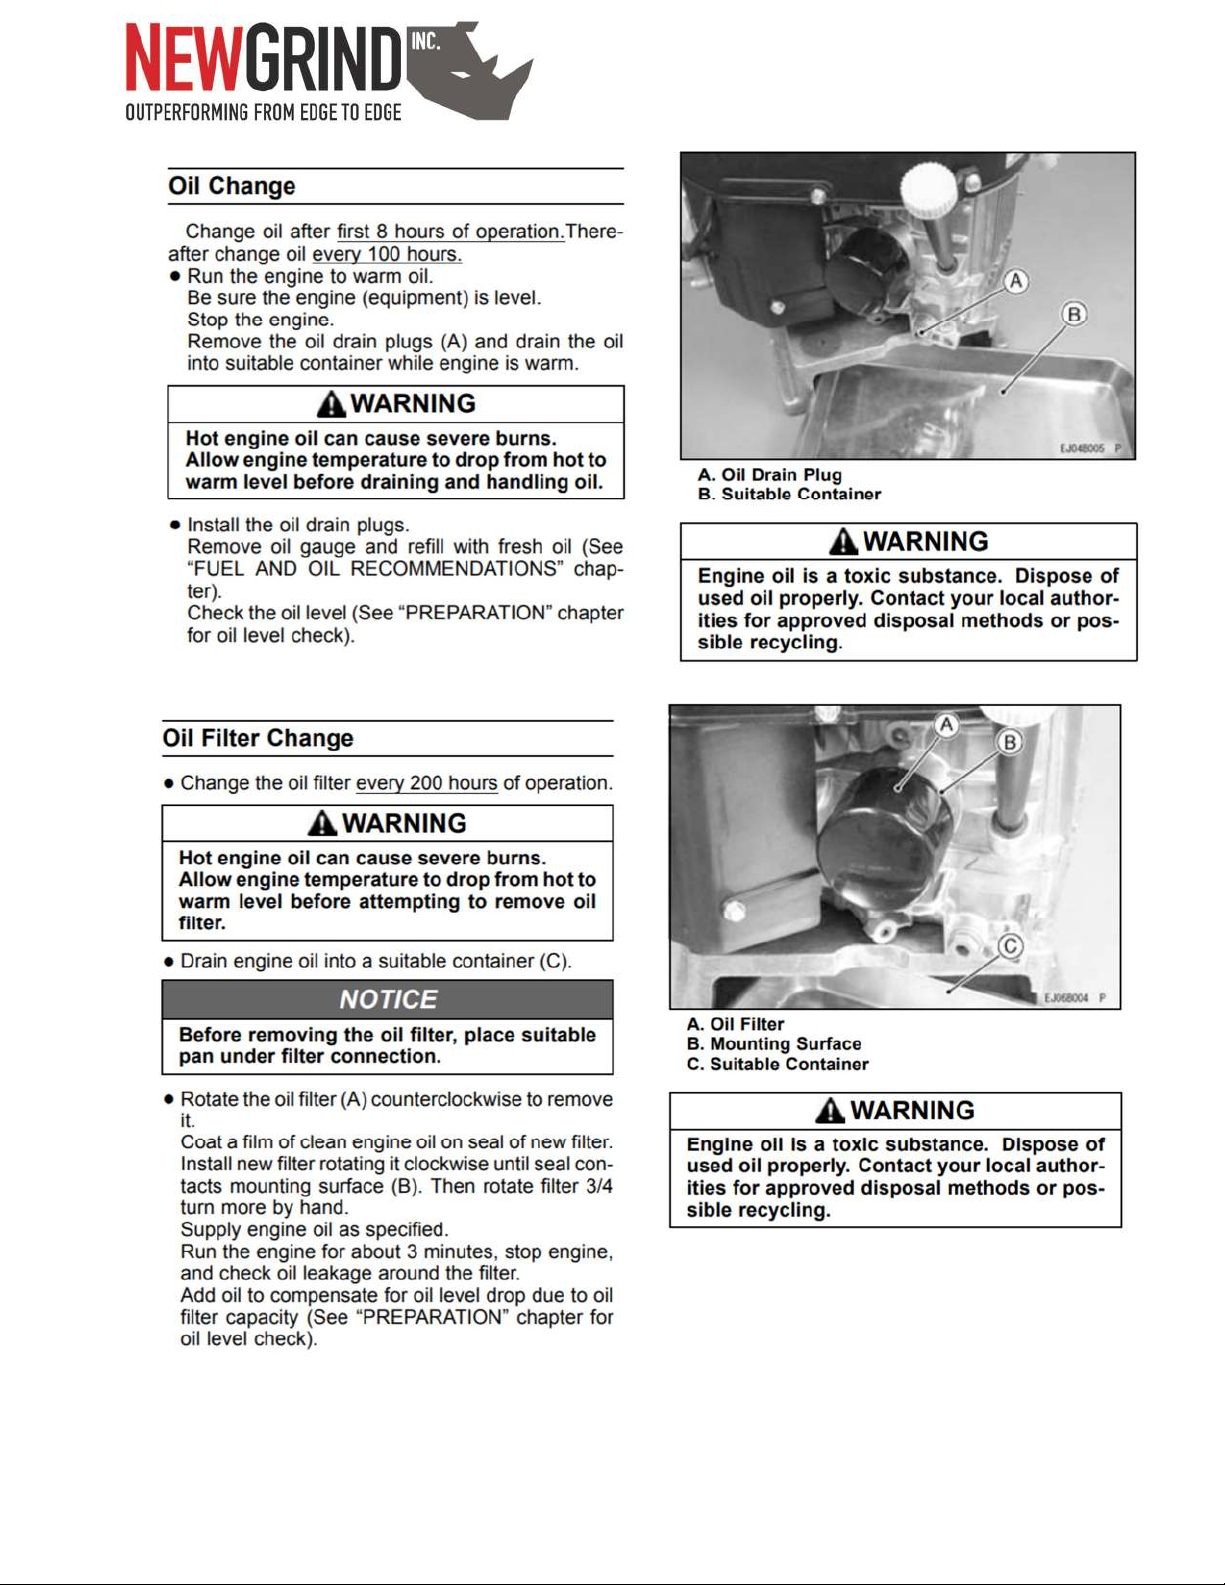
Change engine oil
Clean and re-gap spark plugs
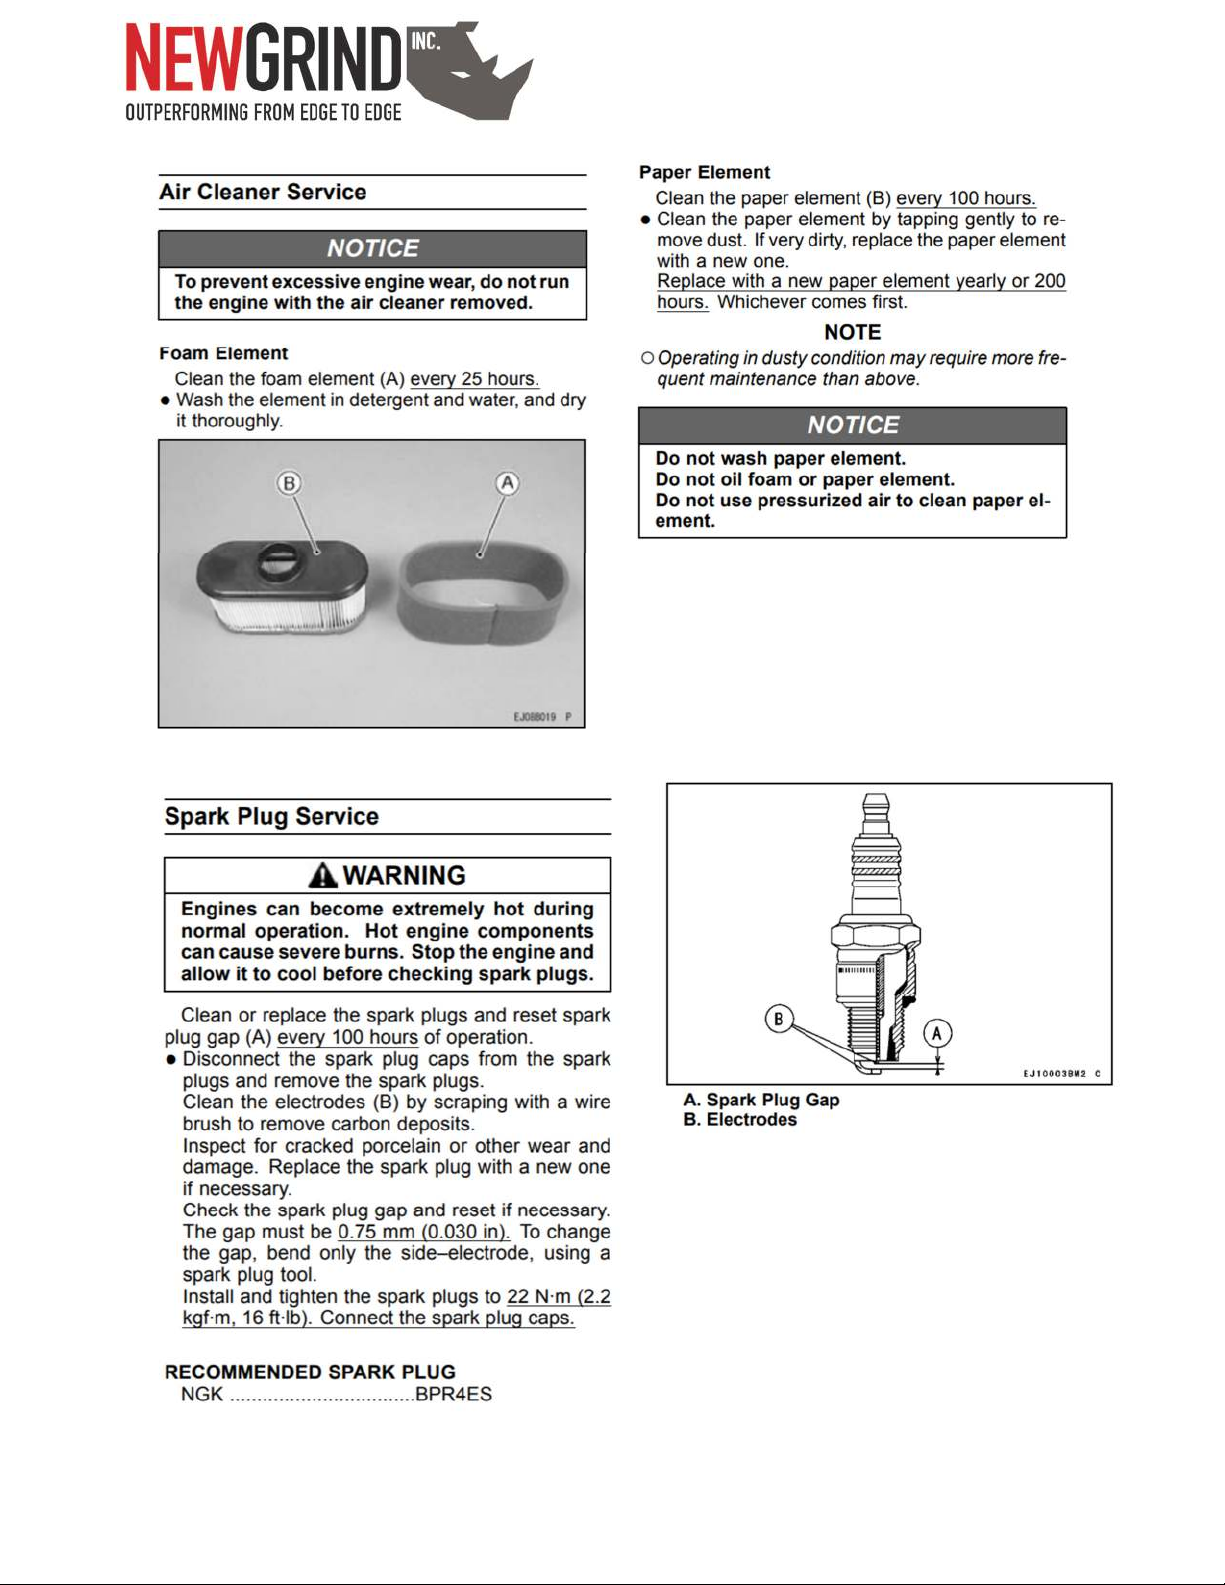
Change oil filter
Repair air cleaner paper element
K Clean combustion chamber
K Check and adjust valve clearance
K Clean and lap valve seating surface
RLP800 Users Manual
16
RLP800 Users Manual
17
RLP800 Users Manual
18
Troubleshooting

RLP800 Users Manual
19
LIMITED EQUIPMENT WARRANTY OF SALE NewGrind Inc. warrants that each new unit manufactured by NewGrind Inc. to be free from
defects in material and workmanship in normal use and service for a period of (3) three years
from date of shipment to the original owner. Accessories or equipment furnished and installed
on the product by NewGrind Inc. but manufactured by others, including, but not limited to
engines, motors, electrical components, transmissions etc., shall carry the accessory
manufacturers own warranty.
NewGrind Inc. will, at its option, repair or replace, at the NewGrind Inc. factory or at a point
designated by NewGrind Inc. any part which shall appear to the satisfaction of NewGrind Inc.
inspection to have been defective in material or workmanship. NewGrind Inc. reserves the right
to modify, alter and improve any part or parts without incurring any obligation to replace any
part or parts previously sold without such modified, altered or improved part or parts.
This warranty is in lieu of and excludes all other warranties, expressed, implied, statutory, or
otherwise created under applicable law. In no event shall seller or the manufacturer of the
product be liable for special, incidental, or consequential damages, including loss of profits,
whether or not caused by or resulting from the negligence of seller and/or the manufacturer of
the product unless specifically provided herein.
In addition, this warranty shall not apply to any products or portions there of which have been
subjected to abuse, misuse, improper installation, maintenance, or operation, electrical failure or
abnormal conditions and to products which have been tampered with, altered, modified,
repaired, reworked by anyone not approved by seller or used in any manner inconsistent with
the provisions of the above or any instructions or specifications provided with or for the
product.
.
FORCE MAJEURE Seller’s obligation hereunder are subject to, and Seller shall not be held responsible for, any
delay or failure to make delivery of all or any part of the product due to labor difficulties, fires,
casualties, accidents, acts of the elements, acts of God, transportation difficulties, delays by a
common carrier, inability to obtain product, materials or components or qualified labor
sufficient to timely perform part of or all of the obligations contained in these terms and
conditions, governmental regulations or actions, strikes, damage to or destruction in whole or
part of manufacturing plant, riots, terrorist attacks or incidents, civil commotions, warlike
conditions, flood, tidal waves, typhoon, hurricane, earthquake, lightning, explosion or any other
causes, contingencies or circumstances within CANADA not subject to the Seller’s control which
prevent or hinder the manufacture or delivery of the products or make the fulfillment of these

RLP800 Users Manual
20
terms and conditions impracticable. In the event of the occurrence of any of the foregoing, at
the option of Seller, Seller shall be excused from the performance under these Terms and
Conditions, or the performance of the Seller shall be correspondingly extended.
This document sets forth the terms and conditions pursuant to which the purchaser
(“Purchaser”) will purchase and New Grind Inc. (“Seller”) will sell the products, accessories,
attachments (collectively the products “) ordered by the Purchaser. These terms and conditions
shall govern and apply to the sale of Seller’s products to Purchaser, regardless of any terms and
conditions appearing on any purchase order or other forms submitted by Purchaser to Seller, or
the inconsistency of any terms therein and herein.
LIABILITY LIMITATIONS The remedies of the user set forth under provisions of warranty outlined above are the exclusive
and total liability of New Grind Inc. with the respect to their sale or the equipment and service
furnished hereunder, in connection with the performance or breach thereof, or from the sale,
delivery, installation, repair or technical direction covered by or furnished under the sale,
whether based on contract, warranty, negligence, indemnity, strict liability, or otherwise shall not
exceed the purchase price of the unit of equipment upon which such liability is based. New
Grind Inc. will not in any event be liable to the user, any successors in interest or any beneficiary
or assignee relating to this sale for any consequential, incidental, indirect, special or punitive
damages arising out of this sale or any breach thereof, or any defects on, or failure of, or
malfunction of the equipment under this sale based upon loss of use, lost profits or revenue,
interest, lost goodwill, work stoppage, impairment of other goods, loss by reason of shutdown
or nonoperation, increased expenses of operation of the equipment, cost of purchase or
replacement power of claims of users or customers of the user for service interruption whether
or not such loss or damage is based on contract, warranty, negligence, indemnity, strict liability,
or otherwise. New Grind Inc. reserves the right to modify, alter and improve any part or parts
without incurring any obligation to replace any part or parts previously sold without such
modified, altered or improved part or parts. No person is authorized to give any other warranty
or to assume any additional obligation on New Grind Inc.'s behalf unless made in writing and
signed by an officer of New Grind Inc.
TERMS & CONDITIONS 1. PRICE
All prices set forth on any purchase order or other document are F.O.B. Sellers facility or
distribution point, as may be determined by Seller (F.O.B. Point). All prices are exclusive of any
and all taxes, including, but not limited to, excise, sales, use, property or transportation taxes
related to the sale or use of the products, now or hereafter imposed, together with all penalties
and expenses. Purchaser shall be responsible for collecting and/or paying any and all such taxes,
Other manuals for RHINO RLP800
1
Table of contents
Other Newgrind Grinder manuals


