NewLine X Series User manual

X Series
Service Manual

X Series Manual
Safety Notice
1. There are many electrical and mechanical parts in the TRUTOUCH VN Series interactive
display. Pay attention and take safety precautions before repairing the display.
2. It is essential that all components be replaced with authorized components recommended
in this manual to prevent shock, fire, or any other hazards.
3. Please do not modify the original mechanical or electrical design without previous
verification from the manufacturer or authorized agent.
4. Before starting a repair or disassembling the display, please make sure to unplug the
display from any power source.

X Series Manual
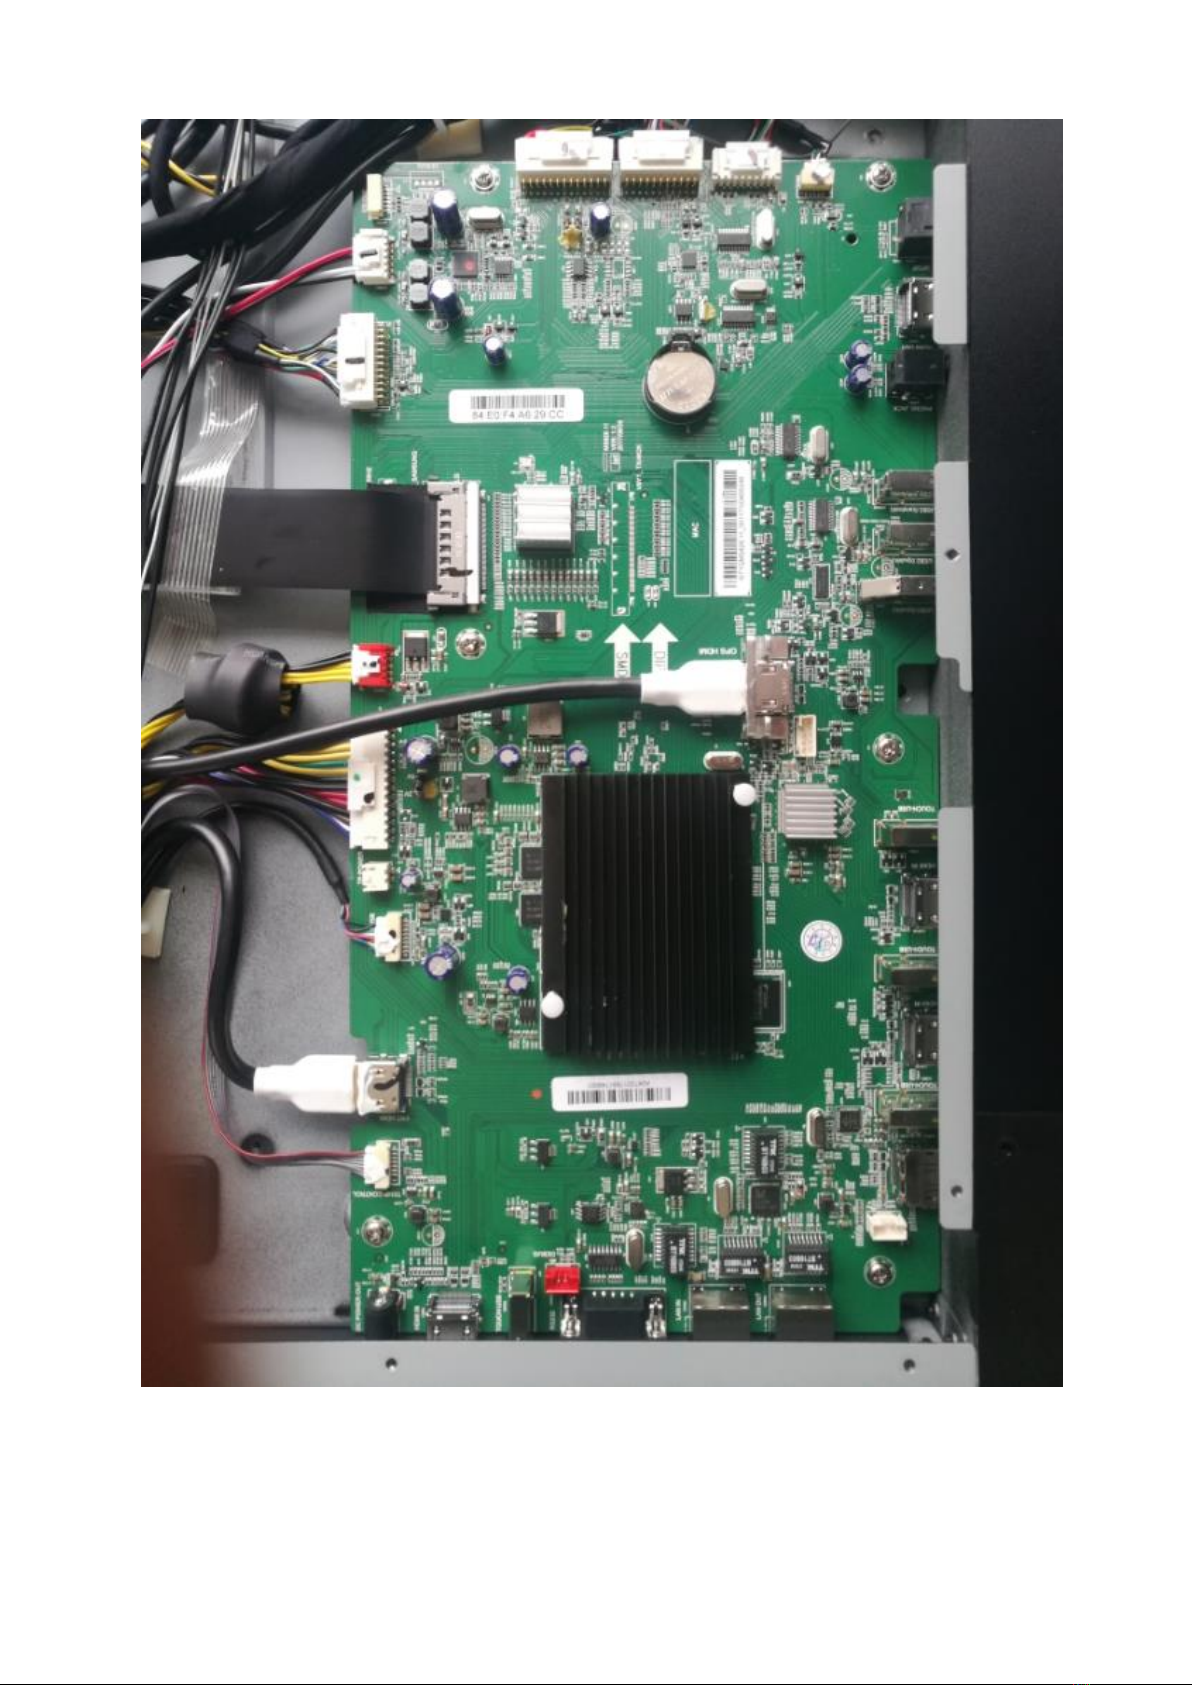
Part A. PCBA Overviews
OPS Dock board
Mainboard
Power board
TempSensor
T-con board
Audio board
Wifi module
Front port board
Keypad board
Power_IR board
AC board
TP control
board
R Micphone L Micphone
Top Cam
Botttom Cam

X SeriesManual
1. Mainboard wiring
AC board
Front port board
FF control board
Powerboard
T-Con board
T-Con board
Front port board &
Power_IR board
/56SHDNHU
OPS docking board
Audio board
OPS docking board
Top & Bottom Cam
Wifi module
X Series Manual

X Series Manual
2. Powerboard wiring
3. Audio board wiring
OC panel
OPS docking
board
FF control
board
Mainboard
AC switch board
Mainboard
Mic R

X Series Manual
4. OPS docking board wiring
5. Wifi module wiring
Mainboard
Mainboard
Powreboard
Mainboard
Antenna

X Series Manual
6. AC Switch board wiring
Tips:
1. After March 2018, there is no longer a Hard Reset button in the AC switch board.
7. Front port board wiring
8. Keypad PCBA connections
Powerboard
Mainboard
TempSensor pcb
Hard Reset button
Mainboard
Mainboard
Power_IR board

X Series Manual
9. Power_IR board wiring
10. TempSensor PCBA wiring
AC switch board
Keypad board
Mainboard

X Series Manual
11. FlatFrog Touch Panel Control board wiring
12. T-CON board wiring
Powerboard
Mainboard
Mainboard
TP PCBA
TP PCBA
Mainboard
Mainboard

X Series Manual

X Series Manual
13. Micphone pcba L & R wiring
14. Camera module wiring
Mainboard
L Microphone
Mainboard
R Microphone

X Series Manual
X Series Manual
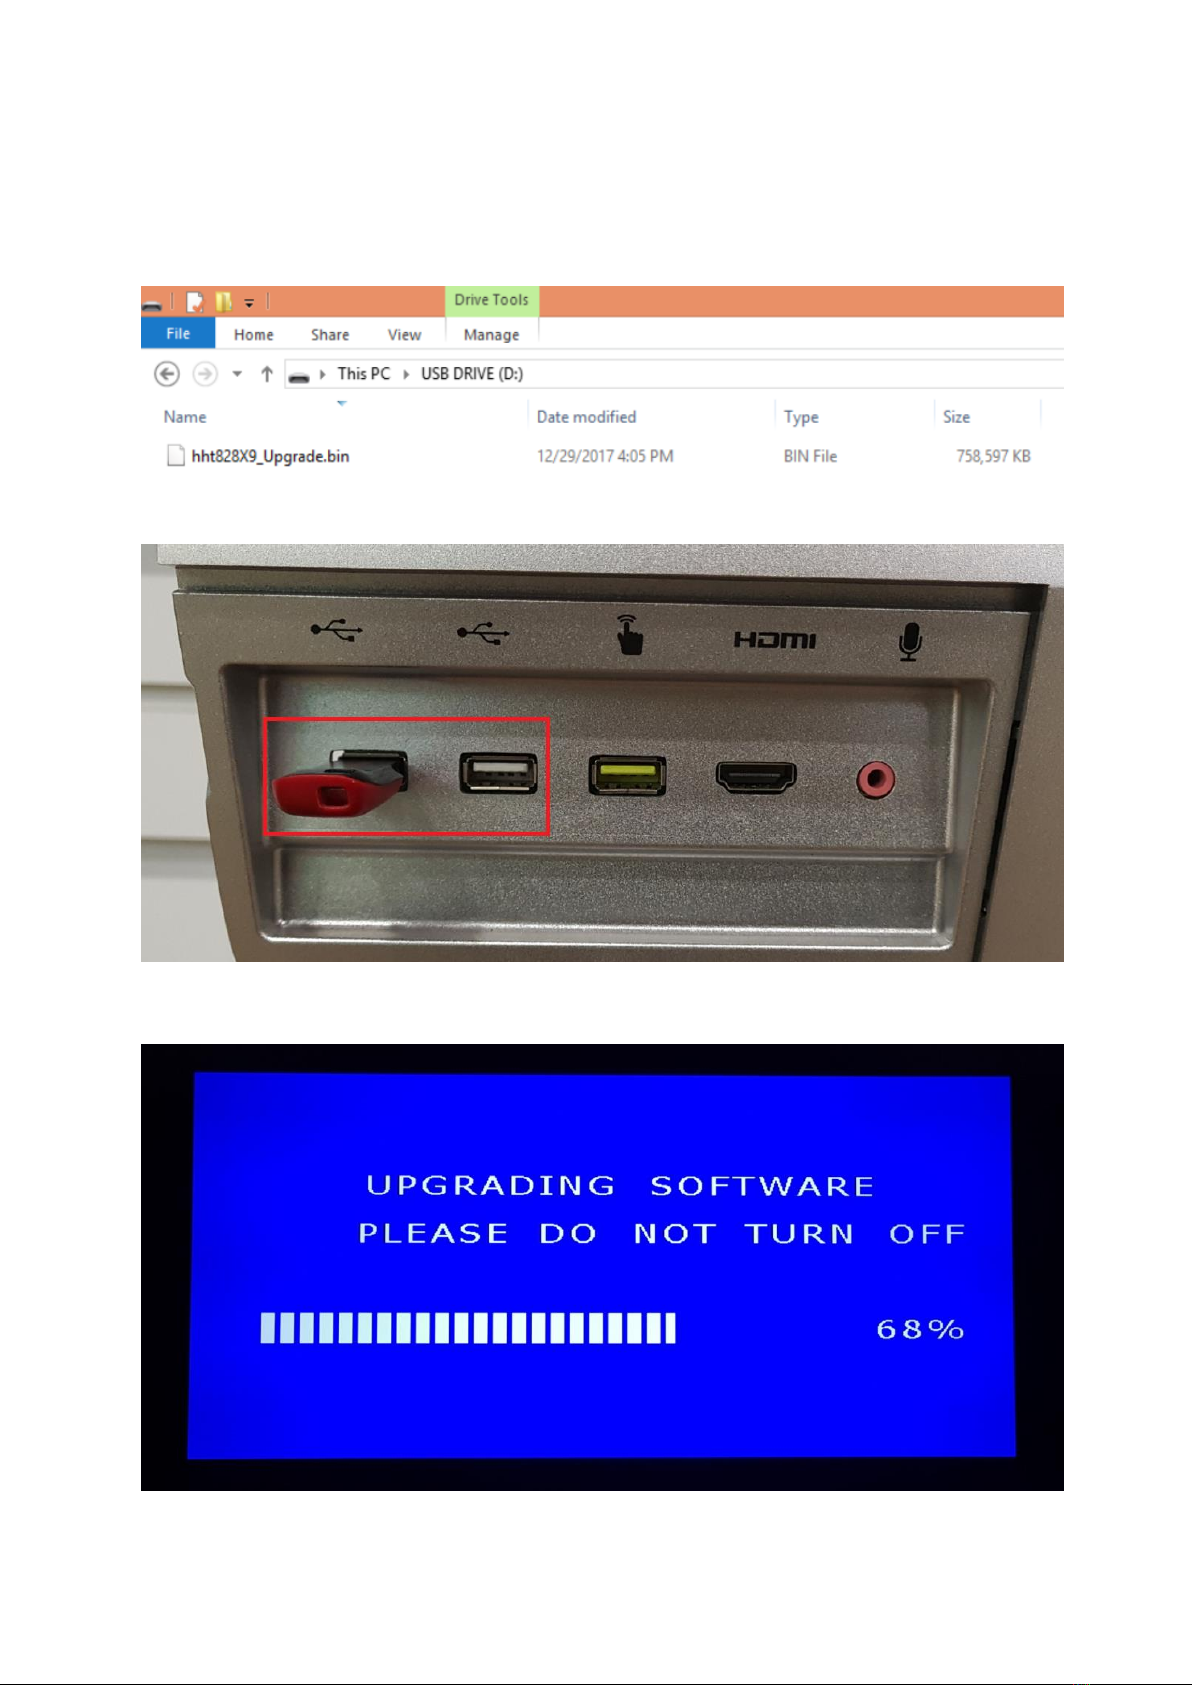
Part B. Firmware Upgrade
Step 1: Prepare a USB drive and format it with the FAT32 format. Copy the firmware files to
the root folder of the USB drive, as shown in the following images:
Step 2: Turn off the display and connect the USB drive to the below front USB port.
Step 3: Turn on the display and the firmware upgrade will start automatically.
Step 4: When the firmware upgrade is finished, the display will restart automatically.

X Series Manual
Step 5: Onthe first boot-up after the firmware upgrade, it will stay on the X Series splash logo
for about 3 minutes.
Step 6: Go to settings menu to check the firmware version is correct.

XService Manual
Part C. Trouble shooting
Problem #1: Can’t turn on machine (Power indicator always stay on red)
Problem #2: Dim screen (After turn on, the display gets an image but it is very faint and hard to see)
Problem #3: Android can’t pick up the OPS signal
Problem #4: No power (Power indicator is blank, neither green or red)
Problem #5: Partial touch or dead touch area
Problem #6: No touch
Problem #7: Ghost touch or the calibration is inaccurate
Problem #8: No image (Black screen) even no faint display
Problem #9: Noise in the image or color distortion
Problem #10: Flickering screen
Problem #11: Stuck on splash logo, can’t enter Home Screen
Problem #12: Broken sound or sound popping
Problem #13: No audio output from OPS
Problem #14: No signal from all HDMI inputs
Problem #15: Wifi module not working, can’t detect wifi signal
Problem #16: Front HDMI not working

XNService Manual
Problem #1: Can’t turn on machine (Power indicator always stay on red)
Step 1: Replace the mainboard first.
Step 2: Replace the powerboard.
Problem #2: Dim screen (After turn on, the display get image but is very faint hard to see)
Step 1: If backlight is ON, replace the optical bonding module.
Step 2: If backlight is OFF, replace the backlight module.
Problem #3: Android can’t pick up the OPS signal
Step 1: Check if the OPS is powered on.If not, press POWER button on the OPS front panel to check
if the OPS can be powered on or not.
Step 2: Check if the OPS can work with another known-working touchscreen.If it does not, replace
the OPS.
Step 3: If there are no other touchscreens, connect the OPS via external HDMI cable to display’s rear
HDMI IN port. Ifit works, check the OPS installed the graphic card driversproperly or not. If it does
not work, install the graphic card drivers.
Step 4: Replace the mainboard.
Step 5: Replace the OPS dock board.
Problem #4: No power (Power indicator is blank even no red colour)
Step 1: Replace the Powerboard
Step 2: Replace the AC relay control board.
Step 3: Replace the Mainboard.
Problem #5: Partial touch or dead touch area
Step 1: Refer to Part Bto test the FlatFrog touch panel signal.
Step 2: According to testing results, replace one pcba sensor or replace a whole set of pcba sensors.
Problem #6: No touch
Step 1: Check if only Windows has no touch or both Windows and Android have no touch.
Step 2: If only Windows has no touch, replace mainboard and OPS docking board one by one.
Step 3: If both Windows and Android have no touch, please refer to Part Bto test the FlatFrog touch
panel signal.According to testing results, replace the TP control board at first.If still not working,
send back testing results for analysis.
Problem #7: Ghost touch or the calibration is inaccurate
Step 1: Refer to Part Bto test the FlatFrog touch panel signal.
Step 2: According to testing results, replace one pcba sensor or replace a whole set of pcba sensors.
Problem #8: No image (Black screen) even no faint display
Step 1: Unplug the power cord for 30 seconds, then plug it back in and check again.If it the display
starts with a normal image, please replace the Powerboard.

XNService Manual
Problem #9: Noise image or colour distortion
Step 1: If only the OPS source has this issue, replace the OPS docking board or HDMI cable that
goes between the OPS docking board and the Mainboard.
Step 2: If all sources, including Android,have this issue, replace the Mainboard, T-CON board, and
LVDS cable one by one.
Step 3: Replace optical bonding module.
Problem #10: Flicker screen
Step 1: Replace Mainboard.
Step 2: Replace T-CON board and clean the FFC cable of T-CON.
Step 3: Replace optical bonding module.
Problem #11: Stuck on splash logo, can’t enter into homepage
Step 1: Reload FW for mainboard.
Step 2: If it does not work, replace Mainboard.
Problem #12: Broken sound or sound popping
Step 1: It should be a speaker issue, replace the speaker.
Problem #13: No audio output from OPS
Step 1: Install audio card drivers for the OPS.
Step 2: Right click the Speaker icon on the right side of the Windows toolbar. Select the “Audio
device” item and set “MStar Demo”speaker as the default speaker device.
Step 3: Install all OPS drivers.
Problem #16: No signal from all HDMI inputs
Step 1: Replace Mainboard.
Problem #17: Wifi module not working, can’t detect wifi signal
Step 1: Replace wifi module pcbas.
Problem #18: Front HDMI not working
Step 1: Replace Front port board.
Step 2: Replace HDMI cable between the Front port board and Mainboard.

XNService Manual
Thank you for reading!
For more info, please contact the manufacturer or authorized agent.
This manual suits for next models
1
Other NewLine Interactive Whiteboard manuals


Popular Interactive Whiteboard manuals by other brands

SMART Board
SMART Board 600ix Configuration and user's guide

Panasonic
Panasonic Panaboard UB-7325 installation manual

Microsoft
Microsoft Surface Hub 2S Technical FAQ

Ricoh
Ricoh D5500 Information sheet

promethean
promethean ActivPanel Titanium Getting started guide

SMART Board
SMART Board SB880i5-SMP Users guick guide


