Newskill Belenor Pro Manual

INSTRUCTION GUIDE
BELENOR PRO

BELENOR PRO GAMING DESK

1
5
8
15 16
911
12
6
10
13
14
7
2
3
4
NO. Part name Qty(PCS)
1Foot 2
2 Columm 2
3 Side Bracket 2
4 Cable Management 1
5 Drive Sha 1
6 Motor 1
NO. Part name Qty(PCS)
7 M6*12 Bolt 22
8 M6*35 Bolt 8
9 ST4*10 Screw 2
10 M4*4 Bolt 4
11 Power Cord 1
12 Control Box 1
NO. Part name Qty(PCS)
13 Power Adapter 1
14 Cable Clip 6
15 Earphone Holder 1
16 Allen Wrench 2
COMPONENTS

1
10 M4*4 Bolt X4
Make sure that the hexagon baris fully inser1ed
and the groove on the hexagon bar completely
sunk into the hexagon hole of the column
This components has pre-installed for you.
For re-installation or size adjustment, please
refer to this instruction
When adjusting the table width, please loosen
the M4*4 bolt and tighten aer adjusting.
Insert the Drive Sha
(a hexagonal bar) into the column
MOUNTING STEPS
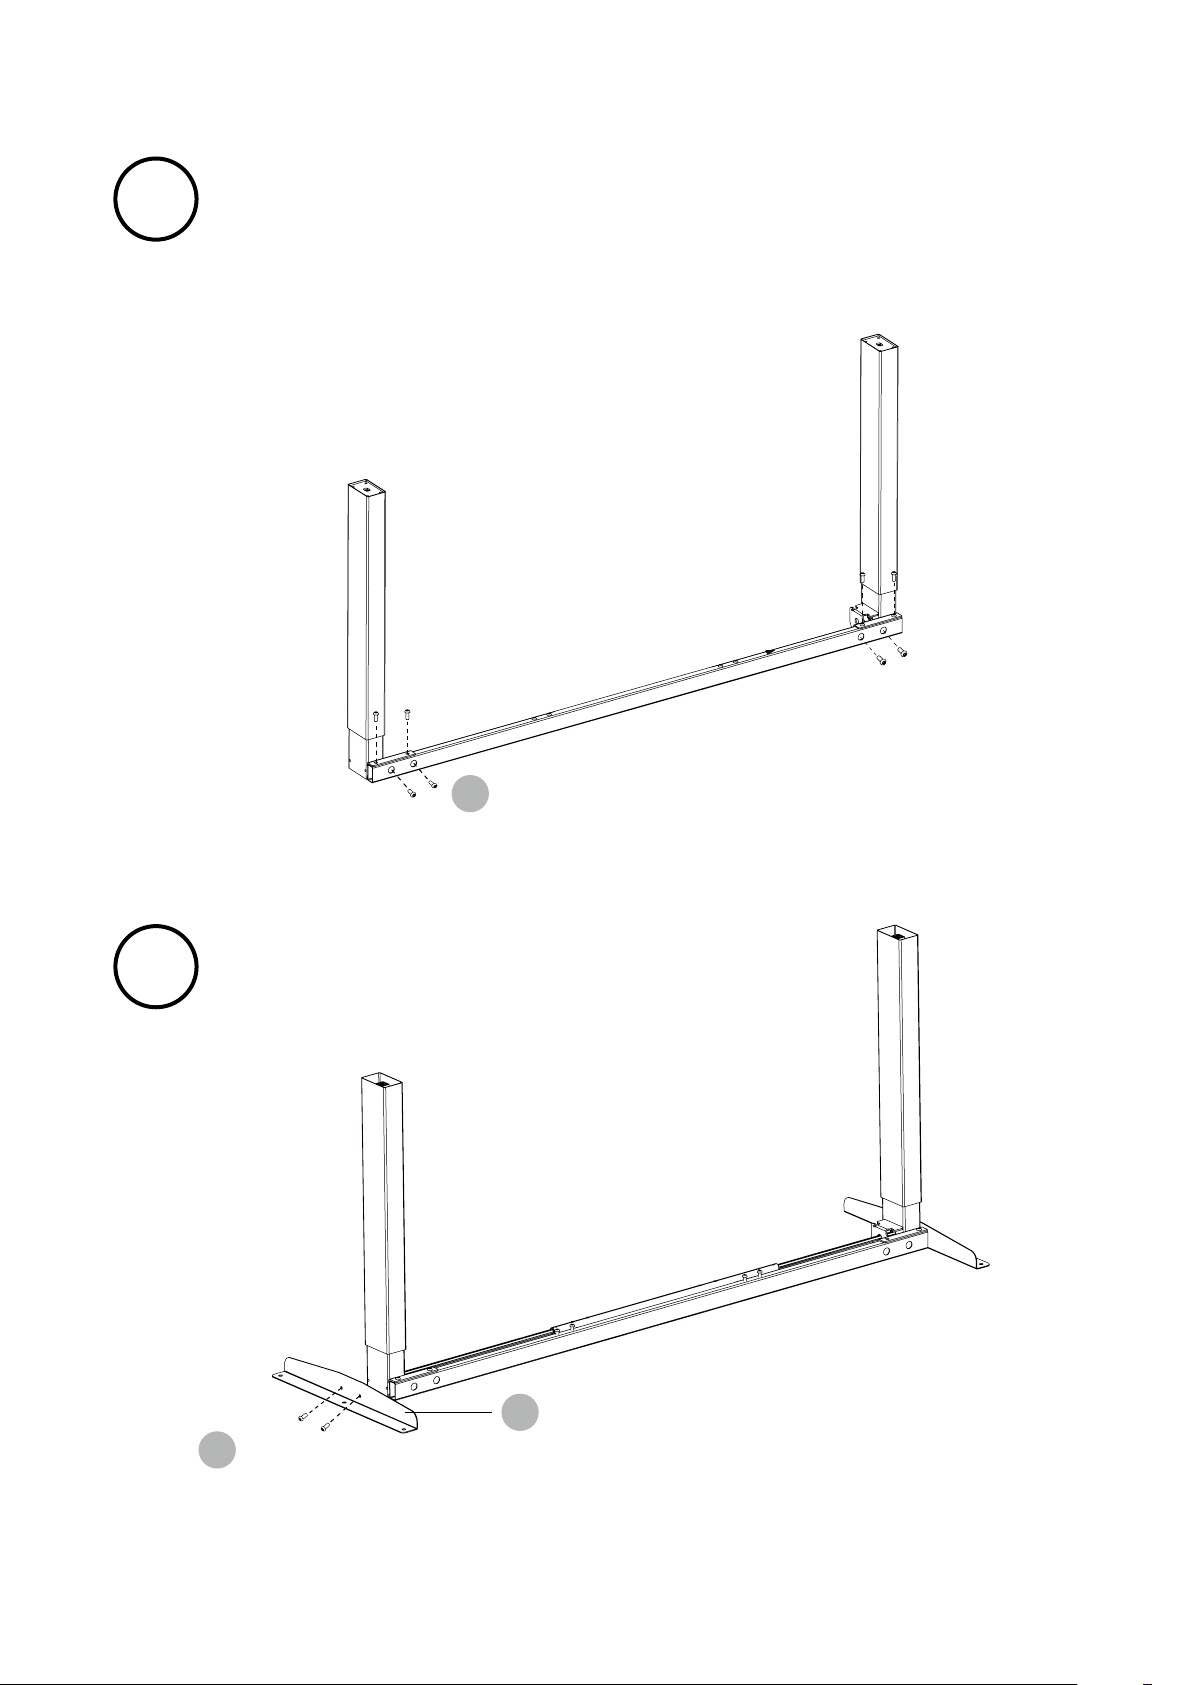
2
• Install the connecting rod on the column as is shown in the picture.
• Respectively, line up the holes on both ends of the connecting rod and
the holes on the L shape metal of the columns.
• Tighten the bolts.
Install the connecting rod
Mounting the side bracket on each
side of the column.
7M6*12 Bolt X8
NOTE: Avoid excessive tightening bolts
NOTE: Avoid excessive tightening bolts
Side bracket
3
3
7M6*12 Bolt X4

4
8M6*35 Bolt X8
1
Fasten the bolts
5
7M6*12 Bolt X8
9
ST4*10 Screw X2
12
4
Line up the screw holes on the feet
and columns.
Install the desktop
NOTE: Avoid excessive tightening bolts
• Check both side of desktop before placing the base on the boom side of the desktop. Adjust
the suitable width. It is suggested that the two sides of the frame side brackets are 2~4inch
15cm~10cm from the edge of the desktop and fasten screws
• As shown below, connect related parts, including control box, extension cable and power cord
• Check all bolts and screws. Make sure all bolts and screws are tightened
Mounting holes are reserved on the back of the desktop. Please
adjust the width of the table frame according to the position of the
mounting holes.
The frame width is adjustable: 42 inches~59 inch, which is suitable
for dierent desktop width

Put the adapter into
the Cable Management
6
12
13
11
Install the Control Box
• Install the Control Box on suitable position of desktop edge to avoid interference with
humans or chairs.
• Tidy up all the power cables and fasten with cable clip.

7
15
7M6*12 Bolt X2
Finish

USAGE INSTRUCTION
Manual Reset
Anti-Collision Function
Up and Down
Saving Position
It is necessary to be reset manually aer the initial
installation and power o.
Before use, please make sure removing obstacle in advance
and human body is in the safe position.
1. Keep pressing down key until the display shows"E-1"and`'rES" alternately and release the key.
2. Keep pressing down key again, the desktop will move slowly down and retum back till the
display shows *70 (27.6’’)/60 (23.7’’)*
3. Release the key, the height-adjustable desk reselling finished.
• Once the desktop encounters any obstacle in its path, the screen displays “E-2”
• The desktop will move a defined distance in opposite direction, and it would be used normally
aer removing the obstacle.
1. Keep pressing "up" key till the required height is reached.
2. Keeping pressing "down" key till the required height is reached.
1. Adjust the desktop to the height you want to save
2. Press "S" key, until the display will show "S --"
3. Press"1", and the display will show alternately as "S-1" and the desktop height.
4. Press "S" key, the first memory position is set successfully. Similar progress for 2 and 3
memory positions.
Note: The anti-Collision function is not enabled during all resets. Please note that there is a potential risk of pinching
in this case, and be sure no obstacles in the desk's path.

Movement Limit & Self-stop Positions
Change the Displayed Unit (cm / inch)
Amend the Desktop Height Displayed
Enable this function only when you are really
need in some situation.
1. Keep pressing the key “S” for 3 seconds "HLP". until the display shows "S--" to enter
2. Press up key till the display flash as “HLP”.
3. Press “1”, the display show alternately as “H-P” and current height.
4. Keep pressing up or down key till the required upper limit position is reached.
5. Press “S”, the desktop height will be showed and the self-stop position has been set.
6. Press “2”, the display will show alternately “L-P” and current height, keep pressing down key till
the low limit position is reached, press S the Movement limit & self-stop position has been set.
1. Keep pressing the key “S” until the display show “S--” to enter the setup menu.
2. Press up key until the display will show “Unt”.
3. Press “1”, and the display will show alternately as “Unt” and the desktop current height value
of by “cm”.
4. Press "S" key to save the unit as cm.
5. Press "2", and the display will show alternately as "Unt" and the desktop current height value by
"inch", press key "S" to save the unit as inch.
1. Keep pressing key "S" till the display show "A--"
2. Briefly Press “UP” or “Down” key, until the display show alternately as “End” and current
height. (At this point, the units display mm or inch).
3. Press "1", "2" ,"3" to choose the first, second and the third number, each click will increase one
value.
4. Press "S" , the amending has been set.
Note: By this function would be used to limit the height movement of desk. Once it is set, the new upper or lower
limitation position will be stored.
Note: The function enables you to change the height shows on the display based on the actual measurement.

Plug Detection
Reset to Factory Seing
CODE MEANING & TROUBLE SHOOTING
The function can defect whether the motors are
connected properly.
With this function, you can make the control unit
to factory seing.
1. Once the display shows “E-3” and “rES”, it means the motors are failed to connected with
control unit.
2. Please unplug the main cable, check all connection and make sure all cables are connected
properly, plug the main cable then.
3. Follow the Manual Reset Progress to reset system.
1. Keep pressing "S" until the display shows "FAC".
2. Press "S" again to confirm to store the control system to factory seing.
Code Information Operating
rES Manual Reseing Refer to the progress of Manual Reset.
Ovr Over Load Remove the load on desktop until it less than
1000N (220 lbs) before further operation
E-2 Anti-Collision Function It can be used normally aer removing the
obstacle.
Dut Too Frequent Operation Make the desk rest for 15minutes before further
operation.
E-4 The Height Dierence between
Two Legs Exceed 1 Inch
Stop the operation and reset, refer to Manual
reset
E-3 Check the Connection Check the cables and ensure they are well
connected, manual reset before re-use

ATTENTION!
GOT QUESTIONS?
1. Verify all parts before assembly.
2. The pictures in this guide may not look like your chair, but the instruction
guide is the same regardless of model.
3. Do not use the chair unless all the bolts and screws are tight.
4. At least every six months check all botls and scres to ensure they are tight.
5. Don not use this chair as a step stool/ladder.
Go newskillgaming.com
Table of contents
Other Newskill Indoor Furnishing manuals


Popular Indoor Furnishing manuals by other brands

Regency
Regency LWMS3015 Assembly instructions

Furniture of America
Furniture of America CM7751C Assembly instructions

Safavieh Furniture
Safavieh Furniture Estella CNS5731 manual

PLACES OF STYLE
PLACES OF STYLE Ovalfuss Assembly instruction

Trasman
Trasman 1138 Bo1 Assembly manual

Costway
Costway JV10856 manual


