Nexans N-COMFORT TR+ User manual

THERMOSTAT
N-COMFORT TR+
USER MANUAL

2
EN BLUETOOTH THERMOSTAT ......................................7
FI BLUETOOTH-TERMOSTAATTI ....................................16
NO BLUETOOTH-TERMOSTAT ......................................25
SE BLUETOOTH-TERMOSTAT ........................................33
3
EN BLUETOOTH THERMOSTAT ......................................7
FI BLUETOOTH-TERMOSTAATTI ....................................16
NO BLUETOOTH-TERMOSTAT ......................................25
SE BLUETOOTH-TERMOSTAT ........................................33
1 / 7
The Bluetooth® trademark and logos are property of
BluetoothSIG,Inc.,andtheirusageislicensendforTaelek
Oy. Other brands and trade names are property of the
respectiveowners.
Apple, the Apple logo, iPhone, iPad, and iPod touch are
trademarksofAppleInc.,registeredin the U.S. and other
countries.AppStoreisaservicemarkofAppleInc.
Google Play and the Google Play logo are trademarks of
GoogleInc.
TSENSE FLAT THERMOSTAT USER MANUAL
USER INTERFACE
NITT
WIRING
REMOVAL OF
VISUAL PARTS
INSTALLATION
USER INTERFACE

4
1 / 7
The Bluetooth® trademark and logos are property of
BluetoothSIG,Inc.,andtheirusageislicensendforTaelek
Oy. Other brands and trade names are property of the
respectiveowners.
Apple, the Apple logo, iPhone, iPad, and iPod touch are
trademarksofAppleInc., registered intheU.S.and other
countries.AppStoreisaservicemarkofAppleInc.
Google Play and the Google Play logo are trademarks of
GoogleInc.
TSENSE FLAT THERMOSTAT USER MANUAL
USER INTERFACE
NITT
WIRING
REMOVAL OF
VISUAL PARTS
INSTALLATION
REMOVAL OF VISUAL PARTS

5
1 / 7
The Bluetooth® trademark and logos are property of
BluetoothSIG,Inc.,andtheirusageislicensendforTaelek
Oy. Other brands and trade names are property of the
respectiveowners.
Apple, the Apple logo, iPhone, iPad, and iPod touch are
trademarksofAppleInc., registered intheU.S.and other
countries.AppStoreisaservicemarkofAppleInc.
Google Play and the Google Play logo are trademarks of
GoogleInc.
TSENSE FLAT THERMOSTAT USER MANUAL
USER INTERFACE
NITT
WIRING
REMOVAL OF
VISUAL PARTS
INSTALLATION
1 / 7
The Bluetooth® trademark and logos are property of
BluetoothSIG,Inc.,andtheirusageislicensendforTaelek
Oy. Other brands and trade names are property of the
respectiveowners.
Apple, the Apple logo, iPhone, iPad, and iPod touch are
trademarksof AppleInc.,registeredin theU.S.and other
countries.AppStoreisaservicemarkofAppleInc.
Google Play and the Google Play logo are trademarks of
GoogleInc.
TSENSE FLAT THERMOSTAT USER MANUAL
USER INTERFACE
NITT
WIRING
REMOVAL OF
VISUAL PARTS
INSTALLATION
WIRING INSTRUCTIONS

6
1 / 7
The Bluetooth® trademark and logos are property of
BluetoothSIG,Inc.,andtheirusageislicensendforTaelek
Oy. Other brands and trade names are property of the
respectiveowners.
Apple, the Apple logo, iPhone, iPad, and iPod touch are
trademarksofAppleInc.,registeredintheU.S.and other
countries.AppStoreisaservicemarkofAppleInc.
Google Play and the Google Play logo are trademarks of
GoogleInc.
TSENSE FLAT THERMOSTAT USER MANUAL
USER INTERFACE
NITT
WIRING
REMOVAL OF
VISUAL PARTS
INSTALLATION
INSTALLATION

7
1 / 7
The Bluetooth® trademark and logos are property of
BluetoothSIG,Inc.,andtheirusageislicensendforTaelek
Oy. Other brands and trade names are property of the
respectiveowners.
Apple, the Apple logo, iPhone, iPad, and iPod touch are
trademarksofAppleInc.,registeredintheU.S.and other
countries.AppStoreisaservicemarkofAppleInc.
Google Play and the Google Play logo are trademarks of
GoogleInc.
TSENSE FLAT THERMOSTAT USER MANUAL
USER INTERFACE
NITT
WIRING
REMOVAL OF
VISUAL PARTS
INSTALLATION
EN
Installation and operating instructions
N-COMFORT TR+ Thermostat – SETUP
TECHNICAL SPECIFICATIONS
Bluetooth: Version 4.2
Power supply: 230V - 50Hz
Maximum load: 16A (resistive)
Temperature range: +5°C/+35°C
External Temperature setback: 230V - 50Hz
IP class: IP20
Standard Color: White
Sensors: Built-in room sensor and external oor sensor NTC or
wireless Bluetooth sensor
INSTALLATION
Installation must be done by a qualied electrician in accordance with
wiring and building regulations. Before installation, disconnect any power
to the thermostat’s mains.

8
To release visual parts (A) and (B) pull the knob (D) out and remove the
screw (C). Plastic covers can now be pulled away easily
Connect the wires to the thermostat’s terminal: SETBACK: External Setback
Wire (if applicable), Nin: Power N connection, Nout: Heating cable N
connection, NTC: Floor temp sensor, Lout: Heating cable L connection, Lin:
Power L connection.
Next, position the thermostat and fasten it into the wall mounting box using
2 screws. Assemble the cover parts, x them with the screw and nally push
the knob in at correct position.
STARTUP
After connecting the power to the thermostat for the rst time thermostat
recognizes if oor sensor is connected or not and makes initialization
accordingly (selects between oor mode and air mode). The following
settings are initialized accordingly (oor/air).
Name of thermostat: RANDOM number
Mode: Floor / Air
Floor temperature min: 5°C / NaN
Floor temperature max: 27°C / NaN
Floor temperature offset (calibration): -3°C
Air temperature min: 5°C

9
Air temperature max: 28°C
Air temperature offset (calibration): 0°C
PWM min: 0%
PWM max: 100%
User program activated eco temp: 19°C
Externally activated eco temp 19°C
Valve protection: OFF
Sensor type: 10k ohm
Led brightness: 70%
Weekly program: OFF
Use N-Comfort app to check and modify settings.
N-COMFORT TR+ Thermostat – user manual
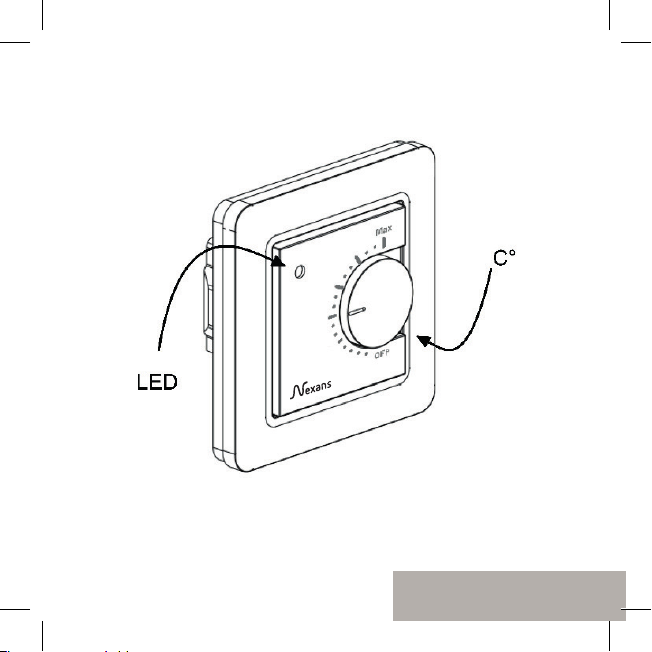
BASIC USE
The thermostat is controlled with a rotary knob and an optional setback
switch. The basic use of the thermostat is simple:
• Turn off the device by rotating the knob to OFF position
• Turn ON and adjust the desired temperature with the knob
• Use external 230VAC setback switch to activate the eco
temperature (19°C by default)

10
Led indication lights show the status:
• Red ON →comfort temp reached
• Red breathing →heating ON
• Green ON →eco temp reached
• Green breathing →heating ON
• Both leds blinking →error
• At power up red led is 4 seconds ON to indicate oor heating
mode and in all other modes green led is ON for 4 seconds
Additionally with N-Comfort app (see next chapter):
• Red blinking →bluetooth connection
• Green blinking →conrm to save changes by shortly turning the
knob to OFF state
ADVANCED USE
You can access all the thermostat data with a free of charge N-Comfort app
running in Android and iOS mobile devices. With the app you read logged
temperatures, modify settings and dene a weekly user program. App can
also generate email reports. Follow the guides in N-Comfort app. Ther-
mostat indicates the mobile device connection with fast blinking red led.
11
1 Settings
The thermostat has several settings which can easily be adjusted with
N-Comfort app. Note! Remember to save changes before leaving the
setting page.
Name of thermostat
A free and descriptive name shown in N-Comfort app
Heating mode
The hermostat can measure and adjust oor temperature, air temperature,
air temperature with oor limits (dual) and heating ratio (PWM control).
Floor temperature min and max
This setting has two main purposes. In oor mode min and max values
specify active range of knob. In dual mode this setting does not effect the
knob but the thermostat keeps oor temperature between limits. Feature
can be used to protect wooden oors (max limit) or e.g. to guarantee warm
oor in room with replace. Note: N/A in PWM and in air mode.
Floor temperature offset (calibration)
If user’s temperature measurement has offset to knob setpoint this setting is
used to calibrate. Note, oor sensor inside oor construction is much war-
mer than real temperatures measured in room. Thus default is -3°C to have
rotary knob adjustment range in realistic area of 18°C...24°C.

12
Air temperature min and max
This setting has two main purposes. In air and dual mode it species active
knob range. In all other modes it can be used as air over temperature
protection.
Air temperature offset (calibration)
If user’s temperature measurement has offset to knob setpoint this setting is
used to calibrate.
PWM min and max
This setting has two main purposes. In PWM mode min and max values
specify active knob range. In all other modes it guarantees maximum pulse
ratio. Note: Setting can be used, e.g., to limit maximum heating power
to comply with installation standard EN50599. Cycle time of PWM is 10
minutes.
User program activated eco temp
During all green hours in user program the temperature is adjusted to this
value.
Externally activated eco temp
When 230VAC (pilot signal) is connected to the setback input terminal the
temperature set value is dened by this parameter.

13
Valve protection
Valve protection turns heating ON once per week for 5 minutes even at
summer time. This setting is typically used with water carrier oor heating
valves. Feature prevents the valve from getting stuck during summer.
Sensor type
Floor sensors from different manufacturers can be used. Supported types
are 2k, 10k, 12.5k, 15k, 33k NTCs.
Led brightness
Brightness of the Led indicator.
User program mode
AUTO enables the user program, OFF disables it.
Wireless temperature sensor
Adding a wireless Bluetooth temperature sensor allows the best location for
temperature measurement. It is also very accurate. To add a wireless sensor
you have to select it in the N-Comfort app and write the sensor address in
Network key elds.
Receive wireless eco controls
Athermostatwithanexternal setback switch can control several other thermo-
stats to go in setback mode. This feature will save the user from hard wiring
the Home/Away switch to many thermostats. To form a group of thermostats

14
you need to enable the Receive wireless eco controls and write a freely
selectable group name in Network key elds.
Network key and Conrm Network key
Network key is used to identify the wireless temperature sensor or the group
of thermostats to receive the wireless eco controls. Both elds need to have
exactly the same text string and you have to save the settings. For the wire-
less sensor you can use the QR code printed on the back side of the device.
Just use the camera function in app (bottom of the screen) to read the code,
then accept and save it.
2 Week schedule
User can create 24h/7d week schedule in N-Comfort app. With week
schedule the user programs thermostat to decrease temperature during
time slots when room is not used. Comfort/eco state is indicated with red/
green led.
Week schedule execution needs correct real time in thermostat. In case of
invalid real time the week program is deactivated and user is warned
by blinking leds. Real time is updated from N-Comfort app every time
the thermostat is connected to a mobile device. Thermostat real time has
backup for up to 2 hour power breaks.

15
3 Error modes
The Thermostat indicates an erratic state by blinking the leds. The most typi-
cal case is that real time is corrupted during too long power break. This is
automatically solved by making a connection with N-Comfort app. Possible
error codes (visible on info page of the App) are
1Floor sensor fault
2Over heat
3Internal fault
10 Calendar time is not valid
In errors 1, 2, 3 heating is permanently off. In error 10 user program is
deactivated.
You may try to reset the fault by switching off the power to soft reset or by
using N-Comfort app to generate a hard reset.

16
FI
Asennus- ja käyttöohje
BLUETOOTH-TERMOSTAATIN ASENTAMINEN
TEKNISET TIEDOT
Bluetooth: Versio 4.2
Käyttöjännite: 230V - 50Hz
Maksimikuorma: 16A (resistiivinen)
Käyttölämpätila: +5°C/+35°C
Ulkoinen ohjaus: 230V - 50Hz
IP-luokka: IP21
Väri: Valkoinen
Anturit: Sisäinen huoneanturi, ulkoinen NTC-lattia-anturi. Mahdolllisuus
kytkeä ulkoinen langaton anturi (Bluetooth).
ASENNUS
Tuotteen saa asentaa vain valtuutettu ja pätevä asentaja paikallisten
määräysten mukaisesti. Varmista sähkönsyötön jännitteettömyys ennen
asennusta.

17
Irrota muoviosat (A) ja (B) vetämällä ensin nuppi (D) ulos ja kiertämällä alta
paljastuva ruuvi (C) irti.
Kytke johdot termostaatin liittimeen: TIPUTUS: ulkoinen ohjaus (jos käytös-
sä), Nin: syötön nollajohdin, Nout: kuorman nollajohdin, NTC: lattia-antu-
rikaapeli, Lout: kuorman vaihejohdin, Lin: syötön vaihejohdin.
Seuraavaksi kiinnitä termostaatti asennusrasiaan 2 ruuvilla. Laita kehys ja
keskiölevy paikalleen, varmista ruuvilla ja paina lopuksi nuppi oikeassa
asennossa paikalleen.
KÄYNNISTYS
Ensimmäiselllä käynnistyskerralla termostaatti tunnistaa jos lattia-anturi kyt-
ketty ja alustuu vastaavasti lattia- tai huonesäädölle. Asetusten oletusarvot:
Termostaatin nimi: satunnaisluku
Toimintatila: Lattia / Huone
Lattialämpötila min: 5°C / ei käytössä
Lattialämpötila max: 27°C / ei käytössä
Lattia-anturin kalibrointi: -3°C
Huonelämpötilan min: 5°C
Huonelämpötilan max: 28°C
Huoneanturin kalibrointi: 0°C
PWM min: 0%

18
PWM max: 100%
Viikko-ohjelman käyttämä eco-lämpötila: 19°C
Ulkoisesti aktivoitava eco-lämpötila: 19°C
Toimilaitteen juuttumissuoja: OFF
Lattia-anturi: 10kOhm
Ledien kirkkaus: 70%
Viikko-ohjelma: OFF
N-Comfort App:n avulla voit tarkistaa ja muuttaa asetuksia.
N-COMFORT TR+ termostaatin KÄYTTÖOHJEET
PERUSKÄYTTÖ
Termostaattia ohjataan kierrettävällä nupilla ja valinnaisella ulkoisella ti-
pukytkimellä. Peruskäyttö on yksinkertaista:
• Sammuta laite kääntämällä nuppi OFF-asentoon
• Käynnistä laite ja käännä nuppi haluttuun lämpötilaan
• Aseta yötiputus (ecotila, oletusarvo 19°C) ulkoisella 230VAC
kytkimellä
Ledien indikoima tila:
• Punainen ON →comfort lämpötila
• Punainen aaltoilee →lämmitys päällä

19
• Vihreä ON →eco-lämpötila
• Vihreä aaltoilee →lämmitys päällä
• Molemmat ledit vilkkkuvat →vikatila
• Käynnistyksessä punainen led on päällä 4 sekunnin ajan
osoittaen lattialämmitys- moodia ja muissa moodeissa vihreä
led palaa 4s ajan
Lisäksi N-Comfort Appin kanssa (ks seur kappale):
• Punainen vilkkuu => N-Comfort kytketty
• Vihreä vilkkuu => muutosten tallennus vahvistettava käyttämällä
nuppi OFF-asennossa
TÄYSIMITTAINEN KÄYTTÖ
Ilmaisella N-Comfort App:llä (Android- ja iOS-mobiililaitteet) käyttäjä
voi seurata huoneen viimeisiä lämpötiloja ja energiankulutuksia, muuttaa
asetuksia ja luoda viikko-ohjelman. App osaa myös luoda raportteja val-
miina lähetettäväksi sähköpostilla ja siinä on sisäänrakennettu käyttöohje.
Termostaatin punainen led vilkkuu nopeasti kun se on yhteydessä N-Com-
fort App:iiin.
1 Asetukset
Termostaatin asetuksia muutetaan helposti N-Comfort App:n avulla. Huom!
Muista tallentaa tehdyt muutokset ennen poistumista asetuksista.

20
Toimintatila
Termostaatti voi toimia lattia-, huone/ilma-, yhdistelmä- tai PWM-tilassa.
Yhdistelmätilassa huonelämpöä pidetään tasaisena lattia- lämmityksellä,
kuitenkin s.e. lattialämmityksen min/max-rajoja noudatetaan. PWM-tilassa
säädetään nupilla kiinteän jakson päälläoloaikaa (0-100%), eli kuormaan
menevää tehoa.
Nimi
Vapaasti valittava ja kuvaava laitteen nimi N-Comfort App:ssä.
Lattialämpötilan min ja max
Asetuksella vaikutetaan kahteen asiaan: Lattia-tilassa määritetään nupin
toiminta-alue ja yhdistelmätilassa pidetään lattian lämpötila annetuissa
rajoissa. Toimintoa voidaan käyttää puulattioiden suojelemiseen liian kor-
keilta lämpötiloilta tai varmistamaan lämmin lattia huoneissa joissa on esim
takka. Huom: Ei käytössä huone- ja PWM-tilassa.
Lattia-anturin kalibrointi
Jos lattia-anturilta mitattu lämpötila poikkeaa nupin osoittamasta arvos-
ta, voidaan tällä asetuksella kumota virhe. Huom, lattia-anturin mittaama
lämpötila lattian sisällä on tyypillisesti korkeampi kuin huoneessa mitattu
lämpötila. Siksi oletuksena tälle asetuksella on -3°C jotta nuppi toimisi
tarkemmin säätöalueella 18...24°C.
Table of contents
Languages:
Other Nexans Thermostat manuals


Popular Thermostat manuals by other brands

Aura
Aura JGSTATW2W instruction manual

Painless Performance Products
Painless Performance Products 30112 installation instructions

EBECO
EBECO EB-Therm 55 manual

Full Gauge Controls
Full Gauge Controls Microsol Ri user manual

EPH Controls
EPH Controls HRT Installation and operation guide

Camco
Camco Therm-O-Disc 08130 installation instructions


Honeywell
Honeywell Digital Round T8775A owner's guide

EUROSTER
EUROSTER Q1 Installation and operation manual

Robertshaw
Robertshaw RS4110 user manual

ICM Controls
ICM Controls SC 1901 Installation, operation & application guide

Powerley
Powerley PWLY-7828-A1 manual

JAGO
JAGO RMTMS01 Original instruction manual