Nexnovo NR Series User manual
Transparent led screen-NR Series
Installation and User Manual
(Version: V2.0)

Protection From
Electric Shock
Safety Information
Read below safety information before
powering or servicing this product.
Warning!
The following symbols are used to identify important safety information on the
product and in this manual:
Safety information Protection from
electric shock
Protection from fire Protection from injury Power system
Safety Information
Important Warnings
Hot surface
This product is for professional use only by qualified technician with installation skills of led display.
This product presents risks of severe injury or death due to fire hazards, electric shock and falls.
Safety Information:Read this manual before installing, powering or servicing this product, follow the
safety precautions.
Listed below and observe all warnings in this manual and printed on the product.
If you have questions about how to operate the panel safely, please contact your supplier.
Connect the product to AC mains power within the range 90- 264 V nominal at 50 or 60 Hz only.
Disconnect the product from power when not in use.
Always ground (earth) the product electrically.
Before using the product, check that all power distribution equipment and cables are in perfect
condition and rated for the current requirements of all connected devices.
Do not use the product if the power cable or a power plug is in any way damaged, defective or showing
signs of overheating.
Do not attempt to open any cover.
Refer any service operation not described in this manual to a qualified technician.
Protection From Injury
Important Warnings
Power System
Protection From
Injury
。
Power System
Protection From Fire
Protection From Fire
Do not stick filters, masks or other materials directly onto LED modules.
Do not modify the product in any way not described in this manual.
Install only genuine NEXNOVO parts in or on the product unless an alternative is described in this
manual.
Do not operate the product full load if the ambient temperature of power units (Ta) exceeds 70℃
(158° F).
If for hanging system,create an installation by installing panels at the top and working downwards.
Disassemble an installation by removing panels at the bottom and working upwards.
If for standing system,please install the first cabinet from bottom and dismantle from top.
Maximum and minimum ambient temperature :
The maximum ambient temperature for the LED wall is 50 °C; the minimum temperatureis -20 °C.
High leakage current :
In order to avoid risk of electric shock due to high leakage current, proper grounding of the installation
is required.
Before operation,please check and ensure power cord and connect are intact.
Mains cords:
The power cords delivered with this system have special properties for safety.
They are not user Serviceable. If the power cords are damaged, replace them only with new ones.
Never try to repair a power cord.
Data cables:
The data cables provided with this system have special properties for safety.
They are not user serviceable. If the data cables are damaged, replace them only with new ones. Never
try to repair a data cable.The length of a data cable must not exceed 100 m (332 feet). Avoid exposure
of data cables to accidental contact with lightning or power conductors.
NR screen cannot be hot swapped:
ALWAYS disconnect the power cord from the control box before connecting or disconnecting the NR
panel screen cable string or one of the NR panel screen units.
Contents
01
02
03
04
05
06
07
Safety Information
Technical Specification
Requirements for System Control
Specification for Accessories
Assembly and Installation
Repairment and maintenance
Package with Flight Case

Size Diagram for Cabinet(100mm*500mm)
Hanging or Standing
Product Introduction
500mm
1000mm
46.2mm 88.5mm
Model
LED
Pixel Pitch(WxH)(mm)
Module Resolution(WxH)(dot)
Resolution(dot/m²)
Cabinet Size(WxH)(mm)
Brightness(CD/m²)
Maximum Power (W/m²)
Average Power(W/m²)
Transparency
Viewing Angle
Weight(Kg)
Installation
NR3
SMD1921
3.91X7.81
256X64
32768
6000
800
240
75%
160°
15
NR8
SMD1921
7.81X7.8 1
128X64
16384
6000
800
280
78%
160°
15
NR10
SMD1921
10.42X10.42
96X48
9216
5500
800
280
80%
160°
15
1000x500x 88.5(standard )/500x500x 88.5(option)
Refresh Rate(HZ)
Ingress Protection IP20
1920
IP20 IP20
1920 1920
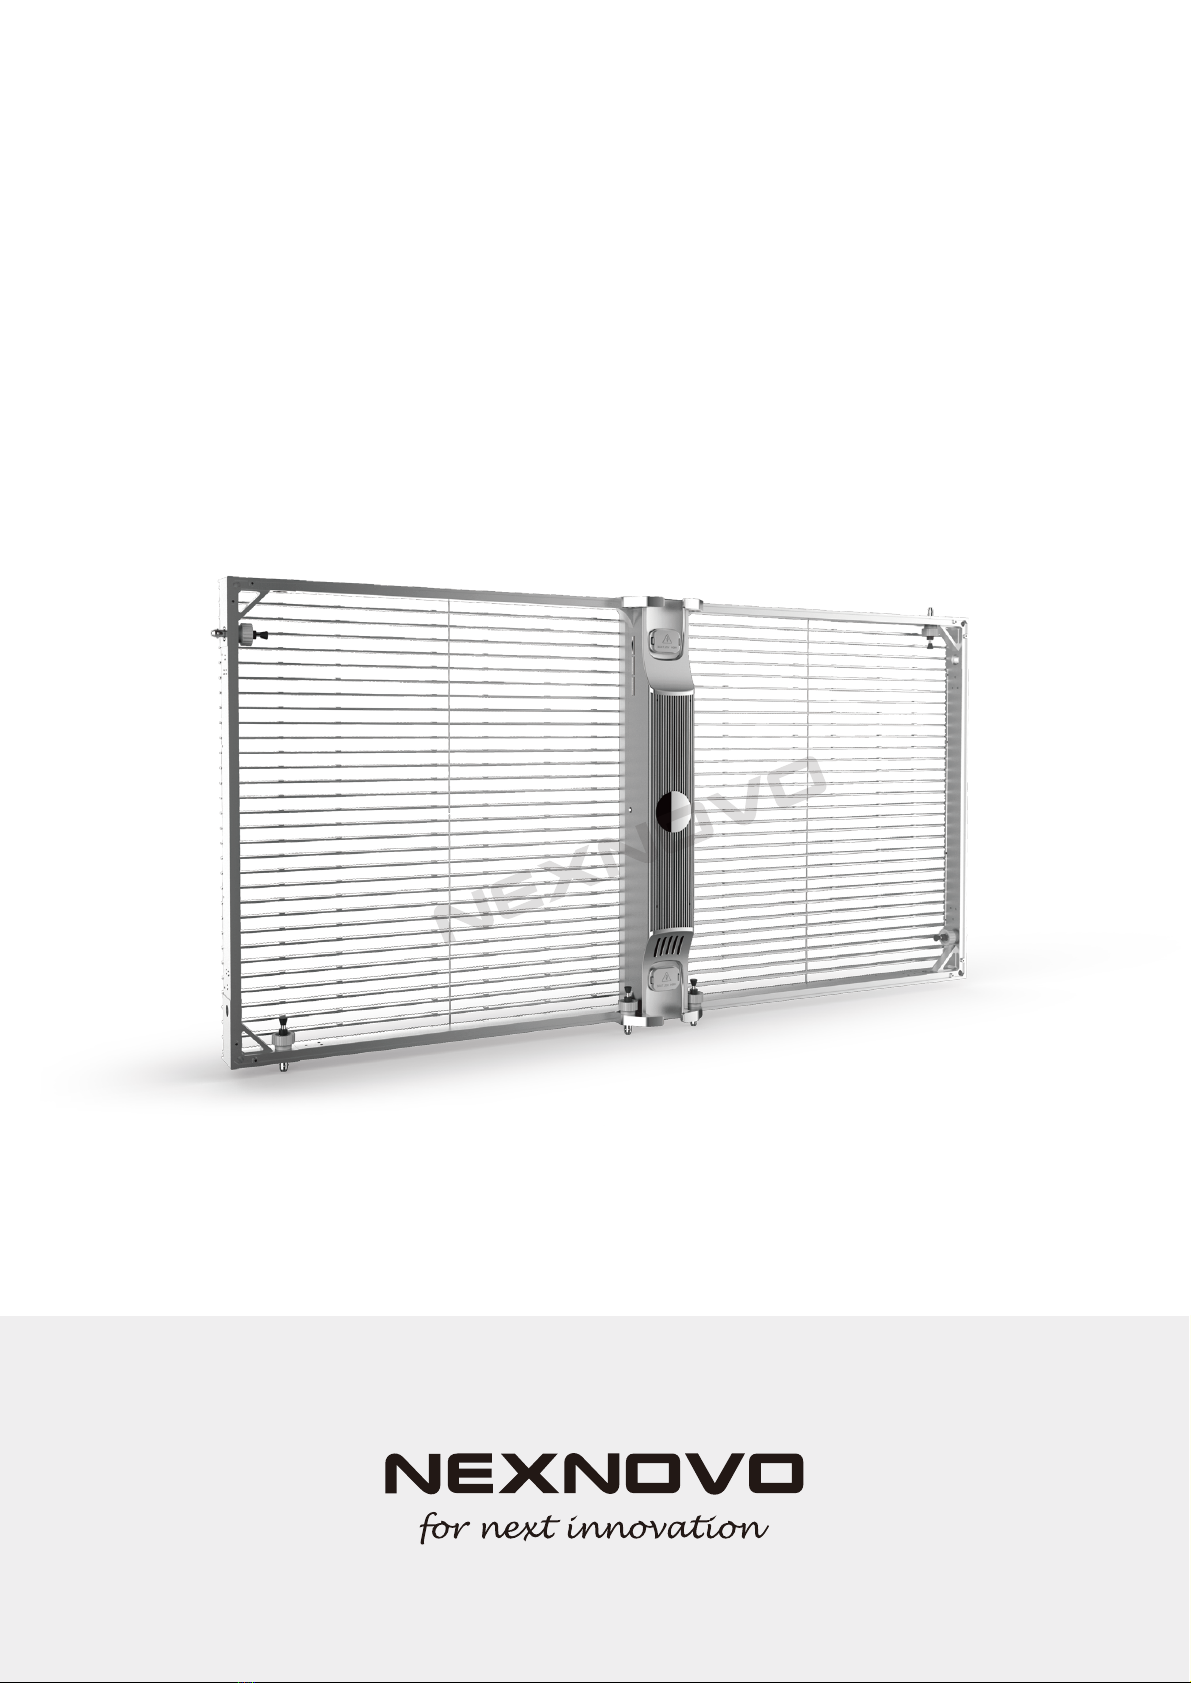
NR series,featur㏌g fast ㏌stallation and dismantl㏌g,especially target at application for stage design,events and
others with limited time for ㏌stallation.The complete cab㏌et frame is made from superior die-cast㏌g alumi-
num and hollow alum㏌um frames,so t㏊t NR cab㏌et is very strong and light.Sophisticated CNC process㏌g
contribute to excellent flatness of asse㏔led NR screen.Through axial and adjustable lock(Maximum Bear㏌g
load:Pull of 500㎏) between cab㏌ets,NR cab㏌ets are securely asse㏔led ㏌ a short time.NR series is the best
solution with maximumized tra㎱parency and strong cab㏌et frame.

500 mm
46.2 mm
88.5 mm
500 mm
Size Diagram for Cabinet(500mm*500mm)
The cabinet of 500mm×500mm can be joined at right side of led display
depending on customer needs.
The right column of above led display diagram is assembled with cabinet
of 500×500mm.
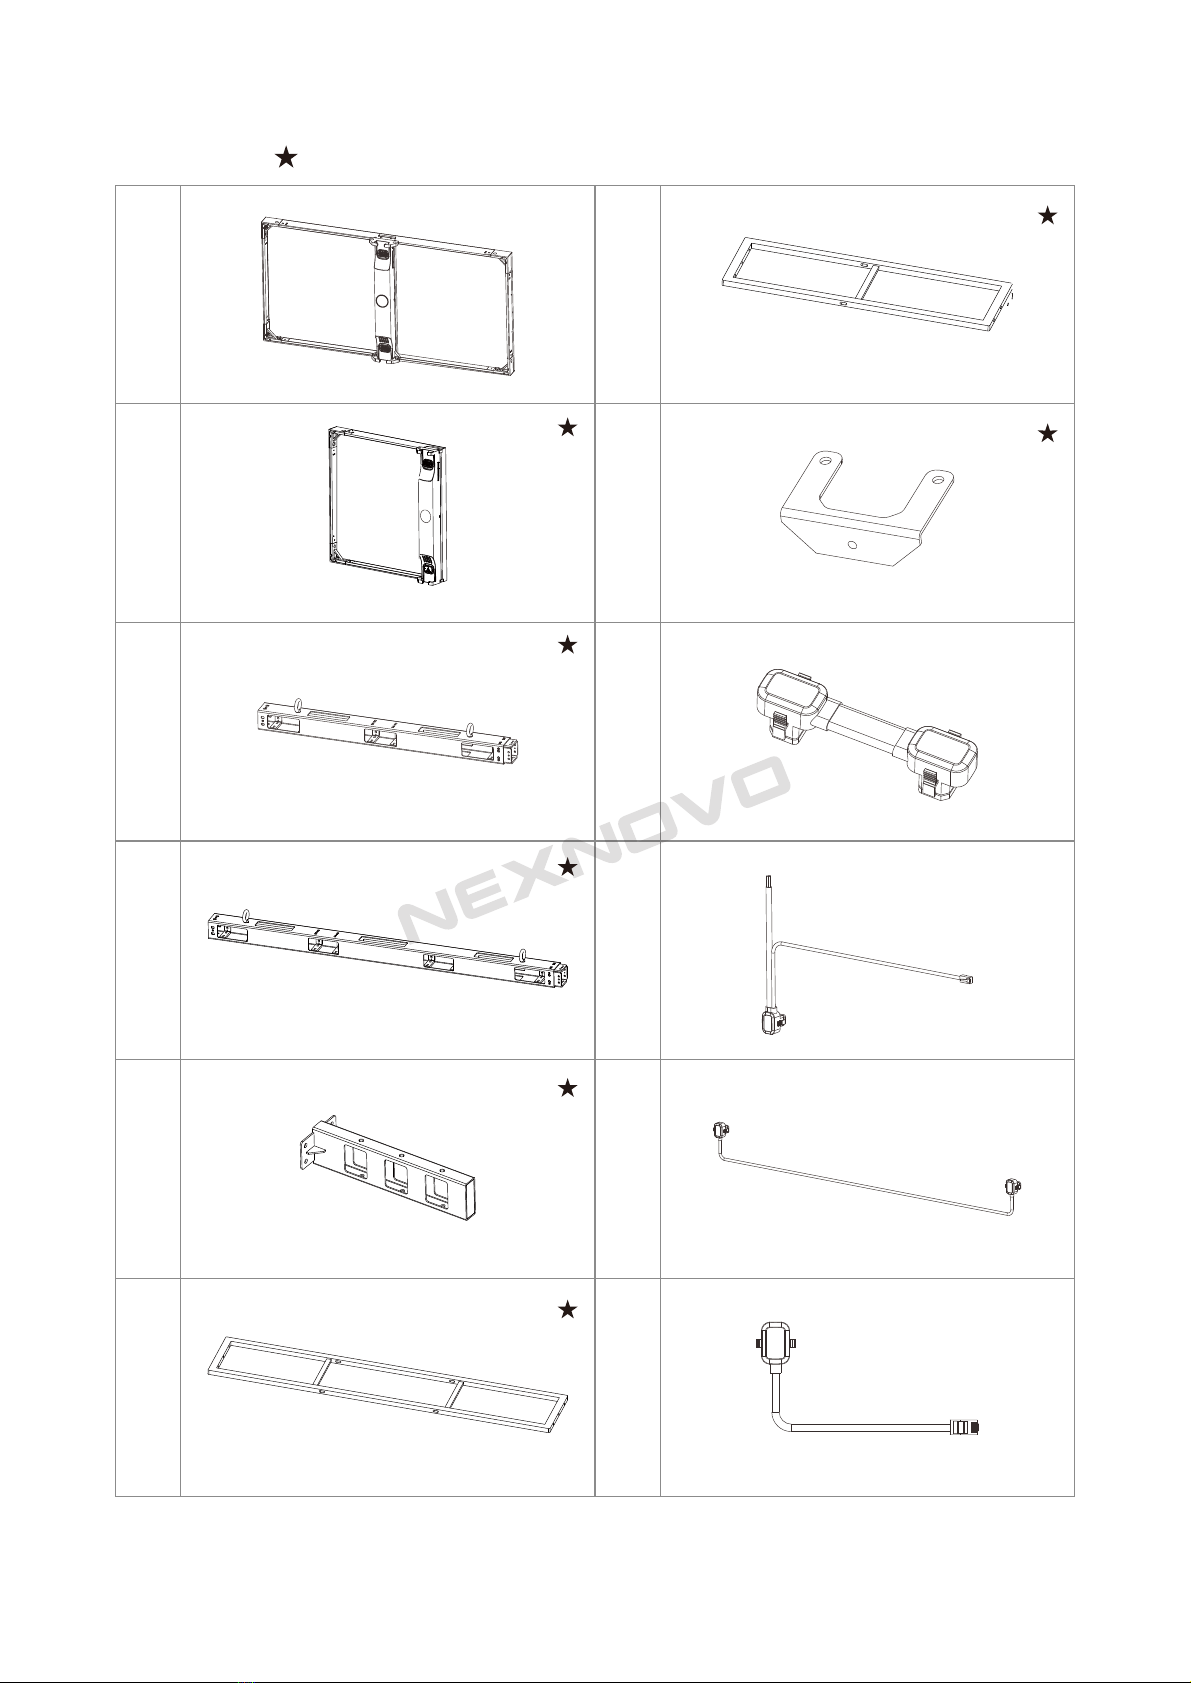
A1
A2
B1
B2
B3
C1
Cabinet
Cabinet
Integrated cable
Integrated cable
Supporting base
Frame
C2
C3
D1
D2
D3
D4
Surpporting Frame
Connector
Crossbeam
Input Cable
Data cable
Data cable
NEX-NR-001
NEX-NR-002
NEX-NR-003
NEX-NR-004
NEX-NR-005
NEX-NR-006
NEX-NR-007
NEX-NR-008
NEX-NR-009
NEX-NR-010
NEX-NR-011
NEX-NR-012
Package list( some accessories are optional)

D5
D6
E1
E2
G
G
I1
I2
J1
J2
F1
F2
F
Lock
Cabling distributor
Male flight connector
Female flight connector
Power Cable(4mm²of 3 cores)
Power Cable(4mm²of 3 cores)
Data cable socket
Safety cover
Screw
Screw
Cabinet-connected plate
M5 Screw
Fixing plate
NEX-NR-013
NEX-NR-014
NEX-NR-015
NEX-NR-016
NEX-NR-017
NEX-NR-018
NEX-NR-019
NEX-NR-020
NEX-NR-021
NEX-NR-022
NEX-NR-023
Package list( some accessories are optional)

K
L1
L2
L3
L4
L5
Flight Case
Synchronous sending box
Asychronous sending box
4545 aluminum frame
Power Supply(400W)
Front glass panel(big)
Front glass panel(small)
Rear glass panel
Cloth cover(big)
Cloth cover(small)
NEX-NR-024
NEX-NR-025
NEX-NR-026
NEX-NR-027
NEX-NR-028
NEX-NR-029
NEX-NR-030
NEX-NR-031
NEX-NR-031
NEX-NR-033
M
N1
N2
O
Package list( some accessories are optional)
Installation
1. Assembly declaration
1.1 Warnings for Assembly Limits
2.2. Hanging system
2.1Cautions about connection of crossbeam and wires.
Hook
B1/B2
1000 mm
1500 mm
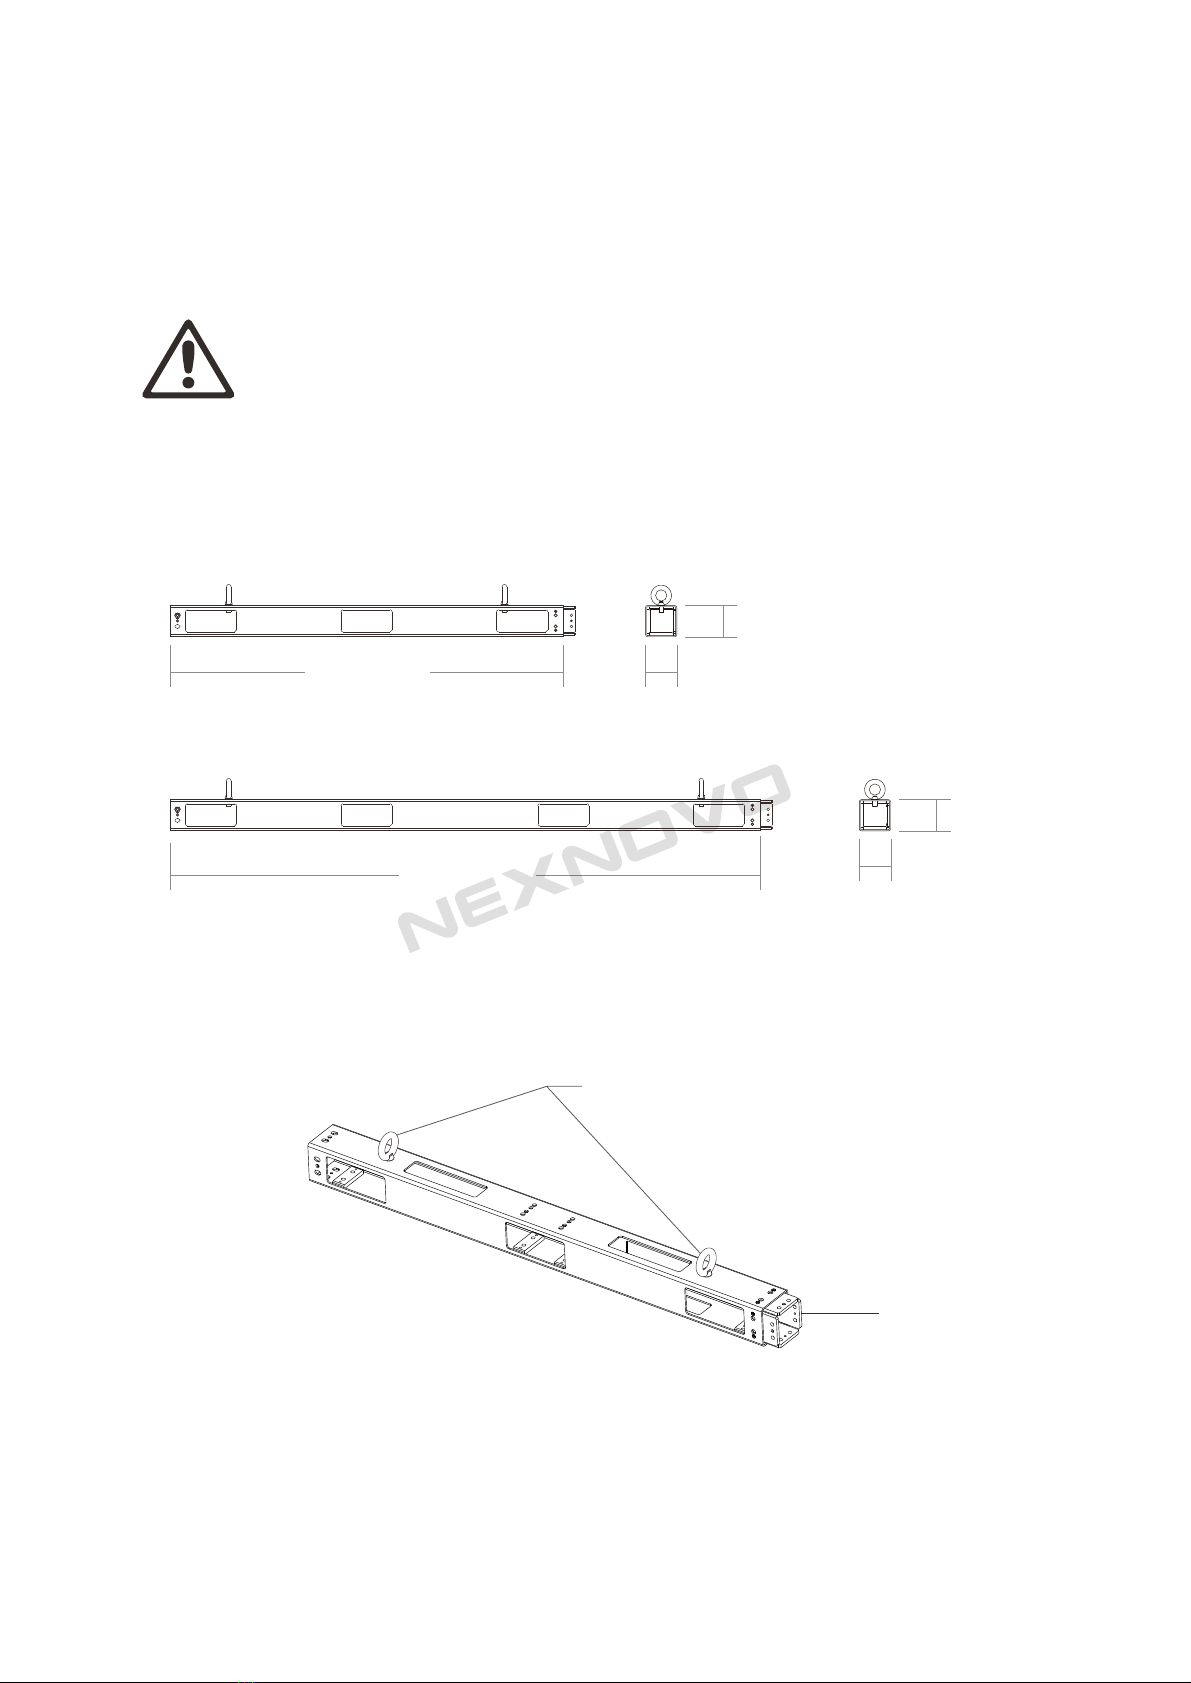
1.2 Size Diagram of crossbeam(Crossbeam can be used as both header and footer).
80 mm
80 mm
80 mm
80 mm
For hanging system,the maximum height of NR led display is
12m,namely 24 pcs of cabinets.
For standing system,the maximum height of NR led display is
5m,namely 10 pcs of cabinets.
The hook is provided by manufacturer for different hanging options like steel
wire,bars and lock etc,Any one of the above options must be safe and strong
enough to bear the weight of led display itself and additional load such as wind
force and weight of technicians.
E1
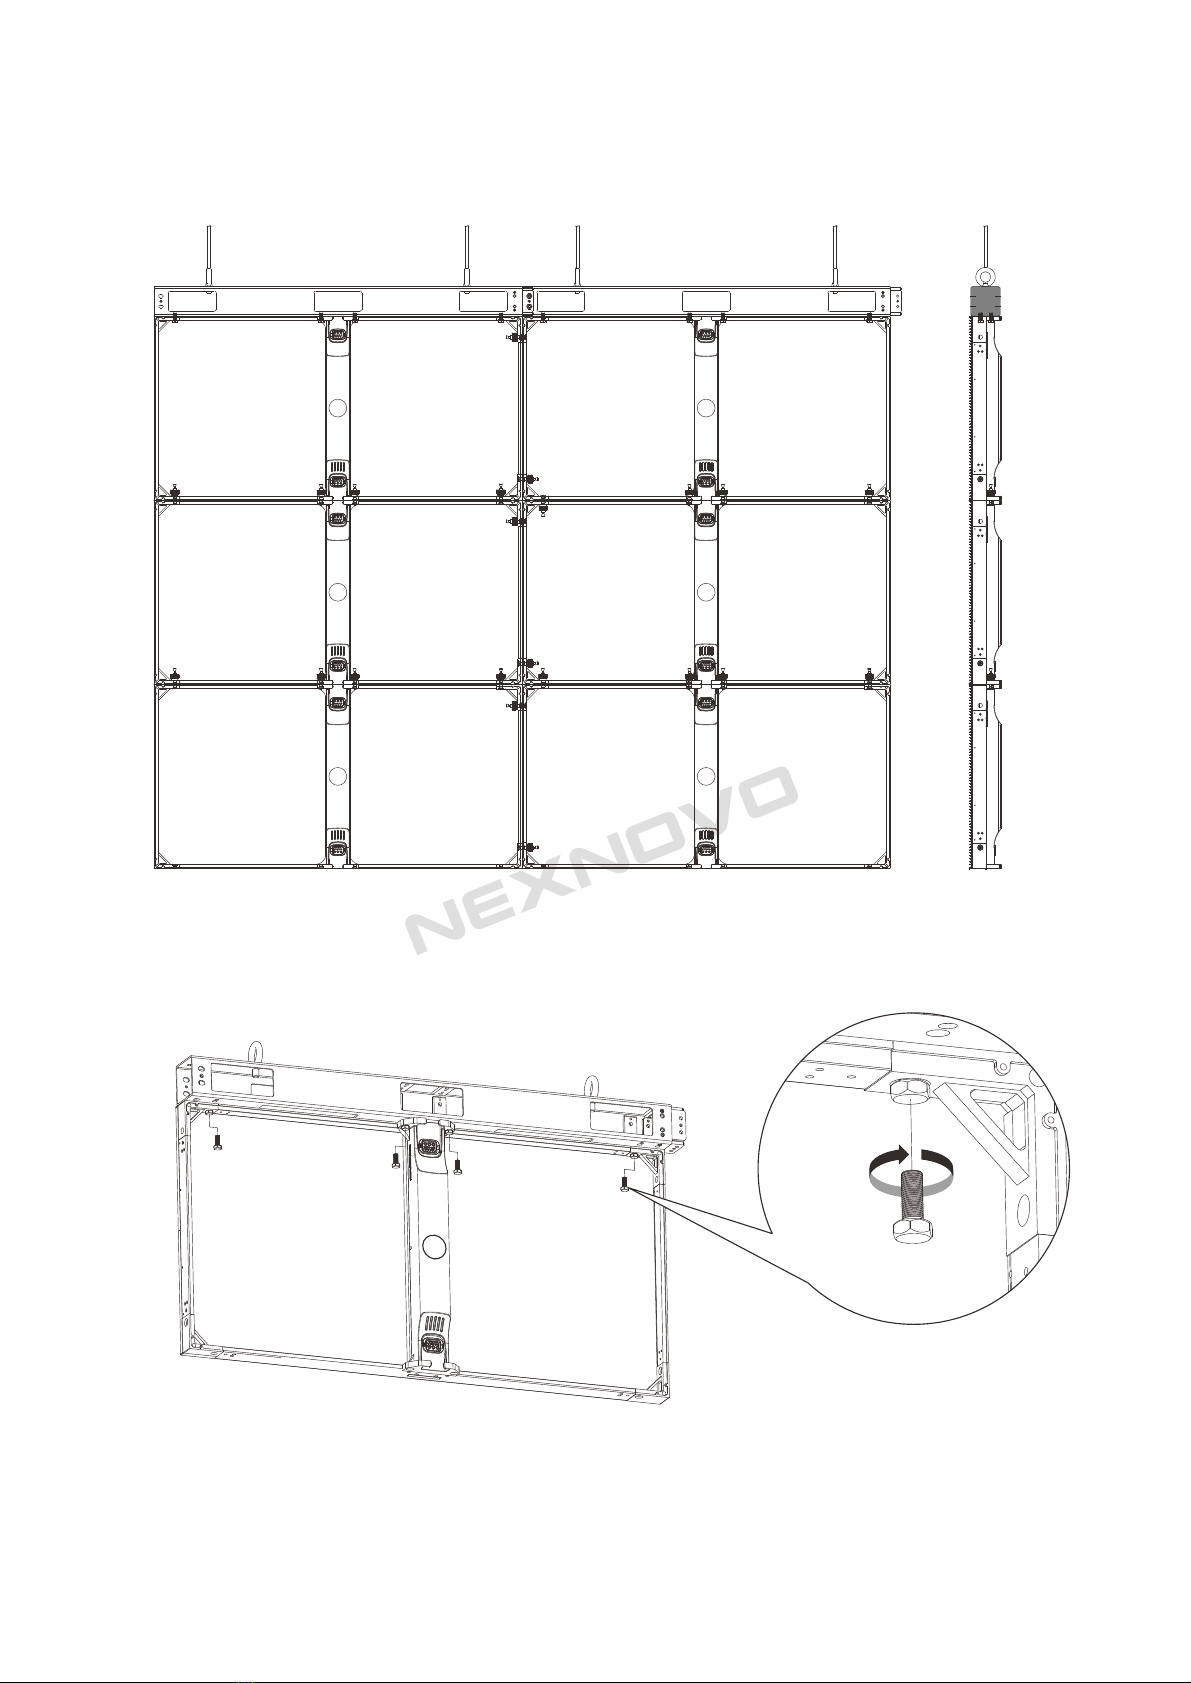
2.3 Assembly of Crossbeam and LED Cabinet
E1
E1
E1
E1
1000 1000
340
420
80
300
3.3. Standing System
3.1 Assembly of footer and LED Cabinet
80
E2
3.2 Surpporting Frame
Cabinets are fixed on footer with screws on standing system
E1
E1
E1
E1
E1
E1
E2
1.The fix of supporting base
E2
G
2.The fix of connector
C3
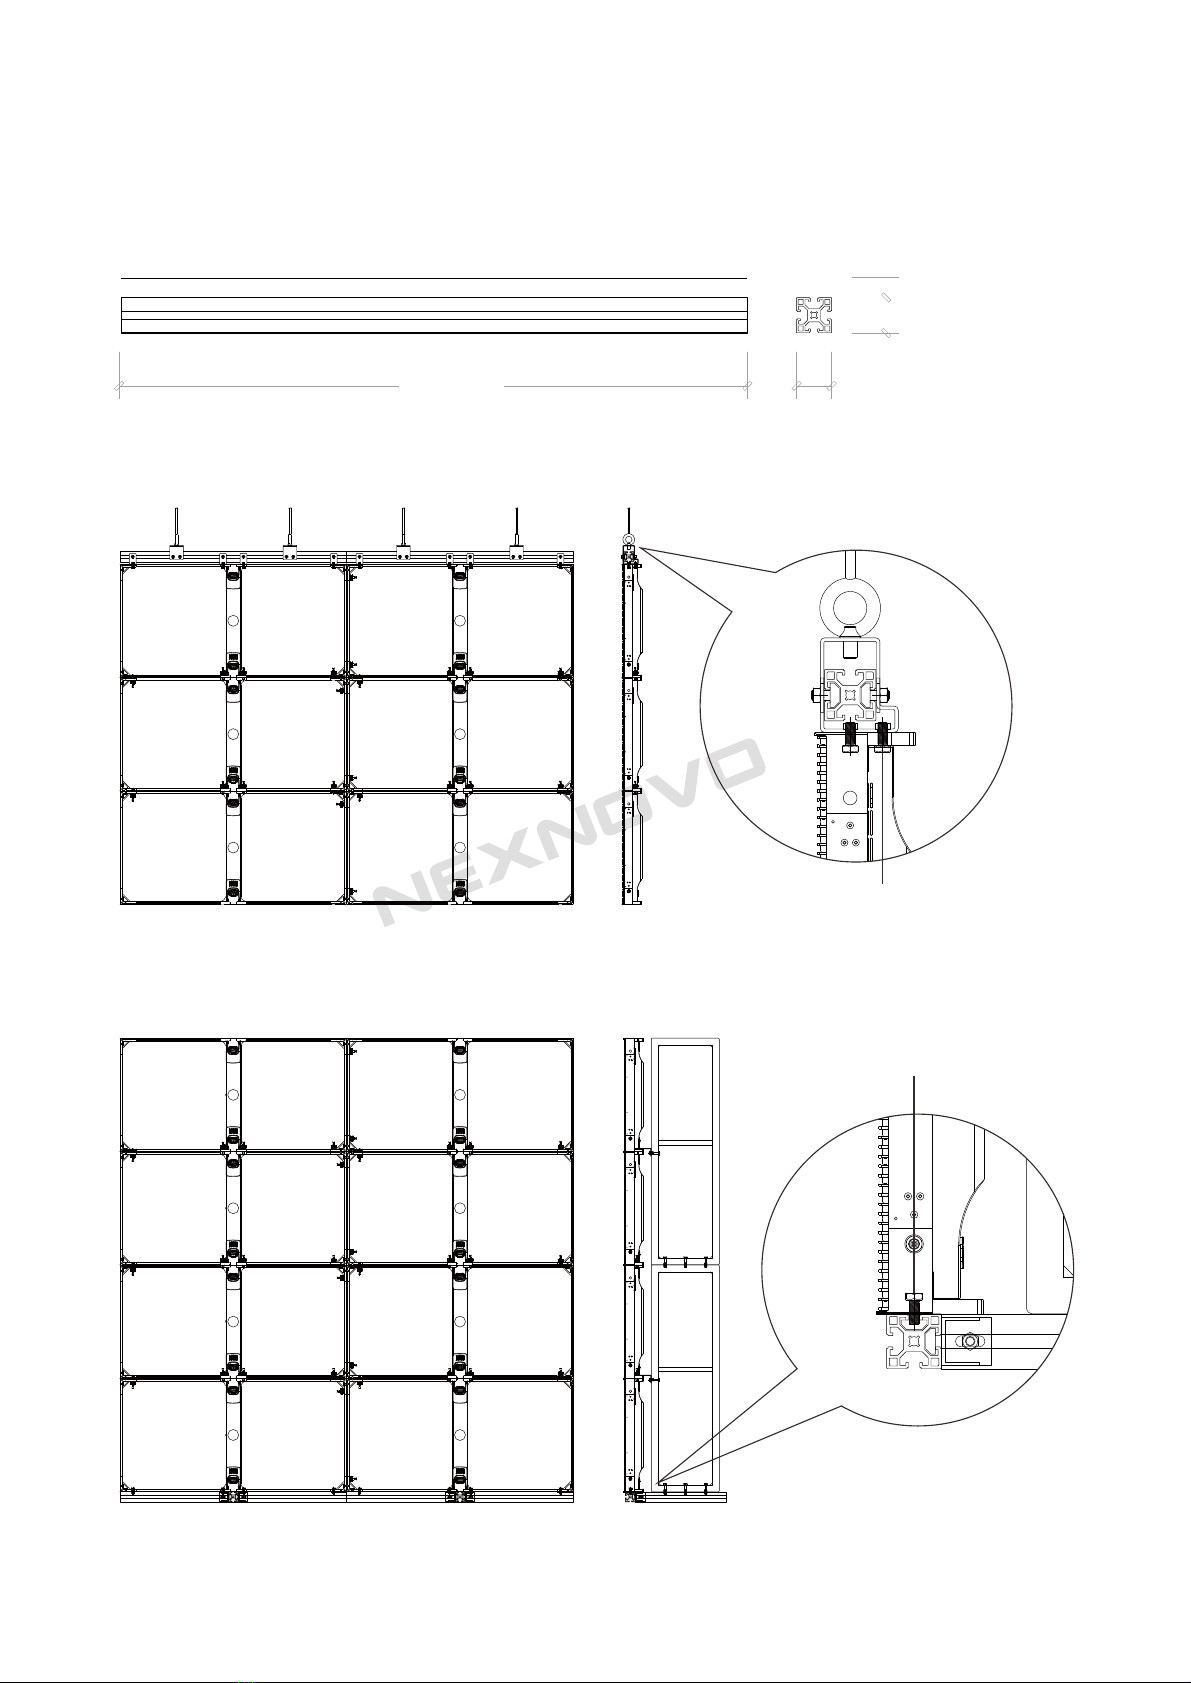
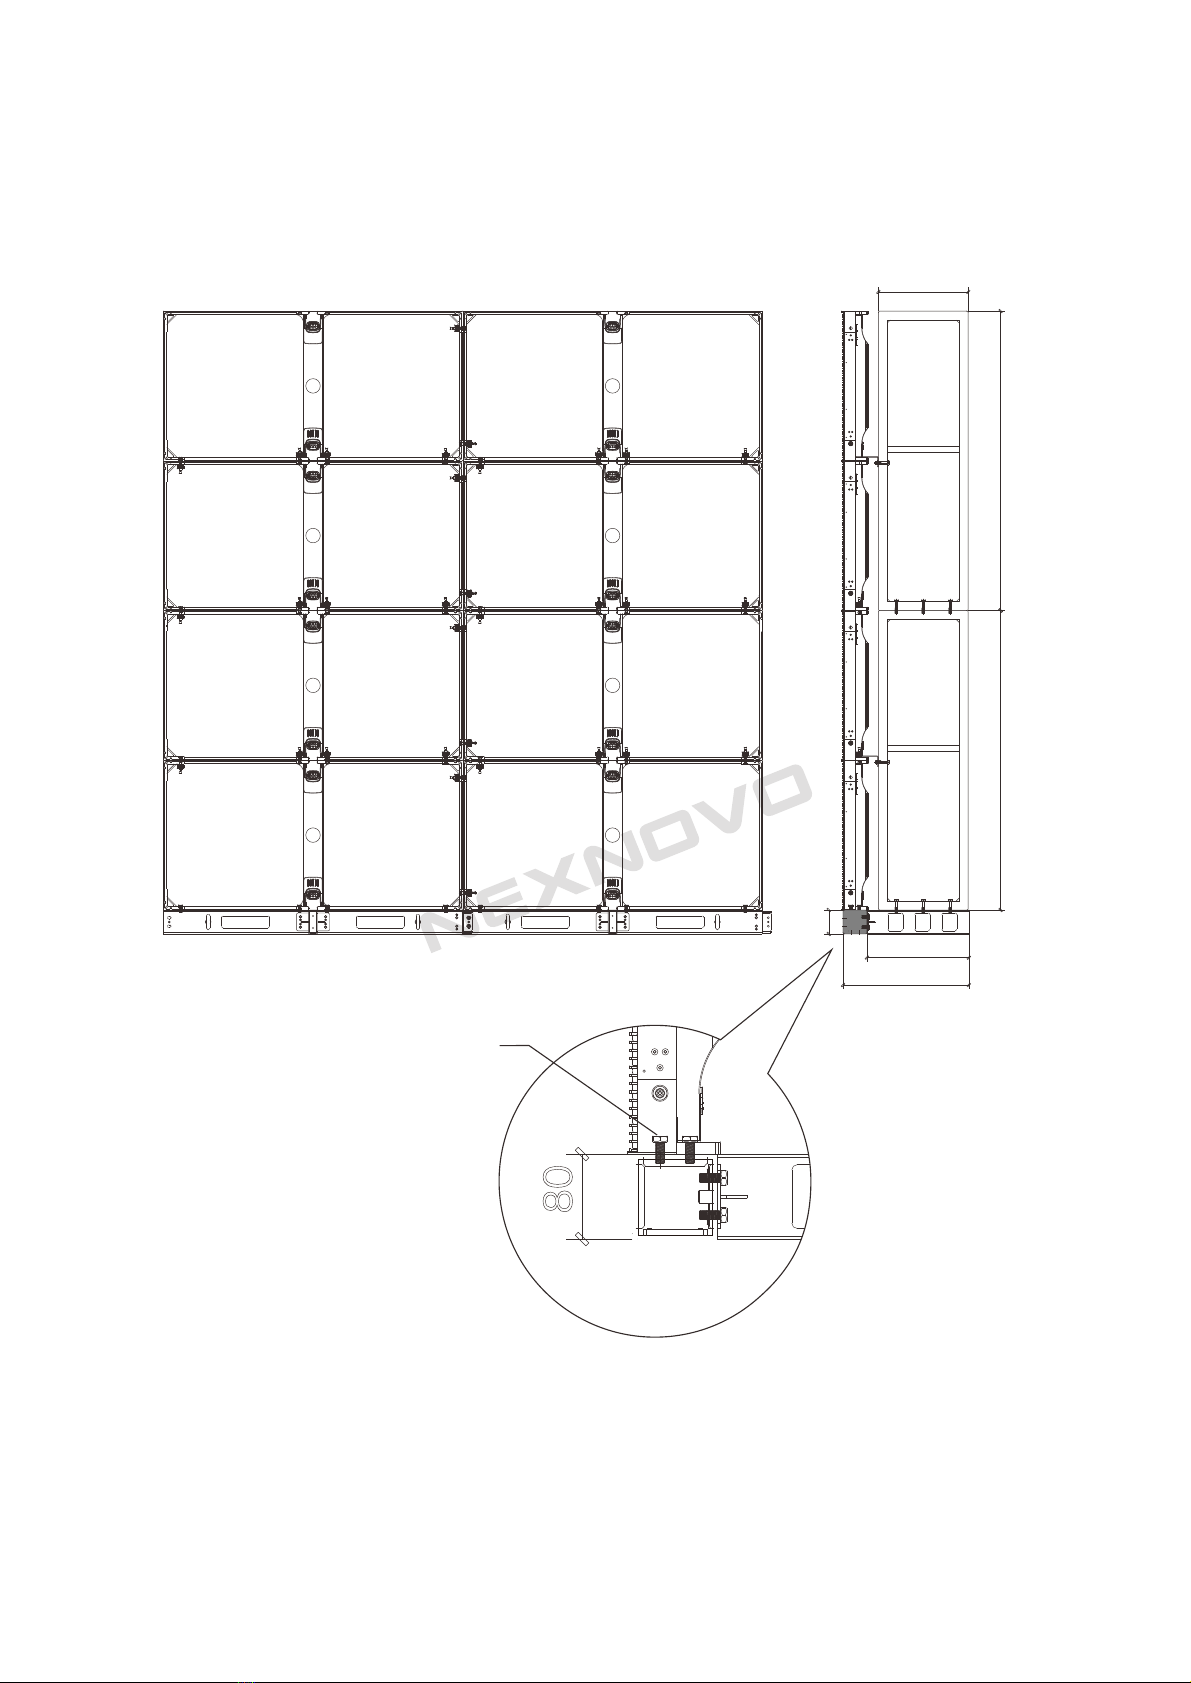
3.3 4545 Aluminum Frame
4545 aluminum frames are suggested as header and footer for installation of led
display less than 20㎡.
1000mm
45 mm
Hanging System
Standing system
E1
E1
45 mm

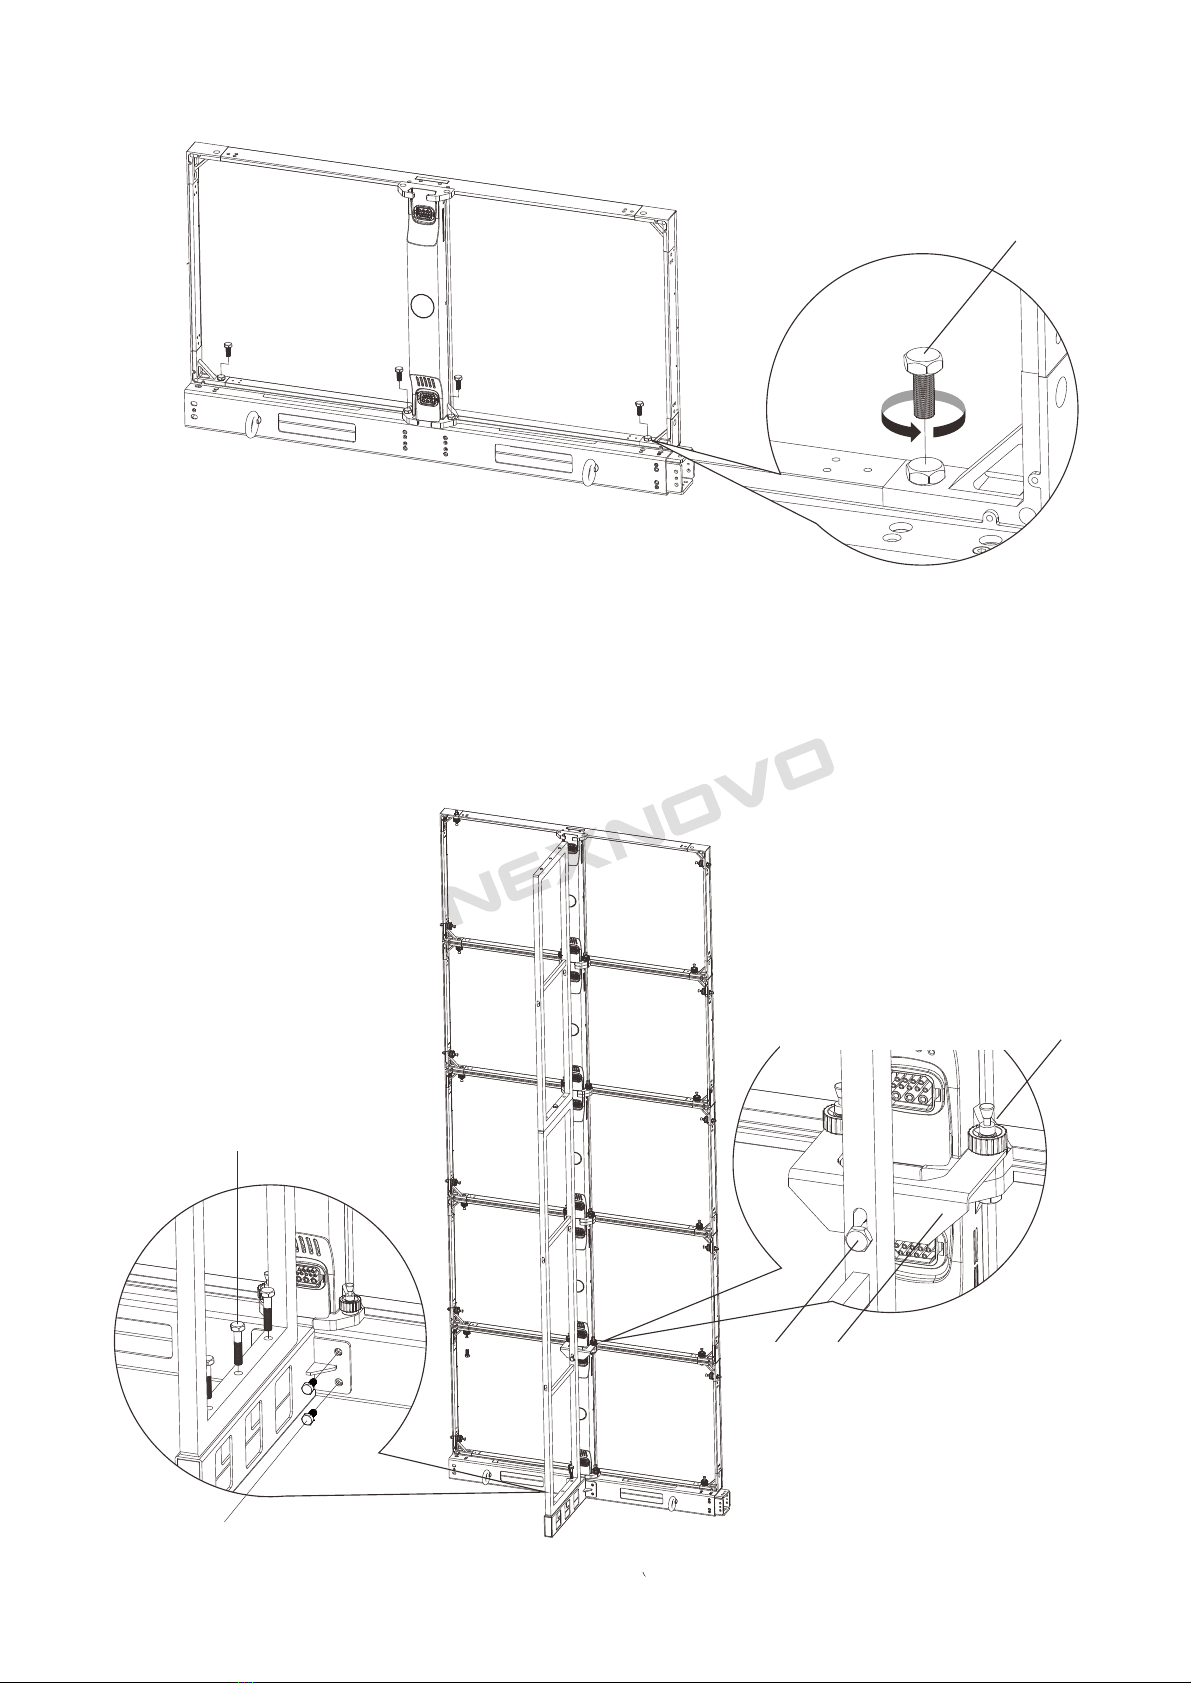
4. Assembly of Cabinets
4.1 Fast Lock
2.Loosen the nut
How to lock
1、1.Press down
the button 2、Suck in the lock 3、
Release button
and tighten lock
How to unlock
1.Press the button 3.Take out fast lock
Fast Joining between cabinets
G
G
G
GG
G
G
G
G
G
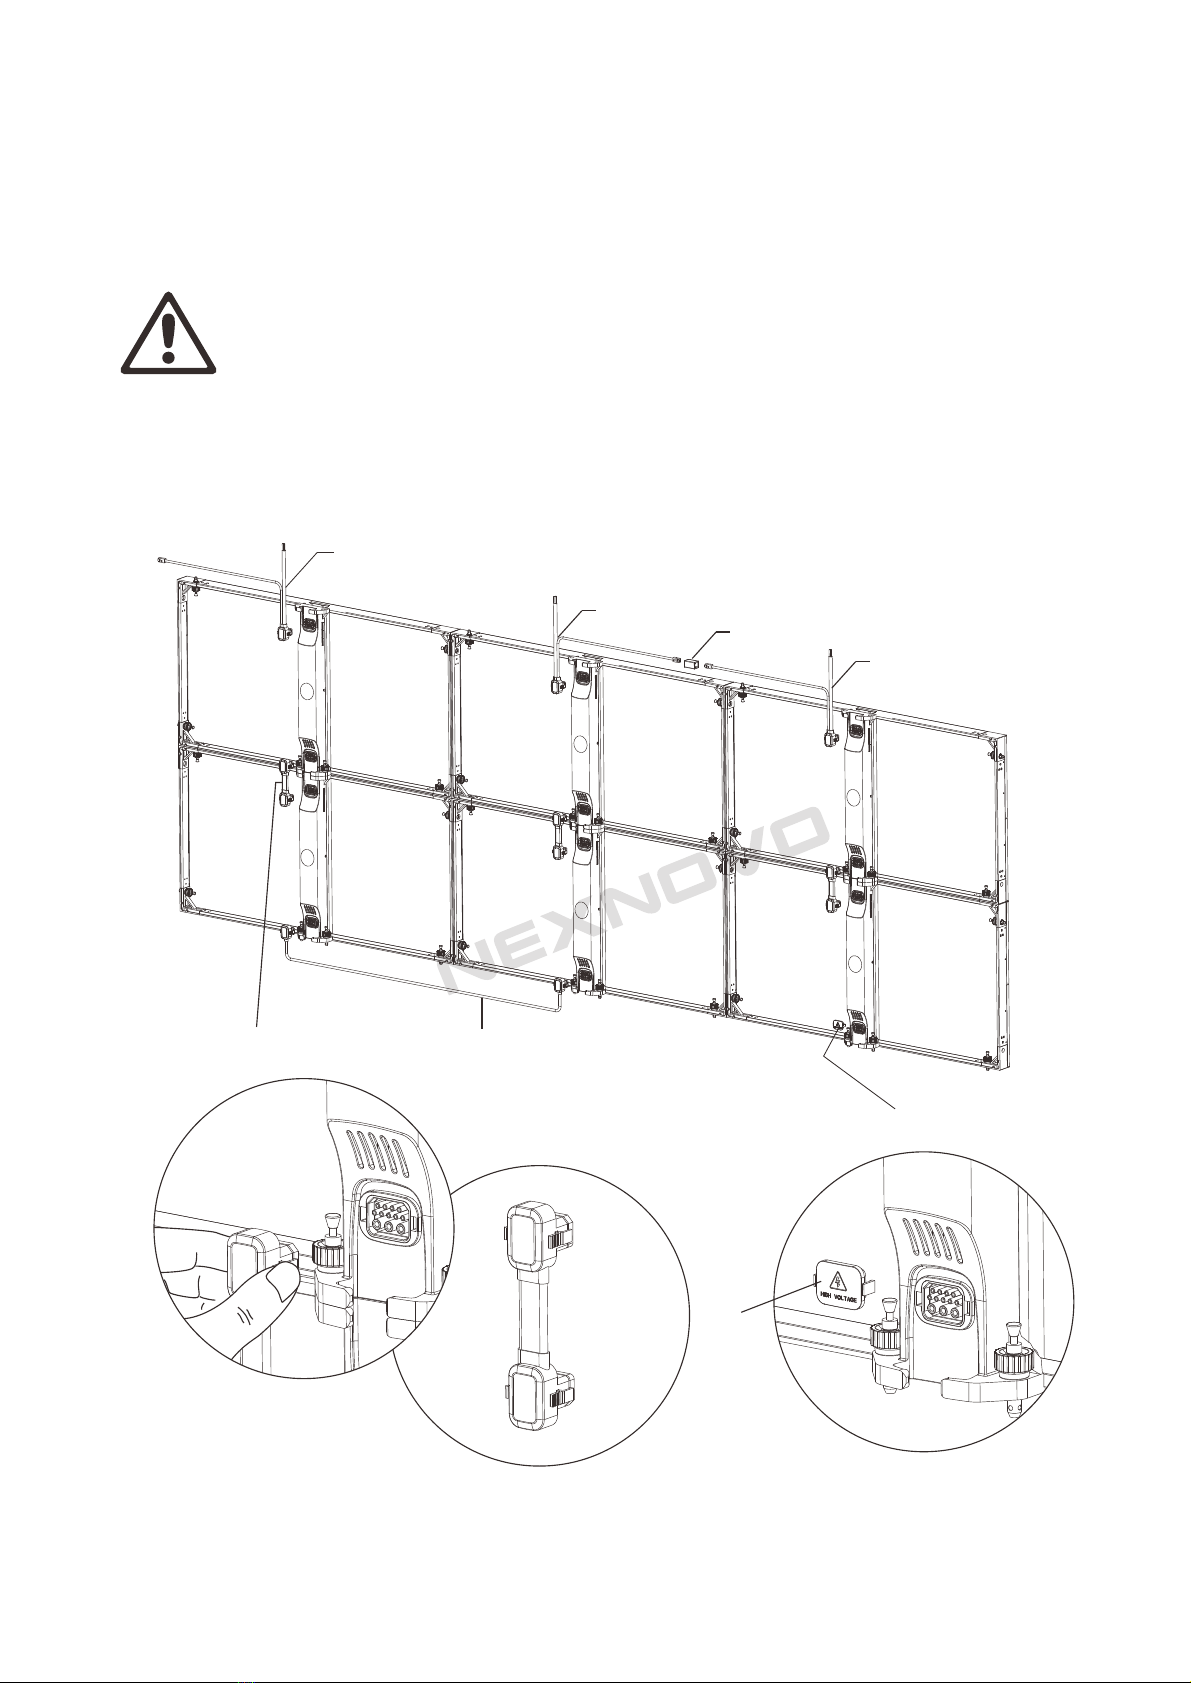
This cables actually is 2 in 1 where
power and data cable are built in.
The socket of last cabinet
must be covered.
5.Cabling work of Power and data cable
1.Hot swapping is prohibited.
2.At 110v,one power cord can at most drive 6 cabinets of 3m high.
3.At 220v,one power cord can at most drive 12 cabinets of 6m high.
4.Extra power cord is required if the load is higher than the above limit.
5.1The connection of power cord
D6
D2
D1 D3
D2
D2
D5
D6

USB
DVI
RJ45
RJ45
RJ45
RJ45
RJ45
RJ45
RJ45
RJ45
RJ45
RJ45
5.2 Connection of power cord
D5
D5
D5D5D5
D2D2D2
D2D2D2
D4D4D4
D3
D3
H
H
At 110v,one
power cord can
at most drive 6
cabinets of 3m
high.
At 220v,one
power cord can
at most drive 12
cabinets of 6m
high.
Extra power cord
is required if the
load is higher
than the above
limit.

5.2 Connection of data cable
USB
DVI
Generally,signal cabling work follows the order like “S”as shown in the
above diagram.

Configuration of System control
Main controller
Power Consumption
Working ambient temperature
Working ambient humidity
Net weight
USB cable
DVI Cable
Outer size
Power
16W
-20℃~60℃
0%~95%
1Kg
1.5
1.5M
L204xw160xH48mm
AC-100-240V -50/60HZ
DVI
USB
Data Cable
Main Controller
Computer
Recommended Model MC TRL300/MC TRL600
1. The system control of NR transparent led screen is composed of main controller
and receiving cards provided by NOVASTAR.

Maintenance
(1)Below diagram shows how to replace led module
(2)Diagram of replacing cabinets
Open screws and replace
led module
1.
2.Dismantle cabinets from top
(Vise versa for standing system)
Replace the cabinet
This manual suits for next models
3
Table of contents
Popular Projection Screen manuals by other brands

Da-Lite
Da-Lite SENIOR ELECTROL Instruction book

Da-Lite
Da-Lite TENSIONED ADVANTAGE ELECTROL Instruction book

Elite Screens
Elite Screens Kestrel Series How to replace

DNP
DNP Supernova STS installation guide

Changhong Electric
Changhong Electric S-CK Series user guide

Cima
Cima Below Ceiling ElectriScreen owner's manual


ADEO SCREEN
ADEO SCREEN PROFESSIONAL PSCHP0001 user manual

Draper
Draper Silhouette C Series Installation & operating instructions

Fraser
Fraser MagnaTrack Care and maintenance

Da-Lite
Da-Lite DESIGNER ELECTROL Instruction book

edding
edding Legamaster PROFESSIONAL e-Screen FLEX Mounting instruction

Amada
Amada AMPJ04 instruction manual