NHD AS LS User manual

June 2022
USER'S MANUAL
LS
MULTIFUNCTIONAL ELECTRIC WHEELCHAIR


Revision Sheet
Revision No. Date
Rev. 1 11.08.2020
Rev. 2 02.12.2020
Rev. 3 22.10.2021
27.06.2022


CONTENTS
1. PRELIMINERY NOTE 7
2. IMPORTANT SAFETY INSTRUCTIONS 8
Generalsafetyinstrucons . . . . . . . . . . . . . . . . . . . . . . . . . . . . . . . . . . . . . . . . . . . 8
NotesonEMCinterference . . . . . . . . . . . . . . . . . . . . . . . . . . . . . . . . . . . . . . . . . . 8
Brakes . . . . . . . . . . . . . . . . . . . . . . . . . . . . . . . . . . . . . . . . . . . . . . . . . . . . . . 8
Intended Use . . . . . . . . . . . . . . . . . . . . . . . . . . . . . . . . . . . . . . . . . . . . . . . . . . 8
Indicaons . . . . . . . . . . . . . . . . . . . . . . . . . . . . . . . . . . . . . . . . . . . . . . . . . . . . 8
Contraindicaons . . . . . . . . . . . . . . . . . . . . . . . . . . . . . . . . . . . . . . . . . . . . . . . . 8
DeclaraonofConformity . . . . . . . . . . . . . . . . . . . . . . . . . . . . . . . . . . . . . . . . . . . 8
Delivery . . . . . . . . . . . . . . . . . . . . . . . . . . . . . . . . . . . . . . . . . . . . . . . . . . . . . 9
Checkthedelivery . . . . . . . . . . . . . . . . . . . . . . . . . . . . . . . . . . . . . . . . . . . . . . . 9
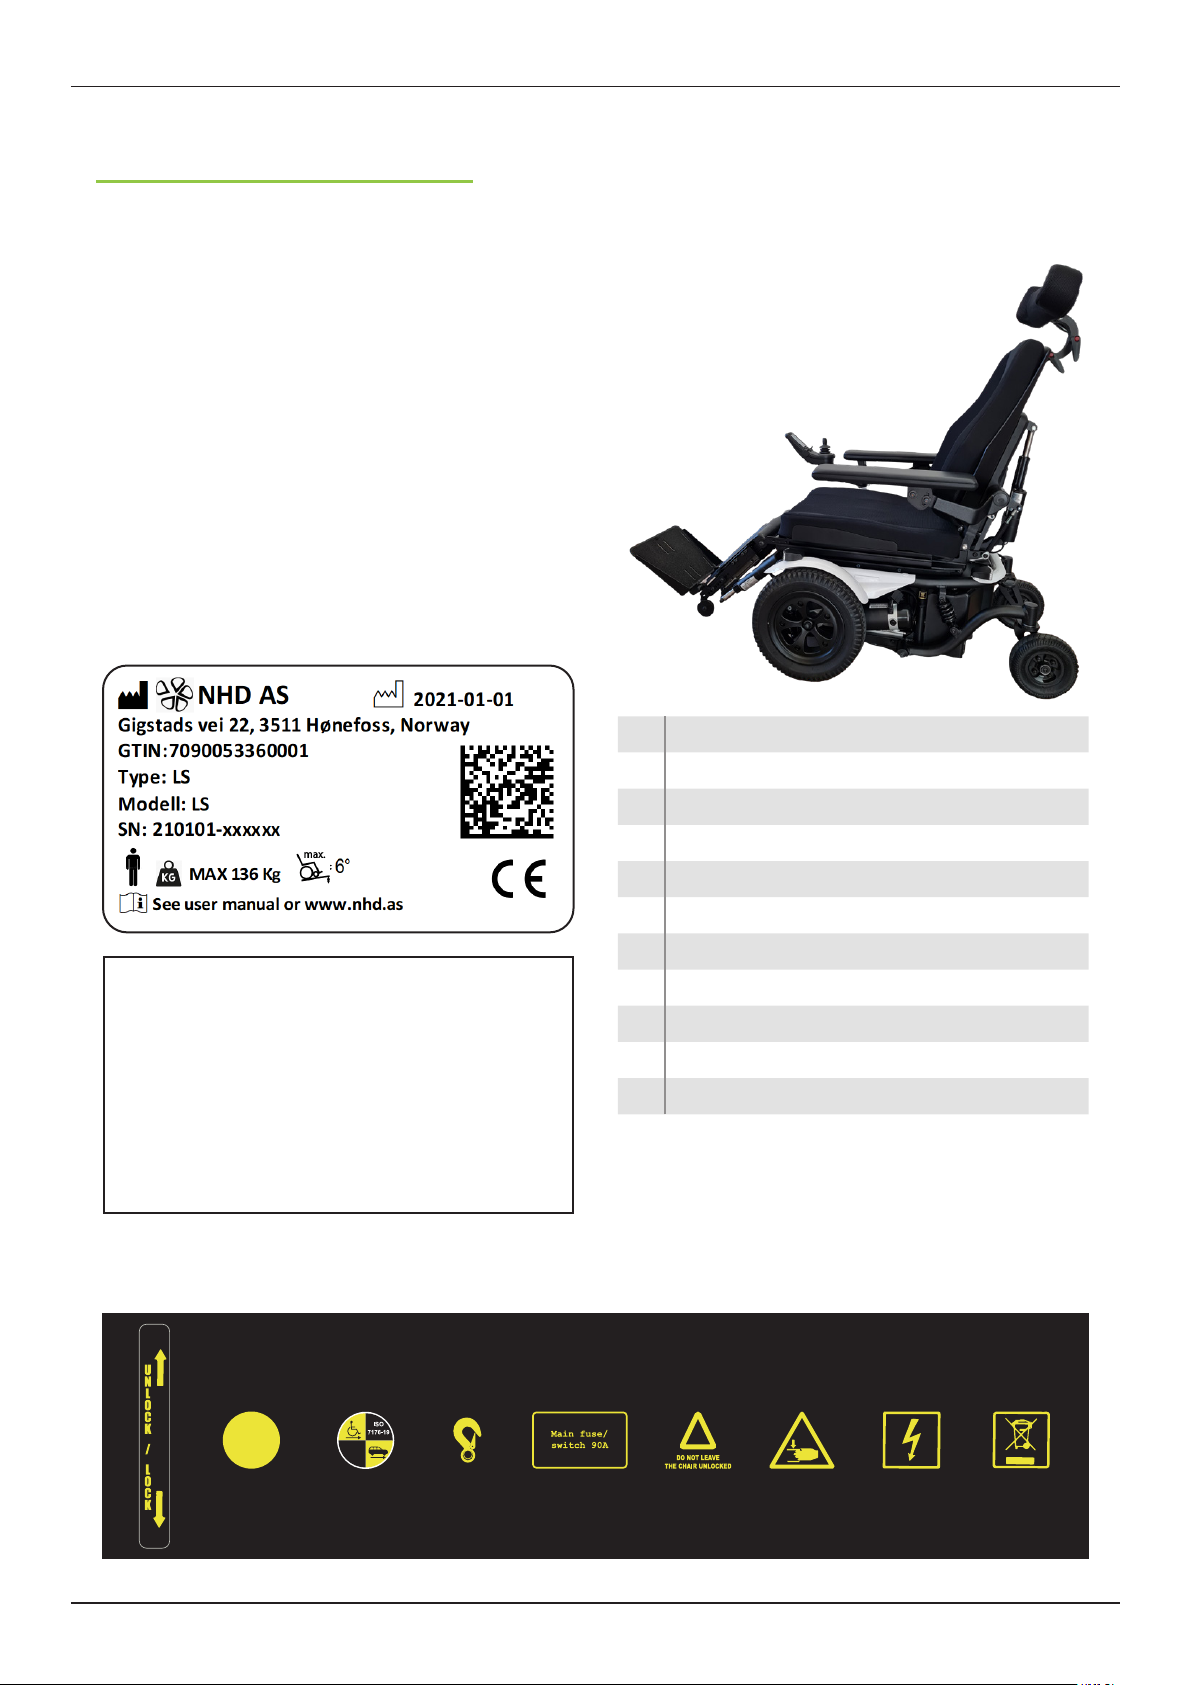
Idencaonlabel . . . . . . . . . . . . . . . . . . . . . . . . . . . . . . . . . . . . . . . . . . . . . . . 9
Overview LS . . . . . . . . . . . . . . . . . . . . . . . . . . . . . . . . . . . . . . . . . . . . . . . . . . . 9
Symbolexplanaon . . . . . . . . . . . . . . . . . . . . . . . . . . . . . . . . . . . . . . . . . . . . . . . 9
Basicsengs . . . . . . . . . . . . . . . . . . . . . . . . . . . . . . . . . . . . . . . . . . . . . . . . . .10
Control . . . . . . . . . . . . . . . . . . . . . . . . . . . . . . . . . . . . . . . . . . . . . . . . . . . . .10
Adjustmentsandequipment . . . . . . . . . . . . . . . . . . . . . . . . . . . . . . . . . . . . . . . . . . 12
Genginandout . . . . . . . . . . . . . . . . . . . . . . . . . . . . . . . . . . . . . . . . . . . . . . .16
5. TECHNICAL SPECIFICATIONS 17
Baeries. . . . . . . . . . . . . . . . . . . . . . . . . . . . . . . . . . . . . . . . . . . . . . . . . . . . . 19
Charging . . . . . . . . . . . . . . . . . . . . . . . . . . . . . . . . . . . . . . . . . . . . . . . . . . . . .19
Careandmaintenance . . . . . . . . . . . . . . . . . . . . . . . . . . . . . . . . . . . . . . . . . . . . . 20
Serviceinformaon. . . . . . . . . . . . . . . . . . . . . . . . . . . . . . . . . . . . . . . . . . . . . . . 20
6. EXAMINATION OF THE WHEELCHAIR 21
Checkingthebrakes . . . . . . . . . . . . . . . . . . . . . . . . . . . . . . . . . . . . . . . . . . . . . .21
Checkingtheres . . . . . . . . . . . . . . . . . . . . . . . . . . . . . . . . . . . . . . . . . . . . . . .21

7. CLEANING AND DISINFECTING 22
Cleaning . . . . . . . . . . . . . . . . . . . . . . . . . . . . . . . . . . . . . . . . . . . . . . . . . . . . . 22
Disinfecon . . . . . . . . . . . . . . . . . . . . . . . . . . . . . . . . . . . . . . . . . . . . . . . . . . . 22
Re-useofthewheelchair . . . . . . . . . . . . . . . . . . . . . . . . . . . . . . . . . . . . . . . . . . .22
8. MAINTENANCE 23
Replacingthebaeries. . . . . . . . . . . . . . . . . . . . . . . . . . . . . . . . . . . . . . . . . . . . . 23
Thepowersupplyofthewheelchair . . . . . . . . . . . . . . . . . . . . . . . . . . . . . . . . . . . . .23
Repair/maintenanceplan . . . . . . . . . . . . . . . . . . . . . . . . . . . . . . . . . . . . . . . . . . .23
Guidelinefortransportaoninavehicle . . . . . . . . . . . . . . . . . . . . . . . . . . . . . . . . . . .24
TransportaonusingDahlDockingstaon. . . . . . . . . . . . . . . . . . . . . . . . . . . . . . . . . . 27
Bracketsforaachingthewheelchair . . . . . . . . . . . . . . . . . . . . . . . . . . . . . . . . . . . .28
12. WARRANTY 30
7User’s Manual LS
1. Preliminery note
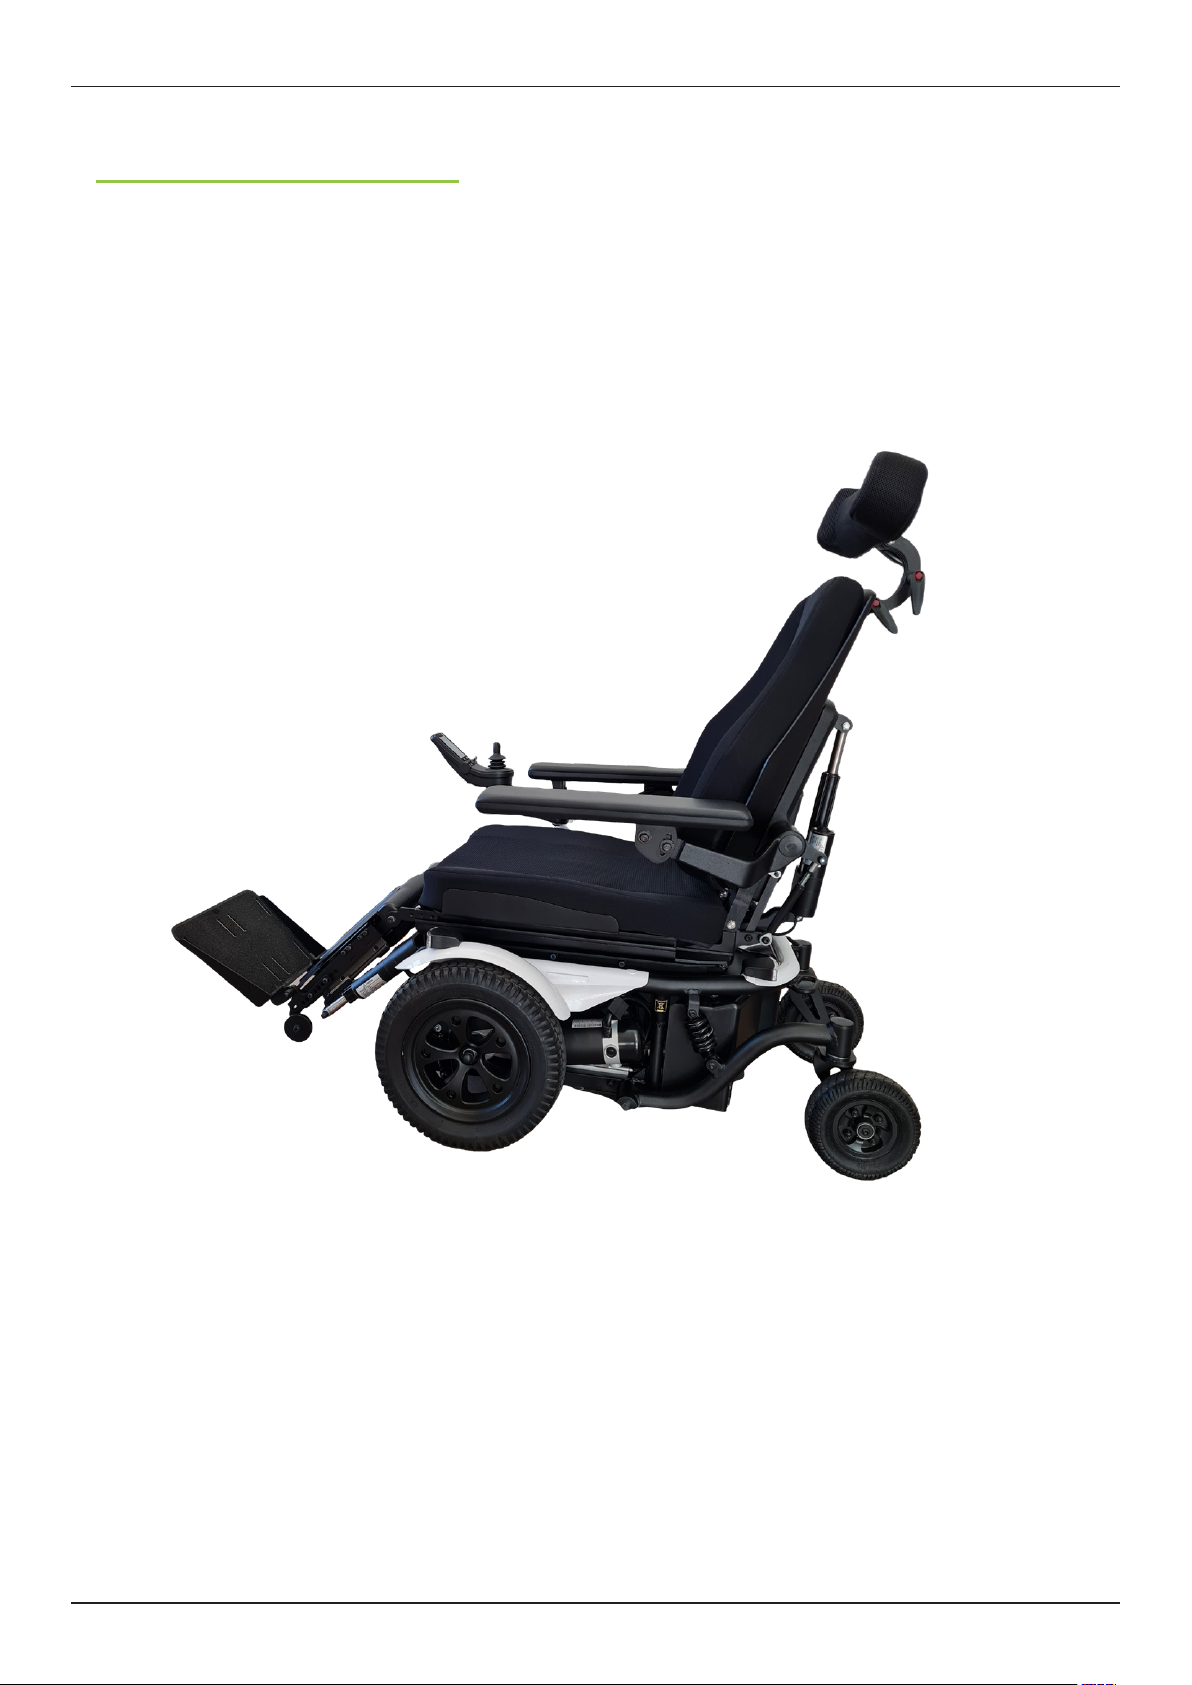
Thank you for purchasing a LS multifunction electric
wheelchair. The LS can be optimally adapted to
your physical needs. All settings can be adjusted
electronically, steplessly via the joystick. You can adjust
seat height, seat angle, backrest angle, knee angle,
armrest position, footplate position and leg length. Its
size combined with its high functionality makes it ideal
for indoor and outdoor use.
use, see Chapter “Charging”. To get the most out of all
carefully, do not throw it away, but keep it handy.
Maintenance work or technical repairs may only be
carried out by authorized specialist dealers.
LS is a Class B electric wheelchair designed for use
in- and outdoors.
LS
User’s Manual LS8
2. Important safety instructions
General safety instructions
• To avoid falls and accidents, it is important to
familiarize yourself with your new wheelchair
in a safe environment, on a level surface. We
recommend that you bring a companion in the
beginning.
• When adjusting the wheelchair there is a risk
of entrapment for the user as well as for third
persons who are in the immediate vicinity of the
wheelchair.
• Avoid driving against steps or curbs.
• When transporting the wheelchair, it must be
secured against rolling away. Use the fastening
devices.
• In the event of prolonged exposure to the sun,
parts of the wheelchair may heat up, there is a risk
of burns.
• Weight transfer due to body movement or load
may increase the risk of tipping.
• Please do not hang objects such as carrying bags,
backpacks etc. on the wheelchair, this is not
intended. Attached loads, change the statics and
• When driving on uphill or downhill gradients,
make sure that the seat surface is not raised as
this will limit the stability and can cause the
wheelchair to fall over.
• Note that the braking distance is longer on
inclines than on level ground.
• When overcoming slight obstacles or height
differences, you should raise the seat slightly, if at
all, and leave the backrest as steep as possible to
prevent the wheelchair from tipping over.
• Do not bring damaged batteries into contact with
skin, as the contents of the battery are harmful to
health and can be corrosive.
• Only charge the battery in ventilated areas.
ENTRAPMENT!
Notes on EMC interference
While all EMC directives have been met, the electric
wheelchair may be affected by other electrical systems
or interfere with these, such as electric motors, electric
doors, alarm systems, mobile phones, and other
electrical systems that emit EMC noise. It may also be
so that the wheelchair can disturbe other electrical
systems.
Brakes
The wheelchair brakes to a halt when the joystick is
released. The functionality should be checked before
each use.
Attention: On gradients, the braking distance is
extended.
Intended Use
The wheelchair is exclusively for the transport of
disabled persons.
Indications
Inability to walk or severe disability caused by:
• paralysis.
• joint contractures, joint damage - not on both
arms.
• loss of limbs.
• limb injury.
The use of an electric wheelchair is intended for
persons who, due to the disability, are unable to
operate hand-driven wheelchairs, but have the ability
to properly operate the electric wheelchairs.
Contraindications
Electric wheelchairs are unsuitable for people:
• with reduced eyesight.
• with severe balance disorders.
• with severe limitations of cognitive abilities.
• with inability to sit.
Declaration of Conformity
NHD, as the manufacturer, declares on its sole
responsibility that the LS electric wheelchair complies
User’s Manual LS
3. Product Overview
Delivery
After receiving your goods, please check the contents
for completeness:
• Packaging.
• Electric wheelchair.
• Control device.
• Charger.
Check the delivery
Your LS wheelchair is delivered ready for use, no
further assembly is necessary.
Please check if all listed elements are present.
drive wheel.
• Manufacturer.
• Model.
• Serial number.
• Max. user weight.
• Max. safe gradient.
• CE mark.
• Production date.
• QR code.
Overview LS
A
E
I
B
F
J
C
G
K
D
H
AHeadrest
B
C
D
E
FFootrest
G
H
I
J
K
Upon request, your wheelchair will be delivered with a
lap belt, which is attached to the side of the seat plate.
This belt does not serve as a safety belt during car rides.
To close, push the two belt parts into each other until
they click into place. Open the clasp by pressing on
“Press”. For optional parts contact our authorized dealers.
Indicates
Approved
Indicates not
point

User’s Manual LS10
4. Use of the wheelchair
Basic settings
use of your electric wheelchair, must be made by the
authorized dealer. Such settings may affect the stability
of the chair.
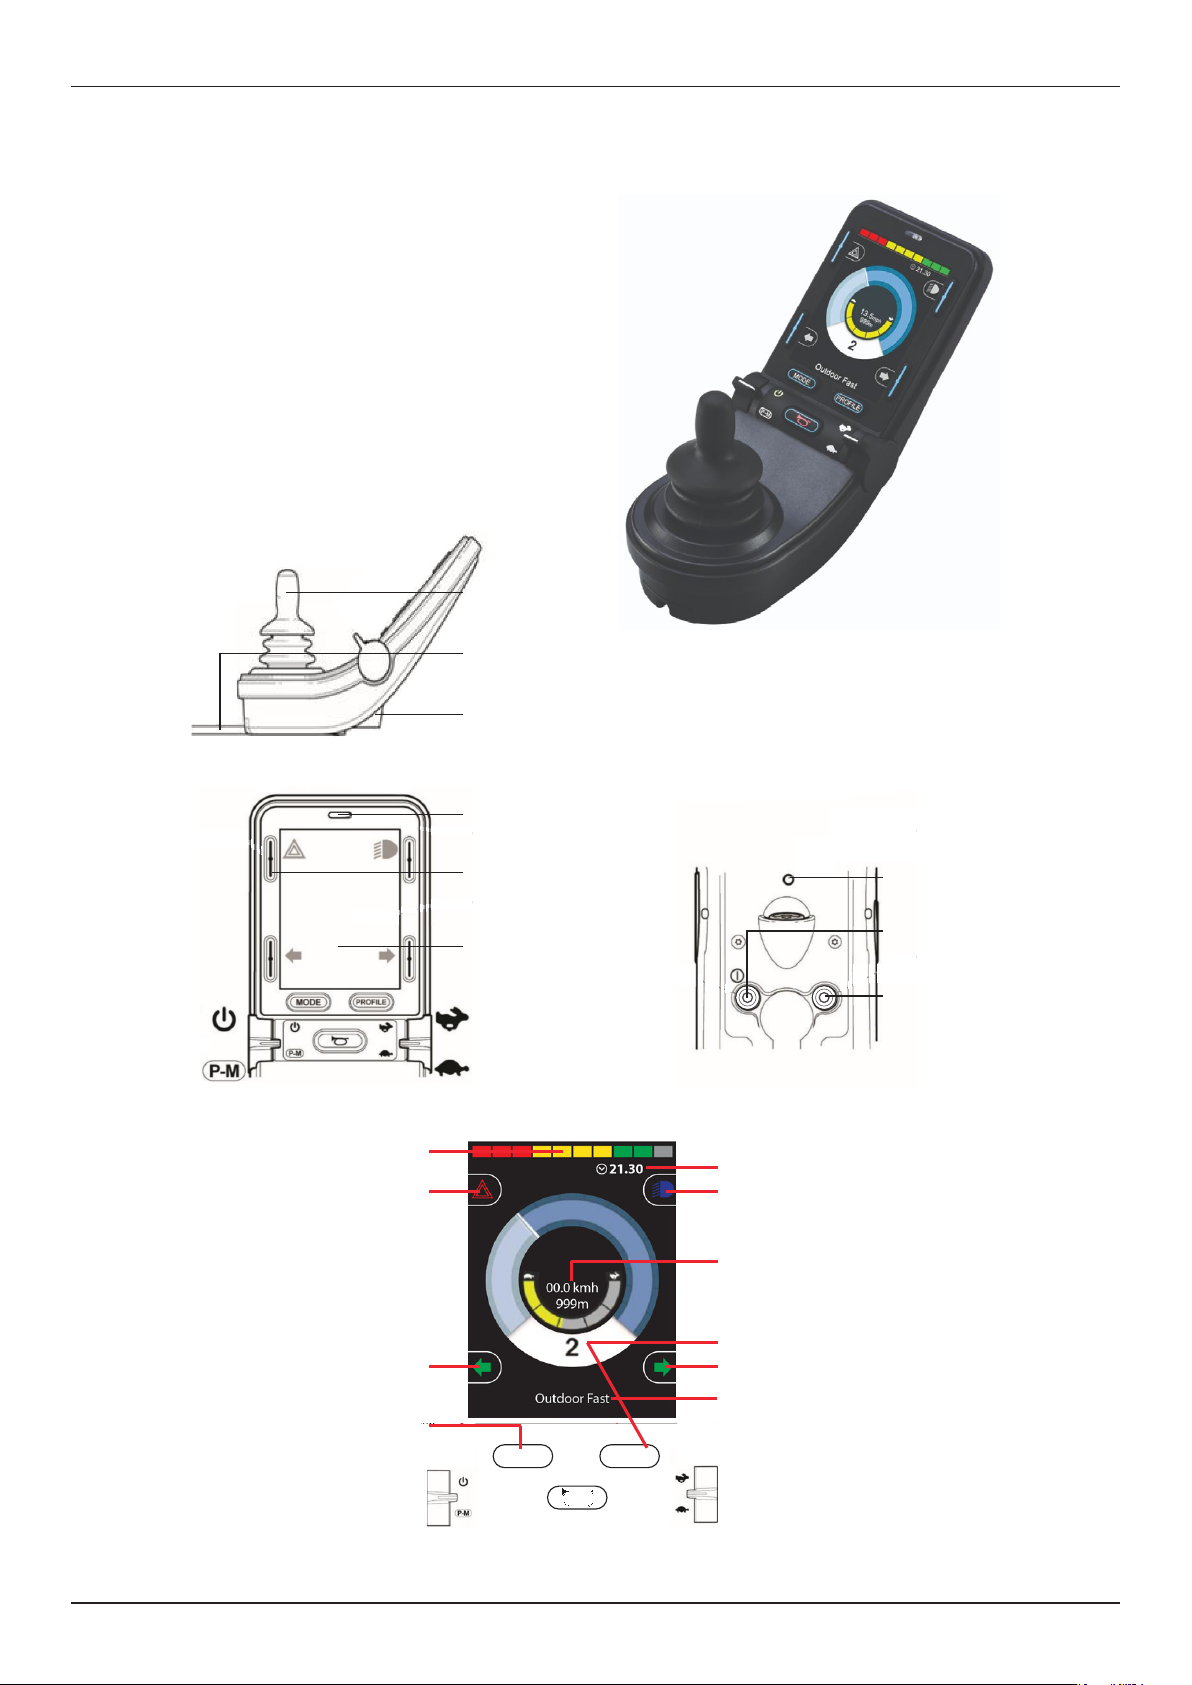
module CJSM-L-SW.
Bruker Handbok LS-300 Side 10
4. � �� � �� � ��q
Grunninstillinger
De individuelle mekaniske tilpasningene før du bruker din elektriske rullestol, må gjøres av en
autorisert forhandler. Slike innstillinger kan påvirke stolens stabilitet.
LS-300 har som standard styringsenhet/joystick modul CJSM-L-SW.
Styringsenhet / joystick
Med styringsenheten/joysticken styrer du innstillingene til rullestolen, samt kjøregenskapene.
Styringsenheten/joysticken gir mulighet for elektrisk justering av setet, den er plassert på armlene
(fortrinnsvis høyre) og kan betjenes med liten kraft.
Les grundig viktige sikkerhets instruksjoner før du bruker rullestolen.
Trykke på av og på knappen, for å slå på den elektriske rullestolen.
"Mode" knappen benyttes for å skifte mellom de to hovedmenyene, kjøre modus og setejustering
modus.
a.) Av/på knapp
b.) Batteri indikator
c.) Horn
d.) Viser hvilke setefunksjoner
som er aktive
e.) Mode knappen som bytter
mellom hovedfunksjone
f.) Display som viser maks
hastighet I den aktuelle kjøre
profil
g.) Knapper for å justere
hastighet i aktuelle kjøre profil
a
b
c
d e
f
g
A
B
C
DE
F
G
A
B
C
D
E
F
G
Control
With the control you control the settings of your
wheelchair, as well as the driving characteristics.
The control offers the possibility to electronically
adjust the seat adjustment, it is located on the right
armrest and can be operated with little force.
PLEASE READ CAREFULLY THE
SAFETY INSTRUCTIONS BEFORE
FIRST USE.
Press the upper button to turn on the controller.
The “Mode” button takes you to the two main
menus, setting mode or driving mode.
Attention: LS has an alternative control systems/
joystick modules.
11User’s Manual LS
Bruker Handbok LS-300 Side 11
Merk: LS-300 har alternativ styringsenhet/joystick moduler.
LS-300 kan leveres med Joystick Modules CJSM2
Justeringer og utstyr til rullestolen
Setejusteringsmodus
Merk: Vær oppmerksom på at store endringer, for eksempel ekstrem posisjonering av ryggstøtte eller
benstøtte og / eller høy høydejustering, kan påvirke stabiliteten negativt. Også bremsetavstandene kan
forlenges. Hvis du har spørsmål, vennligst kontakt forhandleren din.
Hvis et eller flere områder av rullestolen lyser i displayet ved siden av modusknappen, er du i
setejusteringsmodus. Med joysticken til høyre eller venstre kan du bytte mellom de områdene som skal
stilles inn. Hvis du flytter joysticken fremover eller bakover i denne modusen, endrer du posisjonen til
de opplyste områdene.
De følgende setefunksjoner kan individuelt justeres ved hjelp av styringsenheten/joysticken:
II III
•Stort 3,5-tommers VGA-fargeskjerm med høy oppløsning
•Infrarød (IR) kontroll som standard
•Integrert Bluetooth-kontroll som ekstrautstyr
•Stilig og ergonomisk design
•Innebygd lyssensor for automatisk å justere skjermens lysstyrke
•Padlebrytere for enkel tilgang til brukerkontroller
•Forbedrede programmerings- og tilpasningsalternativer
•Høyttaler for forbedret hornvolum
•Metallramme for forbedret robusthet
•Connect-and-Go
• Large, high-resolution 3.5” VGA color display.
• Infra-Red (IR) Control as standard.
• Integrated Bluetooth control as an option.
• Stylish and ergonomic design.
• Built-in light sensor to automatically adjust screen brightness.
• Paddle switches for easy access to user controls.
• Enhanced programming and customization options.
• Speaker for enhanced horn volume.
• Metal case for improved robustness.
• Connect-and-Go.
JOYSTICK MODULE
MODE PROFILE
2
MODE PROFILE
LEFT PADDLE
Decrease Speed
Increase Speed
RIGHT PADDLE
Main area
• Speed
• Distance
•
•
ModeBuon ProleBuon
HornBuon
NEWLIVE
Manuel d’utilisation CJSM2
Page #4
1. Utilisation générale
1.1 Le joystick
La fonction première du joystick est de gérer la direction et la vitesse du fauteuil.
Plus vous appuyez fort dessus plus vous allez vite. Pour arrêter le fauteuil, il suffit
de relâcher le joystick
NEWLIVE
Manuel d’utilisation CJSM2
Page #4
1. Utilisation générale
1.1 Le joystick
La fonction première du joystick est de gérer la direction et la vitesse du fauteuil.
Plus vous appuyez fort dessus plus vous allez vite. Pour arrêter le fauteuil, il suffit
de relâcher le joystick
CONTROL PANEL
LCD Screen
Increase Speed
LEFT PADDLE RIGHT PADDLE
Decrease Speed
NEWLIVE
Manuel d’utilisation CJSM2
Page #4
1. Utilisation générale
1.1 Le joystick
La fonction première du joystick est de gérer la direction et la vitesse du fauteuil.
Plus vous appuyez fort dessus plus vous allez vite. Pour arrêter le fauteuil, il suffit
de relâcher le joystick
EXTERNAL JACK SOCKETS
User’s Manual LS12
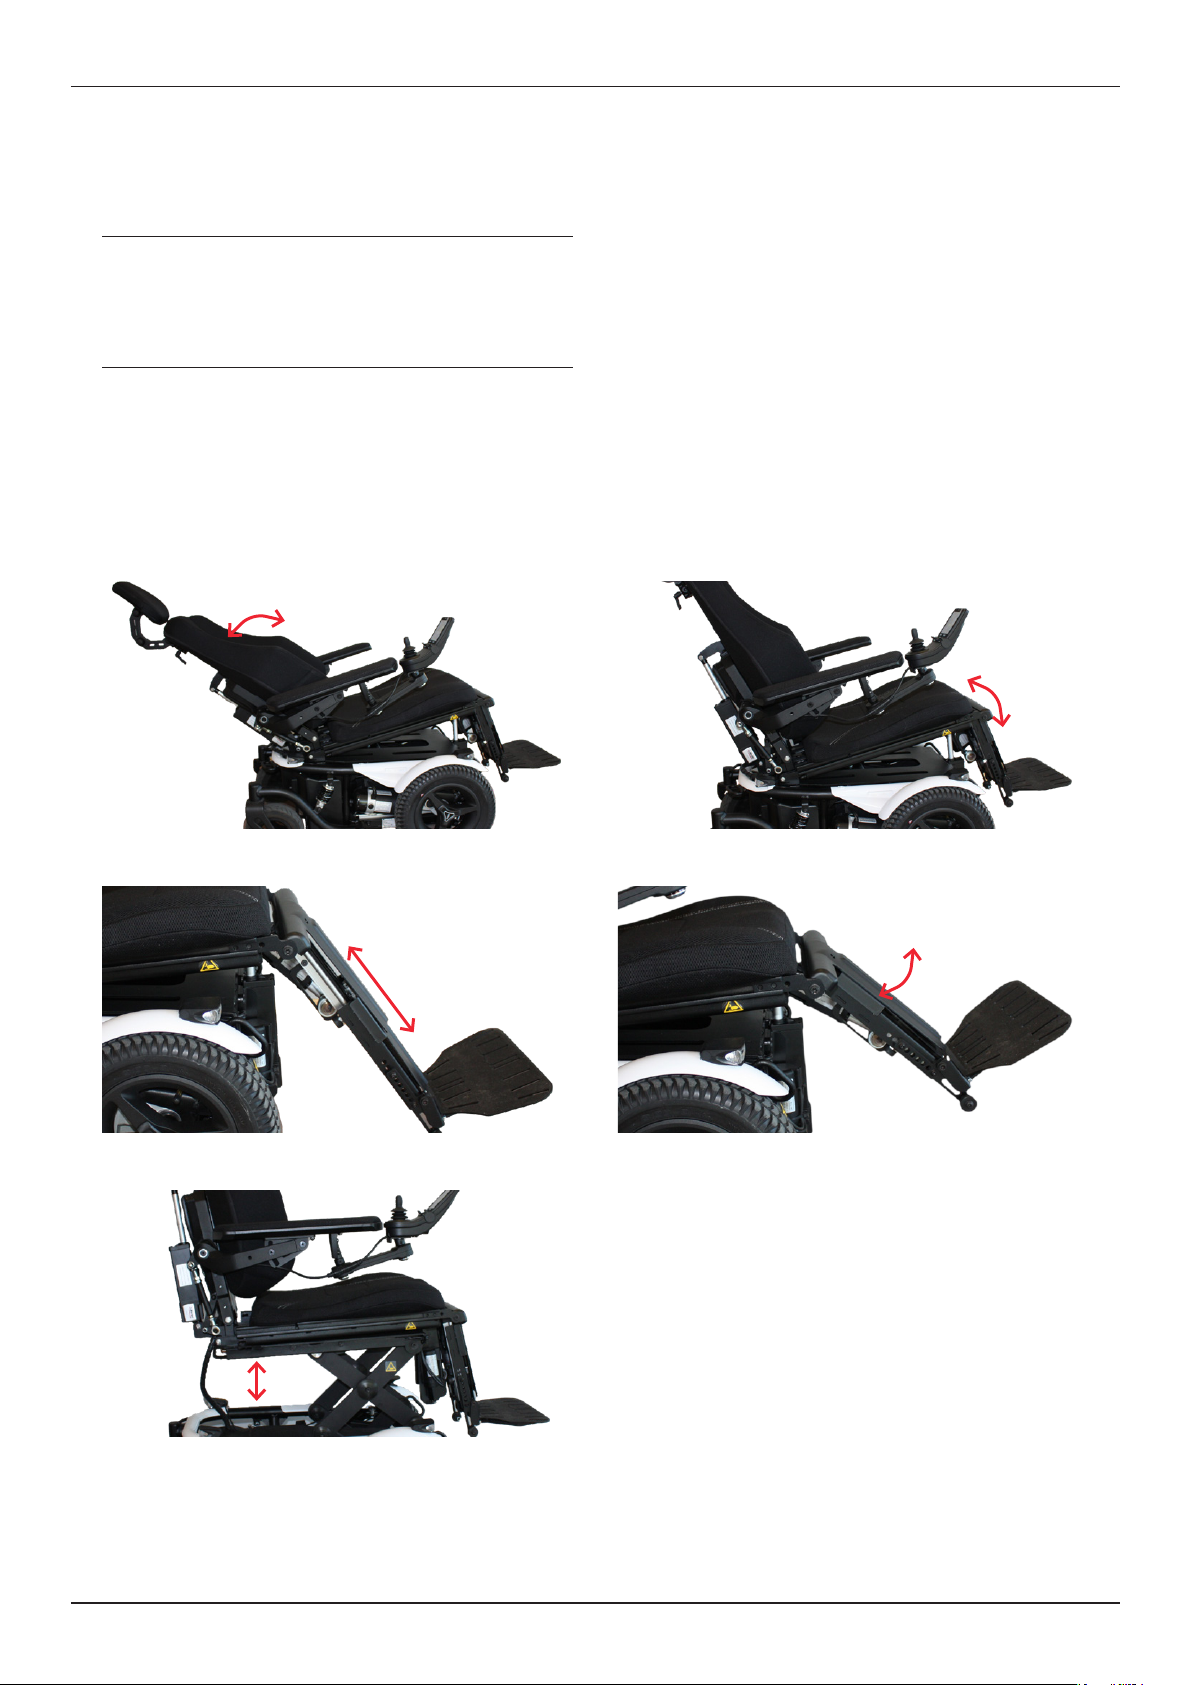
Adjustments and equipment
Setting
Attention: Please note that major changes, such as
extreme positioning of the backrest or leg rest and/
or high height adjustment, can negatively affect the
stability. Also, the braking distances can be extended. If
you have any questions, please consult your dealer.
If one or more areas of the wheelchair lights up in the
display next to the Mode button, you are in setting
mode. With a right or left movement of the joystick you
can switch between the areas to be set. If you move
the joystick forwards or backwards in this mode, you
change the position of the illuminated areas. Total
range of motion for seat functions depend on seat unit
chosen.
control:
• Backrest at an angle.
• Seat angle.
• Length of legrests.
• Angle of legrests.
• Seat height.
Seat angle / tilt adjustment
13User’s Manual LS
Driving mode
next to the mode button light up, you are in driving
mode.
When you move the joystick forward, the
wheelchair moves forward. By releasing the joystick
the wheelchair comes to a standstill.
To change from the setting to the driving mode,
proceed as follows:
• Press the “Mode” button, move the joystick to the
right (or left) until no areas in the display next to
the “Mode” button light up.
Speed
The speed is controlled while driving with the joystick,
if you move the joystick only slightly, the ride is slower.
Push the joystick to the stop to drive at maximum
speed. The maximum speed can be set in advance in
•
such as inside a ship.
•
•
Change of direction
If you move the joystick to a side position while
driving, the wheelchair follows and moves in that
direction.
For reversing, move the joystick towards you.
Attention: The wheelchair has a low turning radius,
make sure that no people or objects are too tight and
that you or others are not injured.
Attention: Please make sure that there are no persons
or obstacles behind you.
To climb up kerbs, steps or other use ramps or
lowered areas. If not possible, drive slowly and head-
on towards the obstacle to be overcome, staying
perpendicular to the obstacle. Now drive at a steady,
Attention: Do not try to drive over obstacles higher
angle, there is a risk of tipping.
Steep terrain
drive forward tilt the seat backwards and be sure that
you're leaning backwards as far as possible. Select a
Mode with reduced speed and brake softly.
The power wheelchair can be set in a manual sliding
mode. This function may only be set by a companion.
The following step is necessary for this:
• Loosen the center handles on the brake release
handles (“Unlock” and “Lock”).
Attention: The wheelchair has no braking function in
sliding mode.
The controller is automatically switched off in
this mode.
After the shift, switch the system back to normal
operation. If the controller is not yet active, switch it
off and on again, now your electric wheelchair is again
driveable.
To secure the control, please proceed as follows:
• Press the ON button until a beep sounds. Release
the button and slide the joystick forwards until
you hear another beep. Release the joystick.
Then move the joystick backwards until you hear
another beep, release the joystick and a long beep
sounds. The electric wheelchair is now locked
against driving away.
• To unlock the wheelchair, follow the same
procedure.
User’s Manual LS
WARNING:
Contact suitable service personnel if you need
adjustment of the chair's technical settings and
for programing/adjustment to the software.
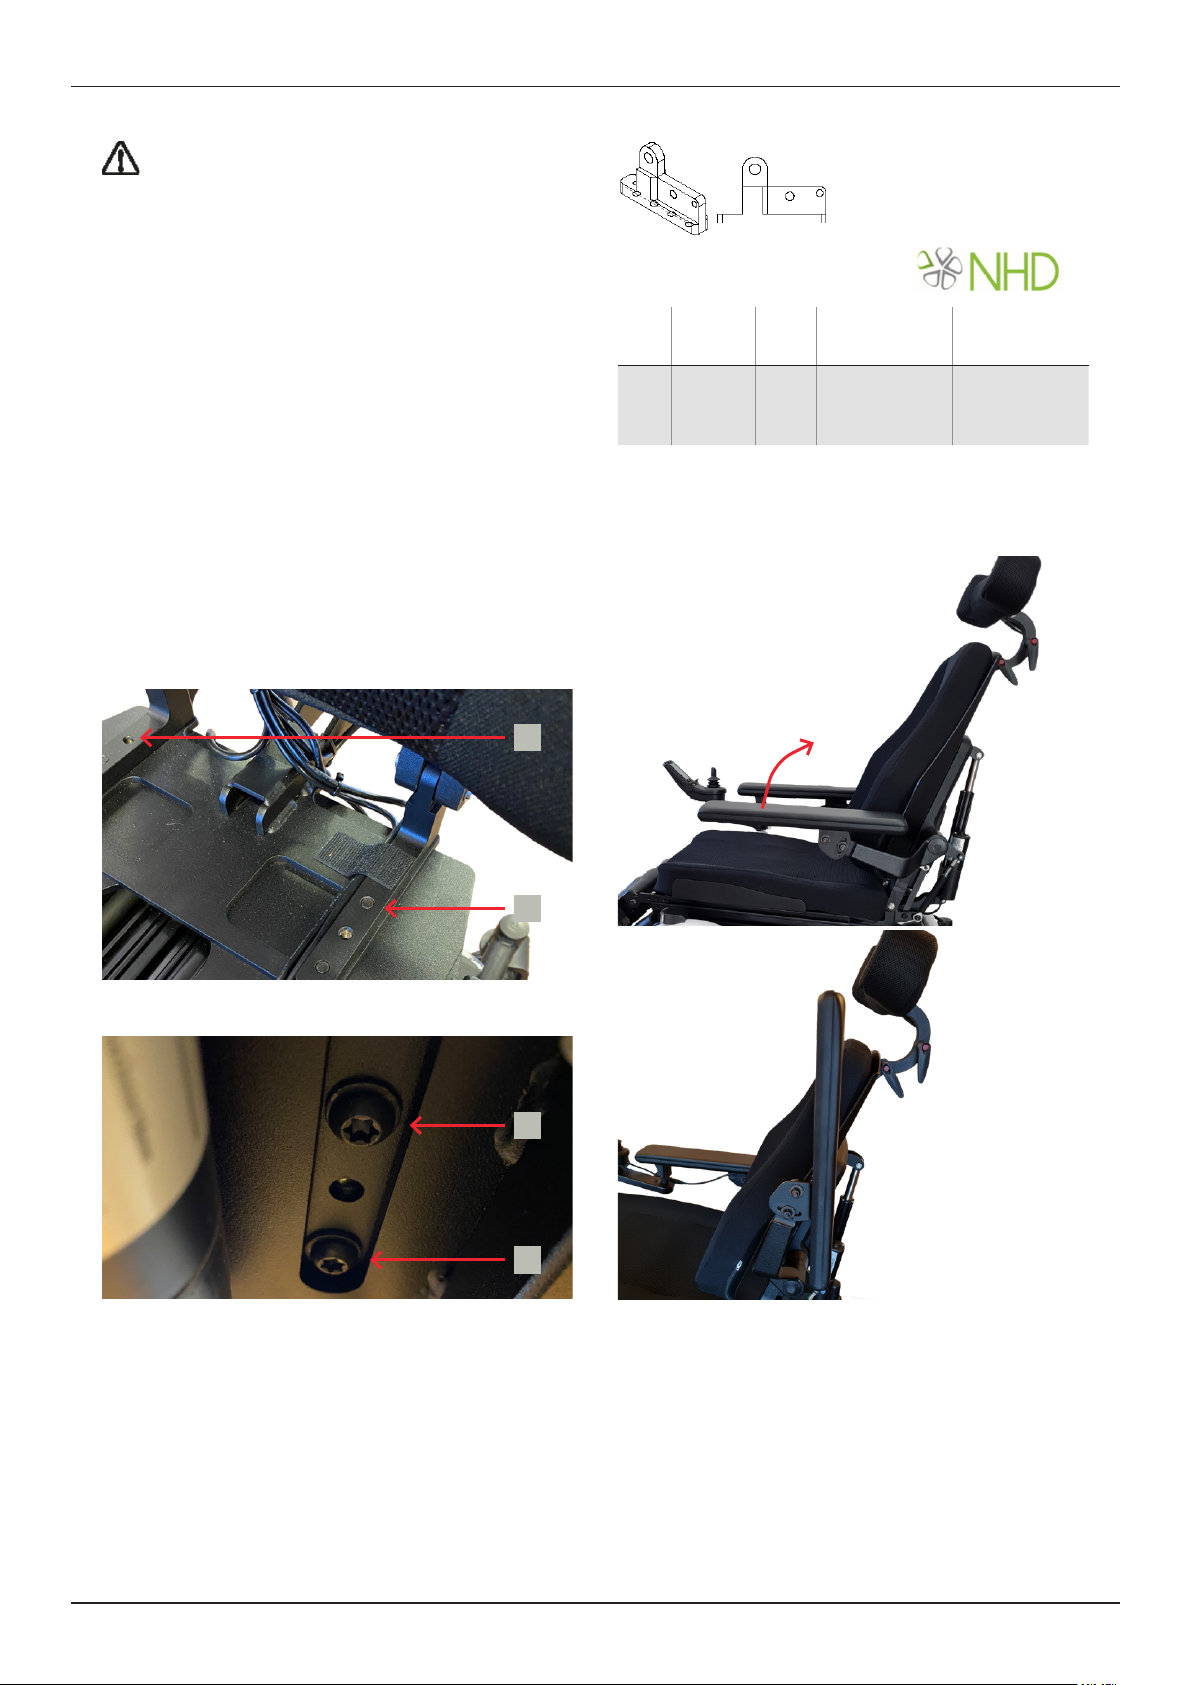
Danger of user and mechanical failure!
The wheelchair seat are designed to optimize the
seating comfort of the user. It can be adjusted in seat
depth and seat width. The seat depth is adjusted with
screws (A) on the underside of the tilting frame. The
must be replaced (see drawing and table to the right).
A rail on each side provides mounting points for
accessories such as hip supports or seat belts. The
mounted on the seat unit.
The backrest is available in different lengths and
widths to give the user maximum support and comfort.
A
A
A
A
Rygg brakett LS
Back bracket LS
Pos. Art. Ant./
No.
1 2
The armrests can be folded up completely to make
getting in easier.
Height adjustment armrest
Height adjustment is made by shortening the
Adjustment Sleeve (A) (raising the armrest) or
extending (lowering the armrest) using the inner
threded rods in it. Unscrew the lower attachment (B)
and loosen the lock nut (C). Then rotate the adjusting
sleeve and the inner threded rods to such a length that
the desired height of the armrest is achieved. Mount in
reverse order.

15User’s Manual LS
A
B
C
C
Adjust the angle of the armrest cushion
To adjust the angle of the armrest cushion, loosen the
screw (A), then loosen the screw (B) and the angle
can be adjusted. Tighten screw (B) and then screw (A)
again.
Always perform a load test to check that the
armrest is properly attached.
A
A
B
B
The optional upholstered lateral support offer support
on the upper body. The supports are adjustable in
height, width, depth and angle. The supports can
adjustments stay intact. The soft rounded pads ensure
optimal support and great comfort.
Our accessories for the LS chair are constantly
under development.
Bruker Handbok LS-300 Side 16
Polstrede sidestøtter( tillegsutstyr)
Polstrede sidestøtten gir støtte for overkroppen. Støttene er justerbare i høyde, bredde, dybde og vinkel.
Støttene kan også vippes bort slik at det blir enklere å komme ut og inn i rullestolen. De myke
avrundede sidestøttene sikrer optimal støtte og god komfort.
Polstrede sidestøtter
Justering av de polstrede sidestøttene
De polstrede sidestøttene kan justres trinnløst i høyden, dybden, bredden og i vinkel.
Justering av høyden på de polstrede sidestøttene.
Trinn 1: Løsne skruene (R) ved å benytte 5mm unbrako nøkkel.
Trinn 2: Beveg sidestøttene til den ønskede høyden.
Trinn 3: Skru fast skruene igjen.
Lateral support settings
The optional lateral support can be adjusted step less
in height, depth, width and angle.
Set the height of the lateral support.
Bruker Handbok LS-300 Side 16
Polstrede sidestøtter( tillegsutstyr)
Polstrede sidestøtten gir støtte for overkroppen. Støttene er justerbare i høyde, bredde, dybde og vinkel.
Støttene kan også vippes bort slik at det blir enklere å komme ut og inn i rullestolen. De myke
avrundede sidestøttene sikrer optimal støtte og god komfort.
Polstrede sidestøtter
Justering av de polstrede sidestøttene
De polstrede sidestøttene kan justres trinnløst i høyden, dybden, bredden og i vinkel.
Justering av høyden på de polstrede sidestøttene.
Trinn 1: Løsne skruene (R) ved å benytte 5mm unbrako nøkkel.
Trinn 2: Beveg sidestøttene til den ønskede høyden.
Trinn 3: Skru fast skruene igjen.
Adjust the depth width and angle of the lateral support.
Bruker Handbok LS-300 Side 17
Justere dybden, vinkelen og bredden på sidestøttene.
Trinn 1: Løsne skruene (S) til friksjonleddet.
Trinn 2: Beveg sidestøttene til ønsket vinkel, dybde og bredde.
Trinn 3: Skru fast skruene igjen.
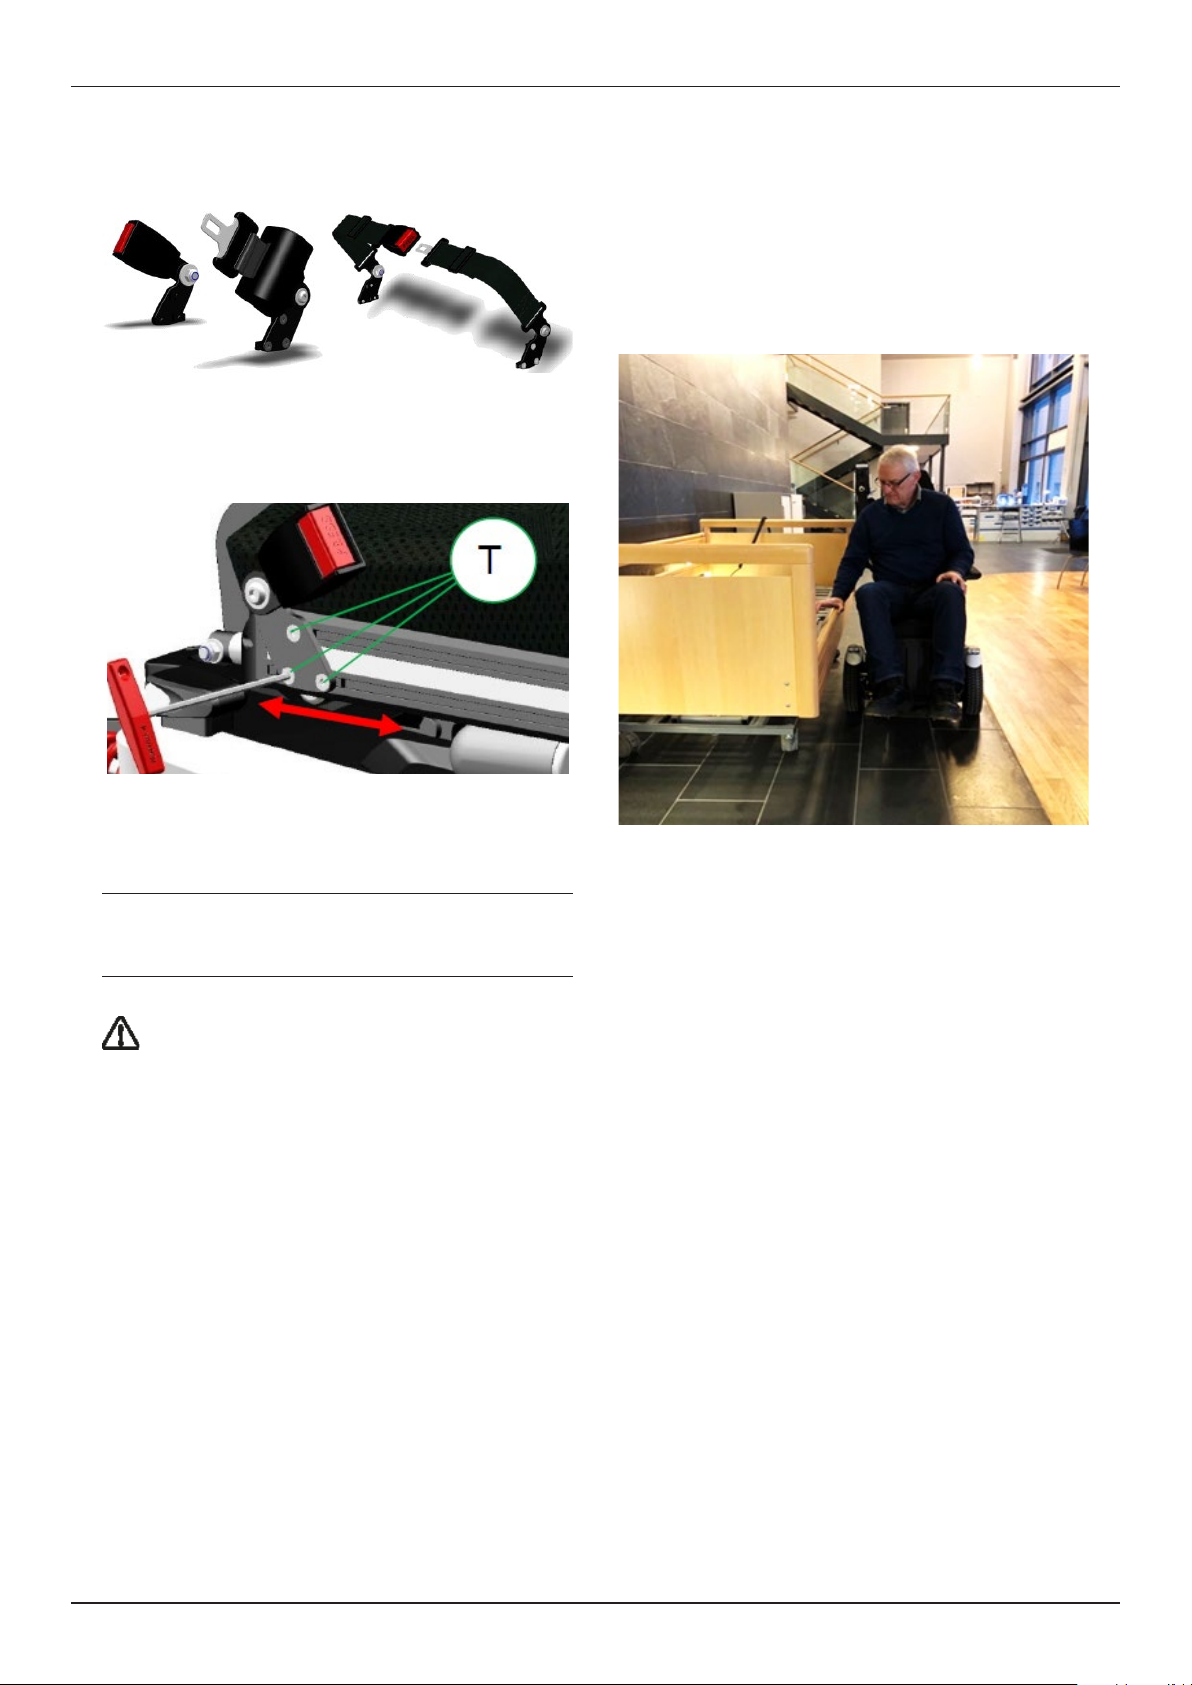
Sete belte (tilbehør)
Det finnes flere typer setebelter tilgjengelig.
Montering av setebelter
Innfestingen av setebeltene kan tilpasses i lengderetningen av setet. Benytte følgende prosedyre for å
justere posisjonen av setebeltet:
Trinn 1: Løsne skruene (T) ved å benytte en 4mm
unbrako nøkkel.
Trinn 2: Beveg setebeltets festebraket til ønsket
posisjon.
Trinn 3: Skru fast skruene igjen.
Merk:
Pass på at setebeltet er feste godt, slik at innfestingen til
setebeltet ikke flytter seg. Hvis innfestingen til
setebeltet flytter seg kan det resultere i feil sitteposisjon.
User’s Manual LS16
For positioning, several types of belts are available.
Bruker Handbok LS-300 Side 17
Justere dybden, vinkelen og bredden på sidestøttene.
Trinn 1: Løsne skruene (S) til friksjonleddet.
Trinn 2: Beveg sidestøttene til ønsket vinkel, dybde og bredde.
Trinn 3: Skru fast skruene igjen.
Sete belte (tilbehør)
Det finnes flere typer setebelter tilgjengelig.
Montering av setebelter
Innfestingen av setebeltene kan tilpasses i lengderetningen av setet. Benytte følgende prosedyre for å
justere posisjonen av setebeltet:
Trinn 1: Løsne skruene (T) ved å benytte en 4mm
unbrako nøkkel.
Trinn 2: Beveg setebeltets festebraket til ønsket
posisjon.
Trinn 3: Skru fast skruene igjen.
Merk:
Pass på at setebeltet er feste godt, slik at innfestingen til
setebeltet ikke flytter seg. Hvis innfestingen til
setebeltet flytter seg kan det resultere i feil sitteposisjon.
The optionally positioning belt can be adjusted in
lenght and anchoring point. To change the setting
simply follow the next steps:
Bruker Handbok LS-300 Side 17
Justere dybden, vinkelen og bredden på sidestøttene.
Trinn 1: Løsne skruene (S) til friksjonleddet.
Trinn 2: Beveg sidestøttene til ønsket vinkel, dybde og bredde.
Trinn 3: Skru fast skruene igjen.
Sete belte (tilbehør)
Det finnes flere typer setebelter tilgjengelig.
Montering av setebelter
Innfestingen av setebeltene kan tilpasses i lengderetningen av setet. Benytte følgende prosedyre for å
justere posisjonen av setebeltet:
Trinn 1: Løsne skruene (T) ved å benytte en 4mm
unbrako nøkkel.
Trinn 2: Beveg setebeltets festebraket til ønsket
posisjon.
Trinn 3: Skru fast skruene igjen.
Merk:
Pass på at setebeltet er feste godt, slik at innfestingen til
setebeltet ikke flytter seg. Hvis innfestingen til
setebeltet flytter seg kan det resultere i feil sitteposisjon.
Make sure the brackets are tighten properly to
avoid sliding of the seat belt along the seat rail. A sliding
seat belt might result in poor seating position of the user.
WARNING:
Positioning belt shall not be used as a safety
belt in a moving vehicle.
Getting in and out
Bring your current seat as close as possible to the side
of the LS. Make sure that the controller is turned off
to prevent uncontrolled rolling. Fold up the armrest
and footplate. Now slip sideways onto the seat of the
LS, making sure that you are as far back as possible in
the seat. Now fold down the footrest and the armrest
again.
Bruker Handbok LS-300 Side 18
Kroker for ekstra last, slik som ryggsekker og bager (ekstra utstyr)
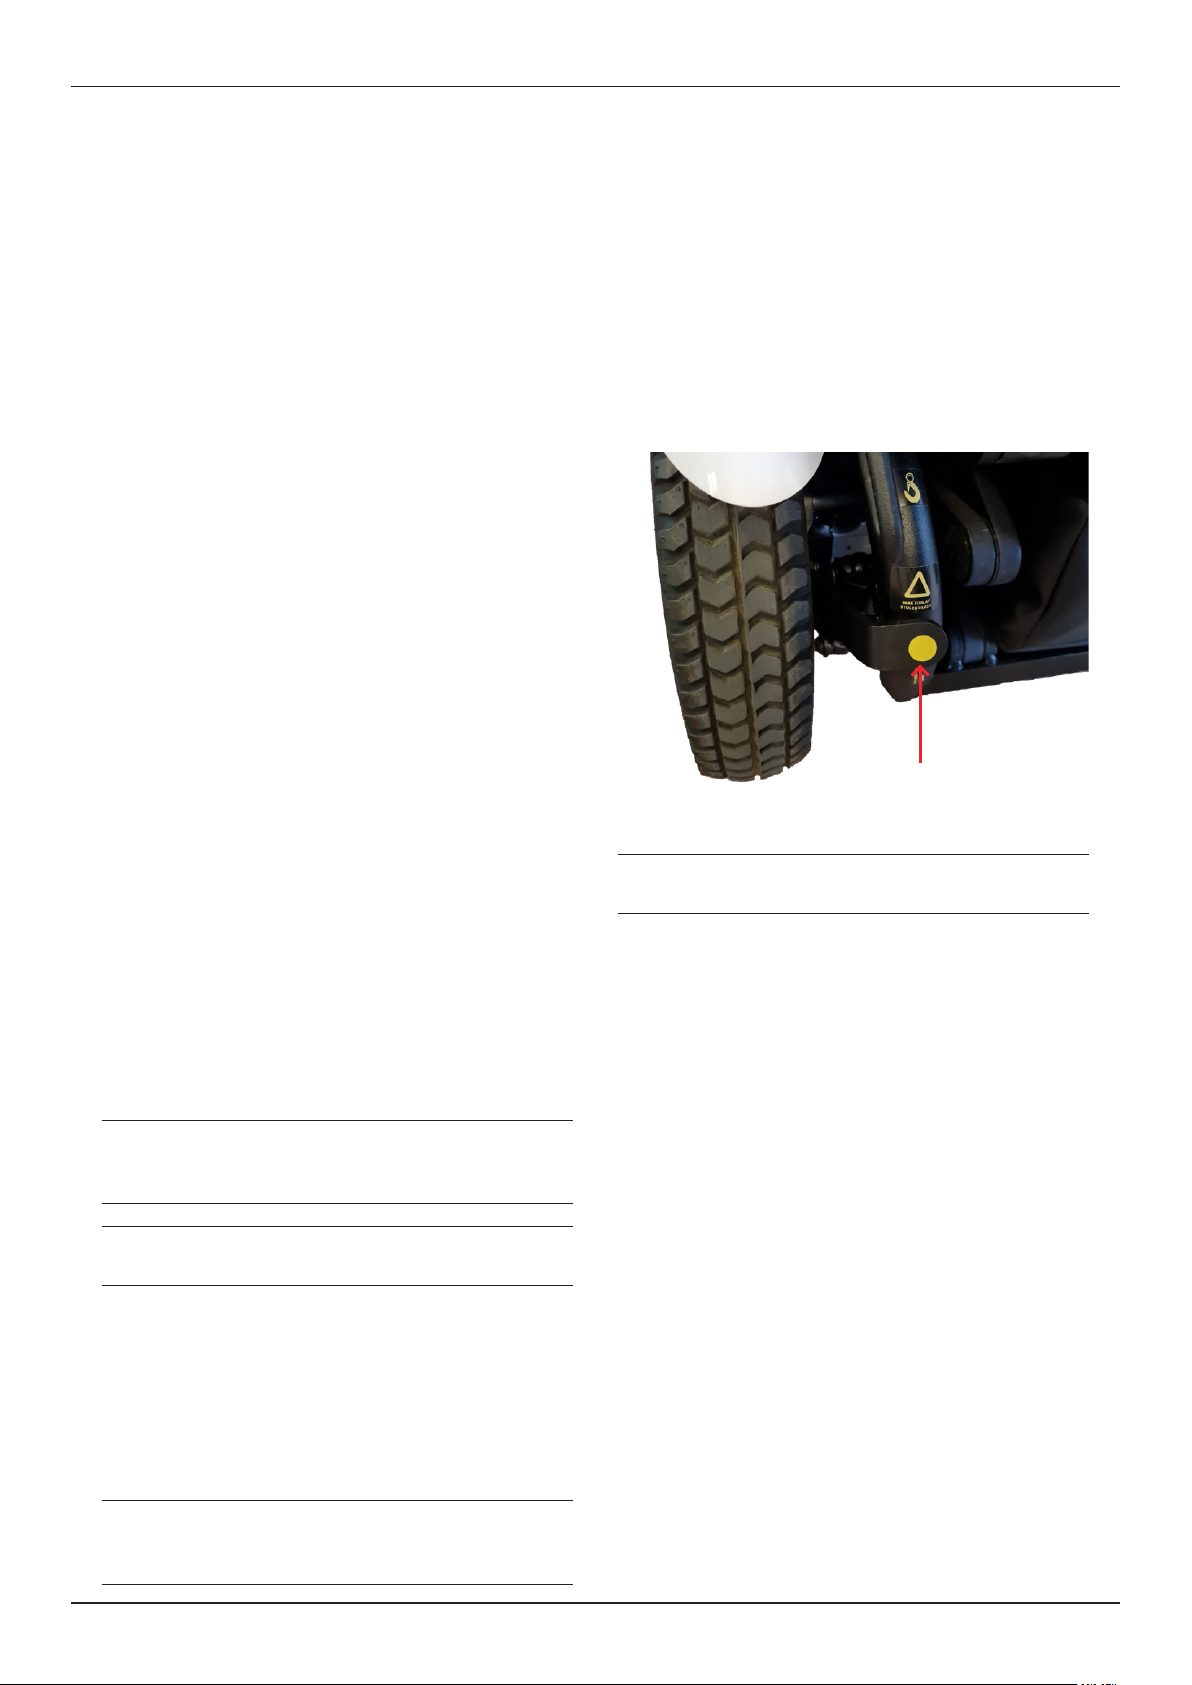
Krokene er plasert på baksiden av rygglenet i nærheten av infesting til hodestøtten. Se bildet.
Løftepunkter
Rullestolen er 168 kg tung. Vi anbefaler ikke at noen løfter denne manuelt. Hvis stolen må løftes må
man benytte stroppefestene foran mellom framhjulene og bak på rullestolen. Se bilder i kapitel 9 om
transport.
Komme inn og ut av rullestolen
Kjør så nært som mulig inn til siden med rullestolen. Sjekk at styringsenheten/joysticken er slått av for å
forhindre ukontrollert bevegelse. Vipp opp armlenet og fotbrettplaten. Skli nå sidelengs inn på setet til
rullestolen, og sørg for at du er så langt tilbake som mulig i setet. Vipp ned fotbrettplaten og armlenet
ned igjen.
For å komme ut av rullestolen, gjøres prosedyren i motsatt rekkefølge.
Advarsel: Ekstralast på krokene kan redusere stolens
stabilitet.

17User’s Manual LS
5.
1
3
2
3
Footrest to seat distance
3
Use in steep conditions or rough ground etc. will have negativ impackt on the distance.
Total range of motion for seat functions depend on seat unit chosen.
The wheelchair conforms to the following standards:
• requirements and test methods for static, impact
• power and control systems for electric wheelchairs
•

User’s Manual LS18
Headrest:
Operating forces
ca. 1 N
ca. 1 N
60 N
Tires
Electrical
Environmental conditions
60% ± 20 %
Storage conditions
60% ± 20 %
Materials
Headrest

User’s Manual LS
Batteries
The wheelchair is equipped with maintenance-free gel
batteries.
If the wheelchair is not used for a long time, the
A complete discharge of the batteries should be
avoided. Charging should be done in a ventilated room,
process, the wheelchair can not be used.
Attention: The replacement is only carried out by
authorized professionals. The battery is located under
the seat. The seat must be raised until it stops by itself.
Attention: Be aware that leaks or defective batteries are
harmful to your health.
Battery charger
Mass
230V 50Hz
Charging
Important: EC-buddy is capable of charging batteries
hours. The charger can be used for both GEL- and AGM
batteries.
Important: The charger should only be used to charge
batteries installed in wheelchairs.
Bruker Handbok LS-300 Side 23
Lading
Viktig: EC-buddy har kapasitet til å lade opp batteriene opp til 80% på mindre enn 8 timer. Laderen kan
brukes på på både GEL og AGM batterier.
Viktig: Laderen må kun bli benyttet til å lade batterier til elektriske rullestoler.
8 Amp 24 V
Vedlikehold
• Hver gang du bruker laderen, må du kontrollere at kablene og kontaktene ikke er skadet
eller slitt. Hvis dette er tilfelle, må kabelen / kontakten umiddelbart skiftes ut av
produsent eller av et autorisert serviceverksted..
• For de beste resultatene, økonomi og levetid for laderen, batteriet og kjøreavstanden
pr. lading, bør følgende råd følges:
-Laderen, kontakter og batteriet må holdes rene.
- Slå av rullestolen når den ikke er i bruk.
- Lad batteriet daglig og så snart som mulig etter at det er tomt.
-Bruk laderen til å vedlikeholdslade batterien hvis rullestole er lagret for en lengre periode.
• Laderen kan bli rengjort ved å benytte en lett fuktet klut.
Merk: Laderen må kun brukes med rullestoler hvis strømforsyningen er konstruert for
strømbelastninger som minst svarer til laderenes nominelle ladestrøm.
Laderkabelen til rullestolen må dimensjoneres med en tilstrekkelig dimensjonert sikring.
Lade tiden er så kort som mulig.
"CHARGING", "COMPLETED" og "ERROR" lysene på fronten av laderen viser ladestatusen.
Merk:
-Batterier avgir eksplosive gasser ved ladning. Unngå flammer og
gnister.
-Laderen er bare beregnet til bruke batterier med 12 celler (24 V).
-Laderen har innebygd sikkerhet mot overoppheting, men laderen
kan bli varm ved ladning.
- Ladning må kun utføres i rom med god ventilasjon.
- Hvis en av pinnene i kontakten blir varm ved ladning kan dette
tyde på at pinnene er slitt eller ødelagt. Hvis dette skjer må
kontaktene byttes.
Kabler og kontakter må kun byttes av produsenten eller et
autorisert serviceverksted.
Bruker Handbok LS-300 Side 26
8. Yhgolnhkr og
Bytte av batterier
Utskiftingen av batteriene til stolen utføres kun av autorisert fagpersonell. LS-300 har 2 batterier som er
plassert under setet. Bytte av batterier er beskrevet i Servicemanualen.
Vær oppmerksom på at lekkasje eller defekte batterier er skadelige
for helsen din.
Stolens strømtilførsel
Bak på stolen finner du bryterne til strømtilførselen på stolen. Bryter inne er strømmen på. Bryter ute
slik at det hvite synes er strøm av.
Reprasjons- og vedlikeholds plan
Merk:Reprasjonene skal utføres av av autorisert service personell.
For å forhinder skader anbefaler vi at du følger denne vedlikeholdsplanen.
Inn = strøm på
Ut = strøm AV
Type: . Haze HZY-EV12-60 batterier.
Art.nr.: KP-NHD10200
WARNING:
• Batteries emit explosive gases during
• The chrager is intended only for GEL- and
• The charger is equipped with
overheatingprotection, but can become hot
during charging.
• Charging must be done in a well ventilated
place.
• If one of the connectors becomes hot during
operation, this can be an indication that the
connector is worn or damaged. In such cases
both the male and female connectors should
be replaced.
• Cables and connectors must be changed only
by the manufacturer or by an authorised
service workshop.

User’s Manual LS20
Care and maintenance
• Each time you use the charger, make sure that the
cables and connectors are not damaged or worn.
replaced immediately by a manufacturer or an
authorized service center.
• For the best results, economy and life of the
charger, battery and driving distance per. charging,
the following advice should be followed:
The charger, connectors and battery must be
kept clean.
Switch off the wheelchair when not in use.
Charge the battery daily and as soon as
possible after it is empty.
Use the charger to recharge the battery if the
wheelchairs are stored for an extended period.
• The charger can be cleaned using a slightly damp
cloth.
Attention: The charger must only be used with
wheelchairs whose power supply is designed for current
loads that are at least equal to the rated charging
current of the charger.
The charging cable of the wheelchair must be
Attention: Non-rechargeable batteries must not be
connected to the charger!
The energi transfer from the mains to the battery
takes place via a patented power circuit. The charging
process is controlled by a microcomputer and
adjusted automatically to the battery charge level.
This optimizes the life of the battery. When the battery
is fully charged, it will switch to trickle charge. An
overcharge of the battery can not occur.
The charging time is as short as possible.
The “CHARGING”, “COMPLETED” and “ERROR”
lamps on the front of the charger indicate the charging
status.
Service information
NHD AS performs service on the LS. Request must
be made directly to us (see item Maufacturer). Main
components replaced by normal wear and tear are:
• Tire.
• Battery.
• Seat System.
A Service Manual or User’s Manual is available if
necessary. Please contact us.
Table of contents
Other NHD AS Wheelchair manuals


Popular Wheelchair manuals by other brands


Shoprider
Shoprider XtraLite Jiffy UL7WR-10 user manual

Stealth Products
Stealth Products ADI Q-Back 2.0 AL Series owner's manual

Pride Mobility
Pride Mobility Jazzy Select 7 Specifications

Drive Medical
Drive Medical Drive owner's manual

Tendercare
Tendercare Mini Tilt Wheelchair Workshop manual

Drive Medical
Drive Medical Titan owner's manual