DeVilbiss Healthcare drive XS2 Series User manual

XS2 Aluminium Wheelchair
(XS2SP16SIL, XS2SP18SIL, XS2SP20SIL,
XS2TS16SIL, XS2TS18SIL, XS2TS20SIL)
Instructions for use

Page 2 of 16XS2 Aluminium Wheelchair (2022-01 rev2)
Introduction
Intended purpose
To provide manually propelled mobility to an individual who has a walking
related disability and/or who does not have the full capacity to walk.
Intended user group
The wheelchair is intended for an individual who has a walking related
disability and/or who does not have the full capacity to walk and has a weight
of up to 135kg (21 stone).
Environment of use
The wheelchair is suitable for both indoor and outdoor use however it is not
intended to be used on rough or uneven terrain.
Indications
To assist with the mobility of an individual, as defined in the ‘intended user
group’ section.
Contraindications
• The occupant exceeds the maximum weight capacity.
• The occupant has postural support needs that are not addressed by
the wheelchair.
• Inability to safely guide a wheelchair (only applies to self propelled
variants).
• Occupants with Hemiplegia (only applies to self propelled variants).
• Occupants with only one arm/hand (only applies to self propelled
variants).
Other contraindications may be relevant which are specific to an individual
and / or care environment.
Product overview
The wheelchair is constructed from an aluminium frame with a padded fabric
seat for the occupant. The wheelchair incorporates footrests for the occupant,
and it is able to be folded when not in use or being transported in a vehicle.
The wheelchair is available as either a transit model, where an attendant is
required to propel it, or as a self-propelled model, where the occupant can
propel it. The wheelchair can be manually propelled forwards and backwards.
!
Warning
This wheelchair must not be used as a seat in a motor vehicle.
Users should always transfer to the vehicle's seat and the
wheelchair should be safely stowed away.
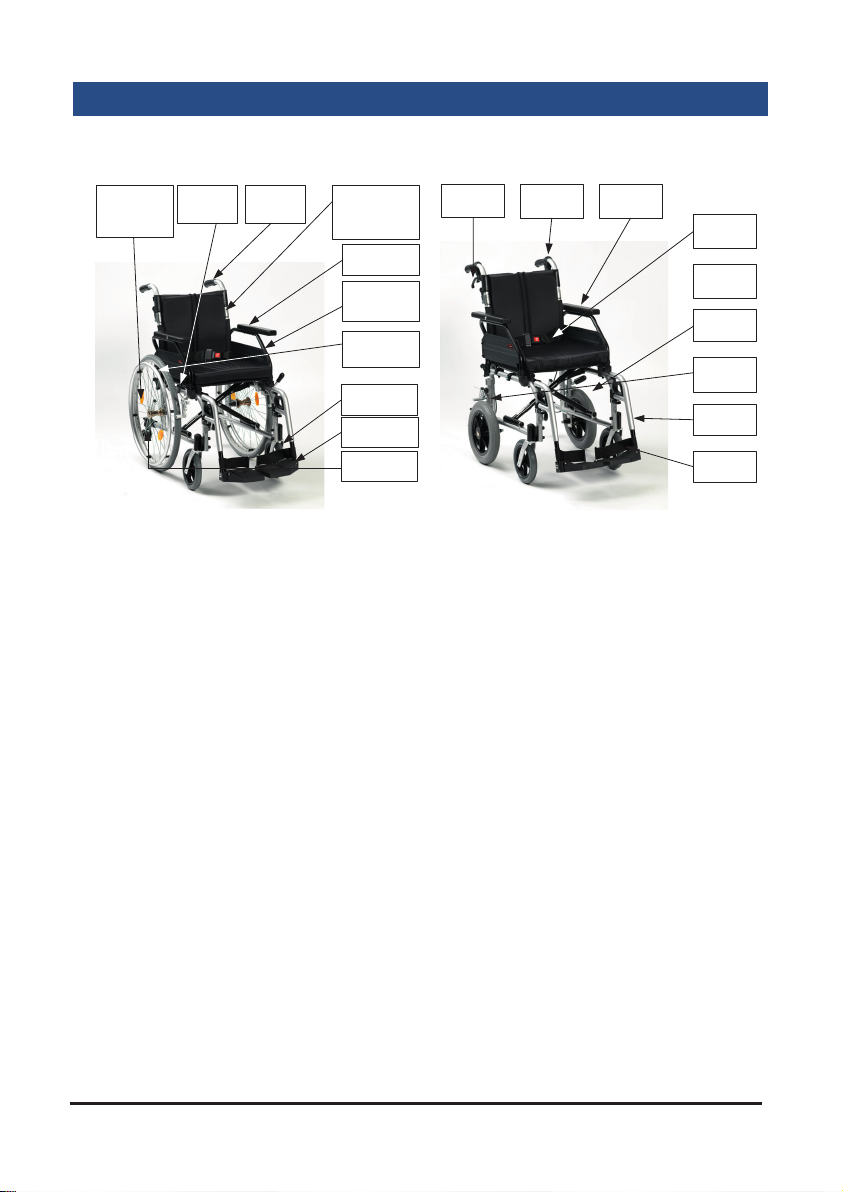
Parts description
PUSH
HANDLE
BRAKE
LEVER
1/2 FOLD
BACK
MECHANISM
ARM REST
SIDE
PANEL
FOOTREST
FRONT
CASTOR
QUICK
RELEASE
PIN
24" WHEEL
& HANDRIM
STEPPER
TUBE
BRAKE
LEVER
PUSH
HANDLE
ARM
RESTSIDE
PANEL
SIDE
PANEL
PARKING
BRAKE
FOOT
REST
FRONT
CASTOR
12.5"
WHEEL
Self Propel models
16” (XS2SP16SIL)
18“ (XS2SP18SIL)
20” (XS2SP20SIL)
Transit models
16” (XS2TS16SIL)
18“ (XS2TS18SIL)
20” (XS2TS20SIL)
Page 3 of 16XS2 Aluminium Wheelchair (2022-01 rev2)

XS2 Aluminium Wheelchair (2022-01 rev2) Page 4 of 16
symbolsPreparing for use
These instructions should be read carefully before using the wheelchair.
This product does not have a service manual. The following parts should be
adjusted by a healthcare professional to suit each user’s requirements:
1. Rear Wheels
Use the axle bracket to alter the horizontal position of rear wheels and the
vertical position of self-propel wheels. Remove the screws and nyloc nuts,
reposition, then reattach the fasteners and adjust brakes (below). Drive
DeVilbiss Healthcare Ltd recommends approved service personnel do this.
2. Upholstery
This wheelchair features a cushioned seat and back, and a tension-
adjustable back canvas. To adjust the tension, remove the cushion and
backrest, then adjust the Velcro straps. Ensure straps are not too taut, as
this can damage the wheelchair.
3. Brake Unit
Loosen the bolt heads with a 5mm hex key, sliding the brake unit along
the frame. Readjust the brakes if any rear wheels have been moved. Drive
DeVilbiss Healthcare Ltd recommends approved service personnel do this.
4. Armpad Position
Move the armpads back or forward by holding the buttons on either side.
5. Footrest Height and Angle, Anti-tip Wheels
See the footrest adjustment and steep terrain, kerbs and steps sections.
A risk assessment must also be performed to assess suitability of the device
for the user. This assessment should include, but not be limited to:
• Small adults (and children)
• Users (and attendants) who lack capacity
• Very active occupants
• Unauthorised access to the wheelchair
Independent users and attendants are responsible for determining that they
are both mentally and physically capable of using the wheelchair with
minimal risk of harm.
Maximum occupant mass – Exceeding the limit marked on your
device can damage the product and put users at risk of harm.
Remove all packaging and stand the wheelchair on the ground. Separate the
arm rests to open the wheelchair, then push down firmly. Once the seat is
secure, the backrest is upright and the footrests are attached (see overleaf),
the wheelchair is ready for use.
XS2 Aluminium Wheelchair (2022-01 rev2) Page 5 of 16
Footrest adjustment
1
2
To fit the footrests, align approximately 45º
outwards, push down firmly into the frame (1)
then rotate inwards (2) until they lock into place.
Pull the handle / lever and rotate to release.
For optimum comfort it is important to attain
the correct leg position. To change the
footrest height, unscrew the hex bolt on the
silver tubing with a 5mm hex key. To alter the
footplate angle, loosen the 6mm hex bolt on
the side. Adjust the footrest as required, then
tighten to secure. Attaching the footrest
!
Common misuse
Do not stand on the footrests. Overloading can damage the
product and cause harm to the occupant.
Folding back mechanism
2
1
PADDLE
To fold the backrest, push the black paddle
towards the back post with your thumb (1)
whilst pulling the handle down (2) as shown
in the folding the backrest image. Repeat this
operation for the other handle.
To put the backrest back into position, lift
both handles together and the folding
mechanism will lock back automatically.
Do not push down on the handles to raise
the front of the wheelchair, as this could
result in damage to the wheelchair. To mount
kerbs and steps, reconnect the backrest and
use the stepper tube as described in the
steep terrain, kerbs and steps section.
Folding the
backrest
!
Common misuse
The paddle is intended to be pushed. Do not pull the paddle to
fold the backrest.

Page 6 of 16XS2 Aluminium Wheelchair (2022-01 rev2)
General warnings
Transfer and use
!
Before using the wheelchair, read the safety notices below;
• Do not exceed the 10º maximum gradient. Use slow speeds
and do not reverse down a gradient.
• Do not use on escalators.
• The wheelchair is only suitable for single occupancy.
• Keep your feet on the footrests when moving. Do not stand on
the footrests.
• Ensure that fingers and objects do not get caught in the wheel
spokes or any other moving parts during use and assembly.
• Maintain proper balance at all times. Users should not move
their centre of gravity out of the seating area.
• Do not reach for items further than your arm’s length.
• Parking brakes should always be applied when transferring.
• Be aware of hazards in your environment, such as narrow
doorways, steps, household appliances, children’s toys, etc.
• A risk assessment must be performed by a competent person
to ensure the wheelchair is suitable for the user. We
recommend you consult a healthcare professional before using
any assistive medical devices.
• Keep away from heating and ignition sources which may raise
surface temperatures or cause a fire.
Transfer: When transferring in and out of the seat, move the seats as
close as possible to each other. Attendants should engage parking brakes and
fold away footrests. If users need to be lifted out of a seat, attendants are
responsible for being suitably trained and competent to lift occupants with
minimal risk of harm. Good health and safety practice must always be used.
Propelling: The attendant should push from behind using the handgrips,
and following the safety advice above. Transit models can only be propelled by
an attendant. Self Propel models can also be propelled by wheelchair users,
pushing the handrims on the rear wheels. To slow down, apply pressure to the
handrims.
When stationary, the brakes should always be applied.
Page 7 of 16XS2 Aluminium Wheelchair (2022-01 rev2)
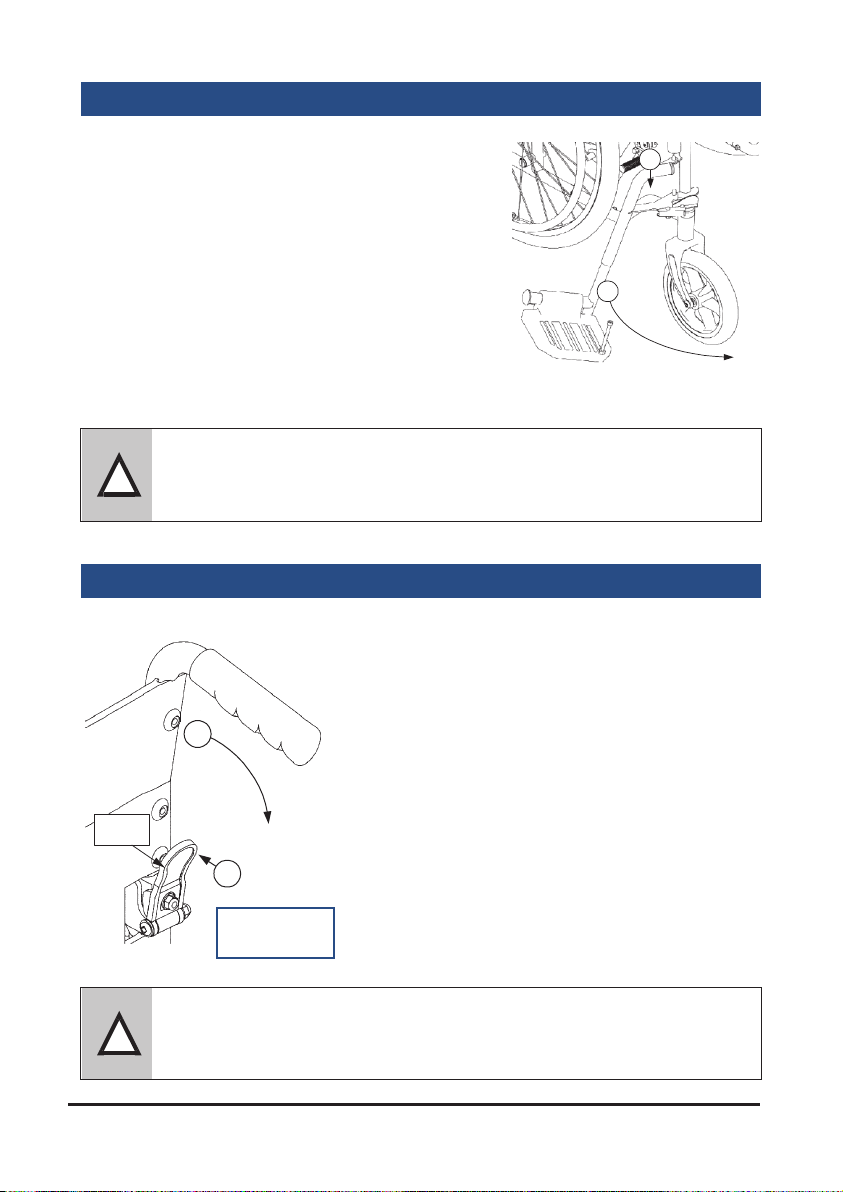
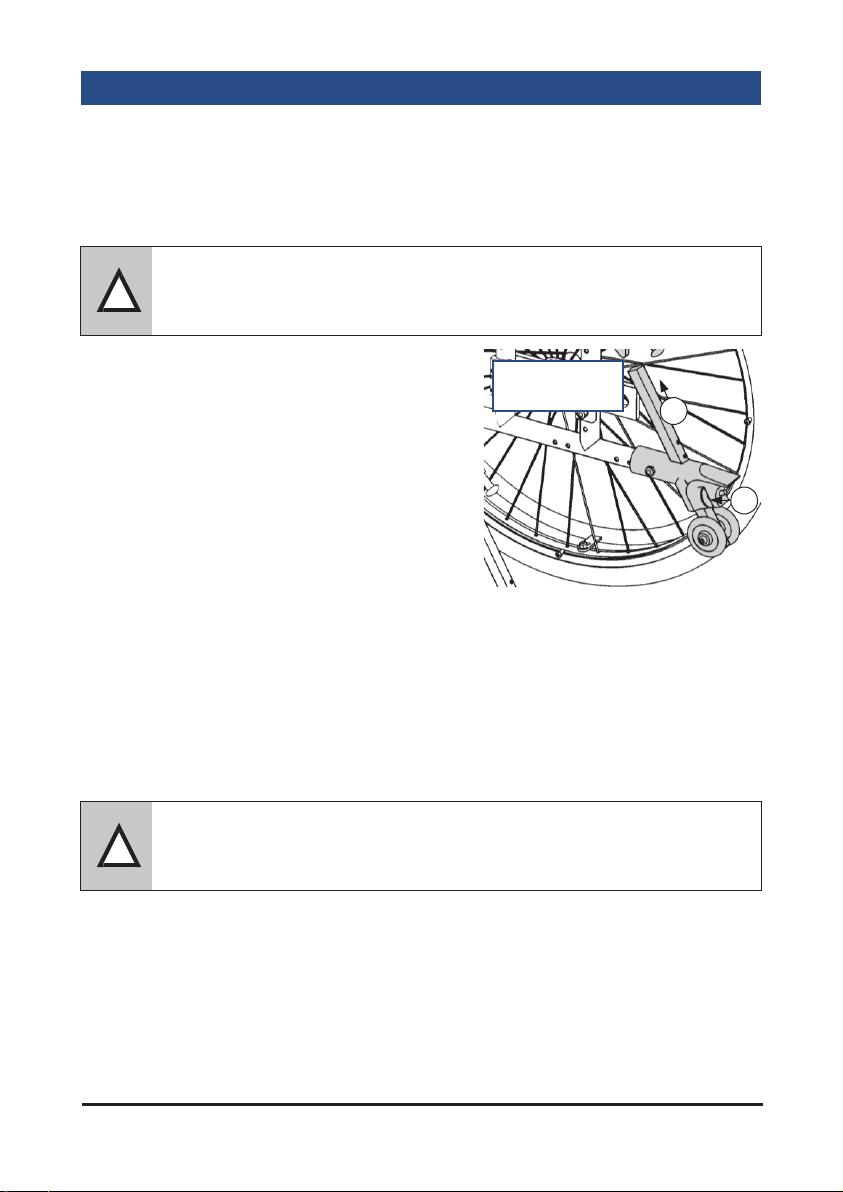
Steep terrain, kerbs and steps
Steep terrain: These wheelchairs are not designed for use on gradients
beyond 10°. When on a slope, avoid swerving or sudden changes in movement.
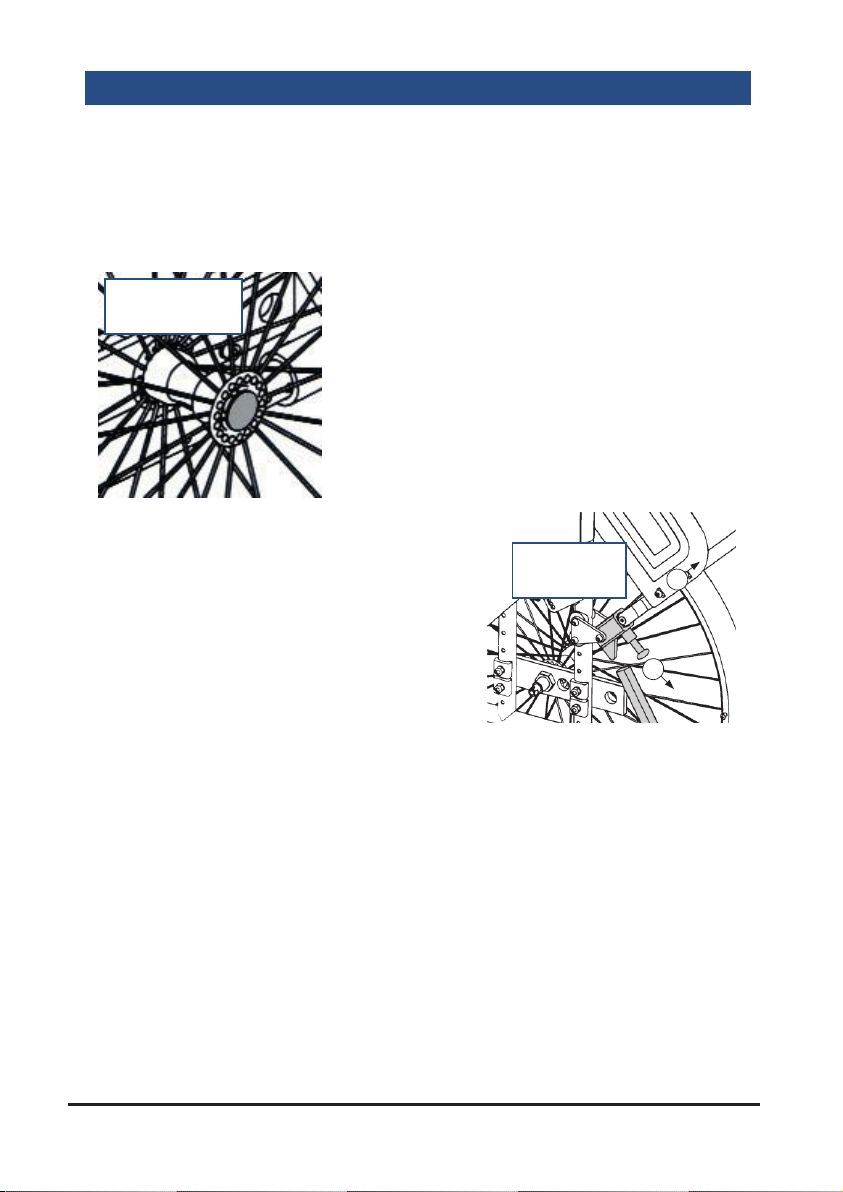
Over kerbs: Attendants push down on the stepper tube with a foot to raise
the front castors (when mounting a kerb for example).
The stepper tube at the back of the
wheelchair comes with an integral anti-tip
wheel (shown in Adjusting anti-tip wheel). To
adjust the height of these wheels and
enable the wheelchair to tip backwards, pull
the metal disc (1) and adjust the height of the
wheel (2). Release the disc and slide the
anti-tip wheels to ensure they are locked in
position.
To mount kerbs, lift the anti-tip wheels fully and approach the kerb head-on.
Then the attendant uses the stepper tube to raise the front castors, and
lowers the front castors on the raised kerb. Finally the attendant should push
the wheelchair forward, lifting it up slightly to mount the kerb if required.
To go down, line up the front castors with the edge of the kerb. The attendant
uses the stepper tube to raise the front castors and tip the user slightly back.
Keeping the castors raised, slowly lower the wheelchair down the kerb.
Multiple steps: The wheelchair is not designed to mount staircases, so may
require carrying if no elevators or ramps are available. Attendants are
responsible for being suitably trained and competent to lift the wheelchair with
minimal risk of harm. Do not carry using the handles or any removable sections.
!
Common misuse
Do not lean or push down on the push handles, as this can
damage the wheelchair.
!
Common misuse
In most cases, attendants should also raise the front castors when
going down kerbs, to prevent the user from falling or sliding out.
Adjusting
anti-tip wheel
1
2
Self Propel Only:
To lock, push the lock tab (B)
forward. Pull back to release.
XS2 Aluminium Wheelchair (2022-01 rev2) Page 8 of 16
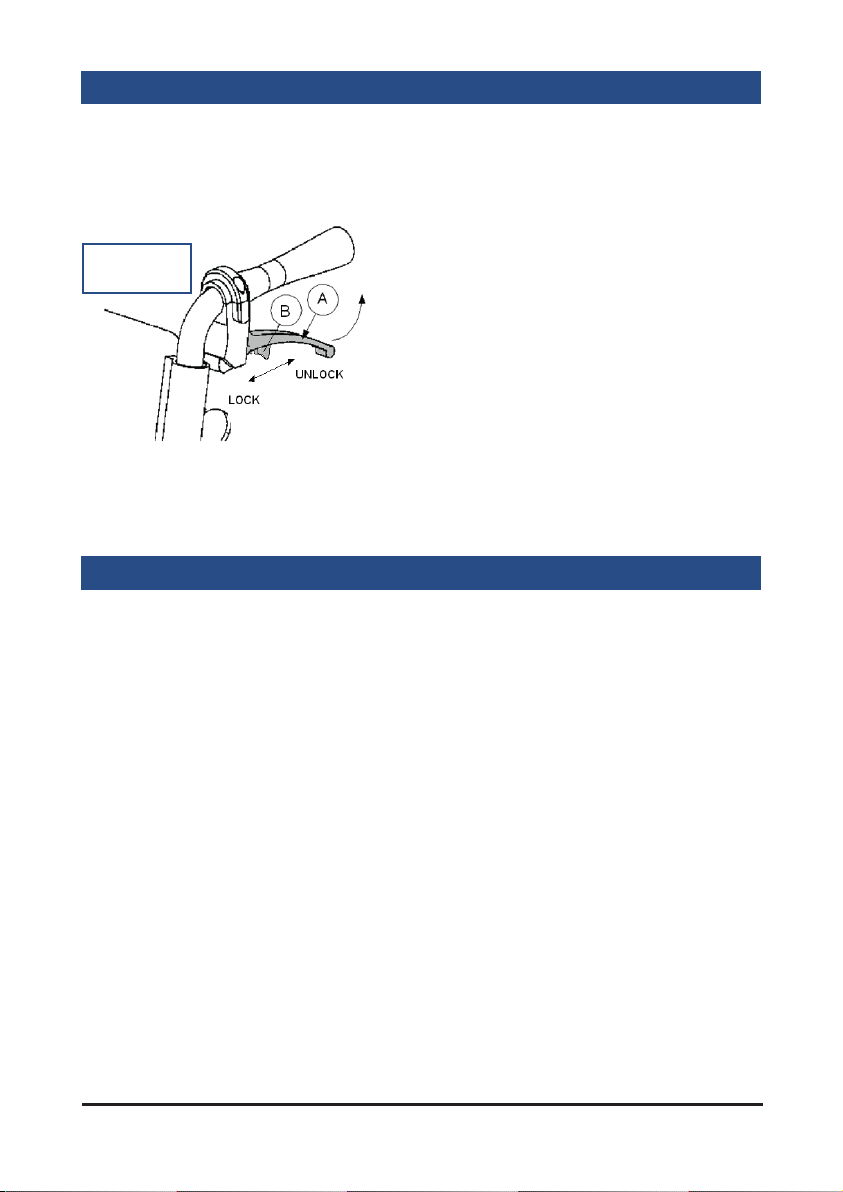
Brake operation
Cable Brakes
On the transit models, the attendant
pushing the wheelchair may use
cable-operated brakes to slow or park
the wheelchair.
To apply the brakes, squeeze the large
lever (A) on the push handles and the
brakes will be applied until the levers
are released. Ensure both levers are
pulled simultaneously to ensure the
wheelchair travels in a straight line.
Parking Brakes
To apply the parking brakes, push the handle on the brake unit until locked
in place. To release the brake, pull the handle in the opposite direction. The
brakes should always be applied when the wheelchair is stationary.
Operating
the brakes
Transit only:
To lock, push the lock tab (B)
forward. Pull back to release.
Using a wheelchair belt
Belts are often used to restrain wheelchair occupants during normal use. Any
belts used should be adjusted to suit each user. When fastened, they should
be tight without causing discomfort or undue pressure. Belts may not be
suitable for all users. Seek professional medical advice before using a
wheelchair belt.
All wheelchairs in the XS2 range come with a lap belt. They are secured
around the user’s pelvis to help keep their hips and pelvis towards the back
of the seat. These belts must not be used as a substitute for a seatbelt in a
motor vehicle. The length of the belt can be adjusted using the tri-glides, and
it has a large clip to fasten and unfasten the lap belt.
There is a risk of suocation from users ‘submarining’ (where they slide down
the chair until the lap belt is around the neck area). To reduce the risk of this,
ensure appropriate belts are fitted, occupants are under supervision and the
belts are used in line with the manufacturer’s instructions for use.
Page 9 of 16XS2 Aluminium Wheelchair (2022-01 rev2)
Disassembly and storage
This wheelchair has a number of quick release components and the
wheelchair frame is easily foldable. This facilitates a light carry weight and
minimises storage space required
. To disassemble for storage, transport or
maintenance, follow the steps below. To reassemble components, reverse
these instructions.
1. Quick release wheels
To remove the rear wheels, push the button
in the centre of the wheel hub, (shown on the
Quick release button diagram in grey), and
slide the wheel and axle from the frame.
To reattach, push both parts into the frame
until the wheel is secure.
2. Armrests
There is a lever towards the front of each
armrest to move them, similar to the
backrest levers. Push the levers to release
the armrests and flip them upwards.
To remove the armrests, flip them
upwards, pull the lever at the back (1) of
the Removing armrests image and pull
upwards on the tube frame (2).
3. Half Folding Back
Follow the previous instructions to fold the back.
4. Footrests
Follow the previous instructions to remove or swing out the footrests.
5. Folding the wheelchair
Remove the seat and back cushions. Then grab the centre of the fron
t and
rear edges of the seat sling. Pull upwards on the seat sling and the
wheelchair should naturally fold up.
Note: The wheelchair may be folded and stored in a motor vehicle.
The wheelchairshould be stored in a dry environment, away from direct
sunlight. If wheels are attached, store with the parking brakes on.
Quick release
button
Removing
armrests
1
2
XS2 Aluminium Wheelchair (2022-01 rev2) Page 10 of 16
Care and maintenance
Do not use a damaged or badly worn wheelchair. Users should routinely check for
any malfunctions or changes in performance. See Accessories and Spare Parts
section for approved parts available from Drive DeVilbiss Healthcare Ltd.
• Before each use of the wheelchair, the brakes and tyres should be checked. It
can be folded up for storage, with the parking brakes on.
• The wheelchairshould be kept clean and dust free. This can be done with a
duster or damp cloth. Avoid neat bleach or abrasive surface cleaners. Leave to
fully dry before reuse.
• Drive DeVilbiss Healthcare Ltd recommends that an approved service engineer
maintains the wheelchair annually, and these items should be repaired,
replaced, adjusted and/or lubricated if required:
•When the product has reached the end of its useful life, follow local recycling
and disposal policies.
• Tyres
• Wheel bearings
•
•
Castors
• Brakes
•Footrest locking mechanism
Seat upholstery
•
•
Back upholstery
•
Arm pads
•
Rear wheel quick release pin
•
Half folding back mechanism
•
Back posts
Wheelchair folding mechanism
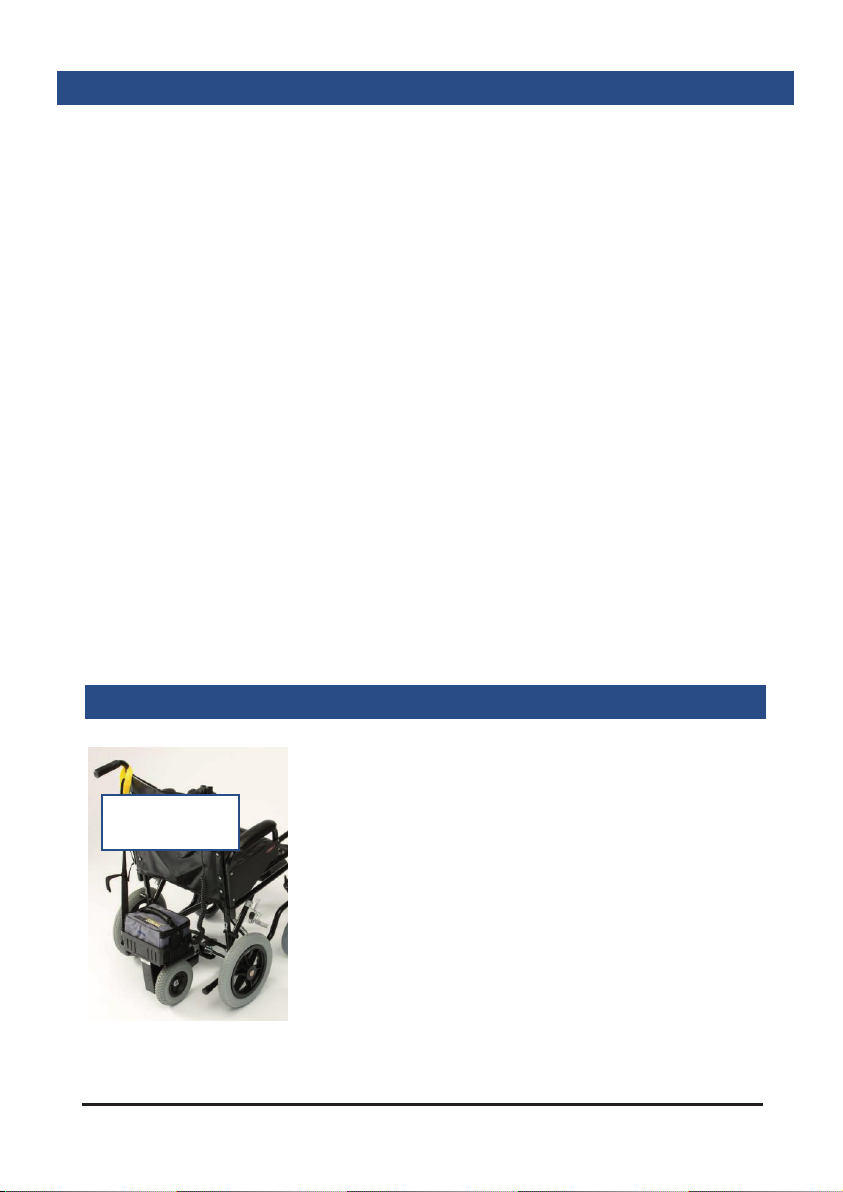
Powerpack installation
This wheelchair is suitable for some retrofit
powerpacks, which allow the device to be
controlled electronically. (See Powerpack example
image.)
Powerpacks are not required to use the
wheelchair. The mounting position will need
adapting to be suitable for both the user and the
powerpack used.
Any installed powerpack must be
used in line with the manufacturer’s instructions
for use.
For more information about powerpacks, contact
Drive DeVilbiss Healthcare Ltd or your local dealer.
Powerpack
example

Page 11 of 16XS2 Aluminium Wheelchair (2022-01 rev2)
Specification
Model XS2SP16SIL XS2SP18SIL XS2SP20SIL XS2TS16SIL XS2TS18SIL XS2TS20SIL
Maximum
occupant
mass
135 kg 135 kg 135 kg 135 kg 135 kg 135 kg
Overall
length with
legrest
103 cm 103 cm 103 cm 92 cm 92 cm 92 cm
Overall
width 58 cm 63 cm 68 cm 58 cm 63 cm 68 cm
Folded
length 83 cm 83 cm 83 cm 83 cm 83 cm 83 cm
Folded
width 26 cm 26 cm 26 cm 26 cm 26 cm 26 cm
Folded
height 63 cm 63 cm 63 cm 63 cm 63 cm 63 cm
Total mass 17 kg 17 kg 17 kg 15 kg 15 kg 15 kg
Static
stability 10° 10° 10° 10° 10° 10°
seat depth 42 cm 42 cm 42 cm 42 cm 42 cm 42 cm
seat width 40 cm 45 cm 50 cm 40 cm 45 cm 50 cm
Seat
surface
height at
front edge
52 cm 52 cm 52 cm 52 cm 52 cm 52 cm
Overall
height 93 cm 93 cm 93 cm 93 cm 93 cm 93 cm

This page is left blank intentionally.
Page 12 of 16XS2 Aluminium Wheelchair (2022-01 rev2)

This page is left blank intentionally.
Page 13 of 16XS2 Aluminium Wheelchair (2022-01 rev2)

This page is left blank intentionally.
Page 14 of 16XS2 Aluminium Wheelchair (2022-01 rev2)

XS2 Aluminium Wheelchair (2022-01 rev2) Page 15 of 16
Warranty
Your Drive branded product is warranted to be free of defects in materials
and workmanship for one year from date of purchase. This device was built to
exacting standards and carefully inspected prior to shipment. This warranty is
an expression of our confidence in the materials and workmanship of our
products and our assurance to the customer.
In the event of a defect covered by this warranty, we will at our option supply
parts or replace the device. This warranty does not cover device failure due
to owner misuse or negligence, or normal wear and tear. The warranty does
not extend to non-durable components, such as rubber accessories, castors
and grips, which are subject to normal wear and need periodic replacement.
The wheelchair frame has a 5-year warranty.
If you have any queries or require full warranty conditions, please contact
your provider.
Accessories and spare parts
Drive DeVilbiss Healthcare Ltd provide a range of accessories for wheelchairs
in the XS2 range. Spare parts are also available for maintaining
your wheelchair.
To order these parts, contact your provider. Visit www.drivedevilbiss.co.uk to
find your local stockist. Spare part catalogues, compatibility charts and other
documentation can also be found on this website. Only use parts approved by
Drive DeVilbiss Healthcare Ltd.

XS2 Aluminium Wheelchair (2022-01 rev2) Page 16 of 16
Support
For more information, or assistance with use and maintenance, please
contact your provider. Users with visual, reading or cognitive disabilities
should seek advice from their provider or a professional care provider for an
appropriate format. For the latest version of this document, contact Drive
DeVilbiss Healthcare Ltd using the details below, or check our website.
Sichuan AST Medical Equipment Co. Ltd.
Lotus NL B.V.
Koningin Julianaplein 10, le Verd, 2595AA, The Hague, NL
Drive DeVilbiss Healthcare Ltd
Sidhil Business Park, Holmfield, Halifax
West Yorkshire, HX2 9TN, GB
Drive DeVilbiss Healthcare Ltd provide these instructions for use and product markings.
Service & Maintenance Spares Customer Service
Tel: +44 (0)1422 233136 Tel: +44 (0)1274 475125 Tel: +44 (0) 845 0600 333
Fax: +44 (0)1422 233010 Fax: +44 (0) 845 0600 334
Approved
service facility
Any serious incident that has occurred in relation to the device should be
reported to the manufacturer and the MHRA or the competent authority of
your Member State. Please quote the product serial code on all
correspondence, which can be found on the wheelchair frame under the seat.
58 Jin-Peng Road, C Area, Luxian Industrial Park,
Luzhou City, Sichuan Province, 646100 CN
SUNGO Certification Company Limited
3rd Floor, 70 Gracechurch Street, London EC3V 0HR, GB
Drive DeVilbiss Sidhil Ltd
4 Trench Road, Mallusk, Newtownabbey
BT36 4TY, Northern Ireland
This manual suits for next models
6
Table of contents
Other DeVilbiss Healthcare Wheelchair manuals

DeVilbiss Healthcare
DeVilbiss Healthcare drive SD2 User manual

DeVilbiss Healthcare
DeVilbiss Healthcare drive AirFold User manual

DeVilbiss Healthcare
DeVilbiss Healthcare Drive Rollator Cristallo2 User manual

DeVilbiss Healthcare
DeVilbiss Healthcare drive FREETEC User manual

DeVilbiss Healthcare
DeVilbiss Healthcare Drive AutoFold User manual

DeVilbiss Healthcare
DeVilbiss Healthcare drive Seren User manual

DeVilbiss Healthcare
DeVilbiss Healthcare drive ASTON User manual

DeVilbiss Healthcare
DeVilbiss Healthcare drive D-LITE User manual

DeVilbiss Healthcare
DeVilbiss Healthcare drive AutoFold User manual


