Nidac Presco PEL1 User manual

PEL1
Presco™Event Logger
“Series 1”
INSTALLATION MANUAL
INTRODUCTION
The Presco™ Event Logger makes programming multiple
Presco™ PAC1 and PAC2 door access controllers a
breeze, providing a user friendly platform for access control
with full upload/download capabilities directly from your PC.
Maximum security is provided with 3 different operator
levels for programming, editing user details or simply
viewing events. When an event is logged it is locked into
memory and cannot be manipulated, so you know the
integrity of your access control system is assured.
FEATURES
Compatible with PAC1 & PAC2 controllers from series 1
to series 3.
Holds 800 users with names up to 32 characters long.
Monitors and programs up to 8 PAC controllers allowing
control of up to 16 doors when using PAC2s.
Stores 5,000 events with time and date stamping.
Simple USB connection to PC.
PC software included for Windows Vista, 7 and 8.1.
Three software operator levels restricts access to
programming features.
Replaceable button cell battery holds event memory and
keeps internal clock running for up to 10 years.
36 month (3 year) manufacturer’s warranty.
Designed and manufactured in Australia.
SPECIFICATIONS
Voltage:
(absolute min-max)1
10-15 Volts D.C.
Current:
80 mA D.C.
PC Interface:
USB 2.0 Mini B
Max USB cable length:
5m
Max wiring distance from
PEL1 to PAC:
1km using 14/0.20. Units may
need to be powered separately.
Operating Temperature:
0C to 50C.
Size:
104mm x 72mm x 27mm.
Weight:
150g.
1 Operating the unit at a voltage outside the specified range may cause
intermittent operation or result in damage to the unit.
TERMINAL DESCRIPTIONS
GND Negative input (or ground) from the power supply.
+12V 12 Volt D.C. positive input from the power supply.
DLOG1 DLOG connection to the first PAC controller.
DLOG2 DLOG connection to the second PAC controller.
DLOG3 DLOG connection to the third PAC controller.
DLOG4 DLOG connection to the fourth PAC controller.
DLOG5 DLOG connection to the fifth PAC controller.
DLOG6 DLOG connection to the sixth PAC controller.
DLOG7 DLOG connection to the seventh PAC controller.
DLOG8 DLOG connection to the eighth PAC controller.
INSTALLATION
Read all instructions carefully before installing and using the
system. It is vital that power be disconnected during wiring.
The PEL1 is to be installed indoors and in a dry secure place.
There are 3 indicator LEDs on the PEL as shown below.
The Power LED indicates that the PEL has power and is
working. The first time it is powered up this led will flash
until the memory and clock have been initialised. If this
LED continues to flash it indicates an internal memory error
and the unit should be returned to the supplier.
The PAC Event Activity LED flashes each time the PEL1
receives an event on a DLOG line from any connected PAC.
The USB connected LED will be on whilst the PEL1 is
communicating with the PC software.
Hold down the Reset Button for 10 seconds to do a full
memory reset, except for the clock. The Power LED will
flash after 10 seconds to indicate that a reset will be
performed when the button is released. If the button is held
down for over 15 seconds it will cancel the reset and the
Power LED will stop flashing.
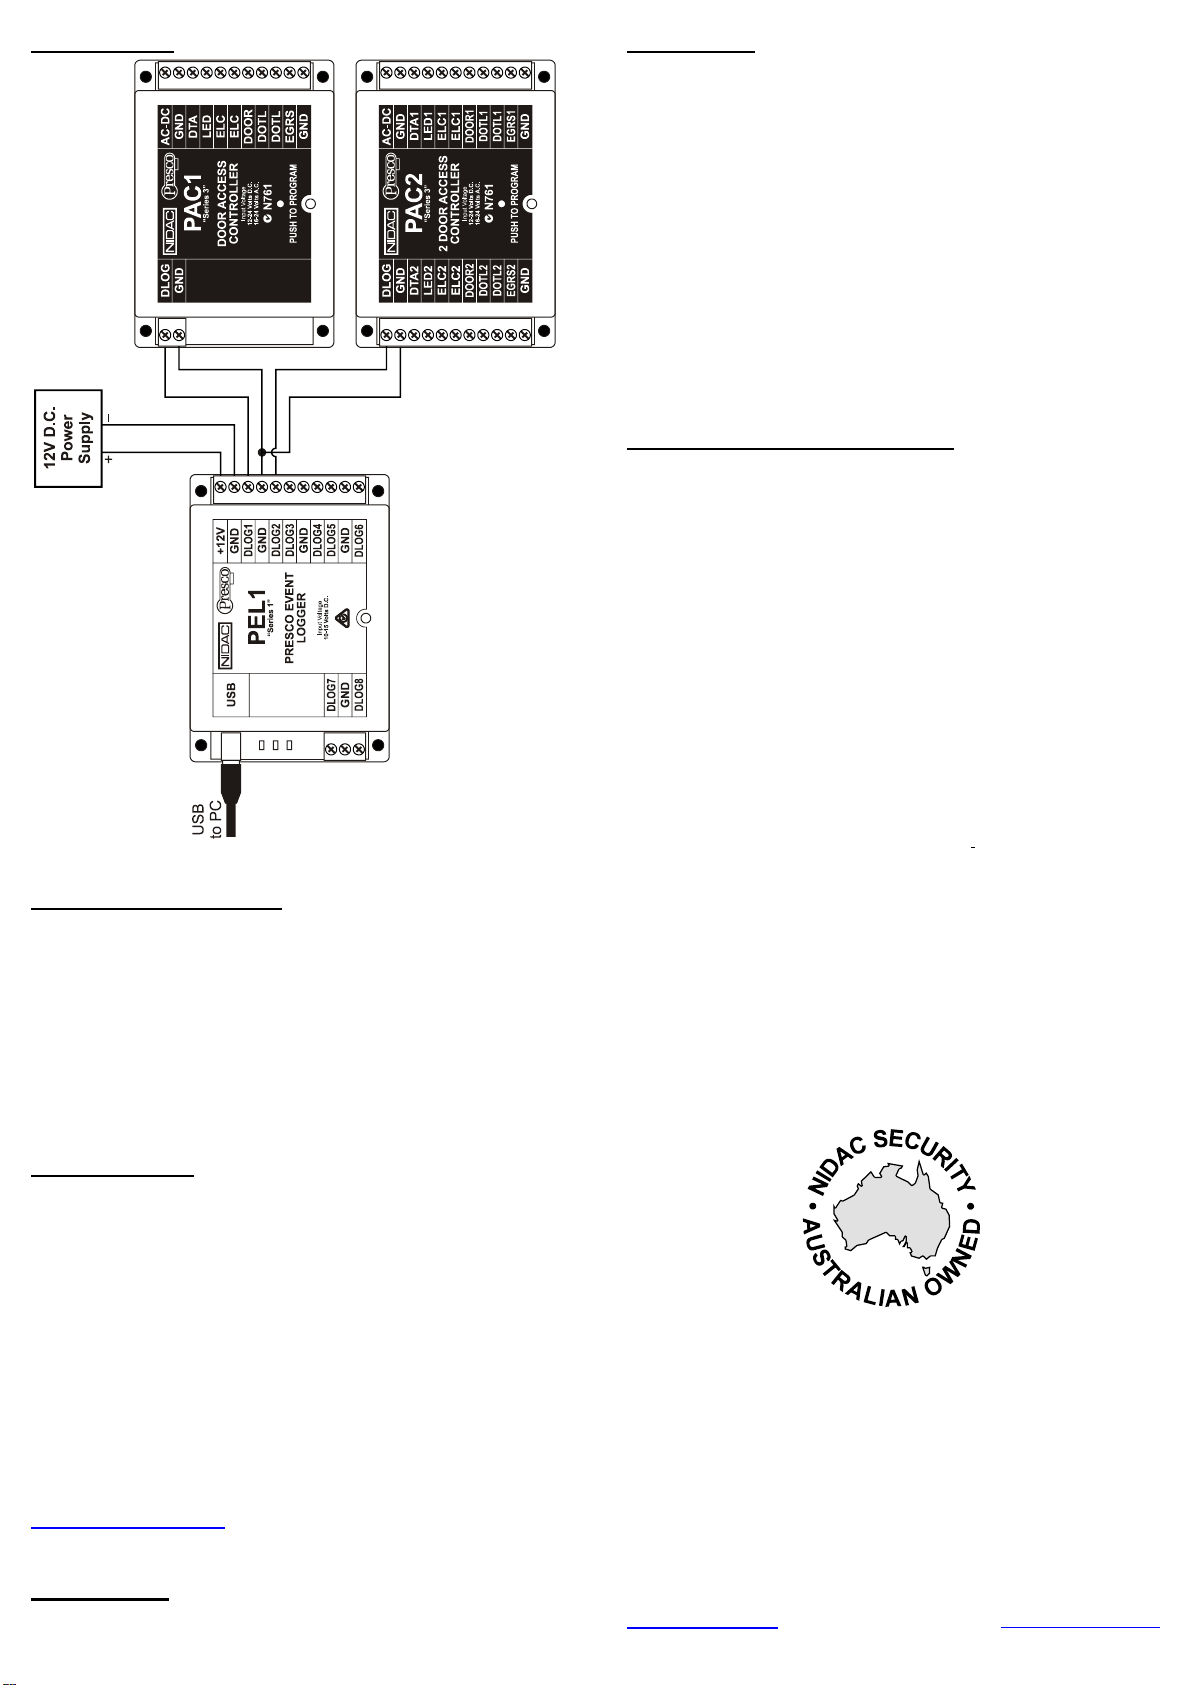
PEL1 WIRING
DRIVER INSTALLATION
The first time the PEL1 is connected to a PC a driver will
need to be installed for the USB connection. If the PC is not
set up to automatically download drivers from the internet
then this will not happen automatically and you will need to
manually install the driver from either the supplied CD or the
internet.
Windows™ Vista will not automatically install the drivers
and so they will need to be manually installed.
PC SOFTWARE
The supplied mini CD includes the Presco™ Event Logger
software suitable for Windows™ Vista, 7 or 8.1 PCs.
Upon start up the software will search for a connected
PEL1. If one is not found then OFFLINE will be flashing on
the status bar at the bottom of the main screen.
The software will automatically search for the PEL1 if it is
connected to the PC whilst the software is running.
To log into the software the default name = “admin” and
password = “admin”.
For more information on using the software please refer to
the software’s help file, accessible from the Help menu.
For the latest version of the PEL1 PC software go to
www.presco.com.au
IMPORTANT!
Do not unplug the PEL1 from the PC whilst the software is
online with it.
WARRANTY
The manufacturer will replace or repair this product if
proven to be faulty (excluding acts of God, accidental or
malicious damage) under the 36 month warranty offered
from the date of purchase.
As NIDAC Security Pty. Ltd. or its agents do not perform the
final installation, inspection or training in the use of this
product, they cannot be held liable for injury, loss or
damage directly or consequentially arising from the use or
misuse of this product.
The software design of the NIDAC Presco™ is protected
internationally. Design improvement and specification
changes are subject to change without notice. All designs
are copyright protected.
OTHER PRESCO™ PRODUCTS
PAC1 Single Door Access Controller with 600 users.
PAC2 2 Door Access Controller with 800 users.
PRE Indoor keypad for Presco™ controllers.
VR43 4x3 Surface Mount vandal and weather resistant
keypad for Presco™ and Wiegand controllers.
VR62 6x2 Surface Mount architrave style vandal and
weather resistant keypad for Presco™ and
Wiegand controllers.
PSE 4x3 Semi Flush Mount vandal and weather
resistant keypad for Presco™ controllers.
PRO2410 Proximity card reader for PAC1, PAC2 or
Wiegand input controllers.
PTKR Touch keypad and Proximity card reader for
PAC1, PAC2 or Wiegand input controllers.
PIM Interface Module for Dallas iButton™, Clock &
Data (Magnetic Card) or Wiegand readers.
Designed and Manufactured by:
NIDAC SECURITY PTY. LTD.
2 CROMWELL STREET
BURWOOD, VICTORIA Tel: (03) 9808 6244
AUSTRALIA 3125 Fax:(03) 9808 9335
www.nidac.com [email protected]
100%
PEL1 Series 1 Installation Manual.docx Revision 0.1
Other Nidac IP Access Controllers manuals


