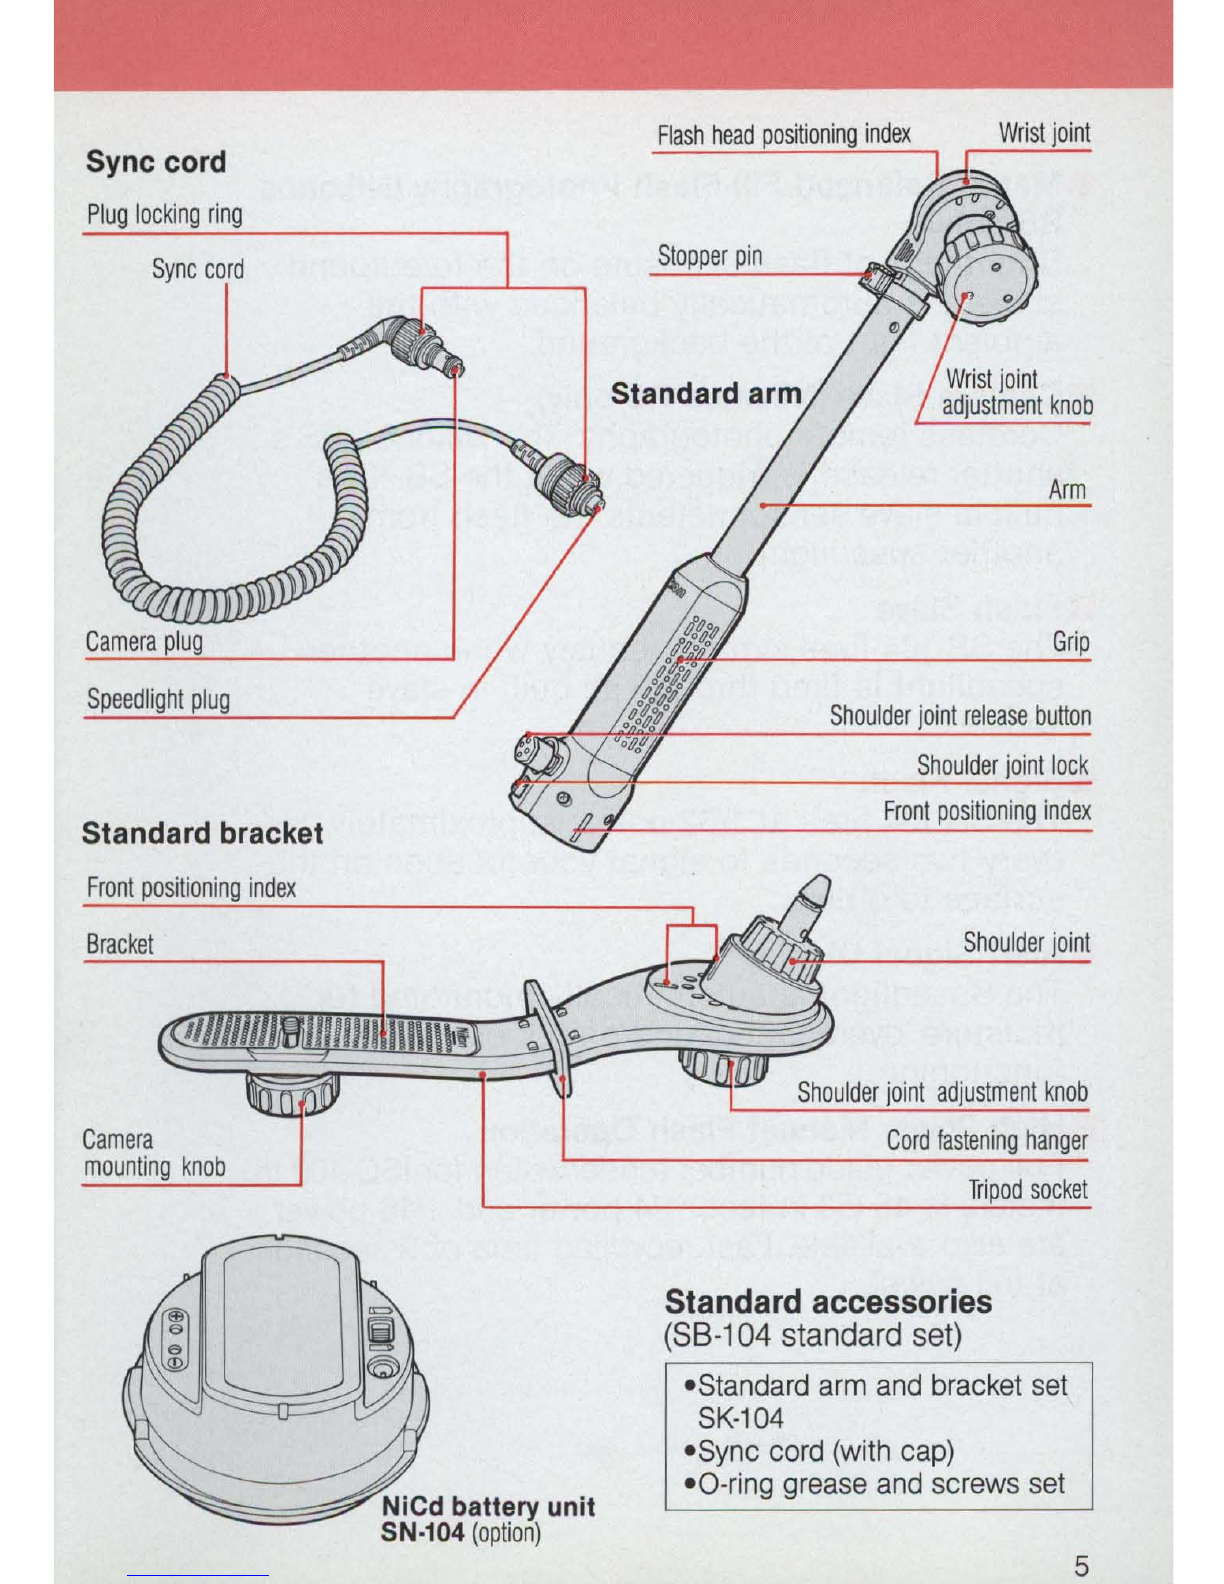
Nikon SB-104 os User manual

Nikon
NIKONOS
Speedlight
·58-104

FOREWORD
Thank you for purchasing the
Nikonos Speedlight
S8-1
04
. This
Speedlight
is
specially designed for
underwater photography and can
be
used with the Nikonos
RS,
as well
as the Nikonos V and Nikonos
IVA
When used with the Nikonos
RS
,
it will allow you to take flash pictures
at depths of
up
to 100 meters
(328 feet).

Speedlight
Parts
Buc
kle
Buc
kle
lock
Fun
ction
selector
Flash
mode
selecto
r
3
Switch·
Moisture
alert
light
'For
more
details
on
the
above
items
,
see
pages
21
-
22
.
Po
we
r
switch

Joint
l
eg
Joint
hole
Battery chamber
Buck
le
hook
4
Distance
scale
chart
Aperture
scale
chart
Aperture
scale
chart
release
lever
Screw
securing
distance
scale
chart
Sync
socket
Sync
socket
cap
Standby
switch
Battery
positioning
axis
Battery
positioning
notch
Battery
chamber
cap
Hinge
Terminal

Sync cord
Plug
locking
ring
Sync
cord
Standard bracket
Front
Bracket
Camera
mounting
knob
Flash
head
positioning
index
Wrist
joint
Stopper
pin
Arm
Grip
Shoulder
joint
release
button
Shoulder
joint
lock
Front
positioning
index
Shoulder
joint
knob
Cord
fastening
hanger
Standard
accessories
(S8-104 standard
set)
-Standard arm and bracket set
SK
-104
-Sync cord (with cap)
-O-ring grease and screws set
5

Main
Features
• Matrix
Balanced
Fill·Flash
Photography
(Nikonos
RS
only)
Brightness
of
flash exposure
on
the foreground
subject is automatically balanced with the
ambient light
of
the background.
•
Camera
Slave
(Nikonos
RS
only)
Cordless remote photography. The Nikonos R8's
shutter release is triggered when the 8B·104's
built·in slave sensor detects the flash from
another speedlight.
•
Flash
Slave
The 8B·104 fires simultaneously when another
speedlight is fired through its built·in slave
sensor.
•
Signal
Flash
The 8B·104 fires at 1/32 power approximately
every two seconds to signal your location on the
surface to others.
•
Alert
Signal
Display
The 8peedlight is automatically monitored for
moisture, overheating, and proper electronic
functioning.
•
High
Power
Manual
Flash
Operation
6
Full power guide number (underwater) for 180
100
in
meters is
16
(53
in
feet).
1/4
power and
1/16
power
are
also available. Fast recycling time of 3 seconds
at full
power.

This Instruction Manual
has
been
organized
as
follows
for
easy
reference.
Use
this guide to
learn
how
to
make
the most of your Speedlight's potential.
Preparations
for
He
re
we
explain
how
to
get the
Taking
Pictures
Speedlight
ready
for
tak
i
ng
pictures.
In
these
sections
the
fundamentals
of
flash
Basic
Shooting/
photography
with
the
Nikonos
RS
,V
and
IV·A,
Taking
Pictures
and
the
procedures
for
taking
pictures
using
the
S8-104
are
explained.
Details
on
the
This
section describes
the
Speed
-
Speedlight's
Parts
light's various features, points to
be
checked,
and
other pertinent items.
Basic
Applications
This
section explains how
to
use
the
Speedlight's features
to
obtain
various results.
In
this
section,
we
describe
optional
Other
Items
accessaries, details
on
the
NiCd
battery
and
tips
on
S8-104
care
.
• Important
Denotes
an
important
point.
e
Caution
Denotes
points
where
caut
i
on
or
mandatory
action
is
required
.
+Note
Denotes
a
useful
point
that
should
be
remembered
for
future
reference.
7
.----
~
Ir
.----
~
.----
'--
,....-
'--

8
Foreword
.........
.
.........
..
. .
..
.
.............
2
Speedlight
Parts
. . .
....
3-5
Main
Features
. . . . . . . . . . . . . . . . . . . . . . . . . . . . . . . . . . . 6
About
this
Manual
. . . . . . . . . . . . . . . . . . . . . . . . . . . . 7
Ti
ps
on
Speedlight
Care
..
..
....
.
............
.
.....
10
Checking
O-rings
....
...
.........
. .
..
. . . . . .
......
11
Removing
and
Reseating
O-
rings
.
...
.. .. .. ..
. ,
......
12
Preparations
for
Taking
Pictures
... .. .. ...
14-22
Installing
the
Battery . . . . . . . . . . . . . . . . . . . . . .
..
. . .
15
Connecting
the
SB-104
to
the
Camera
and
Making
Settings
.
.....
..
.....................
17
Function
Selector
...................
21
Flash
Mode
Selector
. . . . . . . . . . . . . . . . . . . . . . . . . . . . .
22
Basic
Shooting
.
...
..
...
.
............
.
....
23-27
Basic
Flash
Photography
with
the
Nikonos
RS
.........
.
24
Taking
Pictures
.
........
..
...
.. .. .. ..
......
28-35
Fbssible
Shooting
Modes
with
the
SB-104
and
Nikonos
RS.
. . . . . . . .
....
.
.....
29
Fbssible
Shooting
Modes
with
the
SB-104
and
Nikonos
V . . .
..
.
..
.
.....
31
Fbssible
Shooting
Modes
with
the
SB-104
and
Nikonos
IV-A
. .
..........
33
Caring
for
the
SB-104
After
Use
. . . . . . .
..
.
....
.
.....
34
Details
on
the
Speed
light's
Parts
... .. .
....
36-44
Standby
Switch
. . . . . . . . . . . . . . . .
37
Alert
Signal
Lamps
..
. . . . . . . . . . .
39
Reading
the
Exposure
Calculation
Chart
..
.............
41

Basic
Applications
...
..........
... 45-54
Basic Tips
on
Underwater Flash Photography
......
. . . 46
Camera Slave (Cordless Remote Photography) . . _
...
.
..
48
Flash Slave . . . . . . . . . . . . . . . . . . . . . . . . . . . . . . . .
50
Rear-Curtain Sync Photography
..
. .
...
. .
..
..
...
..
..
52
Using the Flash Signal Function
.......
.
...
. . .
.. ..
..
54
Other
Items
....
.
...
.
..........
55-68
Optional Accessories . . . . . . . . . . . . . . . . . . . .
56
Details
on
NiCd Battery Unit SN-104
................
62
Tips
on
SB-104 Care . . . . .
......
.....
...
. 64
Specifications . . . . . . . . . . . . . . . . . . . .
...
. 68
9

Tips
on
Speedlight
Care
Be
sure
to
take
trial
shots
first
.. .
-When taking important photographs with the SB-104 or
using it again after a long period of disuse, be sure to take
one or more trial shots first to be sure it
is
working properly.
Have
Nikon
spot
check
your
Speedlight
regularly
.. .
-Because the Speedlight
is
a precision instrument, we
recommend taking your Speedlight to a Nikon service
center once every year or two to have
it
spot checked, and
to have it overhauled every three to five years.
-
We
recommend this service especially if the Speedlight
is
being used
for commercial applications.
-Once water gets inside the plastic case or the battery has decayed,
be sure to have your Speedlight spot checked, or it may emit a
flammable gas.
Using
the
Speed/ight
safely
.
..
-Use
only Nikon products with this Speedlight, since the
SB-104 has been designed for use with specialized Nikon
camera and lens accessories. The Speedlight may become
damaged if
you
attempt to use it with products of other
manufacturers.
Do
not
fire
toward
eyes
-Since the
SB
-104
is
a high-power output flash unit,
be
sure
not to fire the unit directly
at
or
in
the vicinity of human
eyes.
10

Checking
O-rings
•
Be
sure
to
check
the
O-rings
before
use.
This Speedlight uses O-rings to ensure that it
is
well
sealed and water-proofed. If dust or damage
is
found
on
the O-rings, water will leak into the Speedlight and cause
damage. It is important to check
all
the O-rings and
lubricate them before use.
•
O-ring
areas
to
check
-
Two
O-rings
on
sync cord
·
~H.-
--
O-r
i
ng
on
the main
body, O-ring channel,
and contact area
between battery
chamber cap and
main body
-Sync socket cap
O-ring, and con-
tact area between
sync socket and
main body.
11

Removing
and
Reseating
O-rings
1
Remove the
O-r
ings from their
channels.
-Use
a thin plastic card, such
as
the
S8-
104
's exposure calculation chart,
to
remove O-rings.
-
Do
not use metal items with sharp edges
that may damage the O-rings.
2
Check the O
-ri
ngs to
be
su
re they
are
not damaged.
-Wipe the O-rings and O-ring channels
with a clean cloth or tissue, and check
them for any damage.
-Do
not
use
a cloth or tissue which
contains lint.
-If
O·ring channels
are
damaged, please
contact a
Nikon
service
center.
3
Apply lubricant to the O-rings.
-With
your fingertip, smear a small
amount of O-ring lubricant over the entire
surface of the O-rings.
-This
makes the O-rings slip more easily
into the O-ring channels.
Do
not apply
too much lubricant to the surface of
the O-ring
as
this will not help make
a better seal, and can cause
an
unwanted build-up of excess
lubrication which will attract sand
and dirt.
-Caution
e
Feel
fo
r any damage
on
the O-rings while
applying the lubricant. If damage
is
found,
replace the O·ring with a new one.
e
Take
care that lint, hair, or other foreign
matter does not remain
on
the O-rings or
their channels.
eUse O-ring lubricant available from Nikon.
12
If a lubricant made
by
another
manufacturer
is
used,
it
may adversely
affect the O-ring and result
in
water leaks.

4Reseat the O-
ring
into their
channels.
-Do
not stretch the O-rings too much.
Be
sure that the O-rings are not warped and
they go into the channel correctly.
+Note
The 8B-104 package includes an O-ring set
(three large
an
d small O-rin
gs
, O-ring
lubricant, and two screws). The O-ring set
is also available optionally. Be
su
re to h
ave
this set with you wherever
you
go with your
8peedlight.
13

14

• Important
.Only the NiCd battery unit
SN-104
can be
used with this Speedlight. Do not use any
other type of battery.
•
Be
sure to turn OFF the power of the
SB
-
104
when replacing the battery.
•
Be
sure to recharge the
SN-104
battery
when using it for the first time or after
having stored it for three months or more.
-For
procedures
on
recharging the
SN-104,
refer to the Instruction Manual
that came with the Quick Charger
SH
-104
.
• Refer to page 62 for details on the battery.
Be sure al
so
to read the Inst
ru
ction
Manual that came with the
SN-104
battery
unit.
1
Open the battery chamber while
sliding the buckle lock as shown in
the figure.
2Remove the buckle hook.
15

3
Open
the
battery chamber
cap
by
lifting
it
up.
-The
cover may be hard to open if the
O·ring isn't properly lubricated.
In
this
case, the O-ring should be relubricated.
(See page
12
.)
4
Load
the
battery.
Insert
the
NiCd
battery
unit
SN-104
into
the
battery
chamber
securely,
aligning
the
battery
positioning
notch
with
the
battery
lock
release
lever
(orange).
-Slide
the battery lock release lever
(orange) in the direction of the arrow
(
~
) to remove the battery.
5
Raise
the
buckle.
-Hold
down the battery chamber cap and
engage the buckle hook to raise the
buckle.
6
Lock
the
releasellock
buckle.
-Slide
the buckle lock and press the
release/lock buckle to the Speedlight.
-Check
to
be sure there
is
no
gap between
the battery chamber cap and the
Speedlight.
The
buckle should be securely
locked.
+Note
Standby switch
The
SB-104
is
provided with a standby switch
to conserve battery
power.
Refer
to page
37
for
details
on
the standby switch.
16

Connecting
the
S8-104
to
the
Camera
and
Making
Settings
• Important
.Be sure
to
turn OFF the power to the
camera and the 8B-104 before attaching
the 8peedlight.
• Check the a -rings and apply a small
amount of lubricant when attaching t
he
connector plugs.
1
Attach the bracket to the camera at
the camera mounting knob.
2
Remove the wrist
joint
adjustment
knob and insert the Speedlight
joint
leg.
-Make
sure th
at
t
he
shoulder joint relea
se
button and the flash head turn to the
same direction.
3Insert the adjustment knob into the
joint
hole and fasten the knob.
17

4Remove the sync socket cap on the
camera.
-The
cap can
be
removed
by
using a coin
to
turn it counter·clockwise.
5
Insert the camera plug and fasten
the white locking ring.
-Align the
red
mark
on
the
plug
to
the
red
mark
on
the camera.
6
Turn
the plug locking ring clockwise
until it stops and is secured.
7
Remove the sync socket cap on the
S8
-104.
18
-
Turn
the cap counter
-c
lockwise until it
separates.

8
Insert
the
Speed
light
plug
and
fasten
the
black locking
ring.
-Align
the guide marks
on
the plug and
the 88·104.
9
Turn
the
shoulder
jOint
adjustment
knob
on
the
bracket
in
the
direction
of
the
arrow
to
fasten
the
shoulder
joint.
-Align
it
with the white positioning index on
the front.
10
Insert
the
arm
.
-Release
the shoulder joint lock and
align the arm with the white positioning
index
on
the front of the joint.
+Note
Cord
fasten
ing
hanger
This hanger secures the sync cord to the
bracket to keep it out of the way while
shooting.
To
use the cord fastening hanger,
attach
it
to
the speedlight bracket
as
shown
in
the illustration, then attach the sync cord
to
the hook.
19

eCaution
_ Be sure the shoulder joint is locked when
gripping the arm to carry the camera and
8peedlight after making settings. If it is not
locked, the camera may fall off when the
release button is pressed.
-W
hen releasing the arm from the bracket,
undo the lock of the shoulder joint first
before pressing the release button.
12
Check to
be
sure the Speedlight
is facing forward and the correct
shooting distance has been set.
(1)
The positioning marks on the 8B-104
and wrist joint should match the
shooting distance.
A:
00
B: 1m
C:
O.Sm
(2)
The white positioning marks of the
arm, shoulder joint, and bracket shou
ld
all be aligned.
The above setting
is
made when the
Speedlight is attached to the bracket
and the shooting distance set at more
than
SOcm
(1
.6 ft).
13
Test
firin.g after completing the
connections
20
Slide the function selector knob
to the test fire position before
diving.
-If
the ready-light LED lights up again,
the 8peedlight is ready.
-If
the alert signal lamp blinks, see
page 39.
...
.............
""""",,
......
,,'"
/
•
~
....
~
rr(U'
G
~
(]
~Q
..
~
~
@
MFULL
M1I
4
M1I
16
db
....
~ ~rJ~
OFFo
•
Il
_."
..
""""
\
Table of contents
Other Nikon Camera Accessories manuals

Nikon
Nikon TC-E3PF User manual

Nikon
Nikon AF-S DX NIKKOR 18-105mm f/3.5-5.6 ED VR User manual

Nikon
Nikon R1 User manual

Nikon
Nikon WP-CP5 User manual

Nikon
Nikon AF-S DX 55-200mm f/4-5.6G IF-ED VR II User manual

Nikon
Nikon MC-DC1 User manual

Nikon
Nikon NIKKOR Z TELECONVERTER TC-1.4x User manual

Nikon
Nikon EN-EL7E User manual

Nikon
Nikon MC-36 User manual

Nikon
Nikon WC-E75 User manual

Nikon
Nikon GP-1A User manual

Nikon
Nikon 1 NIKKOR VR 70-300mm f/4.5-5.6 User manual

Nikon
Nikon FTZ User manual

Nikon
Nikon EH SK-6A User manual

Nikon
Nikon SB-25 User manual

Nikon
Nikon AH-4 User manual

Nikon
Nikon AF-S TC-20E III User manual

Nikon
Nikon MD-12 User manual

Nikon
Nikon SB-400 User manual

Nikon
Nikon EN-EL 19 User manual