CONTENTS---------------------------------
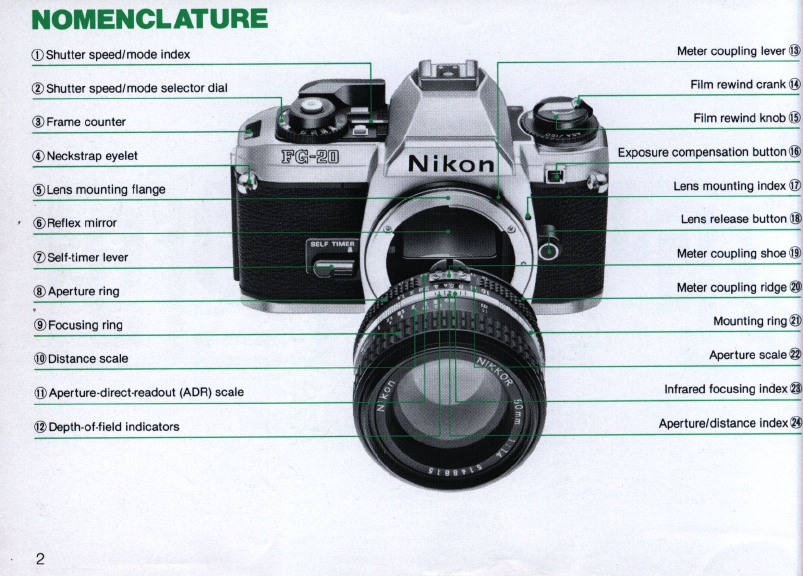
NOMENCLATURE
...........
.
...
2- 3
FOREWORD
..
...
.....
..
....
.
........
5
BASIC OPERATION . .
..
. . .
..
6-19
CONTROLS IN DETAIL. .
.......
20-31
Shutter Relea
se
Button . . . . . . .. . . . . . . . . . . . . .
.....
20
Film Advance Lever . .
......
20
Frame Counter
...............
.
........
.
...........
21
Memo Holder. . .
21
Shutter Speed/Mode Selector Dial . .
...
22-23
Focusing Screen
.............................
24-25
Exposure Viewfinder Information .
.........
.
26-27
Exposure Compensation Button. .
........
28
Self-Timer Lever. . . . . . . . . . . . . . . . . . . . .
..
29
Film Plane Indicator. . . . . . . . . . . .
...
30
Infrared Focu
si
ng Index. . . 30
Meter Coupling
Le
ver . . . . . . . . . . . . . . . . . . . .
........
31
For lenses
or
accessories without
automatic diaphragms.
For fixed
-a
perture lenses. photomicrography.
or astrophotography.
.
.....
31
TECHNICAL
INFORMATioN
. .
...
31
32-42
Relationship Between
Shu
Iter Speed
and Aperture
...
.
..........
.
...............
..
32-33
Depth of Field. . .
34-35
EV
Range of the Camera. . . . . . . . . . . .
.........
36
What is
EV
? .
..
... ...
....
..
.
......
36
EV
range. . . .
...
...
•.
..
. .
.........
36
Exposure Compensation. .
..
37-39
In the manual mode. .
.....
37
Duplication work and photomicrography .
38-39
4
Fl
ash
Ph
otography.
Re
ady-light indication
in
the viewfinder.
Relation
shi
p between the camera
's
meter,
.
40-42
....
41
ready-light indication and shutter speed. .
......
41
Nikon
FG
-20/Speedlight combination chart.
........
42
ACCESSORIES. .
....
43
-48
Ele
ctronic
Fl
ash. .
.......
. , ,
..
.
...
, . . , . .
.....
43
Nikon Speedlight SB-19 . .
........
,
.....
43
Motor Drives . . . . . . . . . . . . .
44
Nikon Motor Drive MD-
14
and MD-E. .
....
44
Close-Up
Eq
uipment.
.................
45
Filter
s.
. . .
...
. . . . . . .
46
Len
s Hoods . .
....
, , , , . . . . . .
46
Eyepiece Correction Lenses
......
.
....
,
...
_
........
47
Rubber Eyecup . . . . . . . . . . .
....
47
Eyepiece Adapter . .
...
47
Anti-Cold Battery Pack DB
-2
.....
,'.
...
.
....
47
Cable Relea
se
AR-3 . . . . . . . .
..
.
..
. . .
..
.
.....
47
Semi-Soft Camera Cases. . . . . . . . . . . .
...
48
Neckstraps. .
.....
.
.................
,
..
.
........
48
TIPS
ON
BATTERY
USE. .
.....
....
..........
49
TIPS
ON
CAMERA
CARE
. .
.............
50-5
1
SPECIFICATIONS
. .
.......
, . . . . . . . . . . . . .
52-5
3
USABLE LENSES. .
......
54
WHAT IS
AI?
..........
. . .
..
55