Nikon Z 9 Service manual

Professional
Setting Guide
—Video Edition—

2Table of Contents
Table of ContentsTable of Contents
Getting Ready
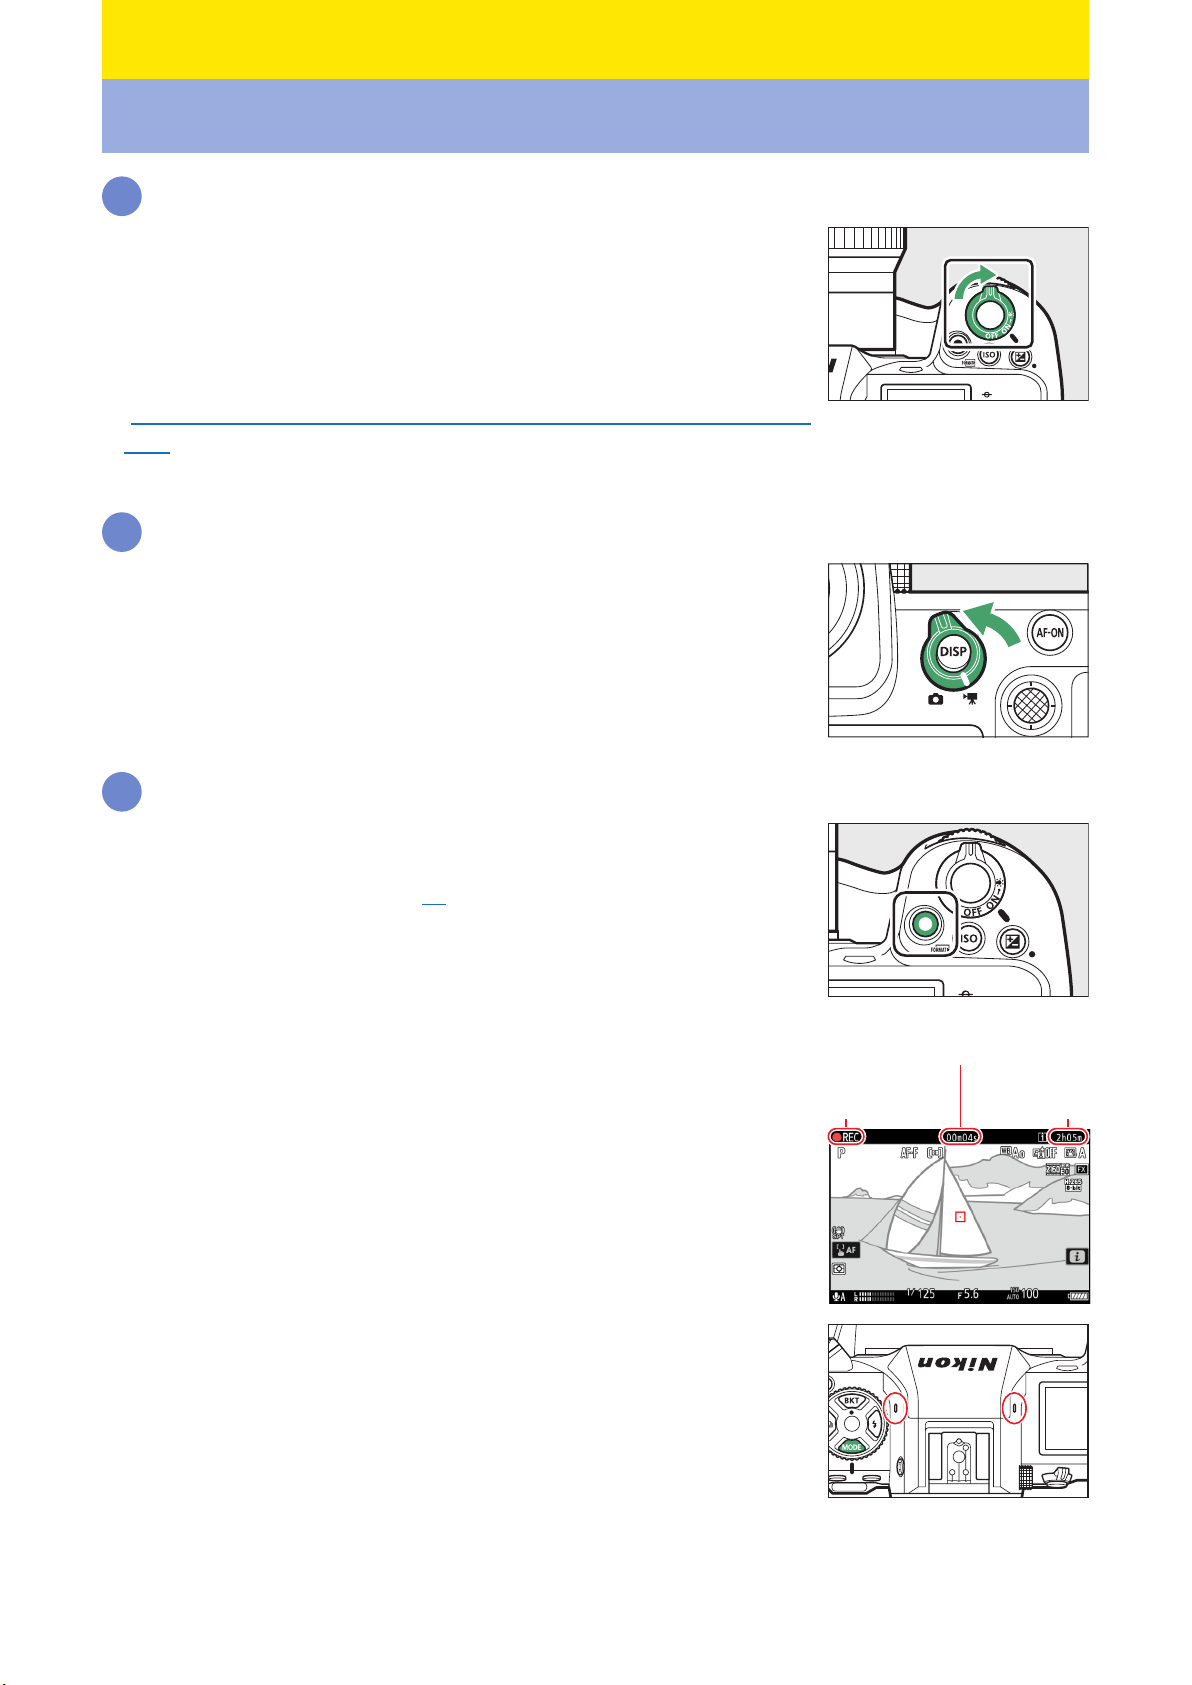
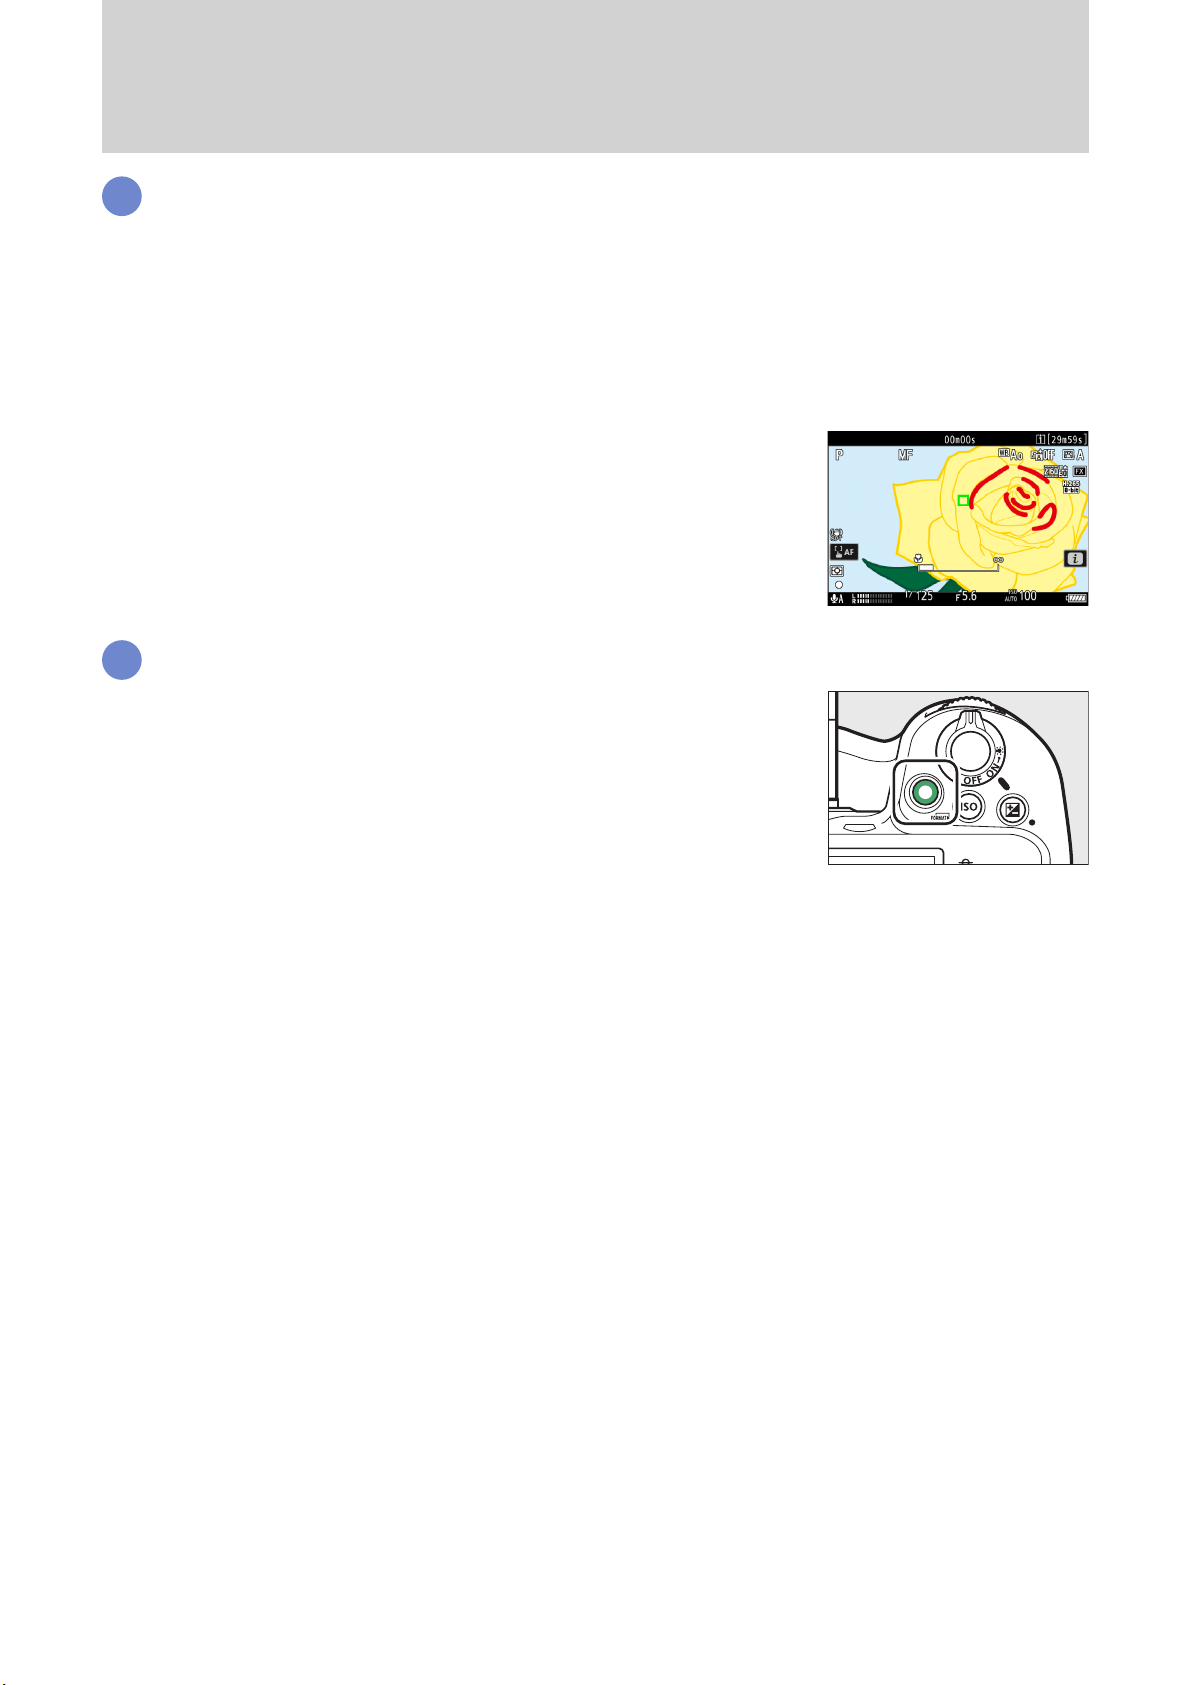
The Video Recording Workow ..... 4
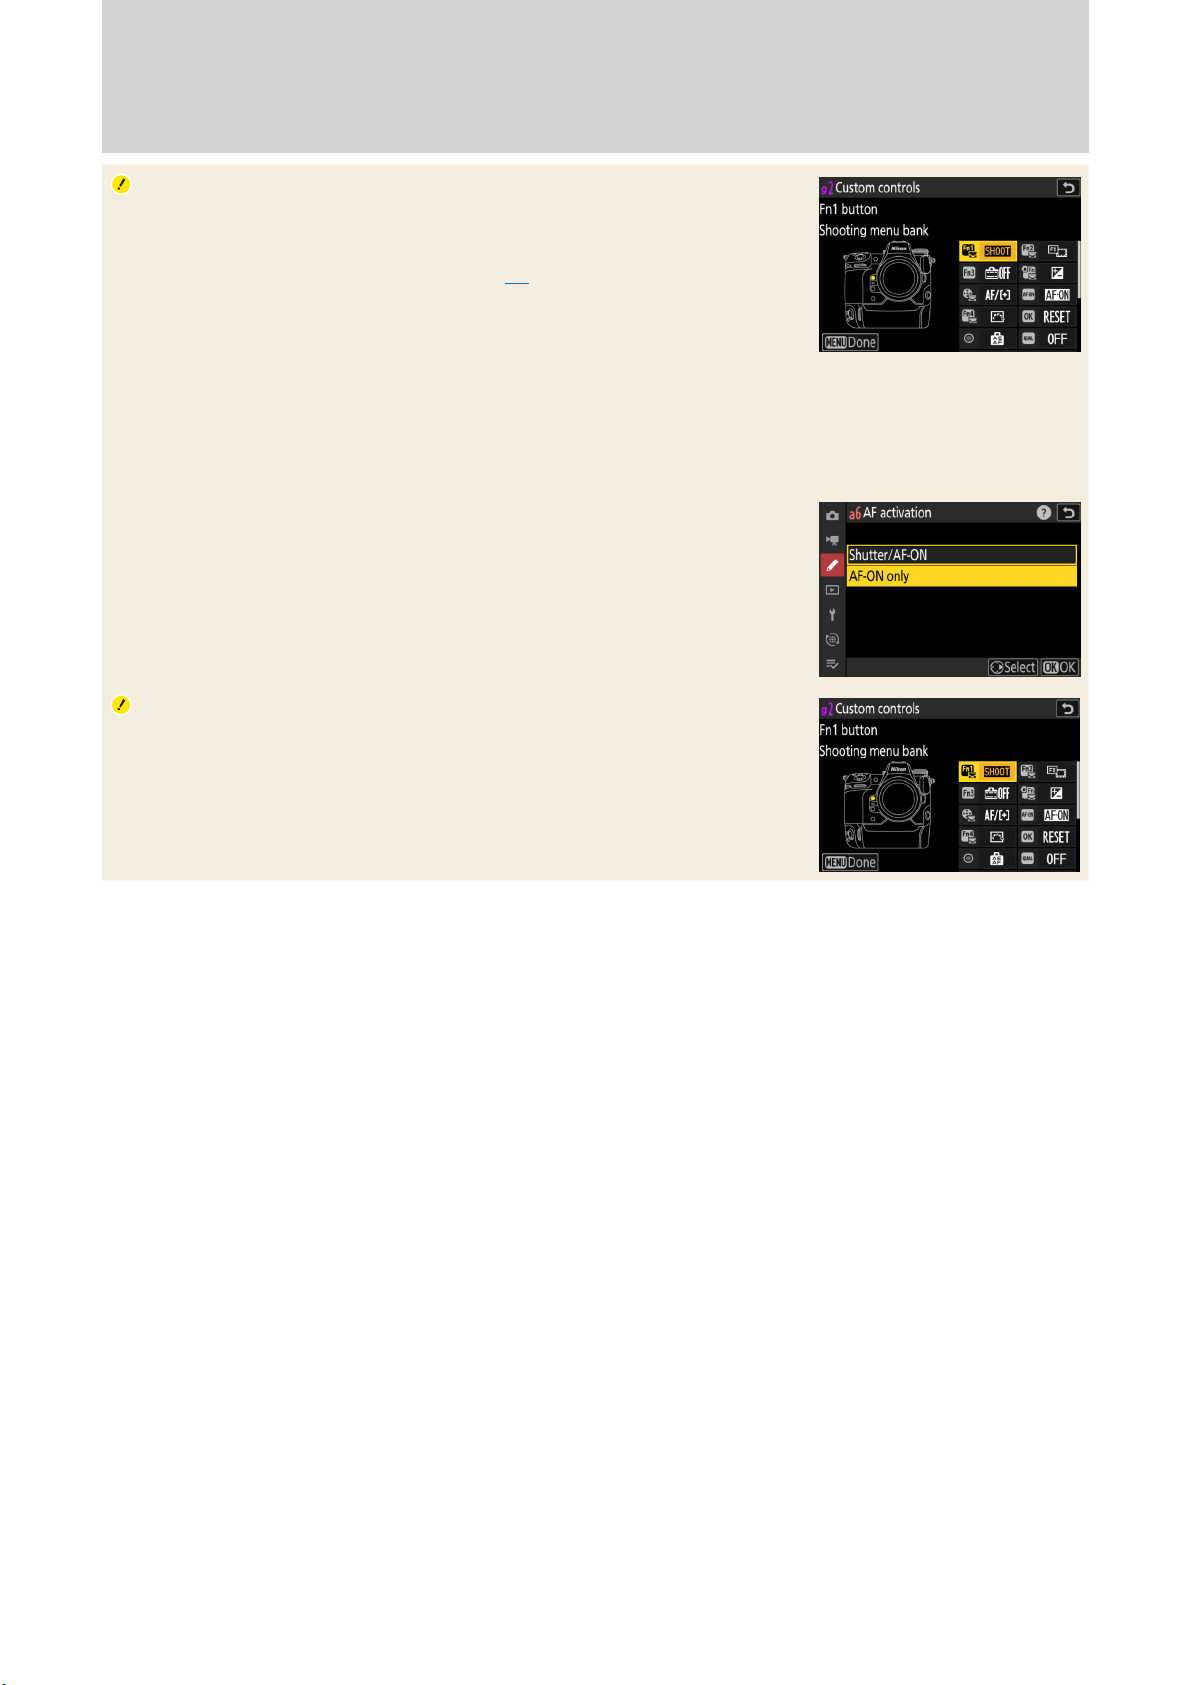
Frequently-Used Controls.............. 7
The Video Recording Display......... 9
The Shooting Display ..........................................9
The Information Display: Video Mode........ 10
Settings
Accessing Video Settings ............. 14
The i-Button Menu........................................... 14
Video-Related Controls.................................... 15
The Video Recording Menu............................ 16
Storage .......................................... 17
Destination........................................................... 17
Video File Type.................................................... 18
Picture Quality .............................. 19
Frame Size/Frame Rate .................................... 19
Choose Image Area........................................... 20
ISO Sensitivity...................................................... 21
White Balance...................................................... 22
Picture Controls.................................................. 25
HLG Quality .......................................................... 28
High ISO NR.......................................................... 28
Vignette Control................................................. 28
Diraction Compensation .............................. 29
Auto Distortion Control................................... 29
Vibration Reduction.......................................... 30
Electronic VR........................................................ 31
Exposure........................................ 32
Shooting Mode................................................... 32
Exposure Compensation................................. 33
Active D-Lighting............................................... 34
Video Flicker Reduction................................... 34
Metering................................................................ 35
Focus.............................................. 36
Focus Mode.......................................................... 36
AF-Area Mode ..................................................... 37
AF Subject Detection Options....................... 38
Focus Point Display ........................................... 40
Focus Peaking ..................................................... 41
Limit AF-Area Mode Selection ...................... 42
Focus Mode Restrictions ................................. 42
AF Speed............................................................... 42
AF Tracking Sensitivity ..................................... 43
Save Focus Position........................................... 43
Audio ............................................. 44
Microphone Sensitivity.................................... 44
Attenuator ............................................................ 45
Frequency Response......................................... 45
Wind Noise Reduction...................................... 45
Microphone Jack Plug-in Power: Mic Jack
Plug-in Power...................................................... 46
Headphone Volume.......................................... 46

Table of Contents, Continued
3
Table of Contents
Controls and Displays................... 47
Timecode .............................................................. 47
Reverse Ring for Focus..................................... 48
Focus Ring Rotation Range ............................ 48
Control Ring Response..................................... 49
Customize iMenu........................................... 49
Custom Controls................................................. 52
Control Lock......................................................... 54
View Assist............................................................ 55
Zebra Pattern....................................................... 56
Grid Type............................................................... 57
Custom Shooting Displays ............................. 58
Monitor Mode ..................................................... 60
HDMI Output................................. 61
HDMI....................................................................... 61
External Recording Control: External Rec.
Cntrl (HDMI)......................................................... 65
Viewing Videos
Video Playback ............................. 66
Using the Command Dials.............................. 66
Video Stills..................................... 67
Full-Frame Playback Flicks........... 68
Filtered Playback .......................... 69
Appendix
Troubleshooting ........................... 70
Image Artifacts.................................................... 70
Other Notes.......................................................... 70

4Getting Ready
Getting ReadyGetting Ready
The Video Recording WorkflowThe Video Recording Workflow
1
Prepare.
Before making videos, learn the names and locations of camera controls
and insert a battery and memory card.
The supplied EH-7P charging AC adapter or an optional AC adapter is
recommended for extended recording. The camera can also be pow-
ered via USB. For more information, see page 744 of the Z 9 Reference
Guide, available from the Nikon Download Center’s Z 9 product page
(https://downloadcenter.nikonimglib.com/en/products/589/Z_9.
html).
Once you’re ready to proceed, turn the camera on.
2
Select video mode by rotating the photo/video selector to 1.
The camera is now ready to record. Adjust recording settings as desired.
3
Press the video-record button to start recording.
You can also start recording via a control chosen using Custom Set-
ting g2 [Custom controls] (052).
A recording indicator will appear in the shooting display. The shoot-
ing display also shows the time remaining, or in other words the ap-
proximate amount of new footage that can be recorded to the mem-
ory card.
Recording
indicator
Time
remaining
Video recording time
(length of footage recorded)
Sound is recorded via the video microphone. Do not cover the video
microphone during recording.

5
Getting Ready
The Video Recording Workflow, Continued
5
4
Adjust focus as required.
In the default focus mode—AF-F—the camera adjusts focus automatically. No particular action is
required on your part, as the camera will adjust focus continuously in response to subject movement
or changes in composition.
To focus on a new subject, tap it in the monitor. The camera will also automatically refocus on sub-
jects in focus points chosen using the multi selector.
To focus in modes AF-S and AF-C, press the AF-ON button or press the shutter-release button half-
way.
When MF is selected for focus mode, you can adjust focus by rotating
the lens focus ring or control ring. If [ON] is selected for Custom Set-
ting a13 [Focus peaking]> [Focus peaking display], objects that are
in focus will be indicated by colored outlines.
5
Press the video-record button to end recording.
Press the video-record button again to end recording.

6Getting Ready
6
The Video Recording Workflow, Continued
Using Other Controls for Video Recording
• You can start and end video recording using a control that has been
assigned [Record videos] via Custom Setting g2 [Custom controls].
[Record videos] can be assigned to (052):
−the focus-mode button,
−the shutter-release button,
−the AF-ON button,
−the center of the sub-selector,
−the Jbutton,
−the AF-ON button for vertical shooting, or
−the center of the vertical multi selector.
• If, after assigning [Record videos] to the shutter-release button, you
would prefer that the camera not focus at the start of recording, select
[AF-ON only] for Custom Setting a6 [AF activation].
Starting and Ending Recording Remotely
When [Record videos] is selected for Custom Setting g2 [Custom
controls] > [Shutter-release button], the shutter-release buttons on
MC-36A remote cords and other remote release accessories can be used
to start and stop video recording.

7
Getting Ready
Frequently-Used ControlsFrequently-Used Controls
Ibutton
Shutter-release button
Power switch
Video-record button
S(Q) button
Ebutton
Control panel
Stereo microphone
(for videos)
g(Fn4) button
O(Q) button
Monitor
bbutton
Ubutton
Photo/video selector
AF-ON button
Jbutton
Kbutton
W(Q) button
DISP button
Main command dial
Sub-selector
ibutton
Multi selector
Gbutton
Xbutton
Speaker
Connector for external
microphone
Headphone connector
HDMI connector
USB connector
Focus-mode button
Fn2 button
Fn1 button
Fn3 button
Sub-command dial
Image sensor

8Getting Ready
8
Frequently-Used Controls , Continued
Dust on the Image Sensor
Dust on the image sensor can greatly complicate the post-production
process, particularly when it comes to video. For this reason, we recom-
mend that, before exchanging lenses or the like, you congure the sensor
shield to close when the camera is turned o. This can be accomplished
by selecting [Sensor shield closes] for [Sensor shield behavior at pow-
er o] in the setup menu.
• Camera startup times may increase.
• The shield can be damaged by touching it when it is closed.
• When exchanging lenses with the shield closed, be sure to insert the
lens perpendicular to the mount. If inserted at an angle, lenses could
contact the sensor shield and damage the shield or the image sensor.

9
Getting Ready
The Video Recording DisplayThe Video Recording Display
Exposure for videos and photos shot in video mode can be previewed in the monitor and viewnder.
The explanation that follows concentrates mostly on the monitor.
The Shooting DisplayThe Shooting Display
The following are displayed in the monitor in video mode:
qq
oo
!0!0
!1!1
!3!3
!2!2
wweettrr
yy
uuii
qqRecording indicatorRecording indicator
Indicates that recording is in progress. A “no
video” indicator ( ) is displayed if videos
cannot currently be recorded.
wwExternal recordingExternal recording
controlcontrol
Displayed if video is simultaneously being
recorded to a device connected via HDMI
(065).
eeVideo recording timeVideo recording time The time elapsed from the start of recording.
rrFrame size and rateFrame size and rate The frame size (in pixels) and frame rate for
video recording (019).
ttTime remainingTime remaining The recording time available for videos
(017).
yyVideo le typeVideo le type The video file type (018).
uuSound levelSound level
The sound level for audio recording. Displayed
in red if the level is too high. Reduce micro-
phone sensitivity.
iiMicrophone sensitivityMicrophone sensitivity The current microphone sensitivity (044)
setting.
ooTouch shootingTouch shooting
Enable or disable touch AF.
• When [VTouch AF] is enabled, the fo-
cus point can be positioned and autofocus
initiated by tapping the monitor.
• When [fPosition focus point] is en-
abled, tapping the monitor positions the
focus point but does not initiate autofocus.
!0!0 Vibration reductionVibration reduction
indicatorindicator
The current vibration reduction setting
(030).
!1!1 Electronic VR indicatorElectronic VR indicator Displayed when electronic vibration reduc-
tion is on (031).
!2!2 Headphone volumeHeadphone volume
Displayed when third-party headphones are
connected. Shows the volume of the audio
output to the headphones.
!3!3 Zebra patternZebra pattern Used to indicate selected tone ranges
(056).

10 Getting Ready
10
The Video Recording Display, Continued
The Information Display: Video ModeThe Information Display: Video Mode
Press the DISP button to choose the information displayed in video mode. The type and content
of the displays available vary with the options chosen for Custom Settings g12 [Custom monitor
shooting display] and g13 [Custom viewnder shooting display] (058).
Display 1
Display 4
Display 2
Display 3
!
Temperature Warnings
• If the camera temperature becomes elevated, a temperature warning
and count-down timer will be displayed. When the timer reaches zero,
the shooting display will turn o.
• The timer turns red when the thirty second mark is reached. In some
cases, the timer may be displayed immediately after the camera is
turned on.
• Turn the camera o if the shooting display turns o due to the camera
overheating. To cool the camera, we recommend that you shade it from
direct sunlight using a parasol, towel, or the like.
!
Memory Card High-Temperature Warning
A high-temperature warning appears in the shooting display when the
temperature of the memory card rises. Do not attempt to remove the
memory card; instead, wait for the camera to cool and the warning to
clear from the display.

11
Getting Ready
The Video Recording Display, Continued
11
■ Customizing the Displays
The indicators shown in the displays can be chosen using Custom Settings g12 [Custom monitor
shooting display] and g13 [Custom viewnder shooting display]. For more information, see “Cus-
tom Shooting Displays” (058). The options available are listed below.
AA[Basic shooting info][Basic shooting info] View the shooting mode, shutter speed, aperture, and other basic shooting info.
BB[Detailed shooting[Detailed shooting
info]info] View the focus mode, AF-area mode, white balance, and other detailed shooting info.
CC[Touch controls][Touch controls] View options that can be accessed via touch controls, including touch AF and the imenu.
• This option cannot be accessed via Custom Setting g13 [Custom viewnder shooting display].
DD[Virtual horizon][Virtual horizon] Enable the virtual horizon. The display type can be selected using
Custom Setting d16 [Virtual horizon type].
EE[Histogram][Histogram] Enable the RGB histogram.
bb[Framing grid][Framing grid] Enable the framing grid.
FF[Center indicator][Center indicator] Display crosshairs at the center of the frame.

12 Getting Ready
12
The Video Recording Display, Continued
■ The Virtual Horizon Display
The virtual horizon can be used to help level the camera. It can be used, for example, to level the
camera when it is mounted on a tripod. At default settings, it can be viewed by pressing the DISP
button to cycle to Display 3.
The indicators are displayed in green when the camera is level.
Camera levelCamera level Camera tilted left or rightCamera tilted left or right Camera tilted forward or backCamera tilted forward or back
The display type can be selected using Custom Setting d16 [Virtual
horizon type]. If [Type B] is selected, the roll indicator will appear at
the bottom of the display and the pitch indicator at its right edge.
!
The Virtual Horizon Display
Note that the display may not be accurate when the camera is tilted at a sharp angle forward or back.
The camera will not display pitch and roll indicators when held at angles at which tilt cannot be mea-
sured.

13
Getting Ready
The Video Recording Display, Continued
13
■ Quick Display Selection
Controls can be assigned display-related functions using Custom Setting g2 [Custom controls].
b[Live view info display o]: Pressing the control hides indicators
in the shooting display. Press again to view indicators.
b[Framing grid]: Pressing the control displays a framing grid. Press
the control again to turn the display o. The display type can be se-
lected using Custom Setting g11 [Grid type].
D[Virtual horizon]: Pressing the control displays the virtual horizon.
Press the control again to turn the display o. The display type can be
selected using Custom Setting d16 [Virtual horizon type].
■ Using Zoom in Video Mode
To zoom in on the display in video mode (to a maximum of approxi-
mately 16×), press the Xbutton.
Use the Xand W(Q) buttons to zoom in and out.
A navigation window will appear at the bottom right corner of the
display.
Use the multi selector to scroll to areas of the frame not visible in the
display.
Pressing Xduring recording zooms the display in to a 1 : 1 (100%) zoom ratio. Press W(Q) to can-
cel zoom.
When viewing videos, you can zoom in on the current frame while playback is paused.
When shooting in video mode, you can also zoom in on the current fo-
cus point using a control assigned [Zoom on/o] via Custom Setting
g2 [Custom controls]. The zoom ratio can be chosen from [Low mag-
nication (50%)], [1 : 1 (100%)], and [High magnication (200%)].

14 Settings
Accessing Video SettingsAccessing Video Settings
Video settings can be adjusted in video mode using any of the following three methods: the ibut-
ton menu, video-related controls, or the video recording menu.
TheThe ii-Button Menu-Button Menu
To display the video imenu, rotate the photo/video selector to 1
and either press the ibutton or tap the iicon.
OptionOption 00OptionOption 00
[[Set Picture ControlSet Picture Control]]0 25 [[Electronic VRElectronic VR]]0 31
[[White balanceWhite balance]]0 22 [[Vibration reductionVibration reduction]]0 30
[[Frame size/frame rateFrame size/frame rate]]0 19 [[Shooting menu bankShooting menu bank]]—
[[Microphone sensitivityMicrophone sensitivity]]0 44 [[Custom controlsCustom controls]]0 52
[[
AF-area mode/subj. detectionAF-area mode/subj. detection
]]0 37
, 38
[[Airplane modeAirplane mode]]—
[[Focus modeFocus mode]]0 36 [[DestinationDestination]]0 17
■ Using the iButton
1
With the camera in video mode, press
the ibutton.
Available settings will be displayed.
If desired, you can navigate the
menu using touch controls after
pressing the ibutton.
2
Highlight the desired item and press J.
Options for the selected item will be
displayed.
3
Press 4or 2to highlight the desired
option and press Jto select.
The menu shown in Step 1 will be
displayed.
To exit to the shooting display, press
the ibutton again.
Using the Command Dials
Items for which the camera displays an on-screen guide can be ad-
justed by highlighting them in the imenu and rotating a command
dial. In some cases, adjustments can be made using both the main and
sub-command dials.
Customizing the iMenu
The items displayed in the video-mode imenu can be chosen using Custom Setting g1 [Customize
imenu] (049).
SettingsSettings

15
Settings
Accessing Video Settings, Continued
15
Video-Related ControlsVideo-Related Controls
The following controls can be used for video recording:
ControlControl SettingSetting 00
IIbuttonbutton Shooting modeShooting mode 0 32
EEbuttonbutton Exposure compensationExposure compensation 0 33
SSbuttonbutton ISO sensitivityISO sensitivity 0 21
Fn2Fn2 buttonbutton Image areaImage area 0 20
Focus-mode buttonFocus-mode button Focus and AF-area modeFocus and AF-area mode 0 36, 37
gg((Fn4Fn4) button) button Picture ControlPicture Control 0 25
bbbuttonbutton Microphone sensitivityMicrophone sensitivity 0 44
UUbuttonbutton White balanceWhite balance 0 22
■ Custom Controls
The following controls can be assigned video-related functions using Custom Setting g2 [Custom
controls]. For more information, see “Custom Controls”(052).
w[Fn1 button]A[QUAL button]
y[Fn2 button]X[Audio button]
1[Fn3 button]j[AF-ON button for vertical
shooting]
n[Fn button for vertical shooting]F[Vertical multi selector center]
u[Focus mode button]y[Command dials]
V[AF-ON button]G[Shutter-release button]
b[Protect/Fn4 button]3[Lens Fn2 button]
p[OK button]S[Lens Fn button]
8[Sub-selector center]l[Lens control ring]

16 Settings
16
Accessing Video Settings, Continued
The Video Recording MenuThe Video Recording Menu
The video recording menu can be displayed by pressing the Gbutton
and selecting the 1tab.
ItemItem 00ItemItem 00
[Shooting menu bank][Shooting menu bank] —[Auto distortion control][Auto distortion control] 0 29
[Extended menu banks][Extended menu banks] —[Video icker reduction][Video icker reduction] 0 34
[Storage folder][Storage folder] —[Metering][Metering] 0 35
[File naming][File naming] —[Focus mode][Focus mode] 0 36
[Destination][Destination] 0 17 [AF-area mode][AF-area mode] 0 37
[Video le type][Video le type] 0 18 [AF subject detection options][AF subject detection options] 0 38
[Frame size/frame rate][Frame size/frame rate] 0 19 [Vibration reduction][Vibration reduction] 0 30
[Image area][Image area] 0 20 [Electronic VR][Electronic VR] 0 31
[ISO sensitivity settings][ISO sensitivity settings] 0 21 [Microphone sensitivity][Microphone sensitivity] 0 44
[White balance][White balance] 0 22 [Attenuator][Attenuator] 0 45
[Set Picture Control][Set Picture Control] 0 25 [Frequency response][Frequency response] 0 45
[Manage Picture Control][Manage Picture Control] —[Wind noise reduction][Wind noise reduction] 0 45
[HLG quality][HLG quality] 0 28 [Mic jack plug-in power][Mic jack plug-in power] 0 46
[Active D-Lighting][Active D-Lighting] 0 34 [Headphone volume][Headphone volume] 0 46
[High ISO NR][High ISO NR] 0 28 [Timecode][Timecode] 0 47
[Vignette control][Vignette control] 0 28 [External rec. cntrl (HDMI)][External rec. cntrl (HDMI)] 0 65
[Diraction compensation][Diraction compensation] 0 29
Accessing Settings
Throughout this chapter, the means by which the settings discussed in each section can be accessed
are listed in tables like that below. The methods that can be used are indicated by check marks (
4
) and
those that cannot by dashes (—).
ii-button menu-button menu
4
Camera controlsCamera controls —
Other menusOther menus
4
• The items that can be accessed via the i-button menu can be chosen using Custom Setting g1 [Cus-
tomize imenu] (049).
• “Camera controls” includes controls to which the function in question has been assigned using Cus-
tom Setting g2 [Custom controls] (052).

17
Settings
StorageStorage
Choose a memory card and format for video recording.
DestinationDestination
To choose the slot used for video recording when two memory cards are
inserted:
1
With the camera in video mode, press the ibutton and then high-
light [Destination] and press J.
Options will be displayed.
You can also select an option using the command dials before
pressing the Jbutton.
2
Press 4or 2to highlight the desired option and press Jto select.
The menu shows the time available on each card.
Recording ends automatically when no time remains on the cur-
rent card.
Overow and backup storage are not available during video re-
cording.
To exit to the shooting display, press the ibutton again.
ii-button menu-button menu
4
Camera controlsCamera controls —
Other menusOther menus
4

18 Settings
18
Storage, Continued
Video File TypeVideo File Type
Choose the video encoding and le type.
The selection can be made using [Video le type] in the video recording
menu. You have a choice of MOV and MP4 formats.
OptionOption DescriptionDescription Tone modeTone mode Inter-frameInter-frame
compressioncompression
Audio record-Audio record-
ing formating format YCbCrYCbCr
[ProRes 422 HQ 10-bit
(MOV)]
Choose for footage destined for editing post-pro-
duction.
[SDR]ALL-I
Linear PCM
4:2:2
[N-Log]
[H.265 10-bit (MOV)] This format assumes the footage will be processed
on a powerful computer.
[SDR]
Long GOP 4:2:0
[HLG]
[N-Log]
[H.265 8-bit (MOV)] This format offers superior compression. [SDR]
[H.264 8-bit (MP4)] A widely-supported file type. [SDR]AAC
■ Tone Mode
To choose the tone mode, highlight [ProRes 422 HQ 10-bit (MOV)] or [H.265 10-bit (MOV)] and
press 2. The tone mode for videos shot using [H.265 8-bit (MOV)] and [H.264 8-bit (MP4)] is xed
at [SDR].
OptionOption DescriptionDescription
[SDR] This mode supports a normal range of brightnesses (dynamic range).
[HLG] This mode supports HDR (high dynamic range). It has a wider dynamic range than SDR.
• It is available only when [H.265 10-bit (MOV)] is selected for [Video le type].
[N-Log] This mode uses Nikon’s unique log curve. Choose for pictures with a wide dynamic range. 3D LUTs for use with N-Log
curves can be applied post-production for footage that displays beautifully on monitors that support Rec. 709.
ii-button menu-button menu —
Camera controlsCamera controls —
Other menusOther menus
4

19
Settings
Picture QualityPicture Quality
The settings covered in this section control video picture quality.
Frame Size/Frame RateFrame Size/Frame Rate
Choose the video frame size (in pixels) and frame rate.
■ Choosing a Frame Size and Frame Rate
1
With the camera in video mode, press the ibutton and then high-
light [Frame size/frame rate] and press J.
Options will be displayed.
The options available for frame size vary with the settings chosen
for [Video le type] in the video recording menu. See the table
below for more information.
You can also select an option using the command dials before
pressing the Jbutton.
2
Press 4or 2to highlight the desired option and press Jto select.
To exit to the shooting display, press the ibutton again.
■ “Frame Size/Frame Rate”
The options available for frame size and rate vary with the setting chosen for [Video le type], as
shown in the table below.
OptionOption11 Video le typeVideo le type
ProRes 422 HQ 10-bitProRes 422 HQ 10-bit H.265 10-bitH.265 10-bit H.265 8-bitH.265 8-bit H.264 8-bitH.264 8-bit
[7680×4320; 30p]2, 3 —4—
[7680×4320; 25p]2, 3 —4—
[7680×4320; 24p]2, 3 —4—
[3840×2160; 120p]2, 4 —4—
[3840×2160; 100p]2, 4 —4—
[3840×2160; 60p]4 4 4 —
[3840×2160; 50p]4 4 4 —
[3840×2160; 30p]4 4 4 —
[3840×2160; 25p]4 4 4 —
[3840×2160; 24p]4 4 4 —
[1920×1080; 120p]2 4 4 —
[1920×1080; 100p]2 4 4 —
[1920×1080; 60p] 444
[1920×1080; 50p] 444
[1920×1080; 30p] —4 4
[1920×1080; 25p] —4 4
[1920×1080; 24p] —4 4
1 The actual frame rate may dier from that shown. The actual frame rates are:
120p: 119.88 fps; 100p: 100 fps; 60p: 59.94 fps; 50p: 50 fps; 30p: 29.97 fps; 25p: 25 fps; 24p
23.976 fps.
2 Fixes [Electronic VR] in the video recording menu at [OFF].
3 Videos are recorded in 8K UHD. Not available with DX lenses.
4 Videos are recorded in 4K UHD.
ii-button menu-button menu
4
Camera controlsCamera controls —
Other menusOther menus
4

20 Settings
20
Picture Quality, Continued
Choose Image AreaChoose Image Area
Choose the image area. Select [FX] to shoot videos in what is referred
to as“FX-based video format”, [DX] to shoot in“DX-based video format”.
■ Video Image Area Options
The illustration shows the crops used for lming
videos. Regardless of the option selected, the as-
pect ratio is 16:9.
Select [FX] to shoot videos in what is referred
to as “FX-based video format”, [DX] to shoot in
“DX-based video format”.
Selecting [DX] for [Choose image area] or
mounting a DX lens on the camera with
[3840×2160; 120p], [3840×2160; 100p],
[1920×1080; 120p], or [1920×1080; 100p]
chosen for [Frame size/frame rate] increases
the apparent focal length by approximately
2.3× when compared to FX format.
The sizes of the dierent crops are as follows.
FormatFormat SizeSize
FX-based video format Approx. 35.9× 20.2 mm
DX-based video format Approx. 23.5× 13.2 mm
2.3× Approx. 16.7× 9.4 mm
DX-based video format is selected automatically when a DX lens is attached.
When 7680× 4320 is selected for frame size, image area is xed at [FX]. The frame size changes to
3840× 2160 when a DX lens is attached.
Selecting [ON] for [Electronic VR] in the video recording menu reduces the size of the crop.
■ Choosing the Image Area
The image area can be selected by holding the Fn2 button and rotating
a command dial.
Fn2 button
The option currently selected is shown by an icon in the display.
ii-button menu-button menu
4
Camera controlsCamera controls
4
Other menusOther menus
4
Other manuals for Z 9
6
Table of contents
Other Nikon Digital Camera manuals

Nikon
Nikon D700 User manual

Nikon
Nikon D7100 User manual

Nikon
Nikon D800 Quick start guide

Nikon
Nikon Coolpix Compact Digital Camera User manual

Nikon
Nikon COOLPIX 5630 User manual

Nikon
Nikon COOLPIX 600 User manual

Nikon
Nikon COOLPIX L3 Guide User manual

Nikon
Nikon COOLPIX L810 User manual

Nikon
Nikon COOLPIX 57000 User manual

Nikon
Nikon 1 v3 User manual

Nikon
Nikon Photomic-T Finder User manual

Nikon
Nikon Z 5 User manual

Nikon
Nikon CoolPix 3100 User manual

Nikon
Nikon Coolpix S3000 User manual

Nikon
Nikon Coolpix A10 User manual

Nikon
Nikon D850 User manual

Nikon
Nikon CoolPix S202 User manual

Nikon
Nikon Coolpix L29 User manual

Nikon
Nikon Coolpix S33 User manual

Nikon
Nikon D6 User manual