Ningbo GYD-B-7 Technical manual


Page 1 of 6
Operation Instruction for oil radiator
Ningbo Yihe ElectricAppliance Co., Ltd.
No. 63-67 Hanjia North Road, Fuhai, Cixi, Ningbo City, P. R. China
130700320HZH

Page 2 of 6
Oil radiator Instruction
Thank you for choosing our oil radiator, please read this instruction carefully before operating and keep it for
future reference.
I. WARNING
1. Please read this instruction carefully before operating.
2. Please disconnect power supply when you are out or the oil radiator is not used for a long time.
3. Do not directly put clothes and other articles on the product to warm so as to prevent fire.
4. Never put the oil radiator just under the socket.
5. Never use the oil radiator in locations with high air humidity such as bathroom, bath house or swimming
pool etc.
6. The oil in this oil radiator is special heat conduction oil. Should it necessary to open oil tank during
repair, only manufacturer or specified representatives are allowed to open the tank. In addition, please
contact us immediately if there is oil leakage. Afterwards, the oil left on the surface should be removed.
7. The timer dial is only allowed to turn clockwise (slightly) as indicated by arrow, and turning it
anti-clockwise facilely will damage the timer.
8. If there is damage with power line, please contact manufacturer or service representatives immediately
for replacing, otherwise it will be dangerous.
9. If the supply cord is damaged, it must be replaced by the manufacturer or its service agent or a
similarly qualified person in order to avoid a hazard.
10. The heat must not be located immediately below a socket-outlet.
11. Don’t use this heater in the immediate surroundings of bath, a shower or a swimming pool.
12. This heater is filled with a precise quantity of special oil. Repairs requiring opening of the oil
container are only to be made by the manufacturer or his service agent who should be
contacted if there id an oil leakage.
13. Regulations concerning the disposal of oil when scrapping the appliance have to be followed.
Please, don't throw away and be burnt on purpose.
14. WARNING: In order to avoid overheating do not cover the heater.
15. This appliance can be used by children aged from 8 years and above and persons with reduced
physical, sensory or mental capabilities or lack of experience and knowledge if they have been
given supervision or instruction concerning use of the appliance in a safe way and understand
the hazards involved.
16. Children shall not play with the appliance, cleaning and user maintenance shall not be made by
children without supervision.
17. Children of less than 3 years should be kept away unless continuously supervised.
18. Children aged from 3 years and less than 8 years shall only switch on/off the appliance provided
that it has been placed or installed in its intended normal operating position and they have been
given supervision or instruction concerning use of the appliance in a safe way and understand
the hazards involved. Children aged from 3 years and less than 8 years shall not plug in,
regulate and clean the appliance or perform user maintenance.
19. CAUTION — Some parts of this product can become very hot and cause burns. Particular
attention has to be given where children and vulnerable people are present.
130700320HZH

Page 3 of 6
II. TECHNICAL DATA
*-7, 9L, 9, 11L, 11, 13, the “ * ” =GYD-B, GYD-GN, AJ01,AJ01T, AK01,AK01T,AL01,AL01T, BM01, BM01T,
AJ01F, AJ01FT,AK01F,AK01FT
220-240V~, 50Hz, Class I for all models, Rated power please refer to below the table:
MODEL NO FINS RATED POWER
*–7 7 1500W
*–9L 9 1500W
*–9 9 2000W
*–11L 11 2000W
*–11 11 2500W
*–13 13 2500W
* = GYD-B, GYD-GN, AJ01, AJ01T, AK01, AK01T, AL01,
AL01T, BM01, BM01T
*–7 7 1900W
*–9L 9 1900W
*–9 9 2400W
*–11L 11 2400W
*–11 11 2900W
*–13 13 2900W
* = AJ01F, AJ01FT, AK01F, AK01FT
.
III. PRODUCT CHARACTERISTICS
◆ Our electro thermal oil radiator operates as follows: tubular element is taken as heat source,
efficient and permanent heat conduction oil is taken as the medium, heat eliminates via
radiation fin, room temperature is increased via air circulation.
◆ Our electro thermal oil radiator has the following advantages: convenient, safe, beautiful,
tranquil operation, without electromagnetic disturbance etc. It is suitable for such locations as
scientific research room, hospital, hotel, training practice house, and bedroom, etc. The oil
radiator keeps your room or office more comfortable in cold seasons!
IV. OPERATION INSTRUCTION
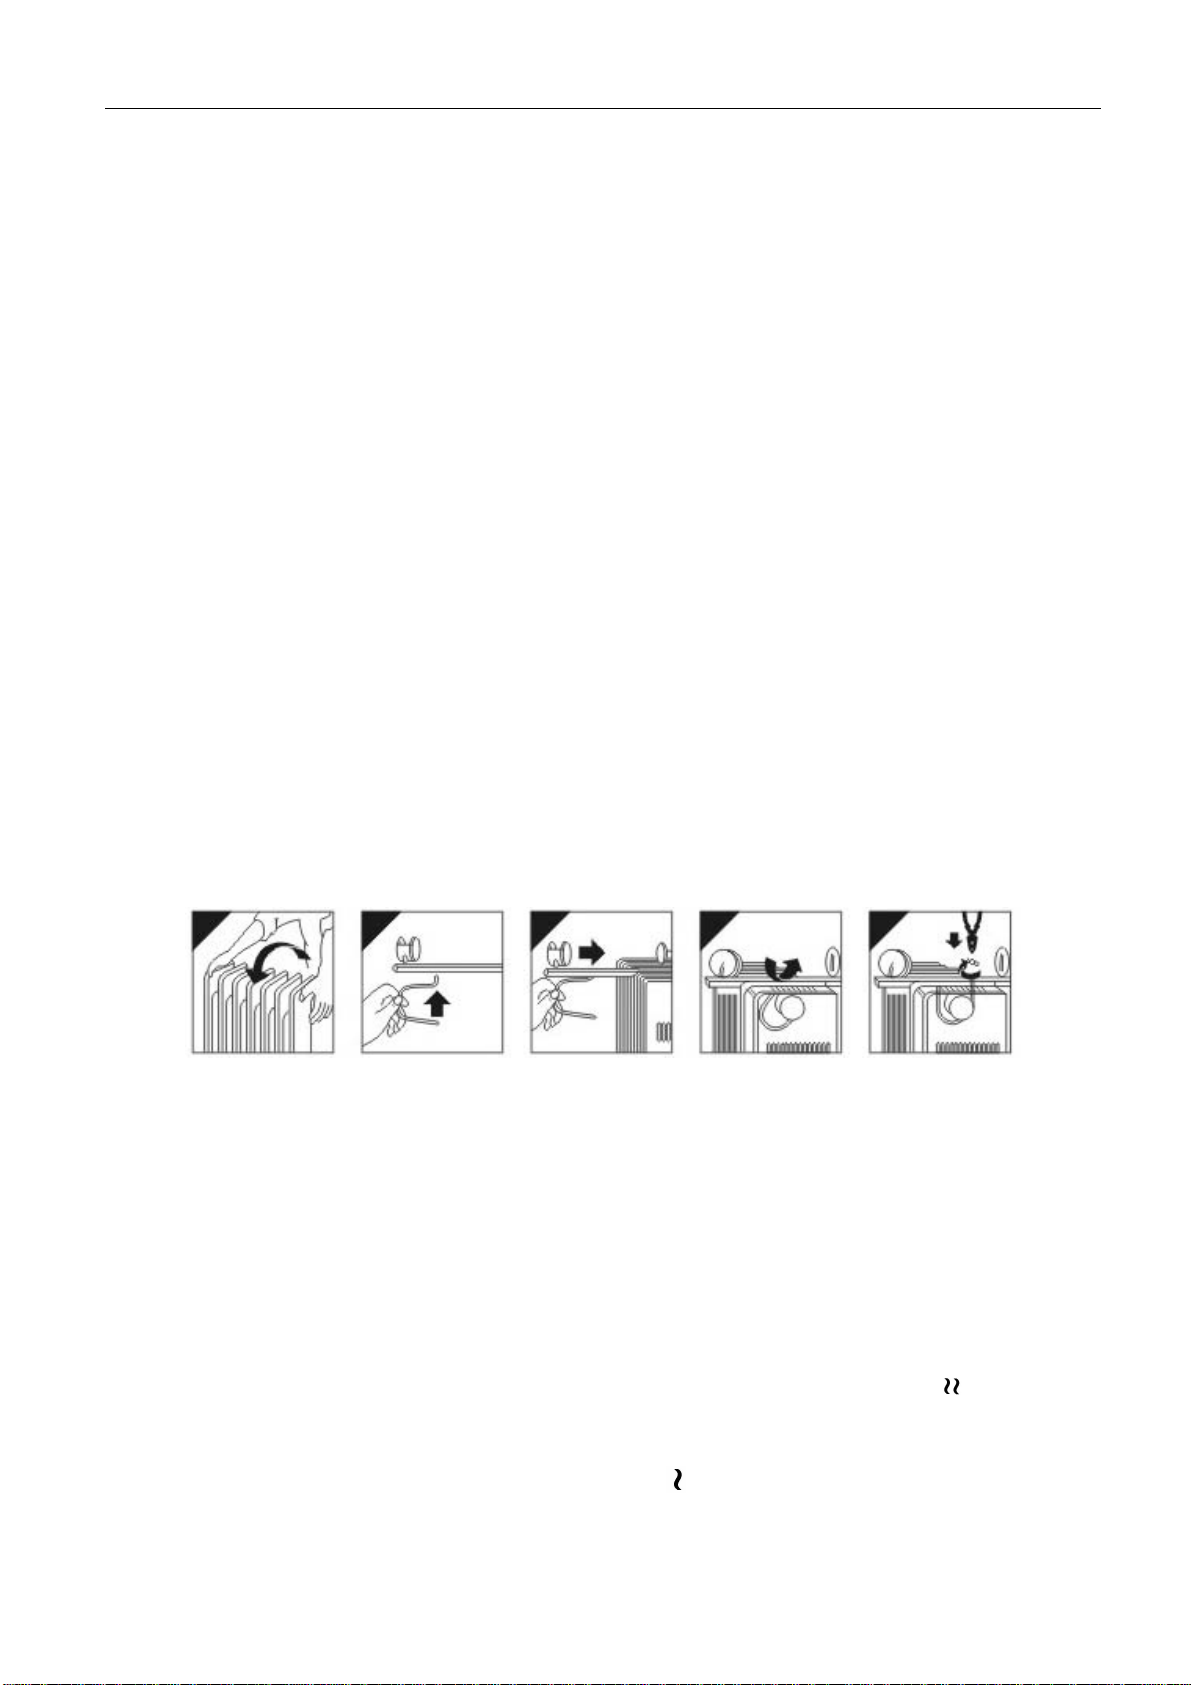
Mounting
Take out the oil radiator and all the parts from packing carton.
1. Make the oil radiator be on its head
2. Place the footplate on the top of both radiation fins
3. Secure the footplate on the oil radiator with specified U type bolt and wing nut
4. Tighten the screw
5. Make the oil radiator stand erect
130700320HZH
Page 4 of 6
Placing
The oil radiator should be away from the wall or other objects such as furniture, curtain at least 90cm; do
ensure that the power supply corresponds to that on the nameplate; the temperature controller switch and
power switch are at “OFF” position; plug in the attaching plug.
1. The temperature controller can regulate room temperature. Turn the temperature controller clockwise to
increase the temperature; turn it anti-clockwise to reduce the temperature until appropriate temperature
is reached.
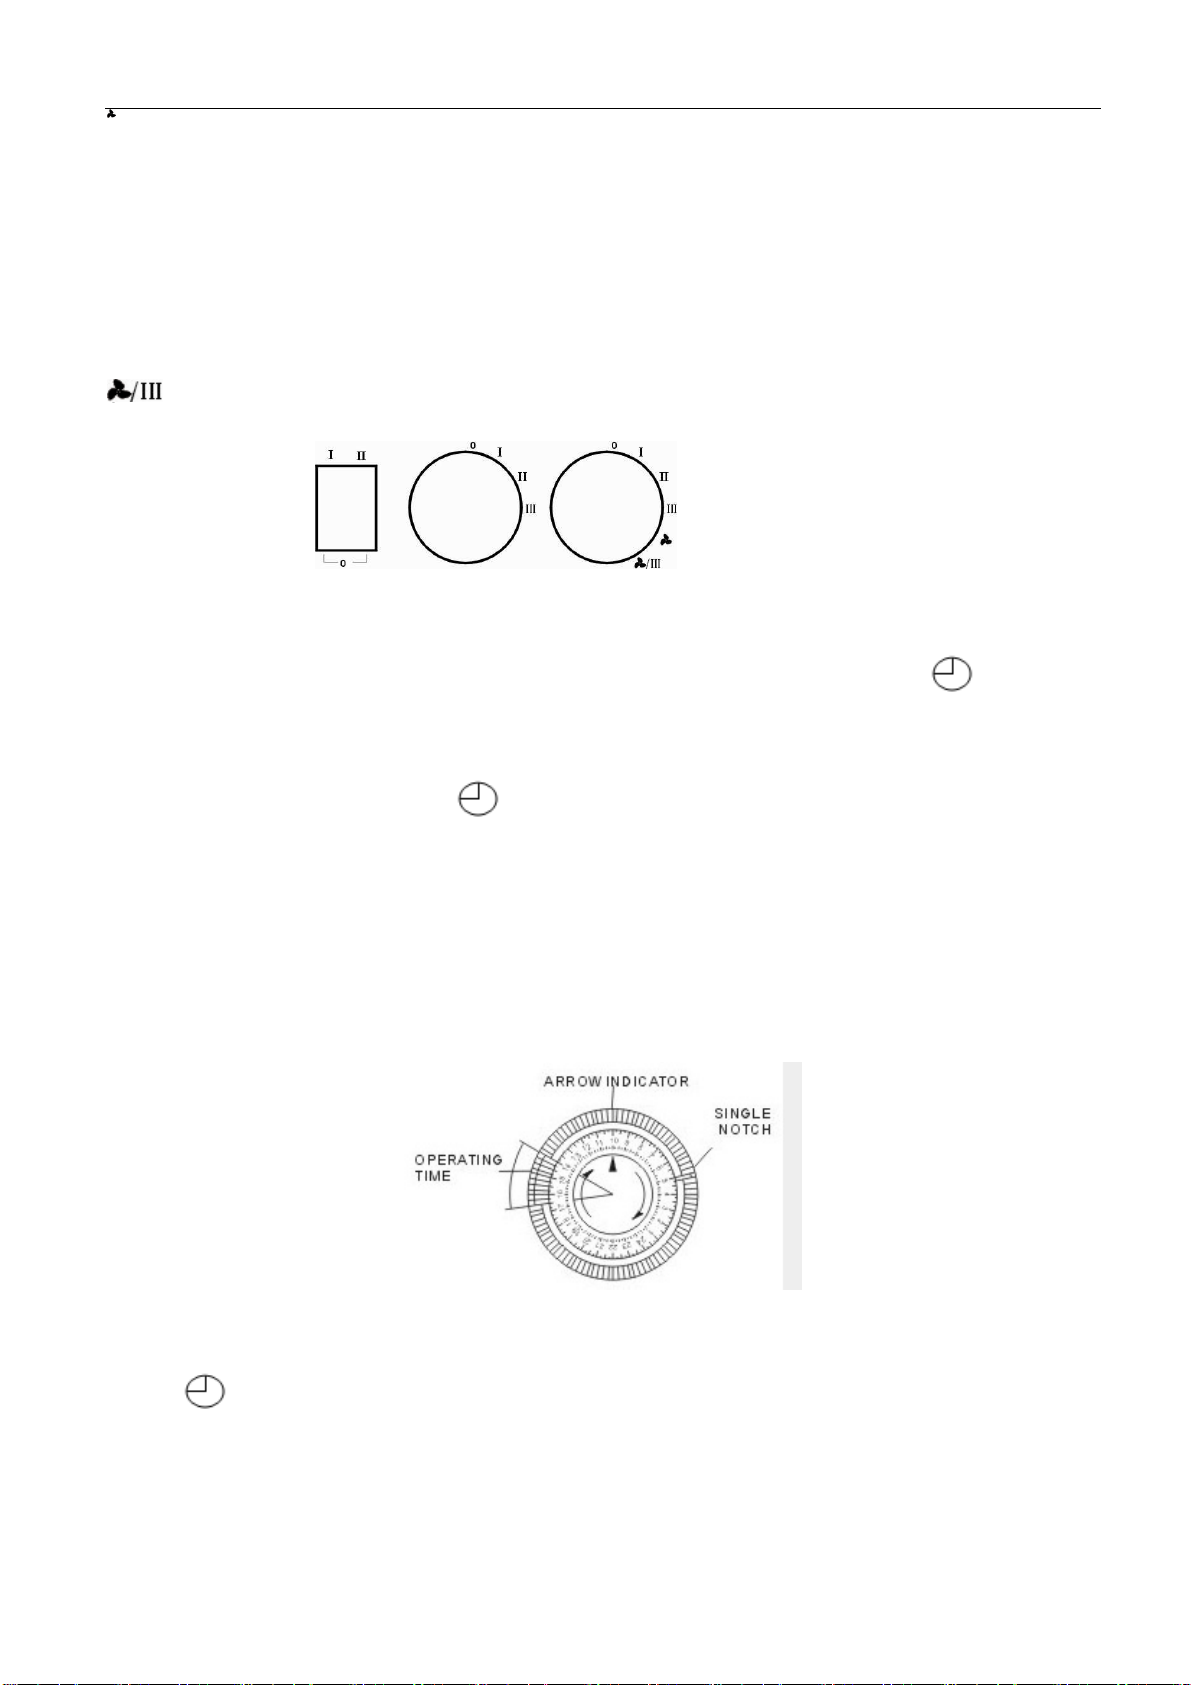
2. Switch the heater to one of the following power settings.
“0”---OFF; “I”---Low power;”II”--- Mid-range power;“III”--- High power; --- Fan heater
3. --- Fan heater + High power
4. Timer
a) Setting current time
Turn the lever in the timer dial used to set operating status to Time Set position.
Turn the timer dial (total 96 sections, each for 15 minutes) clockwise, make the arrow with “▲” mark
on the timer dial point at current time.
b) Setting power on and off time
Several periods for power on and off can be set on the timer within 24 hours a day. There are total
96 timing sliders, with each for 15 minutes. With the timing slider at outer ring, it is power on; with
the timing slider at inner ring, it is power off, and you can slide corresponding timing sliders to set
the period for power on and off according to your own need. Then switch on the power and the oil
radiator starts operating. The electro thermal oil radiator can switch on and off automatically
according to the setting time. As shown in the diagram – an example for time set, current time is
20:00, the period for power on is 0:00∽2:00 in the next morning.
c) Function key
--- indicates time set, the period for power on and off can be set at this position.
“——” --- indicates power on all the time, this position indicates power on all the time - the timing
slider inactive at the position.
When the oil radiator is not in use for a long time, the power switch should be at “0” position and the
temperature controller should be turned anti-clockwise to minimal position, with power plug pulled
out
130700320HZH

Page 5 of 6
Note: the oil radiator operates via heat elimination of heat conduction oil, and the oil cools out slowly
after the oil radiator is turned off, so do not move the oil radiator unless the oil has cooled out, and
move the oil radiator with the handle.
5. Fan heater
AJ01F, AJ01FT, AK01F, AK01FT series also incorporates an internal fan heater which heats the room
more quickly, To turn this function on, push the button into the position
Cleaning
1. Please disconnect power supply before cleaning.
2. Wipe the outside of the oil radiator with wet cloth at first, and then dry it with a piece of soft cloth.
3. Do not use wax or brush polish, since these will react with the oil radiator, resulting in discoloration.
V. SAFETY PROTECTION
1. Do not cover the oil radiator during operating, otherwise it will result in fire.
2. The oil radiator should be away from the wall or other flammable objects such as furniture, curtain, bed
sheet or clothes at least 90cm.
3. Do not disassemble radiation fin.
4. Take care of your children when they are near or use the oil radiator.
5. Do not let power line contact damp or hot objects; do not wind or let child come near the power line.
6. Do not use the oil radiator in open air.
7. Do not let the oil radiator contact hot gasoline or electric burner.
8. Do not use damaged wire or plug; do not use damaged oil radiator unless it is repaired.
9. Do not remove button parts of the oil radiator.
10. This oil radiator is only suitable for use in the room.
11. After dust removal, the oil left on the surface should be removed.
VI. WARRANTY INFORMATION
The manufacturer provides warranty in accordance with the legislation of the customer's own country of
residence, with a minimum of 1 year (Germany: 2 years), starting from the date on which the appliance is
sold to the end user.
The warranty only covers defects in material or workmanship.
The repairs under warranty may only be carried out by an authorized service centre. When making a claim
under the warranty, the original bill of purchase (with purchase date) must be submitted.
The warranty will not apply in cases of:
- Normal wear and tear
- Incorrect use, e.g. overloading of the appliance, use of non-approved accessories
- Use of force, damage caused by external influences
- Damage caused by non-observance of the user manual, e.g. connection to an unsuitable mains supply or
non-compliance with the installation instructions
- Partially or completely dismantled appliances
130700320HZH
Page 6 of 6
VII. CORRECT DISPOSAL OF THIS PRODUCT
This marking indicates that this product should not be disposed with other household
wastes throughout the EU. To prevent possible harm to the environment or human health
from uncontrolled waste disposal, recycle it responsibly to promote the sustainable reuse
of material resources. To return your used device, please use the return and collection
systems or contact the retailer where the product was purchased. They can take this
product for environmental safe recycling.
130700320HZH

Page 1 of 6
Operation Instruction for oil radiator
Ningbo Yihe ElectricAppliance Co., Ltd.
No. 63-67 Hanjia North Road, Fuhai, Cixi, Ningbo City, P. R. China
130700320HZH

Page 2 of 6
Oil radiator Instruction
Thank you for choosing our oil radiator, please read this instruction carefully before operating and keep it for
future reference.
I. WARNING
1. Please read this instruction carefully before operating.
2. Please disconnect power supply when you are out or the oil radiator is not used for a long time.
3. Do not directly put clothes and other articles on the product to warm so as to prevent fire.
4. Never put the oil radiator just under the socket.
5. Never use the oil radiator in locations with high air humidity such as bathroom, bath house or swimming
pool etc.
6. The oil in this oil radiator is special heat conduction oil. Should it necessary to open oil tank during
repair, only manufacturer or specified representatives are allowed to open the tank. In addition, please
contact us immediately if there is oil leakage. Afterwards, the oil left on the surface should be removed.
7. The timer dial is only allowed to turn clockwise (slightly) as indicated by arrow, and turning it
anti-clockwise facilely will damage the timer.
8. If there is damage with power line, please contact manufacturer or service representatives immediately
for replacing, otherwise it will be dangerous.
9. If the supply cord is damaged, it must be replaced by the manufacturer or its service agent or a
similarly qualified person in order to avoid a hazard.
10. The heat must not be located immediately below a socket-outlet.
11. Don’t use this heater in the immediate surroundings of bath, a shower or a swimming pool.
12. This heater is filled with a precise quantity of special oil. Repairs requiring opening of the oil
container are only to be made by the manufacturer or his service agent who should be
contacted if there id an oil leakage.
13. Regulations concerning the disposal of oil when scrapping the appliance have to be followed.
Please, don't throw away and be burnt on purpose.
14. WARNING: In order to avoid overheating do not cover the heater.
15. This appliance can be used by children aged from 8 years and above and persons with reduced
physical, sensory or mental capabilities or lack of experience and knowledge if they have been
given supervision or instruction concerning use of the appliance in a safe way and understand
the hazards involved.
16. Children shall not play with the appliance, cleaning and user maintenance shall not be made by
children without supervision.
17. Children of less than 3 years should be kept away unless continuously supervised.
18. Children aged from 3 years and less than 8 years shall only switch on/off the appliance provided
that it has been placed or installed in its intended normal operating position and they have been
given supervision or instruction concerning use of the appliance in a safe way and understand
the hazards involved. Children aged from 3 years and less than 8 years shall not plug in,
regulate and clean the appliance or perform user maintenance.
19. CAUTION — Some parts of this product can become very hot and cause burns. Particular
attention has to be given where children and vulnerable people are present.
130700320HZH
Page 3 of 6
II. TECHNICAL DATA
220-240V~, 50Hz, Class I for all models,
GYD-BE -7, GYD-BE -9L: 1500W,
GYD-BE -9, GYD-BE -11L: 2000W,
GYD-BE -11, GYD-BE -13: 2500W.
.
III. PRODUCT CHARACTERISTICS
◆ Our electro thermal oil radiator operates as follows: tubular element is taken as heat source,
efficient and permanent heat conduction oil is taken as the medium, heat eliminates via
radiation fin, room temperature is increased via air circulation.
◆ Our electro thermal oil radiator has the following advantages: convenient, safe, beautiful,
tranquil operation, without electromagnetic disturbance etc. It is suitable for such locations as
scientific research room, hospital, hotel, training practice house, and bedroom, etc. The oil
radiator keeps your room or office more comfortable in cold seasons!
IV. OPERATION INSTRUCTION
Mounting
Take out the oil radiator and all the parts from packing carton.
1. Make the oil radiator be on its head
2. Place the footplate on the top of both radiation fins
3. Secure the footplate on the oil radiator with specified U type bolt and wing nut
4. Tighten the screw
5. Make the oil radiator stand erect
Placing
The oil radiator should be away from the wall or other objects such as furniture, curtain at least 90cm; do
ensure that the power supply corresponds to that on the nameplate; the power switch is at “OFF” position;
plug in the attaching plug.
This heater is equipped with Electronic
Digital Controls that provide the ability to set the temperature to the
exact degree desired .To operate , simply follow these instructions.
NOTE:The temperature display will not reflect the accurate room temperature until the heater has
been operating for at least 20 minutes.
1. Turn on Power Switch, Press the power button once to start the heater on High Power( ), Continuous
Run. If left at this setting , the unit will run continuously on High Power and will not shut off until the
unit is manually turned off or the room temperature over 30℃.
2. Press the power button again to change to Lower Power ( ), Continuous Run. If left at this setting,
the unit will run continuously on Lower Power and will not shut off until the unit is manually turned
off or the room temperature over 30℃.
3. Press the power button a third time to turn the heater OFF.
130700320HZH

Page 4 of 6
Note:the heater will run continuously if not setting temperature.
Note: if operated at the Low setting, the heater will not provide as much heat output as in the High setting ,
however , the Low setting will not require a much electrical current to operate .To avoid overloading a
circuit , do not plug the heater into a circuit that already has other appliances working.
SET TEMPERATURE
MODE F/C
+
-
1) Press the Mode button until the temperature icon blinks .
2) Use the + and - button to set the desired temperature,from 13 to30℃.
3) The temperature icon will stop blinking and the current room temperature will appear after the
desired temperature is set.
4) The heat will turn-off shortly after the desired temperature is reached and the temperature display
will blink.
5) The heater will turn back on when the room temperature drops below the desired temperature . the
temperature display will then stop blinking and will display the current room temperature.
SET TIMER (AUTO-OFF)
NOTE: This function should only be set if you desire that the heater be automatically shut off after a certain
period of time(1 to 10 hours from the time the function is set)
NOTE:Always set the desired temperature prior to setting the Timer(see step2) so that the heater will shut
off at the desired temperature setting.
1. Press the Mode button until the timer icon blinks. The hour display will appear . The Auto Off icon will
also appear.
2. Use the +and -buttons to set the heater operation time between 1 and 10 hours. This function will
activate once the timer icon stops blinking.
3. The heater will automatically turn-off when time runs out.
NOTE :If the desired temperature was set prior to setting the timer function , the heater will cycle on and off
as per the selected desired temperature setting and will discontinue operation once the programmed timer
setting has been reached(default is 10 hours).
SET TIMER (AUTO-ON)
NOTE: This function provides a delayed start option and should only be set if you desire that the heater be
automatically turned ON after a certain period of time (1 to 10 hours from the time the function is set).
NOTE:Always set the desired temperature prior to setting the timer (see step2)so that the heater will turn
on at the desired temperature setting.
1. Press the Mode button until the timer icon blinks. The hour display will appear .The Auto On icon will also
appear.
2. Use the + and - buttons to set the heater start time between 1 and 10 hours. This function will activate
once the timer icon stops blinking.
3. The heater will automatically turn on when time expires.
POWER
130700320HZH

Page 5 of 6
NOTE: If the desired temperature was set prior to setting the timer function, the heater will cycle on and
off as per the selected desired temperature setting once the heater begins to operate.
NOTE: When using the Auto-On function the heater will turn on after the set time has elapsed. If the
Auto-Off function has not been set , a default timer of 10 hours will be applied to the function.
TIMER FUNCTION EXAMPLES
Auto on Example:
Set Auto off for 3hours
the heater will start running after 2 hours has elapsed;.
Set Auto on for 2 hours
The heater will then operate for 3 additional hour and then immediately turn off.
Auto off Example:
Set Auto off for 7 hours :
The heater will shut off after 7hours has elapsed.
FAHRENHEIT/CELSIUS FUNCTION
NOTE: This heater offers the option to read the temperature setting in either
Fahrenheit or Celsius.
1. F/C feature functions from only the power or set temperature screens.
2. Press F/C button to toggle between Fahrenheit and Celsius.
Cleaning
1. Please disconnect power supply before cleaning.
2. Wipe the outside of the oil radiator with wet cloth at first, and then dry it with a piece of soft cloth.
3. Do not use wax or brush polish, since these will react with the oil radiator, resulting in discoloration.
V. SAFETY PROTECTION
1. Do not cover the oil radiator during operating, otherwise it will result in fire.
2. The oil radiator should be away from the wall or other flammable objects such as furniture, curtain, bed
sheet or clothes at least 90cm.
3. Do not disassemble radiation fin.
4. Take care of your children when they are near or use the oil radiator.
5. Do not let power line contact damp or hot objects; do not wind or let child come near the power line.
6. Do not use the oil radiator in open air.
7. Do not let the oil radiator contact hot gasoline or electric burner.
8. Do not use damaged wire or plug; do not use damaged oil radiator unless it is repaired.
9. Do not remove button parts of the oil radiator.
10. This oil radiator is only suitable for use in the room.
11. After dust removal, the oil left on the surface should be removed.
VI. WARRANTY INFORMATION
The manufacturer provides warranty in accordance with the legislation of the customer's own country of
residence, with a minimum of 1 year (Germany: 2 years), starting from the date on which the appliance is
130700320HZH
Page 6 of 6
sold to the end user.
The warranty only covers defects in material or workmanship.
The repairs under warranty may only be carried out by an authorized service centre. When making a claim
under the warranty, the original bill of purchase (with purchase date) must be submitted.
The warranty will not apply in cases of:
- Normal wear and tear
- Incorrect use, e.g. overloading of the appliance, use of non-approved accessories
- Use of force, damage caused by external influences
- Damage caused by non-observance of the user manual, e.g. connection to an unsuitable mains supply or
non-compliance with the installation instructions
- Partially or completely dismantled appliances
VII. CORRECT DISPOSAL OF THIS PRODUCT
This marking indicates that this product should not be disposed with other household
wastes throughout the EU. To prevent possible harm to the environment or human health
from uncontrolled waste disposal, recycle it responsibly to promote the sustainable reuse
of material resources. To return your used device, please use the return and collection
systems or contact the retailer where the product was purchased. They can take this
product for environmental safe recycling.
130700320HZH

Seite 1 von 7
BEDIENUNGSANLEITUNG
Ölgefülltes Raumheizgerät
Ningbo Yihe ElectricAppliance Co., Ltd.
No. 63-67 Hanjia North Road, Fuhai, Cixi, Ningbo City, P. R. China
130700320HZH

Seite 2 von 7
Ölgefüllter Heizkörper
Vielen Dank, dass Sie sich für unser Produkt entschieden haben. Bitte lesen Sie sich vor der ersten
Inbetriebnahme Ihres Heizgerätes aufmerksam die Bedienungsanleitung durch und bewahren Sie sie dann
griffbereit auf.
I. ACHTUNG
1. Diese Anweisungen vor der Inbetriebnahme bitte aufmerksam durchlesen.
2. Bitte ziehen Sie den Netzstecker ehe Sie das Haus verlassen oder wenn Sie planen Ihr Gerät über
längere Zeit nicht zu benutzen.
3. Legen Sie bitte keine Kleidungsstücke oder andere Gegenstände zum Trocknen oder Erwärmen über
Ihren Heizkörper, da dies ein Brandrisiko darstellt.
4. Das Heizgerät darf nicht unmittelbar unterhalb einer Wandsteckdose aufgestellt werden.
5. Dieses Heizgerät nicht in feuchter Umgebung, wie z.B. in der Nähe einer Badewanne, einer Dusche
oder eines Schwimmbeckens benutzen.
6. Bei dem im Gerät enthaltenen Öl handelt es sich um ein spezielles Wärme leitendes Öl. Sollte es nötig
sein den Ölbehälter zwecks Reparatur zu öffnen, darf der Öltank nur vom Hersteller oder dessen
autorisierten Kundendienstmitarbeitern geöffnet werden. Bitte benachrichtigen Sie uns im Fall einer
Undichtigkeit sofort. Eventuell auf den Geräteoberflächen haftendes Öl muss anschließend entfernt
werden.
7. Die Zeitschaltuhr darf nur, wie durch einen Pfeil vorgegeben, in Uhrzeigerrichtung gedreht werden
(vorsichtig).Wird die Zeitschaltuhr in Gegenrichtung gedreht, führt dies zur Beschädigung Ihres Timers.
8. Falls Sie Schäden am Anschlusskabel feststellen, wenden Sie sich bitte zwecksAustauschs des
Kabels unverzüglich an den vom Hersteller autorisierten Kundendienst, um Gefährdungen zu
vermeiden.
9. Wenn die Anschlussleitung dieses Gerätes beschädigt wird, muss sie durch den Hersteller oder
seinen Kundendienst oder eine ähnlich qualifizierte Person ersetzt werden, um Gefährdungen
zu vermeiden.
10. Das Gerät nicht unmittelbar unter einer Steckdose betreiben.
11. Dieses Heizgerät nicht in unmittelbarer Nähe einer Badewanne, einer Dusche oder eines
Schwimmbeckens benutzen.
12. Dieses Heizgerät ist mit einer präzisen Menge eines speziellen Öls gefüllt. Reparaturen, die das
Öffnen des Ölbehälters erfordern, sind nur vom Hersteller oder dessen Kundendienstpartner
auszuführen, an die man sich wenden sollte, wenn eine Ölundichtigkeit auftritt.
13. Richtlinien hinsichtlich der Entsorgung des Öls bei Verschrottung des Gerätes sind zu befolgen.
14. WARNUNG: Das Gerät darf nicht bedeckt werden, da es sich sonst überhitzen kann.
15. Dieses Gerät kann von Kindern ab 8 Jahren und darüber und von Personen mit verringerten
physischen, sensorischen oder mentalen Fähigkeiten oder Mangel an Erfahrung und/oder
Wissen benutzt werden, wenn sie beaufsichtigt werden oder bezüglich des sicheren Gebrauchs
des Gerätes unterwiesen wurden und die daraus resultierenden Gefahren verstanden haben.
16. Kinder dürfen nicht mit dem Gerät spielen. Reinigung und Benutzer-Wartung dürfen nicht durch
Kinder ohne Beaufsichtigung durchgeführt werden.
17. Kinder, die jünger als 3 Jahre sind, sind im Falle der nicht gewährleisteten ständigen
Beaufsichtigung dem Heizgerät fernzuhalten.
18. Kinder im Alter von 3 bis 8 Jahren dürfen das Gerät nur ein- oder ausschalten, vorausgesetzt es
wurde in seiner normalen, dafür vorgesehenen Betriebsposition aufgestellt oder installiert und
die Kinder wurden bezüglich des sicheren Gebrauchs des Gerätes unterwiesen und haben die
130700320HZH

Seite 3 von 7
damit verbundenen Gefahren verstanden. Kinder zwischen 3 und 8 Jahren dürfen das Gerät
nicht an das Stromnetz anschließen, das Gerät nicht reinigen und keine Wartungsarbeiten daran
durchführen.
19. VORSICHT — Einige Teile dieses Produktes können sehr heiß werden und besondere Vorsicht
ist geboten, wenn Kinder und schutzbedürftige Personen anwesend sind.
II. TECHNISCHE DATEN
220-240V~, 50Hz, Schutzklasse I für alle Modelle,
GYD-BE -7, GYD-BE -9L: 1500W,
GYD-BE -9, GYD-BE -11L: 2000W,
GYD-BE -11, GYD-BE -13: 2500W.
.
III. PRODUKTEIGENSCHAFTEN
◆ Dieses Produkt verwendet als Medium ein speziell dafür vorgesehenes Öl, das durch Heizrohre
in die Heizrippen geleitet wird. Dies ermöglicht eine dauerhafte, leistungsstarke Heizleistung,
die Ihren Raum schnell auf angenehme Temperaturen bringt.
◆ Ihr Heizgerät zeichnet sich durch einfache Bedienung, sichere Verwendung geräuscharmen
Betrieb und elektromagnetische Verträglichkeit aus. Ihr Heizkörper ist ideal für den Einsatz in
Haushalt, Labor, Krankenhaus, Hotel usw. Optimal zum Einsatz in der kalten Jahreszeit!
IV. Vor der Inbetriebnahme
Zusammenbau:
Nehmen Sie den Heizkörper und alle gelieferten Teile aus dem Karton.
1. Stellen Sie den Heizkörper kopfüber ab.
2. Setzen Sie die Montageplatte oben auf beide Heizrippen.
3. Befestigen Sie die Montageplatte mit Durchsteckbügel und Flügelmutter.
4. Ziehen Sie die Schrauben an.
5. Drehen Sie das Gerät um und stellen Sie es aufrecht ab.
Gerät aufstellen:
Stellen Sie das Gerät in einer Entfernung von mindestens 90cm zu Wänden und anderen Gegenständen,
wie Möbeln, Vorhängen oder Pflanzen auf; überprüfen Sie vor der Inbetriebnahme des Gerätes, ob die auf
dem Typenschild des Gerätes angegebene Spannung mit der Spannung Ihres Stromnetzes übereinstimmt;
vergewissern Sie sich, dass der Temperaturregler und der Netzschalter auf Position “AUS“ eingestellt ist
und stecken Sie den Netzstecker ein.
Dieses Heizgerät ist mit einem digitalen, elektronischen Regler ausgestattet, der es Ihnen ermöglicht, die
Temperatur auf 1Grad genau einzustellen. Gehen Sie einfach folgendermaßen vor:
HINWEIS: Das Temperaturdisplay kann die Raumtemperatur erst nach einem Betrieb von
130700320HZH

Seite 4 von 7
mindestens 20 Minuten korrekt anzeigen.
1. Drücken Sie den Netzschalter. Wenn Sie diesen Schalter einmal betätigen, setzt sich Ihr Heizgerät mit
Hoher Leistung in Betrieb( ), Dauerbetrieb. Wenn Sie das Gerät in dieser Einstellung belassen,
arbeitet es durchgehend und mit voller Leistung. Das Gerät schaltet sich in diesem Falle erst aus,
wenn Sie es manuell ausschalten oder sobald die Raumtemperatur 30°C übersteigt.
2. Wenn Sie die Taste erneut betätigen, wechselt der Heizbetrieb auf Niedrige Leistung ( ), im
Dauerbetrieb. Wenn Sie das Gerät in dieser Einstellung belassen, arbeitet es durchgehend und mit
niedriger Leistung. Das Gerät schaltet sich in diesem Falle erst aus, wenn Sie es manuell
ausschalten oder sobald die Raumtemperatur 30°C übe rsteigt.
3. Wird die Taste ein drittes Mal gedrückt, schalten Sie das Gerät damit AUS.
Hinweis: Wenn Sie keine Zieltemperatur einstellen, läuft Ihr Heizer im Dauerbetrieb.
Hinweis: Wenn Sie das Gerät mit der niedrigen Leistungsstufe betreiben, ist die Wärmeabgabe geringer als
dies beim Betrieb mit hoher Leistung der Fall ist, der Energieverbrauch ist jedoch niedriger. Um einer
Überlastung des Stromkreises vorzubeugen, sollten Sie Ihren Heizer nicht mit anderen Elektrogeräten an
der gleichen Steckdose anschließen.
TEMPERATUR EINSTELLEN
MODE F/C
+
-
1) Halten Sie Mode gedrückt, bis das Temperatursymbol blinkt.
2) Anhand der + und – Tasten, die gewünschte Zieltemperatur im Bereich von 13 bis 30℃eingeben.
3) Das Temperatursymbol blinkt nun nicht mehr und die aktuelle Raumtemperatur wird angezeigt,
sobald die Zieltemperatur eingestellt wurde.
4) Die Heizfunktion wird kurz nach Erreichen der gewünschten Zieltemperatur abgeschaltet und die
Temperaturanzeige blinkt.
5) Wenn die Raumtemperatur unter den gewünschten Einstellwert sinkt, schaltet sich die Heizfunktion
wieder ein. Das Temperatursymbol blinkt nun nicht mehr und die aktuelle Raumtemperatur wird
angezeigt.
TIMER STELLEN (AUTO-AUS)
HINWEIS: Diese Funktion sollten Sie nur nutzen, wenn Sie beabsichtigen, dass sich Ihr Heizgerät nach
einer gewissen Betriebszeit automatisch abschaltet (1 bis 10 Stunden nachdem Sie diese Funktion aktiviert
haben)
HINWEIS: Stellen Sie die gewünschte Zieltemperatur immer ein, bevor Sie den Timer stellen (siehe Schritt
2), so dass sich das Gerät bei Erreichen der Zieltemperatur zeitweise ausschalten kann.
1. Mode drücken, bis das Timersymbol blinkt. Die Stundenanzeige erscheint und das AutoAus Symbol
leuchtet.
2. Mit den +und –Tasten den Heizbetrieb auf eine Dauer zwischen 1 und 10 Stunden einstellen. Diese
Funktion setzt sich in Betrieb, sobald das Timer-Symbol nicht mehr blinkt.
3. Nach Ablauf der eingestellten Betriebszeit schaltet sich Ihr Heizgerät automatisch aus.
NETZSCHALTER
130700320HZH

Seite 5 von 7
HINWEIS: Falls die Zieltemperatur eingestellt wurde, bevor der Timer gestellt wurde, schaltet sich das
Gerät abwechselnd ein und aus um die gewünschte Temperatur aufrecht zu erhalten, bis die
programmierte Zeit abgelaufen ist und sich das Gerät ausschaltet (Standardeinstellung 10 Stunden).
TIMER STELLEN (AUTO-EIN)
HINWEIS: Diese Funktion bietet Ihnen die Möglichkeit das Gerät automatisch zeitverzögert EIN zu schalten
und in Betrieb zu setzen (1 bis 10 Stunden nachdem Sie diese Funktion aktiviert haben)
HINWEIS: Stellen Sie die gewünschte Zieltemperatur immer ein, bevor Sie den Timer stellen (siehe Schritt
2), so dass sich das Gerät bei der gewünschten Einstellung einschalten kann.
1. Mode drücken, bis das Timersymbol blinkt. Die Stundenanzeige erscheint und das Auto Ein Symbol
leuchtet.
2. Mit den +und –Tasten um die Einschaltzeit 1 bis 10 Stunden herauszuschieben. Diese Funktion setzt
sich in Betrieb, sobald das Timer-Symbol nicht mehr blinkt.
3. Nach Ablauf der eigestellten Zeit, schaltet sich das Heizgerät automatisch ein.
HINWEIS: Falls die Zieltemperatur eingestellt wurde, bevor der Timer gestellt wurde, schaltet sich das
Gerät abwechselnd ein und aus um die gewünschte Temperatur aufrecht zu erhalten, sobald der Betrieb
startet.
HINWEIS: Wenn Sie dieAuto-Ein Funktion nutzen, schaltet sich das Gerät nach Ablauf der eingegebenen
Zeit ein. Wenn keine Auto-Aus Zeit eingestellt wurde, läuft das Gerät 10 Stunden lang (Werkseinstellung).
TIMER FUNKTION-- BEISPIELE
Beispiel Auto-Ein:
Einstellung Auto Aus für 3 Stunden
Das Gerät setzt sich nach Ablauf von 2 Stunden in Betrieb;.
EinstellungAuto ein für 2 Stunden
Das Gerät läuft für 3 zusätzliche Stunden weiter und schaltet sich dann aus.
Beispiel Auto-Aus:
EinstellungAuto aus für 7 Stunden:
Das Gerät schaltet sich nach Ablauf von 7 Stunden aus.
FAHRENHEIT/CELSIUS
HINWEIS: Sie haben die Option die Temperatur in Fahrenheit oder Celsius abzulesen.
1. F/C kann nur auf dem Temperatur-oder Leistungsdisplay abgelesen werden.
2. Durch Drücken der F/C Taste können Sie zwischen Fahrenheit und Celsius wechseln.
Reinigung
1. Bitte das Gerät vor der Reinigung von der Stromversorgung trennen.
2. Reinigen Sie die äußeren Oberflächen, indem Sie diese mit einem feuchten Tuch sauber reiben und
dann mit einem trockenen Tuch nachreiben.
3. Verwenden Sie keine Wachse oder Polituren, da diese auf Wärme reagieren und Verfärbungen
verursachen können.
130700320HZH
Seite 6 von 7
V. SICHERHEITSHINWEISE
1. Das Gerät darf während der Nutzung nicht bedeckt werden, da dies ein Brandrisiko darstellt.
2. Achten Sie unbedingt auf einen Mindestabstand von 90cm zu Möbeln, Kissen, Bettzeug, Papier,
Kleidern, Gardinen und anderen brennbaren Materialien.
3. Versuchen Sie nie eine der Heizrippen zu demontieren.
4. Die Nutzung dieses Elektrogerätes durch Kinder oder in deren Beisein muss unter erhöhter Aufsicht
erfolgen
5. Achten Sie darauf, dass das Anschlusskabel zu keiner Zeit mit erhitzten oder nassen Oberflächen in
Kontakt kommt. Sorgen Sie dafür, dass sich dasAnschlusskabel nicht verdreht und verlegen Sie es so,
dass Kinder keinen Zugriff darauf haben.
6. Das Gerät ist nicht zur Verwendung im Freien geeignet.
7. Das Gerät darf nicht in Berührung mit einem erhitzten Gas- oder Elektrobrenner gelangen.
8. Benutzen Sie das Gerät nicht mit beschädigtem Kabel oder Stecker, nach Fehlfunktionen ist oder falls
es irgendwie beschädigt wurde. Vor einer erneuten Inbetriebnahme muss das Gerät repariert werde
9. Versuchen Sie nie die Bedienelemente des Heizkörpers zu entfernen.
10. Dieses Produkt eignet sich nur für den Gebrauch in trockenen, geschlossenen Räumen.
11. Nach der Entfernung von Staub muss eventuell auf den Geräteoberflächen haftendes Öl entfernt
werden.
VI. Garantieerklärung
Unbeschadet der gesetzlichen Gewährleistungsansprüche gewährt der Hersteller eine
Garantie gemäß den Gesetzen Ihres Landes, mindestens jedoch 1 Jahr (in Deutschland 2
Jahre). Garantiebeginn ist das Verkaufsdatum des Gerätes an den Endverbraucher.
Die Garantie erstreckt sich ausschließlich auf Mängel, die auf Material- oder
Herstellungsfehler zurückzuführen sind.
Garantiereparaturen dürfen ausschließlich von einem autorisierten Kundendienst
durchgeführt werden. Um Ihren Garantieanspruch geltend zu machen ist der
Original-Verkaufsbeleg (mit Verkaufsdatum) beizufügen.
Von der Garantie ausgeschlossen sind:
- Normaler Verschleiß
- Unsachgemäße Anwendungen, wie z.B. Überlastung des Gerätes, nicht zugelassene
Zubehörteile
- Beschädigung durch Fremdeinwirkungen, Gewaltanwendung oder durch Fremdkörper
- Schäden die durch Nichtbeachtung der Gebrauchsanleitung entstehen, z.B. Anschluss an
eine falsche Netzspannung oder Nichtbeachtung der Montageanleitung
- Komplett oder teilweise demontierte Geräte.
VII. Korrekte Entsorgung dieses Produkts
Innerhalb der EU weist dieses Symbol darauf hin, dass dieses
Produkt nicht über den Hausmüll entsorgt werden darf. Altgeräte
enthalten wertvolle recyclingfähige Materialien, die einer
Wiederverwertung zugeführt werden sollten, um der Umwelt bzw.
der menschlichen Gesundheit nicht durch unkontrollierte
Müllbeseitigung zu schaden. Bitte entsorgen Sie Altgeräte deshalb
über geeignete Sammelsysteme oder senden Sie das Gerät zur
Entsorgung an die Stelle, bei der Sie es gekauft haben. Diese wird
130700320HZH

Seite 7 von 7
dann das Gerät der stofflichen Verwertung zuführen.
130700320HZH
This manual suits for next models
83
Table of contents
Languages:
Other Ningbo Heater manuals

Popular Heater manuals by other brands


eltherm
eltherm ELK-AE installation manual

Supplies4Heat
Supplies4Heat Woburn Fitting instructions

Hyundai power products
Hyundai power products HY70DKH instruction manual

Rheem
Rheem Raypak Hi Delta 302C Installation and operation manual

Mars
Mars STD2 Unheated 2 Series manual

Lowry
Lowry GSOFR2003 user manual


