For questions or to register your product, visit us online at ninjakitchen.com
@ninjakitchen
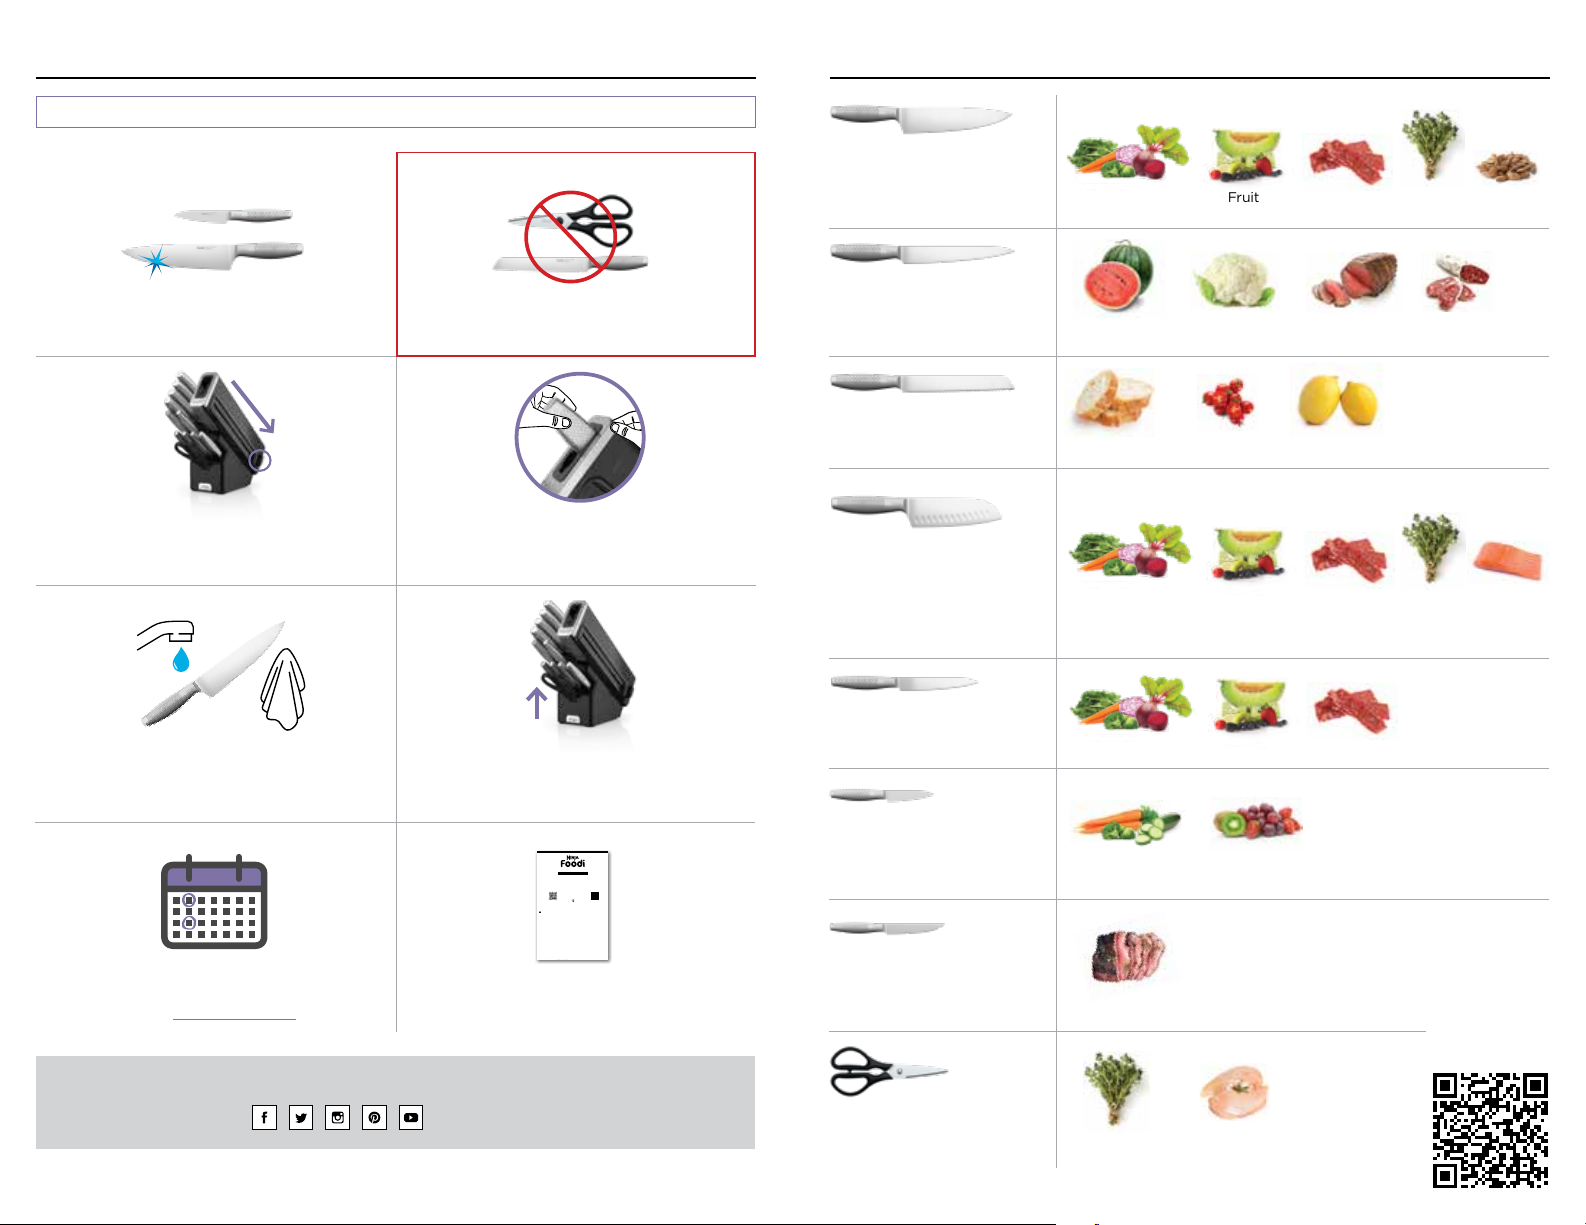
Sharpener Tips & Tricks
Before inserting knife for sharpening,
slide sharpener lever to the bottom of
the knife block. This will help prevent
damaging the knife.
*NeverDull In-Block Sharpener designed for Ninja Knives only. Using other branded knives could damage both
your sharpener and knives.
Frequent sharpening will not damage knives.
If moving the block, remove all knives
first. To release suction, gently lift up
on the front of the block. Push down
to reactivate suction.
To remove sharpened knife, push
down and hold the release button
while carefully removing the knife.
If you have any questions while
using your cutlery, turn to the Use
and Care Guide for more details.
Repeat sharpening
steps for each clean
knife every 2 weeks.
Rinse and dry knife
thoroughly after sharpening
to remove metal shavings.
ONLY sharpen clean,
Ninja-branded cutlery.*
Recommended Knife Usage
DO NOT sharpen Shears
or serrated Bread Knife.
8" Chef
Multipurpose, versatile knife
used for slicing, chopping,
mincing, and dicing. Vegetables Fruit Protein Herbs Nuts
Bread Tomatoes Citrus Fruit
8" Bread
Used for slicing through bread,
tomatoes, and citrus fruit.
8" Slicing
Used for cutting thinner slices
of larger vegetables, fruit,
meat roasts, and cold cuts.
Vegetables
Small Vegetables
Cooked Protein
Herbs
Fruit
Small Fruit
Trim Fat
Protein
Shears
Used for snipping and cutting.
4.5" Steak
Used for slicing through
cooked protein, mainly steak,
chicken, chops, and fish.
3.5" Paring
Used for cutting, trimming
fat, and peeling small
vegetables and fruit.
5 Utility
Used for thinner slicing,
trimming, and filleting.
Scan to learn
more about
recommended
knife usage.
Large VegetablesLarge Fruit Meat Roasts Cold Cuts
Vegetables Fruit Protein Herbs Fish
6" Santoku
Smaller multipurpose knife
used for thinner slicing,
dicing, and mincing. Oval
indents along knife blade help
reduce food from sticking.
SharkNinja Operating LLC US: Needham, MA 02494 1 855 460-5431 | ninjakitchen.com
NEVERDULL is a registered trademark of SharkNinja Operating LLC.
FOODI and NINJA are trademarks of SharkNinja Operating LLC.
This product may be covered by one or more U.S. patents. See sharkninja.com/patents for more information.
© 2023 SharkNinja Operating LLC.
PRINTED IN CHINA
NCL_PKG_INSRT_UseCareGuide_K2000_K6000Series_MP_Mv2
READ BEFORE FIRST USE
Thank you for your purchase of the Ninja™ Foodi™ NeverDull® Stainless Series Knife
System and welcome to the Ninja family! We hope you love your cutlery and will be
inspired to create something new in your kitchen.
This guide includes suggestions for how to maintain your cutlery.
NEVERDULL® STAINLESS SERIES KNIFE SYSTEM
USE AND CARE GUIDE
TM
WARNING—TO REDUCE THE RISK OF INJURY:
Register your Ninja™ Foodi™ NeverDull® Stainless Series Knife System to stay up to
date on what’s new from Ninja and learn about our NeverDull guarantee.
Product
Registration
registeryourninja.com
REGISTER
AND
LEARN MORE
Scan QR code
using mobile device
Instructional
Videos
qr.ninjakitchen.com/
neverdullstainless
1 DO NOT touch a knife’s sharp blade edge.
2 DO NOT put knives in the dishwasher.
3 DO NOT sharpen other branded knives.
4 DO NOT store knives in sharpener.
5 DO NOT
stick fingers inside sharpening slot nor the slot on the side of the sharpener.
6 DO NOT reach blindly for a knife; reach deliberately for the handle.
7 DO NOT use knives with wet hands. Dry knife handles well before using.
8 DO NOT
sharpen knives with wet hands. Dry knife handles well before sharpening.
9 DO NOT use knives as screwdrivers or can openers. This is not their intended
purpose and can bend or break the blade and cause bodily injury.
1 DO NOT cut through bone or use knives to poke, pry, or separate frozen foods.
11 DO NOT
allow acidic foods, such as tomatoes and lemons, to remain on knife after use.
12 DO NOT store knife system next to stove / hot surface or in direct sunlight.
1 DO NOT sharpen Ninja™ 8" Serrated Bread Knife or Ninja™ Shears.
1 DO NOT use force to move the slider on the sharpener if jammed.
1 DO NOT try to catch a falling knife.
1 DO NOT put a knife in a sink full of water.
1 ONLY sharpen clean, dry Ninja™ branded knives.
1 ONLY carry knives with the blade edge pointing down.
For additional info, tips, tricks, and FAQs, visit ninjakitchen.com/support or contact
Customer Service at 1 855 460-5431.
CLEANING THE STONE SHARPENING WHEEL
The stone sharpening wheel inside your sharpener is the component that
sharpens the blade edge. Over time, this wheel collects metal shavings as you
use your sharpener. If you sharpen your knives every 2 weeks (recommended), it
is recommended to clean the wheel every 6 months. Follow the steps in the TO
REMOVE THE STONE SHARPENING WHEEL section to remove the wheel. Rinse
the wheel under running water and use a soft bristle brush to remove any metal
shavings. Towel-dry the wheel immediately before reassembling inside the sharpener.
REPLACING THE STONE SHARPENING WHEEL
Over time, the stone sharpening wheel wears down and must be replaced. If you
sharpen your knives every 2 weeks (recommended), it is recommended to replace
the wheel every 2 years. To purchase a replacement wheel, visit ninjakitchen.com.
TO REMOVE THE STONE SHARPENING WHEEL:
1 Remove all knives from your block.
2 Move the sharpener lever to the bottom position. Rotate block and tilt the block
forward so you can easily access the back. Open the stone sharpening wheel
access door.
3 As you hold the lever in the down position with your left hand, pull the wheel
holder down and towards you with your right hand. The wheel holder should
connect with the snap feature to be held in place.
NOTE: The wheel holder may be greasy and/or oily.
4 Remove the wheel by unsnapping and rotating the wheel pin clip upwards 90
degrees. Slide the wheel pin out and remove the wheel. If replacing the wheel,
discard the old wheel and reserve the wheel pin.
5 Replace the wheel by placing the new wheel, or cleaned wheel, in the wheel
holder. It can be installed in either direction. Insert the wheel pin through the
wheel and snap the wheel pin clip in place.
6 Verify the wheel is installed correctly by spinning the wheel. The wheel should
rotate in the wheel holder. If it is jammed, is wobbly, or easily pops out, repeat
step 5 until it rolls freely.
NOTE: The wheel is meant to be angled in the wheel holder.
7 Gently raise the wheel holder back to its original position inside the sharpener.
Close the stone sharpening wheel access door.
8 Tilt block back so it is standing upright on counter. Move the lever up and down 3
times to ensure the sharpener is not jammed. If it is, repeat steps 2–8. Store your
knives back in their designated slots.


