Nippon Oil Pump C Series Operator's manual
ACI202003
C
CC
C-
--
-
Series
Series Series
Series CI
CICI
CI
User’s
User’sUser’s
User’s
Instruction Manual
Instruction ManualInstruction Manual
Instruction Manual
Read this manual carefully and thoroughly for the correct and
optimum use of NOP coolant unit. Improper use of the pump can
cause personal injury and damage to property and may void the
warranty.
Important
Save this manual for
Save this manual for Save this manual for
Save this manual for future reference, and keep
future reference, and keep future reference, and keep
future reference, and keep
it readily available
it readily availableit readily available
it readily available

1
User’s Instruction Manual
User’s Instruction Manual for NOP Coolant Unit C-Series CI
<
<<
<Contents>
>>
>
For Safe Operation.................................................................................................................... 3
Safety Precautions.................................................................................................................... 6
●Safety Devices............................................................................................................6
●Safety Measures.........................................................................................................6
Model Numbering System........................................................................................................ 7
Pump Installation....................................................................................................................... 7
●Place of Installation....................................................................................................7
●Space Required for Installation...............................................................................10
●Position of Pump Inlet Port .....................................................................................10
Rc 3/8 Drain Piping.................................................................................................................. 10
Filters........................................................................................................................................ 10
●Performance of Built-in Filter. .................................................................................11
Contaminant Drain Port...........................................................................................................11
Outlet Port................................................................................................................................ 12
Piping for the Pump ................................................................................................................ 12
●Torque Applied on Pipe Connection.......................................................................12
●Connecting the Pipes...............................................................................................12
●Pipes and Pipe Joints ..............................................................................................12
Electric Wiring ......................................................................................................................... 13
For Operation........................................................................................................................... 13
●Start-up Checklist.....................................................................................................13
●Test Run....................................................................................................................13
Inspections............................................................................................................................... 14
●Daily Startup Inspections ........................................................................................14
●Periodical Inspections .............................................................................................14
Storage ..................................................................................................................................... 14
Warranty ................................................................................................................................... 15
For Selecting a Pump.............................................................................................................. 15
●Operating Method.....................................................................................................15
●Required Flow Rate..................................................................................................15
●Required Pressure ...................................................................................................15
●Select Coolant Type.................................................................................................15
●Operating Ambient Temperatures...........................................................................16
●Fluid Temperature Range ........................................................................................16
●Fluid Viscosity Range..............................................................................................16
●Compatible Work Materials......................................................................................16
For Selecting a Motor....................................................................................................17

2
●Required Power for the Pump.................................................................................17
●Voltage and Frequency............................................................................................17
Suction Performance .............................................................................................................. 17
Internal Construction.............................................................................................................. 18
Troubleshooting Guide........................................................................................................... 19
3
For Safe Operation
Be sure to understand the safety countermeasures and strictly follow the
precautions, and operating instructions stated in this manual for safe operation.
When you see the following symbols and titles in this manual, be alert to the
potential for personal injury or property damage.
This manual uses the following symbols and titles to identify the risk and danger
levels.
Danger:
Danger:Danger:
Danger:
A hazardous situation which, if not avoided, may result in
death or serious injury.
Warning:
Warning:Warning:
Warning:
A hazardous situation which, if not avoided, could result in
death or serious injury.
Caution:
Caution:Caution:
Caution:
A hazardous situation which, if not avoided, could result in
injury or equipment damage.
Danger
Do not operate the pump in a place having
a
risk of explosion or extremely dusty
place. Do not place any flammable liquids or materials in the area surrounding the
motor. Such items could cause
explosion or fire.
Make sure that the power is disconnected before installing a pump, performing
maintenance work or inspections to avoid the risk of electric shock.
Transporting, installation, plumbing, wiring, operation, or maintenance work must be
performed by personnel specifically knowledgeable in the respective task, and any
legally regulated work must be performed by personnel properly qualified under the
related law.
Warning
Getting your fingers, hands or articles
caught in rotating or moving parts
may cause
an unexpected injury
The motor and pump surface may heat up while in an operation. Be careful not to
touch the pump and motor while/or immediately after an
operation.
Make sure that the power is disconnected before beginning to work on wiring. Also
take measures to avoid accidental power
-
on.
Be sure to follow the instruction
s
of the motor wiring diagram to prevent fire and
electrical leakage.
Ground the
equipment properly to prevent fire and electrical shocks due to electrical
leakage.
Ensure the power is disconnected prior to performing maintenance work or
inspections. Also take measure to prevent accidental power-on.
The pump cannot be used for volatile liquids like gasoline, nor fuel oils like
kerosene. They may explode or cause fire.
Do not pump fluid over the specified temperature range. Leaked fluid may cause
burns.
4
Caution
Be sure to use “Earth
-
Leakage Circuit
Breaker (ELCB)” and overload protection
device to avoid a damage to the equipment or motor burnout.
NOP coolant unit must not be operated outdoor.
H
oist
the pump at designated lifting points. C
heck the lifting points on the drawing
Assembling the
pump in a wrong orientation will damage the motor. Install the pump
unit in an up
-
right position.
I
f the installation site is not level or if there is forcible installation in which the
installation holes are not in exact alignment, the pump might be damaged due to
vibration.
Tramp oil or foam may affect the pump performance. NOP coolant unit must not be
installed in such environment.
Remove the large objects with
pre
-
filtration device, such as a plate
(screen
-
type)
filter before the pump inlet.
Recommended filter mesh size is 18 (about 1mm sieve
size).
Suction of excessive amount of needle
-
like or wool
-
like metal chips may cause
clogging on inlet port, Cyclone filter even when their particle sizes are smaller
than 3 mm.
If
you install additional in
-
line filter onto the outlet line, clean it regularly.
Clogged filters affect the pump performance and abnormal noise, vibration or flow
deficiency may occur.
Tramp oil or foam may affect cyclone filter performance.
Installation of partition
plate is recommended.
Diameter of contaminant drain piping must be the same as /or larger than
contaminant drain port.
Contaminant drain piping must not be higher than 1 M from
the ground and not be longer than 3 M horizontally. T
he piping must be as short as
possible. (PVC piping is recommended).
Inspect all valves, cocks, joints and the like before installatio
n
to
avoid using any
component that has a cavity
in the casting.
Do not narrow the contaminant drain port.
Excessive flow restriction(
≦
20L/min)
may decrease the pump performance
and damage the pump
.
A gate valve is highly recommended for a contaminant drain line.
Do not attach the end of contaminant drain line high above the tank liquid surface
or nearby pump suction port. It may generate foam and suction of foam may cause
flow deficiency in outlet line.
Be sure to follow the instruction of torque control specified on Table 3 on P12.
D
o not use liquid type sealant. Do not use sealant tape too much. Excess use of
sealant tape may result in over
-
torque and damage the port.
Do not attempt to flush out piping if already assembled with the pump
.
Airtight test must be completed before install
ation.
Do not run the pump in reverse direction.
Do not run the pump dry over 10 second
.
If an abnormal phenomenon is observed, stop the pump immediately and check for
the defective areas. (See Table 4, P.19)
Do not use liquid that doesn’t offer lubricity, rust protection (such as tap water) or
contains corrosive substances. They will damage the pump.
5
Caution
Consult your coolant manufacturer (or distributor) for the compatibility with fluoro
carbon rubber, the seal material of NOP pump, in advance to
prevent
leakage.
Operate the pump within the specified temperature range.
Keep the viscosity of your coolant within the specified range (up to 22 mm
2
/sec).
Do not use liquid beyond the specified viscosity range. It may reduce cyclone filter
performance significantly and increase motor output.
Do not use work materials harder than HV
6
00.
Extremely
hard materials, such as
Inconel, Titanium alloys, Tungsten alloys, can drastically shorten your pump
service
-
life.
Do not use hardened steel, carbon fiber, glass fiber contain
ed
materials, carbon
materials. Those materials can drastically shorten your pu
mp service
-
life.
Do not use film or resin coat
ed
materials. Those materials can
easily clog the
cyclone filter, leading to
poor filter performance.
Do not apply wrong supply voltage or frequency
Keep the motor rotation speed within the specified range. (3000 min
-1
or less)
Make sure that there is no excess resistance in outlet line. It will affect the pump
suction performance.
Entry of air into the inlet port will reduce suction performance.
Clean the perforated area of the i
nlet port at regular intervals. Clogged inlet will
cause abnormal noise, vibration or discharge failure, which result in pump
damage
.
Do not run the pump against a closed outlet. Or it will result in pump or motor
damage.

6
Safety Precautions
●Safety Devices
・
Install “Earth-Leakage Circuit Breaker (ELCB)” or overload protection device on
the motor power source without fail.
・
Check the motor nameplate for the ratings, and set up and operate the motor
within the specified ratings.
・
Follow all the technical standards applicable to electrical facilities.
Caution:
Caution: Caution:
Caution:
Be sure to use “Earth-Leakage Circuit
Breaker (ELCB)” and
overload protection device to avoid a damage to the equipment or
motor burnout.
・
To avoid pump damage, install a flow monitor, pressure sensor, or such other
devices in the pump’s outlet line to detect dry running.
・
The oil seals and gaskets are not usable perpetually.
・
Install the pump in a safe location, or provide a protective cover or device so that
accidental oil leakage would not cause personal injury or equipment damage.
●Safety Measures
・
Keep children or other people incapable of judging risks away from the pumps.
・
Furnish a protective cover or device over the drive section to prevent your fingers,
hands, or other articles from getting trapped into the section.
Warning
Getting your fingers, hands or articles caught in rotating or
moving parts may cause an unexpected injury
・Do not contact a pump or motor during the operation, or immediately after the
operation stops.
Warning
The motor and pump surface may heat up while in an operation.
Be careful not to touch the pump and motor while/or
immediately after an operation.
Danger
Do not operate the pump in a place having a risk of explosion or
extremely dusty place. Do not place any flammable liquids or
materials in the area surrounding the motor. Such items could
cause explosion or fire.

7
Model Numbering System
Pump Installation
●Place of Installation
Caution
NOP coolant unit must not be operated outdoor.
Caution
Hoist the pump at designated lifting points. Check the lifting points
on the drawing.
Caution
Assembling the pump in a wrong orientation will damage the
motor. Install the pump unit in an up-right position.
Caution
If the installation site is not level or if there is forcible installation
in which the installation holes are not in exact alignment, the
pump might be damaged due to vibration.
Caution
Tramp oil or foam may affect the pump performance. NOP
coolant unit must not be installed in such environment.
■Model Numbering System
■Model Numbering System■Model Numbering System
■Model Numbering System
TOP-YTH①②-③
TOP-YTH①②-③TOP-YTH①②-③
TOP-YTH①②-③
C
C C
C
*
**
*
I155・I305 are not applicable to 60Hz
I155・I305 are not applicable to 60HzI155・I305 are not applicable to 60Hz
I155・I305 are not applicable to 60Hz
I305: Impeller pump
I305: Impeller pumpI305: Impeller pump
I305: Impeller pump
(5 stages/300L)
(5 stages/300L)(5 stages/300L)
(5 stages/300L)
I302: Impeller pump
I302: Impeller pumpI302: Impeller pump
I302: Impeller pump
(2 stages/300L)
(2 stages/300L)(2 stages/300L)
(2 stages/300L)
② Motor type
② Motor type ② Motor type
② Motor type
AC: AC 200/200/220/230 V
AC: AC 200/200/220/230 V AC: AC 200/200/220/230 V
AC: AC 200/200/220/230 V
50/60/60/60 Hz
50/60/60/60 Hz 50/60/60/60 Hz
50/60/60/60 Hz
3 phase electric induction motor
3 phase electric induction motor 3 phase electric induction motor
3 phase electric induction motor
(IE3) with CE marking
(IE3) with CE marking (IE3) with CE marking
(IE3) with CE marking
③ Flow rate
③ Flow rate ③ Flow rate
③ Flow rate
*
**
*
Filtering method
Filtering method Filtering method
Filtering method
50 Hz
50 Hz50 Hz
50 Hz
60 Hz
60 Hz60 Hz
60 Hz
50 Hz
50 Hz50 Hz
50 Hz
60 Hz
60 Hz60 Hz
60 Hz
① Motor capacity
① Motor capacity ① Motor capacity
① Motor capacity
1500:1.5kW
1500:1.5kW 1500:1.5kW
1500:1.5kW
C: cycloone type
C: cycloone typeC: cycloone type
C: cycloone type
3700:3.7kW
3700:3.7kW 3700:3.7kW
3700:3.7kW
I155: Impeller pump
I155: Impeller pumpI155: Impeller pump
I155: Impeller pump
(5 stages/150L)
(5 stages/150L)(5 stages/150L)
(5 stages/150L)
I152: Impeller pump
I152: Impeller pumpI152: Impeller pump
I152: Impeller pump
(2 stages/150L)
(2 stages/150L)(2 stages/150L)
(2 stages/150L)

8
Figure 1: Pump Mounting Hole Patterns
CI 150L type has 2 mounting positions. Select either one of them considering the
depth of your tank and the liquid level.
<
<<
<CI 150Ltype>
>>
>
<
<<
<CI 300L type>
>>
>
Outlet port
Outlet port
Outlet port
4-M8 × P1.25
or 4-φ9
4-M8 × P1.25
or 4-φ9
22 .1
361.6
Mounting flange
( pper)
Mounting flange
(Lower)
Mounting flange

9
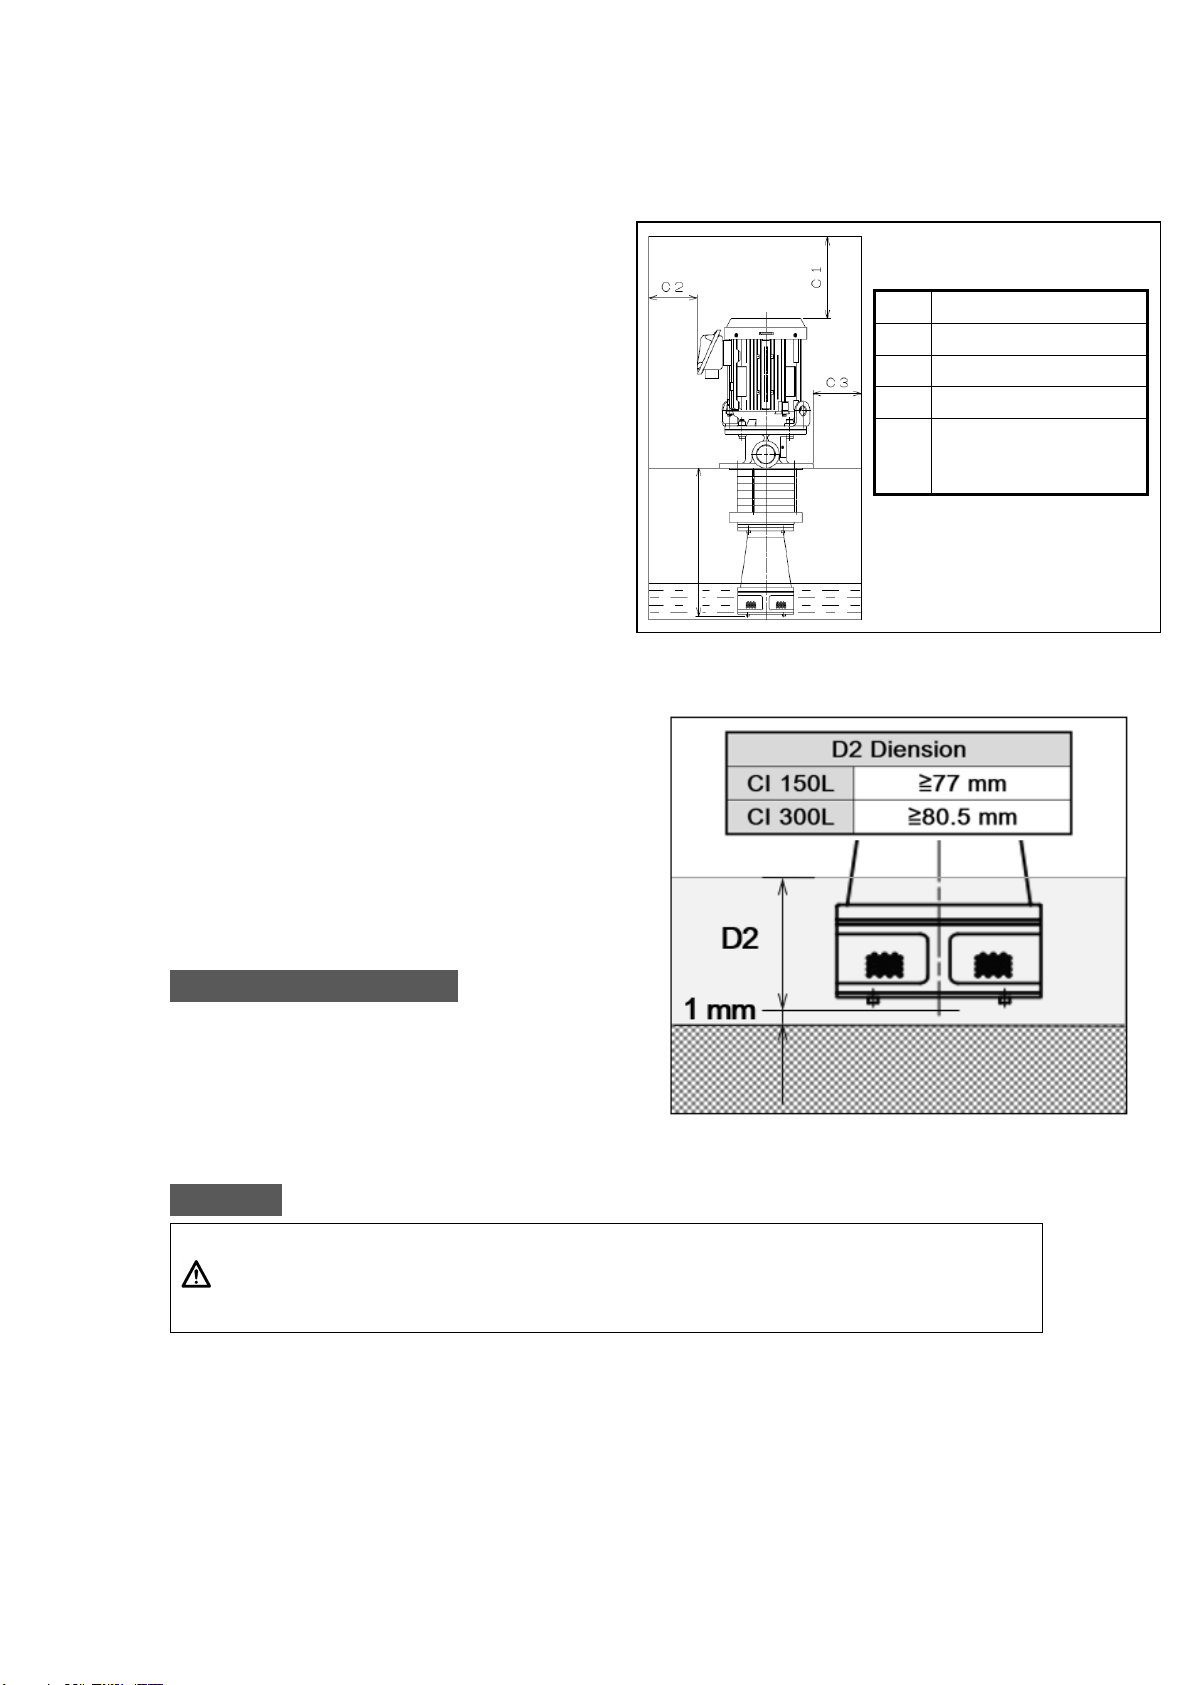
Figure 2: Pump Mounting Dimensions
10
●Space Required for Installation.
Do not operate NOP coolant unit in a
dusty, extremely high, or low
temperature environment.
(See P. 16 for the ambient
temperatures.)
It is recommended to provide minimum
clearances as illustrated in figure 3 for
easy maintenance.
●Position of Pump Inlet Port
Mount the pump in the tank at least 1 mm
above the tank floor. This is to ensure
enough clearance to prevent the pump
from sucking the sediments of sludge or
metal chips on the tank floor.
To prevent the pump from drawing air,
install the pump in the tank water deeper
than 77 mm as illustrated in figure 4.
Rc 3/8 Drain Piping
If mounting the pump at lower flange,
do proper drain piping so that the liquid
from Rc 3/ drain line smoothly flows
into the tank.
Make sure that the pipe(hose) end doesn’t contact the tank liquid surface.
Filters
Caution
Remove the large objects with pre-filtration device, such as a plate
(screen-type) filter before the pump inlet. Recommended filter
mesh size is 18 (about 1mm sieve size).
All foreign objects larger than the perforations of the inlet port must be
pretreated.
If higher filtration accuracy than shown in Table 1 on P11 is required, install in-line
filter in the outlet line.
Dimension
C1
≧(
D+30 mm )
C2
≧
200 mm
C3
≧
50 mm
D1
Pump height below
the top of tank
Figure 4: Gap
u
nder the
B
ottom of
P
ump
Figure 3: Required Clearances Around the Pump
D1

11
●Performance of Built-in Filter.
Table 1 : Filtering Performance (Nominal Value)
Caution
Suction of excessive amount of needle-like or wool-like metal
chips may cause clogging on inlet port, Cyclone filter even when
their particle sizes are smaller than 3 mm.
Caution
If you install additional in-
line filter onto the outlet line, clean it
regularly. Clogged filters affect the pump performance and
abnormal noise, vibration and flow deficiency may occur.
Caution
Tramp oil or foam may affect cyclone filter performance.
Installation of partition plate is recommended.
Contaminant Drain Port
・A
fter being separated by a cyclone filter, contaminant-contained dirty coolant will
be discharged from the contaminant drain port.
・
Filtering the dirty liquid discharged from the contaminant drain line will help
maintain the liquid in the tank clean
Table 2: Contaminant Drain Port Performance
*
These values are for reference only and not for guaranteeing the performance.
Caution
Diameter of contaminant drain piping must be the same as /or
larger than contaminant drain port.
Contaminant drain piping must not be higher than 1 M from the
ground and not be longer than 3 M horizontally. T
he piping must
be as short as possible. (PVC piping is recommended).
Caution
Inspect all valves, cocks, joints and the like before installation to
avoid using any component that has a cavity in the casting.
Cyclone filter Water soluble coolant 100μm 99.9% (Specific weight 2.7)
Straight oil 80% (Specific weight 2.7)
Inlet port 3mm (Solids larger than 3mm must be removed from the tank.)
Model Flow rate Discharge
pressure
I155 20~35 L/min
0.02 MPa
I152 25~40 L/min
I305 45~60 L/min
I302 50~70 L/min

12
Caution
Do not narrow the contaminant drain port. Excessive flow
restriction( ≦20L/min) may decrease the pump performance and
damage the pump.
Caution
A gate valve is highly recommended for a contaminant drain line.
Caution
Do not attach the end of contaminant drain line high above the
tank liquid surface or nearby pump suction port. It may generate
foam and suction of foam may cause flow deficiency in outlet line.
Outlet Port
・
Pipes connected to the outlet port must be as large as the port diameter and
pressure resistant type.
Piping for the Pump
●Torque Applied on Pipe Connection
The maximum torques permissible for pipe connections to NOP coolant unit
are given in the table that follows:
Table 3: Maximum Permissible Torque by the Pipe Size
Caution
Be sure to follow the instruction of torque control above.
Caution
Do not use liquid type sealant. Do not use sealant tape too
much. Excess use of sealant tape may result in over-torque and
damage the port.
●Connecting the Pipes
・
To prevent leaks and air entry, make sure all pipe connections are securely
tightened and completely sealed.
・B
e sure to use pipe-supports so that the pipes are self-supported and no
weight will be placed on the pump.
・Make sure that the pipe lengths and angles are correct when assembled so that
no unnecessary strain is placed on the pump.
・Installation of a pressure gauge is highly recommended as pump conditions can
be easily monitored.
・
Installation of a stop valve, union joints, and such other fittings are also
recommended for easy maintenance.
Pipe size, Rc 1-1/2" 3/4" 3/8"
Torque N·m 150 60 30

13
●Pipes and Pipe Joints
・
Be sure to flush out all pipes to ensure that they are thoroughly clean before
use.
. Caution
Do not attempt to flush out piping if already assembled with the
pump
.
Caution
Airtight test must be completed before installation.
Electric Wiring
Electric wiring must be carried out by qualified personnel.
Warning
Make sure that the power is disconnected before beginning to
work on wiring. Also take measures to avoid accidental power-
on.
Warning
Be sure to follow the instruction of the motor wiring diagram to
prevent fire and electrical leakage.
Warning
Ground the equipment properly to prevent fire and electrical
shocks due to electrical leakage.
・
Check the direction of the motor rotation. If using NOP’s pre-installed motor, the
motor rotation is indicated on the wiring plate on the motor frame or terminal
box. Connect the motor accordingly.
(Our NOP’s pre-installed motor (3-phase type) is, when viewed from the suction
side, designed to rotate in counter-clockwise if wired as illustrated in the figure.5.)
Figure 5: Motor Wiring Diagram
For Operation
●Start-up Checklist
・
Is the tank filled with liquid up to, or over the
specified level? (See Fig.4, P10)
・
Are the inlet, outlet and drain ports unblocked?
・
Check for loose pipe connections.
・
On the initial startup, turn the pump on and off
quickly to confirm that the motor is running in the correct direction.
Caution
Do not run the pump in reverse direction.
●Test Run
Caution
Do not run the pump dry over 10 second.
14
Inspections
●Daily Startup Inspections
Check for liquid leakage, abnormal sound, and heating.
Caution
If an abnormal phenomenon is observed, stop the pump
immediately and check for the defective areas. (See Table 4,
P.19)
●Periodical Inspections
・
Periodical inspection must be performed at least once a year.
<Periodical Inspection Checklist>
・Flow rate, pressure in outlet port
・Flow rate in contaminant drain port (Guideline: 20 L/min, minimum)
・Clogging of contaminant drain port
・Clogging of the inlet port (perforated metal)
・Leaks from pipe connecting parts
・Minimum coolant level in the tank (Keep the level high enough to prevent air entry)
・Amount of contaminant in the tank (It is recommended to perform tank cleaning
at least once in a half year)
・Concentration level of the coolant (Keep the level within the range specified by
the coolant manufacturer)
・Viscosity of straight oils (22 mm
2
/sec or less) .
・Liquid temperature (-5℃~60℃)
・Over-heating of pump motor
Storage
・It is always good to keep replacement parts on hand (pump, motor and coupling)
to minimize downtime due to unexpected pump failure or deterioration.
・
Be sure to perform a periodical inspection.
(See “Periodical inspection” above)
・
If the pump is to be stored for an extended period of time, take the following
steps to protect the pump against the internal rust.
①Pump lubricating oil of 15 mm
2
/s or less viscosity for three minutes to wet
inside the pump.
②Put lids on the ports, wrap the unit in a plastic bag, sealed it air-tight and
store.
・
If storing for six months or longer, check for exterior rust and free rotation once
a month.
・
If you reuse the pump long after storage, check for unusual noise, heating, and
other abnormalities on the first run. When any of these mentioned above
occurs, stop operation immediately.
Warning
Ensure the power is disconnected prior to performing
maintenance work or inspections. Also take measure to prevent
accidental power-on.
15
Warranty
・
NOP coolant unit is warranted to be free from defects in workmanship and
materials for one year from the date we ship to customer’s designated location,
one year from the date we ship to customer’s designated location, one year from the date we ship to customer’s designated location,
one year from the date we ship to customer’s designated location,
or 5000 hours of operation, whichever occurs first
or 5000 hours of operation, whichever occurs firstor 5000 hours of operation, whichever occurs first
or 5000 hours of operation, whichever occurs first.
・The warranty will not cover failures or damages caused by not following the
guidelines stated in this manual, improper use, lack of appropriate maintenance,
natural disaster, accidents or act of God.
・Any disassembly, alteration made to a product by the customer will void the
warranty.
・The warranty will only apply to the products you purchased and not apply to
indirect or consequential loss or damage resulting from the use of this product.
For Selecting a Pump
●Operating Method
・
The pump must be run under continuous operation. Reduce the number of ON/OFF
cycles to a minimum if intermittent operation is unavoidable.
●Required Flow Rate
・Select a pump by referring to the catalog, drawings, or other materials.
・Note that discharge rate is subject to the pump type, temperature, and pressure
of the fluid.
・Select a pump with an adequate margin of outlet pressure and flow rate.
●Required Pressure
・Select a pump by referring to the catalog, drawings and other material.
Note: The pump must be run within the maximum pump operating pressure and the motor
output rating.
●Select Coolant Type
Water-soluble coolants or straight oils with kinematic viscosity of 22 mm
2
/sec or
less.
Caution
Do not use liquid that doesn’t offer lubricity, rust protection (such
as tap water) or contains corrosive substances.
They will damage the pump.
Caution
Consult your coolant manufacturer (or distributor) for the compatibility
with fluoro carbon rubber, the seal material of NOP pump, in advance
to prevent leakage.
Warning
The pump cannot be used for volatile liquids like gasoline, nor fuel
oils like kerosene. They may explode or cause fire.

16
●Operating Ambient Temperatures
・
The permissible ambient temperature range is between -10
℃
and 40
℃
.
Caution Operate the pump within the specified temperature range.
●Fluid Temperature Range
・
The permissible temperature range for the liquid is between -5
℃
and 60
℃
.
・
When start-up, keep the temperature gap between the liquid and ambient
temperature within 40
℃
.
Warning
Do not pump fluid over the specified temperature range. Leaked
fluid may cause burns.
●Fluid Viscosity Range
・The permissible viscosity range is 22 mm
2
/sec or less
Caution Keep the viscosity of your coolant within the specified range.
(up to 22 mm
2
/sec)
Caution
Do not use liquid beyond the specified viscosity range. It may
decrease cyclone filter performance significantly and increase
motor output.
Note:
Low temperature in winter must be taken into account when setting fluid temperature
as viscosity increases rapidly when temperature decreases.
●Compatible Work Materials
・
Maximum permissible hardness of work materials is within HV 600
Caution
Do not use work materials harder than HV600. Extremely hard
materials, such as Inconel, Titanium alloys, Tungsten alloys, can
drastically shorten your pump service-life.
Caution
Do not use hardened steel, carbon fiber, glass fiber contained
materials, carbon materials. Those materials can drastically
shorten your pump service-life.
Caution Do not use film or resin coated materials. Those materials can
easily clog the cyclone filter, leading to poor filter performance.
17
For Selecting a Motor
●Required Power for the Pump.
・
Select a pump with an adequate margin with reference to the performance carve
in the catalog.
・
The power required by a pump is subject to the pressure, flow rate and viscosity
of the liquid.
・
A liquid with higher viscosity requires a greater power.
Note: Low temperature in winter must be taken into account when selecting motor,
as viscosity rapidly increases when temperature drops.
●Voltage and Frequency
Caution Do not apply wrong supply voltage or frequency
Caution Keep the motor rotation speed within the specified range.
(3000 min
-1
or less)
Suction Performance
The pump performance will be reduced by resistance in the inlet line or air suction.
Pay attention to the coolant surface level of a tank and clogging in inlet port
(Perforated metals).
Caution Make sure that there is no excess resistance in outlet line. It will
affect the pump suction performance.
Caution Entry of air into the inlet port will reduce suction performance.
Caution
Clean the perforated area of the inlet port at regular intervals.
Clogged inlet will cause abnormal noise, vibration or discharge
failure, which result in pump damage.
Caution Do not run the pump against a closed outlet. Or it will result in
pump or motor damage.

18
Internal Construction
Figure 6 : Pump Parts Name
19
Troubleshooting Guide
If you experience no oil discharge, a high-pitched sound, or such other abnormal
phenomena soon after the installation, check the troubleshooting chart in the table
that follows.
If you cannot find out the cause of trouble, consult us or a dealer.
Table 4: Pump Troubleshooting Chart
S
ymptom
Possible causes
C
heck
method
s
Possible remedies
No
discharge
from outlet
port.
Insufficient
flow or
pressure.
Abnormal
noise.
Motor failure.
Are wires at motor loose or
disconnected? Do operation test for
motor individually.
・Repair or replace pump.
Motor is wired
incorrectly or
disconnected.
Are wires at motor loose or
disconnected? Check direction of
rotation.
・Rewire motor in a correct rotation
indicated on label.
Coupling is damaged. Check connected area between pump
and motor.
・Replace coupling.
Liquid surface level
decreases.
Check liquid amount in tank.
・Refill tank with enough liquid.
・Control liquid level with level sensor.
Inlet port is clogged. Check the inlet port for clogging.
・Periodical cleaning on and
around inlet port.
・Insert a plate filter prior to the inlet
port as a pre-filtration.
Air drawn into pump
or pipes.
・On the first-run, after long term
storage or immediately after replacing
coolant
liquid, pump often doesn’t discharge
due to the trapped air.
・Perform air-bleeding on pump
or piping. Perform air-bleeding
in front of check valve if the one
is installed in outlet line.
Clogging or failure of
impellers. ・Check the impellers for clogging or
damage.
・Remove accumulated swarf.
・Repair or replace pump.
Aeration. ・Is pump sucking foam or air?
・Take measures to prevent suction
of air or tramp oil.
(ex. Change pump location, use
partition or defoamer )
Pipes connected to
outlet port is too
large.
Is outlet discharge flow rate sufficient?
・Use smaller pipes.
No
discharge
from
contaminant
drain port
Contaminant drain
port piping is too long
or
too high.
Pull off a pipe from the contaminant
drain port and check if liquid is being
delivered properly or not.
Piping must be no higher than
1 m from the tank bottom vertically,
and no longer than 3 m horizontally
.
Clogging of
contaminant drain
port.
Check inside the pipe for clogging. ・Clean inside the pipe periodically.
・Minimize the number of bends in
your pipe layout.
・Use larger pipe.
Clogging inside the
cyclone Check inside the cyclone for clogging. ・Remove swarf.
・Repair or replace pump.
Clogging or failure of
impellers. Check the impellers for clogging or
damage.
・Remove swarf.
・Repair or replace pump.
Liquid
leaks. Oil seal deterioration
or damage. Does liquid leak from drain
port (Rc 3/8)? Repair seal.
Repair or replace pump.
gasket deterioration
or damage. Does liquid leak from connected area? Repair or replace pump.
Breaker or
thermal
trips out.
・Motor failure.
・Wiring errors. ・Check motor wiring.
・Does motor start? ・Rewire motor.
・Repair or replace motor.
Overloading. Are motor output rating and coolant
viscosity adequate? ・Use motor with higher output rating.
・Use pump with lower capacity.
・Lower the pressure setting.
・Change the coolant types.
Coolant type is
incompatible.
(Viscosity is too high,
lubricity insufficient,
Pump failure)
・Is motor rotating?
・Are liquid viscosity and lubricity
adequate?
・Is there abnormal noise?
・Repair or replace pump.
・Change the types of coolant you use.
This manual suits for next models
3
Table of contents
Popular Industrial Equipment manuals by other brands


Dover
Dover Marathon V-4224 Operation, maintenance and installation manual

Polar Instruments
Polar Instruments GRS550 user guide

Belanger
Belanger CUBE Installation and startup guide

FLENDER
FLENDER FASTEX IC250 Assembly and operating instructions

Festo
Festo DSNU-S instructions

OMCA
OMCA SMJ Use and maintenance manual

INOXPA
INOXPA ASPIR EX Installation, service and maintenance instructions

DeWalt
DeWalt DXCM072-0030 instruction manual

HBK
HBK FUSION user manual

Astronergy
Astronergy Crystalline Silicon PV installation manual

Aerotech
Aerotech ALS1000 Series user manual

Massive Dimension
Massive Dimension MDPH2 User manual & setup guide