Nitta FP-120G-60 User manual

GM-NIT-13001 E
Follow this manual when using the Finger Puncher.
Please pass this manual to the Finger Puncher users for a safe and trouble-free operation.
F
Fi
in
ng
ge
er
r
P
Pu
un
nc
ch
he
er
r
F
FP
P-
-1
12
20
0G
G-
-6
60
0
OPERATOR'S MANUAL

- 1 -
Table of Contents
1. Safety Precautions ........................... 2
2. Product Confirmation ....................... 4
3. Specifications ................................... 4
4. Operating Environment .................... 5
5. Storage Environment ....................... 5
6. Name of Each Part ............................ 6
7. How to Make a Finger Joint ............. 7
8. Troubleshooting ............................. 10
9. Spare Parts ...................................... 10
10. Maintenance ..................................... 11
11. Inspection ........................................ 14
12. Parts List ......................................... 15
13. Warranty and after-sales service ....... 14

- 2 -
1. Safety Precautions
Please go over these safety precautions carefully to ensure correct and safe
operation of the Finger Puncher FP-120G-60
Disregarding instructions marked with this symbol may lead
to death or serious injury.
Disregarding instructions marked with this symbol may lead
to injury or property damage.
WARNING
Do not use the Finger Puncher for any application other than the
intended purpose of making belts endless.
Use for any unintended purpose may cause an unexpected accident.
A person with experience and skills should always operate,
maintain and inspect the Finger Puncher.
Handling by an inexperienced person may cause injury.
Do not dismantle or remodel the Finger Puncher under any
circumstance. Please note the Finger Puncher uses a sharp
blade. Dismantling or remodeling the Finger Puncher may cause
physical injury.
For repair or inspection, please contact Nitta, your local distributor or
agent in your area.
Do not operate by placing a finger on top of the cutting sheet.
Failure to do this may cause injury.
Use a dry cloth for cleaning the Finger Puncher. To prevent fire,
do not use alcohol, benzine, thinner or any other inflammable
solvent.
This machine is not intended for use by the physically, sensory or
mentally handicapped. They must have the supervision of a
person responsible for their safety, if they use this machine.
Failure to do this may cause injury.
CAUTION
WARNING
WARNING
WARNING
WARNING
WARNING
WARNING
WARNING
- 3 -
Do not allow children to handle this machine. Keep this machine
out of reach of children.
Failure to do this may cause injury.
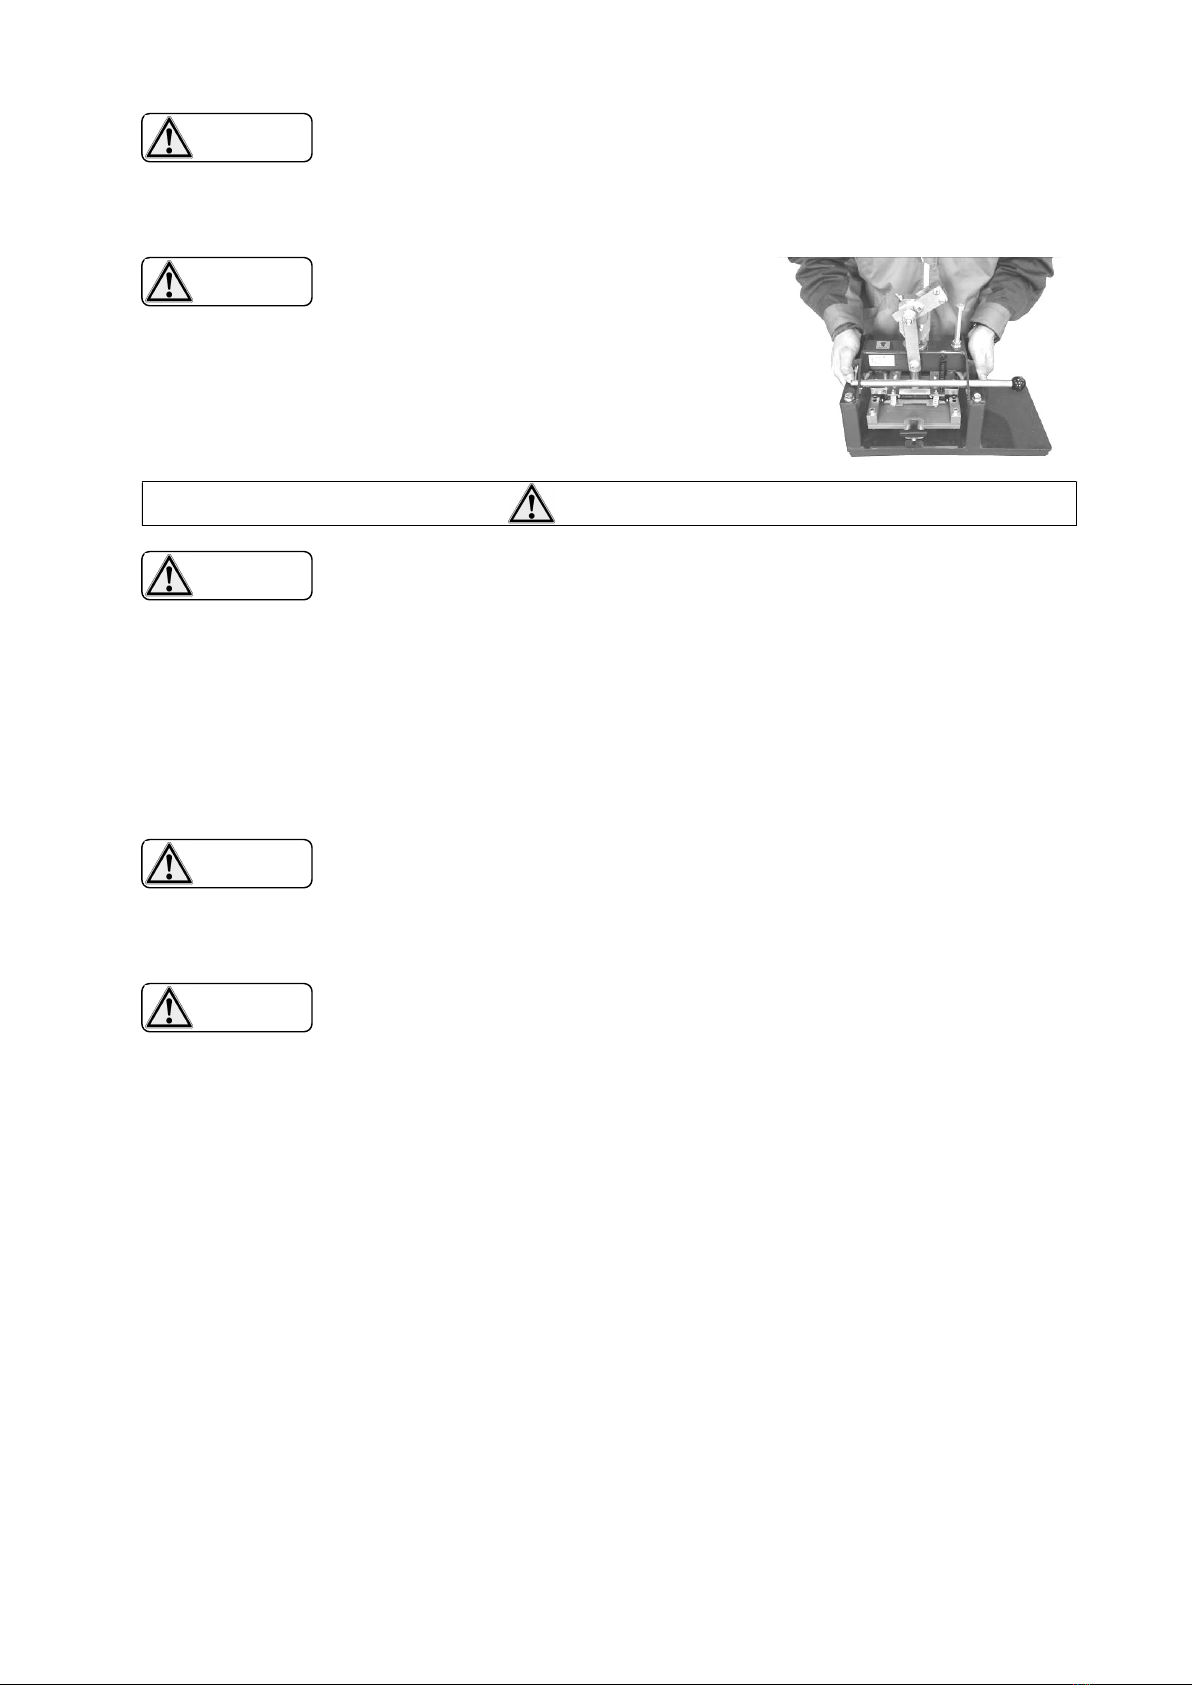
This product, weighs 20 kg.
Requires careful attention to lift.
Please lift as in the figure on the right.
Failure to do this may cause injury.
Caution
Do not use the Finger Puncher under the following conditions:
・ In a corrosive gas environment
・ In ambient temperature of 5C or below
・ In ambient temperature of 40C or above
・ In a high humidity environment (humidity surpassing 85%)
・ In places exposing the puncher to steam or condensation
To prevent physical injury, use the Finger Puncher on a stable
working bench or table that will not collapse.
Before using the Finger Puncher, be sure to inspect the puncher
in accordance with the procedure described on page 12 to help
prevent injury.
CAUTION
CAUTION
CAUTION
WARNING
WARNING
- 4 -
2. Product Confirmation
Thank you for choosing our Finger Puncher FP-120G-60
Check that the product is exactly what you have ordered. Use
of the wrong product may cause injury.
2-1)Product Confirmation
Confirm the following items upon accepting delivery of your order. Contact Nitta,
your local distributor or agent in your area if you find any deficiency or defect in
your item.
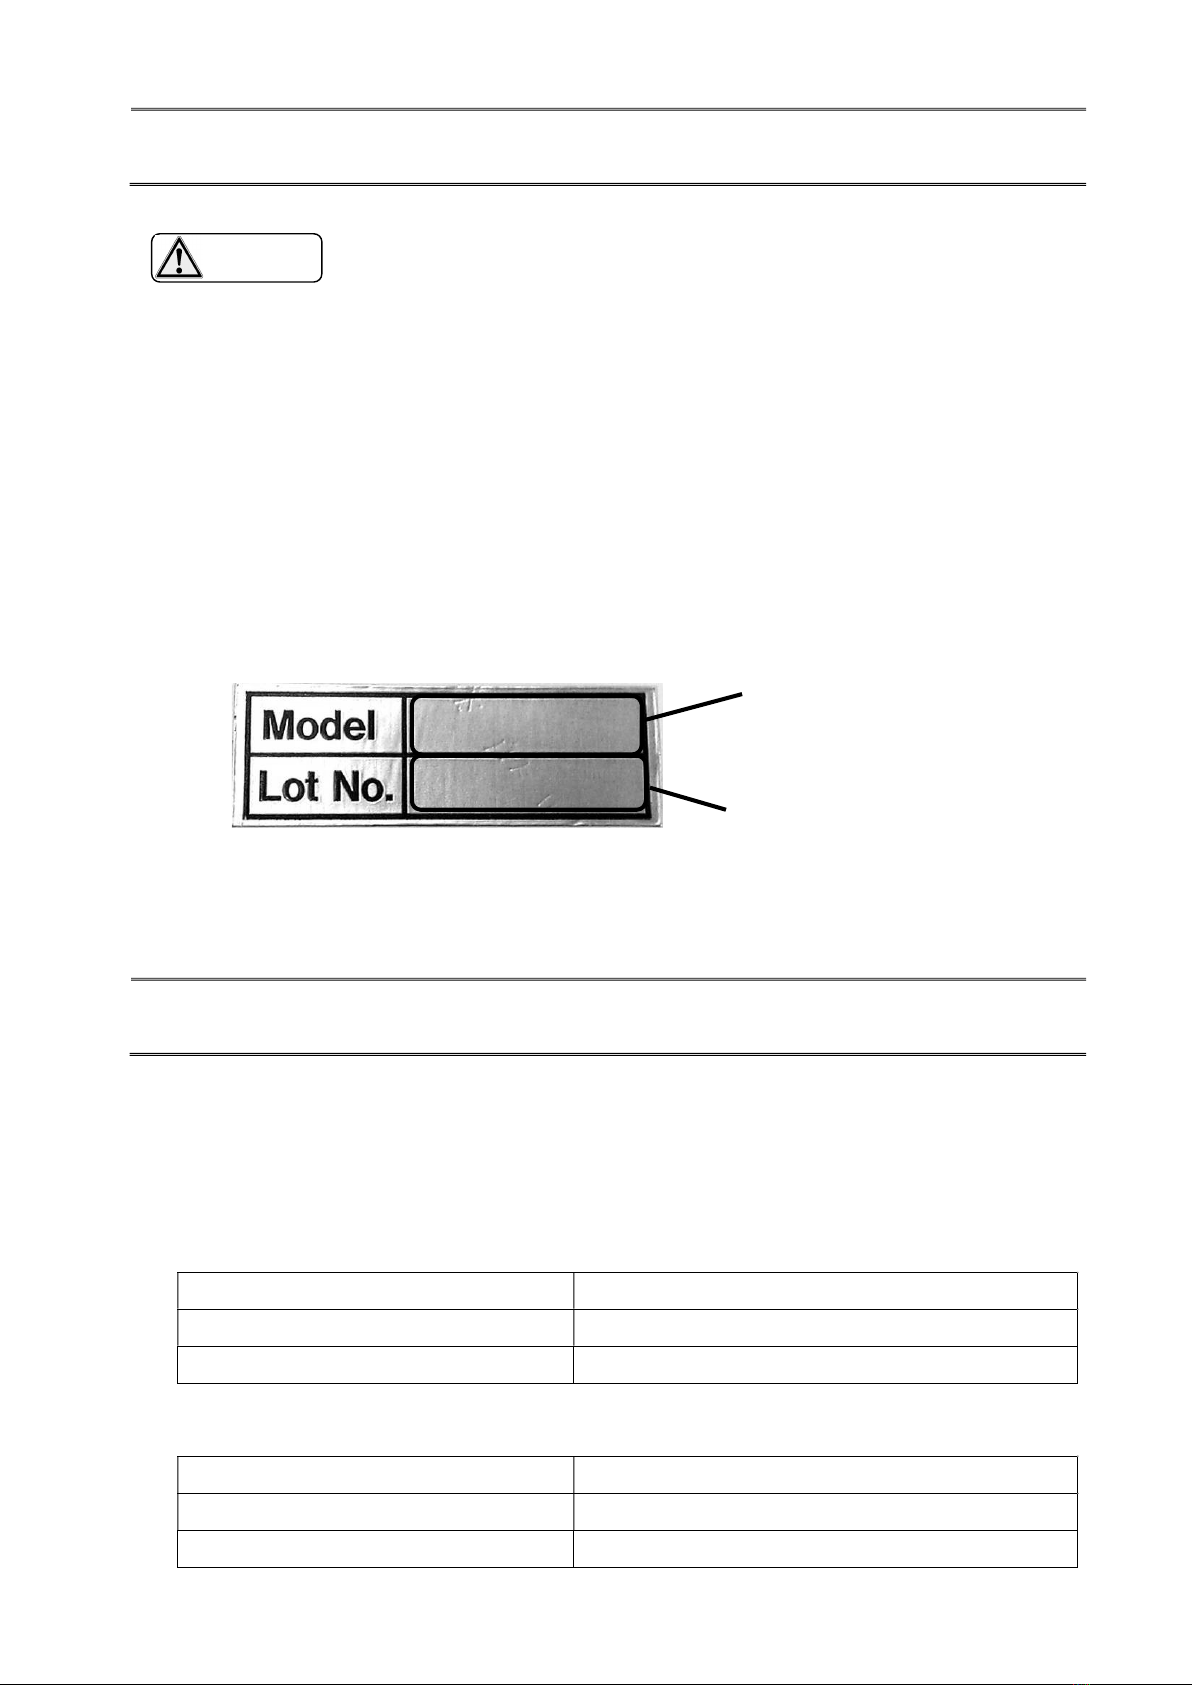
(1) Are descriptions on the face plate the same as those of item ordered?
Please confirm the model type.
(2) Has the product been damaged during transportation?
(3) Has a nut or screw come loose?
2-2)How to Read Face Plate
2-3)Inquiries
When making inquiries, please inform our sales representative of the model type
and the production serial number.
3. Specifications
3-1)Outline of Finger Puncher
(1)The Finger Puncher is exclusively designed for manually punching finger
splice-able NITTA Carryflex CFTG-18G/CFTG-18SG belts with a cutting blade
assembly.
(2)The Finger Puncher is compatible with the following endless specifications:
Finger geometry 120mm length×10mm pitch
Belt width MAX. 60mm
Belt thickness 7.5mm or less
3-2)Major Specifications of Finger Puncher
Type FP-120G-60
Outer Dimension 260mm W x 420mm L x 372mm H
Weight 20.0kg
(2)Production serial number
FP-120G-60
110001
CAUTION
(1)Model type

- 5 -
4. Operating Environment
Ambient Temperature 5-40C (no condensation)
Ambient Humidity 15-85%RH
Place of Use Indoors (free from dust, water)
Environment No inflammable, combustible or corrosive gas; no steam
Use the Finger Puncher under the above conditions.
5. Storage Environment
Ambient Temperature 5-40C (no condensation)
Ambient Humidity 15-85%RH
Place of Use Indoors (free from dust, water)
Environment No inflammable, combustible or corrosive gas; no steam
When the Finger Puncher is not in use, it should be stored under
the above conditions.
CAUTION
CAUTION

- 6 -
6. Name of Each Part
EJECT PLATE
HANDLE BAR
BELT CLAMP BOLT
CUTTING BLADE
BELT CLAMP BAR
T type HANDLE
TOP FRAME
CAM HOLDER
CUTTING SHEET
EJECT PLATE SPRING
- 7 -
7. How to Make a Finger Joint
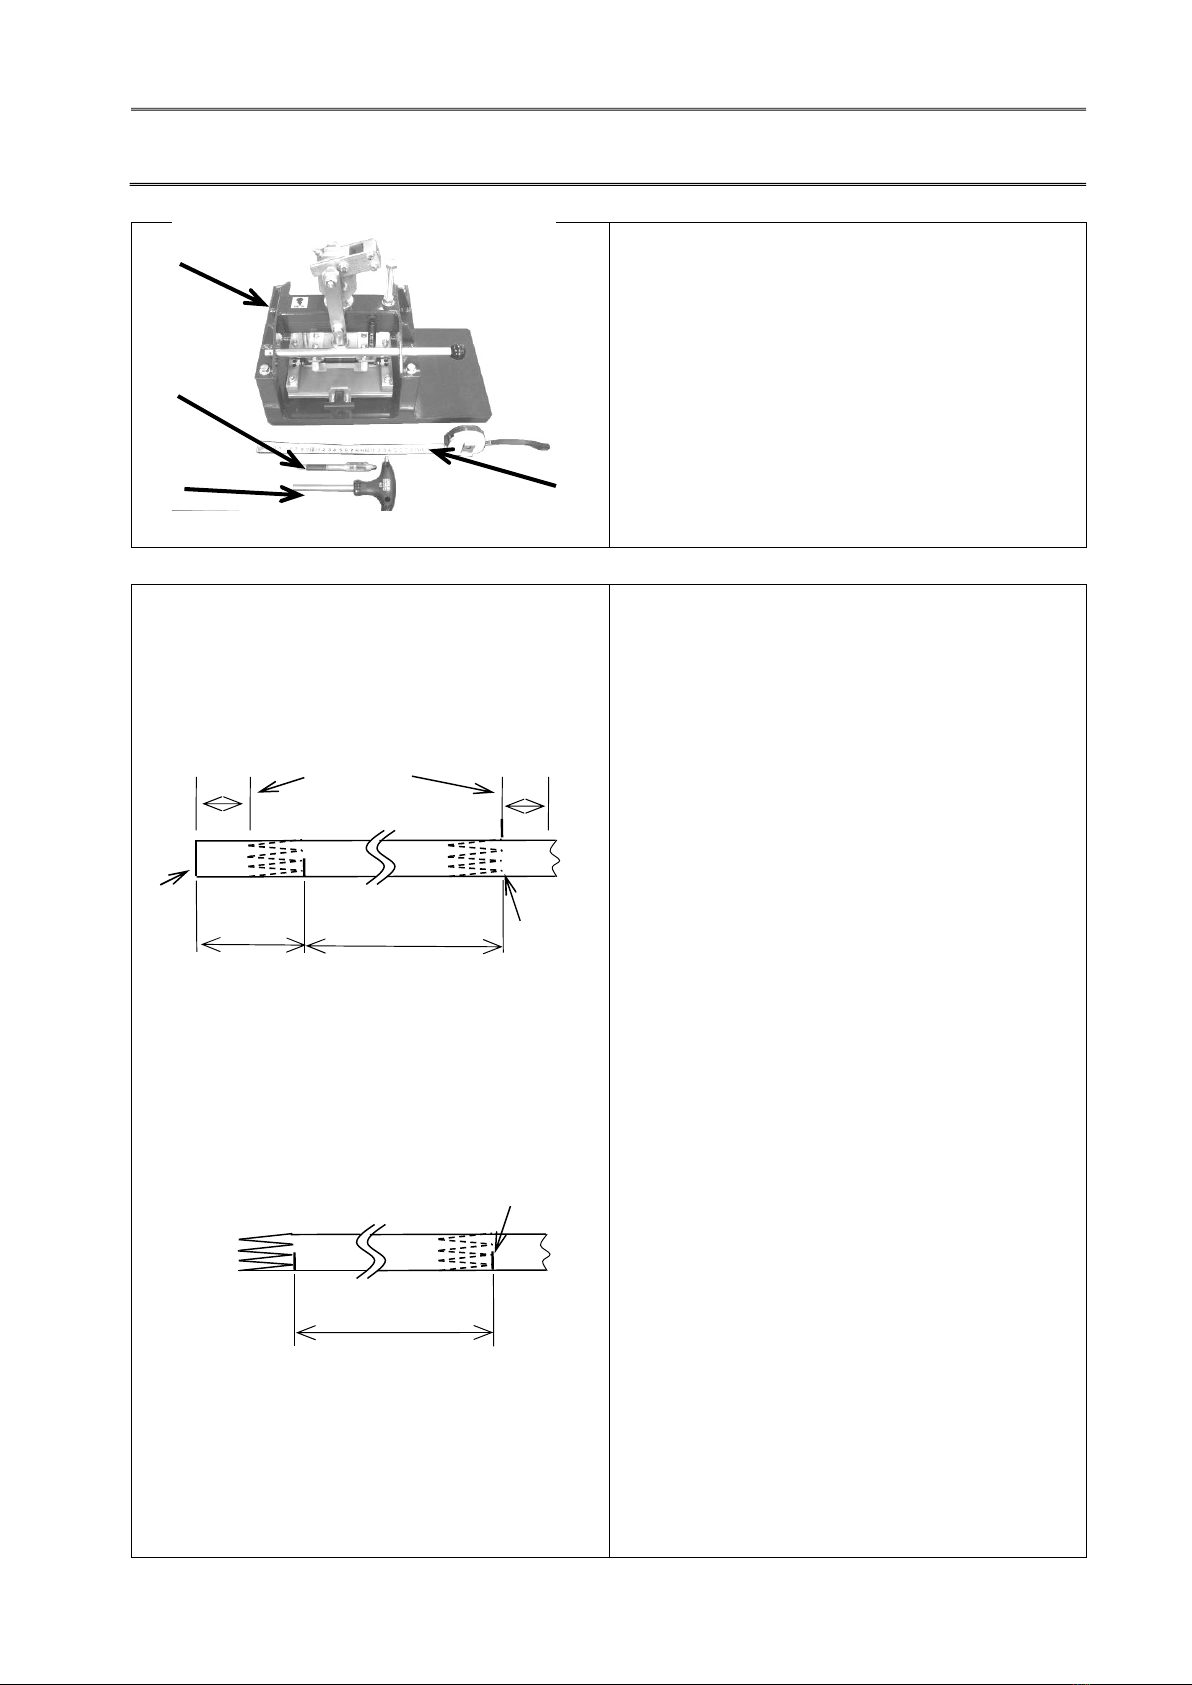
7-1) Required Tools (tools prepared in advance)
a. Finger Puncher
b. Tape Measure or Ruler
(for measurement of belt length)
c. Ballpoint Pen or Felt Pen (for marking)
d. Hexagon Wrench
7-2) How to Measure Belt Length
Measure belt length and mark on the belt.
1) Measure Length from cut end.
2) Measure length from finger end
(For continuous measuring)
(1) Make the first mark 160mm from the
edge of the belt. (See diagram to left.)
(2) Based on the first mark, make a
second mark at the ending point.
(Put both marks on the front side, i.e.
on the operator side.)
(3) When consecutively making endless
belts, obtain required belt length and,
from the second mark made at the
preceding finger joint, measure out the
required belt length and make another
mark. Repeat the above process. By
doing this, punching can always be
done at the right position and there will
be no wasted belt.
Markings
Required length
Belt end
Markings
40mm
160mm
Clamping part 40mm
Required length
a
b.
c
d

- 8 -
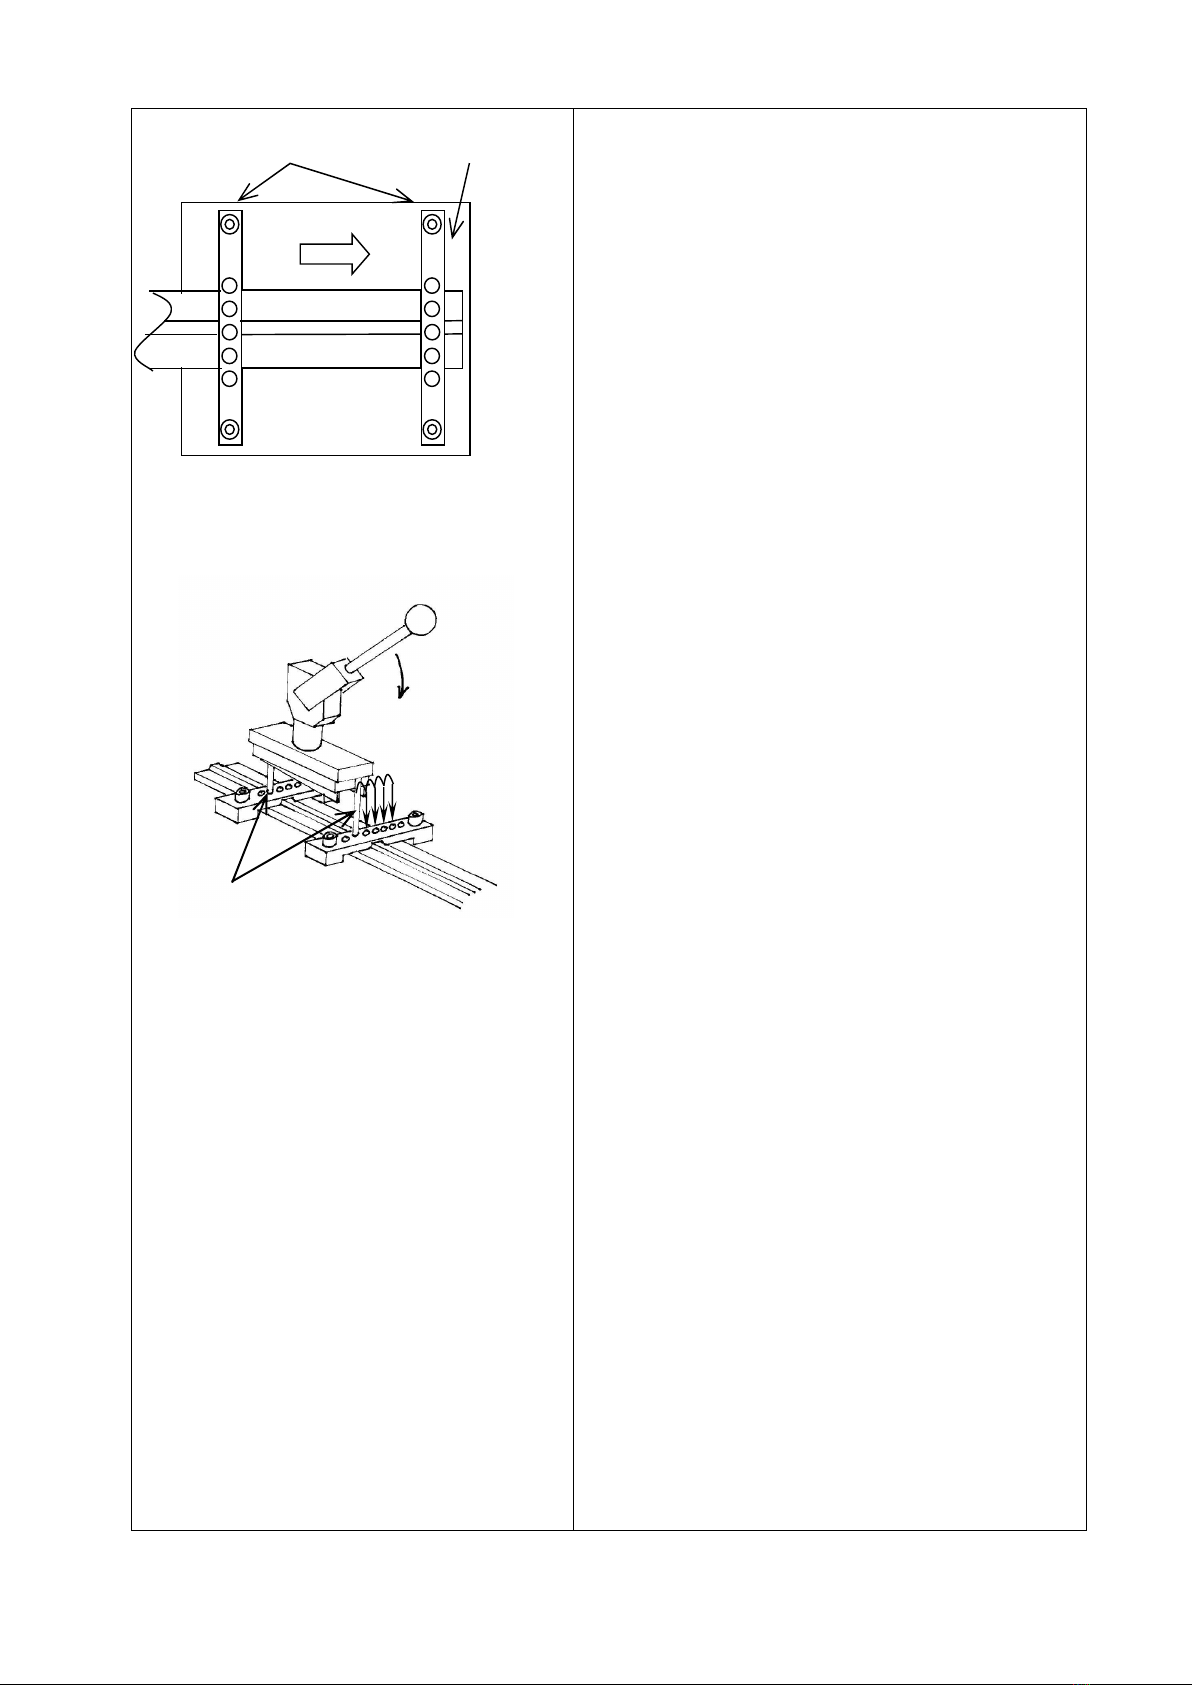
7-3) How to Make a Finger Joint
(1) Loosen bolt on clamping bar and insert
belt end in one side of finger puncher.
(2) Place belt to align marks on belt with
inside or outside edge of clamps. Be sure
to use this same set position for all
punchs.
(3) Fasten the bolts on both clamps with a
wrench to secure the belt position.
(4) Belt insert direction
a) Continuous punching
After punching one end of belt, pull belt
through clamping bar until reaching next
punching position.
Belt
Set both belt ends to same side of the
clamp
NO
Clamp bar bolt
Marks
Clamp bars Cutting Sheet
- 9 -
b) Cutting both ends of belt
When punching, feed one end of belt into
cutter, moving the belt’s v-guide all the way
to one edge of the cutter’s v-guide groove.
After punching, feed other end of belt into
cutter from opposite direction, but be sure to
align edge of v-guide with same edge of
v-guide groove used for first punch.
(5) Align the support table so that guide pins
on the cutter line up with a set of
alignment holes on either end of the
clamps.
(6) Push downward on the handle carefully to
check the alignment of the pins.
(7) Return the handle and move the support
table over so the next set will accept the
guide pins.
(8) Repeat steps (6)~(7).
Guide Pin
Clamp bars Cutting Sheet

- 10 -
8. Troubleshooting
If there are any finger joints which are not cut out properly when a belt is punched,
follow the directions described in the “Maintenance” section on pages 9-12.
If the problem is not solved after following these directions, please contact Nitta,
your local distributor or agent in your area for advice.
9. Spare Parts
1. Cutting sheet
2. Cutting blade

- 11 -
10. Maintenance
10-1) How to Perform Maintenance
If the handle bar does not move smoothly, inject grease into grease nipple.
You can change the position of the cutting sheet, and both sides of the cutting
sheet can be used. Adjusting the position may solve any problems where a
portion of the finger joint is not cut out.
The cutting sheet and the cutting blade are consumable. Specify the cutting sheet
and the cutting blade for Finger Puncher when you order a new one.
10-2-1)How to Grease Cam Holder
(1) Inject grease into grease nipple.
- 12 -
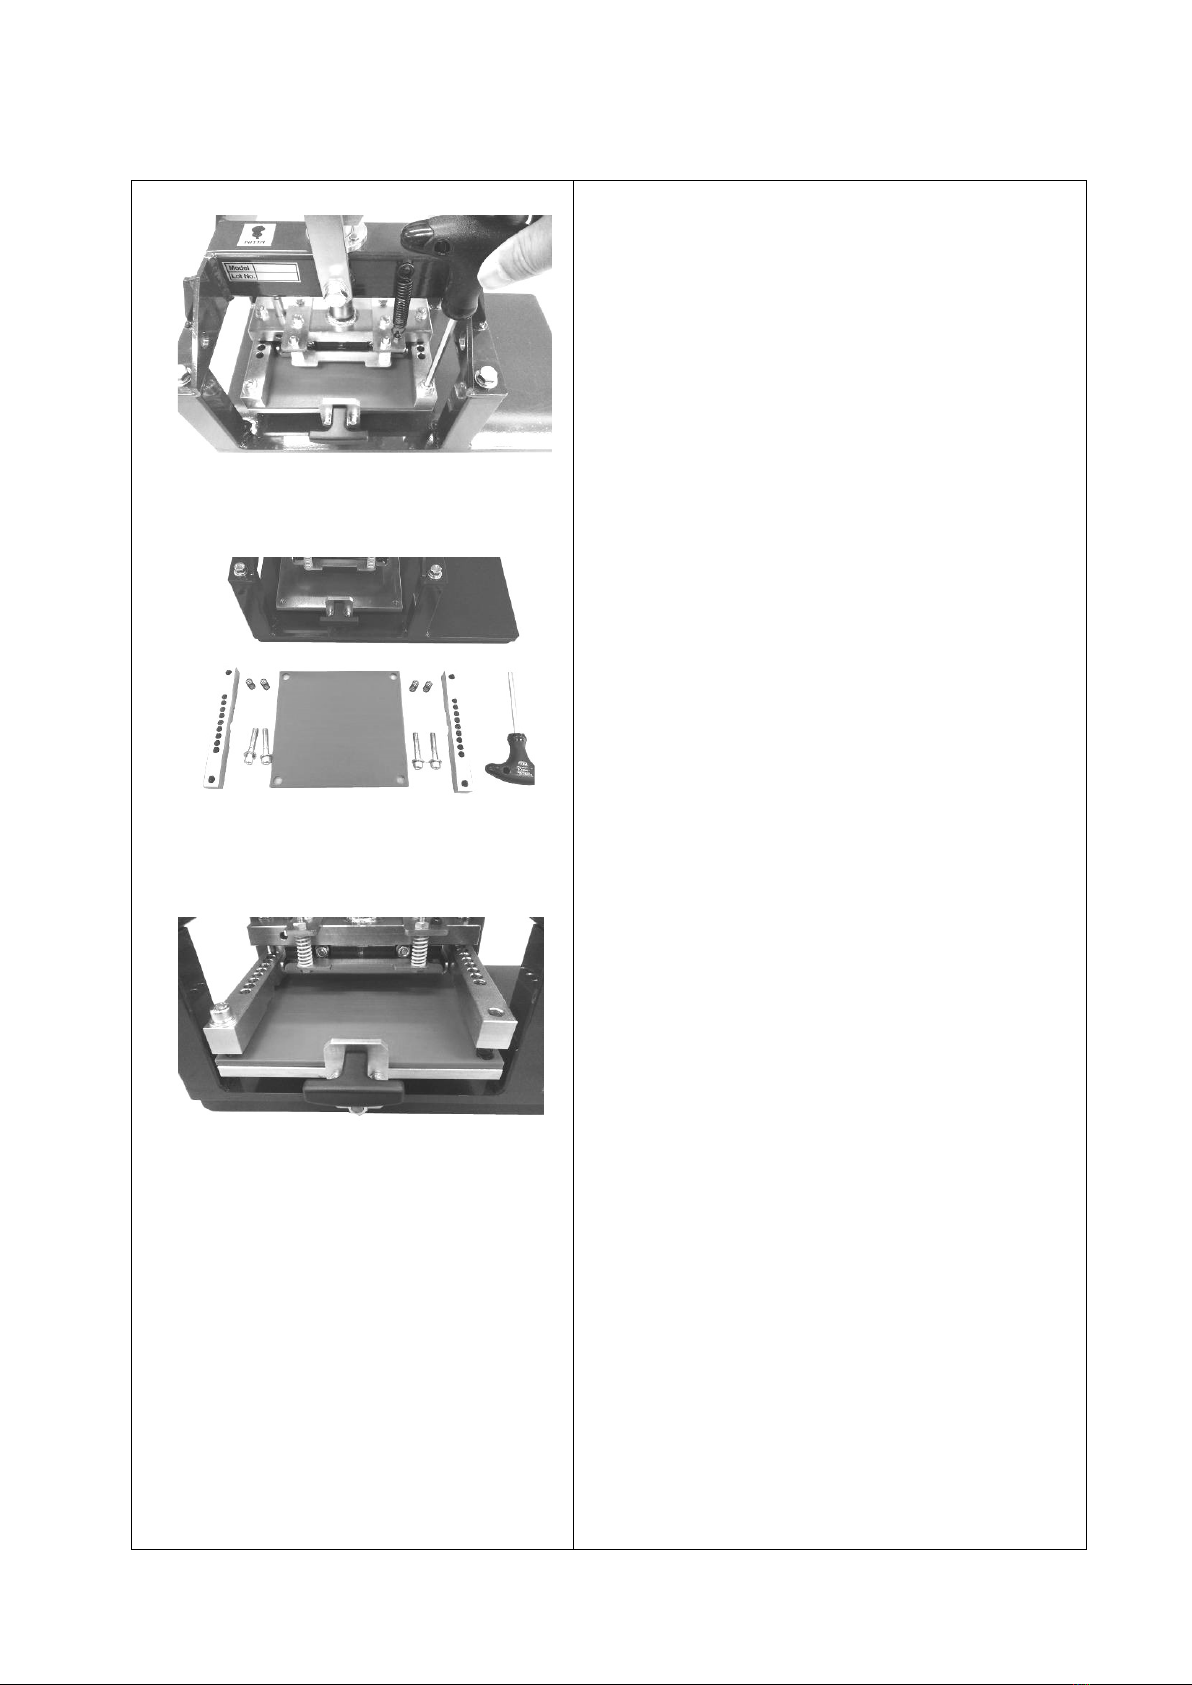
10-2-2)How to Use Both Sides of Cutting Sheet Board.
(1) Loosen bolts to detach bolts, clamping
bars and springs.
※ Be careful not to lose them after
removing from finger puncher.
(2) Reverse the cutting sheet to turn the
unused side up and insert it back into the
finger puncher.
(3) Install the springs, the clamp bars and the
bolts.
- 13 -
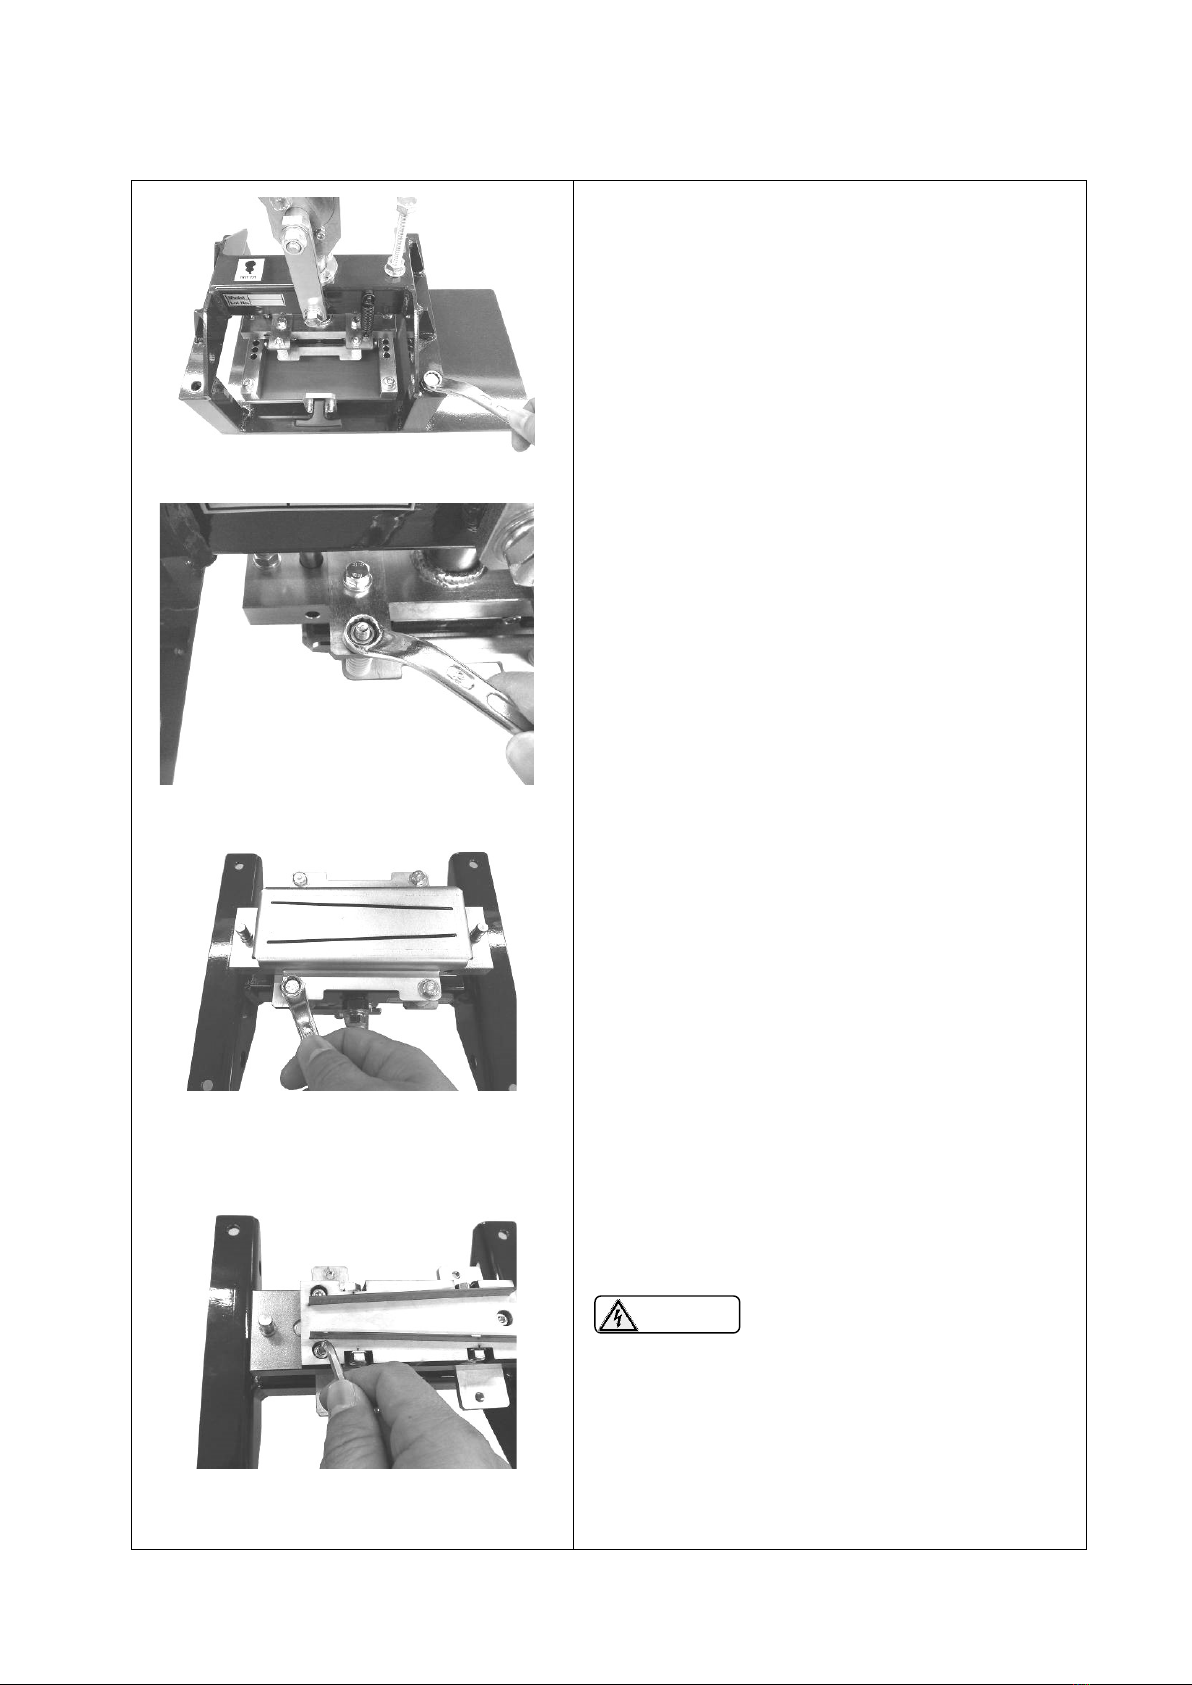
10-2-3) How to Change Cutting Blade.
(1) Loosen bolts, and the Top Frame is
detached.
※ Be careful not to lose them after
removing them from finger puncher.
(2) Next, loosen nuts on bolts holding eject
plate in place.
(3) Loosen the bolts, and the eject plate is
detached.
(4) Loosen the bolts, and the cutting blade is
detached.
Please never touch after removing eject
plate.
It is likely to be injured by the cutting
blade.
WARNING

- 14 -
11. Inspection
Inspection items date/staff
date/staff
date/staff
date/staff
date/staff
The puncher body is free of
damage or destruction.
All screws on the puncher
body are tightened.
The belt can be completely
punched out.
Make a copy of this page and use it for inspection prior to each use.
(5) Tighten the bolts, and the eject plate is
assembled.
※The cutting blade is prevented from
protruding beyond the eject plate.
※ Set for the spring length to be 24 ㎜.
(6) Tighten the bolts, and the upper frame is
assembled.
※Push downward on the handle carefully to
check the alignment of the pins at both ends.
- 15 -
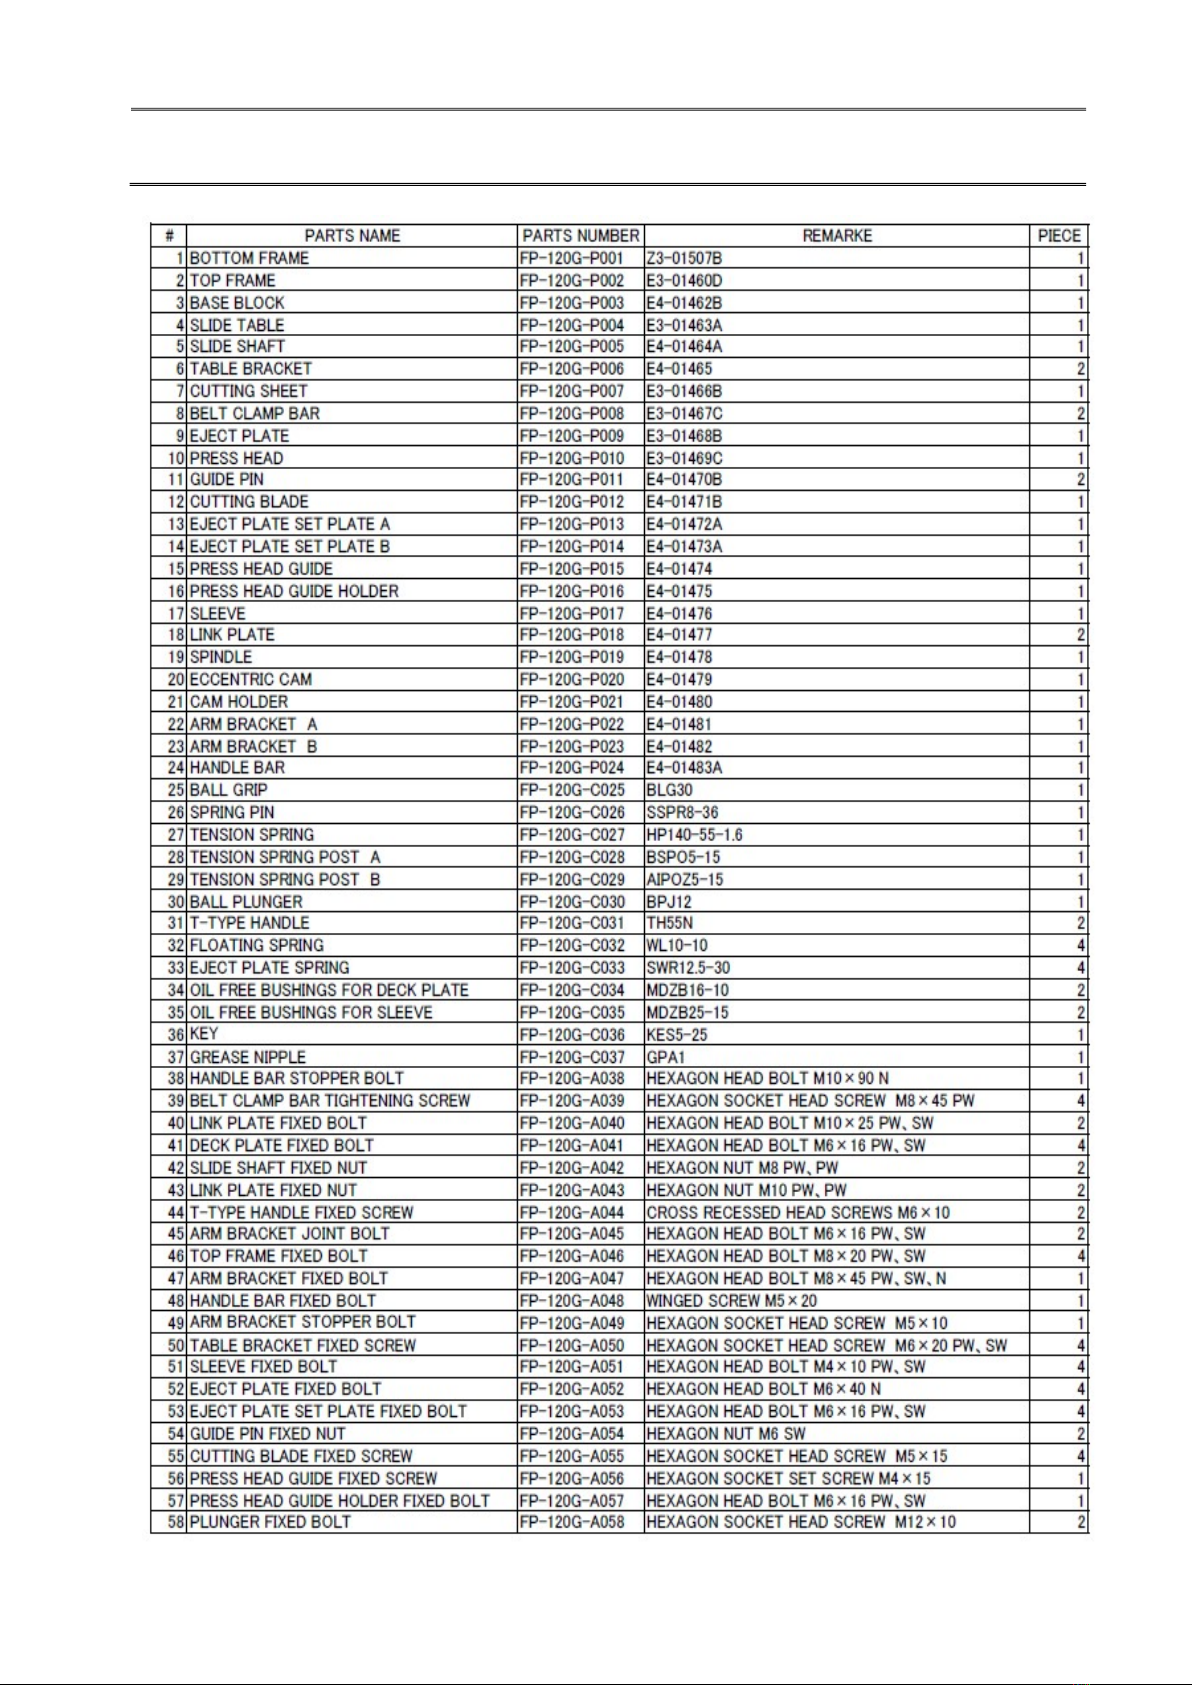
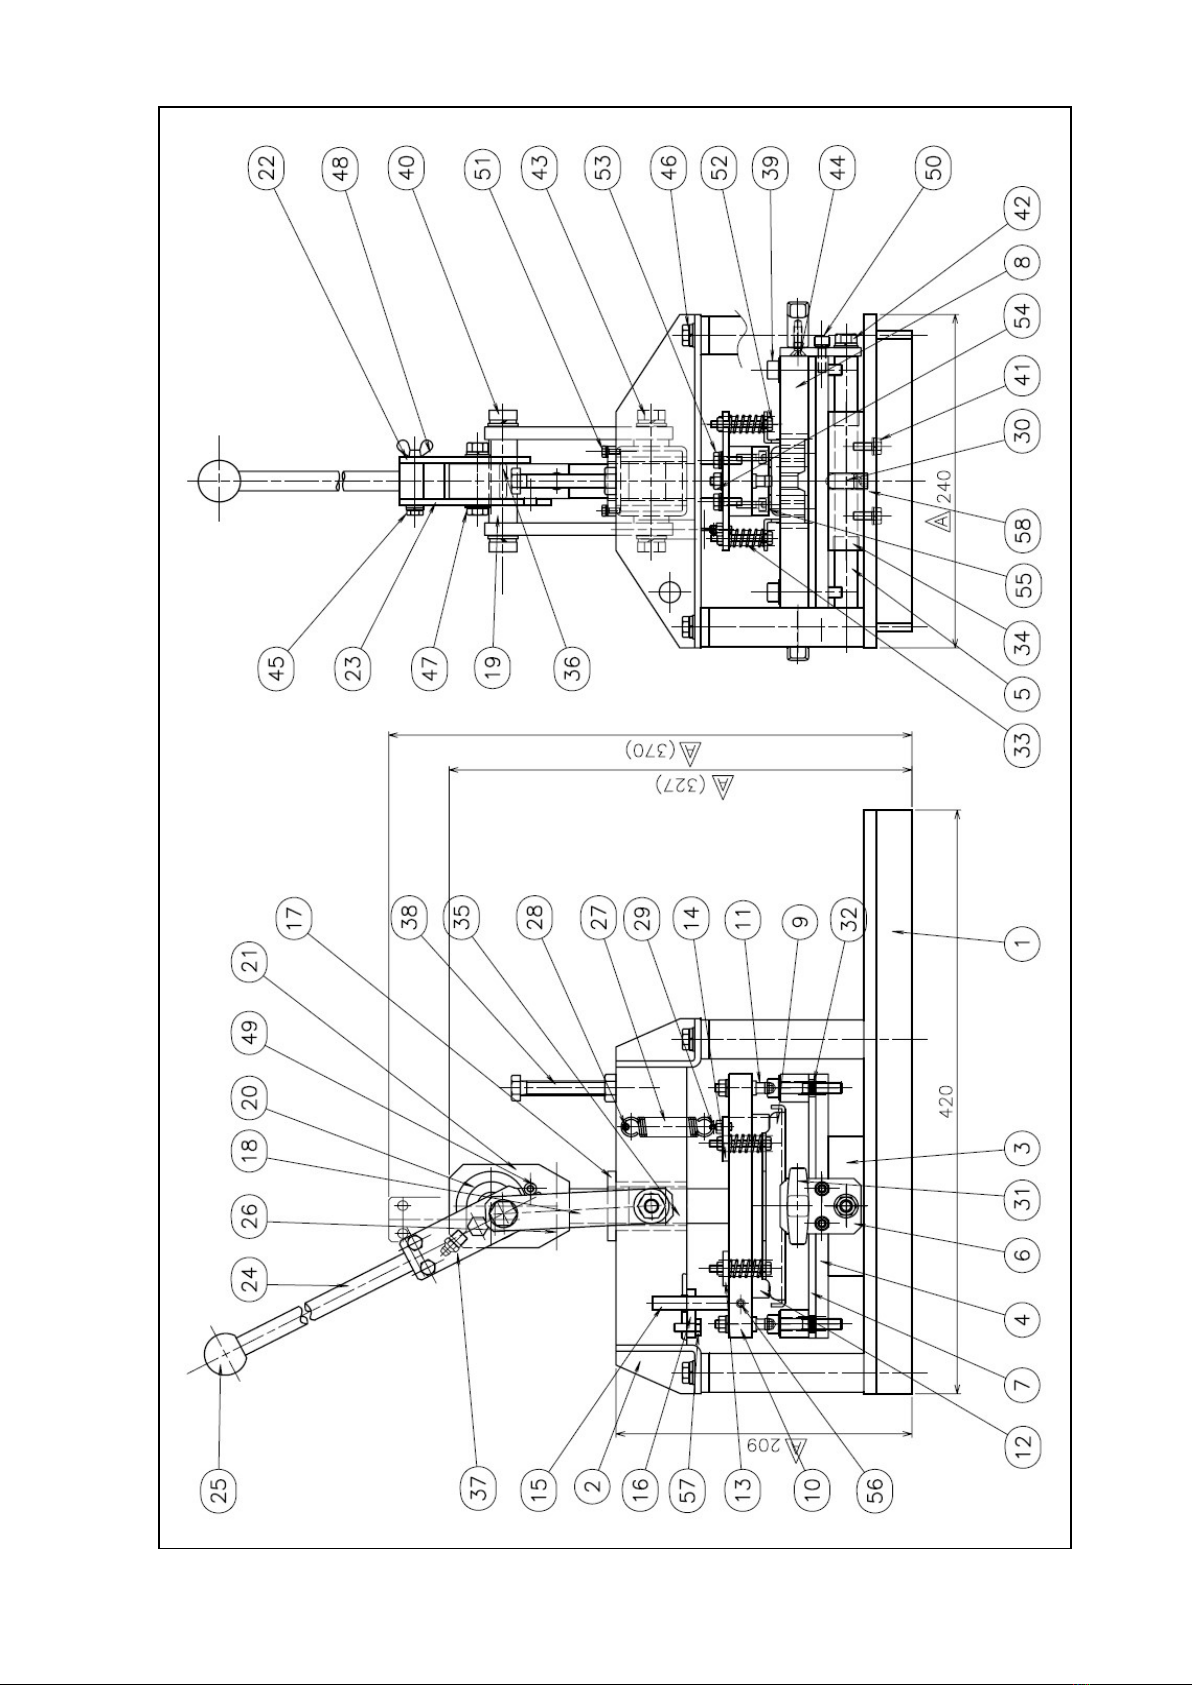
12. Parts List
- 16 -

- 17 -
13. Warranty and after-sales service
1. Warranty period
The warranty period is for one full year after the delivery of the order at your
appointed place.
2. Warranty coverage
1) Should the product malfunction due to causes for which our company is
responsible during the abovementioned warranty period, our company will
provide a replacement product or repair the product free of charge. However,
even within the warranty period the following cases shall not be covered by the
warranty. Please note that even if our company provides a replacement product
or repairs the product, the warranty period will be calculated from the initial date
on which the product was delivered.
① Malfunction arising from any inappropriate conditions, environment, handling
and usage which are not described in the Operation Manual and the Endless
Splicing Procedure.
② Malfunction due to a cause arising from something other than the product,
such as your own device.
③ Malfunction arising from any remodeling or repairing by other than our own
company.
④ Malfunction arising from any reasons unpredictable due to our level of
chemistry and technology before shipment.
⑤ Malfunction arising from fire, earthquake, flood, other disasters, voltage error,
or other external factors for which our company bears no responsibility.
⑥ Malfunction where it can be confirmed that, if perishables stipulated by the
Operation Manual and the Endless Splicing Procedure had been maintained
and/or replaced correctly, prevention of the malfunction would have been
possible.
2) The warranty does not apply to perishables. When perishables which have a
limited lifetime are repaired, and should those perishables be determined by our
company to have reached the end of their lifetime, the perishables will be
replaced for a fee.
① Parts which fall under the category of perishables: “cutting sheet”.
② Parts which fall under the category of perishables having a limited lifetime:
“Thomson blade”.
3) The warranty coverage is limited to what is stated in 1) above, and the warranty
does not cover secondary damages (equipment damage, opportunity loss, profit
loss) and any other damage incurred by the user as a result of a malfunction of
the product.
4) After the warranty period, if after examination the product is repairable, our
company will repair it upon request.

- 18 -
Memo
- 19 -
Oct,2020 Rev10 FP-120G-60 E
Table of contents
Other Nitta Power Tools manuals

Nitta
Nitta PP103 User manual

Nitta
Nitta NittaBeltPoly PI-30 User manual

Nitta
Nitta PolySprint NPS-3050C User manual

Nitta
Nitta NPS-2005A-1 User manual

Nitta
Nitta PolySprint NPS-1205H1 User manual

Nitta
Nitta PP1535-1 User manual

Nitta
Nitta PolySprint NPS-1210A-1 User manual

Nitta
Nitta PolySprint NPS-0310H1 User manual


